1
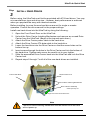
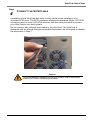
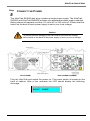
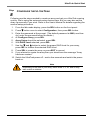
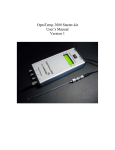
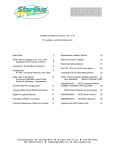
UltraTrak SX4000
UltraTrak SX8000
UltraTrak RM8000
Quick Start Guide
UltraTrak Quick Start
Step
1
UNPACK YOUR ULTRATRAK
Open the UltraTrak box and carefully remove the UltraTrak unit and accessories
from the box. Be sure to remove the packing foam from within the UltraTrak door.
The UltraTrak and accessories include the following items:
•
•
•
•
•
•
•
•
UltraTrak unit
UltraTrak User Manual
Two drive-carrier keys
Null Modem Cable
Power cord
Screw sets for hard drives
(4) Rubber Feet (RM8000 only)
Mounting bracket package
(RM8000 only)
• External LVD SCSI cable
Caution
Packing foam was placed inside the front panel door to prevent damage
during shipping. Remove this packing foam and retain it for future use.
-1-
UltraTrak Quick Start
Step
2
PLACEMENT OF YOUR ULTRATRAK
The UltraTrak may be installed in any convenient location within the LVD SCSI
cable length distance of the next SCSI device. The UltraTrak RM8000 is designed
specifically for rack mount installation but may also serve on a bench top as well.
The UltraTrak RM8000 installs on a customer supplied standard 19” wide rack
mount tray. Assemble the Mounting Brackets on each side of the RM8000 and set
the unit onto an already installed rack mount tray and then secure it to the rack
with four screws.
Part of Rack
Front Door Release Screws, 2 plc.
(Vertical Mounting Rail)
Rack Mounting Tray or Shelf
Rack Mounted RM8000
-2-
UltraTrak Quick Start
Step
INSTALL HARD DRIVES
3
Before using, the UltraTrak must first be populated with ATA hard drives. You may
mix manufacturer type and drive size – however, best performance is achieved
when you populate the array with identical models.
Before installing, be sure the new hard drives are set for single or master
operation. Consult the drive manual for the proper settings.
Install new hard drives into the UltraTrak by doing the following:
1.
2.
3.
4.
5.
6.
7.
8.
Open the Front Panel Door on the UltraTrak.
Unlock the Drive Carrier Latching Mechanism and remove an unused Drive
Carrier from the UltraTrak. (Begin at the top and work down.)
Attach the Drive Carrier power cable to the hard drive.
Attach the Drive Carrier ATA data cable to the hard drive.
Lower the hard drive into the Drive Carrier so that the screw holes on the
bottom line up.
Insert screws through the holes in the Drive Carrier and into the bottom of
the hard drive. Tighten each screw; be careful not to over tighten.
Slide the assembled Drive Carrier back into the UltraTrak and lock the Drive
Carrier lock.
Repeat steps 2 through 7 until all of the new hard drives are installed.
Drive Carrier Lock
Front Panel Door
Drive Carrier Latching Mechanism
Drive Carrier Assembly
Pulled part way out
Hinges out toward Front Panel Door
Note
The Drive Carrier Latching Mechanism must be locked or the disk drive
will not power up.
-3-
UltraTrak Quick Start
Step
CONNECT THE SCSI CABLE
4
Installation of the UltraTrak disk array is very similar to the installation of a
standard SCSI drive. The SCSI connector accepts the standard 68-pin LVD SCSI
connector used on most LVD SCSI devices. Use the cable provided to connect
your UltraTrak to your host system.
Do not connect any external terminators to the UltraTrak. The UltraTrak is
designed with an internal firmware selectable terminator, we will enable or disable
the terminator in Step 7.
Caution
To prevent possible damage to the array or system, ensure that system
power is OFF before connecting the cables.
-4-
UltraTrak Quick Start
Step
CONNECT THE POWER
5
The UltraTrak SX4000 disk array includes a single power supply; The UltraTrak
SX8000 and UltraTrak RM8000 includes two replaceable power supply modules.
Both systems will operate on either 115 volts AC or 230 volts AC. Ensure that the
switch on the back of each power supply is set to your local voltage.
Caution
To prevent serious damage to the UltraTrak be sure that the voltageselect switch on the back of the power supply is set to your loc al voltage.
Plug the UltraTrak and switch the power on. The power switch is located on the
back of cabinet. After a few moments the LCD should display the following
message:
No Array is defined
30°C/86°F
4500RPM
-5-
UltraTrak Quick Start
Step
ASSIGN SCSI ID
6
Each device on a SCSI chain must have a unique ID. The default SCSI ID setting
of the UltraTrak is 0. If you need to change the SCSI IDE setting of the UltraTrak,
do the following:
1.
From the Idle mode display, press the SEL button on the front panel.
2.
3.
Press button once to select Configuration, then press SEL button.
Enter the password at the prompt. (The default password is 0000. See How
do I enter the password below for details.)
4.
At the Configuration menu, use the
and then press the SEL button.
5.
At the Configure SCSI menu, use the
then press the SEL button.
6.
At the SCSI ID menu, use the and button to select the SCSI ID
number, and then press the SEL button.
Press the EXIT button until you return to the Idle mode.
7.
-6-
button to select Configure SCSI,
button to select the SCSI ID, and
UltraTrak Quick Start
Step
ENABLE OR DISABLE SCSI TERMINATION
7
The UltraTrak comes with internal termination that is enabled by default. This
internal termination is used instead of an external terminator that would plug in the
SCSI connector when your UltraTrak is the last device in the SCSI chain. We will
enable termination if your UltraTrak is the last SCSI device in the SCSI chain. We
want be sure that it is disabled if it is not the last device in the SCSI chain. Do the
following to enable or disable termination:
1.
From the Idle mode display, press the SEL button on the front panel.
2.
3.
Press button once to select Configuration, then press SEL button.
Enter the password at the prompt. (The default password is 0000, see How
do I enter the password below for details.)
4.
At the Configuration menu, use the
and then press the SEL button.
5.
At the Configure SCSI menu, use the button to select the SCSI
Terminator, and then press the SEL button to toggle between Enabled and
Disabled.
Press the EXIT button until you return to the Idle mode.
6.
-7-
button to select Configure SCSI,
UltraTrak Quick Start
Step
CONFIGURE THE ULTRATRAK
8
Following are the steps needed to create an array and get your UltraTrak running
quickly. We’re using the automatic setup feature here, but you may also set the
array up manually if you wish. Refer to the User’s Manual for details regarding the
manual setup procedure.
1.
From the Idle mode display, press the SEL button on the front panel.
2.
3.
Press button once to select Configuration, then press SEL button.
Enter the password at the prompt. (The default password is 0000, see How
do I enter the password below for details.)
At Configure Array, press SEL.
Array Setup should be selected, press SEL.
With RAID Level selected, press SEL.
4.
5.
6.
7.
Use the and button to select the proper RAID level for your array,
press SEL to choose the selected RAID level.
8. Press SEL to create the array or press EXIT to cancel.
9. If you elected to create the array then you should see the message “Array
has been created.”
10. Switch the UltraTrak power off – wait a few seconds and switch the power
back on.
Note
Depending on the size of your array, RAID levels 3, 5, 30, and 50 may
take a while to initialize.
-8-
UltraTrak Quick Start
Step
FORMAT THE ARRAY
9
Like any other type of fixed disk media in your system, a RAID array must also be
partitioned and formatted before use. Use the same method of partitioning and
formatting on an array as you would any other fixed disk.
-9-
UltraTrak Quick Start
FREQUENTLY ASKED QUESTIONS
HOW DO I ENTER THE PASSWORD?
You are prompted to enter the correct password each time you access the
UltraTrak Configuration mode. Password entry begins with the left-most digit.
You must enter the proper value before proceeding to the next digit. You
change the value of the active password digit by pressing either the button
or the button. The button increments the digit downward (as, 0, 9, 8, 7
…). The
button increments the digit upward (as, 0, 1, 2, 3 …). Press the
SEL button to proceed to the next digit or to submit the password if you have
just entered the last digit. You are given access to the Configuration menu
when the password is entered correctly.
WHAT KIND OF HARD DRIVES CAN I USE FOR AN ULTRAT RAK ARRAY?
You can use any Ultra ATA/133/100/66/33 hard drive(s) to create arrays on the
UltraTrak. You should use matching drives for multiple-drive arrays to
maximize capacity usage as well as performance.
Note
Ultra ATA/133 hard drives can be used in the UltraTrak units, although
they will run at Ultra ATA/100 speed.
HOW DO I LEARN MORE ABOUT CONFIGURING THE ULTRAT RAK?
Refer to the UltraTrak SX4000/SX8000/RM8000 User’s Manual. The manual
contains detailed information regarding configuration, troubleshooting and
maintenance for your UltraTrak.
- 10 -