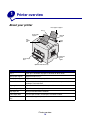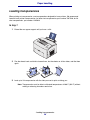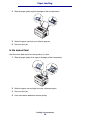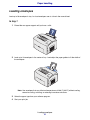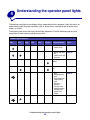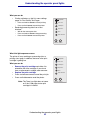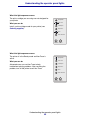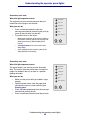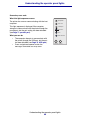
1
E220 Printer
User’s Reference
September 2003
www.lexmark.com
Table of contents
Notices ................................................................................................ 4
Trademarks .......................................................................................................... 5
Licensing notice ................................................................................................... 5
Safety information ................................................................................................ 6
Cautions and warnings ......................................................................................... 6
Electronic emission notices .................................................................................. 7
Noise emission levels ........................................................................................... 8
Energy Star .......................................................................................................... 9
Laser notice .......................................................................................................... 9
Chapter 1: Printer overview ............................................................ 10
About your printer ............................................................................................... 10
Chapter 2: Printing .......................................................................... 12
Using the operator panel .................................................................................... 12
Setting up a print job .......................................................................................... 13
Printing from a Windows environment ............................................................... 13
Printing from a Macintosh computer .................................................................. 14
Canceling a print job .......................................................................................... 15
From the printer operator panel ................................................................... 15
From a Windows computer .......................................................................... 15
From a Macintosh computer ........................................................................ 15
Printing on both sides of the paper .................................................................... 16
Chapter 3: Paper handling .............................................................. 18
Choosing the right print media ........................................................................... 18
Media types and sizes ................................................................................. 19
Printer media sources ....................................................................................... 20
Loading paper .................................................................................................... 21
In tray 1 ........................................................................................................ 21
In the manual feed ....................................................................................... 23
In the optional 250-sheet tray ...................................................................... 25
1
Loading transparencies ...................................................................................... 28
In tray 1 ........................................................................................................ 28
In the manual feed ....................................................................................... 29
Loading envelopes ............................................................................................. 31
In tray 1 ........................................................................................................ 31
In the manual feed ....................................................................................... 32
Loading labels .................................................................................................... 33
In tray 1 ........................................................................................................ 33
In the manual feed ....................................................................................... 35
Loading card stock ............................................................................................. 37
In tray 1 ........................................................................................................ 37
In the manual feed ....................................................................................... 38
Clearing jams ..................................................................................................... 40
Chapter 4: Understanding the operator panel lights ................... 45
Chapter 5: Understanding the printer configuration menus ....... 69
Printing the Printer Settings Configuration sheet ............................................... 69
Configuration menus overview ........................................................................... 69
Utilities menu ............................................................................................... 70
Setup menu ................................................................................................. 70
Parallel menu ............................................................................................... 71
USB menu ................................................................................................... 72
Using the Local Printer Setup Utility ................................................................... 73
Chapter 6: Maintenance .................................................................. 74
Conserving supplies ........................................................................................... 74
Ordering supplies ............................................................................................... 74
Recycling the print cartridge ............................................................................... 75
Replacing the print cartridge .............................................................................. 76
Removing the old print cartridge .................................................................. 76
Installing the new print cartridge .................................................................. 77
Chapter 7: Troubleshooting ........................................................... 79
Solving printing problems ................................................................................... 79
Additional troubleshooting menus ................................................................ 85
Calling for service ............................................................................................... 85
Index .................................................................................................. 86
2
Notices
•
Edition notice
•
Trademarks
•
Licensing notice
•
Safety information
•
Cautions and warnings
•
Electronic emission notices
•
Noise emission levels
•
Energy Star
•
Laser notice
Edition: September 2003
The following paragraph does not apply to any country where such provisions are
inconsistent with local law: LEXMARK INTERNATIONAL, INC., PROVIDES THIS PUBLICATION
“AS IS” WITHOUT WARRANTY OF ANY KIND, EITHER EXPRESS OR IMPLIED, INCLUDING, BUT
NOT LIMITED TO, THE IMPLIED WARRANTIES OF MERCHANTABILITY OR FITNESS FOR A
PARTICULAR PURPOSE. Some states do not allow disclaimer of express or implied warranties in
certain transactions; therefore, this statement may not apply to you.
This publication could include technical inaccuracies or typographical errors. Changes are
periodically made to the information herein; these changes will be incorporated in later editions.
Improvements or changes in the products or the programs described may be made at any time.
Comments about this publication may be addressed to Lexmark International, Inc., Department F95/
032-2, 740 West New Circle Road, Lexington, Kentucky 40550, U.S.A. In the United Kingdom and
Eire, send to Lexmark International Ltd., Marketing and Services Department, Westhorpe House,
Westhorpe, Marlow Bucks SL7 3RQ. Lexmark may use or distribute any of the information you
supply in any way it believes appropriate without incurring any obligation to you. You can purchase
additional copies of publications related to this product by calling 1-800-553-9727. In the United
Kingdom and Eire, call +44 (0)8704 440 044. In other countries, contact your point of purchase.
References in this publication to products, programs, or services do not imply that the manufacturer
intends to make these available in all countries in which it operates. Any reference to a product,
program, or service is not intended to state or imply that only that product, program, or service may
be used. Any functionally equivalent product, program, or service that does not infringe any existing
intellectual property right may be used instead. Evaluation and verification of operation in conjunction
with other products, programs, or services, except those expressly designated by the manufacturer,
are the user’s responsibility.
Notices
4
Notices
© 2003 Lexmark International, Inc.
All rights reserved.
UNITED STATES GOVERNMENT RIGHTS
This software and any accompanying documentation provided under this agreement are commercial
computer software and documentation developed exclusively at private expense.
Trademarks
Lexmark and Lexmark with diamond design are trademarks of Lexmark International, Inc., registered
in the United States and/or other countries.
PictureGrade is a trademark of Lexmark International, Inc.
Mac and the Mac logo are trademarks of Apple Computer, Inc., registered in the U.S. and other
countries.
PCL® is a registered trademark of the Hewlett-Packard Company. PCL is Hewlett-Packard
Company’s designation of a set of printer commands (language) and functions included in its printer
products. This printer is intended to be compatible with the PCL language. This means the printer
recognizes PCL commands used in various application programs, and that the printer emulates the
functions corresponding to the commands.
PostScript® is a registered trademark of Adobe Systems Incorporated. PostScript X is Adobe
Systems’ designation of a set of printer commands (language) and functions included in its software
products. This printer is intended to be compatible with the PostScript X language. This means the
printer recognizes PostScript X commands used in various application programs, and that the printer
emulates the functions corresponding to the commands.
Details relating to compatibility are included in the Technical Reference.
Other trademarks are the property of their respective owners.
Licensing notice
The printer resident software contains:
•
Software developed and copyrighted by Lexmark
•
Lexmark modified software licensed under the provisions of the GNU General Public License
version 2 and the GNU Lesser General Public License version 2.1
•
Software licensed under the BSD license and warranty statements
Click the title of the document you want to review:
BSD License and Warranty statements
GNU General Public License
Trademarks
5
Notices
The Lexmark modified GNU licensed software is free software; you can redistribute it and/or modify it
under the terms of the licenses referenced. These licenses do not provide you any rights to the
Lexmark copyrighted software in this printer.
Since the GNU licensed software that the Lexmark modifications are based upon is supplied
explicitly without warranty, use of the Lexmark modified version is similarly provided without warranty.
See the warranty disclaimers in the referenced licenses for additional details.
To obtain source code files for the Lexmark modified GNU licensed software, launch the drivers CD
that shipped with your printer and click Contact Lexmark.
Safety information
•
If your product is not marked with this symbol
that is properly grounded.
, it must be connected to an electrical outlet
CAUTION: Do not set up this product, make electrical connections, or use a fax modem
feature during a lightning storm.
•
The power cord must be connected to an electrical outlet that is near the product and easily
accessible.
•
Refer service or repairs, other than those described in the operating instructions, to a
professional service person.
•
This product is designed, tested, and approved to meet strict global safety standards with the
use of specific Lexmark components. The safety features of some parts may not always be
obvious. Lexmark is not responsible for the use of other replacement parts.
•
Your product uses a laser.
CAUTION: Use of controls or adjustments or performance of procedures other than
those specified herein may result in hazardous radiation exposure.
•
This product uses a printing process that heats the print media, and the heat may cause the
media to release emissions. You must understand the section in your operating instructions
that discusses the guidelines for selecting print media to avoid the possibility of harmful
emissions.
Cautions and warnings
CAUTION: A caution identifies something that could cause you harm.
Warning: A warning identifies something that could damage your product hardware or
software.
Safety information
6
Notices
Electronic emission notices
Federal Communications Commission (FCC) compliance
information statement
The Lexmark E220, Type 4500-101, has been tested and found to comply with the limits for a Class
B digital device, pursuant to Part 15 of the FCC Rules. Operation is subject to the following two
conditions: (1) this device may not cause harmful interference, and (2) this device must accept any
interference received, including interference that may cause undesired operation.
The FCC Class B limits are designed to provide reasonable protection against harmful interference
in a residential installation. This equipment generates, uses and can radiate radio frequency energy
and, if not installed and used in accordance with the instructions, may cause harmful interference to
radio communications. However, there is no guarantee that interference will not occur in a particular
installation. If this equipment does cause harmful interference to radio or television reception, which
can be determined by turning the equipment off and on, the user is encouraged to try to correct the
interference by one or more of the following measures:
•
•
•
•
Reorient or relocate the receiving antenna.
Increase the separation between the equipment and receiver.
Connect the equipment into an outlet on a circuit different from that to which the receiver is
connected.
Consult your point of purchase or service representative for additional suggestions.
The manufacturer is not responsible for any radio or television interference caused by using other
than recommended cables or by unauthorized changes or modifications to this equipment.
Unauthorized changes or modifications could void the user’s authority to operate this equipment.
Note: To assure compliance with FCC regulations on electromagnetic interference for a
Class B computing device, use a properly shielded and grounded cable such as
Lexmark part number 1329605 for parallel attachment or 12A2405 for USB
attachment. Use of a substitute cable not properly shielded and grounded may
result in a violation of FCC regulations.
Any questions regarding this compliance information statement should be directed to:
Director of Lexmark Technology and Services
Lexmark International, Inc.
740 West New Circle Road
Lexington, KY 40550
(859) 232-3000
Industry Canada compliance statement
This Class B digital apparatus meets all requirements of the Canadian Interference-Causing
Equipment Regulations.
Electronic emission notices
7
Notices
Avis de conformité aux normes d’Industrie Canada
Cet appareil numérique de la classe B respecte toutes les exigences du Règlement sur le matériel
brouilleur du Canada.
European Community (EC) directives conformity
This product is in conformity with the protection requirements of EC Council directives 89/336/EEC
and 73/23/EEC on the approximation and harmonization of the laws of the Member States relating to
electromagnetic compatibility and safety of electrical equipment designed for use within certain
voltage limits.
A declaration of conformity with the requirements of the directives has been signed by the Director of
Manufacturing and Technical Support, Lexmark International, S.A., Boigny, France.
This product satisfies the Class B limits of EN 55022 and safety requirements of EN 60950.
Japanese VCCI notice
The United Kingdom Telecommunications Act 1984
This apparatus is approved under the approval number NS/G/1234/J/100003 for the indirect
connections to the public telecommunications systems in the United Kingdom.
Noise emission levels
The following measurements were made in accordance with ISO 7779 and reported in conformance
with ISO 9296.
1-meter average sound pressure, dBA
Printing
49 dBA
Idling
30 dBA
Noise emission levels
8
Notices
Energy Star
The EPA ENERGY STAR Office Equipment program is a partnership effort with office equipment
manufacturers to promote the introduction of energy-efficient products and to reduce air pollution
caused by power generation.
Companies participating in this program introduce products that power down when they are not
being used. This feature will cut the energy used by up to 50 percent. Lexmark is proud to be a
participant in this program.
As an ENERGY STAR Partner, Lexmark International, Inc. has determined that this product meets
the ENERGY STAR guidelines for energy efficiency.
Laser notice
The printer is certified in the U.S. to conform to the requirements of DHHS 21 CFR Subchapter J for
Class I (1) laser products, and elsewhere is certified as a Class I laser product conforming to the
requirements of IEC 60825-1.
Class I laser products are not considered to be hazardous. The printer contains internally a Class IIIb
(3b) laser that is nominally a 5 milliwatt gallium arsenide laser operating in the wavelength region of
770-795 nanometers. The laser system and printer are designed so there is never any human
access to laser radiation above a Class I level during normal operation, user maintenance, or
prescribed service condition.
Energy Star
9
1
Printer overview
About your printer
Rear paper support
Tray 1
Front paper
support
Top
output
bin
Manual
feed
Paper
guide
Operator
panel
lights
Front output
door
Optional 250-sheet tray
Use this feature:
When you want to:
Tray 1
Load up to 150 sheets of paper or 10 sheets of other media.
Rear paper support
Support media in tray 1.
Front paper support
Support media in the top output bin.
Manual feed
Load a single sheet of paper/other media. Use for transparencies, labels,
envelopes, and card stock.
Paper guides
Adjust the width of the media in tray 1 and the manual feed.
Operator panel lights
Check the status of your printer.
Top output bin
Stack printed documents facedown.
Front output door
Print on special media, for example, card stock or labels.
Optional 250-sheet
tray
Increase your paper capacity.
Printer overview
10
Printer overview
The operator panel has 6 lights and 2 buttons.
Ready/Data
Toner Low
Load Paper
Paper Jam
Error
Press Continue
Continue Cancel
•
Press and release Continue to resume printing.
•
Press and release Continue twice quickly to display an error code.
•
Press and release Cancel to cancel the job currently printing.
•
Press and hold Cancel until all of the lights come on to reset the printer.
About your printer
11
2
Printing
Using the operator panel
The operator panel has 6 lights and 2 operator panel buttons.
Ready/Data
Toner Low
Load Paper
Paper Jam
Error
Press Continue
Continue Cancel
When the:
The printer:
Ready/Data light is on
is ready to receive and process data.
Ready/Data light is
blinking
is busy receiving or processing data.
Toner Low light is on
alerts you that the toner is getting low.
Load Paper light is on
prompts you to load media in tray 1, manual feed, or the optional
250-sheet tray (if installed).
Paper Jam light is on
detects a jam.
Error light is on
cover is open or the print cartridge is not installed.
Press Continue light is on
prompts you to press the Continue button to resume printing.
Error light and Press
Continue light are both on
alerts you that a secondary error occurred.
Printing
12
Printing
Setting up a print job
Once your printer is set up and your drivers are installed, you are ready to print. Do you want to print
a letter, add a Do Not Copy watermark to a presentation, or adjust the print darkness setting? Just
choose the printer setting in your printer driver and print your job.
Printing from a Windows environment
For example, let’s say you have plain paper loaded in tray 1, but you want to print a letter on
letterhead paper and an envelope.
1 Load letterhead with the top of the page pointing down facing you in tray 1.
2 From your software application, open the file you want to print.
3 From the File menu, select Print (or Printer) Setup to open your printer driver.
4 Verify the correct printer is selected in the dialog box.
5 In the Print Setup dialog box, click Properties, Options, or Setup (depending on the
application) to change the paper setting to Letterhead, and then click OK.
6 Click OK or Print to send the job to print.
Setting up a print job
13
Printing
Now print the envelope:
1 Load an envelope vertically, flap side down, with the stamp area in the top left corner in the
manual feed.
2 From the File menu, select Print (or Printer) Setup to open your printer driver.
3 In the Print Setup box, click Properties, Options or Setup (depending on the application)
and select the size envelope you want from the Paper Type setting.
4 Change Orientation to Landscape.
5 In the Print dialog box, click OK to send the job to print.
Note: To change printer settings not available from your printer driver, install the Local
Printer Setup Utility from the drivers CD (see Using the Local Printer Setup
Utility).
If you need an explanation about a printer setting, help is just a click away:
•
•
Click the Help box in the bottom right corner of any dialog box.
Move your cursor to the setting in question and press F1 or right-click your mouse.
Printing from a Macintosh computer
For example, you want to print a letter on letterhead paper and an envelope:
1 Load letterhead with the top of the page pointing down facing you in tray 1.
2 From your software application, open the file you want to print.
3 From the File menu, select Page Setup to open your printer driver.
4 Verify the correct printer is selected in the dialog box.
5 Select Letterhead from Paper, and then click OK.
6 Click Print from the File menu to send the job to print.
Printing from a Macintosh computer
14
Printing
Now print the envelope:
1 Load an envelope vertically, flap side down, with the stamp area in the top left corner in the
manual feed.
2 From the File menu, select Page Setup.
3 From the Paper Size setting, select the size envelope you want.
4 Change Orientation to Landscape.
5 Click OK to close the Page Setup dialog box.
6 Go back to the File menu and select Print.
7 From Paper Source, select Envelope.
8 Click Print to send the job to print.
Canceling a print job
From the printer operator panel
Press and release Cancel to cancel the job currently printing.
From a Windows computer
1 Minimize all programs to display the desktop.
2 Double-click the My Computer icon.
3 Double-click the Printer icon.
A list of available printers appears.
4 Double-click the printer you are using to print the job.
A list of print jobs appears.
5 Select the job you want to cancel.
6 Press the Delete key on the keyboard.
From a Macintosh computer
When you send a job to print, the printer icon appears on the desktop.
1 Double-click the printer icon on your desktop.
A list of print jobs appears.
Canceling a print job
15
Printing
2 Press the Control key and click the print job you want to cancel. Select Stop Queue from the
pop-up menu.
Printing on both sides of the paper
Printing on both sides of the paper reduces printing costs. Select Duplex from your printer driver to
format your job to print every other page of the document first. Once the first side of your job prints,
the Load Paper light comes on and the Press Continue light blinks. Follow the instructions from your
drivers pop-up menu to print the corresponding back side to each page.
Ready/Data
Toner Low
Load Paper
Paper Jam
Error
Press Continue
Continue Cancel
Note: Manual duplex is only available on Windows NT 4.0, Windows 2000, and
Windows XP.
Although you can use tray 1 or the optional 250-sheet tray to print the first side of the duplex job, only
use tray 1 to print the second side.
You can also choose how you want your job duplexed: Long Edge or Short Edge.
Long Edge means pages are bound along the long edge of the page (left edge for portrait, top edge
for landscape).
Landscape
Back of
sheet
Portrait
Back of
sheet
Front of next
sheet
Front of next
sheet
Printing on both sides of the paper
16
Printing
Short Edge means pages are bound along the short edge of the page.
Portrait
Back of
sheet
Landscape
Back of
sheet
Front of
sheet
Front of
sheet
Printing on both sides of the paper
17
3
Paper handling
Choosing the right print media
Selecting the right paper or other media reduces printing problems. For best print quality, try a
sample of the paper or other media you are considering before buying large quantities.
•
Use 20 lb (75 g/m2) xerographic paper.
•
Use transparencies designed for laser printers. We recommend Lexmark™ laser printer
transparencies: for letter size transparencies, part number 70X7240; for A4 size transparencies, part
number 12A5010.
•
Use envelopes made from 24 lb (90 g/m2) bond paper. To reduce paper jams, do not use envelopes
that:
–
–
–
–
–
–
–
Have excessive curl
Are stuck together
Are damaged in any way
Contain windows, holes, perforations, cutouts, or embossing
Use metal clasps, string ties, or metal folding bars
Have postage stamps attached
Have any exposed adhesive when the flap is in the sealed position
•
Do not use labels that have exposed adhesive on the sheets.
•
Do not print a large number of labels continuously.
•
Use card stock with a maximum weight of 163 g/m2 and a minimum size of 76.2 x 127 mm (3 x 5 in.).
Paper handling
18
Paper handling
Media types and sizes
Media
Size
Weight
Capacity
Paper
A4, A5, B5, letter, legal,
executive, folio
17–43 lb
(64–163 g/m2)
Tray 1: 150 sheets
(20 lb paper)
16–43 lb
(60–163 g/m2)
Manual feed: 1 sheet
16–24 lb
(60–90 g/m2)
Transparencies
A4, letter
N/A
Optional 250-sheet tray: 250
sheets (20 lb paper)
Tray 1: 10 sheets
Manual feed: 1 sheet
Envelopes
Labels (Paper)
g/m2)
Monarch (7 3/4), 9, Com-10,
C5, C6, B5, DL
24 lb (90
Minimum: 8.3 x 11 in.
(210 mm x 279 mm)
17–43 lb
(64–163 g/m2)
Tray 1: 10 sheets
67–90 lb Index
Bristol
(120–163 g/m2)
Tray 1: 10 cards
Tray 1: 10 envelopes
Manual feed:1 envelope
Manual feed: 1 sheet
Maximum: 8.5 x 11.7 in.
(216 mm x 297 mm)
Index Bristol
Minimum: 3 x 5 in.
(76.2 x 127 mm)
Tag card stock
Maximum: 8.5 x 14 in.
(216 mm x 356 mm)
Manual feed: 1 card
50–100 lb tag
(75–163 g/m2)
Choosing the right print media
19
Paper handling
Printer media sources
Your printer has two standard paper sources: an automatic paper feeder (tray 1), which holds up to
150 sheets of plain paper, and a single-sheet manual feed. Use tray 1 for most print jobs. Use the
manual feed for a single piece of paper, transparency, envelope, label, or index card.
Paper support
Paper support
Tray 1
Top
output
bin
Manual feed
Front output
door
Optional 250sheet tray
An exit output bin on top of the printer holds up to 100 sheets. The single-sheet front output door
provides a straight-through paper path for special media, such as transparencies, envelopes, labels,
card stock or index cards, reducing curling and potential paper jams.
To increase paper capacity, you can purchase the optional 250-sheet tray.
Printer media sources
20
Paper handling
Loading paper
In tray 1
1 Extend the rear paper support until you hear a click.
2 Flex the sheets back and forth to loosen them, fan the sheets on all four sides, and flex them
again.
Loading paper
21
Paper handling
3 If loading letterhead paper, insert letterhead with the top of the page pointing down, facing
you.
Note: Preprinted papers such as letterhead must be able to withstand temperatures up
to 200°C (392°F) without melting or releasing hazardous emissions.
4 Slide the paper guides against the edges of the paper.
Loading paper
22
Paper handling
5 Extend the front paper support on the paper output bin until you hear a click. If you are
printing on legal-size paper, completely extend the front paper support.
6 Select the paper size and type from your software program.
7 Start your print job.
In the manual feed
Use the manual feed to print one sheet of paper at a time.
1 If loading letterhead paper, insert one sheet of letterhead with the top of the page pointing
down, facing you.
2 Slide the paper guides flush against the edges of the paper.
3 Select the paper size and type from your software program.
4 Start your print job.
5 Press and release Continue to resume printing.
Loading paper
23
Paper handling
6 When the Load Paper light blinks and the Press Continue light comes on, place another
sheet in the manual feed.
Ready/Data
Toner Low
Load Paper
Paper Jam
Error
Press Continue
Continue Cancel
7 Press Continue.
Loading paper
24
Paper handling
In the optional 250-sheet tray
1 Grasp the tabs on either side of the tray and pull it completely out of the printer.
2 Before loading paper, push down on the metal plate until it locks into place.
3 If loading A4 or legal-size paper, extend the paper support.
Loading paper
25
Paper handling
4 Flex the sheets back and forth to loosen them, fan the sheets on all four sides, and flex them
again.
5 If loading letterhead paper, insert letterhead facedown with the top of the page entering the
printer first.
6 Do not exceed the stack height indicator; overfilling the tray may cause paper jams.
Corner bucklers
7 Make sure the paper is under both corner bucklers and lying flat in the tray.
8 Slide the paper guides flush against the edges of the media.
Loading paper
26
Paper handling
9 Reinstall the tray firmly into the printer.
If the tray is not pushed all the way in, the paper may not feed properly.
10
Select the paper size from your software program.
11
Start your print job.
Loading paper
27
Paper handling
Loading transparencies
When printing on transparencies, use transparencies designed for laser printers. We recommend
Lexmark laser printer transparencies: for letter size transparencies, part number 70X7240; for A4
size transparencies, part number 12A5010.
In tray 1
1 Extend the rear paper support until you hear a click.
2 Flex the sheets back and forth to loosen them, fan the sheets on all four sides, and flex them
again.
3 Load up to 10 transparencies with the side you want to print on facing you.
Note: Transparencies must be able to withstand temperatures of 200°C (392°F) without
melting or releasing hazardous emissions.
Loading transparencies
28
Paper handling
4 Slide the paper guides against the edges of the transparencies.
5 Select the paper type from your software program.
6 Start your print job.
In the manual feed
Use the manual feed to print one transparency at a time.
1 Slide the paper guides flush against the edges of the transparency.
2 Select the paper size and type from your software program.
3 Start your print job.
4 Press and release Continue to resume printing.
Loading transparencies
29
Paper handling
5 When the Load Paper light blinks and the Press Continue light comes on, place another
transparency in the manual feed.
Ready/Data
Toner Low
Load Paper
Paper Jam
Error
Press Continue
Continue Cancel
6 Press Continue.
Loading transparencies
30
Paper handling
Loading envelopes
Load up to 10 envelopes in tray 1 or load envelopes one at a time in the manual feed.
In tray 1
1 Extend the rear paper support until you hear a click.
2 Load up to 10 envelopes in the center of tray 1 and adjust the paper guides to fit the width of
the envelopes.
Note: Use envelopes that can withstand temperatures of 200°C (392°F) without sealing,
excessive curling, wrinkling, or releasing hazardous emissions.
3 Select the paper type from your software program.
4 Start your print job.
Loading envelopes
31
Paper handling
In the manual feed
Use the manual feed to print one envelope at a time. If you experience problems feeding envelopes
in tray 1, try printing them one at a time from the manual feed.
1 Load an envelope in the center of the manual feed and adjust the paper guides to fit the width
of the envelope.
2 Select the paper size and type from your software program.
3 Start your print job.
4 Press and release Continue to resume printing.
5 When the Load Paper light blinks and the Press Continue light comes on, place another
envelope in the manual feed.
Ready/Data
Toner Low
Load Paper
Paper Jam
Error
Press Continue
Continue Cancel
6 Press Continue.
Loading envelopes
32
Paper handling
Loading labels
For occasional label printing, use paper labels designed for laser printers. You can load labels one at
a time from the manual feed, or you can load up to 10 sheets of labels in tray 1.
For more information on label printing, refer to the Card Stock & Label Guide on the Lexmark Web
site at www.lexmark.com.
In tray 1
1 Extend the rear paper support until you hear a click.
2 Flex the sheets back and forth to loosen them, fan the sheets on all four sides, and flex them
again.
Loading labels
33
Paper handling
3 Load up to 10 label sheets with the side you want to print on facing you.
Note: Use labels with a pressure of 25 psi that can withstand temperatures of 200°C
(392°F) without releasing hazardous emissions.
4 Slide the paper guides against the edges of the label sheets.
5 Select the paper size and type from your software program.
6 Start your print job.
Loading labels
34
Paper handling
In the manual feed
Use the manual feed to print one label sheet at a time. If you experience problems feeding labels in
tray 1, try printing one sheet at a time from the manual feed.
1 Extend the front paper support on the paper output bin until you hear a click.
2 Load the label sheet with the side you want to print on facing you.
Loading labels
35
Paper handling
3 Slide the paper guides against the edges of the label sheet.
4 Select the paper size and type from your software program.
5 Start your print job.
6 Press and release Continue to resume printing.
7 When the Load Paper light blinks and the Press Continue light comes on, place another label
sheet in the manual feed.
Ready/Data
Toner Low
Load Paper
Paper Jam
Error
Press Continue
Continue Cancel
8 Press Continue.
Loading labels
36
Paper handling
Loading card stock
For occasional printing on index Bristol or tag card stock, load up to 10 sheets of card stock or index
cards in tray 1. Load one sheet of card stock or one index card at a time in the manual feed.
For more information on card stock printing, refer to the Card Stock & Label Guide on the Lexmark
Web site at www.lexmark.com.
In tray 1
1 Extend the rear paper support until you hear a click.
2 Load up to 10 sheets of card stock or 10 index cards with the print side facing you.
Note: Use card stock with a pressure of 25 psi that can withstand temperatures of 200°C
(392°F) without releasing hazardous emissions.
Loading card stock
37
Paper handling
3 Slide the paper guides against the edges of the card stock.
4 Select the paper size and type from your software program.
5 Start your print job.
In the manual feed
Use the manual feed to print one sheet of card stock or one index card at a time. If you experience
problems feeding index cards in tray 1, try printing them one at a time from the manual feed.
1 Load an index card with the print side facing you.
2 Slide the paper guides against the edges of the index card.
3 Select the paper size and type from your software program.
4 Start your print job.
Loading card stock
38
Paper handling
5 Press and release Continue to resume printing.
6 When the Load Paper light blinks and the Press Continue light comes on, place another index
card in the manual feed.
Ready/Data
Toner Low
Load Paper
Paper Jam
Error
Press Continue
Continue Cancel
7 Press Continue.
Loading card stock
39
Paper handling
Clearing jams
If print media jams in the printer, the Paper Jam light prompts you to clear the paper path.
Ready/Data
Toner Low
Load Paper
Paper Jam
Error
Press Continue
Continue Cancel
If media has just started to feed from tray 1 when the jam occurs:
1 Pull the media straight up out of tray 1.
2 Press the Continue button or open and close the printer cover to resume printing.
Clearing jams
40
Paper handling
If the jam occurs in the fuser:
1 Open the printer cover.
2 Remove the print cartridge (it may be warm).
Note: The photoconductor drum on the bottom of the print cartridge may be damaged if
it is exposed to light. Cover the cartridge or store it in a clean, dark place if you take
it out of the printer for an extended period of time.
Photoconductor
drum
3 Gently pull out the media.
Fuser
Roller
CAUTION: Avoid touching the fuser; it may be hot!
4 If the media is jammed tightly behind the roller, or if you cannot get a grip on it, close the
cover, open the front output door, and pull out the paper.
5 Make sure there is no more media in the printer.
Clearing jams
41
Paper handling
6 Reinstall the print cartridge.
7 Close the printer cover to resume printing.
A jam may occur if the top output bin is too full and the media is unable to exit the printer:
1 Remove the media from the top output bin.
2 Clear the jam.
If a jam occurs while printing labels from tray 1 or the manual feed:
1 Be sure the labels remain attached to the backing sheet after clearing the jam.
2 Before resuming label printing, load paper in tray 1.
3 Press the Continue button and print 10 or more menu settings pages.
The paper removes any remaining adhesive in or on the fuser.
Warning: Serious damage to your printer may occur if adhesive labels remain in the fuser.
See Calling for service.
If the jam occurs as the paper exits the optional 250-sheet tray into the printer:
1 Open the printer cover.
2 Remove the print cartridge (the cartridge may be warm).
Clearing jams
42
Paper handling
3 Gently pull the paper toward you.
4 Reinstall the print cartridge.
5 Close the printer cover to resume printing.
If you cannot reach the paper easily:
1 Turn off the printer.
Note: You will lose the rest of the print job.
2 Lift the printer off the support unit.
3 Clear the jam.
Clearing jams
43
Paper handling
4 Align the printer with the front of the support unit and place it on top of the support unit.
5 Turn on the printer and resend your print job.
If the jam occurs just after the paper feeds from the optional 250-sheet tray:
1 Pull the tray all the way out.
2 Reach inside and gently pull the paper toward you.
3 Reinstall the tray and resume printing.
Clearing jams
44
4
Understanding the operator panel lights
The operator panel lights mean different things, depending on their sequence. Lights that are off, on,
and/or blinking indicate printer conditions such as printer status, intervention (for example, out of
paper), or service.
The following table shows the most common light sequences. Click the indicated page for more
information on what it means and what you can do.
Common light sequences:
Ready/
Data
Toner
Low
Load
Paper
Paper
Jam
Error
Press
Continue
Printer condition:
Go to:
• Ready
• Power Saver
Page 49
• Ready and toner
low
• Power saver and
toner low
Page 50
Not ready (printer is
offline)
Page 50
Not ready and toner
low
Page 51
• Busy
• Defragmenting
flash
• Formatting flash
• Programming
flash
• Printing a
directory
• Printing menu
settings page(s)
• Printing Print
Quality Test
Pages
Page 52
Busy and toner low
Page 53
Understanding the operator panel lights
45
Understanding the operator panel lights
Common light sequences:
Ready/
Data
Toner
Low
Load
Paper
Paper
Jam
Error
Press
Continue
Printer condition:
Go to:
Waiting
Page 54
Waiting and toner
low
Page 54
• Flushing
• Resolution
reduced
Page 55
• Flushing and
toner low
• Resolution
reduced and
toner low
Page 55
Load manual feed
Page 56
Load tray 1 or the
optional 250-sheet
tray
Page 56
Remove paper from
output bin
Page 57
Print side two of
Page 57
your duplex print job
• Top cover open
• Print cartridge is
not installed
Page 58
Print cartridge error
Page 58
Change invalid print
cartridge
Page 59
Understanding the operator panel lights
46
Understanding the operator panel lights
Common light sequences:
Ready/
Data
Toner
Low
Load
Paper
Paper
Jam
Error
Press
Continue
Printer condition:
Go to:
Hex Trace Ready
Page 59
Hex Trace Ready
and toner low
Page 60
• Cancel job
• Reset printer
• Restore factory
defaults
Page 60
Service error
Page 61
When the Error and Press Continue lights are both on, a secondary error occurred. Press and
release Continue twice quickly to display secondary error code light sequences. The following table
shows what these light sequences mean and what you can do.
Secondary error code light sequences
Ready/
Data
Toner
Low
Load
Paper
Paper
Jam
Error
Press
Continue
Printer condition:
Go to:
Secondary error
code
Page 61
Insufficient collation
area
Page 62
Memory full
Page 63
Complex page
Page 64
Short paper
Page 64
Understanding the operator panel lights
47
Understanding the operator panel lights
Secondary error code light sequences
Ready/
Data
Toner
Low
Load
Paper
Paper
Jam
Error
Press
Continue
Printer condition:
Go to:
Font error
Page 65
Insufficient printer
memory
Page 65
Flash full
Page 66
Defective flash
Page 66
Unformatted flash
Page 67
Insufficient defrag
memory
Page 67
Error
Page 68
communicating with
the host computer
.
Secondary error code light sequences for jams
Ready/
Data
Toner
Low
Load
Paper
Paper
Jam
Error
Press
Continue
Printer
condition:
Jam
Go to:
Page 40,
Clearing jams
Page 40,
Jam occurs
Page 44,
just as it
starts to feed Clearing jams
from the tray
Understanding the operator panel lights
48
Understanding the operator panel lights
Secondary error code light sequences for jams
Ready/
Data
Toner
Low
Load
Paper
Paper
Jam
Error
Press
Continue
Printer
condition:
Jam occurs
as it exits the
tray into the
printer
Page 41,
Page 42,
Clearing jams
Jam occurs
as a printed
job exits the
tray
Page 42,
Clearing jams
What this light sequence means:
•
•
The printer is ready to receive and process
data.
The printer is in Power Saver mode.
What you can do:
•
•
•
Go to:
Send a print job.
Press and release Continue to print the menu
settings pages for a list of current printer
settings.
Press and hold Cancel to reset the printer.
Note: If you want to change the Power
Saver setting, it can only be set from
the Local Printer Setup Utility (see
Using the Local Printer Setup
Utility).
Understanding the operator panel lights
49
Understanding the operator panel lights
What this light sequence means:
The printer is ready to receive and process data. In
addition, the toner in the print cartridge is getting low.
Ready/Data
What you can do:
Toner Low
•
•
•
•
•
Send a print job.
Press and release Continue to print the menu
settings page for a list of current printer
settings.
Remove the print cartridge and shake it to
extend the life of the cartridge. If you do not
have a replacement cartridge, order one now.
Replace the print cartridge.
Press and hold Cancel to reset the printer.
Load Paper
Paper Jam
Error
Press Continue
Continue Cancel
Note: The Toner Low light does not come
on if the 1,500-page starter print
cartridge is installed.
What this light sequence means:
The printer is not ready to receive or process data, or
the printer ports are offline.
Toner Low
What you can do:
•
•
•
Ready/Data
Press and release Continue to return to the
Ready or Busy state.
Press and release Cancel to cancel the print job.
Press and hold Cancel to reset the printer.
Load Paper
Paper Jam
Error
Press Continue
Continue Cancel
Understanding the operator panel lights
50
Understanding the operator panel lights
What this light sequence means:
The printer is not ready to receive or process data, or
the printer ports are offline. In addition, the toner in the
print cartridge is getting low.
What you can do:
•
•
•
•
•
Ready/Data
Toner Low
Load Paper
Press and release Continue to return to the
Ready or Busy state.
Press and release Cancel to cancel the print job.
Remove the print cartridge and shake it to
extend the life of the cartridge. If you do not
have a replacement cartridge, order one now.
Replace the print cartridge.
Press and hold Cancel to reset the printer.
Paper Jam
Error
Press Continue
Continue Cancel
Understanding the operator panel lights
51
Understanding the operator panel lights
What this light sequence means:
•
•
•
•
•
The printer is busy receiving and processing
data or printing.
The printer is defragmenting the flash memory
to reclaim storage space occupied by deleted
resources.
The printer is formatting the flash memory.
The printer is storing resources, such as fonts
or macros, in flash memory.
The printer is printing a directory, font list, menu
settings pages, or Print Quality Test Pages.
Ready/Data
Toner Low
Load Paper
Paper Jam
Error
Press Continue
What you can do:
•
–
–
–
•
Continue Cancel
Busy:
Wait for the message to clear.
Press and release Cancel to cancel the print job.
Press and hold Cancel to reset the printer.
Defragmenting flash, formatting flash, or
programming flash:
–
Wait for the message to clear.
Warning: Do not turn the printer off while this
message is displayed.
•
Printing a directory, a font list, menu settings
pages, or Print Quality Test Pages:
–
Wait for the pages to print. The Busy message is
displayed as the pages print. The Ready/Data
light is on when printing stops.
Understanding the operator panel lights
52
Understanding the operator panel lights
What you can do:
•
Printing a directory, a font list, menu settings
pages, or Print Quality Test Pages:
–
–
•
Press and release Cancel to cancel printing.
Press and hold Cancel to reset the printer.
Receiving/processing data from a host
interface:
–
–
–
Wait for the message to clear.
Press and release Cancel to stop processing.
Press and hold Cancel to reset the printer.
Ready/Data
Toner Low
Load Paper
Paper Jam
Error
Press Continue
Continue Cancel
What this light sequence means:
The printer is busy receiving or processing data, or
printing a test page. In addition, the toner in the print
cartridge is getting low.
What you can do:
•
•
•
•
Ready/Data
Toner Low
Load Paper
Remove the print cartridge and shake it to
extend the life of the cartridge. If you do not
have a replacement cartridge, order one now.
Replace the print cartridge.
Press and release Cancel to cancel the print job.
Press and hold Cancel to reset the printer.
Note: The Toner Low light does not come
on if the 1,500-page starter print
cartridge is installed.
Paper Jam
Error
Press Continue
Continue Cancel
Understanding the operator panel lights
53
Understanding the operator panel lights
What this light sequence means:
The printer is waiting until a print timeout occurs, or
until it receives additional data.
Ready/Data
What you can do:
Toner Low
•
•
•
Press and release Cancel to cancel the print job.
Press and release Continue to print the contents
of the print buffer.
Press and hold Cancel to reset the printer.
Load Paper
Paper Jam
Error
Press Continue
Continue Cancel
What this light sequence means:
The printer is waiting until a print timeout occurs, or
until it receives additional data. In addition, the toner in
the print cartridge is getting low.
What you can do:
•
•
•
•
•
Ready/Data
Toner Low
Load Paper
Remove the print cartridge and shake it to
extend the life of the cartridge. If you do not
have a replacement cartridge, order one now.
Replace the print cartridge.
Press and release Continue to print the contents
of the print buffer.
Press and release Cancel to cancel the print job.
Press and hold Cancel to reset the printer.
Paper Jam
Error
Press Continue
Continue Cancel
Note: The Toner Low light does not come
on if the 1,500-page starter print
cartridge is installed.
Understanding the operator panel lights
54
Understanding the operator panel lights
What this light sequence means:
•
•
The printer is flushing corrupted print data.
The printer is processing data or printing pages,
but the resolution of a page in the current print
job is reduced from 600 dots per inch (dpi) to
300 dpi in order to prevent a memory full error.
•
•
Toner Low
Load Paper
Paper Jam
What you can do:
•
Ready/Data
Wait until the operator panel returns to Ready/
Data to print other jobs.
Press and release Cancel to cancel the print job.
Press and hold Cancel to reset the printer.
Error
Press Continue
Continue Cancel
What this light sequence means:
The printer is flushing corrupted print data. In addition,
the toner in the print cartridge is getting low.
Ready/Data
What you can do:
Toner Low
•
•
•
Wait until the operator panel returns to Ready/
Data to print other jobs.
Remove the print cartridge and shake it to
extend the life of the cartridge. If you do not
have a replacement cartridge, order one now.
Replace the print cartridge.
Note: The Toner Low light does not come
on if the 1,500-page starter print
cartridge is installed.
Load Paper
Paper Jam
Error
Press Continue
Continue Cancel
Understanding the operator panel lights
55
Understanding the operator panel lights
What this light sequence means:
The printer prompts you to load a single sheet of media
in the manual feed.
Ready/Data
What you can do:
Toner Low
•
•
Load media, with the side to be printed facing
the front of the printer, into the manual feed.
Press and release Continue to resume printing.
Load Paper
Paper Jam
Error
Press Continue
Continue Cancel
What this light sequence means:
The printer is out of media, or the media did not feed
properly.
Ready/Data
What you can do:
Toner Low
•
•
•
Load media into tray 1 or the optional 250-sheet
tray and press and release Continue to resume
printing.
Check that the media is loaded correctly in tray
1 or the optional 250-sheet tray.
Press and release Cancel to cancel the print job.
Load Paper
Paper Jam
Error
Press Continue
Continue Cancel
Understanding the operator panel lights
56
Understanding the operator panel lights
What this light sequence means:
The top output bin is full.
Ready/Data
What you can do:
Toner Low
Remove the print media from the bin.
Load Paper
Paper Jam
Error
Press Continue
Continue Cancel
What this light sequence means:
Print the other side of your duplex print job.
Ready/Data
What you can do:
Re-insert your print job in tray 1 using the instructions
in the driver pop-up menu to orient the pages correctly.
Toner Low
Load Paper
Paper Jam
Error
Press Continue
Continue Cancel
Understanding the operator panel lights
57
Understanding the operator panel lights
What this light sequence means:
The printer top cover is open, or the print cartridge is
not installed.
Ready/Data
What you can do:
Toner Low
•
•
Close the cover to display the light sequence
that appeared before the cover was opened.
Install the print cartridge.
Load Paper
Paper Jam
Error
Press Continue
Continue Cancel
What this light sequence means:
The print cartridge is not installed, or the printer detects
a print cartridge error.
Ready/Data
What you can do:
Toner Low
•
•
If the print cartridge is not installed, install it.
If the print cartridge is installed, remove it and
install a new print cartridge (see Replacing a
print cartridge).
Load Paper
Paper Jam
Error
Press Continue
Continue Cancel
Understanding the operator panel lights
58
Understanding the operator panel lights
What this light sequence means:
The print cartridge you are using was not designed for
your printer.
Ready/Data
Toner Low
What you can do:
Install a print cartridge made for your printer (see
Ordering supplies).
Load Paper
Paper Jam
Error
Press Continue
Continue Cancel
What this light sequence means:
The printer is in the Ready mode and Hex Trace is
active.
Ready/Data
Toner Low
What you can do:
Advanced users can use Hex Trace to help
troubleshoot printing problems. After resolving the
problem, turn off the printer to exit Hex Trace.
Load Paper
Paper Jam
Error
Press Continue
Continue Cancel
Understanding the operator panel lights
59
Understanding the operator panel lights
What this light sequence means:
The printer is in the Ready mode, Hex Trace is active,
and the toner in the print cartridge is getting low.
Toner Low
What you can do:
•
•
•
Ready/Data
Advanced users can use Hex Trace to help
troubleshoot printing problems. After resolving
the problem, turn off the printer to exit Hex
Trace.
Remove the print cartridge and shake it to
extend the life of the cartridge. If you do not
have a replacement cartridge, order one now.
Replace the print cartridge.
Load Paper
Paper Jam
Error
Press Continue
Continue Cancel
Note: The Toner Low light does not come
on if the 1,500-page starter print
cartridge is installed.
What this light sequence means:
•
•
The current print job is canceled.
The printer is resetting to the user default
settings. Any active print jobs are canceled. A
user default setting remains in effect until you
change it or until you restore the factory default
settings.
Ready/Data
Toner Low
Load Paper
Paper Jam
What you can do:
Error
Wait for the message to clear.
Press Continue
Continue Cancel
Understanding the operator panel lights
60
Understanding the operator panel lights
What this light sequence means:
The printer has a service error and printing has
stopped.
Ready/Data
What you can do:
Toner Low
Turn the printer off and back on. If the lights are still
blinking, contact the place where you bought your
printer.
Load Paper
Paper Jam
Error
Press Continue
Continue Cancel
Secondary error code
What this light sequence means:
The printer has one of the following errors:
•
•
•
•
•
•
•
•
Memory is full.
A page is too complex to print.
A page is shorter than the set page margins.
Resolution of a formatted page is reduced to
300 dpi before printing.
A font error occurred.
Memory is insufficient to save what is in the
buffer.
Printer memory is insufficient to defragment
flash memory.
Communication with the host computer is lost.
Ready/Data
Toner Low
Load Paper
Paper Jam
Error
Press Continue
Continue Cancel
–Continued–
Understanding the operator panel lights
61
Understanding the operator panel lights
Secondary error code
What you can do:
•
•
Press and release Continue twice quickly to see
the secondary message.
Press and release Continue to clear the
secondary message.
Ready/Data
Toner Low
Load Paper
Paper Jam
Error
Press Continue
Continue Cancel
Secondary error code
What this light sequence means:
The printer memory does not have the free space
necessary to collate the print job. This may happen due
to one of these errors:
•
•
•
•
•
•
•
•
Memory is full.
A page is too complex to print.
A page is shorter than the set page margins.
Resolution of a formatted page is reduced to
300 dpi before printing.
A font error has occurred.
Memory is insufficient to save what is in the
buffer.
Printer memory is insufficient to defragment
flash memory.
Communication with the host computer is lost.
Ready/Data
Toner Low
Load Paper
Paper Jam
Error
Press Continue
Continue Cancel
–Continued–
Understanding the operator panel lights
62
Understanding the operator panel lights
Secondary error code
What you can do:
•
•
•
•
Press and release Continue to clear the message
and continue printing the job (the job may not
print correctly.)
Press and release Cancel to cancel the print job.
Press and hold Cancel to reset the printer.
To avoid this error in the future:
–
–
Simplify the print job. Reduce the complexity of
the page by reducing the amount of text or
graphics on the page and deleting unnecessary
downloaded fonts or macros.
Install additional printer memory (refer to the
Setup Guide for instructions).
Ready/Data
Toner Low
Load Paper
Paper Jam
Error
Press Continue
Continue Cancel
Secondary error code
What this light sequence means:
The printer is processing data, but the memory used to
store pages is full.
•
•
•
Press and release Continue to clear the message
and continue printing the job (the job may not
print correctly).
Press and release Cancel to cancel the print job.
Press and hold Cancel to reset the printer.
To avoid this error in the future:
–
–
Toner Low
Load Paper
What you can do:
•
Ready/Data
Simplify the print job. Reduce the complexity of
the page by reducing the amount of text or
graphics on the page and deleting unnecessary
downloaded fonts or macros.
Install additional printer memory (refer to the
Setup Guide for instructions).
Paper Jam
Error
Press Continue
Continue Cancel
Understanding the operator panel lights
63
Understanding the operator panel lights
Secondary error code
What this light sequence means:
The page may not print correctly because the print
information on the page is too complex.
•
Press and release Continue to clear the
message and continue processing the print job
(some of the print data may be lost).
To avoid this error in the future:
–
–
–
Toner Low
Load Paper
What you can do:
•
Ready/Data
Reduce the complexity of the page by reducing
the amount of text or graphics on the page and
deleting unnecessary downloaded fonts or
macros.
Set Page Protect to On in the Local Printer
Setup Utility.
Install additional printer memory (refer to the
Setup Guide for instructions).
Paper Jam
Error
Press Continue
Continue Cancel
Secondary error code
What this light sequence means:
The paper length is too short to print the formatted
data. This occurs when the printer does not know the
media size loaded in the tray, or there is a problem
feeding the media.
•
•
•
Toner Low
Load Paper
Paper Jam
What you can do:
•
Ready/Data
Make sure the print media you loaded is large
enough.
Open the printer cover, clear the paper path
and close the cover to resume printing (see
Clearing jams).
Press and release Continue to clear the message
and continue printing the job.
Press and release Cancel to cancel the print job.
Error
Press Continue
Continue Cancel
Understanding the operator panel lights
64
Understanding the operator panel lights
Secondary error code
What this light sequence means:
The printer has received a request for a PPDS font
which is not installed.
Toner Low
Load Paper
What you can do:
•
•
•
Ready/Data
Press and release Cancel to cancel the print job.
Press and hold Cancel to reset the printer.
Press and release Continue to clear the
message and continue printing.
Paper Jam
Error
Press Continue
Continue Cancel
Secondary error code
What this light sequence means:
The printer does not have enough memory to save the
data in the buffer.
•
•
Toner Low
Load Paper
What you can do:
•
Ready/Data
Install additional memory (refer to the Setup
Guide for instructions).
Press and release Continue to continue printing
the job.
Press and release Cancel to cancel the print job.
Paper Jam
Error
Press Continue
Continue Cancel
Understanding the operator panel lights
65
Understanding the operator panel lights
Secondary error code
What this light sequence means:
There is not enough free space in the flash memory to
store the data you are trying to download.
•
•
•
•
Toner Low
Load Paper
What you can do:
•
Ready/Data
Delete fonts, macros, and other data stored on
the flash memory to free up space.
Press and release Continue to clear the
message and continue printing. Downloaded
fonts and macros not previously stored in flash
memory are deleted.
Install flash memory with more storage
capacity. Refer to the Setup Guide for
instructions to install flash memory.
Press and release Cancel to cancel the print job.
Press and hold Cancel to reset the printer.
Paper Jam
Error
Press Continue
Continue Cancel
Secondary error code
What this light sequence means:
The printer detects defective flash memory.
What you can do:
•
•
Ready/Data
Toner Low
Load Paper
Press and release Continue to clear the
message and continue printing. Downloaded
fonts and macros not previously stored in flash
memory are deleted.
Refer to the Setup Guide for instructions to
install flash memory.
Paper Jam
Error
Press Continue
Continue Cancel
Understanding the operator panel lights
66
Understanding the operator panel lights
Secondary error code
What this light sequence means:
The printer detects unformatted flash memory.
What you can do:
•
•
•
Ready/Data
Toner Low
Load Paper
Press and release Continue to clear the
message and continue printing. The job may
not print correctly.
Reformat the flash memory. Refer to the
Technical Reference on Lexmark’s Web site for
more information about reformatting flash.
If the error message remains, the flash memory
may be defective and should be replaced.
Paper Jam
Error
Press Continue
Continue Cancel
Secondary error code
What this light sequence means:
The printer has insufficient memory to free up unused
space in flash memory.
Toner Low
Load Paper
What you can do:
•
•
Ready/Data
Delete fonts, macros, and other data in RAM.
Install additional printer memory.
Paper Jam
Error
Press Continue
Continue Cancel
Understanding the operator panel lights
67
Understanding the operator panel lights
Secondary error code
What this light sequence means:
The printer has an error communicating with the host
computer.
Ready/Data
Toner Low
This light sequence is displayed if the computer
attempts to communicate with the printer through the
parallel port, but the port setting has been disabled
(see Page 71, parallel port).
Load Paper
What you can do:
Press Continue
•
•
The computer attempts to communicate with
the printer through the USB port, but the port
has been disabled (see Page 72, USB port).
Press and release Continue to clear the
message. Some data loss may occur.
Paper Jam
Error
Continue Cancel
Understanding the operator panel lights
68
5
Understanding the printer configuration
menus
Printing the Printer Settings Configuration sheet
To help resolve printing problems or to change printer configuration settings, advanced users can
print the Printer Settings Configuration sheet for instructions on scrolling through the configuration
menus to select and save new settings.
To print the Printer Settings Configuration sheet:
1 Turn off the printer.
2 Open the top cover.
3 Press and hold Continue as you turn the printer back on.
All the lights cycle.
4 Release Continue.
5 Close the top cover.
The Printer Settings Configuration sheet prints.
Configuration menus overview
Menus are represented by Ready/Data, Toner Low, Load Paper, and Paper Jam light sequences.
Menu items and their settings are indicated by Error and Press Continue light sequences.
•
Press and release Cancel to scroll through menus and menu items.
•
Press and release Continue to advance to the setting you need.
•
Press and hold Continue until all of the lights cycle to save a setting.
•
Press and hold Cancel until all of the lights cycle to return to the Home menu.
•
Turn off the printer to exit the menus.
Understanding the printer configuration menus
69
Understanding the printer configuration menus
Utilities menu
Use the Utilities menu to troubleshoot printer problems.
Reset Factory Defaults
Use this setting to: return your printer settings to the factory default values. Sometimes resetting
the printer to the original settings solves formatting problems. All menu items are reset to the factory
default values except:
•
Display Language.
•
All settings in the Parallel menu and USB menu.
All downloaded resources (fonts, macros, and symbol sets) in printer memory (RAM) are deleted.
Resources in flash memory are unaffected.
Hex Trace
Use this setting to: help isolate printing problems when unexpected characters print or characters
are missing. Hex Trace helps you determine if there is a problem with the language interpreter or the
cable by telling you what information your printer is receiving. To exit Hex Trace, turn off the printer.
Print Quality Test Pages
Use this setting to: help isolate print quality problems, such as streaking. When you select this
setting, three pages print to help you evaluate print quality:
•
•
A text page with printer information, cartridge information, current margin settings, and a
graphic.
Two pages with graphics.
Setup menu
Use the Setup menu to configure how the printer formats the end of a line depending on the
computer system being used.
Auto CR after LF
Use this setting to: specify whether the printer automatically performs a carriage return after a line
feed control command.
Values:
Off (factory default)
On
Configuration menus overview
70
Understanding the printer configuration menus
Auto LF after CR
Use this setting to: specify whether the printer automatically performs a line feed after a carriage
return control command.
Values:
Off (factory default)
On
Parallel menu
Use the Parallel menu to change printer settings on jobs sent through a parallel port.
NPA Mode
Use this setting to: send print jobs to the printer and query printer status information
simultaneously.
Values:
Off
On
Auto (factory default)
Protocol
Use this setting to: receive information at a much higher transmission rate if your printer is set to
Fastbytes (if your computer supports Fastbytes) or receive information at a normal transmission rate
if your printer is set to Standard.
Values:
Standard
Fastbytes (factory default)
Mode 2
Use this setting to: determine whether the parallel port data is sampled on the leading (On) or
trailing (Off) edge of strobe.
Values:
Off
On (factory default)
MAC Binary PS
Purpose: To configure the printer to process Macintosh binary PostScript print jobs.
Configuration menus overview
71
Understanding the printer configuration menus
Values:
Off - The printer filters PostScript print jobs using standard protocol.
On - The printer processes raw binary PostScript print jobs from computers using the Macintosh
operating system. This setting often causes Windows print jobs to fail.
Auto (factory default) - The printer processes print jobs from computers using either Windows or
Macintosh operating systems.
USB menu
Use the USB menu to change printer settings on jobs sent through a Universal Serial Bus (USB)
port.
NPA Mode
Use this setting to: send print jobs to the printer and query printer status information
simultaneously.
Values:
Off
On
Auto (factory default)
MAC Binary PS
Use this setting to: configure the printer to process Macintosh binary PostScript print jobs.
Values:
Off - Printer filters PostScript print jobs using standard protocol.
On - Printer processes raw binary PostScript print jobs from computers using the Macintosh
operating system. This setting often causes Windows print jobs to fail.
Auto (factory default) - Printer accepts print jobs from computers using either Windows or
Macintosh operating systems.
Configuration menus overview
72
Understanding the printer configuration menus
Using the Local Printer Setup Utility
The Local Printer Setup Utility, located on the drivers CD, lets you change printer settings not
available from your printer driver (for example, activating Alarm Control if you want the printer to
sound an alarm when it needs attention). Follow the instructions on the drivers CD to install the Local
Printer Setup Utility on your computer.
You can change the following settings using the Local Printer Setup Utility:
Paper Settings
Finishing Settings
PCL Emulation Settings
Paper Source
Duplex
Orientation
Paper Size (per supported sources)
Duplex Bind
Lines Per Page
Paper Type (per supported sources)
Copies
A4 Width
Custom Types (per custom type number)
Blank Pages
Substitute Size
Collation
Tray Renumber (per
supported sources)
Configure MP
Separator Sheets
Paper Texture (per supported media)
Separator Source
Paper Weight (per supported media)
Multipage Print
Paper Loading (per supported media)
Multipage Order
Multipage View
PostScript Settings
Multipage Border
Auto CR after LF
Auto LF after CR
USB Settings
PCL SmartSwitch
PS SmartSwitch
USB Buffer
Print PS Error
Font Priority
Setup Settings
Quality Settings
Parallel Settings
Printer Language
Print Resolution
PCL SmartSwitch
Power Saver
Toner Darkness
PS SmartSwitch
Resource Save
PQET
Parallel Buffer
Download Target
PictureGrade™
Advanced Status
Print Timeout
Honor Init
Wait Timeout
Auto Continue
Jam Recovery
Page Protect
Print Area
Display Language
Alarm Control
Toner Alarm
Using the Local Printer Setup Utility
73
6
Maintenance
Conserving supplies
Conserving supplies lowers printing costs.
•
When printing drafts, conserve toner by changing the Print Darkness setting in your printer driver. The
settings range from Very Light to Very Dark. Selecting the Very Light setting conserves toner.
•
Reduce paper consumption by printing on both sides of the paper.
Ordering supplies
Within the United States or Canada, you can order Lexmark supplies from any authorized Lexmark
supplies dealer. To locate the dealer nearest you, just call 1-800-539-6275. In other countries or
regions, visit the Lexmark online store at www.lexmark.com or contact the place where you bought
your printer.
When the Toner Low light comes on (in this example, the light is on while the printer is busy receiving
data or printing), check that you have a new print cartridge.
Ready/Data
Toner Low
Load Paper
Paper Jam
Error
Press Continue
Continue Cancel
Note: The Toner Low light does not come on if the 1,500-page starter print cartridge is
installed.
To use the remaining toner, remove the print cartridge, shake it gently back and forth, and reinsert it.
When the print fades or no longer prints satisfactorily, replace the print cartridge.
Maintenance
74
Maintenance
When it is time to order a new print cartridge, there is a Lexmark Cartridge Collection Program print
cartridge and a regular print cartridge specifically designed for your printer:
Print cartridge part numbers
Average yield
12S0400 Lexmark Cartridge Collection Program Print
Cartridge1
2,500 pages2
Print coverage
(approximate)
5%
12S0300 Regular Print Cartridge
12S0401 Lexmark Cartridge Collection Program Print
Cartridge1
12S0301 Regular Print Cartridge
1
Sold at a special price with the understanding that you return your empty cartridge only to
Lexmark.
2
Yield is based on approximately 5% coverage at print darkness setting 8.
2
Yield is based on approximately 5% coverage at print darkness setting 10.
Recycling the print cartridge
Please return your used cartridge to Lexmark. Use the Lexmark Cartridge Collection Program to
contribute to a worldwide recycling effort at no cost to you.
To learn how, visit www.lexmark.com/recycle or www.lexmark.com/LCCP and select your country.
Specific instructions and prepaid return shipping labels are available online for some countries. You
may also contact your Lexmark representative or the place where you purchased your cartridge.
Recycling the print cartridge
75
Maintenance
Replacing the print cartridge
Removing the old print cartridge
1 Use the finger tab to pull down the printer cover.
2 Grasp the cartridge handle and pull the print cartridge straight up (it may be warm).
Warning: Do not touch the photoconductor drum on the bottom of the print cartridge.
Photoconductor drum
3 Set the print cartridge aside.
Warning: Lexmark does not recommend refilling used printer cartridges or purchasing
refilled cartridges from a third party. Print quality and printer reliability cannot be
guaranteed if third-party supplies are used. For best results, use genuine Lexmark
supplies.
Replacing the print cartridge
76
Maintenance
Installing the new print cartridge
1 Take the new print cartridge out of the bag.
2 Pull off the plastic piece attached to the ends of the print cartridge and remove the foam
protective liner.
Note: If you recycle the old print cartridge, wrap the used cartridge with the protective
foam liner and place the used cartridge in the bag. Follow the instructions inside
the new print cartridge box to send the used cartridge back to Lexmark.
Warning: Do not touch the photoconductor drum on the bottom of the print cartridge.
3 Shake the cartridge to distribute the toner evenly.
4 Insert the print cartridge.
1
Align the colored arrows on either side of the print cartridge with the corresponding
arrows in the printer.
2
Holding the handle, tilt the cartridge down and guide it between the print cartridge
grooves.
Fuser
CAUTION: Avoid touching the fuser; it may be hot!
Replacing the print cartridge
77
Maintenance
3
Push down on the cartridge until it is firmly in place.
5 Close the printer cover.
To get the maximum benefit from your print cartridge:
•
Do not remove the print cartridge from its packaging until you are ready to install it.
•
Store print cartridges in the same environment as the printer.
•
Do not remove the print cartridge from the printer except to replace it or to clear a paper jam.
Replacing the print cartridge
78
7
Troubleshooting
Solving printing problems
Use the following tables to find solutions for printing problems you have encountered. If you cannot
fix the problem, contact the place where you bought your printer. You may have a printer part that
requires cleaning or replacement by a service technician.
Problem
What to do
Light or blurred characters.
The print cartridge may be getting low on toner. If you do
not have a replacement cartridge, order one now:
1 Remove the print cartridge.
2 Shake it from side to side to use the remaining toner.
3 Reinstall it.
• Make sure you are using recommended print media
(see Media types and sizes).
• If you are printing on special media, for example, card
stock or labels, be sure you selected the correct paper
type in the printer driver.
• The printer detects a print cartridge error. Replace it.
Toner smudges appear on the
front or back of the page.
• Make sure the paper is straight and unwrinkled.
• Replace the print cartridge.
Vertical or horizontal streaks
appear on the page.
Replace the print cartridge.
Troubleshooting
79
Troubleshooting
Problem
What to do
Toner smears or rubs off the
page.
• Try a different kind of paper. Paper designed for
copiers gives the best quality.
• If you are printing on special media, for example, card
stock or labels, be sure you selected the correct paper
type in the printer driver.
• Try changing the media weight to a heavier setting and
the texture to a rougher setting. To change these
settings, install the Local Printer Setup Utility from the
drivers CD (see Using the Local Printer Setup
Utility).
The print is getting light, but the
Toner Low light is not on.
• The Toner Low light does not come on if the 1,500page starter print cartridge is installed.
• Remove the print cartridge and shake it from side to
side to use the remaining toner. If you do not have a
replacement cartridge, order one now.
• Replace the print cartridge.
Ready/Data
Toner Low
Load Paper
Paper Jam
Error
Press Continue
Continue Cancel
The Toner Low light is on.
Ready/Data
• Remove the print cartridge and shake it to use the
remaining toner. If you do not have a replacement
cartridge, order one now.
• Replace the print cartridge.
Toner Low
Load Paper
Paper Jam
Error
Press Continue
Continue Cancel
Solving printing problems
80
Troubleshooting
Problem
What to do
Solid black areas appear on
transparencies or paper contains
white streaks.
• Choose a different fill pattern in your software
application.
• Try a different type of paper. Paper designed for
copiers gives the best quality.
• Remove the print cartridge and shake it from side to
side to use the remaining toner. If you do not have a
replacement cartridge, order one now.
• Replace the print cartridge.
Faint images or repetitive spots
appear on the page.
• Try a different type of paper. Paper designed for
copiers gives the best quality.
• Replace the print cartridge.
Pages are blank.
• The print cartridge may be out of toner. Replace the
cartridge.
• You may have a software error. Try turning the printer
off and back on.
The printer has missing or
damaged parts.
Contact the place where you bought your printer.
The operator panel lights do not
come on when the printer is
turned on.
• The lights may take a few seconds to come on.
• Make sure the power cord is firmly plugged in at the
back of the printer and at the wall outlet.
You cannot close the top cover.
Make sure the print cartridge is positioned correctly.
The printer is on, but nothing
prints.
• Make sure the print cartridge is installed.
• Make sure the parallel or USB cable is firmly plugged
into the connector on the back of the printer.
• Press and release Continue to print a menu settings
page to determine if the problem is with the printer or
the computer.
– If you can print a menu settings page, the problem is in the
computer or the software application.
– If you cannot print a menu settings page, call for service.
The Toner Low light is on and
printing stops.
If the Toner Low alarm is enabled, the printer stops
printing until you replace the print cartridge.
Note: To change the Toner Low Alarm setting, install the
Local Printer Setup Utility from the drivers CD (see Using
the Local Printer Setup Utility).
Solving printing problems
81
Troubleshooting
Problem
What to do
The printer is on and the Error
light is on.
Make sure the print cartridge is installed.
Ready/Data
Toner Low
Load Paper
Paper Jam
Error
Press Continue
Continue Cancel
The media skews or buckles.
• Do not overfill tray 1 or the optional 250-sheet tray (see
media capacities in the Media types and sizes table).
• Make sure the paper guides are flush against the
edges of the media.
The paper sticks together/printer
feeds multiple sheets of paper.
• Remove the paper from tray 1 or the optional 250sheet tray and fan the paper.
• Do not overfill tray 1 or the optional 250-sheet tray (see
media capacities in the Media types and sizes table).
The paper fails to feed from
tray 1.
• Remove the paper from tray 1 and fan the paper.
• Make sure tray 1 is selected from the printer driver.
• Do not overfill the tray.
Solving printing problems
82
Troubleshooting
Problem
What to do
The paper fails to feed from the
optional 250-sheet tray.
• Make sure the optional 250-sheet tray is selected from
the printer driver.
• Make sure the tray is pushed all the way in.
• Make sure the metal plate is pressed down before
inserting the tray into the printer.
Note: After the tray is inserted, the metal plate springs
back up so the paper can feed into the printer.
• Make sure the paper does not exceed the stack height
indicator.
• Make sure the paper is under both corner bucklers
(see Loading paper).
• Remove the paper from the optional 250-sheet tray
and fan the paper.
The Load Paper light is on, even
though there is paper loaded in
the optional 250-sheet tray.
Make sure the tray is pushed all the way in.
Ready/Data
Toner Low
Load Paper
Paper Jam
Error
Press Continue
Continue Cancel
Solving printing problems
83
Troubleshooting
Problem
What to do
The Jam light is still on, even
though you cleared the jam.
• Make sure you cleared all jams.
• Press and release Continue, or open and close the
printer cover to restart the printer.
• Make sure the print cartridge is installed.
Ready/Data
Toner Low
Load Paper
Paper Jam
Error
Press Continue
Continue Cancel
Unexpected characters print or
characters are missing.
• Make sure you are using the correct printer driver.
• Press and hold Continue until all the lights come on to
reset the printer to your user default settings.
• Select Hex Trace to help you troubleshoot the
problem.
• Reset the printer to the factory default settings (see
Reset Factory Defaults).
• Make sure the parallel cable or USB cable is firmly
plugged in at the back of the printer.
Jobs are not printing and the
Error light comes on solid.
• Make sure the print cartridge is installed.
• Make sure the printer top cover is closed.
While in PostScript 3 emulation,
the printer is flushing data
(Ready/Data and Error indicator
lights are blinking).
• Make sure you are using the correct PostScript driver.
• The Lexmark E220 does not support PostScript.
• The printer does not have enough memory to print the
job. Install more memory.
You want to use manual duplex
but cannot find it on your printer
driver.
Your printer driver may not support manual duplex. Go to
the Lexmark Web site at www.lexmark.com to download
the latest printer driver for your printer if you are using
Windows NT 4.0, Windows 2000, or Windows XP.
While using manual duplex, the
printer gets a paper jam.
A paper jam interrupts the duplex process. As a result,
the information on the page that jammed is lost.
• Press and release Cancel to cancel the print job.
• Press and hold Cancel to reset the printer.
• Resend your print job.
You keep getting paper jams
while using manual duplex.
Try using 20 lb xerographic paper or 80 g/m2 A4 paper.
Solving printing problems
84
Troubleshooting
Additional troubleshooting menus
For advanced troubleshooting, see Understanding the printer configuration menus.
Calling for service
Before calling for service, check the following:
•
Is the power cord plugged into the printer?
•
Is the power cord plugged directly into a properly grounded wall outlet?
•
Is your printer properly connected to your computer?
•
Are all other devices attached to your printer plugged in and turned on?
•
Is the wall outlet turned off by any switches?
•
Did a fuse blow?
•
Has a power outage occurred in your area?
•
Is a print cartridge installed in your printer?
•
Is the printer cover closed completely?
If all else fails, try turning your printer off and back on again. If your printer is still not operating
properly, call for service. If you are able to print, press and release Continue to print a menu settings
page, which lists the printer model type and other information the service representative may need to
know.
For service in the U.S., call 1-859-232-3000. For other countries or regions, refer to the numbers
listed on the drivers CD.
Calling for service
85
Index
Symbols
22
A
A4
loading 23
250-sheet tray 25
manual feed 23
tray 1 21
A5
loading 23
250-sheet tray 25
manual feed 23
tray 1 21
Auto CR after LF (Setup menu) 70
Auto LF after CR (Setup menu) 71
B
B5
loading 23
250-sheet tray 25
manual feed 23
tray 1 21
B5 paper 23
Busy light 52, 53
C
card stock 37, 38
loading 38
manual feed 38
tray 1 37
sizes and weights 19
cardstock
loading 37
configuration menus
Parallel menu 71
MAC Binary PS 71
Mode 2 71
NPA Mode 71
Protocol 71
printing the Printer Settings
Configuration sheet 69
Setup menu
Auto CR after LF 70
Auto LF after CR 71
USB menu 72
MAC Binary PS 72
NPA Mode 72
Utility menu 70
Hex Trace 70
Print Quality Test Pages 70
Reset Factory Defaults 70
corner bucklers
250-sheet tray 26
E
emission notices 7
envelopes 32
loading 32
manual feed 32
tray 1 31
sizes and weights 19
Error light 58, 59, 60, 61, 62, 63,
64, 65, 66, 67, 68
call for service 61
flushing data 55
print cartridge error 58
print cartridge not installed 58
printer top cover open 58
executive
loading 23
250-sheet tray 25
manual feed 23
tray 1 21
F
FCC notices 7
features 10
Flushing light 55
Font Error light 65, 66, 67, 68
H
Hex Trace (Utilities menu) 70
I
interfaces
parallel 71
USB 72
86
L
labels 33, 35
loading 33, 35
manual feed 35
tray 1 33
sizes and weights 19
legal
loading 23
250-sheet tray 25
manual feed 23
tray 1 23
letter
loading 23
250-sheet tray 25
manual feed 23
tray 1 21
letterhead
loading 23
250-sheet tray 25
manual feed 23
tray 1 21
Load Paper light 56
manual feed 56
tray 1or 250-sheet tray 56
loading 23, 28, 29, 31, 32, 33, 35
A4 paper 23
250-sheet tray 25
manual feed 23
tray 1 22
A5 paper 23
250-sheet tray 25
manual feed 23
tray 1 22
B5 paper
250-sheet tray 25
manual feed 23
tray 1 22
card stock 37
manual feed 38
tray 1 37
envelopes 31, 32
manual feed 32
tray 1 31
executive 23
manual feed 23
labels 35
manual feed 35
tray 1 33
legal 23
250-sheet tray 25
manual feed 23
tray 1 23
letter 23
250-sheet tray 25
manual feed 23
tray 1 22
letterhead 23
250-sheet tray 25
manual feed 23
tray 1 22
transparencies 28, 29
manual feed 29
tray 1 28
loading labels 33
Local Printer Setup Utility
values
Finishing Settings 73
Paper Settings 73
Parallel Settings 73
PCL Emulation Settings 73
PostScript Settings 73
Quality Settings 73
Setup Settings 73
USB Settings 73
M
MAC Binary PS (Parallel menu) 71
MAC Binary PS (USB menu) 72
Manual Duplex light 57
manual duplex, using 16
media 19
types and sizes 19
menus
advancing in 69
entering 69
exiting 69
saving settings 69
scrolling through 69
Setup menu 70
messages
Busy 52
Canceling job 60
Change cartridge 59
Complex page 64
Defective flash 66
Defective print cartridge 64
Defragmenting flash 52
Flash full 66
Formatting flash 52
Hex Trace Ready 59, 60
Insufficient collation area 62
Memory full 63
Not ready 50, 51
Offline 50, 51
Printing a directory 52
Printing a font list 52
Printing menu settings pages
52
Printing Print Quality Test
Pages 52
Programming flash 52
Resetting printer 60
Restoring factory defaults 60
Standard bin full 57
Unformatted flash 67
Mode 2 (Parallel menu) 71
N
NPA Mode (Parallel menu) 71
NPA Mode (USB menu) 72
O
operator panel 11
lights 11
Busy 52, 53
Canceling job 60
Change cartridge 59
Complex page 64
Defective flash 66
Defective print cartridge 64
Defragment flash 52
Error 58, 59, 60, 61, 62, 63,
64, 65, 66, 67, 68
Flash full 66
Flushing Data 55
Font Error 65, 66, 67, 68
Formatting flash 52
Hex Trace Ready 59, 60
Insufficient collation area 62
Load Paper, manual feeder
56
Load Paper, tray 1 or
250-sheet tray 56
Manual Duplex 57
Memory full 63
Not ready 50, 51
Offline 50, 51
Print Cartridge error 58
Printer Top Cover Open 58
Printing a directory 52
Printing a font list 52
Printing menu settings pages
52
Printing Print Quality Test
Pages 52
Programming flash 52
Ready/Data 50
Resetting printer 60
Restoring factory defaults 60
Standard bin full 57
Toner Low 53, 54, 55, 57
Unformatted flash 67
87
Waiting 54
P
paper 21, 23, 25
loading 21, 23, 25
250-sheet tray 25
manual feed 23
tray 1 21
sizes and weights 19
Parallel Menu 71
ports
parallel 71
USB 72
print cartridge 58
error 58
replacing 76
Print Quality Test Pages (Utility
menu) 70
printer
features 10
Printer Settings Configuration
sheet
printing 69
Protocol (Parallel menu) 71
R
Ready/Data light 50
replacing the print cartridge 76
Reset Factory Defaults (Utility
menu) 70
reset user defaults 84
S
safety information 6
secondary error codes
complex page 64
host interface error 68
insufficient defrag memory 67
memory full 63
PPDS font error 65
short paper 64
service 85
calling for 85
error lights 61
Setup Menu 70
stack height indicator
250-sheet tray 26
T
Toner Low light 50, 53, 54, 55, 57
transparencies 28, 29
loading 28, 29
manual feed 29
tray 1 28
sizes and weights 19
troubleshooting 79
paper problems 82
print quality problems 79, 80,
81
printing problems 81, 82, 83, 84
U
USB Menu 72
Utilities Menu 70
W
Waiting light 54
88
Lexmark and Lexmark with diamond design are trademarks of Lexmark International, Inc.,
registered in the United States and/or other countries.
© 2003 Lexmark International, Inc.
740 West New Circle Road
Lexington, Kentucky 40550
www.lexmark.com