1
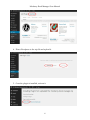
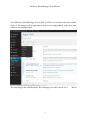
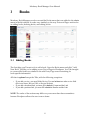
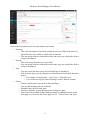
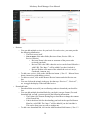
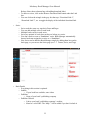
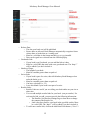
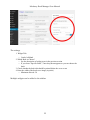
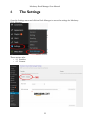
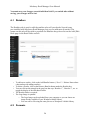
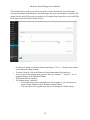
Mooberry Book Manager
User Manual
Version 1.0
Mooberry Dreams
http://www.mooberrydreams.com
[email protected]
Mooberry Book Manager User Manual
Table of Contents
1
2
About Mooberry Book Manager
3
1.1 Features
3
1.2 Requirements
3
1.3 Release Notes
4
Getting Started with Mooberry Book Manager
2.1 Installing Mooberry Book Manager
3
4
5
6
7
5
5
Books
8
3.1 Adding Books
8
3.2 Editing Books
13
3.3 Deleting Books
13
3.4 Viewing Books
14
3.5 Genres, Series, and Tags
14
Book Grids
16
4.1 About Book Grids
16
4.2 Setting up a Book Grid
16
4.3 Special Book Grids
19
Sidebar Widgets
21
5.1 Description of Widgets
21
5.2 Adding a Widget
21
The Settings
23
6.1 Retailers
24
6.2 Formats
24
Frequently Asked Questions
26
2
Mooberry Book Manager User Manual
1
About Mooberry Book Manager
1.1 Features
○
○
○
○
Add books to your website with an easy form, no coding required
Consistent display on every book page
Books can be listed on website in multiple configurations, with no
coding required
Uses your theme’s formatting so looks and feels consistent with the
rest of the website
1.2 Requirements
In order to use Mooberry Book Manager, the following are required:
○ Wordpress.org installation (NOT wordpress.com)
○ Wordpress version 3.8 or higher
○ Mooberry Book Manager has been tested up to Wordpress version 4.1.1
○ Javascript is required for Mooberry Book Manager to work properly on the
admin screens. It is not required for the end user browsing the author’s website.
A modern web browser is required for the Javascript to work properly. Basically,
IE 9 or higher, or almost any version of Chrome, Firefox, or Safari.
3
Mooberry Book Manager User Manual
1.3 Release Notes
Version 1.0 (3/31/2015)
○ Initial Release
○ KNOWN BUG: When adding a new Retailer, Format, or Review,
sometimes the fields pre-fill with data from the previous one. This can be
over-written with the new item and saved without problem. This is a
known bug and we’re working on a fix.
4
Mooberry Book Manager User Manual
2
Getting Started with Mooberry
Book Manager
2.1 Installing Mooberry Book Manager
Mooberry Book Manager is available in the Wordpress plugin repository, which means
installing it is easy.
1. From the Wordpress Admin Dashboard, in the Plugins menu, click Add New.
2. Search for Mooberry Book Manager.
3. Click Install Now.
4. Click Activate Plugin.
If you choose to install Mooberry Book Manager manually, you can download the zip
file from https://wordpress.org/plugins/mooberry-book-manager/ and install it with
these steps:
1. Download the zip file. Do not extract it.
2. From the Wordpress Admin Dashboard, in the Plugins menu, click Add New.
3. At the top, right next to “Add Plugins” click Upload Plugin
5
Mooberry Book Manager User Manual
4. Direct Wordpress to the zip file and upload it.
5. Once the plugin is installed, activate it.
6
Mooberry Book Manager User Manual
Once Mooberry Book Manager is activated, you'll see a new item in the menu called
Books. A few images will be uploaded as well, a new widget added, and a new item
added to the Settings menu.
The first thing to do with Mooberry Book Manager is to add a book. See 3
7
Books.
Mooberry Book Manager User Manual
3
Books
Mooberry Book Manager revolves around the Books menu that was added to the admin
menu in the left sidebar. It works very similarly to the way Posts and Pages work as far
as adding books, deleting books, and editing books.
3.1 Adding Books
The first thing you’ll want to do is add a book. Open the Books menu and click “Add
New Book” just like you’re adding a new Post or Page in Wordpress. You’ll be brought
to a screen that looks very similar to the edit Posts/Page screen but asking for
book-specific information.
All data is optional except the Title, with the following exceptions:
○ If you add a review, you must fill the Review Text and at least one other review field
(Reviewer Name, Review URL, or Review Website)
○ If you add a download link, you must fill in both the Format and the Link
○ If you add a purchase link, you must fill in both the Retailer and the Link
NOTE: The order of the sections may differ on your screen than these screenshots
because Wordpress allows the user to move items.
8
Mooberry Book Manager User Manual
Here is the information you can enter about your books:
○ Summary
○ This is the description of your book, usually the text you’d find on the back of a
physical book or on a retailer’s website such as Amazon.
○ You can use the toolbar to format this text the same way you would with a Post or
a Page in Wordpress.
○ Excerpt
○ This is an excerpt from the text of your book.
○ You can use the toolbar to format this text the same way you would with a Post or
a Page in Wordpress.
○ Tags
○ Tags are exactly the same as tags for Posts and Pages in Wordpress
○ You could use tags to specify categories or characteristics of your book that aren’t
genres.
○ For example, “strong heroine”, “gay for you”, “friend to lovers”
○ You can also use tags for content warnings, such as “dubious consent”
○ Genres
○ Genres work the same way tags do in Posts and Pages
○ You can add multiple genres to each book
○ Multiple books can be in each genre
○ Genres are optional. A book does not have to belong to a genre.
○ New Genres can be added to Book Manager simply by adding them here on the
book page, or you can use the Genres page (see 3.5 Genres, Series, and Tags)
9
Mooberry Book Manager User Manual
○ Reviews
○ You can add multiple reviews for your book. For each review, you must provide
the following information:
○ The Review text itself.
○ One or more of the other fields (Reviewer Name, Review URL, or
Review Website)
○ Reviewer Name is the name or username of the person who
reviewed your book
○ Review URL is the URL where the review can be found. Must be a
valid URL. The “http://” will be added if you don’t include it.
○ Review Website is the name of the website the review is on (ie,
Goodreads, Amazon, etc.)
○ To add a new review, click on the Add Review button. (* See 1.3 Release Notes
about a known bug with adding reviews)
○ To delete a review, click on the Remove Review button under the Review text
box.
○ You can click on the triangle in the gray box that says “Review 1”, “Review 2”,
etc. to toggle the display of the individual review.
○ Download Links
○ Download links are used if you are allowing readers to download your book for
free.
○ You can add multiple download links for your book. (one per format.) For each
download link you add, you must provide the following information:
○ The Format (See Formats Setting Page to learn how to change the content
of the Format list)
○ Link is the direct link for downloading your book in the specified format.
Must be a valid URL The “http://” will be added if you don’t include it.
This can be from your own site or another one.
○ To add a new download link, click on the Add Download Link button. (* See 1.3
10
Mooberry Book Manager User Manual
Release Notes about a known bug with adding download links)
○ To delete a review, click on the Remove Download Link button under the Link
box.
○ You can click on the triangle in the gray box that says “Download Link 1”,
“Download Link 2”, etc. to toggle the display of the individual download link.
○
○ Series
○
○
○
○
○
Series work the same way tags do in Posts and Pages
You can add multiple series to each book.
Multiple books can be in each series
Series are optional. A book does not have to belong to a series.
You don’t need to create a “Standalone” series. Book Manager automatically
detects books not assigned to a series as a “Standalone”
○ New Series can be added to Book Manager simply by adding them here on the
book page, or you can use the Series page (see 3.5 Genres, Series, and Tags)
○ Book Details
○ Everything in this section is optional.
○ Subtitle
○ If your book has a subtitle, enter it here
○ Publisher
○ Name of your book’s publishing company
○ Publisher Website
○ Link to your book’s publishing company’s website
○ Must be a valid URL. The “http://” will be added if you don’t include it.
11
Mooberry Book Manager User Manual
○ Release Date
○ The date your book was/will be published
○ Future dates are allowed. Book Manager automatically recognizes future
release dates as books that are “coming soon”
○ Must be a valid date in the format mm/dd/yyyy or yyyy/mm/dd
○ Date can be typed in or selected from the calendar pop up
○ Goodreads Link
○ If your book is on Goodreads, you can add the link to it here
○ Must be a valid URL that starts with www.goodreads.com. The “http://”
will be added if you don’t include it.
○ Number of Pages
○ The length of your book
○ Must be a number greater than or equal to 1
○ Series Order
○ If your book is part of a series, this tells Mooberry Book Manager what
order the books go in
○ Must be a number greater than or equal to 0
○ Can have a decimal (i.e. 2.5)
○ Leave this blank if your book is not part of a series
○ Retailer Links
○ Retailer Links are used if you are selling your book online on your site or
other sites.
○ You can add multiple retailer links for your book. (one per retailer.) For
each retailer link you add, you must provide the following information:
○ The Retailer (See Retailers Settings Page to learn how to change
the content of the Retailer list
○ Link is the direct link for your book in the specified retailer. Must
be a valid URL The “http://” will be added if you don’t include it.
○ To add a new retailer link, click on the Add Retail Link button. (* See 1.3
12
Mooberry Book Manager User Manual
Release Notes about a known bug with adding retail links)
○ To delete a retailer link, click on the Remove Retailer Link button under
the Retailer Link box.
○ You can click on the triangle in the gray box that says “Retailer Link 1”,
“Retailer Link 2”, etc. to toggle the display of the individual retailer link.
○ Cover
○ You can select a file to be used as your book cover using the same process
as Wordpress’s Media Library
○ You can upload a file from your computer or choose one from your Media
Library
○ You can delete the cover image by clicking the red circle in the upper left
corner of the image preview
After you’re satisfied with your information, click “Publish” (or “Update” if you’re
editing not adding a new book).
Your Book Details Page will be live on your site immediately, and automatically added
to any 4
Book Grids that apply to it.
If you aren’t ready for your book to be live, you can save it as a draft by changing the
Status, just like any other Wordpress post or page.
3.2 Editing Books
To edit any book, go to the All Books page, and click on a book’s title or the “Edit” link
under the title.
3.3 Deleting Books
To delete any book, click on the red “Trash” link under the title.
To delete multiple books, select them with the checkboxes on the left. Choose “Move to
Trash” from the “Bulk Actions” list and click “Apply”.
Deleted books are not gone forever. They are moved to the Trash instead. To see the
books in the Trash, click on the “Trash” link. From here, books can be deleted
permanently or restored by clicking the appropriate link under the book title. Books can
be deleted permanently or restored in bulk by using the checkboxes on the left and the
13
Mooberry Book Manager User Manual
“Bulk Actions” list.
3.4 Viewing Books
Now that you’ve added books in the admin side of Wordpress, how do you view them
on your website?
Until you’ve added a Book Grid or a Widget, you can only view a book by going to its
Book Details Page directly. You can find the link for the Book Detail Page on the
Edit/Add page. Right under the title, you’ll see “Permalink” and a URL. That’s the
direct URL to your book. Copy and paste it into your browser’s URL window and look
at your pretty book page!
You can use that direct URL anywhere you want to link to your book. Or you can add
your book to your site’s menu through the Menu section in Wordpress, but the real
magic comes in when you set up Book Grids and Widgets. (And multiple books too, of
course!)
3.5 Genres, Series, and Tags
14
Mooberry Book Manager User Manual
Each book can be added to multiple genres, series, and tags (or none at all). All three of
these work exactly the same way Wordpress tags do on blog posts. (Actually, book tags
aren’t like Wordpress tags, they are Wordpress tags.)
Just like Wordpress tags, new genres, series, and tags can be created on the Add/Edit
Book page when they are added to the book, or you can explicitly set them up on a
separate page. To access this page, click on Genres, Series, or Tags in the Books menu.
This page works exactly the same was as Wordpress tags, so if you’re not sure about
how it works, you can check the Wordpress documentation.
15
Mooberry Book Manager User Manual
4
Book Grids
4.1 About Book Grids
Book Grids make it easy to display multiple books on your page.There are several
options for choosing which books to display in a Grid, as well as how to sort them. You
can also choose the size of the book covers and the number of books in each row.
4.2 Setting up a Book Grid
To set up a Book Grid, add a new page using the Pages menu (or edit an existing one),
just like you normally would in Wordpress. Scroll down on the Add/Edit Page screen
and you’ll find the Book Grid Settings section. You can add a Book Grid to any page on
16
Mooberry Book Manager User Manual
your website!
Any text you enter into the text box will be displayed before the Book Grid.
Here’s how to add a Book Grid:
1. Choose “Yes” for “Display Books on This Page?”
2.Next, choose which books you want to display in the Grid:
Setting
Chooses these books to display in the Grid
All
All the books you’ve saved into Mooberry Book
Manager
All Published
All the books with a publication date of the current
day or earlier
17
Mooberry Book Manager User Manual
All Coming Soon
All the books with a publication date after the
current day or with no publication date
Select Genres
All the book in the genre(s) you select
Select Series
All the books in the series (one or more) you select
Select Books
You select the specific book(s) to display
3. The books can be grouped into categories with a heading for each group:
Setting
Groups the books by
None
No groupings, no heading
Genre
Genre, with the name of the genre as the heading.
(Books without a genre specified will be in the
“Uncategorized” group.)
Series
Series, with the name of the series as the heading.
(Books not in a series will be in the “Standalones”
group.)
4. If you group by Genre, you can also group by Series within the Genre groups.
5. If you aren’t grouping by series, choose an order for the books. (Books grouped by
series will be ordered by their Series Order.)
Setting
Sorts the books by
Publication Date (oldest
first)
Order of publication, oldest to newest
Publication Date (newest
first)
Order of publication, newest to oldest
Title (A-Z)
Alphabetical by title
Title (Z-A)
Reverse-alphabetical by title
6. Set the height (in pixels) for the book covers. The default is 200, but you can tweak it
18
Mooberry Book Manager User Manual
based on your preference and theme. The minimum height allowed is 50.
7. Set the number of books to display horizontally in the Grid. The default is 3, but you
can tweak it based on your cover size and theme. The minimum allowed is 1.
Save the Page as you normally would. If you have Wordpress set up to add new Pages
to your menu automatically, you should be all set. Otherwise, you can link to your page
however you normally do.
4.3 Special Book Grids
There are three kinds of Book Grids that are built-in with Mooberry Book Manager and
you don’t need to create a Page for:
○ Books from one series, ordered by the series ordinal
○ Books from one genre, ordered by title
○ Books from one tag, ordered by title
To access these built-in Book Grids, you have to get the slug for the series, genre, or tag.
To find the slug, click on the Books menu and choose the corresponding page: Tags,
Genres, or Series. In the list, find the slug for the item you want. The format for the URL
for these built-in Book Grids is:
○ Tag: http://your-site.com/tag/{slug}
○ Series: http://your-site.com/series/{slug}
○ Genre: http://your-side.com/genre/{slug}
So if you had a “Contemporary” genre with a slug of “contemporary”, the URL would
be:
http://your-site.com/genre/contemporary
NOTE: There is one case where these special URLs will not work: if the Permalinks
settings for your Wordpress site are set to “Default”. In this case, you will not be able
to use the URLs as formatted above. Links that do work will be used on your Book
Details Page, but they will look more like this:
http://your-site.com/?mbdb_tax_grid=Test&the-taxonomy=mbdb_genre&th
19
Mooberry Book Manager User Manual
e-term=contemporary&post_type=mbdb_tax_grid
You should change your Permalinks setting if it is set to Default. This is a
good practice not just for Mooberry Book Manager, but for Wordpress
websites in general. When you use the Default setting the URLs use
numbers to determine what page to display. This means that search engines
like Google can’t use your URL to determine if your page should be
returned as a result. In other words, setting your Permalinks setting to
something other than Default will help search engines find your site. That’s
a good thing!
20
Mooberry Book Manager User Manual
5
Sidebar Widgets
5.1 Description of Widgets
Widgets are another way to display your books on your website. The Mooberry Book
Manager Widget displays a single book cover and links to its Book Details Page. The
book chosen is determined by the type of Widget you add.
There are four types of widgets:
○ Random Book
○ Chooses a book at random every time the page is loaded
○ Newest Book
○ Chooses the book with the latest publication date that is not later than the current
day.
○ If more than one book meets that criteria, one of them is chosen randomly
○ Future Book
○ Choose a book at random with a publication date after the current day or a blank
publication date
○ Specific Book
○ You choose a book from the drop down
5.2 Adding a Widget
To set up a Mooberry Book Manager Widget, drag the Mooberry Book Manager Widget
into the sidebar area you want.
21
Mooberry Book Manager User Manual
The settings:
1. Widget Title
○ Can be left blank
2. Which Book to Choose?
○ See the description of widget types in the previous section
○ If you chose “Specific Book”, a new drop down appears so you can choose the
book
3. Check whether the book title should be printed below the cover or not
4. Enter the width of the book cover image (in pixels)
○ Minimum allowed: 50
Multiple widgets can be added to the sidebar.
22
Mooberry Book Manager User Manual
6
The Settings
Open the Settings menu and click on Book Manager to access the settings for Mooberry
Book Manager.
There are two tabs:
○ 6.1 Retailers
○ 6.2 Formats
23
Mooberry Book Manager User Manual
You must save your changes on each individual tab. If you switch tabs without
saving, your changes will be lost.
6.1 Retailers
The Retailers tab is used to add the retailers who sell your books. Several come
pre-installed with Mooberry Book Manager, but you can add more if needed. The
names on this tab will be used to populate the Retailers drop down list on the Add/Edit
Book page in the Retail Links section.
○ To add a new retailer, click on the Add Retailer button. (* See 1.3 Release Notes about
a known bug with adding retailers)
○ To delete a retailer, click on the Remove Retailer button under the Retailer box.
○ You can click on the triangle in the gray box that says “Retailer 1”, “Retailer 2”, etc. to
toggle the display of the individual retailer.
○ The Retailer Name is required.
○ The Logo Image is optional.
○ The Logo Image can be uploaded from your computer or you can choose an
image already available in your Wordpress Media Library
○ You can select a file using the same process as Wordpress’s Media Library
6.2 Formats
24
Mooberry Book Manager User Manual
The Formats tab is used if you offer your books for free download. Several formats
come pre-installed with Mooberry Book Manager, but you can add more if needed. The
names on this tab will be used to populate the Formats drop down list on the Add/Edit
Book page in the Download Links section.
○ To add a new format, click on the Add Format button. (* See 1.3 Release Notes about a
known bug with adding formats)
○ To delete a format, click on the Remove Format button under the Format box.
○ You can click on the triangle in the gray box that says “Format 1”, “Format 2”, etc. to
toggle the display of the individual format.
○ The Format Name is required.
○ The Format Image is optional.
○ The Format Image can be uploaded from your computer or you can choose an
image already available in your Wordpress Media Library
○ You can select a file using the same process as Wordpress’s Media Library
25
Mooberry Book Manager User Manual
7
Frequently Asked Questions
1. Will Mooberry Book Manager work with my theme?
Mooberry Book Manager has been designed to be theme-independent and should work
for most themes. However, as there are infinite possibilities when developing themes
and little required standardization, so some themes may not work as expected with the
plugin. If Mooberry Book Manager isn’t working for your theme, e-mail us at
[email protected] and we’ll see if we can help.
2. What’s the difference between Download Links and Retailer Links?
Download Links should be used when you are allowing readers to download the book
for free.
Retailer Links are used when you are linking to website for readers to purchase your
book.
A single book most likely won’t have both Download Links and Retailer Links, unless
your book is listed for free at retailers and you are also allowing readers to download
the ebooks directly from your website.
26