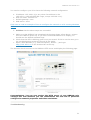
1
Hyper Media Player: HMP100 User Manual V1.2 © 2007-2008 SpinetiX S.A. All rights reserved. DISCLAIMER THE SPECIFICATIONS AND INFORMATION REGARDING THE PRODUCTS IN THIS MANUAL ARE SUBJECT TO CHANGE WITHOUT NOTICE. ALL STATEMENTS, INFORMATION, AND RECOMMENDATIONS IN THIS MANUAL ARE BELIEVED TO BE ACCURATE BUT ARE PRESENTED WITHOUT WARRANTY OF ANY KIND, EXPRESS OR IMPLIED. USERS MUST TAKE FULL RESPONSIBILITY FOR THEIR APPLICATION OF ANY PRODUCTS. THE SOFTWARE LICENSE AND LIMITED WARRANTY FOR THE ACCOMPANYING PRODUCT ARE SET FORTH IN THE INFORMATION PACKET THAT IS SHIPPED WITH THE PRODUCT AND ARE INCORPORATED HEREIN BY THIS REFERENCE. IF YOU ARE UNABLE TO LOCATE THE SOFTWARE LICENSE OR LIMITED WARRANTY, CONTACT YOUR SPINETIX REPRESENTATIVE FOR A COPY. NOTWITHSTANDING ANY OTHER WARRANTY HEREIN, ALL DOCUMENT FILES AND SOFTWARE OF THESE SUPPLIERS ARE PROVIDED “AS IS” WITH ALL FAULTS. SPINETIX DISCLAIMS ALL WARRANTIES, EXPRESSED OR IMPLIED, INCLUDING, WITHOUT LIMITATION, THOSE OF MERCHANTABILITY, FITNESS FOR A PARTICULAR PURPOSE AND NONINFRINGEMENT OR ARISING FROM A COURSE OF DEALING, USAGE, OR TRADE PRACTICE. IN NO EVENT SHALL SPINETIX OR ITS SUPPLIERS BE LIABLE FOR ANY INDIRECT, SPECIAL, CONSEQUENTIAL, OR INCIDENTAL DAMAGES, INCLUDING, WITHOUT LIMITATION, LOST PROFITS OR LOSS OR DAMAGE TO DATA ARISING OUT OF THE USE OR INABILITY TO USE THIS MANUAL, EVEN IF SPINETIX OR ITS SUPPLIERS HAVE BEEN ADVISED OF THE POSSIBILITY OF SUCH DAMAGES. Hyper Media Player 100 User Manual V1.2 ©2007-2008 SpinetiX S.A. All rights reserved. "SpinetiX" and “HMP Hyper Media Player” are registered trademarks, and all logo and graphic designs are trademarks of SpinetiX S.A. Other product and company names appearing in SpinetiX S.A. products and materials are used for identification purposes only and may be trademarks or registered trademarks of their respective companies. Registered and unregistered trademarks used in any SpinetiX S.A. products and materials are the exclusive property of their respective owners SpinetiX S.A. rue des Terreaux, 17 1003 Lausanne Switzerland www.spinetix.com [email protected] Tel. +41 21 341 15 50 Fax. +41 21 311 19 56 2 HHMP100 User Manual V1.2 INTRODUCTION SpinetiX HMP100 is the first networked Hyper Media Player appliance dedicated to the professional digital signage industry. In this field it represents for final users, integrators and service providers a better alternative of choice to personal and industrial computers and proprietary dedicated software. HMP100 offers a standard and simplified way to schedule, combine, update, animate, stream and display video, audio, vector graphics, pictures and text with low acquisition and operational costs. The rich set of functionalities offered by HMP100 simplifies the implementation, management and maintenance of effective and modern audio/visual communication solutions. HMP100 is not a simple media player, but an Hyper Media player. It combines in an embedded solution all the display functionalities of a PC. What is Hyper Media? As defined by Wikipedia, Hyper Media “is used as a logical extension of the term hypertext in which graphics, audio, video, plain text and hyperlinks intertwine to create a generally non-linear medium of information.” A movie or a video clip is a typical linear content: you watch it from the beginning to the end. The content in a WEB page is a typical example of non linear content: multiple media elements are dynamically and interactively consumed. Servers use PHP scripts and databases to retrieve live content and allow the browser to display the latest information in an interactive and dynamic way. The HMP100 allows you to obtain the same result on any digital screen or projector and display true Hyper Media content exactly as you can do with a PC-based solution. Thanks to its compact form factor, robust and dedicated hardware, HMP100 turns any digital display into a network device. In this short manual we collect the information published on the WEB on HMP100. Read this information to quickly get started with HMP100 units. 3 © 2007-2008 SpinetiX S.A. All rights reserved. HOW TO BUY HMP100 HMP100 can be ordered online from the SpinetiX Web site: http://www.spinetix.com/store or by sending an order to [email protected] We propose two offers: Starter Kit Price: 699 € Content: 1 unit of HMP100. 1 voucher to download a single node, multi users license of the HMD software. Professional Pack Price: 5990 € Content: 10 units of HMP100. 1 voucher to download a single node, multiusers license of the HMD software. 4 HHMP100 User Manual V1.2 TABLE OF CONTENT Disclaimer ............................................................................................................2 Introduction...........................................................................................................3 How to buy hmp100...............................................................................................4 Table of Content.....................................................................................................5 How it works?........................................................................................................6 The first Hyper Media Player....................................................................................7 Easy to install and maintain.....................................................................................8 Plug & Play.........................................................................................................8 Top reliability.....................................................................................................8 Smallest form factor!...........................................................................................9 Remote Monitoring..............................................................................................9 Updates and upgrades.........................................................................................9 Full Connectivity...................................................................................................10 Green Product......................................................................................................12 Installing HMP100.................................................................................................13 Learn HMP100 connectors......................................................................................14 HMP100 Front panel connectors..........................................................................14 HMP100 Back panel connectors ..........................................................................14 Power up HMP100.................................................................................................15 Reset HMP100 to its factory default settings.........................................................16 Updating firmware................................................................................................17 Updated Version............................................................................................18 Get Connected.....................................................................................................20 How to connect to the HMP100 from Mac OS X without HMD......................................23 How to access the HTTP server of an HMP100 unit....................................................27 How to configure an HMP100 unit to connect to a DHCP network?..............................28 Requirements:..................................................................................................28 Guide:.............................................................................................................28 Troubleshooting................................................................................................29 How to configure a HMP100 unit to connect to a fixed IP network?.............................30 Requirements:...............................................................................................30 Guide:..........................................................................................................30 Troubleshooting.............................................................................................31 Configure the network connection of your PC...........................................................33 Set Display settings..............................................................................................36 Technical specifications.........................................................................................37 SPINETIX HARDWARE LIMITED WARRANTY AGREEMENT...........................................39 SPINETIX End-User Software License Agreement......................................................40 5 © 2007-2008 SpinetiX S.A. All rights reserved. HOW IT WORKS? SpinetiX HMP100 simplifies the publishing and maintenance of your digital signage project. Connected to digital displays through HDMI and VGA, HMP100 is capable of rendering combinations of media elements from a rich set of formats: audio, video, vector graphics, pictures and text. HMP100 natively implements the open standards required to schedule, update, stream, and animate each supported media. Distributing content from a central location onto a specific display is as easy as publishing a web page. As a network appliance HMP100 offers plug & play functionalities that simplifies installation, remote maintenance and monitoring. From anywhere, your network of digital displays is under control. 6 HHMP100 User Manual V1.2 THE FIRST HYPER MEDIA PLAYER Only your imagination is the limit because HMP 100 is even more than a multi media player. HMP 100 enriches digital signage projects with high quality video, audio, images, animations and text... all these media can be retrieved by HMP100 from local or network resources and can be combined and rendered on any type of digital displays following specific graphical layouts and time schedules. HMP100 extends the basic functionalities of state of the art media players supporting Hyper Media content. The term hypermedia is used as a logical extension of the term hypertext, in which graphics, audio, video, plain text and hyperlinks intertwine to create a generally non-linear medium of information. HMP100 brings hypermedia content on digital displays in several ways. For example it is possible to: access public or private databases and display contextual selected content with predefined graphical layouts; aggregate and display RSS news based on key words; connect to public or private audio/video streaming servers and display live events, news and entertainment contents; retrieve from network disks images and videos satisfying specific constraints; enable all sorts of network interactive services; schedule which content to display when and where; stream live audio/video source (IP cam, video servers...) With all these functionalities brought by HMP100 it has never been so simple to create, customize, keep up to date and schedule content for your digital signage network! 7 © 2007-2008 SpinetiX S.A. All rights reserved. EASY TO INSTALL AND MAINTAIN When working with personal computers, everyone has experienced installation and maintenance troubles. In professional environments, when service must be guaranteed on a 24/7 basis, installing PC and maintaining them updated, upgraded and in correct working status is the job of IT specialists and require the on-site intervention of technicians. This job represents consistent and recurrent expenses that prevent today the wide adoption of distributed network of digital signs. HMP100 has been designed to simplify both the installation and the maintenance tasks by offering: • • • • • Plug & Play Top reliability Smallest form factor Remote monitoring Updates and upgrades Plug & Play HMP100 is a dedicated appliance and thus truly “plug and play”. You start a HMP100 by plugging in two cables: the power line and the video cable (HDMI and/or VGA) to the digital display. As soon as it is connected to the power line, HMP100 boots in a few seconds and automatically selects the resolution supported by the associated digital display so as to start rendering content in less than 1 minute. When connected to a local network through the RJ45 connector, HMP100 automatically detects and configures the right parameters without the need of IT specialists. Wether you choose to activate the DHCP support to automatically configure the network or specify the IP address and network properties manually, HMP100 minimizes the costs of setting up networked digital signage projects. When custom configurations are required, HMP100 offers an intuitive web interface that allows through any web browser to choose different network and display options. Top reliability HMP100 has been designed to satisfy the reliability constraints of non stop 24/7 display service and minimize the costs of maintenance that represent today with state of the art technology more than 40% of the operative costs in digital signage projects. To achieve this goal, HMP100 hardware design does not include any mechanical parts such as fans or hard drives. These parts suffer from reliability and limited life-time issues which become critical when the environment is dusty or without correct air circulation. Moreover, HMP100 integrates electronics which are designed for the automotive industry with the top quality and reliability standards and is protected by a solid and compact aluminium case that reduces the risks of damage when transported and installed. Finally, HMP100 runs a linux OS and software applications designed for the HMP100 hardware architecture. 8 HHMP100 User Manual V1.2 Smallest form factor! HMP100: 200g of high technology concentrate. HMP100 is the smallest digital signage hyper media player on the market. With only 10.5x9x2.5 cm and 200g, HMP100 simplifies your logistic and installation process. Whether you integrate it behind your screens, behind your technical floor or under the roof, HMP100 does not suffer from dust or heat. Its aluminium case guarantees robustness and protection in tough environments. Remote Monitoring The management of a distributed network of HMP100 devices is simplified by the native support of the SNMP protocol. Through this standard protocol HMP100 devices can publish all their vital parameters such as storage level and CPU status. There are several network management software tools that support SNMP protocol. These tools offer professional graphical frameworks to remote monitoring the status of an individual HMP100 unit or a complex network of units. It is possible to set threshold on the monitored variables and associate alarm events to prevent failures and schedule an efficient maintenance. In addition to SNMP protocol, HMP100 implements an intuitive web interface. By connecting to the IP address of a specific HMP100 unit with any web browser, the user can monitor the status of the unit and even configure specific parameters. Updates and upgrades HMP100 can update and upgrade its functionalities. This guarantees a reactive customer service and the possibility to support new media formats and video standards, new devices such as touch screens, and new extensions such as wireless network connectivity. Updates and upgrades are automatically installed on HMP100 from a local or remote PC using the software packages distributed by SpinetiX. The entire process limits the downtime of the unit to about 1 minute. 9 © 2007-2008 SpinetiX S.A. All rights reserved. FULL CONNECTIVITY HMP100 offers full connectivity capabilities. HMP100 connects to digital displays through onboard HDMI and VGA connectors. Through the HDMI output it is possible to support DVI displays as well, but in this case the digital audio is lost. Both connectors are simultaneously active so as to drive two monitors without the need of additional splitters. HDMI is a digital audio/video connector widely adopted by most digital displays. VGA is an analogue computer video connector also supported by the majority of digital displays. VGA connector does not carry audio information: for this reason, an analogue audio connector is provided by the HMP100. HMP100 is a high-definition ready device: it can render content on digital displays with resolution up to 1280x720 at 60Hz (720p resolution)1. The Maximum resolution supported by HMP100 is: • 1280x720 (16:9) • 1024x640 (16:10) • 1024x768 (4:3) HMP100 connects to the network through an onboard RJ-45 connector. Each HMP100 unit has a unique MAC address that allows to identify the unit and thus the associated display. elements. HMP100 supports 10/100BASE-T Ethernet and all the required protocols to connect to network file systems and retrieve media In particular: • Ethernet 10/100 Mbit/s, • IPv4, DHCP or fixed address • HTTP configuration server, password protected • HTTP client for web content retrieval • WebDAV server, password protected • SNMPv1/v2c, • NTP 1 Video standards supported 480p, 576p, 720p, 50 or 60 fps 10 HHMP100 User Manual V1.2 HMP100 supports USB2.0 Hi-Speed with a bandwidth up to 10 Mbyte/s. USB interface can be used to extend the local storage through memory sticks or hard drives. The same interface can support external devices such as touch screen controllers, DVB tuners or wireless network connectivity. When professional displays are connected to HMP100, the standard RS-232 connector lets you control the behavior of the monitor: On/off, volume, sources, image properties It is possible to upload multiple protocols to support different display models. The required cable can be purchased from SpinetiX 11 © 2007-2008 SpinetiX S.A. All rights reserved. GREEN PRODUCT HMP100 brings to your screen the highest rendering quality with the lowest power consumption: only 2 watts. Compared to current digital signage solutions based on PC platforms you can significantly reduce your power consumption by up to 800kW per year and per controlled display. For Europe, this represents a direct saving of 1’100.00 € on the electricity bills! The compact form factor of HMP100 positively reduces both the recycling and the logistic costs compared to a PC-based solution. The long life-time of HMP100 further contributes to optimize the cost/service ratio. 12 HHMP100 User Manual V1.2 INSTALLING HMP100 Installing HMP100 is a relatively simple task. Integrators and electricians appreciate the limited number of cables required to connect the HMP100 unit and its light form factor: a Velcro stripe can be used secure HMP100 in any position you like. Since the unit does not heat and does not contain mechanical parts, it can be installed indoor almost everywhere: just be careful of water and humidity infiltrations! Once installed, getting started with HMP100 is a matter of few steps. In the following sections we show how to connect one or more units onto your network and how to publish content from the Hyper Media Director software to specific displays. • • • • Get Started: how do I check that the HMP100 I have received can drive my display. Get Connected: how do I access the administration console of HMP100. Set Display settings: how to configure the display settings of HMP100. Datasheet: An overview of the technical specifications. 13 © 2007-2008 SpinetiX S.A. All rights reserved. LEARN HMP100 CONNECTORS HMP100 exposes several I/O connectors identified by small icons. In this guide we will only use those required to test that your HMP100 unit is functional. HMP100 Front panel connectors RS232 interface: the serial port is used in developement mode only Ethernet RJ45: plug the Ethernet cable in this socket USB 2.0 supports an USB memory device LEDs The green/red LED gives an indication on the state of the system. Push-button: this push-button is used to manually reboot the HMP100 unit. Keep it pressed fro few seconds. HMP100 Back panel connectors 5V-DC input: power socket where the power adapter DC output jack is to be plugged. Digital Video out. Standard High Definition Media Interface (HDMI) available on most recent digital displays. It also carries digital audio. Analog Audio out: This stereo audio output can be used to drive amplified audio speakers. Analog Video out: Standard Video Graphics Array (VGA) supported by most LCD screens. 14 HHMP100 User Manual V1.2 POWER UP HMP100 1. Check your digital display. HMP100 can drive a digital display through HDMI or VGA connections: make sure that your display supports at least one of the two. 2. Get the correct video cable. HMP100 is not delivered with HDMI or VGA cables: these are often provided with the display or can be found in specialized shops. According to your display make sure to get the right video cable. 3. Connect HMP100 to the display. Simply plug the HDMI or the VGA cable between the corresponding video out connector on the front panel of HMP100 and the corresponding video in connector of your display. 4. Power up the display. Make sure to select the right video input. 5. Power up HMP100. Use the cables and the power converter provided in the HMP100 package. Simply plug the power converter on one side to a 110-220V outlet and on the other to the back panel DC jack. Shortly after power up, the screen displays the SpinetiX splash screen as displayed in the Figure. The first time HMP100 boots, the automatic configuration procedure takes about 1½ minute. The process will be reduced to less than 50 seconds when you will reboot the HMP100 again. During this booting process the front panel LED shows green and red activity. 15 © 2007-2008 SpinetiX S.A. All rights reserved. At the end of the booting process, the screen will start displaying the animated SpinetiX logo. This is the default content. At this time, the green LED blinks regularly on and off every second to notify the correct behavior of HMP100. If your system did not have the behavior described above you may have a defective unit. Before contacting SpinetiX, make sure that the digital displays are functional and that the right input has been selected (some displays have multiple inputs and you may need to manually select the right one). Also check that the push button is not pressed by external elements. If the set-up appears correct, try to power down and up the HMP100 unit by unplugging and plugging again the power. If this does not correct the errors send a message describing what you observe to [email protected] Reset HMP100 to its factory default settings WARNING: The following procedure will delete all the content and configurations on the HMP100 unit. To reinitialize the HMP100 unit to its factory default settings do the following: a) b) c) d) e) f) 16 Unplug the unit from the power. Push the blue button and keep it pressed. Power up again the HMP100 unit. Wait with the push button pressed at least 8 seconds. Release the push button. The HMP100 unit will now boot in the factory default mode and will have the default IP address. HHMP100 User Manual V1.2 UPDATING FIRMWARE The updating procedure of the HMP100 depends on your network configuration. Case 1 Your HMP100 has a direct connection to the Internet: • • • • Go to the update page of the HTTP interface. You can find the update page under the menu Advanced – Update. Check that the Source URI is equal to http://download.spinetix.com/hmp100/updates/ . If this is not the case, press the Reset to Default button. Press the From the Web button, to update the firmware of your HMP100. This update should takes less than five minutes. Do not power down the unit during the update. The HMP100 will restart automatically once the update is over. It is possible that the web page display a time-out error during the update. However, this has no influence on the update process. Once the update has been performed and the HMP100 has rebooted, you need to perform a second update, by pressing the From the Web button again. Case 2 Your HMP100 doesn’t have a direct connection to the Internet: • Please contact [email protected] to check which update procedure is best suited to your configuration. Specify in your message if your HMP100 unit(s) are in a location where you can easily plug an USB key or if they have local network connectivity. Case 3 You don’t know if your HMP100 has direct access to the Internet: • • • • Go to the update page of the HTTP interface. You can find the update page under the menu Advanced – Update. Check that the Source URI is equal to http://download.spinetix.com/hmp100/updates/ . If this is not the case, press the Reset to Default button. Check the Check only check box Press the From the Web button. The HMP100 will let you know if update is possible using the Internet connection. The update page should look as the image below. If it not the case, your HMP100 is probably already up-to-date and doesn’t need to be updated. 17 © 2007-2008 SpinetiX S.A. All rights reserved. Once the update has been updated successfully, it is recommended to re-configure the display setting using the Basic menu of the updated interface. This will increase the smoothness of the video and the animation displayed by the HMP100. If your HMP100 is using the default update configuration and has direct access to the Internet, it will update it's firmware in an automatic and transparent manner as soon as a firmware is available. The update will take place at 3:00 AM and will not modify the content played by the HMP100 nor its display and networks settings. Updated Version If your firmware has been updated, you can find the update menu under Administration - Firmware Update. Your HTTP interface should look like the image below. 18 HHMP100 User Manual V1.2 To update your firmware manually, press the Check for Update button, choosing From server in the drop box list. The HMP100 will check the server for updates. If updates are available, the interface will indicate the number of updates and ask you to confirm or cancel the update. Press Update Now to perform the update. This will trigger the firmware update. This operation may take quite some time (up to 30 minutes). Do not power down the unit during the update. The HMP100 will restart automatically once the update is over. It is possible that the web page display a time-out error during the update. However, this has no influence on the update process. 19 © 2007-2008 SpinetiX S.A. All rights reserved. GET CONNECTED This tutorial explains how to access for the first time an HMP100 unit from a PC using the RJ-45 Ethernet interface. This step is required to access the HMP100 administration HTTP server or to publish content on a HMP100 unit. Note that this procedure applies only if you have not modified the default network configuration of the HMP100 unit. See Reset to Factory default to make sure that your HMP100 has the default network configuration. Requirements: • • One of the following configurations o PC with RJ-45 10/100/1000 Ethernet interface and an Ethernet cable. o PC with RJ-45 10/100 Ethernet interface and an Ethernet crossover cable. o PC with RJ-45 10/100 Ethernet interface, a switch and 2 Ethernet cables. One HMP100 unit Schemes: Guide: 1. Connect the PC, through the switch depending on the chosen setup, to the HMP100 unit following one of the above schemes. 2. Power up the PC and switch (if applicable). 3. Power up the HMP100 unit. (Note that the HMP100 unit does not need to be connected to a display: allow about 1mn to HMP100 to boot up, you will see the green light blinking once per second). 4. Configure the network on your PC. 20 HHMP100 User Manual V1.2 You need to configure your PC to have the following network configuration: a. IP address: 192.168.1.9 (or any other free address in the 192.168.1.1-192.168.255.254 range, except 192.168.1.10). b. Sub net mask: 255.255.0.0 c. Default gateway: none d. DNS server: none Click here to read an example of how to configure the network on a PC running Windows XP Pro. 5. Validate that the above steps are successful: a. Make sure that HMP100 has completed the booting phase: allow about 1 minute from the HMP100 power up. If you have connected HMP100 to a display you should see the default animated logo. b. Check that the LED is blinking green once per second. If this is not the case go to the troubleshooting section at the end of this guide. c. Open a Web Browser (e.g. Internet Explorer, Firefox...) and type http://192.168.1.10 in the location bar at the top. The browser should connect to the HMP100 HTTP server and display the following page. Congratulations. You can now explore the HTTP server of your HMP100 unit. Through this web interface you can administrate the unit and in particular configure its network properties and video resolutions. Troubleshooting 21 © 2007-2008 SpinetiX S.A. All rights reserved. If you have not been able to connect to your HMP100 unit, please read the following suggestions before contacting the SpinetiX support team. 1. Double check that you have correctly written the right address on your web browser. It should be: http://192.168.1.10 2. Check the LED on you HMP100 unit. a. If the led is blinking from orange to red once per second: the IP address of your HMP100 unit has already been assigned on the network. Check your network configuration and make sure that the address 192.168.1.10 is not taken by another device. b. If the led is blinking fast (several times per second) from green to red. Your HMP100 is in recovery mode. In this case, unplug and power up again the HMP100 unit. Wait about 1 minute. If the HMP100 unit remains in recovery mode contact support. 3. It may happen that your HMP100 unit has already been configured and does not have the default IP address. In this case you should reinitialize the unit to its factory default. Note that all the content stored on the HMP100 unit will be deleted. Follow the instructions reported in Reset to Factory default. 4. Double check the connectivity in your setup (cables, connectors, switches...). 5. Check the network configuration of your PC. 6. Verify that the web browser does not have a proxy configured. If you have checked all the above and the HMP100 HTTP server still cannot be accessed, contact the support at [email protected] 22 HHMP100 User Manual V1.2 HOW TO CONNECT TO THE HMP100 FROM MAC OS X WITHOUT HMD This tutorial explains how to connect to your HMP100 unit from Mac OS X without Hyper Media Director. First we explain how to locate the HMP100 unit on the network and then how to access and upload contect to the HMP100. Requirements: • • One HMP100 unit. A Mac computer running Mac OS X version 10.2 or later. Finding the HMP100 on the network: This section explains how to find the network address of an HMP100 unit connected to the same local area network (LAN) as the Mac computer, or directly to the Mac computer. This is particularly useful when the HMP100 unit has been configured to use DHCP or when the static IP address that was configured has been lost. 1. Verify that the HMP100 is powered on and running: the green LED should blink once per second. 2. Verify that the HMP100 has network connectivity: the red LED should not be brightly on. 3. Open the Terminal program, which you'll find in the Applications Utilities folder. The Terminal program presents a text based terminal where commands can be typed. 4. Type the command ping -c 3 224.0.0.1 and press Return. You will see multiple responses from all computers and/or devices on the network. 23 © 2007-2008 SpinetiX S.A. All rights reserved. 5. Immediately after type the command arp -a and press Return. This will print out a list of known network names, IP addresses and Ethernet MAC address, in the first, second and fourth columns, respectively. 24 HHMP100 User Manual V1.2 6. Look in the list for the Ethernet MAC address that matches the serial number of the HMP100 (e.g., 0:1d:50:0:0:6e for serial number 001d5000006e). All MAC addresses of the HMP100 start with 0:1d:50:. 7. The network name of the HMP100 unit appears on the first column of the matching line, if none is registered ? is shown. 8. The IP address of the HMP100 unit appears, betweeen parentheses, on the second column of the matching line. 9. You may now close the Terminal application if so desired. Now you can use either the network name, if one is registered, or the IP address to address the unit on the network. Note that the factory default IP address of the HMP100 is 192.168.1.10. Connecting the the HMP100 content: This section explains how to connect to the HMP100 content using the Mac OS X Finder. 1. Click anywhere on your desktop to bring up the Finder menubar at the top of the screen. 2. From the Go menu, select Connect to Server... The Connect to Server dialog appears. 3. In the Server Address textbox type http:// followed by the IP address ot network name of the HMP100 unit and :81/. For instance http://192.168.1.10:81/ to connect to the unit with the 192.168.1.10 IP address. 4. Click the Connect button. This will open the content folder on the HMP100 unit in a Finder window. 5. The HMP unit is also added, using the typed network name or IP address, to the list of connected network servers and one need not re-connect to it using this procedure. 25 © 2007-2008 SpinetiX S.A. All rights reserved. Accessing / copying content from / to the HMP100 unit: This section explains how to access content from or copy (upload) content on the HMP100 unit. 1. Open a Finder window. 2. Select the HMP100 unit on the list of connected servers on the left of the window, it appears by the network name or IP address that was typed when the connection was done. 3. On the right pane you now see all the content files on the HMP100 unit, you can manage them as regular files on Mac OS X. 4. To copy files to the HMP100 unit (i.e. upload) just drag and drop files from another Finder window to the right pane. 5. After uploading files allow some time for the HMP100 unit to notice the new files. 26 HHMP100 User Manual V1.2 HOW TO ACCESS THE HTTP SERVER OF AN HMP100 UNIT If you want access the HTTP server for the first time read the Get Connected guide first. Otherwise make sure that you have a PC connected to the HMP100 unit through Ethernet connection and that you have correctly configured the PC and/or the HMP100 unit to be on the same network with the right IP address. Execute on the PC a Web browser such as Internet Explorer or Fire Fox. There are few ways to access the HTTP server of a specific HMP100 unit. 1. You know the IP address of the HMP100 unit: then type http://<ip address> in the location bar of your web browser. 2. You know under which name the HMP100 unit has been registered on the DNS server. This registration can be done manually by the DNS server administrator and in this case the name of the unit is arbitrary. In this case write http://<DNS name of the unit>/ in the location bar of your web browser. 3. You know that the HMP100 unit is configured in DHCP mode and that the DHCP server is configured to dynamically register the names in the DNS server. In this case the name of the HMP100 unit will have the following predefined pattern: spx-hmp-<serial number>, where <serial number> is the 12 digit serial number that you find on the label below the HMP100 unit. In this case write http://spx-hmp-<serial number>/ in the location bar of your web browser. If you do not know any of the above information, then you may retrieve the IP address and the name of the HMP100 unit using the Hyper Media Director software. This software shall be executed on the PC which is connected through the Ethernet to the HMP100 unit. To validate that you have successfully connected to the HTTP server, you should see the following screen: 27 © 2007-2008 SpinetiX S.A. All rights reserved. HOW TO CONFIGURE AN HMP100 UNIT TO CONNECT TO A DHCP NETWORK? This tutorial explains how to manually configure an HMP100 unit to connect to a specific network using DHCP for the attribution of network addresses. Note that this procedure assumes that you can access the HTTP server of the HMP100 unit through the Ethernet interface. Requirements: One HMP100 unit. A PC from which it is possible to access the HTTP server of the HMP100 unit. Guide: 1) Access the HTTP server of your HMP100 unit. • • If you have just received an HMP100 unit see the Get Connected guide to learn how to connect to its HTTP server If the network configuration of your HMP100 unit has already been modified follow the suggestions in Access HTTP server. 2) Select the Network configuration page on the left menu under Basic. (see screenshot below) • • Under Current settings you can read the current network configuration of the HMP100 unit. In particular you can read the current IP address, the Host name and the MAC address. Under Change settings you can configure the network settings of the HMP100 unit. 3) Configure the HMP100 to use DHCP. • Set the DHCP radio button instead of Static one. 5) Validate the changes. • • Validate the new network configuration with the Update button. The changes will be valid once the HMP100 unit has rebooted. If you want to immediately reboot the unit, check the Reboot now check box before pressing the Update button. 6) Re-connect to your HMP100. • • 28 If your DHCP server is configured to register new computer to the DNS you can access your HMP100 using the following address http://spx-hmp<serial_number>. Otherwise you need to find the IP address assigned to your HMP100. This can be done using the "discover device" feature of the HMD for instance. HHMP100 User Manual V1.2 Troubleshooting Once the device has rebooted, you can check the new configuration by accessing the HTTP server. Note that you need to use the new IP address of the device name this time. If you are not able to connect to your HMP100 unit after modifying the IP configuration, please read the following suggestions before contacting the SpinetiX support team. 1) Check the LED on you HMP100 unit. If the led is blinking once per second in orange colour and the red led is bright on then your HMP100 unit has been configured to activate DHCP but no DHCP server has been detected on your network. Make sure your DHCP server is working correctly. If the green led is blinking fast (several times per second) then your HMP100 unit is in recovery mode. In this case, unplug and power up again the HMP100 unit. Wait about 1 minute to complete the booting procedure and check the led again. If the HMP100 unit remains in recovery mode then contact support. 2) You don't have a DHCP server In the case where your HMP100 unit has been configured to use DHCP but the DHCP server cannot be contacted by the unit, you need to reinitialize the unit to its factory default (See Reset to Factory default) and restart the configuration procedure. 29 © 2007-2008 SpinetiX S.A. All rights reserved. HOW TO CONFIGURE A HMP100 UNIT TO CONNECT TO A FIXED IP NETWORK? This tutorial explains how to manually configure an HMP100 unit to connect to a specific network with a fixed IP address. Note that this procedure assumes that you can access the HTTP server of the HMP100 unit through the Ethernet interface. Requirements: • • One HMP100 unit. A PC from which it is possible to access the HTTP server of the HMP100 unit. Guide: 1) Collect information on your network configuration. The following information should be available about your network: • • A range of free IP addresses that can be allocated to the HMP100 unit(s) without network conflicts. The right subnet mask. 2) Access the HTTP server of your HMP100 unit. • • If you have just received an HMP100 unit see the Get Connected guide to learn how to connect to its HTTP server. If the network configuration of your HMP100 unit has already been modified follow the suggestions in Access HTTP server. 3) Select the Network configuration page on the left menu under Basic. (see screenshot below) • • Under Current settings you can read the current network configuration of the HMP100 unit. In particular you can read the current IP address, the Host name and the MAC address. Under Change settings you can configure the network settings of the HMP100 unit. 4) Set the static IP address and the subnet mask. • • • • Set the Static radio button instead of DHCP one. Attribute to the HMP100 unit a static IP address in the range of the free IP addresses of your network. Also, make sure that the subnet mask correspond to your network configuration. You may fill the other network parameters as well if known. 5) Validate the changes. Validate the new network configuration with the Update button. 30 HHMP100 User Manual V1.2 The changes will be valid once the HMP100 unit has rebooted. If you want to immediately reboot the unit, check the Reboot now check box before pressing the Update button. Troubleshooting Once the device has rebooted, you can check the new configuration by accessing the HTTP server. Note that you need to use the new IP address this time. If you are not able to connect to your HMP100 unit after modifying the IP configuration, please read the following suggestions before contacting the SpinetiX support team. 1) Check the LED on you HMP100 unit. If the led is blinking once per second in orange color and the red led is bright on then you are in one of the following cases • • The IP address of your HMP100 unit has already been assigned on the network. Check your network configuration and make sure that the address <new IP> is not taken by another device. Your HMP100 unit has been configured to activate DHCP but no DHCP server has been detected on your network. Make sure you have selected the Static radio button. If not, reboot the unit by keeping pressed the push-button for few seconds. If the green led is blinking fast (several times per second) then your HMP100 unit is in recovery mode. In this case, unplug and power up again the HMP100 unit. Wait about 1 minute to complete the booting procedure and check the led again. If the HMP100 unit remains in recovery mode then contact support. 2) Wrong IP address 31 © 2007-2008 SpinetiX S.A. All rights reserved. In the case where your HMP100 unit has been configured with a wrong IP address and cannot longer be contacted, you need to reinitialize the unit to its factory default (See Reset to Factory default) and restart the configuration procedure. 32 HHMP100 User Manual V1.2 CONFIGURE THE NETWORK CONNECTION OF YOUR PC Under Windows XP Professional you can configure the network connection of your PC so as to connect to a HMP100 unit in its default configuration with the following steps: 1) Open the Control Panel (Start>Control Panel) and then double click Network Connections. 2) Select the local connection corresponding to the RJ-45 Ethernet connection you have connected to the HMP100 unit. Right click on the icon and choose Properties. 33 © 2007-2008 SpinetiX S.A. All rights reserved. 3) Select Internet Protocol (TCP/IP) from the list and press the Properties button. 4) Configure the Protocol properties as follows: 34 HHMP100 User Manual V1.2 5) Confirm with OK. 35 © 2007-2008 SpinetiX S.A. All rights reserved. SET DISPLAY SETTINGS This tutorial explains how to configure the display settings of your HMP100 unit using its administration HTTP server. Note that this procedure applies only if you can access the HTTP server of the HMP100 unit whose display settings need to be configured. (Learn how to do it) 1. In the main page of the HTTP server of your unit, select in the left menu the Display Settings item that you find under Administration. The current display settings will be shown on your browser. 2. Choose the output resolution to activate. The Basic menu let you select between seven presets resolutions. For finer settings, you need to use the Advanced menu. o The aspect ratio of your display will be automatically updated according to the chosen resolution. You can modify it by checking the Force aspect ratio check box. 3. Choose your display orientation. In case you are using a vertical display make sure you select the correct rotation direction. 4. If you require audio output, you must enable it using the Enable audio output checkbox. The preview icon on the right helps you to choose the correct settings for your display. All changes need to be confirmed with the Apply button and will trigger a reboot of the unit. The reboot process requires about 2 min. 36 HHMP100 User Manual V1.2 TECHNICAL SPECIFICATIONS Media content specifications Content description language Media/animation synchronization Aspect ratio Maximum resolution Video standards Still image formats SVG Tiny 1.2 + (Scalable Vector Graphics) SMIL 2.1 16:9, 16:10, 4:3 1280x720 (16:9), 1024x640 (16:10), 1024x768 (4:3) HD-Ready: 480p, 576p, 720p, 50 or 60 fps JPEG, PNG, GIF, SVG Supported video codecs ISO MPEG1, MPEG2, MPEG4 ASP, MJPEG, Microsoft VC1 (Windows Media Video 9) Supported audio codecs ISO MPEG Audio layer 1/2/3 (MP3), ITU G.711, G.722, G. 729,PCM, Microsoft WMA, Real Audio Media container formats AVI, ASF/WMV/WMA, VOB, AIFF, OGG, WAV, MOV QuickTime) Streaming media protocol Import filters provided for MMS, RTSP, RTP, SDP, HTTP PowerPoint presentations, BMP, TIFF, XPM, WBMP, PNM bitmaps. Content scripting PHP 5 language Content scheduling iCalendar (RFC2445) Graphic effects engine specifications Graphic effects language SVG Tiny 1.2 + Vector graphics primitives International text support Font file formats Animation capabilities Animation modes Network Connectivity Protocols Remote configuration Content administration Other protocols Rectangles, polygons, paths with lines, elliptical arcs and Bezier curves, text areas, linear and radial gradients. Unicode standard compliant with bidirectional text support TrueType and OpenType. Color, gradients, transparency level, audio volume, motion along a path, translation, scaling, rotation, clipping. Discrete, linear, paced and spline interpolation. Ethernet 10/100 Mbit/s, IEEE 802.3u, 802.3x IPv4, DHCP or fixed address HTTP configuration server, password protected WebDAV server, password protected SNMPv1/v2c, NTP 37 © 2007-2008 SpinetiX S.A. All rights reserved. Physical & environmental specifications Size Weight Power supply Power supply input Operating temperature Storage temperature Real time clock External connectivity External storage Serial Network Video output Analog audio output 105mm (W) x 83mm (D) x 26mm (H) 4.13’ (W) x 3.27’ (D) x 1.02’(H) 190g / 6.7 oz 5V DC, typ. 0.4A (2W) 100-240V 50-60 Hz, max input current 0.6A 10 to 35 ºC (50 to 95 ºF), 10 to 90 % RH -25 to 45 ºC (-13 to 113 ºF), 10 to 90% RH Min accuracy 1 min/month free running, battery backed USB 2.0 Hi-Speed, one port Supports USB flash and hard drives RS232, up to 115200 bauds, mini-jack 3.5mm RJ-45 Ethernet HDMI (inc. digital audio), DVI via adapter VGA (DB15 HD connector) Line level, stereo, mini-jack 3.5mm Please check back frequently as our technical specifications are still subject to change at any time 38 under editing process and may be HHMP100 User Manual V1.2 SPINETIX HARDWARE LIMITED WARRANTY AGREEMENT SpinetiX S.A. manufactures its hardware products from parts and components that are new or equivalent to new in accordance with industry-standard practices. SpinetiX warrants to the Customer in accordance with the following provisions that its branded hardware products, purchased by the Customer from a SpinetiX company or an authorized SpinetiX Reseller, will be free from defects in materials, workmanship and design affecting normal use, as long as the original End User continues to own or use the Product. The firmware installed in the hardware Product is covered by the SpinetiX EndUser Software License Agreement and is guaranteed according to the terms of the Software Limited Warranty stated therein. In the event of discontinuance of product manufacture, SpinetiX warranty support is limited to two (2) years from the announcement of discontinuance. Products for which proper claims are made will, at SpinetiX’ option, be repaired or replaced. SpinetiX owns all parts removed from repaired products. SpinetiX uses new and reconditioned parts made by various manufacturers in performing repairs and building replacement products. Exclusions: This Warranty does not apply to defects from: improper or inadequate installation, use or maintenance; actions or modifications by unauthorized third party or the Customer accidental or willful damage. Making a Claim: The Customer must send a RMA (Return Material Authorization) to SpinetiX and always supply proof of purchase, indicating name and address of the Reseller, date of purchase, model and serial number, name and address of the Customer and details of symptoms and configuration at time of malfunction, including peripheral and software used. Otherwise, SpinetiX may refuse the guarantee claim. Customer must send to SpinetiX defective product properly packed in original or equally protective packaging together with details listed above and the RMA number provided to the Customer by SpinetiX. Limitation and Statutory Rights: SpinetiX makes no other warranty, guarantee or like statement other than as explicitly stated above and this Warranty is given in place of all other warranties whatsoever, to the fullest extent permitted by law. In the absence of applicable legislation, this Warranty will be the Customer's sole and exclusive remedy against SpinetiX or any of its affiliates, and neither SpinetiX nor any of its affiliates shall be liable for loss of profit or contracts, or any other indirect or consequential lost arising from negligence, breach of contract, or howsoever. SPINETIX PRODUCTS ARE NOT INTENDED FOR USE IN DIRECT LIFE SUPPORT APPLICATIONS WHERE MALFUNCTION MAY RESULT IN DIRECT PHYSICAL HARM OR INJURY TO PERSONS. NO WARRANTIES OF ANY KIND, INCLUDING, BUT NOT LIMITED TO, THE IMPLIED WARRANTIES OF MERCHANTABILITY OR FITNESS FOR A PARTICULAR PURPOSE ARE OFFERED. This Hardware Limited Warranty Agreement shall be governed by and construed in accordance with the laws of Switzerland. If any portion hereof is found to be void or unenforceable, the remaining provisions of this Agreement shall remain in full force and effect. This Agreement constitutes the entire agreement between the parties with respect to the use of the Hardware. 39 © 2007-2008 SpinetiX S.A. All rights reserved. SPINETIX END-USER SOFTWARE LICENSE AGREEMENT IMPORTANT YOU SHOULD CAREFULLY READ THE FOLLOWING TERMS, CONDITIONS AND RESTRICTIONS BEFORE INSTALLATION AND USE OF ANY SOFTWARE PROGRAMS PROVIDED BY SPINETIX S.A. OPENING THE SEALED SOFTWARE PACKAGE AND/OR INSTALLATION OR USE OF SUCH SOFTWARE PROGRAMS SHALL BE DEEMED TO CONFIRM YOUR ACCEPTANCE OF THESE TERMS, CONDITIONS AND RESTRICTIONS. This License Agreement (this "Agreement") is a legal agreement between you and SpinetiX S.A., a Swiss corporation ("SpinetiX") for the accompanying software, associated media, printed materials, audiovisual content, and "online" or electronic documentation (collectively, the "Product"). By installing or using the Product, you agree to be bound by the terms of this Agreement. If you do not agree to all of the terms of this agreement, de-install all copies of the Product from your computer and return all Product materials to your distributor or SpinetiX for a refund of any license fees paid. LICENSE: The Product includes software modules that are distributed under their specific license: all these license agreements are distributed within the Product. The following license terms apply on the entire Product except for its parts covered by the aforementioned licenses. The Product is licensed, not sold. The Product is protected by copyright law and international copyright treaty provisions, as well as other intellectual property laws and treaties. You must not allow copies of the Product or any part of it to be made or distributed to anyone else. You may make backup copies of the software for archival purposes only. SpinetiX grants to you a non-exclusive, non-sublicensable, license to use the Product for your own use only on a single computer. The Product in source code form is confidential and SpinetiX’ protected trade secret and you may not attempt to reverse engineer, decompile, disassemble or otherwise decipher any portion of the Product. Reproduction and/or redistribution of any portion of the Product is specifically prohibited in the absence of a separate written agreement with SpinetiX. All video, audio, and other content accessed through the Product is the property of the applicable content owner and may be protected by applicable copyright law. This Agreement gives you no rights to such content. If you use the Product to create or distribute audio, video, or other content, SpinetiX is not responsible for such content, and you are solely responsible, for the property rights, legality, and regulation of all such content, including but not limited to issues of copyright ownership and obscenity regulation worldwide. SpinetiX retains all ownership and intellectual property rights in and to the Product. You agree to abide by the copyright law and all other applicable laws of Switzerland, including those relating to Switzerland export controls. You agree not to ship or re-export any portion of the Product to any destination to which it could not lawfully have been exported originally under those export controls. 40 HHMP100 User Manual V1.2 SpinetiX may terminate this Agreement at any time by delivering notice to you, and you may terminate this Agreement at any time by removing all copies of the Product from your computer and destroying all Product materials. This Agreement is personal to you and you agree not to assign your rights under it. This Agreement shall be governed by and construed in accordance with the laws of Switzerland relating to intellectual property in general, and to copyrights, patents, and trademarks in particular. You agree to submit all disputes to the exclusive jurisdiction of courts or tribunals located within the territorial boundaries of Switzerland. LIMITED WARRANTY SpinetiX warrants that the software will perform substantially in accordance with the accompanying user documentation for a period of 90 days from the date of receipt. THE PRODUCT IS PROVIDED WITHOUT ANY OTHER EXPRESS OR IMPLIED WARRANTIES, INCLUDING WITHOUT LIMITATION WARRANTIES OF MERCHANTABILITY OR FITNESS FOR A PARTICULAR PURPOSE. SPINETIX SHALL NOT BE LIABLE: (A) FOR INCIDENTAL, CONSEQUENTIAL, SPECIAL, OR INDIRECT DAMAGES OF ANY SORT WHATSOEVER, WHETHER ARISING IN TORT, CONTRACT, OR OTHERWISE (INCLUDING WITHOUT LIMITATION DAMAGES FOR LOSS OF BUSINESS PROFITS, REVENUES, OR INFORMATION, OR FOR BUSINESS INTERRUPTION) RESULTING FROM YOUR USE OF THE PRODUCT OR YOUR INABILITY TO USE THE PRODUCT, EVEN IF SPINETIX HAS BEEN INFORMED OF THE POSSIBILITY OF SUCH DAMAGES; OR (B) FOR ANY CLAIM BY ANY PARTY OTHER THAN YOU. IN NO EVENT SHALL SPINETIX’ LIABILITY TO YOU EXCEED THE AMOUNT YOU ORIGINALLY PAID FOR THE PRODUCT. THIS LIMITATION OF LIABILITY SHALL NOT APPLY TO LIABILITY FOR DEATH OR PERSONAL INJURY TO THE EXTENT APPLICABLE LAW PROHIBITS SUCH LIMITATION. SOME STATES AND JURISDICTIONS DO NOT ALLOW THE EXCLUSION OR LIMITATION OF INCIDENTAL OR CONSEQUENTIAL DAMAGES, SO THE ABOVE LIMITATION AND EXCLUSION MAY NOT APPLY TO YOU. SpinetiX entire liability and your exclusive remedy shall be, at SpinetiX’ option, either (a) return of the price paid or (b) repair or replacement of the software. This Limited Warranty is void if failure of the software has resulted from abuse, or misapplication. Any replacement software will be warranted for the remainder of the original warranty period or 30 days, whichever is longer. Neither these remedies nor any product support services offered by SpinetiX are available without proof of purchase from an authorized source. Petri Konferenztechnik GmbH Zentrale Crailsheimer Str. 1, 90574 Roßtal/Buchschwabach Telefon +49 (0) 91 27 – 90 33 80 Telefax +49 (0) 91 27 – 90 33 89 petri konferenztechnik.de e-Mail [email protected] Zweigstelle Lerchenbühlstr. 17, 90419 Nürnberg Telefon +49 (0) 911 – 80 13 220 Telefax +49 (0) 911 – 80 13 221 www.petri-konferenztechnik.de Full Service in Konferenz-, Messe- und Veranstaltungstechnik 41