1
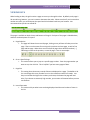
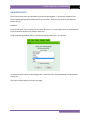
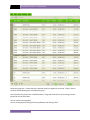
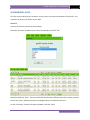
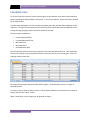
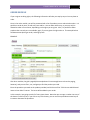
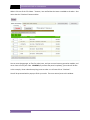
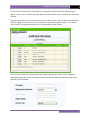
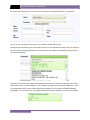
EWP
eTraker Web Portal User Manual
Traker Systems
4/15/2009
ETRAKER WEB PORTAL USER MANUAL
Table of Contents
OVERVIEW..................................................................................................................................................... 3
LOGGING ON ................................................................................................................................................. 4
AVAILABLE MODULES ................................................................................................................................... 5
SELECTING AN OWNER OF INVENTORY ........................................................................................................ 6
VIEWING DATA .............................................................................................................................................. 7
SORTING DATA .............................................................................................................................................. 8
DATA VIEWS .................................................................................................................................................. 9
FILTERING DATA .......................................................................................................................................... 10
GROUPING DATA......................................................................................................................................... 15
SUMMARIZING DATA .................................................................................................................................. 17
EXPORTING DATA........................................................................................................................................ 18
ORDER MODULE ......................................................................................................................................... 19
2
ETRAKER WEB PORTAL USER MANUAL
OVERVIEW
This document has been provided to get you started with the eTraker Web Portal. We will cover the
basic functions of the modules.
The eTraker Web Portal is designed to work best with a broadband Internet connection. The following
browsers have been tested running the portal:
•
•
•
•
•
Internet Explorer 6, 7 and 8
Firefox 3 or Higher
Safari 4 or Higher
Google Chrome
Opera 9 or Higher
Internet Explorer or Firefox is recommended. Also note that if you attempt to use a version of Internet
Explorer prior to version 6, you will have display and functionality problems.
3
ETRAKER WEB PORTAL USER MANUAL
LOGGING ON
When entering the eTraker Web Portal, you will be presented with the home page, which includes the
ability to login to the portal.
To Login, enter your user name, and password. Passwords are case sensitive. If you would like the site
to remember your password, check the “Remember Login” checkbox. If you do this, when you leave the
site, simply close the browser. Clicking the “Logout” link disables the “Remember Login” feature.
If you forget your password, click the “Forgot Password ?” link. You will be taken to a page, asking for
your username, and to enter a security code. If the user exists, and the code is entered correctly, an
email reminder will be sent to the address attached with that username.
4
ETRAKER WEB PORTAL USER MANUAL
AVAILABLE MODULES
Here is a list of modules available in the system. What modules are available to you depend on the
rights you are given, and the Inventory Control version supporting the portal.
•
INVENTORY MODULE
o View your current Inventory levels.
•
INBOUND MODULE
o View your Inbound Receipts
•
OUTBOUND MODULE
o View your Outbound Shipments
•
INVOICE MODULE
o View your Invoices (listings only. BOL’s cannot be generated).
•
PRODUCT MODULE
o View your Item list.
•
ORDER MODULE
o Place Outbound Shipment Orders (Warehouse Version Only)
•
SALES ORDER MODULE
o Place Sales Orders (Manufacturing & Distributor Version Only)
5
ETRAKER WEB PORTAL USER MANUAL
SELECTING AN OWNER OF INVENTORY
In some cases you may have the ability to select from more than one owner of inventory. If that is the
case, you can select the owner of inventory using the pulldown from any of the modules:
Once selected, the owner of inventory you select will be maintained as you move from module to
module.
Please note; that when placing orders. Once you have selected one or more items from one owner, you
cannot switch to another owner and add items to the order. Owners of inventory cannot be mixed on
an order.
6
ETRAKER WEB PORTAL USER MANUAL
VIEWING DATA
When looking at data, the grid contains a pager to move you through the data. By default, each page is
20 records long, however, you can increase or decrease that value. Please note that if you increase that
number too much, you could impact the speed at which the data loads into your browser. We
recommend that you do not exceed 50.
The pager is available on both the top and bottom of the grid. Each part of the pager is labeled above,
and here are descriptions of its parts:
A. Page Selection
• The pager will show the current 10 pages, clicking on any of them will take you to that
page. There are also arrows for moving to the previous and next page, as well as first
page and last page. When there are more than 10 pages there will be three dots (…),
indicating to move to the previous, or next 10 pages. Here is an example:
B. Go to a Specific Page
• This section allows you to jump to a specific page number. Enter the page number you
want to see, then click Go. This is helpful if you have many pages of data.
C. Page Size
• This setting alters how many records of data are displayed on a page. The default is 20.
You can change this to any number from 1 to the maximum number of records. Just
keep in mind that the higher the number you choose, the slower the page will load.
Also, if you choose an extremely high number, your session will timeout before you ever
see the data.
D. Item Information
• This section tells you what items are being displayed and the total number of items in
the list.
7
ETRAKER WEB PORTAL USER MANUAL
SORTING DATA
All grids appear in their natural sort order. Each module has its own natural order. This, however, can
be changed to fit your needs.
Simply click on the header of the field you want to sort by. Clicking once, sets the grid in ascending
order of the header you clicked. Clicking twice, sets the grid in descending order of the header you
clicked. A third click removes the sort.
MULTIPLE FIELD SORTING
You can also sort by multiple fields. Simply click on the first field you want to sort by, then the next,
then the next, etc. This allows you to sort the data based on your needs. Keep in mind, to easily remove
multiple field sorting, click the “Clear Sorting” button that was provided, which will return the grid to the
natural order.
The header of the sorted columns will display an up arrow, or down arrow depending how you set the
sort. Here is an example:
Note: There is a very small number of fields that cannot be sorted (pictures for example).
8
ETRAKER WEB PORTAL USER MANUAL
DATA VIEWS
The company providing you access to the portal can customize a view to fit your need in any of the
modules. These views are available via the “View” pulldown menu. The company providing you access
can also set what views are displayed by default for your logon.
Simply click the View Menu, select the view you would like to see, and click Select.
Note, however, that if you change the view from your default, that view is only maintained while you
are in the module. If you leave the module, and return, you will be returned to your default view.
9
ETRAKER WEB PORTAL USER MANUAL
FILTERING DATA
Often times you need to find specific information. Filtering allows you to find specific data , whether it
is in the inbound module, the inventory module, or the order module.
Click on the “Filter” pulldown menu to set your filters. You can set up to five filters.
Select the “Filter Field”. This is the field (or column) you want to filter on.
Select the “Filter Condition”. Based on the field, these are the condition you are testing for.
Enter what you are searching for in “Filter Criteria”.
Click “Set” to set your filter.
10
ETRAKER WEB PORTAL USER MANUAL
If you want to set additional filters, the “And/OR” radio box will enable. This will allow you to control
how the filter is executed.
EXAMPLE #1:
In the Inventory Module, I want to see all the Inventory for Item Number 12345, but I only want to see
lines, where the quantity is greater than 100. So, my filter would be:
Filter for Item Number Equals 12345 and the quantity is greater than 100.
I will set my first filter. This would be the filter for the Item Number. It would look like this:
11
ETRAKER WEB PORTAL USER MANUAL
Once I have set my first filter, I can then set the second filter to get what I am looking for.
Notice the And/Or is available, and I selected and. When I click Set, I now have the filter I was looking
for. In addition to the data, the module will also let you know what filter you have set:
12
ETRAKER WEB PORTAL USER MANUAL
EXAMPLE #2:
I want to see a list of All Inventory for two different Item numbers. The Item Numbers are 12345 and
56789. To accomplish this, I again need to set two filters, but this time, I will need to use the or
constructor. My filter would be:
Filter for Item Number equals 12345 or Item Number equals 56789.
13
ETRAKER WEB PORTAL USER MANUAL
FILTERING “BETWEEN”
Two filtering functions allow you specify two values. “Between” will return data between two values,
and “Not Between” will return data that is not between two values. This filter works for both character
data and numeric data.
To specify two values for a between or not between filter, use the pipe character (|).
EXAMPLE 3:
I want a list of all items between Item Number 12345 and Item 56789. You could accomplish this by
using two filters. The first filter using the Greater than filter, and the second, using the Less than filter.
However, you can also accomplish this filter using the between filter:
To clear any filters, from the filter menu, lick “Clear”.
14
ETRAKER WEB PORTAL USER MANUAL
GROUPING DATA
There may be times when you would like to group like data together. The Inbound, Outbound, and
Invoice Module group data by default (which you can clear). But there may be other groupings you
need to look at.
EXAMPLE:
I want to look at all of the Inventory for my owner of inventory. I have multiple aisles in the warehouse.
I want to see what products are stored in each aisle.
Using the Grouping pulldown menu, I will select the Group Field “Aisle”, and click set.
If I wanted to see the Aisles in descending order, I would check the “Sort Descending” checkbox before
clicking set.
The results of the grouping are on the next page…
15
ETRAKER WEB PORTAL USER MANUAL
Notice the group line. It shoes the Aisle, and how many lines appear for that aisle. There is also an
arrow to the left allowing you to collapse the group.
Also notice the last group in the screenshot above. The group continues on the next page, and the
group line lets you know that.
You can set up to three groups.
You can clear groups by clicking the Group pulldown, and clicking “Clear”.
16
ETRAKER WEB PORTAL USER MANUAL
SUMMARIZING DATA
Let’s say you are looking at your inventory, and you want to see the total quantities of each item. You
can do this by setting a summary on your data.
EXAMPLE:
I want to summarize inventory by Item Number.
Select the “Summary” pulldown menu, select Item Number, and click “Set”.
Notice the fields with “N/A”. These are fields that would contain different values (for example, multiple
lots for each item). Otherwise, quantity and weight values are totaled for each item.
To clear a summary, select the Summary pulldown, and click “Clear”.
17
ETRAKER WEB PORTAL USER MANUAL
EXPORTING DATA
For those of you who have used Traker Systems legacy eTraker website, there were limited reporting
options regarding the data available in that portal. In this portal, however, reports have been replaced
by an export feature.
Any data being displayed in any of the modules (excluding the order and sales order modules) can be
exported. The export format is based on the view being used, and the data exported depends on the
sorting, filtering, grouping, and/or summaries applied to the data.
The export types available are:
•
•
•
•
•
Comma Delimited (CSV)
Formatted Microsoft Excel
Microsoft Excel
Microsoft Word
Acrobat Reader (PDF)
The most popular and most useful format appears to be Formatted Microsoft Excel. Once exported in
this format, the data can be manipulated further to obtain the results you are looking for. Here is an
example of what it looks like:
Microsoft formats require Microsoft Office 2003 or higher. Acrobat Reader version 6 or higher is
required for PDFs.
To export, once you have the data you want, click the Export pulldown, select the format you want to
export, and click the “Export” button.
(Note: Some fields, such as images, will be ignored on export)
18
ETRAKER WEB PORTAL USER MANUAL
ORDER MODULE
If you are given ordering rights, the following information will take you step by step on how to place an
order.
Once in the order module, you will be presented with a list of products you are authorized to order. It is
possible to order by item, as well as by item and lot. You can order either way, or you may only be
allowed to order in one manner, depending on the rights you are given. Also, it is possible to order
products that currently are not available, again, if you are given the right to do so. The example below
will demonstrate placing an order, ordering by item.
EXAMPLE:
Like other modules, the grid is paged (this example doesn’t have enough items to show the paging,
however), and you can filter, sort, and group to find the product you need.
Enter the quantities you need on the product provided, and click one of the “Click Here to Add Selected
Items to Your Order” buttons. The items will be added to your order.
In this example, I am going to order 5 of every item shown. Note that you can type a number into any of
the boxes in each line, but, if you click on any of the boxes, you can use the up and down arrow keys to
increase or decrease the quantities.
19
ETRAKER WEB PORTAL USER MANUAL
When I click one of the “Click Here…” buttons, I am notified that the items are added to the order. Also
notice that the “Checkout” button enables.
You can now change pages, or filter for other items, and you can even leave to go another module, and
return later to finish your order. HOWEVER, if you leave the portal completely, your order will be lost.
In this example, I have ordered everything I want to order so I will now click on “Checkout”.
You will be presented with a popup to finish your order. There are several parts to this window.
20
ETRAKER WEB PORTAL USER MANUAL
The top of the window contains the window title, along with the owner of inventory being ordered
against. There is also a “Continue Ordering” button that will close the screen, and allow you to continue
ordering.
The grid contains the items you have selected for your order to review. You can adjust the quantities by
simply changing the quantity of a line, and clicking its corresponding “Update” button. To remove an
item, enter 0 in the quantity field and click it’s corresponding “Update” button.
The next section allows you to enter general information regarding your order. PO #, a suggested
shipping date along with carrier and shipper number free fields for additional information and finally
payment type are available.
21
ETRAKER WEB PORTAL USER MANUAL
The next section allows you to select a carrier to ship with, and the destination for your shipment.
The carrier list is limited to which carriers you have been authorized to select.
Consignees (or Destinations), are also limited to the list you are authorized to select, with one exception.
First of all, when selecting a destination, the destinations entire address is displayed to help you select
the correct destination.
Secondly, for customers that need to enter addresses that are not in the portal’s database, you can be
authorized to type in a manual address. This is helpful if you often ship to residential addresses. If you
are authorized to do this, there will be a destination available in the list called ALTERNATE ADDRESS
(ALTADDR). If you select this entry, the address fields will become available for you to enter an address.
22
ETRAKER WEB PORTAL USER MANUAL
The final section is a large text area that allows you to enter in additional information about the order.
You can enter in up to 32k (about 32,000 characters) of information regarding your order.
If you have filled out all required information, you can click “Continue Ordering” to add more items to
your order, or click the “Submit Order” button to submit your order for processing.
When you click “Submit Order”, your order will begin processing:
23