1
DECT-TELEPHONE
CALIOS A1
CALIOS 1
CONTENTS _____________________________
5-7
5
5
5-6
7
7
7
7
8-13
INITIAL SETUP
8
8
9
9
10
11
12
13
14-15
Packing contents for Calios A1/Calios
Condition on delivery
Setting up/range
Inserting the battery in the handset
Connecting the base station (Calios A1)
Connecting the base station (Calios)
Connecting additional handsets (accessories)
Battery
Safety notes for the battery
16-19
16
17
18
19
20-28
2
INFORMATION
Preface
Application information
Safety information
Environment
Packaging
Batteries
The product
20
20
21
21
22
23
24
24
24
25
25
26
26
27
28
28
OVERVIEW
Handset
Base station (Calios A1)
Base station (Calios)
Display – icons and their meanings
TELEPHONING
Dialling with the number buttons
Using the redial
Speed dialling
Dialling from the telephone book
Dialling from the call log
CLIP function
Accepting a call
Ending a call
Speaker phone
Calling back if busy
Call waiting (accept/refuse)
Making a second call
Brokering
Conference calls
Switching the keypad lock on and off
Switching the handset on and off
CONTENTS _____________________________
29-36
29
30-33
34
35
35
36
37-41
37
38
39
39
40
40
41
42-52
42
43
43-44
45
46
47-49
50-51
52
53
53
53
54-58
54
55
56-58
58
59-60
59
60
Switching the microphone on and off
Adjusting the volume
CONVENIENCE FUNCTIONS
Menu navigation
Telephone book
Alarm function
Speed dialling
Recording calls (Calios A1 only)
Room monitor
SMS FUNCTIONS
Selecting the SMS menu
Writing and sending an SMS
SMS inbox
The »Draft« menu
The »Outbox« menu
The »SMS Center« menu
Partially deleting the SMS memory (Auto delete)
ANSWERING MACHINE (Calios A1 only)
Switching the answering machine on and off
Activating the message or announcement service
Making your own message or announcement
Screening messages
Deleting messages
Settings for the answering machine mode
Remote message enquiry
Remote message enquiry settings
VOICE MAIL (Calios A1 only)
Recording voice mails
Listening to and editing voice mail
ADDITIONAL HANDSETS
Registering new handsets (accessories) at the base station
Assigning personal names to a handset
Special features for using several handsets
Removing the handset from the base station
TELECOMMUNICATION
SYSTEM OPERATION
Setting the flash time
Entering the external access code and dialling pause
ENGLISH
28
28
3
CONTENTS _____________________________
61-68
61
61
62-64
64
65
66-67
67
68
69
4
SETTINGS
Setting the date and time
Setting the menu language
Sound settings
Dimmer mode
Setting the background image and contrast
Locking the settings (PIN)
Recording a call directly
Restoring the settings (Reset)
TECHNICAL DATA
INFORMATION _______________________
Preface
Dear customer, congratulations on buying your
Grundig DECT telephone and thank you for placing
your confidence in us.
This device has been manufactured with the utmost
care. If you should have difficulties in operating it, we
recommend that you consult this user manual. You can
find more information on our website at:
http://www.grundig-dect.com
To operate the device safely and easily, please read the
following sections carefully:
Application information
This telephone is to be used for transmitting voice
messages via telephone networks. Any other use is not
permitted and is considered unfit for the intended use.
Do not install your DECT telephone in a damp environment, such as a bathroom, washroom, kitchen etc, and
not within 1.50 metres of a source of water or outside.
This device is designed for use in temperatures of
between 5 °C and 45 °C.
Only use the power unit supplied and connect it to the
electricity mains in accordance with the installation
instructions in this user manual and the details on the
sticker regarding voltage, electrical current and
frequency. As a precaution if there is a risk of danger,
the power plug can be pulled out to disconnect the
230 volt power supply. Therefore the sockets should be
near the device and easily accessible.
This device is designed to be used for connecting to the
public telephone network. If problems should arise,
contact your nearest specialist dealer. Only use the
telephone cable supplied.
For safety reasons, never put the handset in the base
station without the battery inserted or without the lid on
the battery compartment as this could cause an electric
shock.
ENGLISH
Safety information
5
INFORMATION _______________________
To avoid damaging the handset, only use the rechargeable battery supplied.
The used battery must be disposed of in line with the
recycling regulations in this user manual.
Your DECT telephone has a range of approx. 50
metres indoors and up to 300 metres outdoors. The
range can be affected by the proximity of metal
objects, such as a television and electrical devices.
Certain medical equipment and highly-sensitive
machines or security systems may be affected by the
transmission power of the telephone. In these cases we
recommend adhering to the safety information.
In regions greatly affected by electrical storms we recommend that you protect your telephone circuit with a
special fixture for excess voltage.
You cannot make calls with the device if there is a
power cut. Therefore keep another telephone at the
ready in the event of an emergency.
The CE label confirms that the product complies with
the 1999/5/EC regulations of the European Union
Parliament regarding wireless systems and telecommunications for user protection and for preventing electromagnetic interference. This ensures the allocated
communication network is used properly and radio
interference is avoided.
The declaration of compliance may be looked up on
the www.grundig-dect.com website, section “support”
or can be obtained from the following address:
Sagem Communication - Customer relations department
4, rue du Petit Albi - 95800 Sergy-Saint Christophe France.
6
INFORMATION _______________________
Environment
Environmental protection and sustainable development
is an important priority for Sagem Communication.
Sagem Communication has a policy of using environmentally-friendly systems and makes environmental
protection an essential part of the life-cycle of its
products – from the manufacturing, to the installation,
operation and disposal.
Packaging
The logo (green point) on the packaging means that a
fee is paid to an authorised national organisation to
improve packaging recycling and the recycling infrastructure.
Follow the local sorting regulations for this type of
waste product in order to improve recycling.
Batteries
If your product contains batteries, they must be disposed of at the designated collection points.
The product
The crossed out dustbin displayed on the product signifies that it belongs to the electrical and electronic
equipment group.
The European regulations request you to carry out your
own selective recycling collection at;
• the sales outlet when you buy a similar new device
• the collection points available in your area (recycling
centres, sorting points, etc).
ENGLISH
This means you participate in the recycling and valorisation of used electric and electronic goods which
would otherwise have a negative impact on the
environment and health.
7
INITIAL SETUP ________________________
Packing contents
Calios A1/Calios
Base station
Handset
1 battery (Li-ion type, 3.7 V 600 mAh)
Power supply unit
Connecting cable for the telephone socket
Operating manual
Condition on delivery
Base:
Ring volume:
Ring melody:
PIN:
CLIP:
Interval:
Flash time:
3
3
0000
On
1 second
200 ms
Handset:
Ring volume:
Ring melody:
Handset volume:
Keypad tone:
Battery charging tone:
Battery alert tone:
Range alert tone:
Listening tone:
Display language:
Automatic ringer selection:
Telephone book:
Call list:
Redial:
Handset name:
5
1
1
On
On
On
Off
Off
English
Off
Empty
Empty
Empty
Handset
Answering machine:
TAD-PIN remote message
enquiry:
Answering machine:
Texts:
8
123
On
1 message text and
1 announcement text
INITIAL SETUP ________________________
Setting up/range
Place the base station somewhere central and easily
accessible where you want to use it.
Depending on the ambient conditions, the range can
be up to approx. 300 metres outdoors. It has a range
of up to 50 metres indoors depending on the space
and structure of the building.
The structure of the building can cause signal shadows
to occur. This can lead to short interruptions when
speaking due to the weak signal.
The connection breaks up temporarily when there is
insufficient field strength.
Place an anti-slip mat under the base station. The feet
on the device do not usually leave any undesirable
marks behind. Due to the variety of varnish and polish
used on furniture, we cannot completely rule out the
possibility that marks from the feet of the device are left
on any surfaces.
Grundig does not accept any liability for this type of
damage.
Operating the base station or charger outside or in
areas exposed to frost is not permitted.
The recommended ambient temperature for operating
the base station is +5 °C – +45 °C, the recommended
relative air humidity is 20 % to 75 %.
The installation location must have a mains socket
for 230 volts for the base station or the charger.
Inserting the battery in the handset
1 On the back of the handset, press the top section of
the battery lid and push down.
3 Replace the battery lid on the handset and push it as
far as it will go.
ENGLISH
2 Plug the battery into the plug connector and insert
the battery.
9
INITIAL SETUP ________________________
Connecting the base station
(Calios A1)
Telephone
socket
Power supply unit
Connecting cable for
the telephone socket
Connecting the power cord to the telephone
socket
1 Plug the RJ connector of the power cord into the
»
« socket until it catches, on the back of the
base station.
2 Connect the plug on the power cord into the telephone socket.
Note:
To detach the RJ connector, press the snap-in hooks
down and pull it out.
Connecting the power supply
Only use the power supply unit supplied.
1 Plug the power supply unit into the »
« socket
until it catches, on the back of the base station.
2 Plug the power supply unit into the 230 volt socket.
– Display on the top of the base station: » – – «.
10
INITIAL SETUP ________________________
Connecting the base station (Calios)
Telephone
socket
Power supply unit
Connecting cable for
the telephone socket
Connecting the power cord to the telephone
socket
1 Plug the RJ connector of the power cord into the
»
« socket until it catches, on the back of the
base station.
2 Connect the plug on the power cord into the telephone socket.
Note:
To detach the RJ connector, press the snap-in hooks
down and pull it out.
Connecting the power supply
Only use the power supply unit supplied.
2 Plug the power supply unit into the 230 volt socket.
– The LED indicator lights up on the top of the base
station.
ENGLISH
1 Plug the power supply unit into the »
« socket
until it catches, on the back of the base station.
11
INITIAL SETUP ________________________
Connecting additional handsets
(accessories)
Only use the power supply unit supplied.
1 Plug the power supply unit into the socket
until it catches, on the back of the
charging station.
2 Plug the power supply unit into the
230 volt socket.
12
INITIAL SETUP ________________________
Battery
Charging the battery
Before you can use your telephone, the battery must be
charged.
Put the handset into the cradle of the base station or
charger (accessories) with the keypad facing forwards.
When the battery is flat, »Ä« flashes in the handset
display. It has a charging cycle from 12 to 15 hours.
Charging status of the battery
The charging status of the battery appears in the display.
The number of bars show the charging status of the
battery (»Ä« flat, »Ü« charged). When the
battery is almost flat, the display flashes »Ä«, the
backlight for the display does not come on and a
warning signal sounds (if you have not deactivated it,
see section on “Settings”, on page 64). This also
happens if a battery that is charging is removed briefly
and then replaced. New batteries usually reach their
full capacity once they have been charged several
times. Although the battery display shows that the
battery of a handset is charged, you should take into
account that the length of normal calls and availability
time is limited at the beginning.
Operating time of the battery
The operating time of the battery in standby is up to
five days or up to ten hours for longer calls.
ENGLISH
Service life of the battery
To increase the service life of the battery, note the
following:
– Do not short-circuit the plug.
– Use your handset as a mobile phone and do not
replace it in the base station or charger (accessories)
to be charged after every phone call.
13
INITIAL SETUP ________________________
Safety notes for the battery
Read the safety notes on the battery before use.
Inappropriate handling of the battery can cause
overheating, fire, faults, loss of power and also serious
injury.
14
7
Do not expose the battery to fire or heat. Do not
store the battery in hot places.
7
Be careful not to mix up the polarities (+ and –)
when inserting the battery in the handset.
7
Keep the battery polarities (+ and –) well away
from wire and any other metal objects when storing
them. Any connection to the polarities could lead to
a short-circuit.
7
Do not use nails, hammers or stamps or anything
similar on the battery. Avoid any harm coming to
the battery.
7
Do not deform the battery or modify it in any other
way.
7
Do not immerse the battery in water. Do not store
the battery and handset in a damp place.
7
Only charge the battery using the handset and base
station supplied. Note the correct connections and
proper use.
7
Only use the battery in the handset supplied.
7
Do not use any other batteries in the hand set, i.e.
NI-CD and lithium batteries. This could result in an
explosion, fire or overheating.
INITIAL SETUP ________________________
7
Do not leave the battery in the handset if there is an
unusual smell, it is overheating, the colour or shape
has changed, it is leaking or you notice any other
unusual occurrences.
7
If the handset is to be used by children, make sure
they are aware of how to use it safely and remind
them to use the handset properly at all times.
7
Only use the handset under the following operating
conditions, otherwise the handset could cause overheating, fire and faults or the battery will suffer
from a rapid loss of power.
7
Operating conditions:
Charging: 0 °C to +45 °C
Operation: -20 °C to +60 °C
7 Storage: -20 °C to +45 °C
7
ENGLISH
7
15
OVERVIEW ____________________________
Handset
Left function buttons,
main redialling functions.
Central function buttons,
main telephone book functions.
Right function buttons,
selects the main functions in the main
menu.
(The assigned functions are in the
display above the buttons.)
Ŀ
ĭ
K
ŀ
R
Opens the call list,
scrolls upwards.
Opens the call list,
scrolls downwards.
Establishes and ends the connection.
Exits the menu.
Press and hold down to switch the
handset off and on again.
Establishes and ends the connection.
Signal button (Hook Flash), needed
for extension systems.
The blue ring around the cursor
buttons flashes when there is a new
message, a missed call and a new
SMS.
16
1 ... 0
Number buttons.
*
Star button.
Press and hold down to switch
keypad on and off.
# INT
Hash key.
Press and hold down, code for an
internal call.
OVERVIEW ____________________________
Base station (Calios A1)
z
Adjusts the base station volume.
Briefly press to get the ring tune for 30
seconds for all the registered handsets.
Press and hold down for more than five
seconds and the LED indicator flashes
quickly to show the base station is ready to
be registered.
•
Display lights up when the handset is ready.
5
Plays the recorded message,
finds the beginning of the current message,
finds the previous message.
87
Starts and ends the message recall enquiry.
6
Finds the end of the current message,
finds the next message.
Ǽ
Press and hold down to switch the
answering machine on and off.
Press briefly to select the operating mode
(message text).
SIM
Slot for a SIM card.
88
Shows answering machine is on or off,
messages received, number of messages.
ENGLISH
Deletes messages.
x
17
OVERVIEW ____________________________
Base station (Calios)
Briefly press to get the ring tune for 30
seconds for all the registered handsets.
Press and hold down for more than five
seconds and the LED indicator flashes
quickly to show the base station is ready to
be registered.
18
•
Display lights up when the handset is ready.
SIM
Slot for a SIM card.
OVERVIEW ____________________________
Display –
icons and their meanings
III
Center
1
23.11
d
Symbols flash if the handset is not
within the range of the base station
or if it is searching for a base
station.
11:22
D
Signal strength.
Symbols are visible if the handset is
within range of the base station.
Menu
Ä
Charging status of the battery.
CENTER 1
Name and number of the handset.
13.09 13:50
Date and time.
d
Current functions for the left function
buttons – redial.
Current functions for the central
function buttons – telephone book.
Menu
Current functions for the right
function buttons – main menu.
ENGLISH
III
19
TELEPHONING _______________________
Dialling with the number buttons
1 Enter the telephone number using »1...0 «.
– The telephone number is ready to be connected for
approx. 60 seconds.
Notes:
The display lighting switches on automatically after
pressing the first button and switches off again 20
seconds after pressing the last button.
If you press a wrong number button, you can delete
it by pressing »
« step-by-step.
ŀ
2 Press » K « or » « to establish a connection.
– The number is called.
3 Press » K « to end the call.
Using the redial
The redial function stores the last ten numbers you
called. If the phone number is already in the telephone
book, the name is displayed.
1 Press the » d « function button on the left.
– The last phone number used appears.
Note:
Press »ĭ« or »Ŀ« to scroll through the list of phone
numbers last used.
ŀ
2 Press » K « or » « to establish a connection.
– The number is called.
3 Press » K « to end the call.
Notes:
You can delete phone numbers from the redial list.
Press »ĭ« or »Ŀ« to select the phone number and
activate by pressing the »Option« function button
on the right.
Select »Delete« by pressing »ĭ« or »Ŀ« and confirm
with the »OK« function button on the right.
If you want to delete all the numbers in the list, select
»Delete all?« with »ĭ« or »Ŀ« and confirm by pressing the »OK« function button on the right.
20
TELEPHONING _______________________
Speed dialling
The number buttons 2, 3 to 9 and 0 can be occupied
with phone numbers.
You can find out how to enter names and numbers
for speed dialling in the section on “Convenience
functions” on page 35.
1 To open the speed dialling number, press and hold
down »2« to »0«.
ŀ
2 Press » K « or » « to establish a connection.
– The number is called.
3 Press » K « to end the call.
Dialling from the telephone book
In its original state the telephone book is empty.
You can find out how to enter names and numbers in
the phone book in the section on “Convenience
functions” on page 25 to 27.
1 Open the phone book with » «.
– The first entry in the phone book appears.
2 Press »ĭ« or »Ŀ« until the name you want appears
in the display,
or
to search for a specfic number in the phone book,
press the number buttons located next to the appropriate letter until the first name appears with the
letter you want (for example, press »8« twice to
select the people whose names begin with “U”).
ŀ
3 Press » K « or » « to establish a connection.
– The number is called.
ENGLISH
4 Press » K « to end the call.
21
TELEPHONING _______________________
Dialling from the call log
When a call also transfers the phone number, it places
the number in the call log regardless of whether you
take the call or not. If you have a phone with an
answering machine (Calios A1), the messages are also
listed.
A maximum of 30 entries can be stored in the call log.
Each entry consists of the name (12 characters maximum) and the number (24 digits maximum) as well as
the date and the time.
1 Open the call log with »ĭ«.
2 If several calls are stored in the call log, (e.g. Display
»# 03«) you can scroll up and down using »ĭ« or
»Ŀ«.
Note:
The number in brackets shows how many times a
call from the number displayed has attempted to get
through.
ŀ
3 Press » K « or » « to establish a connection.
– The number is called.
ŀ
4 Press » K « or » « to end a connection.
Deleting entries in the call log
1 Open the call log with »ĭ«.
2 Select the entry by pressing »ĭ« or »Ŀ«.
3 Press the »Option« function button on the right.
4 Select »Delete« with »ĭ« or »Ŀ« and press the »OK«
function button on the right to delete.
22
TELEPHONING _______________________
Using the call log
You can set the call log so that all the calls or missed
calls are displayed.
1 Open the menu by pressing the »Menu« function
button on the right.
Handset Set.
Base Set.
Base Set.
Change PIN
Remove HS
Default BS
Flash Time
Pause Time
Call Log
ŀ
2 Select »Settings« with »Ŀ«, »ĭ«, » « or »R« activate
with the »OK« function button on the right.
3 Select »Base Set« with »ĭ« or »Ŀ« and press the
»OK« function button on the right to activate.
4 Select »Call log« with »ĭ« or »Ŀ« and press the
»On« function button on the right to activate.
5 Select »All call« or »Missed call« with »ĭ« or »Ŀ«
and press the »On« function button on the right to
activate.
– The calls are displayed.
6 Press » K « to end the setting.
CLIP function
Before using the phone number transfer (CLIP), it must
be provided by the local phone company and enabled
by the caller.
There might be a special rate or a fee required for this
function to be enabled.
If the caller’s phone number is in the phone book, the
name of the caller is displayed as well as the number.
If the caller has suppressed or not activated the CLIP
function, » Unknown« appears.
ENGLISH
Settings
23
TELEPHONING _______________________
Accepting a call
You can recognise an incoming call by a ring tone on
the handset. The blue ring around the cursor buttons
flashes.
You can set the volume and melody of the ring tone.
See the section on “Settings” on page 62.
The phone number is displayed for a call which has
transferred the phone number.
If there is already a name in the phone book for the
number displayed, it will appear.
1 Remove the handset from the base station.
– The call is received automatically,
or
press » K « if the handset is not in the base station.
Ending a call
1 Press » K «,
or
put the handset in the base station.
Speaker phone
While you are talking, you can switch to speaker
phone, put the phone down and still keep on talking.
ŀ
1 Press » « while talking.
ŀ
2 Switch off the function with » «.
24
TELEPHONING _______________________
Calling back if busy
If the number of the caller is busy, you can activate the
redial.
When the line is free, your handset gives a ring tone.
1 Remove the handset from the base station.
– The call is received automatically,
or press » K « if the handset is not in the base
station.
Activating the redial
When you hear the busy tone ...
1 Press the »Option« function button on the left,
select the »Calling back if busy« and activate
by pressing the »OK« function button on the right.
2 After confirmation from the telephone network, press
» K «.
Note:
The function remains active for approx. 45 minutes.
Calling back is only possible during this time.
Call waiting (accept/refuse)
This feature enables you to accept or refuse a second
external call.
1 Accept an external call by pressing » K «.
– You are now connected to the external caller. If
you receive another call during this time, you will
hear a brief call waiting tone.
2 Press the »Option« function button on the left,
select the »Accept+hold« function and activate by
pressing the »OK« function button on the right.
– You can take the second call and the first call
remains on hold,
press the »Option« function button on the left,
select the »Accept+end« function and confirm by
pressing the »OK« function button on the right.
– You can take the second call and the first call ends,
ENGLISH
or
25
TELEPHONING _______________________
or
press the »Option« function button on the left,
select the »Reject« function and confirm by
pressing the »OK« function button on the right.
– The second call is refused and the caller gets a
busy tone.
Making a second call
While you are calling an external caller, you can also
make a second external call.
1 Accept an external call by pressing » K «.
– You are now connected to the external caller.
2 Press the »Option« function button on the left,
select the »Making a second call« function and
activate by pressing the »OK« function button on
the right.
– The first call is put on hold and the caller hears a
message.
3 Enter the phone number for the second person with
»1...0 « and make the connection by pressing
» K « or » «.
– Make your call.
ŀ
4 Press the »Option« function button on the left,
select the »End second connection« function
and activate by pressing the »OK« function button
on the right.
– You are then put through to the first caller again.
5 Press » K « to end the call.
Brokering
While you are making an external call, you can also
alternate with a second caller.
1 Accept an external call by pressing » K «.
– You are now connected to the external caller.
2 Press the »Option« function button on the left and
select the »Brokering« function. Switch between
both external calls using the »OK« function button
on the right.
26
3 Press the »Option« function button on the left, select
the »End first connection« function and activate
by pressing the »OK« function button on the right,
TELEPHONING _______________________
or
press the »Option« function button on the left,
select the »End second connection« function
and activate by pressing the »OK« function button
on the right.
4 Press » K « to end the call.
Conference calls
You can speak to two callers at the same time.
1 Accept an external call by pressing » K «.
– You are now connected to the external caller.
2 Press the »Option« function button on the left,
select the »Making a second call« function and
activate by pressing the »OK« function button on
the right.
– The first call is put on hold and the caller hears a
message.
3 Enter the phone number for the second person with
»1...0« and make the connection by pressing » K «
or » «.
ŀ
4 Press the »Option« function button on the left,
select the »Conference« function and activate by
pressing the »OK« function button on the right.
– You are now connected with both external callers.
5 Press the »Option« function button on the left,
select the »End first connection« function and
activate by pressing the »OK« function button on
the right,
or
press the »Option« function button on the left,
select the »End second connection« function
and activate by pressing the »OK« function button
on the right.
ENGLISH
6 Press » K « to end the call.
27
TELEPHONING _______________________
Switching the keypad lock
on and off
You can protect the keypad on the handset from being
inadvertently pressed.
Switching on the keypad lock
1 In the idle mode, press » g « until the »
appears.
– The keypad on the handset is locked.
« icon
Note:
You can still accept an incoming call.
Switching off the keypad lock
1 In the idle mode, press and hold down » g « again.
Switching the handset on and off
Switching off the handset
1 In the idle mode, press » K « until the display is
switched off.
– You cannot make any calls.
Switching on the handset
1 Press » K « from the switched off state.
– The handset is switched on again.
Switching the microphone on and off
You can switch the microphone on and off during a
call.
1 Press the »
« function button on the right during
the call.
– Display: »Mute on«, the microphone is switched
off.
2 To switch on, press the »
right again.
« function button on the
Adjusting the volume
You can adjust the volume during the call.
You can find out how to permanently set the volume in
the section on “Settings” on page 62.
28
1 During the call, adjust the volume using »ĭ« or »Ŀ«.
CONVENIENCE FUNCTIONS __
Menu navigation
Phonebook
Telefonbuch
The menu
You can get an overview of all the different menus at
the touch of a button.
There is a complete overview of the menu structure
and settings in the section on “The menu” on pages 63
and 67.
OK
Using the menu and buttons
Open the menu with the »Menu« function button on
the right.
You can then see the menu items in the display.
Use the »Ŀ«, »ĭ«, » « or »R« cursor buttons to select
the menu items.
ŀ
Activate the selected menu by pressing the »OK«
function button on the right.
Switch back a menu level by pressing the »Back«
function button on the left.
In the current menu, select the functions with the »Ŀ«,
»ĭ« cursor buttons and save the functions with the
»OK« function button on the right.
You can see exactly what the function buttons do in the
display above the buttons.
The activated function is marked with a »✓«.
Once you have selected or set the function, you can
switch back a menu level (the »Back« function button
on the left) or exit the menu (press » K «).
ENGLISH
Esc
Zurück
29
CONVENIENCE FUNCTIONS __
Telephone book
You can enter names and numbers in the phone book
and then dial directly from it.
The phone book contains enough space for about 255
entries, depending on the number of characters
(maximum of 12 for the name) and digits (maximum of
25 for the phone number).
Once the memory for the phone book is full up, you
will hear an alert tone when trying to enter another
name and number and »Function not possible« appears
in the display.
Phonebook
New Entry
View Entry
Edit Entry
Delete Entry
Delete All
PB Transfer
New Entry
Enter Name
_
Enter Number
Tone
New Entry
Enter Name
XXX XXXXXX
Enter Number
_
Tone
Making new entries in the telephone book
You can enter names and numbers manually or copy
entries from the phone book, the call log or from
the redial. Entries in the phone book should always
include a code, otherwise the CLIP name display in the
programmed phone book will not work.
1 Open the phone book with »
– The first entry appears.
«.
2 Press the »Option« function button on the right,
press »ĭ« or »Ŀ« to select »New entry« and activate
with the »OK« function button on the right.
3 Enter the letters/characters of the name with
»1...0 « (maximum 12).
Notes:
The numbers and characters available are displayed
in the bottom line.
Press »#« to switch between uppercase and lowercase.
If you make an error, you can delete the last letter
with the »
« function button.
4 Confirm the name by pressing the »OK« function
button on the right.
5 Enter the phone number (max. 25 digits) with
»1...0 « and confirm with the »OK« function button
on the right.
6 Select the ring tone for the entry with »ĭ« or »Ŀ«
and press the »OK« function button on the right to
confirm.
30
7 Exit the setting with the »Back« function button
on the left.
CONVENIENCE FUNCTIONS __
Phonebook
New Entry
View Entry
Edit Entry
Delete Entry
Delete All
PB Transfer
Edit Entry
Enter Name
XXXX XXXXX_
Enter Number
Changing an entry in the telephone book
1 Open the phone book with » «.
– The first entry appears.
2 Select the entry to be changed with »ĭ« or »Ŀ« and
confirm with the »OK« function button on the right.
3 Press the »Option« function button on the right,
press »ĭ« or »Ŀ« to select »Edit Entry« and confirm
with the »OK« function button on the right.
4 Confirm the name, number and ring tone with the
»OK« function button on the right.
5 Exit the setting with the »Back« function button on
the left.
Tone
Saving an entry from the redial in the
telephone book
1 Open the redial with »d «.
– The first entry appears.
2 Select the name and number to be transferred into
the phone book with »ĭ« or »Ŀ« and confirm with
the »Option« function button on the right.
3 Select »Save to P. Book« with »ĭ« or »Ŀ« and press
the »OK« function button on the right to activate.
4 Enter the name and confirm by pressing the »OK«
function button on the right.
– The selected number appears.
5 Confirm the number with the »OK« function button
on the right.
6 Select the ring tone for the entry with »ĭ« or »Ŀ«
and press the »OK« function button on the right to
confirm.
ENGLISH
7 Exit the setting with the »Back« function button on
the left.
31
CONVENIENCE FUNCTIONS __
Phonebook
New Entry
View Entry
Edit Entry
Delete Entry
Delete All
PB Transfer
Copying the telephone book from one
handset to another
1 Open the phone book on handset 1 with » «.
– The first entry appears.
2 Press the »Option« function button on the right,
press »ĭ« or »Ŀ« to select »PB transfer« and confirm
with the »OK« function button on the right.
3 Select the handset which is to receive the contents of
the phone book, select »ĭ« or »Ŀ« and confirm with
the »OK« function button on the right.
– Display: Send phone book to handset 2.
4 On handset 2, press the »Accept« function button
on the right.
– The phone book is transferred from handset 1 to
handset 2.
Copying the telephone book from a SIM card
to a handset
1 Open the card slot for the SIM card on the base
station, insert the SIM card and close the slot.
Phonebook
Edit Entry
Delete Entry
Delete All
PB Transfer
Quick Dial
Copy from SIM
32
2 Open the phone book on the handset with »
– The first entry appears.
«.
3 Press the »Option« function button on the right,
press »ĭ« or »Ŀ« to select »Copy from SIM« and
confirm with the »OK« function button on the right.
4 Press »1...0« to enter the SIM PIN number and confirm with the »OK« function button on the right.
– The telephone book on the SIM card is transferred.
CONVENIENCE FUNCTIONS __
Phonebook
New Entry
View Entry
Edit Entry
Delete Entry
Delete All
PB Transfer
Deleting entries from the telephone book
1 Open the phone book with » «.
– The first entry appears.
2 Select the entry to be deleted with »ĭ« or »Ŀ« and
confirm with the »OK« function button on the right.
3 Press the »Option« function button on the right,
press »ĭ« or »Ŀ« to select »Delete Entry« and confirm with the »OK« function button on the right.
4 Exit the setting with the »Back« function button on
the left.
View Entry
Edit Entry
Delete Entry
Delete All
PB Transfer
2 Press the »Option« function button on the right,
press »ĭ« or »Ŀ« to select »Delete All« and confirm
with the »OK« function button on the right.
3 Confirm with the »OK« function button on the right.
– Display »Phonebook Empty«.
4 Exit the setting with the »Back« function button on
the left.
ENGLISH
Phonebook
New Entry
Deleting all the entries from the telephone
book
1 Open the phone book with » «.
– The first entry appears.
33
CONVENIENCE FUNCTIONS __
Alarm function
You can use your handset as an alarm clock.
To set the time and the date, see the section on
“Settings, setting the time and date” on page 61.
1 Open the menu by pressing the »Menu« function
button on the right.
2 Select the »Alarm/Clock« menu item with »Ŀ«, »ĭ«,
» « or »R« and activate with the »OK« function
button on the right.
ŀ
Alarm/Clock
Clock Setting
Alarm Setting
3 Select »Alarm Setting« with »ĭ« or »Ŀ« and press
the »OK« function button on the right to activate.
Alarm Setting
4 Press the »Change« function button on the right
and enter the wake-up time in four digits with
»1...0« then save with the »OK« function button on
the right.
Edit Entry
Time:
00:00
Alarm Setting
Time:
16:00
Alarm:
Alarm Tone
Alarm Setting
Alarm Tone 1
Alarm Tone 2
Alarm Tone 3
On
5 Select »Alarm« with »ĭ« or »Ŀ« and press the
»On« function button on the right to activate.
6 Select »Alarm Tone« with »ĭ« or »Ŀ« and press the
»On« function button on the right to activate.
7 Select the alarm tone with »ĭ« or »Ŀ« and confirm
with the »OK« function button on the right.
8 Press » K « to conclude the setting.
Note:
You can switch off the alarm tone by pressing » K «.
34
CONVENIENCE FUNCTIONS __
Speed dialling
You can programme a telephone number in the
»1...0« number buttons.
Edit Entry
Delete Entry
Delete All
PB Transfer
Quick Dial
Copy from SIM
Quick Dial
Enter Number
_
(1 – 9)
Entering the speed dialling number
1 Open the phone book with » «.
– The first entry appears.
2 Press »ĭ« or »Ŀ« to select the entry to be stored on
the speed dialling button.
3 Press the »Option« function button on the right,
press »ĭ« or »Ŀ« to select »Quick Dial« and activate
with the »OK« function button on the right.
4 Press »1...9« to enter the speed dialling number
and confirm with the »OK« function button on the
right.
5 Press » K « to conclude the setting.
Recording calls
(Calios A1 only)
You can record the conversation during a call.
The recording is then saved as a new message on the
answering machine.
1 Press the »Option« menu function button on the left
during the call.
2 Select »Record Call« with »ĭ« or »Ŀ« and press the
»OK« function button on the right to activate.
3 End the recording by pressing the »Stop« button on
the right.
ENGLISH
Phonebook
35
CONVENIENCE FUNCTIONS __
Room monitor
You can use your handset as a room monitor. If the
noise in the room exceeds a certain level, the handset
automatically calls a second handset.
When the room monitor function is switched on, no
calls will be indicated on the handset.
Calls made while the room monitor is switched on will
be automatically ended after two minutes.
Note:
This function is only an additional monitoring aid. It
should never be relied on as monitoring equipment
for medical purposes. This function should only be
used as a baby phone in conjunction with regular
checks on the child by the parents.
Switching on the room monitor
1 Open the menu by pressing the »Menu« function
button on the right.
ŀ
2 Select »Settings« with »Ŀ«, »ĭ«, » « or »R« activate
with the »OK« function button on the right.
Settings
Handset Set.
3 Select »Handset Set.« with »ĭ« or »Ŀ« and press the
»OK« function button on the right to activate.
Base Set.
Handset Set.
Register HS
Dim Mode
Handset Name
Language
Default HS
Room Monitor
Room Monitor
Call To:
_
36
✓
4 Select »Room Monitor« with »ĭ« or »Ŀ« and press
the »OK« function button on the right to activate.
5 Enter the handset number with »1« to »5«.
– Display: »Room Monitor on«.
Switching off the room monitor
1 Press the »Menu« function button on the right.
2 Switch off by pressing the »off« function button on
the right.
SMS FUNCTIONS ____________________
You can send and receive text messages on the base
station (SMS – Short Message Service) from all the
registered handsets.
If you have several handsets in use, only one handset
can use the SMS function at any one time.
The blue ring round the cursor buttons flashes when
there is an incoming SMS.
One SMS can contain up to 640 letters/characters.
Text messages are passed on by service providers via
SMS centres. Your handset has phone numbers for two
SMS centres.
The numbers for the SMS centres are preset.
The following settings must be made for you to receive
SMSs:
– The phone number transfer for your telehone connection must be enabled and activated.
– You are registered with the service provider for
receiving SMSs.
There are no further settings required for sending
SMSs.
Enquire at your service provider about
– how the cost of sending and receiving an SMS is
calculated
– which mobile communications network providers you
can send messges to and which ones you can receive
from
– which functions your SMS service provides
– how you are registered at the default SMS centres.
Selecting the SMS menu
Write
Inbox
00/00
Draft
00
Outbox
Service Center
00
00/00
ŀ
2 Select the »SMS« menu item with »Ŀ«, »ĭ«, » « or
»R« and activate with the »OK« function button on the
right.
– The SMS menu appears and you will see if you
have any messages stored.
ENGLISH
1 Open the menu by pressing the »Menu« function
button on the right.
SMS
37
SMS FUNCTIONS ____________________
Writing and sending an SMS
1 Open the menu by pressing the »Menu« function
button on the right.
SMS
Write
Inbox
00/00
Draft
00
Outbox
00
Service Center
Write
XXXX XXXXX XX
00/00
ŀ
2 Select the »SMS« menu item with »Ŀ«, »ĭ«, » « or
»R« and activate with the »OK« function button on
the right.
3 Select »Write« with »ĭ« or »Ŀ« and press the »OK«
function button on the right to activate.
4 Type the message with the »1...0 « number buttons.
Notes:
The numbers and characters available are displayed
in the bottom line after touching the first button.
Press »#« to switch between uppercase and lowercase.
If you make an error, you can delete the last letter
with the »
« function button on the left.
5 Confirm the text with the »OK« function button on
the right.
Write
Number:
_
6 Enter the phone number (max. 25 digits) with
»1...0 « and confirm with the »OK« function button
on the right,
or
press the »TelB« function button on the right, select
the phone number with »ĭ« or »Ŀ« from the phone
book and confirm with the »OK« function button on
the right.
Note:
The local area code must always be added to each
phone number.
Write
Send SMS
Save SMS
7 Select »Send SMS« or »Save SMS« (if you want to
save it in the »Draft« file) with »ĭ« or »Ŀ« and press
the »OK« function button on the right to confirm.
– Display: »Sending message«.
8 Quit the function with » K «.
38
SMS FUNCTIONS ____________________
SMS inbox
In the »Inbox« menu, you can read received messages,
reply to a message, forward a message, save the
sender’s phone number in the phone book and delete
individual messages or all of them.
1 Open the menu by pressing the »Menu« function
button on the right.
SMS
Write
Inbox
00/00
Draft
00
Outbox
00
Service Center
00/00
ŀ
2 Select the »SMS« menu item with »Ŀ«, »ĭ«, » « or
»R« and activate with the »OK« function button on
the right.
3 Select »Inbox« with »ĭ« or »Ŀ« and press the »OK«
function button on the right to activate.
4 Select message by pressing »ĭ« or »Ŀ« and open
with the »Read« function button on the right.
Inbox
XXXX XXXXX XXX
Notes:
You can select other functions with the »Option«
function button on the right.
5 Quit the function with » K «.
The »Draft« menu
In the »Draft« menu you can save the SMS and edit it
later, send or delete it.
1 Open the menu by pressing the »Menu« function
button on the right.
SMS
Write
Inbox
00/00
Draft
03
Outbox
00
Service Center
00/00
ŀ
2 Select the »SMS« menu item with »Ŀ«, »ĭ«, » « or
»R« and activate with the »OK« function button on
the right.
3 Select »Draft« with »ĭ« or »Ŀ« and press the »OK«
function button on the right to activate.
4 Select the SMS by pressing »ĭ« or »Ŀ« and activate
with the »Read« function button on the right.
Edit SMS
Send SMS
Delete
Delete All
5 Press the »Option« button on the right to edit the
SMS.
6 Select the option with »ĭ« or »Ŀ« and activate with
the »OK« function button on the right.
7 Carry out the option and confirm with the »OK«
button on the right.
8 Quit the function with » K «.
ENGLISH
Draft
39
SMS FUNCTIONS ____________________
The »Outbox« menu
In the »Outbox« you can read your message, change
messages, send the message again, save the message
in the draft folder or delete individual or all the messages.
1 Open the menu by pressing the »Menu« function
button on the right.
SMS
Write
Inbox
00/00
Draft
03
Outbox
00
Service Center
00/00
ŀ
2 Select the »SMS« menu item with »Ŀ«, »ĭ«, » « or
»R« and activate with the »OK« function button on
the right.
3 Select »Outbox« with »ĭ« or »Ŀ« and press the
»OK« function button on the right to activate.
The »SMS Center« menu
The memory for the SMS centres is filled with phone
numbers. You can change the SMS centres by overriding the phone numbers.
Normally the SMS is sent via SMS centre 1, and to
receive the SMS via SMS centre 2.
If you would like to send the SMS via SMS centre 2,
change it in the »Send via C2« menu item.
1 Open the menu by pressing the »Menu« function
button on the right.
SMS
Write
Inbox
00/00
Draft
03
Outbox
00
Service Center
Service Center
SMS Center 1
SMS Center 2
Send via C2
ŀ
2 Select the »SMS« menu item with »Ŀ«, »ĭ«, » « or
»R« and activate with the »OK« function button on
the right.
3 Select »Service Center« with »ĭ« or »Ŀ« and press
the »OK« function button on the right to activate.
4 Select the item with »ĭ« or »Ŀ« and press the »OK«
function button on the right to activate.
5 Delete the phone number with »
«, enter the new
number with »1...0 « and save with the »OK« function button on the right.
6 Press » K « to conclude the setting.
40
SMS FUNCTIONS ____________________
Partially deleting the SMS memory
(Auto-Delete)
When this function is activated, the oldest SMS messages in all the SMS folders (inbox, outbox, draft) are
automatically deleted. This makes more space for new
messages.
When this function is switched off, all the messages are
kept and the device lets you know when the memory is
full.
1 Open the menu by pressing the »Menu« function
button on the right.
Settings
Handset Set.
Base Set.
Base Set.
Remove HS
Default BS
Flash Time
Pause Time
Call Log
Auto-Delete
ŀ
2 Select »Settings« with »Ŀ«, »ĭ«, » « or »R« activate
with the »OK« function button on the right.
3 Select »Base Set« with »ĭ« or »Ŀ« and press the
»OK« function button on the right to activate.
4 Select »Auto-Delete« with »ĭ« or »Ŀ« and press the
»OK« function button on the right to activate.
5 Select »Enable« with »ĭ« or »Ŀ« and press the
»OK« function button on the right to activate.
6 Press » K « to conclude the setting.
Auto-Delete
Enable
ENGLISH
Disable
41
ANSWERING MACHINE _________
Note:
The answering machine functions can only be
carried out with the Calios A1 model.
Switching the answering machine
on and off
The answering machine is switched on in its original
condition.
On the base station
1 Press and hold down »
Ǽ« on the base station
to switch on the answering machine.
– You will hear a message, display on the base station: » A o «.
2 Press and hold down »
Ǽ« on the base station
to switch off the answering machine.
– You hear a message, on the base station display:
» – – « or » 0 0«.
On the handset
1 Open the menu by pressing the »Menu« function
button on the right.
TAM
Message ICM
ŀ
2 Select the »TAM« menu item with »Ŀ«, »ĭ«, » « or
»R« and activate with the »OK« function button on
the right.
Settings
Record Memo
OGM
TAM On/Off
3 Select »TAM on /off« with »ĭ« or »Ŀ« and press the
»OK« function button on the right to activate.
Remote Control
4 Select »On« with »ĭ« or »Ŀ« and press the right
»OK« button to activate.
TAM On/Off
On
Off
✓
5 Quit the function with » K «.
Accepting a call
When you have an incoming call, you can wait until
the caller begins to leave a message on the answering
machine.
If you want to take the call, pick up the handset from
the base station/charger and press » K «.
The answering machine then stops recording.
42
Memory capacity of answering machine
The device informs you when the memory is full of
messages.
ANSWERING MACHINE _________
Activating the message
or announcement service
A message and an announcement are already set by
default.
The message with a message recording (activated in
original condition):
“There is no one available to take your call at the
moment. You can leave a message after the tone”.
The announcement without the message recording:
“There is no one available to take your call at the
moment. Please call back later”.
TAM
Message ICM
Settings
Record Memo
OGM
TAM On/Off
Remote Control
Select
OGM01
1 Open the menu by pressing the »Menu« function
button on the right.
ŀ
2 Select the »TAM« menu item with »Ŀ«, »ĭ«, » « or
»R« and activate with the »OK« function button on
the right.
3 Select »OGM« with »ĭ« or »Ŀ« and press the »OK«
function button on the right to activate.
4 Select »Select« with »ĭ« or »Ŀ« and press the right
»OK« button to activate.
5 Select »OGM01« or »OGM02« with »ĭ« or »Ŀ«
and press the »OK« function button on the right to
activate.
OGM02
6 Quit the function with » K «.
Making your own message or
announcement
You can make your own message or announcement.
To achieve an optimal recording quality, it is recommended that you record your message in a quiet room
and record it as loudly as possible.
Settings
Record Memo
OGM
TAM On/Off
Remote Control
1 Open the menu by pressing the »Menu« function
button on the right.
ŀ
2 Select the »TAM« menu item with »Ŀ«, »ĭ«, » « or
»R« and activate with the »OK« function button on
the right.
3 Select »OGM« with »ĭ« or »Ŀ« and press the »OK«
function button on the right to activate.
ENGLISH
TAM
Message ICM
43
ANSWERING MACHINE _________
Select
OGM01
OGM02
4 Select »Record« with »ĭ« or »Ŀ« and press the
»OK« function button on the right to activate.
5 Select »OGM01« or »OGM02« with »ĭ« or »Ŀ«
and press the »OK« function button on the right to
activate.
– You will hear an acknowledgement tone, display:
»OGM«.
6 After the tone, say your message or announcement.
Note:
You have 60 seconds for your message.
If you exceed the recording time, you will hear a
tone.
Repeat your recording.
7 End the recording by pressing the »Stop« button
on the right.
– The message is saved.
Note:
You can listen to your message at the »Replay«
menu item.
8 Quit the function with » K «.
44
ANSWERING MACHINE _________
Screening messages
When new messages are in the inbox, the handset
display and the base station display show the blue ring
flashing around the cursor button.
Settings
Record Memo
OGM
TAM On/Off
Remote Control
Remote Control
Skip Forward
Delete message
Skip Back
Repeat message
Call Back
Delete all Msgs
ŀ
2 Select the »TAM« menu item with »Ŀ«, »ĭ«, » « or
»R« and activate with the »OK« function button on
the right.
3 Select »Message ICM« with »ĭ« or »Ŀ« and press
the »OK« function button on the right to activate.
– The voice mails are played back automatically.
Note:
Press the »Menu« function button on the left for
other functions.
Select the function with »ĭ« or »Ŀ« and press the
»OK« function button on the right to activate.
4 Quit the function with » K «.
Screening messages on the base station
1 Press »87« to start the messages.
2 Press »6« or »5« to go to the next or the previous
message.
3 Press »87« to stop the messages.
ENGLISH
TAM
Message ICM
Screening messages with the handset
1 Open the menu by pressing the »Menu« function
button on the right.
45
ANSWERING MACHINE _________
Deleting messages
TAM
Message ICM
Settings
Record Memo
OGM
TAM On/Off
Remote Control
Remote Control
Skip Forward
Delete message
Skip Back
Repeat message
Call Back
Delete all Msgs
Deleting messages with the handset
1 Open the menu by pressing the »Menu« function
button on the right.
ŀ
2 Select the »TAM« menu item with »Ŀ«, »ĭ«, » « or
»R« and activate with the »OK« function button on
the right.
3 Select »Message ICM« with »ĭ« or »Ŀ« and press
the »OK« function button on the right to activate.
– The messages are played back automatically.
4 Press the »Menu« function button on the left.
5 Select »Delete Imessage« or »Delete all Msgs« with
»ĭ« or »Ŀ« and press the »OK« function button on
the right to activate.
– The message is deleted.
6 Quit the function with » K «.
Deleting messages on the base station
1 Press »87« to start the messages.
2 Press »x« to delete message.
46
ANSWERING MACHINE _________
Settings for the answering machine
mode
Length of messages
You can specify the length of a message. You can
choose a recording of 60 seconds, 120 seconds or
unlimited.
1 Open the menu by pressing the »Menu« function
button on the right.
TAM
Message ICM
ŀ
2 Select the »TAM« menu item with »Ŀ«, »ĭ«, » « or
»R« and activate with the »OK« function button on
the right.
Settings
Record Memo
OGM
3 Select »Setting« with »ĭ« or »Ŀ« and press the
»OK« function button on the right to activate.
TAM On/Off
Remote Control
4 Select »ICM Rec. Time« with »ĭ« or »Ŀ« and press
the »OK« function button on the right to activate.
Settings
ICM Rec. Time
Time Stamp
Ring to ANS
Monitoring
✓
5 Select the recording length with »ĭ« or »Ŀ« and
confirm with the »OK« function button on the right.
6 Quit the function with » K «.
Record. Quality
Time and date of message (time stamp)
The time and date is recorded with the message using
this function.
1 Open the menu by pressing the »Menu« function
button on the right.
ŀ
2 Select the »TAM« menu item with »Ŀ«, »ĭ«, » « or
»R« and activate with the »OK« function button on
the right.
TAM
Message ICM
Settings
Record Memo
3 Select »Setting« with »ĭ« or »Ŀ« and press the
»OK« function button on the right to activate.
OGM
TAM On/Off
Remote Control
4 Select »Time Stamp« with »ĭ« or »Ŀ«.
Settings
ICM Rec. Time
Time Stamp
✓
Ring to ANS
Monitoring
Record. Quality
✓
6 Press » K « to conclude the setting.
ENGLISH
5 Press the »On« function button on the right to activate.
47
ANSWERING MACHINE _________
Ringer selection (ring tones)
You can set the number of rings after which the
answering machine comes on. Select one of the rings
from 2 to 9 and the “Automatic” setting.
The “Automatic” setting allows you to check the
answering machine for new messages quickly and free
of charge from another location.
If there are new messages, the answering machine
comes on after two rings.
If there are no new messages, the answering machine
comes on after four rings. Therefore, you can end the
call after the third ring.
1 Open the menu by pressing the »Menu« function
button on the right.
TAM
Message ICM
ŀ
2 Select the »TAM« menu item with »Ŀ«, »ĭ«, » « or
»R« and activate with the »OK« function button on
the right.
Settings
Record Memo
OGM
TAM On/Off
3 Select »Setting« with »ĭ« or »Ŀ« and press the
»OK« function button on the right to activate.
Remote Control
4 Select »Ring to Ans« with »ĭ« or »Ŀ« and press the
»OK« function button on the right to activate.
Settings
ICM Rec. Time
Time Stamp
Ring to ANS
Monitoring
Record. Quality
48
✓
5 Select the time (call sign) with »ĭ« or »Ŀ« and confirm with the »OK« function button on the right.
6 Press » K « to conclude the setting.
ANSWERING MACHINE _________
Screening calls
When this function is activated, you can listen to the
message being recorded and then decide if you want
to take the call.
If you take the call, the answering machine stops
recording.
1 Open the menu by pressing the »Menu« function
button on the right.
TAM
Message ICM
ŀ
2 Select the »TAM« menu item with »Ŀ«, »ĭ«, » « or
»R« and activate with the »OK« function button on
the right.
Settings
Record Memo
OGM
TAM On/Off
3 Select »Setting« with »ĭ« or »Ŀ« and press the
»OK« function button on the right to activate.
Remote Control
4 Select »Call Screening« with »ĭ« or »Ŀ«.
Settings
ICM Rec. Time
5 Press the »On« function button on the right to
activate.
Time Stamp
Ring to ANS
✓
Record. Quality
Recording quality
1 Open the menu by pressing the »Menu« function
button on the right.
Settings
ICM Rec. Time
ŀ
Time Stamp
Ring to ANS
Monitoring
✓
2 Select the »TAM« menu item with »Ŀ«, »ĭ«, » « or
»R« and activate with the »OK« function button on
the right.
3 Select »Setting« with »ĭ« or »Ŀ« and press the
»OK« function button on the right to activate.
Record. Quality
4 Select »Record Quality« with »ĭ« or »Ŀ« and press
the »OK« function button on the right to activate.
Settings
Standard
High
6 Press » K « to conclude the setting.
✓
5 Select the recording quality you want with »ĭ« or
»Ŀ« and confirm with the »OK« function button on
the right.
6 Press » K « to conclude the setting.
ENGLISH
Monitoring
49
ANSWERING MACHINE _________
Remote message enquiry
The answering machine can be checked and operated from an external telehone.
However, you can only do this if the answering
machine is switched on and the “Remote control”
function is activated.
If you want to delete a message from a remote location, the “Delete by remote” function must be activated (see section on “Settings for remote enquiry” on
page 52).
If the answering machine is switched off and the
“Remote control” function is on, then the answering
machine accepts an incoming call after the tenth
ring. Then you enter the PIN.
Using the answering machine from a
remote location
1 Call your own phone number.
– Listen to your recorded message.
2 While the message is playing, press » «, then
enter the three-digit TAD-PIN (default 1 2 3) with
»0« to »9«.
– You will hear a long tone and the recorded messages are played.
*
3 During playback, you can use the remote enquiry
functions, see “Remote enquiry functions”.
Notes:
If you enter the PIN incorrectly, the answering
machine switches off and you have to repeat the
call.
The answering machine also switches off if it takes
longer than ten seconds to select a function.
If a second or third digit is necessary when you are
choosing a function, press it within four seconds.
50
ANSWERING MACHINE _________
Remote enquiry functions
... Playing back messages and memos
Number buttons Function
Play all messages
2
*
2
Play new message(s) only,
repeat playback.
5
Pause playback
2
Start playback
55
Stop playback
1
Go to the beginning of the current
message
11
Play previous message
3
Play next message
02
Deletes the current message during
playback,
deletes all the messages you have
listened to.
... Recording and playing a message
Number buttons Function
61
Records a message
62
Records an announcement
71
Plays a message
72
Plays an announcement
... Recording memos
Number buttons Function
63
Starts recording memo
5
Stops recording memo
Number buttons Function
8
Switching the answering machine on
and off
(Off ➔ On ➔ Only answering
machine ➔ Answering machine with
recording)
ENGLISH
... Switching the answering machine
on and off
51
ANSWERING MACHINE _________
Remote message enquiry settings
Recording length
You can specify the length of a message. You can
choose a recording of 60 seconds, 120 seconds or
unlimited.
1 Open the menu by pressing the »Menu« function
button on the right.
TAM
Message ICM
ŀ
2 Select the »TAM« menu item with »Ŀ«, »ĭ«, » « or
»R« and activate with the »OK« function button on
the right.
Settings
Record Memo
OGM
TAM On/Off
3 Select »Remote control« with »ĭ« or »Ŀ« and press
the »OK« function button on the right to activate.
Remote Control
4 Select »Change PIN« with »ĭ« or »Ŀ« and press the
»OK« function button on the right to activate.
Remote Control
Change PIN
Remote Control
–
Del by remote
✓
5 Enter the current PIN (1 2 3) with »1...0« and confirm with the »OK« function button on the right.
6 Enter the new PIN with »1...0« and confirm with the
»OK« function button on the right.
Change PIN
Original PIN
Note:
If you make an error, you can delete the last digit
with the »
« function button on the left.
___
7 Repeat the new PIN with »1...0« and confirm with
the »OK« function button on the right.
8 Press » K « to conclude the setting.
Switching the remote enquiry and remote
delete on and off
1 Open the menu by pressing the »Menu« function
button on the right.
ŀ
2 Select the »TAM« menu item with »Ŀ«, »ĭ«, » « or
»R« and activate with the »OK« function button on
the right.
3 Select »Remote control« with »ĭ« or »Ŀ« and press
the »OK« function button on the right to activate.
4 Select »Remote control« or »Delete by remote« with
»ĭ« or »Ŀ«.
Remote Control
Change PIN
Remote Control
–
Del by remote
✓
52
5 Press the »On« function button on the right to
activate.
6 Press » K « to conclude the setting.
VOICE MAILS __________________________
Recording voice mails
TAM
Message ICM
Settings
Record Memo
OGM
TAM On/Off
Remote Control
(Calios A1 only)
1 Open the menu by pressing the »Menu« function
button on the right.
ŀ
2 Select the »TAM« menu item with »Ŀ«, »ĭ«, » « or
»R« and activate with the »OK« function button on
the right.
3 Select »Record Memo« with »ĭ« or »Ŀ« and press
the »OK« function button on the right to activate.
4 Dictate your voice mail.
5 End the voice mail by pressing the »Stop« button
on the right.
Listening to and editing voice mail
(Calios A1 only)
Message ICM
Settings
Record Memo
OGM
TAM On/Off
Remote Control
1 Open the menu by pressing the »Menu« function
button on the right.
ŀ
2 Select the »TAM« menu item with »Ŀ«, »ĭ«, » « or
»R« and activate with the »OK« function button on
the right.
3 Select »Message ICM« with »ĭ« or »Ŀ« and press
the »OK« function button on the right to activate.
– The voice mails are played back automatically.
Note:
Press the »Menu« function button on the left for
other functions.
Select the function with »ĭ« or »Ŀ« and press the
»OK« function button on the right to activate.
4 Quit the function with » K «.
ENGLISH
TAM
53
ADDITIONAL HANDSETS ________
You can operate up to five handsets on your base
station.
If there are five handsets connected to the base station,
there can be an external call and two internal calls
carried out at the same time.
Registering new handsets
(accessories) at the base station
Each additional handset must be registered on at the
base station.
Note:
There cannot be a handset at the base station.
1 Open the menu by pressing the »Menu« function
button on the right.
ŀ
2 Select »Settings« with »Ŀ«, »ĭ«, » « or »R« activate
with the »OK« function button on the right.
Settings
Handset Set.
3 Select »Handset Set.« with »Ŀ« or »ĭ« and press the
»OK« function button on the right to activate.
Base Set.
Handset Set.
Aut. Rufannah.
–
Register HS
Dim Mode
Handset Name
Language
Default HS
Register HS
Enter PIN
––––
✓
4 Select »Register HS« with »Ŀ« or »ĭ« and press the
»OK« function button on the right to activate.
5 Enter the PIN number »0000« (or personal PIN –
see section on “Lock settings”, on page 64) with
»1...0« and confirm with the »OK« function button
on the right.
– Display: »Registering...«.
6 Press and hold down the »
« button on the base
station for longer than five seconds until you hear
two tones. The base station is now ready to be
logged on for 60 seconds.
7 Select the number for the handset to be registered on
with »2« to »5«.
– After a short time the handset registers at the base
station.
– The number of the new handset appears in the
display.
54
ADDITIONAL HANDSETS ________
Assigning personal names to a
handset
You can have a separate name for each handset.
1 Open the menu by pressing the »Menu« function
button on the right.
ŀ
2 Select »Settings« with »Ŀ«, »ĭ«, » « or »R« activate
with the »OK« function button on the right.
Settings
Handset Set.
3 Select »Handset Set.« with »Ŀ« or »ĭ« and press the
»OK« function button on the right to activate.
Handset Set.
Aut. Rufannah.
–
Register HS
Dim Mode
Handset Name
Language
Default HS
Handset Name
–
✓
4 Select »Handset Name« with »Ŀ« or »ĭ« and press
the »OK« function button on the right to activate.
5 Enter the names with the number buttons.
You can enter up to 12 letters.
Notes:
The numbers and characters available are displayed
in the bottom line.
Press »#« to switch between uppercase and lowercase.
If you make an error, you can delete the last letter
with the »
« function button on the left.
6 Save the name by pressing the »OK« function
button on the right.
7 Press » K « to conclude the setting.
ENGLISH
Base Set.
55
ADDITIONAL HANDSETS ________
Special features for using several
handsets
Calling from one handset to another –
internal calls
You can make internal calls free of charge.
1 On the first handset, press and hold down »# INT.«.
– Display: »Internal Call« and the number (1-5) of
the available handset.
2 Select the handset with »1« to »5«.
3 On the second handset, accept the call with » K «.
4 Press » K « to end the call,
or
replace the handset in the base station.
Transferring a call
You can transfer an external call on your handset to
another handset.
1 Press »# INT.« and hold down for two seconds
during the call.
– Display: »Internal Call«, the external caller is on
hold.
2 Select the handset with »1« to »5«.
– You can hear the internal ring.
3 Announce the call and transfer with » K «.
Note:
If there is no reply on the handset, press »#
again to return to the external caller.
INT.«
Call waiting
During an internal call, an incoming external call is
shown as “Call waiting”.
If the CLIP function is activated, the phone number of
the caller is displayed.
You can switch the external caller over to an internal
call (Conference) or switch between both callers.
56
ADDITIONAL HANDSETS ________
Conference calls
During an internal call, you can include an external
caller in the call.
1 An external call is indicated as a“Call waiting” tone.
– The external number appears in the display if it
has been transferred and the CLIP function is activated.
2 Accept an external call by pressing » K «.
– You are now connected to the external caller and
the internal call is on hold.
3 Press the »Option« function button on the left,
select the »Conference« function and activate by
pressing the »OK« function button on the right.
– You are connected to the internal and external
caller.
Notes:
The conference call can be interrupted. Press the
»Option« function button on the left, select the
»Switch to external« function button and confirm with the »OK« function button on the right. The
call only takes place with the external caller,
or
press the »Option« function button on the left,
select the »Switch to internal« function and confirm with the »OK« function button on the right. The
call only takes place with the internal caller.
The other caller is on hold.
ENGLISH
4 Press » K « to end the conference call.
57
ADDITIONAL HANDSETS ________
Brokering (internal)
During an external call, you can make a second call
from your handset to another handset without ending
the external call.
1 An external call is indicated as a “Call waiting” tone.
– The external number appears in the display if it
has been transferred and the CLIP function is
activated.
2 Accept an external call by pressing » K «.
– You are now connected to the external caller and
the internal call is on hold.
3 Press the »Option« function button on the left and
select the »Brokering« function. Switch between
the external and internal call with the »OK« function
button on the right.
4 Press » K « to end the call.
Removing a handset from the base
station
Note:
You can only make the settings on the base station
once you have entered your PIN number.
1 Open the menu by pressing the »Menu« function
button on the right.
Settings
Handset Set.
Base Set.
Base Set.
Change PIN
Remove HS
Default BS
Flash Time
Pause Time
Call Log
ŀ
2 Select »Settings« with »Ŀ«, »ĭ«, » « or »R« activate
with the »OK« function button on the right.
3 Select »Base Set« with »Ŀ« or »ĭ« and press the
»OK« function button on the right to activate.
4 Select »Remove HS« with »Ŀ« or »ĭ« and press the
»OK« function button on the right to activate.
– Display: »Remove HS« and the number of the
handset.
5 Select the number of the handset to be deregistered
with »1« to »5«.
6 Press » K « to conclude the setting.
– Display: »Register HS«.
58
TELECOMMUNICATION
SYSTEM OPERATION______________
Setting the flash time
Note:
You can only make the settings on the base station
once you have entered your PIN number.
1 Open the menu by pressing the »Menu« function
button on the right.
Base Set.
Base Set.
Change PIN
Remove HS
Default BS
Flash Time
Pause Time
Call Log
ŀ
2 Select »Settings« with »Ŀ«, »ĭ«, » « or »R« activate
with the »OK« function button on the right.
3 Select »Base Set« with »Ŀ« or »ĭ« and press the
»OK« function button on the right to activate.
4 Select »Flash Time« with »Ŀ« or »ĭ« and press the
»OK« function button on the right to activate.
5 Select the flash time you want with »Ŀ« or »ĭ« and
confirm with the »OK« function button on the right.
6 Press » K « to conclude the setting.
ENGLISH
Settings
Handset Set.
59
TELECOMMUNICATION
SYSTEM OPERATION______________
Entering the external access code
and dialling pause
The external access code (often “0”) can be saved in
the memory (redial/phone book/call log) to give you
direct access to an external number. As the access code
is automatically used every time a number is dialled,
calling within the internal system is only possible if the
system recognises that the number is internal by means
of a special button (»g«, »h« or »R«). For internal
calls, this special button must be selected with a pause
before the caller’s number. You can deactivate the
external access code by deleting it. The automatic
dialling prefix is often carried out by settings in the
telecommunications system. In this case you will not
be able to programme a direct access code. Please
read the operating manual for the telecommunication
system.
Note:
You can only make the settings on the base station
once you have entered your PIN number.
1 Open the menu by pressing the »Menu« function
button on the right.
Settings
Handset Set.
Base Set.
Base Set.
Change PIN
Remove HS
Default BS
Flash Time
Pause Time
Call Log
60
ŀ
2 Select »Settings« with »Ŀ«, »ĭ«, » « or »R« activate
with the »OK« function button on the right.
3 Select »Base Set« with »Ŀ« or »ĭ« and press the
»OK« function button on the right to activate.
4 Select »Pause Time« with »Ŀ« or »ĭ« and press the
»OK« function button on the right to activate.
5 Select the time with »Ŀ« or »ĭ« and press the »OK«
function button on the right to confirm.
6 Press » K « to conclude the setting.
SETTINGS ________________________________
Setting the date and time
1 Open the menu by pressing the »Menu« function
button on the right.
2 Select the »Alarm/Clock« menu item with »Ŀ«, »ĭ«,
» « or »R« and activate with the »OK« function
button on the right.
ŀ
Alarm/Clock
Clock Setting
Alarm Setting
3 Select »Clock Setting« with »Ŀ« or »ĭ« and press the
»OK« function button on the right to activate.
Clock Setting
4 Enter the time in four-digits by pressing »1...0«.
Set Time-Date
5 Enter the date in six-digits with »1...0« and press
the »OK« function button on the right to save.
hh : mm TT – MM – JJ
00 : 00 01 / 01 / 06
Note:
If you make an error, you can delete the last digit
with the »Back« function button on the left.
6 Press » K « to conclude the setting.
Note:
If the base station is disconnected from the mains,
the time and date is reset to 01. JAN. 00:00.
Setting the menu language
You can choose between several languages.
1 Open the menu by pressing the »Menu« function
button on the right.
ŀ
2 Select »Settings« with »Ŀ«, »ĭ«, » « or »R« activate
with the »OK« function button on the right.
Settings
Handset Set.
3 Select »Handset Set« with »Ŀ« or »ĭ« and press the
»OK« function button on the right to activate.
Handset Set.
Aut. Rufannah.
–
Register HS
Dim Mode
Handset Name
Language
Default HS
✓
4 Select »Language« with »Ŀ« or »ĭ« and press the
»OK« function button on the right to activate.
5 Select the language with »Ŀ« or »ĭ« and confirm
with the »OK« function button on the right.
6 Press » K « to conclude the setting.
ENGLISH
Base Set.
61
SETTINGS ________________________________
Sound settings
You can assign internal and external calls with a
different ring tune. You can also use this to tell the
difference between the additional handsets.
Setting the handset volume
You can set the earpiece volume and the volume of the
handset (speaker phone) separately.
Sound Setting
Handset Volume
HS Ring
Internal Ring
BS Ring
Tone
1 Open the menu by pressing the »Menu« function
button on the right.
2 Select the »Sound Setting« menu item with »Ŀ«,
»ĭ«, » « or »R« and activate with the »OK« function button on the right.
ŀ
3 Select »Handset Volume« with »ĭ« or »Ŀ« and press
the »OK« function button on the right to activate.
Handset Volume
Earpiece
Speaker
Earpiece
4 Select »Earpiece« or »Speaker« with »ĭ« or »Ŀ«
and press the »OK« function button on the right to
activate.
ŀ
5 Select the volume with » « or »R« and confirm with
the »OK« function button on the right.
6 Press » K « to conclude the setting.
Sound Setting
Handset Volume
HS Ring
Internal Ring
BS Ring
Tone
2 Select the »Sound Setting« menu item with »Ŀ«,
»ĭ«, » « or »R« and activate with the »OK« function button on the right.
ŀ
3 Select »HS Ring« with »ĭ« or »Ŀ« and press the
»OK« function button on the right to activate.
HS Ring
Melody
Volume
Melody
Melody 1
Melody 2
Melody 3
62
Setting the handset tone and melody for
external calls
1 Open the menu by pressing the »Menu« function
button on the right.
4 Select »Melody« or »Volume« with »ĭ« or »Ŀ« and
press the »OK« function button on the right to
activate.
5 Select the melody with »Ŀ« or »ĭ« or adjust the
volume with » « or »R« and press the »OK«
function button on the right to confirm.
ŀ
6 Press » K « to conclude the setting.
SETTINGS ________________________________
Sound Setting
Handset Volume
HS Ring
Internal Ring
BS Ring
Tone
Setting the handset tone and melody for
internal calls
1 Open the menu by pressing the »Menu« function
button on the right.
2 Select the »Sound Setting« menu item with »Ŀ«,
»ĭ«, » « or »R« and activate with the »OK« function button on the right.
ŀ
3 Select »Internal Ring« with »ĭ« or »Ŀ« and press the
»OK« function button on the right to activate.
Internal Ring
Melody
Volume
Melody
Melody 1
Melody 2
Melody 3
Sound Setting
Handset Volume
HS Ring
Internal Ring
BS Ring
Tone
4 Select »Melody« or »Volume« with »ĭ« or »Ŀ« and
press the »OK« function button on the right to
activate.
5 Select the melody with »ĭ« or »Ŀ« or adjust the
volume with » « or »R« and press the »OK«
function button on the right to confirm.
ŀ
6 Press » K « to conclude the setting.
Setting the tone and ring melody on the
base station
1 Open the menu by pressing the »Menu« function
button on the right.
2 Select the »Sound Setting« menu item with »Ŀ«,
»ĭ«, » « or »R« and activate with the »OK« function button on the right.
ŀ
3 Select »BS Ring« with »ĭ« or »Ŀ« and press the
»OK« function button on the right to activate.
Volume
Melodie
Melody 1
Melody 2
Melody 3
4 Select »Melody« or »Volume« with »ĭ« or »Ŀ« and
press the »OK« function button on the right to
activate.
5 Select the melody with »ĭ« or »Ŀ« or adjust the
volume with » « or »R« and press the »OK«
function button on the right to confirm.
ŀ
6 Press » K « to conclude the setting.
ENGLISH
BS Ring
Melody
63
SETTINGS ________________________________
Information tone
Information tones tell you about the condition of your
handset, such as when the battery is flat or the reception is weak, etc.
You can switch the tones on and off.
1 Open the menu by pressing the »Menu« function
button on the right.
Sound Setting
Handset Volume
2 Select the »Sound Setting« menu item with »Ŀ«,
»ĭ«, » « or »R« and activate with the »OK« function button on the right.
HS Ring
ŀ
Internal Ring
BS Ring
Tone
3 Select »Tone« with »ĭ« or »Ŀ« and press the »OK«
function button on the right to activate.
Tone
Key Tone
✓
Charge Tone
✓
Battery low
✓
Our of Range
✓
List End Tone
✓
4 Select the item with »ĭ« or »Ŀ« and press the »On«
function button on the right to switch on.
– A »✓« marks the activated function.
5 Press » K « to conclude the setting.
Note:
Switch off the information tone by repeating the
setting and in point 4 switch off with the »Off«
function button on the right.
Dimmer mode
If the dimmer mode is activated, the brightness is on
low in the display when it is not being used.
If the dimmer mode is switched off, the display is also
switched off.
1 Open the menu by pressing the »Menu« function
button on the right.
ŀ
2 Select »Settings« with »Ŀ«, »ĭ«, » « or »R« activate
with the »OK« function button on the right.
Handset Set.
Aut. Rufannah.
Register HS
Dim Mode
Handset Name
Language
Default HS
64
–
3 Select »Handset Set« with »ĭ« or »Ŀ« and press the
»OK« function button on the right to activate.
4 Select »Dim Mode« with »ĭ« or »Ŀ« and press the
»On« function button on the right to activate.
5 Press » K « to conclude the setting.
Note:
Switch off the function by repeating the setting and
in point 4 switch off with the »Off« function button
on the right.
SETTINGS ________________________________
Setting the background image and
contrast
You can set the background image for the display and
the display contrast.
Display
Wallpaper
Contrast
Setting the background image of the display
1 Open the menu by pressing the »Menu« function
button on the right.
ŀ
2 Select the »Display« menu item with »Ŀ«, »ĭ«, » «
or »R« and activate with the »OK« function button
on the right.
3 Select »Wallpaper« with »ĭ« or »Ŀ« and press the
»OK« function button on the right to activate.
4 Select the image with »ĭ« or »Ŀ« and confirm with
the »OK« function button on the right.
5 Press » K « to conclude the setting.
Display
Wallpaper
Contrast
Setting the display contrast
1 Open the menu by pressing the »Menu« function
button on the right.
ŀ
2 Select the »Display« menu item with »Ŀ«, »ĭ«, » «
or »R« and activate with the »OK« function button
on the right.
3 Select »Contrast« with »ĭ« or »Ŀ« and press the
»OK« function button on the right to activate.
Level 2
Level 3
4 Select the contrast with »ĭ« or »Ŀ« and confirm with
the »OK« function button on the right.
5 Press » K « to conclude the setting.
ENGLISH
Contrast
Level 1
65
SETTINGS ________________________________
Locking the settings (PIN)
You can enter a PIN number to protect the settings from
unauthorised access. The default PIN is 0000. A PIN
number is always needed to access the answering
machine by remote enquiry.
Note:
Make sure you remember your new PIN. If you have
forgotten your PIN, contact the hotline, see page 70.
Entering a new PIN
1 Open the menu by pressing the »Menu« function
button on the right.
Settings
Handset Set.
Base Set.
Base Set.
Change PIN
Remove HS
Default BS
Flash Time
Pause Time
Call Log
ŀ
2 Select »Settings« with »Ŀ«, »ĭ«, » « or »R« activate
with the »OK« function button on the right.
3 Select »Base Set« with »Ŀ« or »ĭ« and press the
»OK« function button on the right to activate.
4 Select »Change PIN« with »Ŀ« or »ĭ« and press the
»OK« function button on the right to activate.
5 Enter the new PIN in four-digits with »1...0« and
confirm with the »OK« function button on the right.
Note:
If you make an error, you can delete the last letter
with the »➔« function button on the left.
6 Repeat the entry with »1...0« and confirm with the
»OK« function button on the right.
7 Press » K « to conclude the setting.
Changing the PIN
1 Open the menu by pressing the »Menu« function
button on the right.
Settings
Handset Set.
Base Set.
66
ŀ
2 Select »Settings« with »Ŀ«, »ĭ«, » « or »R« activate
with the »OK« function button on the right.
3 Select »Base Set« with »Ŀ« or »ĭ« and press the
»OK« function button on the right to activate.
SETTINGS ________________________________
4 Select »Change PIN« with »Ŀ« or »ĭ« and press the
»OK« function button on the right to activate.
5 Enter the PIN »0000« with »1...0« and confirm
with the »OK« function button on the right.
Change PIN
6 Enter the new PIN in four-digits with »1...0« and
confirm with the »OK« function button on the right.
Enter new PIN
____
Note:
If you make an error, you can delete the last letter
with the »➔« function button on the left.
7 Repeat the entry with »1...0« and confirm with the
»OK« function button on the right.
8 Press » K « to conclude the setting.
Receiving a call directly
You can set the handset so that you can hear the caller
when you remove the handset from the base
station/charger.
1 Open the menu by pressing the »Menu« function
button on the right.
ŀ
2 Select »Settings« with »Ŀ«, »ĭ«, » « or »R« activate
with the »OK« function button on the right.
Settings
Handset Set.
3 Select »Handset Set.« with »ĭ« or »Ŀ« and press the
»OK« function button on the right to activate.
–
4 Select »Auto answer« with »ĭ« or »Ŀ« and press the
»On« function button on the right to activate.
✓
5 Press » K « to conclude the setting.
Handset Set.
Aut. Rufannah.
Register HS
Dim Mode
Handset Name
Language
Default HS
Note:
Switch off the function by repeating the setting and
in point 4 switch off with the »Off« function button
on the right.
ENGLISH
Base Set.
67
SETTINGS ________________________________
Restoring the settings (Reset)
You can restore all the settings and entries in the phone
book and call list with the reset function.
Restoring handset settings
1 Open the menu by pressing the »Menu« function
button on the right.
ŀ
2 Select »Settings« with »Ŀ«, »ĭ«, » « or »R« activate
with the »OK« function button on the right.
Settings
Handset Set.
3 Select »Handset Set.« with »Ŀ« or »ĭ« and press the
»OK« function button on the right to activate.
Base Set.
Handset Set.
Aut. Rufannah.
–
Register HS
Dim Mode
Handset Name
Language
Default HS
✓
4 Select »Default HS« with »Ŀ« or »ĭ« and press the
»OK« function button on the right to activate.
5 Confirm the reset function with the »OK« button on
the right,
or
deactivate the reset function with » K «.
Restoring the base station settings
Note:
You can only make the settings on the base station
once you have entered your PIN number.
1 Open the menu by pressing the »Menu« function
button on the right.
Settings
Handset Set.
Base Set.
Base Set.
Change PIN
Remove HS
Default BS
Flash Time
Pause Time
Call Log
68
ŀ
2 Select »Settings« with »Ŀ«, »ĭ«, » « or »R« activate
with the »OK« function button on the right.
3 Select »Base Set« with »Ŀ« or »ĭ« and press the
»OK« function button on the right to activate.
4 Select »Default BS« with »Ŀ« or »ĭ« and press the
»OK« function button on the right to activate.
5 Confirm the reset function with the »OK« button on
the right,
or
deactivate the reset function with » K «.
TECHNICAL DATA
__________________
Standard
DECT, GAP
Frequency range
1880-1900 MHz
Transmission channels
120
Medium output
approx. 10 mW
Range
up to 300 m outdoors
up to 50 m indoors
Calios A1
Battery
Power supply
230 V, 50 Hz, 40 mA
Power supply
230 V, 50 Hz, 30mA
Li-ion type, 3.7 V 600 mAh
Dialling method
DTMF (touch tone)
Handset operating life:
In use
In standby
up to 12 hours*
up to 120 hours*
Ambient temperature:
+ 5 °C to + 40 °C
Dimensions:
Calios A1 base station
(L x W x H)
151 mm x 105 mm x
40 mm
Calios base station
(L x W x H)
124 mm x 105 mm x
40 mm
Handset (L x W x H)
153 mm x 39 mm x 19 mm
Weight:
Calios base station
Calios base station
Handset
180 gr.
135 gr.
90 gr.
Connection:
Power cord
TAE 6F/TSV 6/4
Power supply unit cable
TSV 6/6
Answering machine
approx. 28 minutes
recording duration
Calios
* If the base station is not connected to the mains (such as in a
power outage), the handset continuously searches for a base
station.
Therefore, more battery power is used up and the standby
time is reduced.
Technical changes and errors reserved.
ENGLISH
Power supply unit:
69
Grundig Multimedia B.V.
http://www.grundig-dect.com
07/04
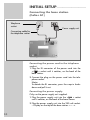
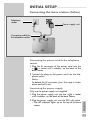
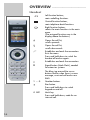

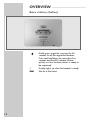
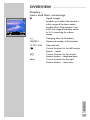
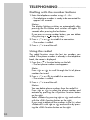


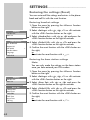


![[January] [2010] Oracle Part Number E51573-01](http://vs1.manualzilla.com/store/data/005777075_1-9f1c819619cc4ae74609e937019c49fd-150x150.png)