1
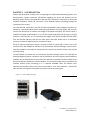
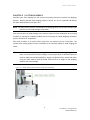
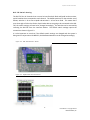
instrumentation and software for research
LIQUID INTAKE MONITOR
ENV-251 & ENV-252-LIM
USER’S MANUAL
DOC-058
Rev. 2.1
Copyright ©2012
All Rights Reserved
Med Associates Inc.
P.O. Box 319
St. Albans, Vermont 05478
Phone: 802.527.2343
Fax: 802.527.5095
www.med-associates.com
LIQUID INTAKE MONITOR
notes
i
LIQUID INTAKE MONITOR
Table of Contents
Chapter 1 | Introduction ........................................................................... 1
Chapter 2 | System Assembly.................................................................... 2
DIG-745 Switch Setting ................................................................................ 3
Cable Connections ....................................................................................... 4
Water Bottle Set-Up Procedure ................................................................... 6
Chapter 3 | Weighing System Tare and Calibrate Utility .......................... 10
Help Screen ................................................................................................ 11
Calibrating the Channels ............................................................................ 11
Chapter 4 | Sample MED-PC Programs .................................................... 15
Liquid Weighing System.mpc ..................................................................... 15
Liquid & Food Weighing System.mpc ......................................................... 19
Appendix A | Driver and Software Installation ........................................ 25
Appendix B | Contact Information .......................................................... 26
ii
LIQUID INTAKE MONITOR
CHAPTER 1 | INTRODUCTION
Please read this manual carefully prior to unpacking the Liquid Intake Monitoring System. This
documentation contains important information regarding the set-up and operation of the
Weighing System. Refer to the Appendix at the end of this manual for instructions on driver and
software installation. Follow the instructions in the Appendix before proceeding through the
remainder of this manual.
The ENV-251-LIM (stationary) and ENV-252-LIM (retractable) Liquid Weighing Systems are
housed on a standard modular panel containing liquid bottles, Lixit-valve sippers and precision
sensors with electronics to measure the weight of the bottles and liquid. The sensor output is
amplified and signal conditioned for a 0 to +10 volt output range which can be input to an A/D
converter, chart recorder, etc. for monitoring the weight of the liquid. The ENV-252-LIM differs
from the ENV-251-LIM only that the Lixit-valve sipper and water bottle rest on a retractable
surface to remove the opportunity for the subject to drink.
The 0 to +10V full-scale sensor output is accurate to 1/10 of a gram and is input to one of 16
channels of the DIG-745ADC 16 Channel PCI and Transducer Interface Package. A photo sensor
head-entry detector is provided to indicate when the animal has placed its head in the cup and
may be drinking.
The DIG-745ADC 16 Channel PCI and Transducer Interface Package consists of a DIG-744 PCI
Analog-to-Digital Converter card which may be installed in the same computer with a MED-PC®
interface card, an SG-244 cable that connects this card to the transducer interface module and a
DIG-745 16 Channel Transducer Interface Module. This interface module may be installed in the
interface cabinet (space permitting) or in a separate SG-6080C Table Top Cabinet. Each
individual 16-transducer channel has a tare control used to "zero" the transducers. The DIG-745
ADC interface card supplies the amplifier with power and tare control signal.
Figure 1.1 - DIG-745ADC Package
-1DOC-058 Rev 2.1 Copyright © 2012
MED Associates, Inc.
LIQUID INTAKE MONITOR
CHAPTER 2 | SYSTEM ASSEMBLY
Carefully open each shipping box and remove the packing material to expose the Weighing
Systems. Identify and label each weighing system as #1, #2, etc. as it is unpacked and identify
the water bottle platform (see Figure 2.1).
NOTE: The water bottle platform is attached to the weighing sensor and must be handled with
extreme care to avoid damage to the sensor.
Care must be taken to avoid damage to the sensitive load-cell sensor assemblies when moving
chambers or moving the individual modular panels containing the Liquid Weighing assemblies
(herein referred to as ‘assemblies’).
Place each chamber on a sturdy surface away from any external sources of vibration. Use
caution when routing cables from the assemblies to the interface cabinet to avoid tangling the
cables.
NOTE:
Use care when placing or removing the water bottle onto the weighing platform.
Never use excessive force when seating or removing the bottle. If downward pressure
must be applied to the bottle/platform, support the platform from underneath while
using the other hand to place the bottle. Excessive force or weight on the weighing
platform will cause damage.
Figure 2.1 - Water Bottle Sensor Platform (ENV-251-LIM shown)
-2DOC-058 Rev 2.1 Copyright © 2012
MED Associates, Inc.
LIQUID INTAKE MONITOR
DIG-745 Switch Setti ng
The DIG-745 has 16 channels that are used to interface both food and liquid intake monitors,
and 16 switches that correspond to each channel. The default positions for the switches are as
follows, switches 1 – 8 are set to Liquid and switches 9 – 16 are set to Food. This means that if
more than eight of either the food or liquid intake devices are going to be connected to the DIG745, the switch settings will need to be changed accordingly. The switches can be accessed by
removing the DIG-745 from the interface cabinet. The default switch settings require the
connections shown in Figure 2.3.
It is also important to note that if the default switch settings are changed and the system is
being used in conjunction with MED-PC, the MedState Notation must be changed accordingly.
Figure 2.2 - DIG-745 Channel 1 Switch
Figure 2.3 - Default DIG-745 Connections
-3DOC-058 Rev 2.1 Copyright © 2012
MED Associates, Inc.
LIQUID INTAKE MONITOR
Cable C onnecti ons
When making cable connections, first identify each type of cable, and then make the
connections. Use care when connecting the cables to the mating connectors since most
connectors are keyed. Alignment of the cables to the connectors is important to avoid damage
to connectors and connector pins.
Amplifier Cabling
Once all of the liquid intake monitor assemblies are placed in the chambers and the interface
cabinet is situated, begin by connecting each channel of the DIG-745 card to a liquid intake
monitor using the supplied 8-pin modular cables.
Insert one end of the cable into the appropriate channel connector until a ‘snap’ or ‘click’ is
heard. The cable should be locked in place into the connector. Be sure to connect the liquid
intake monitors into Channels 1 – 8 if the DIG-745 switches are in the default positions. Refer to
Figure 2.3.
Connect the other end of the modular cable to a liquid intake monitor amplifier. Again, the cable
connector is keyed and a ‘click’ will be heard as the cable locks in place. To release the cable
from the connector, gently press down on the tab of the modular cable and remove as shown in
Figure 2.4.
NOTE: The interface cable MUST be connected to the weighing system amplifier in order for the
head entry detector to function.
Figure 2.4 - Amplifier Cable Connection
-4DOC-058 Rev 2.1 Copyright © 2012
MED Associates, Inc.
LIQUID INTAKE MONITOR
National Instruments Cabling
Connect one end of the SG-244 cable to the ADC connector on the DIG-745 card connector and the
other end to the DIG-744 card (in the computer). Use care when aligning and inserting this cable
into the connectors as a misalignment of the connector could cause the pins to fold over and bend.
Secure the cable to the connector by tightening the jackscrews located on both sides of the cable
connector.
Smart Control Connection Panel Cabling
Refer to the manual “Wiring the Operant Test Chamber Package” and the supplied wiring chart for
instructions on how to wire the Operant Chamber and Interface Cabinet.
-5DOC-058 Rev 2.1 Copyright © 2012
MED Associates, Inc.
LIQUID INTAKE MONITOR
Water Bottle Set -Up Procedure
1. Ensure that the vent screw is closed (turned all the way into the bottle) prior to filling. See
Figure 2.5.
Figure 2.5 - Water Bottle Vent Screw
2. Fill the bottle to where it begins to narrow to avoid filling with more than 200 grams of
water. See Figure 2.6.
Figure 2.6 - Water Bottle Fill Line
-6DOC-058 Rev 2.1 Copyright © 2012
MED Associates, Inc.
LIQUID INTAKE MONITOR
3. Install the stopper with the Lixit valve. Ensure that the stopper is not cocked in the
bottleneck. See Figure 2.7.
Figure 2.7 - Stopper/Lixit Valve Assembly
4. Invert the bottle with the stopper and verify that the water level is below the level of the
vent screw. If the water level is above the vent screw, remove liquid until it is below the
bottom of the screw. See Figure 2.8.
Figure 2.8 - Water Level Verification
-7DOC-058 Rev 2.1 Copyright © 2012
MED Associates, Inc.
LIQUID INTAKE MONITOR
5. Once the proper liquid level has been reached, open the vent by turning the screw until the
vent port in the threaded section is visible. See Figure 2.9.
Figure 2.9 – Water Bottle with Vent Open
6. After the vent is opened, prime the Lixit valve by manipulating the shaft in the center of the
valve opening. Pressing in on the shaft, or manipulating it up and down opens the ball valve
in the tube and allows the liquid to flow. See Figure 2.10.
Figure 2.10 - Lixit Valve Priming
7. Now that the bottle is functioning properly, gently position it on the load cell platform. The
rubber stopper should rest on the platform, while the Lixit valve assembly is fed through the slot
in the platform and guided through the retaining hoop in the front of the underside of the
-8DOC-058 Rev 2.1 Copyright © 2012
MED Associates, Inc.
LIQUID INTAKE MONITOR
platform. Move the stopper forward until it fits into the circular cutout on the upper surface of
the platform. Check the alignment of the Lixit valve with the opening in the receptacle on the
chamber wall. See Figure 2.11.
Figure 2.11 - Proper Valve Alignment
Ensure that the Lixit valve is not touching the walls of the opening and the cables from the control
box are not touching the bottle or platform assembly. If the valve is to uching the walls or the
cables are touching the bottle or the platform assembly, they will produce a force on the load cell
and adversely affect the test. Adjust the water bottle and cables as needed. The completed
assembly (ENV-251-LIM) is shown in
8. Figure 2.12.
NOTE:
For ENV-252-LIM, the assembly should move freely back a forth so that the Lixit
valve can be retracted and made unavailable during the experimental session.
-9DOC-058 Rev 2.1 Copyright © 2012
MED Associates, Inc.
LIQUID INTAKE MONITOR
Figure 2.12 - Completed Assembly (ENV-251 shown)
CHAPTER 3 | WEIGHING SYSTEM TARE AND CALIBRATE UTILITY
To run the Weighing System Tare and Calibrate Utility, open the Weighing System application.
The screen shown in Figure 3.1 will appear.
Figure 3.1 - Weighing System Tare and Calibration Utility
- 10 DOC-058 Rev 2.1 Copyright © 2012
MED Associates, Inc.
LIQUID INTAKE MONITOR
Each channel has it’s own display and Reset/Tare button. Click the Reset button for each of the
channels being used. This will turn the displays from red to white. If any of the displays remain
red, an error has occurred in that particular channel’s reading of the digital Tare
potentiometers. An error can occur if the channel is not connected to a device or if the
interface cabinet is not turned on before the Weighing System Tare and Calibration Utility was
started.
If the channel on which the error occurred is not being used for the experiment, the error can be
ignored. If the channel is in use and was not connected, connect the device to the interface and
click on the corresponding Reset button. If the interface cabinet was not turned on when the
utility was started, exit the program. Restart the program after power has been applied to the
interface cabinet.
Before beginning the calibration procedure, be sure to select the correct system in the Weighing
System area of the screen shown in Figure 3.1.
- 11 DOC-058 Rev 2.1 Copyright © 2012
MED Associates, Inc.
LIQUID INTAKE MONITOR
Help Screen
Clicking on Help will cause the screen shown in Figure 3.2 to appear. Clicking on any of the tabs
on this screen will display detailed information about each function of the software.
Figure 3.2 - Help Screen
Calibrati ng the Channels
Attach the empty water bottle and stopper to the Liquid weighing system as shown in
1.
Figure 2.12.
2.
Click the Tare buttons associated with each channel being used. After taring, the displays
of all the channels that have devices connected to them should read 0.0. If they do not
read zero, double-click on the display for that channel. That will cause the Reset button to
change back to Tare so that the channel may be tared again.
3.
Minimize the Weighing System Tare and Calibrate Utility and run the National
Instruments Measurement and Automation Explorer Software (Figure 3.3).
Figure 3.3 - Measurement and Automation Explorer
- 12 DOC-058 Rev 2.1 Copyright © 2012
MED Associates, Inc.
LIQUID INTAKE MONITOR
4.
Expand the Devices and Interfaces folder to view the PCI-6023E (Device 1) interface card.
The screen shown in Figure 3.4 will appear.
Figure 3.4 - Devices and Interfaces
5.
Select the Properties button from the top tool bar, and then select the AI tab. Within the
AI tab, select from the Mode menu Referenced Single Ended, for initial setup only. Click
OK to exit.
6.
Click the Test Panel button from the top tool bar. The screen shown in Figure 3.5 will
appear.
Figure 3.5 - Test Panel
- 13 DOC-058 Rev 2.1 Copyright © 2012
MED Associates, Inc.
LIQUID INTAKE MONITOR
7.
Ensure the Data Mode is set to Strip Chart and the Y Scale Mode is Full Range, as shown in
Figure 3.5.
8.
Change the Test Panel data channel to match the intake monitor that is being calibrated.
To calibrate the first monitor, set the channel for 0, for the second monitor, set the channel
to 1, etc.
9.
Verify that the position of the green signal line in the chart and the Average Reading below
the chart is approximately zero.
10. Place the 200-gram calibration weight on the bottle, as shown in Figure 3.6.
Figure 3.6 - Bottle with Calibration Weight
11. Using a small flat blade screwdriver, turn the Gain Adjustment Screw located through the
top cover of the amplifier box until the Average Reading is +9.5 ± 0.1 Volts (+9.40 to +9.6
Volts). See Figure 3.7.
Figure 3.7 - Gain Adjustment Screw
- 14 DOC-058 Rev 2.1 Copyright © 2012
MED Associates, Inc.
MED ASSOCIATES INC.
L I QU I D I NT AK E M O NI T O R
12. Maximize the Weighing System Tare and Calibrate Utility. Enter the value of the calibration
weight in the Calibration Weight box (200 grams). This will be the new full-scale weight. Click
the CAL button.
13. The Current Value box should now contain the calibration weight value.
When the
calibration weight is removed, the Current Value should go down to 0.0 grams. If the Current
Value does not show 0.0 grams, re-tare the appropriate channels to 0.0 grams.
14. Once again, place the calibration weights back onto the bottles, and with a reading equal to
the calibration weight value, click the Reset buttons. Now when the weights are removed,
the display should read 0.0 grams.
15. The system has been calibrated for 200 grams of liquid in the bottle. Do not overfill the liquid
bottles. Fill and install the bottle as outlined in the Water Bottle Set-Up Procedure. The
calibration information for all channels will be saved when the software is exited.
- 15 DOC-058 Rev 2.1 Copyright © 2012
MED Associates, Inc.
MED ASSOCIATES INC.
L I QU I D I NT AK E M O NI T O R
CHAPTER 4 | SAMPLE MED-PC PROGRAMS
Liquid Weig hing System.mpc
After the sample program shown below starts, it looks for a Head Entry into the Liquid Hopper.
When a Head Entry is detected the program times the duration of the drinking session and records
how much liquid was consumed during the session. The "Minimum Drink Weight" parameter is
used to determine if the drinking session is a Partial Drinking Bout or a Complete Drinking Bout.
The "End of Drinking Bout Criterion" is used to determine when a drinking session has ended. The
default value is two minutes. This means that two minutes must pass with no Head Entry into the
Liquid Hopper before the drinking session is considered over. However, this value is not used to
determine if the drinking session was a Partial Drinking Bout or a Complete Drinking Bout. The
"Session Time" is how long the program will run. The sample program expects a Resolution of
1ms.
Compare the configurations below to the wiring chart supplied with the system. Edit the input
and output numbers in the program if they differ from the actual setup of the system.
Standard Input Configuration:
HeadEntry
= 1
\ Level Mode
Standard Output Configuration:
HouseLight = 7
Sample Program:
\ Copyright (C) 2008 MED Associates, All rights reserved.
\
\
\
\
\
\
\
\
\
\
\
\
\
\
\
\
\
\
Liquid Weighing System.mpc
After the program starts it looks for a Head Entry into the Liquid Hopper.
When a Head Entry is detected the program times how long the Drinking Session
is and records how much liquid was drank during the Drinking Session.
The "Minimum Drink Weight" parameter is used to determine if the Drinking
Session is a Partial Drinking Bout or a Complete Drinking Bout.
The "End of Drinking Bout Criterion" is used to determine when a Drinking
Session has ended. The default value is two minutes. This means that two
minutes must pass with no Head Entry into the Liquid Hopper before the
Drinking Session is considered over. It is not used to determine if the
Drinking Session was a Partial Drinking Bout or a Complete Drinking Bout.
The "Session Time" is how long the program will run.
Program expects a Resolution of 1ms.
\ Inputs
^HeadEntry
= 1
\ Level Mode
\ Outputs
^HouseLight = 7
- 16 DOC-058 Rev 2.1 Copyright © 2012
MED Associates, Inc.
MED ASSOCIATES INC.
L I QU I D I NT AK E M O NI T O R
\ A() = Control Variables with Assigned Aliases as
Var_Alias Minimum Drink Weight (grams)
Var_Alias End of Drinking Bout Criterion (seconds)
seconds
Var_Alias Session Time (minutes)
minutes
^MinDrink
= 0
^EndDrink
= 1
^Session
= 2
^EndDrinkTicks = 3
Defined
= A(0) \ Default = 0.1 grams
= A(1) \ Default = 120
= A(2)
\ Default = 480
\ List Data Variables Here
\ E = Liquid Drank Total (grams)
\ F = Starting Liquid Total (Starting Weight) (grams)
\
\
\
\
\
M() = Drinking Bout Data
M(0)
= Total Number of Drinking Bouts
M(1)
= Total Liquid Drank in Drinking Bouts (grams)
M(I)
= Length of Drinking Bout (ms)
M(I+1) = Liquid Drank During Drinking Bout (grams)
\
\
\
\
\
P() = Partial Drinking Bout Data
P(0)
= Total Number of Partial Drinking Bouts
P(1)
= Total Liquid Drank in Partial Drinking Bouts (grams)
P(J)
= Length of Partial Drinking Bout (ms)
P(J+1) = Liquid Drank During Partial Drinking Bout (grams)
\
W = Ending Liquid Total (Ending Weight) (grams)
\ List Working Variables Here
\ B = Liquid Drank this Bout (grams)
\ C = Current Liquid Available (grams)
\ I = Subscript for the Drinking Bout Array M
\ J = Subscript for the Partial Drinking Bout Array P
\ S = Drinking Bout Timer
\ T = Session Timer
\ Z-Pulses Used in this Program
^StartDrinking = 1
\ Signal Start of a Drinking Bout
^StopDrinking = 2
\ Signal Stop of a Drinking Bout
^End
= 32 \ Signal End of Data Collection
DIM A = 3
DIM M = 10000
DIM P = 10000
DISKFORMAT = 8.3
DISKCOLUMNS = 2
\***************************************************
\
LIQUID WEIGHING SYSTEM SCHEDULE
\ S1 - Set Default Values
\
Minimum Drink Weight
(0.1 g)
\
End of Drinking Bout Criterion (120 sec)
\
Session Time
(480 min)
\***************************************************
- 17 DOC-058 Rev 2.1 Copyright © 2012
MED Associates, Inc.
MED ASSOCIATES INC.
L I QU I D I NT AK E M O NI T O R
S.S.1,
S1,
0.01": SET A(^MinDrink) = 0.1, A(^EndDrink) = 120, A(^Session) = 480;
SET I = 2, J = 2, M(I) = -987.987, P(J) = -987.987 ---> S2
S2,
#START: CLEAR 1,60; SET A(^EndDrinkTicks) = A(^EndDrink) * 1" ---> S3
0.01": SHOW 2,Minimum Drink Weight (grams),A(^MinDrink);
SHOW 3,End of Drinking Bout Criterion (sec),A(^EndDrink);
SHOW 4,Session Time (min),A(^Session) ---> SX
S3,
1': SET A(^EndDrinkTicks) = A(^EndDrink) * 1" ---> SX
\***************************************************
\
RECORD DRINKING
\***************************************************
S.S.2,
S1,
#START: ~F := Weigh(MG, BOX);~;
SHOW 6,Starting Liquid Weight,F;
ON ^HouseLight ---> S2
S2,
#R^HeadEntry: Z^StartDrinking ---> S3
#Z^End: ~W := Weigh(MG, BOX);~ ---> S4
S3,
#R^HeadEntry: ---> S3
A(^EndDrinkTicks)#T: ~W := Weigh(MG, BOX);~; SET B = C - W; Z^StopDrinking;
IF B >= A(^MinDrink) [@Drink, @NoDrink]
@Drink: ADD M(0); SET M(I) = S, M(I+1) = B, M(I+2) = 987.987;
SET I = I + 2, M(1) = M(1) + B, E = E + B, C = W
---> S2
@NoDrink: ADD P(0); SET P(J) = S, P(J+1) = B, P(J+2) = 987.987;
SET J = J + 2, P(1) = P(1) + B, E = E + B, C =
W ---> S2
#Z^End: ~W := Weigh(MG, BOX);~; SET B = C - W;
IF B >= A(^MinDrink) [@Drink, @NoDrink]
@Drink: ADD M(0); SET M(I) = S, M(I+1) = B, M(I+2) = -987.987;
SET I = I + 2, M(1) = M(1) + B, E = E + B, C = W ---> S4
@NoDrink: ADD P(0); SET P(J) = S, P(J+1) = B, P(J+2) = -987.987;
SET J = J + 2, P(1) = P(1) + B, E = E + B, C = W ---> S4
S4,
1': ---> SX
\***************************************************
\
DRINKING BOUT TIMER
\***************************************************
S.S.3,
S1,
#Z^StartDrinking: SET S = 0.001 ---> S2
S2,
0.001": SET S = S + 0.001 ---> S2
#Z^StopDrinking ! #Z^End: ---> S1
\***************************************************
- 18 DOC-058 Rev 2.1 Copyright © 2012
MED Associates, Inc.
MED ASSOCIATES INC.
L I QU I D I NT AK E M O NI T O R
\
UPDATE DISPLAY
\***************************************************
S.S.4, \ Update Display
S1,
#START: SHOW 2,Total # of Drinking Bouts,M(0);
SHOW 3,Total Liquid Drank in Drinking Bouts,M(1);
SHOW 4,Total # of Partial Drinking Bouts,P(0);
SHOW 5,Total Liquid Drank in Partial Drinking Bouts,P(1) ---> S2
S2,
1": SHOW
SHOW
SHOW
SHOW
2,Total
3,Total
4,Total
5,Total
# of Drinking Bouts,M(0);
Liquid Drank in Drinking Bouts,M(1);
# of Partial Drinking Bouts,P(0);
Liquid Drank in Partial Drinking Bouts,P(1) ---> S2
\***************************************************
\
TIME SESSION
\***************************************************
S.S.5, \ Time Session
S1,
#START: ---> S2
S2,
1': ADD T; SHOW 1,Session Time (min),T;
IF T >= A(^Session) [@End, @Continue]
@End: OFF ^HouseLight; Z^End ---> S3
@Continue: ---> S2
S3,
\ Allow time for screen update before closing the session and saving
data.
5": ---> STOPABORTFLUSH
\***************************************************
\
UPDATE WEIGHT
\***************************************************
S.S.6, \ Get the Starting Weight.
\
\ Update the Starting Weight every 1 minute
\ when the Animal is not drinking. This
\ removes liquid that is lost for reasons
\ other than the Animal drinking.
S1,
0.01": ~C := Weigh(MG, BOX);~; ---> S2
S2,
#R^HeadEntry: ---> S3
1': ~C := Weigh(MG, BOX);~; ---> S2
#Z^End: ---> S4
S3,
#R^HeadEntry: ---> S3
A(^EndDrinkTicks)#T: ---> S2
#Z^End: ---> S4
S4,
1': ---> SX
- 19 DOC-058 Rev 2.1 Copyright © 2012
MED Associates, Inc.
MED ASSOCIATES INC.
L I QU I D I NT AK E M O NI T O R
Liquid & Food Weighi ng System.mpc
After the program starts it looks for a Head Entry into the Food and/or Liquid Hopper. When a
Head Entry is detected the program times how long the meal and/or drinking session is and
records how much food and/or liquid is taken during the session. The "Minimum Meal Weight"
parameter is used to determine if the eating bout is a Partial Meal or a Complete Meal. The "End
of Meal Criterion" is used to determine when a meal has ended. The default value is two minutes.
This means that two minutes must pass with no Head Entry into the Food Hopper before the meal
is considered over. It is not used to determine if the meal was a Partial Meal or a Complete Meal.
The "Minimum Drink Weight" parameter is used to determine if the drinking session is a Partial
Drinking Bout or a Complete Drinking Bout. The "End of Drinking Bout Criterion" is used to
determine when a drinking session has ended. The default value is two minutes. This means that
two minutes must pass with no Head Entry into the Liquid Hopper before the drinking session is
considered over. It is not used to determine if the drinking session was a Partial Drinking Bout or a
Complete Drinking Bout.
The "Session Time" is how long the program will run. Program expects a Resolution of 1ms.
Compare the configurations below with the wiring chart supplied with all system orders. Edit
input and output numbers if they are different for the system, or contact MED Associates for
assistance.
Standard Input Configuration:
Liquid Head Entry = 1 (Level Mode)
Food Head Entry = 2 (Level Mode)
Standard Output Configuration:
House Light = 7
Sample Program:
\ Copyright (C) 2008 MED Associates, All rights reserved.
\
\
\
\
\
\
\
\
\
\
\
\
\
\
\
\
\
\
Liquid & Food Weighing System.mpc
After the program starts it looks for a Head Entry into the Food and/or Liquid
Hopper. When a Head Entry is detected the program times how long the Meal
and/or Drinking Session is and records how much food and/or liquid is taken
during the session.
The "Minimum Meal Weight" parameter is used to determine if the Eating Bout is
a Partial Meal or a Complete Meal.
The "End of Meal Criterion" is used to determine when a Meal has ended. The
default value is two minutes. This means that two minutes must pass with no
Head Entry into the Food Hopper before the Meal is considered over. It is not
used to determine if the Meal was a Partial Meal or a Complete Meal.
The "Minimum Drink Weight" parameter is used to determine if the Drinking
Session is a Partial Drinking Bout or a Complete Drinking Bout.
- 20 DOC-058 Rev 2.1 Copyright © 2012
MED Associates, Inc.
MED ASSOCIATES INC.
\
\
\
\
\
\
\
\
\
L I QU I D I NT AK E M O NI T O R
The "End of Drinking Bout Criterion" is used to determine when a Drinking
Session has ended. The default value is two minutes. This means that two
minutes must pass with no Head Entry into the Liquid Hopper before the
Drinking Session is considered over. It is not used to determine if the
Drinking session was a Partial Drinking Bout or a Complete Drinking Bout.
The "Session Time" is how long the program will run.
Program expects a Resolution of 1ms.
\ Inputs
^LiquidHeadEntry = 1
^FoodHeadEntry
= 2
\ Level Mode
\ Level Mode
\ Outputs
^HouseLight = 7
\ A() = Control Variables with Assigned Aliases as
Var_Alias Minimum Meal Weight (grams)
Var_Alias End of Meal Criterion (seconds)
seconds
Var_Alias Minimum Drink Weight (grams)
Var_Alias End of Drinking Bout Criterion (seconds)
seconds
Var_Alias Session Time (minutes)
minutes
^MinMeal
^EndMeal
^MinDrink
^EndDrink
^Session
^EndMealTicks
^EndDrinkTicks
=
=
=
=
=
=
=
Defined
= A(0) \ Default = 0.1 grams
= A(1) \ Default = 120
= A(2)
= A(3)
\ Default = 0.1 grams
\ Default = 120
= A(4)
\ Default = 480
0
1
2
3
4
5
6
\ List Data Variables Here
\ D = Total Liquid Drank (grams)
\ E = Total Food Eaten (grams)
\ F = Starting Food Total (Starting Weight) (grams)
\ G = Starting Liquid Total (Starting Weight) (grams)
\
\
\
\
\
M() = Meal Data
M(0)
= Total Number of Meals
M(1)
= Total Food Consumed in Meals (grams)
M(I)
= Length of Meal (ms)
M(I+1) = Food Consumed During Meal (grams)
\
\
\
\
\
N() = Drinking Bout Data
N(0)
= Total Number of Drinking Bouts
N(1)
= Total Liquid Consumed in Drinking Bouts (grams)
N(J)
= Length of Drinking Bout (ms)
N(J+1) = Liquid Consumed During Drinking Bout (grams)
\
\
\
\
\
P() = Partial Meal Data
P(0)
= Total Number of Partial Meals
P(1)
= Total Food Consumed in Partial Meals (grams)
P(K)
= Length of Partial Meal (ms)
P(K+1) = Food Consumed During Partial Meal (grams)
\
\
Q() = Partial Drinking Bout Data
Q(0)
= Total Number of Partial Drinking Bouts
- 21 DOC-058 Rev 2.1 Copyright © 2012
MED Associates, Inc.
MED ASSOCIATES INC.
L I QU I D I NT AK E M O NI T O R
\
\
\
Q(1)
= Total Liquid Consumed in Partial Drinking Bouts (grams)
Q(L)
= Length of Partial Drinking Bout (ms)
Q(L+1) = Liquid Consumed During Partial Drinking Bout (grams)
\
\
W = Ending Food Total (Ending Weight) (grams)
X = Ending Liquid Total (Ending Weight) (grams)
\ List Working Variables Here
\ B = Bout Food Eaten (grams)
\ C = Current Food Available (grams)
\ H = Current Liquid Available (grams)
\ I = Subscript for the Meal Array M
\ J = Subscript for the Liquid Bout Array N
\ K = Subscript for the Partial Meal Array P
\ L = Subscript for the Partial Liquid Bout Array Q
\ O = Bout Liquid Drank (grams)
\ R = Elapsed Session Timer
\ S = Meal Timer
\ T = Drinking Bout Timer
\ Z-Pulses Used in this Program
^StartMeal
= 1
\ Signal Start of a Meal
^StopMeal
= 2
\ Signal Stop of a Meal
^StartDrinking = 3
\ Signal Start of a Drinking Bout
^StopDrinking = 4
\ Signal Stop of a Drinking Bout
^End
= 32 \ Signal End of Data Collection
DIM
DIM
DIM
DIM
DIM
A
M
N
P
Q
=
=
=
=
=
6
1000
1000
1000
1000
DISKFORMAT = 8.3
DISKCOLUMNS = 2
\***************************************************
\
LIQUID & FOOD WEIGHING SYSTEM SCHEDULE
\ S1 - Set default values
\
Minimum Meal Weight
= 0.1 g
\
End of Meal Criterion
= 120 s
\
Minimum Drink Weight
= 0.1 g
\
End of Drinking Bout Criterion
= 120 s
\
Session Time
= 480 min
\***************************************************
S.S.1,
S1,
0.01": SET A(^MinMeal) = 0.1, A(^EndMeal) = 120, A(^MinDrink) = 0.1;
SET A(^EndDrink) = 120, A(^Session) = 480;
SET I = 2, J = 2, K = 2, L = 2;
SET M(I) = -987.987, N(J) = -987.987;
SET P(K) = -987.987, Q(L) = -987.987 ---> S2
S2,
#START: CLEAR 1,60; ON ^HouseLight;
SET A(^EndMealTicks) = A(^EndMeal) * 1";
SET A(^EndDrinkTicks) = A(^EndDrink) * 1" ---> S3
- 22 DOC-058 Rev 2.1 Copyright © 2012
MED Associates, Inc.
MED ASSOCIATES INC.
L I QU I D I NT AK E M O NI T O R
0.01": SHOW 2,Minimum Meal Weight (grams),A(^MinMeal),
3,End of Meal
Criterion (sec),A(^EndMeal);
SHOW 4,Minimum Drink Weight (grams),A(^MinDrink), 5,End of Drinking Bout
Criterion (sec),A(^EndDrink);
SHOW 6,Session Time (min),A(^Session) ---> SX
S3,
1': SET A(^EndMealTicks) = A(^EndMeal) * 1";
SET A(^EndDrinkTicks) = A(^EndDrink) * 1" ---> SX
\***************************************************
\
RECORD MEALS
\***************************************************
S.S.2,
S1,
#START: ~F := Weigh(MG, BOX+8);~;
SHOW 11,Starting Food Weight,F ---> S2
S2,
#R^FoodHeadEntry: Z^StartMeal ---> S3
#Z^End: ~W := Weigh(MG, BOX+8);~ ---> S4
S3,
#R^FoodHeadEntry: ---> S3
A(^EndMealTicks)#T: ~W := Weigh(MG, BOX+8);~; SET B = C - W; Z^StopMeal;
IF B >= A(^MinMeal) [@Meal, @NoMeal]
@Meal: ADD M(0); SET M(I) = S, M(I+1) = B, M(I+2) = 987.987;
SET I = I + 2, M(1) = M(1) + B, E = E + B, C = W
---> S2
@NoMeal: ADD P(0); SET P(K) = S, P(K+1) = B, P(K+2) = 987.987;
SET K = K + 2, P(1) = P(1) + B, E = E + B, C =
W ---> S2
#Z^End: ~W := Weigh(MG, BOX+8);~; SET B = C - W;
IF B >= A(^MinMeal) [@Meal, @NoMeal]
@Meal: ADD M(0); SET M(I) = S, M(I+1) = B, M(I+2) = -987.987;
SET I = I + 2, M(1) = M(1) + B, E = E + B, C = W ---> S4
@NoMeal: ADD P(0); SET P(K) = S, P(K+1) = B, P(K+2) = -987.987;
SET K = K + 2, P(1) = P(1) + B, E = E + B, C = W ---> S4
S4,
1': ---> SX
\***************************************************
\
MEAL TIMER
\***************************************************
S.S.3,
S1,
#Z^StartMeal: SET S = 0.001 ---> S2
S2,
0.001": SET S = S + 0.001 ---> S2
#Z^StopMeal ! #Z^End: ---> S1
\***************************************************
\
RECORD DRINKING
\***************************************************
S.S.4,
S1,
#START: ~G := Weigh(MG, BOX);~;
SHOW 12,Starting Liquid Weight,G ---> S2
S2,
#R^LiquidHeadEntry: Z^StartDrinking ---> S3
- 23 DOC-058 Rev 2.1 Copyright © 2012
MED Associates, Inc.
MED ASSOCIATES INC.
L I QU I D I NT AK E M O NI T O R
#Z^End: ~X := Weigh(MG, BOX);~ ---> S4
S3,
#R^LiquidHeadEntry: ---> S3
A(^EndDrinkTicks)#T: ~X := Weigh(MG, BOX);~; SET O = H - X; Z^StopDrinking;
IF O >= A(^MinDrink) [@Drink, @NoDrink]
@Drink: ADD N(0); SET N(J) = T, N(J+1) = O, N(J+2) = 987.987;
SET J = J + 2, N(1) = N(1) + O, D = D + O, H =
X ---> S2
@NoDrink: ADD Q(0); SET Q(L) = T, Q(L+1) = O, Q(L+2) =
-987.987;
SET L = L + 2, Q(1) = Q(1) + O, D = D + O, H
= X ---> S2
#Z^End: ~X := Weigh(MG, BOX);~; SET O = H - X;
IF O >= A(^MinDrink) [@Drink, @NoDrink]
@Drink: ADD N(0); SET N(J) = T, N(J+1) = O, N(J+2) = -987.987;
SET J = J + 2, N(1) = N(1) + O, D = D + O, H = X ---> S4
@NoDrink: ADD Q(0); SET Q(L) = T, Q(L+1) = O, Q(L+2) = -987.987;
SET L = L + 2, Q(1) = Q(1) + O, D = D + O, H = X ---> S4
S4,
1': ---> SX
\***************************************************
\
DRINKING BOUT TIMER
\***************************************************
S.S.5,
S1,
#Z^StartDrinking: SET T = 0.001 ---> S2
S2,
0.001": SET T = T + 0.001 ---> S2
#Z^StopDrinking ! #Z^End: ---> S1
\***************************************************
\
UPDATE DISPLAY
\***************************************************
S.S.6, \ Update Display
S1,
#START: ---> S2
S2,
1": SHOW 2,Total # of Meals,M(0),
Meals,M(1);
SHOW 4,Total # of Partial Meals,P(0),
Partial Meals,P(1);
SHOW 7,Total # of Drinking Bouts,N(0),
Drinking Bouts,N(1);
SHOW 9,Total # of Partial Drinking Bouts,Q(0),
Partial Drinking Bouts,Q(1) ---> S2
3,Total Food Eaten in
5,Total Food Eaten in
8,Total Liquid Taken in
10,Total Liquid Taken in
\***************************************************
\
TIME SESSION
\***************************************************
S.S.7,
S1,
#START: ---> S2
S2,
1": ADD R; SHOW 1,Session Time (min),R/60;
- 24 DOC-058 Rev 2.1 Copyright © 2012
MED Associates, Inc.
MED ASSOCIATES INC.
L I QU I D I NT AK E M O NI T O R
IF R/60 >= A(^Session) [@End, @Continue]
@End: OFF ^HouseLight; Z^End ---> S3
@Continue: ---> S2
S3,
\ Allow time for screen update before closing the session and saving
data.
5": ---> STOPABORTFLUSH
\***************************************************
\
UPDATE FOOD WEIGHT
\***************************************************
S.S.8, \ Get the Starting Weight.
\
\ Update the Starting Weight every 1 minute
\ when the Animal is not eating. This removes
\ food that is lost for reasons other than the
\ Animal eating.
S1,
0.001": ~C := Weigh(MG, BOX+8);~; ---> S2
S2,
#R^FoodHeadEntry: ---> S3
1': ~C := Weigh(MG, BOX+8);~; ---> S2
#Z^End: ---> S4
S3,
#R^FoodHeadEntry: ---> S3
A(^EndMealTicks)#T: ---> S2
#Z^End: ---> S4
S4,
1': ---> SX
\***************************************************
\
UPDATE LIQUID WEIGHT
\***************************************************
S.S.9, \ Get the Starting Weight.
\
\ Update the Starting Weight every 1 minute
\ when the Animal is not drinking. This
\ removes liquid that is lost for reasons
\ other than the Animal drinking.
S1,
0.01": ~H := Weigh(MG, BOX);~; ---> S2
S2,
#R^LiquidHeadEntry: ---> S3
1': ~H := Weigh(MG, BOX);~; ---> S2
#Z^End: ---> S4
S3,
#R^LiquidHeadEntry: ---> S3
A(^EndDrinkTicks)#T: ---> S2
#Z^End: ---> S4
S4,
1': ---> SX
- 25 DOC-058 Rev 2.1 Copyright © 2012
MED Associates, Inc.
MED ASSOCIATES INC.
L I QU I D I NT AK E M O NI T O R
APPENDIX A | DRIVER AND SOFTWARE INSTALLATION
If not already done, install the MED-PC software and the DIG-704 card per the instructions
included with MED-PC. Do NOT install the DIG-744 PCI Data Acquisition card (PCI-6023E) at this
time. You will be instructed to do so at a later time.
Insert the Intake Monitor CD into the CD-ROM drive. The screen shown in Figure A.1 will appear.
Click on Install Weighing System. The screen shown in Figure A.2 will appear.
Figure A.1 – Weighing System Setup
Click Install to begin the driver and software installation. Follow the steps to complete the
National Instruments installation and when installation is completed the screen shown in Figure
A.3 will appear.
Figure A.2 – Begin Driver and Software Installation
- 26 DOC-058 Rev 2.1 Copyright © 2012
MED Associates, Inc.
MED ASSOCIATES INC.
L I QU I D I NT AK E M O NI T O R
The software and driver installation is now complete. Click Finish to close this window. Shut
down the computer and remove power. Install the DIG-744 PCI Data Acquisition Card according
to the instructions included with the computer for installing PCI cards.
Figure A.3 – Installation Complete
APPENDIX B | CONTACT INFORMATION
Please contact MED Associates, Inc. for information regarding any of our products.
Visit our website at www.med-associates.com for contact information.
For technical questions, email [email protected].
- 27 DOC-058 Rev 2.1 Copyright © 2012
MED Associates, Inc.