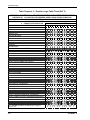
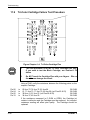
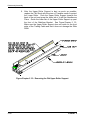
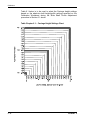
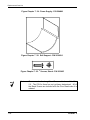
1
® CADJET 2 Service Manual Copyright 1995 ENCAD®, Inc. All rights reserved. ENCAD is a registered trademark of ENCAD, Inc. Trademark application for CADJET 2 is pending. HP-GL, HP-GL/2, and HP RTL are registered trademarks of HewlettPackard Company. AutoCAD is a registered trademark of AutoDesk, Inc. Other trademarks and registered trademarks are the property of their respective owners. No part of this manual may be copied or distributed, transmitted, transcribed, stored in a retrieval system, or translated in any human or computing language, in any form or by any means, electronic, mechanical, magnetic or otherwise, or disclosed to a third party without the express written permission of ENCAD, Inc., 6059 Cornerstone Court West, San Diego, CA 92121, U.S.A. CADJET 2 i FCC Statement (U.S.A) The United States Federal Communications Commission (47 CFR 15.105 and 15.27) has specified that the following notice be brought to the attention of the users of the CADJET 2. FEDERAL COMMUNICATIONS COMMISSION RADIO FREQUENCY INTERFERENCE STATEMENT This equipment has been tested and found to comply with the limits for a Class B digital device, pursuant to part 15 of the FCC Rules. These limits are designed to provide reasonable protection against harmful interference in a residential installation. This equipment generates, uses, and can radiate radio frequency energy and, if not installed and used in accordance with the instructions, may cause harmful interference to radio communications. User Instructions: If the equipment does cause harmful interference to radio or television reception, which can be determined by turning the equipment off and on, the user is encouraged to try to correct the interference by one of the following measures: l Reorient or relocate the receiving antenna. l Increase the separation between the equipment and receiver. l Connect the equipment into an outlet on a circuit different from that to which the receiver is connected. l Consult the dealer or an experienced radio/TV technician for help. Changes or modifications not expressly approved by ENCAD, Inc. could void the user’s authority to operate the equipment. Note: ii This product was FCC certified under test conditions that included the use of shielded I/O cables and connectors between system components. To be in compliance with FCC regulations, the user must use shielded cables and connectors and install them properly. CADJET 2 VDE Statement Hiermit wird bescheinigt, daß der CADJET 2 in Übereinstimmung mit den Bestimmungen der BMPT-AmstbIVfg 234/1991 funkentstört ist. Der vorschriftsmäßige Betrieb mancher Geräte (z.B. Meßsender) kann allergings gewissen Einschränkungen unterliegen. Beachten Sie deshalb die Hinweise in der Bedienungsanleitung. Dem Zentralamt für Zulassungen im Femmeldewesen wirde dan Inverkehrbringen dieses Gerätes angezeigt und die Berechtigung zur Überprüfung der Serie auf die Einhaltung der Bestimmungen eingeräumt. ENCAD, Inc. U.S.A CADJET 2 iii Material Safety Data Sheet CADJET 2 ink is nonhazardous, requiring no special disposal handling. It can be harmful if swallowed and should be kept away from children. To obtain a Material Safety Data Sheet, contact ENCAD, Inc. at: 6059 Cornerstone Court West San Diego, CA 92121-3734 (619) 452-4350 International users should contact their local dealer or distributor. iv CADJET 2 PRINTING HISTORY 1st Edition CADJET 2 September 18, 1995 v TABLE OF CONTENTS QUICK OVERVIEW CHAPTER 1 GENERAL INFORMATION ............................................................... 1-1 CHAPTER 2 THEORY OF OPERATION ............................................................... 2-1 CHAPTER 3 MAINTENANCE ................................................................................ 3-1 CHAPTER 4 TROUBLESHOOTING ...................................................................... 4-1 CHAPTER 5 DISASSEMBLY/ASSEMBLY ............................................................ 5-1 CHAPTER 6 CALIBRATION .................................................................................. 6-1 CHAPTER 7 REPLACEMENT PARTS LIST.......................................................... 7-1 APPENDIX A EMERGENCY FIRMWARE DOWNLOAD PROCEDURE ................ A-1 APPENDIX B PRINTER FIRMWARE UPGRADE PROCEDURE ........................... B-1 APPENDIX C FINAL ASSEMBLY DRAWINGS.......................................................C-1 APPENDIX D SCHEMATICS...................................................................................D-1 CADJET 2 vi Table of Contents CHAPTER 1 GENERAL INFORMATION Overview, Technical Support, media sizes and plot areas, general product notes, plotter features and specifications, Line Length Accuracy and Skew information, acronyms and abbreviations, and glossary. 1.0 Introduction........................................................................................................ 1-1 2.0 Overview............................................................................................................ 1-2 2.1 Related Publications ............................................................................ 1-2 2.2 Features of this Service Manual........................................................... 1-3 2.2.1 Subject Headings ................................................................. 1-3 2.2.2 Figures and Tables .............................................................. 1-3 2.2.3 Manual Conventions ............................................................ 1-4 3.0 ENCAD Technical Support & Service ............................................................... 1-5 4.0 Media Sizes and Plotting Areas......................................................................... 1-6 5.0 General Product Notes ...................................................................................... 1-9 6.0 Plotter Features ............................................................................................... 1-10 7.0 Plotter Specifications ....................................................................................... 1-13 8.0 Line Length Accuracy ...................................................................................... 1-14 9.0 Skew................................................................................................................ 1-15 10.0 Acronyms and Abbreviations........................................................................... 1-17 11.0 Glossary .......................................................................................................... 1-18 CADJET 2 vii Table of Contents CHAPTER 2 THEORY OF OPERATION Mechanical overview and electrical circuitry theory with block diagram visuals. 1.0 Introduction ....................................................................................................... 2-1 2.0 Mechanical Operation ....................................................................................... 2-2 3.0 2.1 Media Axis Drive .................................................................................. 2-2 2.2 Carriage Axis Drive .............................................................................. 2-2 Electrical Operation........................................................................................... 2-3 3.1 viii Circuit Assemblies ............................................................................... 2-3 3.1.1 Main Printed Circuit Board (MPCB) ..................................... 2-3 3.1.2 Front Panel Circuit ............................................................... 2-3 3.1.3 Carriage Printed Circuit Assembly (Carriage PCB).............. 2-4 3.2 Block Diagram ..................................................................................... 2-5 3.3 Power Supply....................................................................................... 2-6 3.4 Microprocessor .................................................................................... 2-7 3.5 Start-up Sequence............................................................................... 2-8 3.6 Memory................................................................................................ 2-9 3.7 Flash EPROM.................................................................................... 2-10 3.8 RAM................................................................................................... 2-11 3.9 EEPROM ........................................................................................... 2-11 3.10 Gate Array ......................................................................................... 2-12 3.11 Stepper Motor .................................................................................... 2-13 3.12 Servo Motor ....................................................................................... 2-15 3.13 Parallel and Serial Ports .................................................................... 2-16 3.14 Keypad/Display.................................................................................. 2-17 3.15 Carriage Circuits ................................................................................ 2-18 3.16 LED’s, Beeper, and Fan .................................................................... 2-19 3.17 Dot Firing Sequence .......................................................................... 2-19 3.18 Schematic Diagrams.......................................................................... 2-19 CADJET 2 Table of Contents CHAPTER 3 MAINTENANCE Maintenance of Unit, Slide Shaft, Service Station, Encoder Strip, Cartridges, and Rollers. 1.0 Introduction........................................................................................................ 3-1 2.0 External Cleaning .............................................................................................. 3-2 3.0 Slide Shaft Maintenance ................................................................................... 3-3 4.0 Service Station Maintenance............................................................................. 3-5 5.0 Encoder Strip Maintenance ............................................................................... 3-6 6.0 Ink Cartridge Maintenance ................................................................................ 3-7 7.0 6.1 Initial Installation of Cartridges ............................................................. 3-7 6.2 Cleaning Cartridges ............................................................................. 3-9 6.3 Other Causes of Misfiring................................................................... 3-11 6.4 Storage of Cartridges During Extended Periods of Inoperation ......... 3-12 6.5 Refilled Cartridges.............................................................................. 3-12 Upper and Lower Rollers................................................................................. 3-13 CADJET 2 ix Table of Contents CHAPTER 4 TROUBLESHOOTING Chart of problems and solutions with detailed action steps and cross reference information. Service Menu information. Keypad functions and messages. Plotter initialization sequence. Plotter error message descriptions. Operation problems. 1.0 Introduction ....................................................................................................... 4-1 2.0 Decision Logic Tables ....................................................................................... 4-2 2.1 Procedure for Using Decision Logic Tables......................................... 4-2 2.2 Decision Logic Tables.......................................................................... 4-3 3.0 Service Menu .................................................................................................... 4-8 4.0 Service Menu Description ................................................................................. 4-9 4.1 Service Information............................................................................ 4-10 4.1.1 Information Display Settings .............................................. 4-10 4.1.2 Information Print Settings .................................................. 4-13 4.2 Service Diagnostics ........................................................................... 4-14 4.3 Service Calibration............................................................................. 4-17 5.0 LED Keys ........................................................................................................ 4-18 6.0 LCD Keypad.................................................................................................... 4-19 7.0 Keypad Messages........................................................................................... 4-20 7.1 Plot Received..................................................................................... 4-20 7.2 Drying Plot ......................................................................................... 4-20 7.3 Insert Media ....................................................................................... 4-20 7.4 Memory Full ....................................................................................... 4-20 7.5 RAM OK............................................................................................. 4-21 7.6 Checksum Error................................................................................. 4-21 7.7 Plotter Error ....................................................................................... 4-21 7.8 Ready to Replot ................................................................................. 4-21 8.0 Initialization Sequence .................................................................................... 4-22 9.0 RS-422/RS-232 Error Messages..................................................................... 4-23 10.0 RAM Error ....................................................................................................... 4-24 x CADJET 2 Table of Contents CHAPTER 4 11.0 TROUBLESHOOTING (continued) Operation Problems ........................................................................................ 4-25 11.1 Plotter Does Not Turn On................................................................... 4-25 11.2 Plotter Slow to Initialize ...................................................................... 4-26 11.3 Plotter Will Not Plot ............................................................................ 4-27 11.3.1 Parallel Interface and Serial Interface Tests ...................... 4-29 11.4 No Movement in the Carriage Axis..................................................... 4-31 11.5 Media Problems ................................................................................. 4-34 11.5.1 Cut Sheet Media Won’t Load ............................................. 4-34 11.5.2 Media Feeds Out of Plotter When Plot is Completed ........ 4-36 11.5.3 Media Skews or Ripples..................................................... 4-36 11.5.4 Loaded Media Not Detected, Media Size Not Detected, or Plotter Has Incorrect Plot Area ...................................... 4-37 11.5.5 Keypad Display Shows LOAD MEDIA Message When Rollfeed Media is Loaded .................................................. 4-38 11.5.6 Loud Grinding Noise When Media Loads .......................... 4-39 11.6 Media Cutting Problems..................................................................... 4-41 11.7 Ink Cartridge Problems ...................................................................... 4-42 11.7.1 Dried Up Cartridge ............................................................. 4-43 11.7.2 Determining Ink Level ........................................................ 4-44 11.8 PRIME Plot ........................................................................................ 4-45 11.9 Tri-Color Cartridge Failure Test Procedure ........................................ 4-46 11.10 Black Cartridge Failure Test Procedure ............................................. 4-47 11.10.1 Running the Cartridge Diagnostic Test .............................. 4-48 11.10.2 Interpreting the Cartridge Diagnostic Test ......................... 4-50 11.10.3 Black Cartridge Flex Test................................................... 4-51 11.11 Memory Full ....................................................................................... 4-55 11.12 Plotter Hesitates During Plotting ........................................................ 4-56 11.13 Plot Appearance is not as Expected .................................................. 4-56 11.14 Plots are Cut Off. ............................................................................... 4-57 CADJET 2 xi Table of Contents CHAPTER 4 xii TROUBLESHOOTING (continued) 11.15 Plotter is Noisy................................................................................... 4-58 11.16 User Parameters Not Saved When Power Is Cycled......................... 4-58 11.17 Plotter Carriage Moves Erratically...................................................... 4-59 11.18 Media Movement Erratic .................................................................... 4-61 11.19 LCD or LED Key(s) Inoperative ......................................................... 4-62 11.20 Front Keypad Display Inoperative...................................................... 4-64 CADJET 2 Table of Contents CHAPTER 5 DISASSEMBLY/ASSEMBLY Detailed procedures for removing and installing field replaceable parts and assemblies. 1.0 Introduction........................................................................................................ 5-1 2.0 Tools and Equipment Required ......................................................................... 5-4 3.0 Stand ................................................................................................................. 5-7 4.0 3.1 Removing the Plotter from the Stand ................................................... 5-7 3.2 Replacing the Plotter on the Stand ...................................................... 5-9 3.3 Alternate Method for Securing Carriage Assembly and Fixed Blade.................................................................................................. 5-10 Right Cover Assembly, SIMMS, and MPCB .................................................... 5-11 4.1 Removing the Right Cover Assembly................................................. 5-11 4.2 Removing the MPCB Connectors ...................................................... 5-13 4.3 MPCB................................................................................................. 5-15 6.0 7.0 Removing the MPCB.......................................................... 5-15 4.3.2 Reinstalling the MPCB ....................................................... 5-16 4.4 Reinstalling the MPCB Connectors .................................................... 5-17 4.5 Extra Memory (SIMM) ........................................................................ 5-18 4.6 5.0 4.3.1 4.5.1 Extra Memory (SIMM) Removal ......................................... 5-18 4.5.2 Extra Memory (SIMM) Installation ...................................... 5-19 Reinstalling the Right Cover Assembly .............................................. 5-20 Servo Motor ..................................................................................................... 5-21 5.1 Removing the Servo Motor ................................................................ 5-21 5.2 Replacing the Servo Motor................................................................. 5-24 Display Assembly ............................................................................................ 5-25 6.1 Removing the Display Assembly........................................................ 5-25 6.2 Reinstalling the Display Assembly ..................................................... 5-26 Service Station Assembly................................................................................ 5-27 7.1 Removing the Service Station Assembly ........................................... 5-27 7.2 Reinstalling the Service Station Assembly ......................................... 5-29 CADJET 2 xiii Table of Contents CHAPTER 5 8.0 9.0 10.0 11.0 12.0 xiv DISASSEMBLY/ASSEMBLY (continued) Left Cover Assembly, Left Side Plate, Carriage Assembly, Trailing Cable, and Carriage Belt ............................................................................................ 5-30 8.1 Removing the Left Cover Assembly and Left Side Plate ................... 5-30 8.2 Removing the Carriage Assembly ..................................................... 5-32 8.3 Reinstalling the Carriage Assembly ................................................... 5-35 8.4 Reinstalling the Left Side Plate and Left Cover Assembly................. 5-40 8.5 Removing the Trailing Cable.............................................................. 5-41 8.6 Reinstalling the Trailing Cable ........................................................... 5-43 8.7 Removing the Carriage Belt from Carriage Assembly ....................... 5-46 8.8 Installing the Carriage Belt on Carriage Assembly............................. 5-47 Power Supply and ON/OFF Switch ................................................................. 5-48 9.1 Removing the Power Supply and ON/OFF Switch............................. 5-48 9.2 Installing the Power Supply and ON/OFF Switch............................... 5-49 Stabilizer Bracket and Encoder Strip............................................................... 5-50 10.1 Removing the Stabilizer Bracket........................................................ 5-51 10.2 Reinstalling the Stabilizer Bracket ..................................................... 5-52 Lower Drive Assembly, Fan Assembly, and Stepper Motor Assembly (Inner Platen Parts) ......................................................................................... 5-54 11.1 Disassembly of Plotter Before Removing the Inner Platen Parts....... 5-55 11.2 Removing the Inner Platen Parts ....................................................... 5-57 11.3 Stepper Motor .................................................................................... 5-61 11.3.1 Removing the Stepper Motor............................................. 5-61 11.3.2 Reinstalling the Stepper Motor .......................................... 5-63 11.4 Reinstalling the Inner Platen Parts..................................................... 5-64 11.5 Reassembly of Plotter After Reinstalling the Inner Platen Parts........ 5-67 Fixed Blade ..................................................................................................... 5-70 12.1 Removing the Fixed Blade................................................................. 5-70 12.2 Reinstalling the Fixed Blade .............................................................. 5-71 CADJET 2 Table of Contents CHAPTER 5 13.0 14.0 DISASSEMBLY/ASSEMBLY (continued) Cutter Wheel ................................................................................................... 5-72 13.1 Removing the Cutter Wheel............................................................... 5-72 13.2 Replacement of Cutter Wheel............................................................ 5-74 Upper Roller Supports ..................................................................................... 5-75 14.1 Removing the Upper Roller Supports ................................................ 5-76 14.2 Installing the Upper Roller Supports .................................................. 5-81 CADJET 2 xv Table of Contents CHAPTER 6 CALIBRATION Procedures to mechanically and electrically align the plotter following repairs, or when plotter performance has been affected. 1.0 Introduction ....................................................................................................... 6-1 2.0 Required Supplies and Tools ............................................................................ 6-2 3.0 Required Documentation and Files ................................................................... 6-4 4.0 Downloading Files From the BBS ..................................................................... 6-5 5.0 Numbering Sequence of Upper Roller Supports ............................................... 6-7 6.0 Adjustments Prior to Calibration........................................................................ 6-8 6.1 Slide Shaft Profile Adjustment ............................................................. 6-9 6.2 Cartridge Head Height Adjustment .................................................... 6-12 6.2.1 Gauge Setup Procedure .................................................... 6-12 6.2.2 Cartridge Head Height Adjusting Procedure...................... 6-17 6.2.3 Verify Head Height Values................................................. 6-18 6.3 Encoder Strip Location/Visual Check................................................. 6-19 6.4 Idler Pulley and Belt Position Check .................................................. 6-20 6.5 Power Up and ROM Verification Test ................................................ 6-21 6.5.1 Functional Test .................................................................. 6-21 6.5.2 Adjustment of the Paper Sensor Potentiometer ................ 6-23 7.0 Paper Skew Setup .......................................................................................... 6-27 8.0 Paper Skew Adjustment.................................................................................. 6-28 xvi 8.1 Paper Skew Adjustment Sequence ................................................... 6-29 8.2 Mounting Screw Information .............................................................. 6-30 8.3 Other Functional Requirements ......................................................... 6-33 8.4 Adjustment of Upper Roller Supports ................................................ 6-34 8.4.1 Visual Verification .............................................................. 6-34 8.4.2 Observation of Paper Skew at Rear Media Alignment Mark................................................................................... 6-35 8.4.3 Observation of Paper Skew at Front Media Alignment Mark................................................................................... 6-37 8.4.4 Adjustment of the Mounting Screws .................................. 6-38 CADJET 2 Table of Contents CHAPTER 6 CALIBRATION (continued) 9.0 Plotting PRIME Pattern.................................................................................... 6-39 10.0 XY Calibration.................................................................................................. 6-43 11.0 10.1 Calibrating the Y-Axis (Carriage Axis or Horizontal Axis Calibration)......................................................................................... 6-44 10.2 Calibrating the X-Axis (Paper Axis or Vertical Axis Calibration) ......... 6-46 Deadband Calibration...................................................................................... 6-47 11.1 Slow Deadband Calibration................................................................ 6-48 11.2 Fast Deadband (Height Calibration)................................................... 6-50 11.2.1 12.0 13.0 Cartridge Calibration - Horizontal and Vertical ................................................ 6-53 12.1 Adjusting the Horizontal Head-to-Head Calibration............................ 6-55 12.2 Adjusting the Vertical Head-to-Head Calibration................................ 6-56 Color Deadband Calibration ............................................................................ 6-57 13.1 14.0 Adjusting Fast Deadband; Vertical Lines (All) and Vertical Lines (One) ........................................................... 6-51 Adjusting the Color Deadband Value ................................................. 6-58 Line Quality Plot (Computer) Test ................................................................... 6-60 CADJET 2 xvii Table of Contents CHAPTER 7 REPLACEMENT PARTS LIST A complete listing (numerical, alphabetical, and illustrated alphabetical) of all field replaceable parts and assemblies for the CADJET 2 Color Inkjet Plotters. 1.0 Introduction ....................................................................................................... 7-1 2.0 Numerical Listing............................................................................................... 7-2 3.0 4.0 xviii 2.1 Parts Used in both D-Size and E-Size (Numerical).............................. 7-2 2.2 D-Size Unique Parts (Numerical) ......................................................... 7-4 2.3 E-Size Unique Parts (Numerical) ......................................................... 7-5 Alphabetical Listing ........................................................................................... 7-6 3.1 Parts Used in both D-Size and E-Size (Alphabetical) .......................... 7-6 3.2 D-Size Unique Parts (Alphabetical) ..................................................... 7-8 3.3 E-Size Unique Parts (Alphabetical)...................................................... 7-9 Alphabetical Listing with Drawings .................................................................. 7-10 4.1 Drawings - Parts Used in both D-Size and E-Size ............................. 7-10 4.2 Drawings - D-Size Unique Parts ........................................................ 7-26 4.3 Drawings - E-Size Unique Parts......................................................... 7-30 CADJET 2 Table of Contents APPENDICES APPENDIX A EMERGENCY FIRMWARE DOWNLOAD PROCEDURE Procedure for downloading firmware to a CADJET 2 Color Inkjet Plotter which has a blank or corrupt Flash EPROM. Emergency Firmware Download Procedure.................................................................A-1 APPENDIX B PRINTER FIRMWARE UPGRADE PROCEDURE Procedure for upgrading a CADJET 2 Color Inkjet Plotter to the newest version of firmware (Flash EPROM is not blank or corrupt). Printer Firmware Upgrade Procedure ..........................................................................B-1 APPENDIX C FINAL ASSEMBLY DRAWINGS CADJET 2 Color Inkjet Plotters (D-Size and E-Size) Final Assembly Drawings with Callouts. CADJET 2 D-Size Final Assembly Callouts ................................................................ C-2 CADJET 2 E-Size Final Assembly Callouts ................................................................ C-4 APPENDIX D SCHEMATICS Schematics for the CADJET 2 Color Inkjet Plotters Boards. Main PCB Assembly ............................................................................................ 9 pages Keypad PCB Assembly .......................................................................................... 1 page Carriage PCB Assembly....................................................................................... 2 pages Flex Circuit ............................................................................................................. 1 page CADJET 2 xix Table of Contents FIGURES CHAPTER 1 GENERAL INFORMATION Number Title Figure 1.1 Front View -- Cover Closed................................................................ 1-10 Figure 1.2 Front View -- Cover Open .................................................................. 1-11 Figure 1.3 Back View .......................................................................................... 1-12 Figure 1.4 Line Length Accuracy ........................................................................ 1-14 Figure 1.5 Skew .................................................................................................. 1-15 CHAPTER 2 Page THEORY OF OPERATION Number Title Figure 2.1 Major Functional Areas of the Plotter .................................................. 2-5 Figure 2.2 Gate Array ......................................................................................... 2-12 Figure 2.3 Stepper Motor .................................................................................... 2-14 Figure 2.4 Servo Motor ....................................................................................... 2-15 Figure 2.5 Parallel and Serial Ports .................................................................... 2-16 Figure 2.6 Keypad Display.................................................................................. 2-17 Figure 2.7 Carriage Circuits ................................................................................ 2-18 CHAPTER 4 Page TROUBLESHOOTING Number Title Figure 4.1 LED Keys........................................................................................... 4-18 Figure 4.2 LCD Keypad ...................................................................................... 4-19 Figure 4.3 Parallel and Serial Loop Back Tests .................................................. 4-30 Figure 4.4 Tri-Color Cartridge Flex ..................................................................... 4-46 Figure 4.5 Sample of Black Cartridge Diagnostics Test...................................... 4-50 Figure 4.6 Black Cartridge Failure Test Setups .................................................. 4-51 Figure 4.7 Black Cartridge Flex Dimple Pattern .................................................. 4-53 xx Page CADJET 2 Table of Contents CHAPTER 5 DISASSEMBLY/ASSEMBLY Number Title Page Figure 5.1 CADJET 2 Hardware Kit Assembly...................................................... 5-5 Figure 5.2 CADJET 2 Final Assembly Tools......................................................... 5-6 Figure 5.3 Preparing the Plotter for Shipping ........................................................ 5-8 Figure 5.4 Preparing the Plotter for Shipping - Alternate Method ....................... 5-10 Figure 5.5 Inside View of Right Cover Assembly ................................................ 5-11 Figure 5.6 MPCB Connectors ............................................................................. 5-14 Figure 5.7 Location of SIMMS............................................................................. 5-18 Figure 5.8 Closeup View of Clip .......................................................................... 5-18 Figure 5.9 Side View of SIMMS Removal ........................................................... 5-18 Figure 5.10 Side View of SIMMS Installation ........................................................ 5-19 Figure 5.11 Servo Motor........................................................................................ 5-22 Figure 5.12 Compression of Frame Tensioner...................................................... 5-23 Figure 5.13 Display Assembly............................................................................... 5-25 Figure 5.14 Keypad PCB ...................................................................................... 5-26 Figure 5.15 Service Station Assembly .................................................................. 5-27 Figure 5.16 Inside View of Left Side Plate ............................................................ 5-31 Figure 5.17 Trailing Cable Connector Lock on Carriage PCB............................... 5-33 Figure 5.18 Left End of Y-Arm .............................................................................. 5-34 Figure 5.19 Reinstalling the Trailing Cable in J1 Connector ................................. 5-37 Figure 5.20 Positioning the Trailing Cable on the Stabilizer Bracket..................... 5-44 Figure 5.21 Removing the Carriage Belt ............................................................... 5-46 Figure 5.22 Placement of Carriage Belt on Carriage ............................................ 5-47 Figure 5.23 Encoder Strip ..................................................................................... 5-50 Figure 5.24 Inner Platen Parts .............................................................................. 5-54 Figure 5.25 Disassembly of Plotter Prior to Removing the Inner Platen Parts ...... 5-56 Figure 5.26 Removing the Lower Drive Shaft Screws........................................... 5-58 Figure 5.27 Removing the Foam Block ................................................................. 5-59 CADJET 2 xxi Table of Contents CHAPTER 5 DISASSEMBLY/ASSEMBLY (continued) Number Title Figure 5.28 Lower Drive Assembly and Stepper Motor Assembly ........................ 5-62 Figure 5.29 Routing of Wires and Cables on Right Side Plate and MPCB ........... 5-68 Figure 5.30 Fixed Blade........................................................................................ 5-70 Figure 5.31 Cutter Assembly ................................................................................ 5-73 Figure 5.32 Upper Roller Support - Normal and Bent for Removal....................... 5-77 Figure 5.33 Removing the Old Upper Roller Support ........................................... 5-78 Figure 5.34 Inserting New Upper Roller Supports ................................................ 5-81 Figure 5.35 Positioning Upper Roller Supports..................................................... 5-82 CHAPTER 6 Page CALIBRATION Number Title Figure 6.1 Upper Roller Supports Numbering Sequence...................................... 6-7 Figure 6.2 Inner Stand Off Screws and Turnbuckle ............................................ 6-10 Figure 6.3 Carriage Height Measurement Fixture ............................................... 6-14 Figure 6.4 Installation of Typical Black Cartridge................................................ 6-15 Figure 6.5 Top View of Carriage Board .............................................................. 6-23 Figure 6.6 Upper Roller Support and Mounting Screws...................................... 6-30 Figure 6.7 Correct Positioning of the Spring in the Upper Roller Support........... 6-32 Figure 6.8 Test for Minimum Acceptable Gap .................................................... 6-33 Figure 6.9 Visual Verification of Gap between Roller and Y-Arm ....................... 6-34 Figure 6.10 Paper Skew Acceptance Range for Rear Media Alignment Mark...... 6-36 Figure 6.11 Paper Skew Acceptance Range for Front Media Alignment Mark ..... 6-37 Figure 6.12 Motion of Rollers and Adjustment of Mounting Screws ..................... 6-38 Figure 6.13 Deadband Alignment ......................................................................... 6-47 Figure 6.14 Vertical Lines (All) .............................................................................. 6-51 Figure 6.15 Vertical Lines (One) ........................................................................... 6-52 Figure 6.16 CADJET 2 Calibration Worksheet ..................................................... 6-62 xxii Page CADJET 2 Table of Contents CHAPTER 7 REPLACEMENT PARTS LIST Number Title Part # Page Figure 7.1 Assy, Bracket, Drive Shaft (left bracket w/bushing) ........................................P/N 204916 .......... 7-10 Figure 7.2 Assy, Carriage......................................................P/N 204854 .......... 7-10 Figure 7.3 Assy, Cover, Left..................................................P/N 203533 .......... 7-11 Figure 7.4 Assy, Cover, Right ...............................................P/N 203476 .......... 7-11 Figure 7.5 Assy, Cutter..........................................................P/N 203614 .......... 7-11 Figure 7.6 Assy, Exhaust ......................................................P/N 204384 .......... 7-12 Figure 7.7 Assy, Fan .............................................................P/N 203443 .......... 7-12 Figure 7.8 Assy, Hardware Kit CADJET 2, Service ..............P/N 205188 .......... 7-12 Figure 7.9 Assy, Idler ............................................................P/N 203345-1 ....... 7-12 Figure 7.10 Assy, Keypad Top ................................................P/N 203488 .......... 7-13 Figure 7.11 Assy, MPCB .........................................................P/N 205329 .......... 7-13 Figure 7.12 Assy, Pinch Roller ................................................P/N 203637-2 ....... 7-14 Figure 7.13 Assy, Rollguide, Left ............................................P/N 204969 .......... 7-14 Figure 7.14 Assy, Rollguide, Right ..........................................P/N 203477-2 ....... 7-14 Figure 7.15 Assy, Service Station ...........................................P/N 203233 .......... 7-15 Figure 7.16 Assy, Servo Motor................................................P/N 203265 .......... 7-15 Figure 7.17 Assy, Stepper Motor Bracket, Service (right bracket w/bushing)......................................P/N 205350 .......... 7-15 Figure 7.18 Assy, Stepper Motor Service (includes Gear) ......P/N 205128 .......... 7-16 Figure 7.19 Cable, Keypad .....................................................P/N 205111 .......... 7-16 Figure 7.20 Cable, RS422 Mini-DIN8......................................P/N 203977 .......... 7-17 Figure 7.21 Cam, Actuator (Left and Right) ............................P/N 203646 .......... 7-17 Figure 7.22 Caster, Locking, Twin...........................................P/N 202513 .......... 7-17 Figure 7.23 Caster, Non-Locking, Twin...................................P/N 202512 .......... 7-18 Figure 7.24 Clip, Belt...............................................................P/N 203644-1 ....... 7-18 Figure 7.25 Cutter, Wheel .......................................................P/N 203622-1 ....... 7-18 Figure 7.26 Foam, Block .........................................................P/N 205079 .......... 7-19 CADJET 2 xxiii Table of Contents CHAPTER 7 REPLACEMENT PARTS LIST (continued) Number Title Figure 7.27 Foam, Bottom, Left .............................................. P/N 203480-1 ....... 7-19 Figure 7.28 Foam, Bottom, Right............................................ P/N 203481-1 ....... 7-19 Figure 7.29 Foam, Top, Left ................................................... P/N 203788-1 ....... 7-20 Figure 7.30 Foam, Top, Right ................................................. P/N 203789-1 ....... 7-20 Figure 7.31 Frame, Tensioner ................................................ P/N 203343-1 ....... 7-20 Figure 7.32 Keypad, Bottom ................................................... P/N 203440-1 ....... 7-21 Figure 7.33 ON/OFF Switch (Power Entry Module) ................ P/N 204599 .......... 7-21 Figure 7.34 Power Supply....................................................... P/N 204849 .......... 7-21 Figure 7.35 Roll Support ......................................................... P/N 203868-1 ....... 7-22 Figure 7.36 Screws, Stand...................................................... P/N 203485 .......... 7-22 Figure 7.37 Sideplate, Left...................................................... P/N 204968 .......... 7-23 Figure 7.38 Sideplate, Right ................................................... P/N 204973 .......... 7-23 Figure 7.39 Spring, Compression (Idler) ................................. P/N 203447 .......... 7-24 Figure 7.40 Spring, Compression (Top Cover) ....................... P/N 202010 .......... 7-24 Figure 7.41 Spring, Roll Holder............................................... P/N 203918-2 ....... 7-24 Figure 7.42 Stop, Retracting ................................................... P/N 204246 .......... 7-25 Figure 7.43 Support, Drive Shaft (middle support).................. P/N 203556-2 ....... 7-25 Figure 7.44 Angle, Trailing Cable ........................................... P/N 203800-32 ..... 7-26 Figure 7.45 Assy, Legs and Basket ........................................ P/N 205175 .......... 7-26 Figure 7.46 Assy, Lower Drive ................................................ P/N 204917-31 ..... 7-27 Figure 7.47 Assy, Stabilizer Bracket, Service ......................... P/N 204551 .......... 7-27 Figure 7.48 Assy, Top Cover .................................................. P/N 204367-5 ....... 7-27 Figure 7.49 Belt, Ribbed ......................................................... P/N 203903 .......... 7-28 Figure 7.50 Cable, Trailing...................................................... P/N 203778 .......... 7-28 Figure 7.51 Platen, Machined ................................................. P/N 204848 .......... 7-28 Figure 7.52 Slide Shaft ........................................................... P/N 204007-31 ..... 7-29 Figure 7.53 Angle, Trailing Cable ........................................... P/N 203800-3 ....... 7-30 xxiv Part # Page CADJET 2 Table of Contents CHAPTER 7 REPLACEMENT PARTS LIST (continued) Number Title Figure 7.54 Assy, Legs and Basket.........................................P/N 205174 .......... 7-30 Figure 7.55 Assy, Lower Drive ................................................P/N 204917-1 ....... 7-31 Figure 7.56 Assy, Stabilizer Bracket, Service..........................P/N 204550 .......... 7-31 Figure 7.57 Assy, Top Cover...................................................P/N 204367-7 ....... 7-31 Figure 7.58 Belt, 3 Rib ............................................................P/N 203230 .......... 7-32 Figure 7.59 Cable, Trailing ......................................................P/N 203448 .......... 7-32 Figure 7.60 Platen, Machined .................................................P/N 204847 .......... 7-32 Figure 7.61 Slide Shaft............................................................P/N 204007-2 ....... 7-33 APPENDIX A Part # Page EMERGENCY FIRMWARE DOWNLOAD PROCEDURE Number Title Figure A.1 Cable, RS422 Mini-DIN8......................................................................A-3 APPENDIX C Page FINAL ASSEMBLY DRAWINGS Number Title Page Figure C.1 CADJET 2 D-Size Final Assembly...................................................... C-6 Figure C.2 CADJET 2 E-Size Final Assembly ...................................................... C-7 CADJET 2 xxv Table of Contents TABLES CHAPTER 1 GENERAL INFORMATION Number Title Table 1.1 Media Sizes and Maximum Plotting Areas for Rollfeed Media ............ 1-7 Table 1.2 Media Sizes and Maximum Plotting Areas for Sheet Media ................ 1-8 CHAPTER 4 Page TROUBLESHOOTING Number Title Table 4.1 Decision Logic Table One (DLT 1)....................................................... 4-4 Table 4.2 Decision Logic Table Two (DLT 2)....................................................... 4-5 Table 4.3 Decision Logic Table Three (DLT 3) .................................................... 4-6 Table 4.4 Decision Logic Table Four (DLT 4) ...................................................... 4-7 Table 4.5 Decision Logic Table Five (DLT 5)..................................................... 4-42 Table 4.6 Black Cartridge Flex Test Matrix........................................................ 4-54 CHAPTER 6 Page CALIBRATION Number Title Table 6.1 Carriage Height Settings Chart .......................................................... 6-16 Table 6.2 Potentiometer Adjustment Flowchart ................................................. 6-25 xxvi Page CADJET 2 Chapter 1 GENERAL INFORMATION 1.0 Introduction This manual provides service information for the ENCAD®, Inc. CADJET™ 2 Color Inkjet Plotter. This manual is written for service personnel who are experienced in analog and digital circuitry. Chapter 2, the Theory of Operation, should be read and thoroughly understood before attempting to troubleshoot or calibrate the plotter. The CADJET 2 supports both pre-cut and roll media, automatically determining the media size and setting the hardclip limits accordingly. The CADJET 2 uses both a serial interface and the Centronics parallel interface. It understands commands sent from the host computer in several forms, including HP-GL*, HP-GL/2*, and HP-RTL. _______________ * (Hewlett-Packard Graphics Language). CADJET 2 1-1 General Information 2.0 Overview Plotters draw according to instructions issued from a "host" computer. Any plotter is engineered to understand a specific set of instructions and to execute each instruction in a precise manner. In addition, most plotters are designed to execute predetermined characters automatically without a specific line-by-line instruction from the program. These characters are part of the plotter's permanent memory. 2.1 Related Publications The following publications contain additional information which may be useful in servicing the ENCAD, Inc. CADJET 2 Color Inkjet Plotter. l ENCAD, Inc. CADJET 2 User's Guide, P/N 205377 l ENCAD, Inc. P/N 205368 l ENCAD, Inc. P/N 205374 l ENCAD, Inc. CADJET 2 Installation Guide, P/N 205367 (This is the instruction sheet for installing the floor stand.) CADJET 2 CADJET 2 Troubleshooting Supplies Guide, Reference Guide, Additional copies of ENCAD, Inc. publications may be obtained by contacting your nearest authorized ENCAD, Inc. dealer or by contacting ENCAD’s Technical Support and Service Department. 1-2 CADJET 2 General Information 2.2 Features of this Service Manual 2.2.1 Subject Headings All subject headings are numbered. Main subject headings are identified by a dark gray banner with large white type. First sublevel subject headings are in large bold type and are set in slightly from the left margin. Second sublevel subject headings are in bold, italicized type. 1.0 Main Subject Heading 1.1 First sublevel subject heading Paragraph 1.1.1 Second sublevel subject heading Paragraph 2.2.2 Figures and Tables Figures are used to clarify procedures. They are for illustrative purposes only and may not necessarily be drawn to scale. Figures and Tables are easily located and cross-referenced, and are listed in the Table of Contents. CADJET 2 1-3 General Information 2.2.3 CAUTION NOTE Manual Conventions CAUTION - Reminders of importance that must be addressed, but may or may not cause minor damage, are highlighted with the “Caution” symbol at the left and with a cautionary note in bold type and is enclosed in a box. NOTE - Notes are placed before or after a procedure to inform the service person of specific details to improve quality, to give reminders of inter-related parts, and to provide other helpful information. They are indicated by the “Note” symbol at the left. The text of the note is in italics and is enclosed in a box. ORIENTATION - Instructions in this manual are based on the assumption that the service person is facing the front of the plotter. References to top view, back view, and so forth are consistent with this engineering standard. References to the X Axis and Y Axis (Paper Axis and Carriage Axis, respectively) follow the standard of AutoCAD™ absolute coordinates: up and down for X, left to right for Y. WARNING 1-4 WARNING - Read all warning notes before proceeding with any action steps to eliminate possible serious damage to the plotter and/or possible personal injury to the service person. Warnings are indicated by the “Warning” symbol at the left. The warning text is in bold italics type and is enclosed in a box. CADJET 2 General Information 3.0 ENCAD Technical Support & Service ENCAD offers full technical support and service for its various products. If you are unable to find the answer to your question in either the User’s Guide, Service Manual, or other related publications, contact our Technical Support and Service Department’s Help Desk. ENCAD, Inc. Technical Support & Service Dept. 6059 Cornerstone Court West San Diego, CA 92121 Help Desk Telephone: (619) 452-4350 Help Desk FAX: (619) 546-0659 Additional information is available on ENCAD’s bulletin board and through Internet: ENCAD BBS: (619) 452-2653 or (619) 452-3768 Internet WEB Page Address: http://www.thegroup.net/encad/ CADJET 2 1-5 General Information 4.0 Media Sizes and Plotting Areas The CADJET 2 plotter is designed to recognize specific standard media sizes by checking the narrow dimension of the media as it is loaded. The Normal and Expanded Plot Areas depend upon whether Rollfeed media or Sheet media has been loaded. The media sizes recognized by the plotter and the maximum plotting areas for Rollfeed media are listed in Table 1.1. The media sizes and maximum plotting areas for Sheet media are listed in Table 1.2. NOTE Note: The Expanded setting for the Margins option expands the plot area and decreases the margins. The current maximum plotting area may be viewed in the CADJET 2 keypad display by performing the following steps: 1. Initialize unit and load paper. 2. Press the UP ARROW five times until you see the following display: MAIN MENU PAGE FORMAT 3. Press SELECT once to display: PAGE FORMAT MARGINS=NORMAL 4. Press the UP ARROW twice to display: PAGE FORMAT PLOT AREA→ 5. 1-6 Press SELECT to view the current maximum plotting areas. CADJET 2 General Information Table Chapter 1 .1: Media Sizes and Maximum Plotting Areas for Rollfeed Media Paper Size Normal Plot Area Expanded Plot Area U.S. ENGINEERING A B C D E 8.5” 11.0” 17.0” 22.0” 34.0” x x x x x 11.0” 17.0” 22.0” 34.0” 44.0” A B C D E 9.0” 12.0” 18.0” 24.0” 36.0” x x x x x 12.0” 18.0” 24.0” 36.0” 48.0” A4 A3 A2 A1 A0 210 297 420 594 841 7.3” 9.8” 15.8” 20.8” 32.8” x x x x x 9.8” 15.8” 20.8” 32.8” 42.8” 8.1” 10.6” 16.6” 21.6” 33.6” x x x x x 10.6” 16.6” 21.6” 33.6” 43.6” 8.6” 11.6” 17.6” 23.6” 35.6” x x x x x 11.6” 17.6” 23.6” 35.6” 47.6” U.S. ARCHITECTURAL 7.8” 10.8” 16.8” 22.8” 34.8” x x x x x 10.8” 16.8” 22.8” 34.8” 46.8” ISO - A x 297 mm x 420 mm x 594 mm x 840 mm x 1189 mm 180 267 390 564 811 x 267 mm x 390 mm x 564 mm x 810 mm x 1159 mm 200 287 410 584 831 x 287 mm x 410 mm x 584 mm x 830 mm x 1179 mm 240 327 450 624 871 x 327 mm x 450 mm x 624 mm x 871 mm x 1219 mm METRIC - DIN A4 A3 A2 A1 A0 250 337 460 634 881 x 337 mm x 460 mm x 634 mm x 881 mm x 1229 mm 220 307 430 604 851 x 307 mm x 430 mm x 604 mm x 851 mm x 1199 mm B3 B2 B1 353 x 500 mm 500 x 707 mm 707 x 1000 mm 323 x 470 x 677 x E1 E2 E3 30.0” x 42.0” 26.0” x 38.0” 27.0” x 39.0” 28.8” x 40.8” 24.8” x 36.8” 25.8” x 37.8” ISO - B 470 mm 677 mm 970 mm 343 x 490 x 697 x 490 mm 697 mm 990 mm SPECIAL CADJET 2 29.6” x 41.6” 25.6” x 37.6” 26.6” x 38.6” 1-7 General Information Table Chapter 1 .2: Media Sizes and Maximum Plotting Areas for Sheet Media Paper Size Normal Plot Area Expanded Plot Area U.S. ENGINEERING A B C D E 8.5” 11.0” 17.0” 22.0” 34.0” x x x x x 11.0” 17.0” 22.0” 34.0” 44.0” A B C D E 9.0” 12.0” 18.0” 24.0” 36.0” x x x x x 12.0” 18.0” 24.0” 36.0” 48.0” A4 A3 A2 A1 A0 210 297 420 594 841 7.3” 9.8” 15.8” 20.8” 32.8” x x x x x 9.0” 15.0” 20.0” 32.0” 42.0” 8.1” 10.6” 16.6” 21.6” 33.6” x x x x x 9.4” 15.4” 20.4” 32.4” 42.4” 8.6” 11.6” 17.5” 23.6” 35.6” x x x x x 10.4” 16.4” 22.4” 34.4” 46.4” U.S. ARCHITECTURAL 7.8” 10.8” 16.8” 22.8” 34.8” x x x x x 10.0” 16.0” 22.0” 34.0” 46.0” ISO - A x 297 mm x 420 mm x 594 mm x 840 mm x 1189 mm 180 267 390 564 811 x 247 mm x 370 mm x 544 mm x 791 mm x 1139 mm 200 287 410 584 831 x 257 mm x 380 mm x 554 mm x 801 mm x 1149 mm 240 327 450 634 871 x 297 mm x 420 mm x 694 mm x 841 mm x 1189 mm METRIC - DIN A4 A3 A2 A1 A0 250 337 460 634 881 x 337 mm x 460 mm x 634 mm x 881 mm x 1229 mm 220 307 430 604 851 x 287 mm x 410 mm x 580 mm x 831 mm x 1179 mm B3 B2 B1 353 x 500 mm 500 x 707 mm 707 x 1000 mm 323 x 470 x 677 x E1 E2 E3 30.0” x 42.0” 26.0” x 38.0” 27.0” x 39.0” 28.8” x 40.0” 24.8” x 36.0” 25.8” x 37.0” ISO - B 450 mm 657 mm 950 mm 343 x 490 x 697 x 460 mm 667 mm 960 mm SPECIAL 1-8 29.6” x 40.4” 25.6” x 36.4” 26.6” x 37.4” CADJET 2 General Information 5.0 General Product Notes WARNING The material below is very important for the proper and safe operation of the plotter and should be read before proceeding. CLEANING - Alcohol contact with the Carriage Assembly bushings will cause damage. Wait until the Slide Shaft is completely dry before moving the Carriage Assembly. CUTTER - Proper safety procedures should be used when handling the Cutter in order to avoid injury. ENCODER STRIP - Water should NOT be used to clean the Encoder Strip. See Chapter 3 of this manual for the cleaning procedure. Be very careful when working near the Encoder Strip so that it is not damaged. LUBRICANTS - Do not use any lubricants on this product. USE OF LUBRICANTS WILL VOID THE WARRANTY. SLIDE SHAFT - Dry the Slide Shaft completely after cleaning it with alcohol. Alcohol contact to the Carriage Assembly bushings will cause damage. START UP - If the CADJET 2 doesn’t power-up, it must be turned off immediately to eliminate any damage until the problem can be resolved. CADJET 2 1-9 General Information 6.0 NOTE Plotter Features Note: The stand and basket assembly shown in Figure Chapter 1 .1 and Figure Chapter 1 .2 is changing. Drawings of the new stand and basket were not available at the time of publication. The major features of the CADJET 2 plotter are illustrated and described in Figure Chapter 1 .1, Figure Chapter 1 .2, and Figure Chapter 1 .3. 1-10 CADJET 2 General Information Figure Chapter 1 .1: Front View -- Cover Closed CADJET 2 1-11 General Information Figure Chapter 1 .2: Front View -- Cover Open 1-12 CADJET 2 General Information Figure Chapter 1 .3: Back View CADJET 2 1. Centronics Parallel Port (J2) 2. RS-422/423 Serial Port/Apple Talk (J3) 3. Power Input Plug and ON/OFF Switch 4. ID Label 5. Left Rollguide 6. Right Rollguide 7. Rear Media Alignment Mark 1-13 General Information 7.0 Plotter Specifications Standard Features: Cut sheet or roll feed with cutter Low ink level indicator 8 user-savable settings Replot and multiple copies Long plot up to 50 feet (15.4 m) Merged vector/raster images Ink reduction Plot nesting Auto rotation Cut Sheet Maximum Plotting Area: Normal = 0.59” (15 mm) margin on each of 3 sides and a 1.38” (35 mm) margin on the fourth side. Expanded = 0.197” (5 mm) margin on each of 3 sides and a 1.38” (35 mm) margin on the fourth side. Rollfeed Maximum Plotting Area: Normal = 0.59” (15 mm) on all sides. Expanded = 0.197” (5 mm) on all sides. Line Length Accuracy: ±0.015” (0.38mm) or ±0.2% of the specified vector line length, whichever is greater Long Plot: Plot length: 50’ (15.24m) Frame to Frame Registration: .01” Distance Accuracy: .20% of total length Buffer: 4 MB permanently installed Two 72-pin 32-bit wide DRAM SIMM sockets. User upgradable with 8, 16, 32, or 64 MB with 70 ns or faster SIMMS, conforming to JEDEC Standard Number 21-C Release 4 or later. Language Emulation: HP-GL: HP 7440,7470,7475, 7550, 7570, 7575, 7576, 7580, 7585, 7586, 7596 HP-GL/2, HP-RTL, EN-RTL Media Types: Paper based: Presentation (5 mil) and Premium Bond (7 mil) Cotton based: Inkjet Vellum Polyester based: Inkjet Transparency Film (4 mil) and Inkjet Drafting Matte Film (4 mil) Resolution: 300 x 300 DPI monochrome, gray, and color 600 x 600 DPI monochrome and gray Interfaces: Centronics bi-directional parallel RS-422 serial RS-232 (requires adaptor cable) Baud Rates: 300, 600, 1200, 2400, 4800, 9600, 19200, 38400 Power: Universal Power Supply: 100-240 Vac, 50-60 ±2 Hz, AC Input, DC Output Consumption: 40 W Typical, 60 W Max. Compliance: Safety: UL, CSA, TUV EMI: FCC Class B, VDE Class B CISPR22 Physical Specifications: E Size Model Dimensions: Height: Width: Depth: 48” (121 cm) 54” (140 cm) 28” (72 cm) Weight: Assembled: Shipping - Plot-head: 69 lbs. (31 kg) 62 lbs. (28 kg) D Size Model Dimensions: Height: Width: Depth: 42” (105 cm) 43” (112 cm) 28” (72 cm) Weight: Assembled: Shipping - Plot-head: 57 lbs. (26 kg) 54 lbs. (25 kg) Operating Environment: 41° to 104°F (5° to 40°C) 20 - 80% RH, Non-condensing Storage Environment: -40° to 140°F (-40° to 60°C) 10 - 80% RH, Non-condensing Rasterization: Internal rasterizer 1-14 CADJET 2 General Information 8.0 Line Length Accuracy The following information for the CADJET 2 clarifies the amount of acceptable variation for plotting accurately. See Figure Chapter 1 .4. Figure Chapter 1 .4: Line Length Accuracy 1. The drawn line length Lw is to be within ± 0.2% of the length specified. Lw typically is constant on the top and bottom of the plot. 2. Line length LL and LR are to each be ± 0.2% of length L specified. 3. The total difference, or delta, between the longest line within specification and the shortest line within specification is: L ( 1 + 0.2% ) - L ( 1 - 0.2% ) ⇒ + .2 - ( -.2 ) = .4%L LR - LL = ∆L ∆L < 0.4% of L Example: If: L specified = 45” Then: ∆L (left and right) must be .4% of 45 ∆L < 0.18 inches CADJET 2 1-15 General Information 9.0 Skew If the media loading instructions have been correctly implemented, these figures are conditions for variable paper movement during plotting. See Figure Chapter 1 .5. Figure Chapter 1 .5: Skew Given a specified rectangle LW wide and L high, the diagonal error L1 - L2 defines the skew. The maximum acceptable skew is: EQUAL TO: 0.2% of L1 + 0.2% of L2 or 0.4% of (L1 + L2) EXAMPLE: If: LW = 60cm L = 80cm Then: L1 should = L2 = 100cm Actual permissible skew ( L1 - L2 ) = .4% x 100cm = .4cm or 0.157 inches. 1-16 CADJET 2 General Information NOTE Note: 1. This method is the only method used to specify skew. Other geometrical constructs may yield different results. 2. Actual output is a function of the combined line length and skew errors and typically is a straight polygon whose four sides are not necessarily equal. CADJET 2 1-17 General Information 10.0 Acronyms and Abbreviations ACK A/D ANSI ARCH AS ASCII AUTO BTU C CAD CHG cm cm/s CPU CTRL CTS d or∆ dB DC DPI DRAM DSR DTE DTR EAS ENQ F FCC g gm GND HP-GL HP-GL/2 1-18 - Acknowledge - Analog to Digital - American National Standards Institute - Architectural - Address Strobe - American Standard Code for Information Interchange - Automatic - British Thermal Unit - Celsius - Computer Aided Drafting - Change - Centimeter - Centimeter per second - Central Processing Unit - Control - Clear to Send - Differential - Decibel - Direct Current - Dots Per Inch - Dynamic Random Access Memory - Data Set Ready - Data Terminal Equipment - Data Terminal Ready - Eavesdrop Enable Signal - Enquire - Fahrenheit - Federal Communications Commission - Gravity (defined as 9.82 m/s2 or 32 ft/s2) - grams - Ground - Hewlett-Packard Graphics Language (older standard) - Hewlett-Packard (standard) Graphics Language Hz INIT IP/s ISO - KB kHz LCD LED MANF MAX MB MIN mm MPCB PC PD PLL PROM - PU PWM RAM ROM RTS RXD SG SIMM - SRXD STXD TXD TXDO - UART - V Vac Vdc W - Hertz (cycles per second) Initialize Inches per second International Standards Organization Kilobytes Kilo (One Thousand) Hertz Liquid Crystal Display Light Emitting Diode Manufacturer’s Maximum Megabyte Minimum Millimeter Main Printed Circuit Board Personal Computer Pen Down Phase Locked Loop Programmable Read Only Memory Pen Up Pulse Width Modulation Random Access Memory Read Only Memory Ready to Send Receive Signal Ground Single Inline Memory Module Secondary Receive Secondary Transmit Transmit Transmitter Signal Data Output Universal Asynchronous Receiver/Transmitter Volts Volts Alternating Current Volt Direct Current Watts CADJET 2 General Information 11.0 Glossary ASCII American Standard Code for Information Interchange. An information scheme used by computers to represent letters, numbers, and symbols. ACCURACY The condition of being correct. ASYNCHRONOUS Data which is independent from a clock mechanism. BASIC Beginner's All-Purpose Symbolic Instruction Code. A common programmer's language for computer systems. BAUD The rate of data transfer (number of bits per second that data is transmitted or received). BIT The smallest piece of digital information that can be handled by a processor. A unit of information equal to one binary decision. BI-DIRECTIONAL Cartridges on the plotter fire ink on the media as the Carriage moves in either direction, right to left and left to right. BINARY The number system with a base of two used by the internal logic of all digital computers and controllers. It is a code that uses two distinct characters, usually the numbers 1 and 0. BITMAP A region of memory treated as a rectangular array of pixels. BYTE A single group of 8 bits processed together in parallel. Generally, eight bits which can be arranged in groups to represent 256 unique characters. BUFFER The part of the plotter’s memory used for receiving and temporarily holding plot files. BUS Computer circuits used to transmit data from one unit to another on a printed circuit board. CAD Computer Aided Drafting. A computer system or software designed to generate drawings on hardcopy media. CALIBRATION The procedures for adjusting the ink cartridge alignment, line length accuracy, and deadband. CADJET 2 1-19 General Information CARRIAGE The electromechanical assembly which carries the four ink Cartridges across the media. The PCB on the Carriage contains the decoding circuits to fire the ink nozzles and determine carriage location. CARRIAGE AXIS The plot area measured parallel to the platen; that is, the Y-Axis or Horizontal Axis. CARTRIDGE The plastic housing containing the ink and the ink nozzles. Two Cartridges are mounted on the plotter Carriage. CENTRONICS A parallel interface standard . CONFIGURATION The way that the computer and plotter are interconnected and set up to operate as a system. CPU Central Processor Unit. The part of the computer system that contains the Arithmetic-Logic Unit and the Control Unit. It forms the "brains" of the system, usually called the "computer." DATA The term used to denote any or all facts, numbers, letters, and other characters used in information transfer. DEADBAND The term when used in the physical or mechanical sense is "lost motion." It results from a number of accumulated effects, such as friction, pulley and belt backlash, electrical losses, finite position errors from digital encoders, and low servo gain. DEFAULT A value supplied by the internal firmware which is assumed to be the desired or common response for the plotter. This value may be changed by the user through the use of the front panel display buttons. DIAGNOSTICS A set of firmware instructions for the detection and isolation of plotter malfunctions. DISPLACEMENT A change in position. DISPLAY A device used to graphically show data. DPI Dots per inch, the number of dots the plotter lays down in an inch. DUTY CYCLE One complete cycle of time to complete a printing command. EMULATE To equal in quality or quantity. 1-20 CADJET 2 General Information EPROM Stores data and uses UV light to erase. FLASH EPROM Electronically erasable and programmable. MPCB and not replaceable.) GRAVITY Used to indicate the force to which a body is subjected when accelerated. HANDSHAKE A method of controlling the speed that information flows between two computer devices to insure that the sender does not transmit data too quickly for the receiver to process. HARDCLIP LIMIT A precise outer margin positioned around the plotting area. The boundaries of the printing area beyond which the plotter cannot print. HEIGHT ADJUSTMENT Height Adjustment refers to the adjustment of the gap between the Platen and the Cartridge head. INITIALIZE The menu driven instruction set which brings the plotter to the factory default conditions. INKJET The nozzle part of the ink cartridge. INK RECEPTIVITY The ability of the media to take various quantities of ink, thereby affecting the quality of the plot. This is determined by differences in sizing and media coating. INTERFACE CABLE The cable used to connect the plotter to the computer. CADJET 2 uses a serial or parallel interface cable. I/O ERROR A data transmission error between the computer and the plotter (for example, mismatched interfacing conditions such as baud rate and parity). LAN Local area network linking computers through cabling covering a 3K area. LINEAR ENCODER Reads data through the optical sensor. MEDIA The surface on which the plotter prints the image. Media are available in a variety of types, including paper, polyester, canvas, and film. MENU A firmware created display allowing the user to select and execute various functions or features. CADJET 2 (Soldered on 1-21 General Information MODE COMMAND This command sets the protocol parameters used to initialize the Asynchronous Communications Adapter (Com Port). MODIFY The user may change a plotting parameter previously set by the default values. MONOCHROME Printing done in only one color, usually black. NESTING Placing two or more plots horizontally on the media. OPACITY The ability of media to prevent ink from showing through. ORIENTATION The direction of the plotted image on the media; that is, portrait or landscape. P1 A scaling point used by the plotter that specifies the location of the plot's lower left corner. On the CADJET 2, this point will either be NORMAL or MAX. P2 A scaling point used by the plotter that specifies the location of the plot's upper right corner. On the CADJET 2, this point will either be NORMAL or MAX. PAPER AXIS The long side of the plot area measured at right angles to the platen; that is, the X-Axis or Vertical Axis. PARALLEL INTERFACE An interface type in which a separate line is used for each data bit in a byte or word and all bits are transferred simultaneously, making it faster than a serial interface. PARITY A method for checking for errors in the transfer of information between computing devices. Parity checks the accuracy of the binary data on a serial connection. PLATEN The surface on which the media moves. PLOT AREA The area in which the plotter prints the image, determined by the width of the media. PLOTTER An electromechanical device that produces hardcopies of computer data. Typically, this is done by moving the drawing device and/or the media to create lines or filled areas. POROSITY A measure of the flow of ink or air through the media. PRIME To clear the ink cartridges by forcing them to fire rapidly. 1-22 CADJET 2 General Information RAM Random Access Memory. Usually temporary electronic storage for data. Data will be lost when power is removed. RASTER IMAGE A graphic image created by dots called bitmaps. The plot is defined in terms of pixels (dots) rather than as vectors. Each pixel is defined by a bit. A bit that is “on” will print a dot on the media. A bit that is “off” will leave the area blank. REPEATABILITY The act of repeating. In plotting, the ability of a plotter to return to a predetermined location on the plot with a given amount of accuracy. RESET The plotter’s menu-driven instruction to return the plotter to a predetermined status. RESOLUTION The sharpness of a printed image as measured by dots per inch. The number of dots per unit of area to which the plotter may be addressed. ROLLFEED Media that is packaged on a roll and is loaded and fed through the back of the plotter. ROM Read Only Memory. Permanent electronic storage for data. Used to store the plotter's internal instructions. There is no data loss when power is removed. RS-422 Differential communication serial port with a mini-Din connector compatible to Apple/Mac. RS-423 Single-Ended Communication that requires conversion of the mini-Din to a DB-9 or a DB-25. QUADRANTS Blocks that count data to sequence the ink jet firing. SCALING Dividing of the plotting area into units convenient for the plotting application. SCALING POINTS Points which have been assigned user unit values in the (SC) instruction. These points define the user coordinate system mapped into the area defined by P1 and P2. SERIAL INTERFACE An interface type which uses a single data line to transfer all data bits sequentially between devices. Slower than a parallel interface. SERVO A self-correcting closed loop electromechanical system that compares an output signal to an input or feedback signal. CADJET 2 1-23 General Information SHEET MEDIA Media that is packaged in individual sheets and is loaded and fed through the front of the plotter. SKEW The rotation of the media from the initial inserted position (not the rotational inaccuracy of the initial media loading). Affects line length accuracy, especially in the paper axis. May be measured, in the demo plot or any plot, by how far the line on the left margin is different from the line on the right margin. Sometimes referred to as “SLEW.” See Section 9.0 of this chapter for information about determining the Skew and Chapter 6 for the adjustment procedures. STEPPER The media drive motor. The motor rotates one step for each pulse generated by the drive circuit. Position is controlled by the number of pulses generated. STOP BIT In the RS-422/432 configuration, one or two bits following a transmitted data byte which notify the receiver that the information is complete. TRANSDUCER Converts dynamic quantity into voltage. UART Universal Asynchronous Receiver/Transmitter. An interface device used between bit serial and bit parallel communications devices. UNI-DIRECTIONAL Cartridges on the plotter fire ink on the media during right to left movement only. VECTOR A graphic created by geometric lines. HP-GL and HP-GL/2 files are vector files. VELOCITY The time-rate of linear motion in a given direction. Commonly referred to as speed. 1-24 CADJET 2 General Information Chapter 1 GENERAL INFORMATION 1-1 1.0 Introduction......................................................................................................... 1-1 2.0 Overview............................................................................................................. 1-2 2.1 Related Publications ....................................................................................... 1-2 2.2 Features of this Service Manual...................................................................... 1-3 2.2.1 Subject Headings ..................................................................................... 1-3 2.2.2 Figures and Tables................................................................................... 1-3 2.2.3 Manual Conventions................................................................................. 1-4 3.0 ENCAD Technical Support & Service................................................................. 1-5 4.0 Media Sizes and Plotting Areas.......................................................................... 1-6 5.0 General Product Notes ....................................................................................... 1-9 6.0 Plotter Features ................................................................................................ 1-10 7.0 Plotter Specifications ........................................................................................ 1-14 8.0 Line Length Accuracy ....................................................................................... 1-15 9.0 Skew................................................................................................................. 1-16 10.0 Acronyms and Abbreviations.......................................................................... 1-18 11.0 Glossary ......................................................................................................... 1-19 TABLES Table 1.1: Media Sizes and Maximum Plotting Areas for Rollfeed Media................... 1-7 Table 1.2: Media Sizes and Maximum Plotting Areas for Sheet Media ...................... 1-8 FIGURES Figure 1.1: Front View -- Cover Closed ..................................................................... 1-11 Figure 1.2: Front View -- Cover Open ....................................................................... 1-12 Figure 1.3: Back View ............................................................................................... 1-13 Figure 1.4: Line Length Accuracy.............................................................................. 1-15 Figure 1.5: Skew ....................................................................................................... 1-16 CADJET 2 1-25 Chapter 2 THEORY OF OPERATION 1.0 Introduction This chapter explains the mechanical and electrical theory of the operation of the CADJET 2 Color Inkjet plotter. The CADJET 2 is a 68340 microprocessor-based digital plotter that receives plotting instructions from a host computer through the RS-422/423 serial interface or the Centronics parallel interface. CADJET 2 2-1 Theory of Operation 2.0 2.1 Mechanical Operation Media Axis Drive The Media Axis Drive moves the plotting media in a direction perpendicular to the length of the plotter. This friction drive consists of the Stepper Motor, reduction gears, and the Pinch Wheels. 2.2 Carriage Axis Drive The Carriage Axis Drive moves the plotter Carriage Assembly along the length of the plotter. The drive consists of a Servo Motor, Drive Belt, and Tensioning Assembly. The Stepper and Servo Motors are controlled from the main printed circuit assembly by the microprocessor, which also supplies to the Carriage the signals necessary to cause the ink cartridge nozzles to fire the desired colors of ink onto the media. 2-2 CADJET 2 Theory of Operation 3.0 Electrical Operation 3.1 Circuit Assemblies Four circuit assemblies are contained in the CADJET 2 plotter: the Main Printed Circuit Board (in the right cover assembly), the front panel circuits (in the Keypad Assembly), and the Carriage Flex Assembly and the Carriage Rigid Board (in the moveable Carriage Assembly). 3.1.1 Main Printed Circuit Board (MPCB) The Main Printed Circuit Board (MPCB) contains six features: 1. Microprocessor (CPU) 2. Gate Array 3. Memory Circuits 4. Stepper Motor driver 5. Servo Motor driver 6. Interface Circuits: 3.1.2 Serial & Centronics Parallel Front Panel Front Panel Circuit The Front Panel Circuit contains two features: CADJET 2 1. Supertwist Display (Liquid Crystal Display, or LCD) 2. Keypad 2-3 Theory of Operation 3.1.3 Carriage Printed Circuit Assembly (Carriage PCB) The Carriage Printed Circuit Assembly (Carriage PCB) contains five features: 2-4 1. Registers 2. Demultiplexers 3. Ink Nozzle Drivers (Inkjet Driver Circuit) 4. Linear Encoder 5. Paper Sensor (separate board) CADJET 2 Theory of Operation 3.2 Block Diagram Figure Chapter 2 .1 illustrates the major functional areas of the plotter. Major control and data paths are shown. Figure Chapter 2 .1: Major Functional Areas of the Plotter CADJET 2 2-5 Theory of Operation 3.3 Power Supply An internal UL recognized switching power module supplies power for the CADJET 2. It provides a constant 5Vdc and 24Vdc output from input voltage in the range of 100~240 Vac. A power switch mounted on the back left end of the platen turns the power on and off. The 24V supply is used for the stepper controller which advances the paper, the servo controller which moves the Carriage and provides power to fire the inkjets. The 5V supply powers the logic circuits. The DS1233D reset generator IC monitors the 5V power supply and holds RESET low for 350ms after the 5V supply reaches 4.375V. When RESET goes high, the microprocessor itself will drive it low for an additional 512 clock cycles. If the microprocessor’s 32KHz crystal oscillator is not working, it will hold RESET low. 2-6 CADJET 2 Theory of Operation 3.4 Microprocessor The microprocessor (a Motorola MC68340) is a central processor unit which supervises system functions, executes the plotter firmware, manipulates data, and controls input/output data busses. It has two built-in serial ports, a two channel DMA controller, a timer module, a clock generator, and an on-board chip select generator. One serial port connects to the Mini-Din connector which can be used to communicate with the host computer; the other serial port interfaces to the Keypad/Display module. One DMA channel supplies data to the gate array for jet firing; the other DMA channel is used to receive data through the parallel port or the serial port when using a high speed serial mode. One timer generates a servo interrupt every millisecond; the other is used for timing the Stepper Motor. The phase-locked-loop (PLL) frequency synthesizer generates the 16.777MHz system clock from a 32768Hz crystal reference. The chip select generator is programmed to generate chip selects at the appropriate addresses, with the appropriate data size (byte, word) and with the appropriate number of wait states. CADJET 2 2-7 Theory of Operation 3.5 Start-up Sequence Immediately after power-up, the following sequence of events takes place: 2-8 1. System registers in the microprocessor are initialized. This includes initializing the clock generator. Prior to this, the clock runs at about half its normal speed. 2. All LEDs are turned on and off. The fan is turned off. 3. The display is initialized and the copyright message is displayed. 4. A checksum of the EPROM is performed. 5. The first four kilobytes of RAM are tested to make sure enough RAM is working to run the compiled C code. 6. Execution of the compiled C code begins. 7. RAM size is determined, and all RAM is tested. Status information is shown on the display during the test. “Memory OK” is displayed at the end of the test. 8. The code in the EPROM is copied to RAM, and the program begins executing out of RAM. CADJET 2 Theory of Operation 3.6 Memory Memory is used to retain large amounts of information. This information is stored in the device memory in the form of binary bits. Plotter memory consists of Flash EPROM, RAM, and EEPROM. Flash EPROM is Erasable, Programmable, Read Only Memory used to store instructions and data constants which the microprocessor can access and interpret, with no loss of information when power is off. RAM is Random Access Memory which provides temporary storage of the microprocessor calculation and input/output data. The plotter control program is also copied from the Flash EPROM to RAM where it can be executed faster. EEPROM is an Electrically Erasable, Programmable, Read Only Memory which provides storage for calibration constants and user configuration data entered from the front panel keys. Maximum usable memory is as follows: RAM = 68 MB Flash EPROM = 1 MB EEPROM = 1KB CADJET 2 2-9 Theory of Operation 3.7 Flash EPROM The system firmware is stored in a Flash EPROM. The Flash EPROM allows the firmware to be upgraded by simply downloading a file containing the new firmware. It can be erased and reprogrammed more than 10,000 times. The term “Flash” means that bytes cannot be individually erased. A block or the whole device is erased at the same time and the block or whole device is then reprogrammed. The plotter is designed to support Flash devices. The 29F040 is a 512Kx8 5V only device. There is an extra socket for another 512Kx8 available. The normal method of downloading new firmware is to send the plotter a file of the new code. This requires using an appropriate host utility. This can be done through either the serial or parallel port. This method requires code to be running in the plotter to interpret the file. If, for some reason, the EPROM is blank or corrupt, there is an alternate method to download firmware to the plotter. This alternate method takes advantage of a feature of the MC68340 processor known as Background Debug Mode (BDM). Background Debug Mode only works through the serial port and requires a special host utility. It is a mode that allows some registers and RAM to be written to, based upon commands sent through the serial port. The special host utility provides user instructions as it runs. 2-10 CADJET 2 Theory of Operation 3.8 RAM The plotter also has two 72-pin 32-bit wide SIMM sockets for RAM. The plotter is supplied with 4 Megabytes of RAM permanently installed on the Main Board. The following SIMM sizes are supported: 4MB (1Mx32), 8MB (2Mx32), 16MB (4Mx32), and 32MB (8Mx32). The SIMMS must have an access time of 70ns or less, and conform to JEDEC Standard Number 21-C Release 4 or later. Remove the Right Cover Assembly to install additional memory (see Chapter 5, Section 4.5 for installation procedures). Refer to the User’s Guide for specifications and requirements. 3.9 EEPROM An 8K bit serial non-volatile EEPROM stores calibration and configuration information. It retains data while the unit is off. CADJET 2 2-11 Theory of Operation 3.10 Gate Array Figure Chapter 2 .2: Gate Array The gate array contains the hardware logic for dot firing, monitoring changes in the Carriage position, controlling DMA (Direct Memory Access) through the parallel port, and generating the PWM (Pulse Width Modulation) waveforms for the servo. The gate array is a Xilinx device. It is a static RAM based field programmable gate array. This means that the logic that it implements is determined by configuration information in internal RAM storage. Each time power is turned on, this information must be downloaded from the system ROM. This type of gate array allows for the flexibility of upgrading the logic by upgrading the system software. The XDONE signal is held low by the gate array and all its outputs are in a high impedance state until its programming is complete. 2-12 CADJET 2 Theory of Operation 3.11 Stepper Motor The media is driven by a Stepper Motor which drives the media in a direction perpendicular to the length of the plotter. The media in the plotter can advance forward and backward, depending upon the commands which the Stepper Motor receives from the microprocessor. The Stepper Motor drive contains two identical circuits, one for each winding of the stepper motor. The circuit is a combination of two simpler types of circuits and can be thought of as a variation of either one. The first is a switching power supply, but in this case the current rather than the voltage is regulated. Instead of output capacitors to filter voltage ripple, output inductance in the form of the motor winding filters current ripple. The other type of circuit is a bipolar chopper drive which is commonly used for driving stepper and servo motors. In both cases, the circuit has the additional feature that the reference varies with time so that a waveform is generated rather than a steady state signal. CADJET 2 2-13 Theory of Operation Each circuit contains four main blocks (see Figure Chapter 2 .3): 1. Reference waveform generator The microprocessor uses a D/A (digital to analog) converter to set the desired level for the current in the stepper motor winding. The output of the D/A converter varies in time to create a reference waveform. This reference waveform is centered around 10V. 2. Motor current sense The voltage across a series current sense resistor is measured and level shifted so that it is centered around 5V. 3. Compare and control This portion divides the output of the reference waveform generator by two and compares it to the output of the motor current sensor. Logic inside the gate array generates the control signals for the power driver that applies voltage across the motor winding in order to make the actual current match the reference waveform. 4. Power driver An H-bridge allows the supply voltage to be applied across the winding in either polarity to drive the current to the desired value. Figure Chapter 2 .3: Stepper Motor 2-14 CADJET 2 Theory of Operation 3.12 Servo Motor Figure Chapter 2 .4: Servo Motor The Carriage is driven by the Servo Motor. The speed of the Carriage is controlled by varying the duty cycle of the power applied to the controller. The microprocessor checks the position of the Carriage approximately 1,000 times per second during the servo interrupt. It then updates the PWM (pulse width modulator) register in the gate array which sets the duty cycle to make adjustments to the Carriage speed. A linear optical encoder (Encoder Strip) is used to monitor the Carriage position. The optical codestrip runs the length of the Carriage and contains 150 lines and spaces per inch. Thus there are 300 edges per inch. The detector actually consists of two detectors. They are separated from each other such that one detects edges halfway between where the other detects edges. This is known as a quadrature decoder. It gives an effective resolution of 600 lines per inch. The direction the Carriage is moving is known based upon the state of one detector’s output and the direction of the transition of the other detector’s output. A hardware counter in the gate array increments as the Carriage moves left and decrements as the Carriage moves right. The hardware counter is only eight bits wide, so it cannot store a value large enough to represent an absolute carriage position. Instead, it is read during the servo interrupt and its value compared with that from the previous interrupt. This difference is used to update the absolute position value in the software. CADJET 2 2-15 Theory of Operation 3.13 Parallel and Serial Ports Figure Chapter 2 .5: Parallel and Serial Ports Data from the host computer is received either through the Centronics parallel port or the serial port. The gate array provides the control signals for DMA transfers from the parallel port. The serial port is designed primarily to interface to a Macintosh printer port. It has an eight pin Mini-Din connector. The data (TXD, RXD) signals meet RS422 electrical specifications, and the control signal (DTRCLK) meets the RS423 electrical specifications. The control signal can be configured as a 1MHz clock for high speed serial communications with a Macintosh. The serial port is compatible with RS232 devices when an appropriate adapter cable is used. This cable is available from ENCAD. Please refer to Chapter 7 of this Service Manual for the part number. 2-16 CADJET 2 Theory of Operation 3.14 Keypad/Display Figure Chapter 2 .6: Keypad Display In addition to the seven dedicated function keys on the plotter Right Cover Assembly as part of the main board, the front keypad uses four keys to access the menu: main, select, forward (up arrow), and backward (down arrow). The data from the four keys and to the display is encoded on the second serial port of the microprocessor. The display provides information to the user on plotter status. CADJET 2 2-17 Theory of Operation 3.15 Carriage Circuits Figure Chapter 2 .7: Carriage Circuits The Carriage contains the optical encoder for horizontal position sensing, a Paper Sensor, and the logic and drive circuitry for firing the ink jets. 2-18 CADJET 2 Theory of Operation 3.16 LEDs, Beeper, and Fan Five LEDs indicate the following conditions: READY, MEDIA OUT, INK LOW, MONOCHROME, and COLOR MODE. The beeper contains built-in driver circuitry so that it beeps whenever power is applied to it. The beeper alerts the user to error conditions in these categories. The Fan provides suction on the platen bed and holds the paper flat during the plot process. 3.17 Dot Firing Sequence The following sequence of events occurs for every strip printed: 3.18 1. A buffer in RAM is filled with all the firing data for the whole strip. 2. The DMA controller is initialized. 3. INIT_DMA 4. ENEQ 5. When the Carriage reaches the firing position, the gate array sequences through the thirteen jet positions in the cartridge quadrants. The data in the buffer ram transfers to the Carriage electronics and the appropriate jets fire. The gate array initiates the DMA transfer of the data for the next firing position. This step repeats until the entire strip is printed, then the process repeats, starting at the first step. is set in the gate array. This causes the gate array to initiate the DMA transfer of the 24 bytes of firing data for the first position into the buffer RAM. The last byte of data is the quadrature counter value at which to fire the jets. is set in the gate array to enable the hardware position comparator. Schematic Diagrams Engineering schematic diagrams for the Main PCB Assembly, Keypad PCB Assembly, Carriage PCB Assembly, and the Flex Circuit are located in Appendix D. CADJET 2 2-19 Theory of Operation Chapter 2 THEORY OF OPERATION 2-1 1.0 Introduction ........................................................................................................ 2-1 2.0 Mechanical Operation ........................................................................................ 2-2 2.1 Media Axis Drive ............................................................................................. 2-2 2.2 Carriage Axis Drive ......................................................................................... 2-2 3.0 Electrical Operation ............................................................................................ 2-3 3.1 Circuit Assemblies .......................................................................................... 2-3 3.1.1 Main Printed Circuit Board (MPCB).......................................................... 2-3 3.1.2 Front Panel Circuit ................................................................................... 2-3 3.1.3 Carriage Printed Circuit Assembly (Carriage PCB) .................................. 2-4 3.2 Block Diagram ................................................................................................ 2-5 3.3 Power Supply.................................................................................................. 2-6 3.4 Microprocessor ............................................................................................... 2-7 3.5 Start-up Sequence.......................................................................................... 2-8 3.6 Memory........................................................................................................... 2-9 3.7 Flash EPROM............................................................................................... 2-10 3.8 RAM.............................................................................................................. 2-11 3.9 EEPROM ...................................................................................................... 2-11 3.10 Gate Array .................................................................................................. 2-12 3.11 Stepper Motor ............................................................................................. 2-13 3.12 Servo Motor ................................................................................................ 2-15 3.13 Parallel and Serial Ports ............................................................................. 2-16 3.14 Keypad/Display........................................................................................... 2-17 3.15 Carriage Circuits ......................................................................................... 2-18 3.16 LEDs, Beeper, and Fan .............................................................................. 2-19 3.17 Dot Firing Sequence ................................................................................... 2-19 3.18 Schematic Diagrams................................................................................... 2-19 2-20 CADJET 2 Theory of Operation FIGURES FIGURE 2.1: MAJOR FUNCTIONAL AREAS OF THE PLOTTER ............................. 2-5 FIGURE 2.2: GATE ARRAY ..................................................................................... 2-12 FIGURE 2.3: STEPPER MOTOR ............................................................................. 2-14 FIGURE 2.4: SERVO MOTOR.................................................................................. 2-15 FIGURE 2.5: PARALLEL AND SERIAL PORTS....................................................... 2-16 FIGURE 2.6: KEYPAD DISPLAY .............................................................................. 2-17 FIGURE 2.7: CARRIAGE CIRCUITS ........................................................................ 2-18 CADJET 2 2-21 Chapter 3 MAINTENANCE 1.0 Introduction This chapter contains general maintenance and cleaning instructions for the CADJET 2 plotter. Refer to Chapter 4 for troubleshooting information. 1. Always disconnect the power cord and the interface cables before cleaning the plotter. An electrical shock hazard may result if these procedures are not followed. 2. Never allow liquids to come in contact with the plotter’s electrical circuitry. Failure to follow this procedure may result in an electrical shock hazard and damage to the plotter. WARNING CADJET 2 3-1 Maintenance 2.0 CAUTION External Cleaning Do not use abrasive cleansers of any sort on any area of the plotter. Damage to the surface texture may result. Clean the exterior surface of the plotter with a soft, damp cloth. For more persistent stains, a small amount of liquid cleaner may be used. Cleaning intervals are determined by the environment in which the plotter is used. 3-2 CADJET 2 Maintenance 3.0 Slide Shaft Maintenance CAUTION Lubrication should not be used on the Slide Shaft. It may damage the Carriage Assembly, the Servo Motor, and/or the Carriage Belt. USE OF LUBRICATION WILL VOID THE WARRANTY! An accumulation of dirt or other contamination on the Slide Shaft may result in excessive drag on the Carriage, which will affect the plot quality. It is therefore necesssary to clean the Slide Shaft at regular intervals, as determined by the environmental conditions. To clean the Slide Shaft: CADJET 2 1. Park the Carriage Assembly in the Service Station. 2. Disconnect the power cord and interface cables from the plotter. 3. Raise the plotter top cover. 4. Moisten a clean cloth or paper wipe with isopropyl alcohol. 5. Wipe the length of the Slide Shaft with the moistened cloth. 3-3 Maintenance CAUTION To prevent damage to the plotter, do not slide the Carriage on the shaft until the alcohol is completely dry. 6. Manually move the Carriage from end to end. 7. Wipe the Slide Shaft with a dry cloth to remove any deposits left by the Carriage. 8. Reconnect the power cord and interface cables and run the PRIME plot. (See Chapter 4, Section 11.8 for information concerning the appearance of the PRIME plot.) During plotting, make sure that: a. the Carriage Assembly slides freely on the Slide Shaft, and b. there is no Carriage vibration or any noise. If the Carriage Assembly does not move freely, or if there is Carriage vibration and/or any noise, clean the Slide Shaft again and repeat the PRIME plot. If the problem is not resolved, refer to Chapter 4, Section 11.17 “Plotter Carriage Moves Erratically” for additional troubleshooting steps. 3-4 CADJET 2 Maintenance 4.0 Service Station Maintenance Ink and dust accumulation on the Service Station may affect the print quality. To clean the Service Station: CADJET 2 1. Disconnect the power cord. 2. Raise the Top Cover. 3. Carefully move the Carriage Assembly to the center of the Slide Shaft. 4. Dampen a cotton swab with warm water and wipe the seals and the rubber wiper to completely remove ink residue and dust accumulation. Also clean all the excess ink out of the reservoirs and out of the bottom of the Service Station. 5. Remove all moisture from the seals and the wiper with a dry swab. 6. Reconnect the power cord. 3-5 Maintenance 5.0 Encoder Strip Maintenance Clean the Encoder Strip only as necessary to remove any buildup of debris. Isopropyl alcohol may be used. You may notice that it tends to fog the Encoder Strip; however, no detrimental effect has been observed as of the publication date of this manual. To clean the Encoder Strip, use a Q-Tip which has been slightly dampened with isopropyl alcohol and wipe along the length of the Encoder Strip on both sides of the Encoder Strip. 3-6 CADJET 2 Maintenance 6.0 Ink Cartridge Maintenance 1. Hold the Cartridges by the green or black area only. Do not let the copper or gold areas come in contact with any surface. 2. When installing the Cartridges, lower them straight down into the Cartridge Covers. Tilting the Cartridges at an angle may cause damage to the Carriage Flex Cable. 3. Tapping Cartridges on any hard surface may jar Cartridge components and cause extreme damage. CAUTION 6.1 CADJET 2 Initial Installation of Cartridges 1. Cartridges can dry out quickly, so keep them in the original containers until ready for installation. 2. After removing the Cartridge from the container, carefully remove the tape from the nozzle area (do not touch nozzle or jet area). Save the tape and the original container so that they are available in case the Cartridge is removed from the plotter for a prolonged period of time. 3. Lower the Cartridge straight down into the Cartridge Cover and firmly press down and forward so that the Cartridge moves forward slightly. Push the lever up until it stops. When installing the Tri-Color Cartridge, press firmly on its top as you close the lever. 3-7 Maintenance 3-8 4. Run the PRIME plot and verify that all the jets are firing. The bands should be smooth without dark streaks or white lines. The sloping (diagonal) lines should not look fuzzy or contain gaps. You may need to run the PRIME plot several times. If a satisfactory plot is not obtained, follow the instructions below in Section 6.2. You may also need to refer to Chapter 4, Section 11.7 “Ink Cartridge Problems.” 5. After a satisfactory PRIME plot is obtained, perform the Cartridge Calibration. See Chapter 6, Section 12.0 of this service manual. CADJET 2 Maintenance 6.2 CAUTION Cleaning Cartridges Do not use alcohol in the nozzle plate area. Alcohol in this area will cause damage to the ink Cartridge. 1. Remove the Cartridge from the Cartridge Holder. 2. Press lightly against the jets with a moistened (with water), lint-free, non-paper cloth (do not use tissues) until ink is released from the Cartridge. Blot, do not wipe, the jet area. Wiping may damage the jet area. CAUTION Gently blot any excess ink, reinstall Cartridge, and run PRIME. It may be necessary to run the PRIME plot several times in order to obtain a satisfactory plot. See Chapter 4, Section 11.8 for information concerning the appearance of the PRIME plot. 3. 1. The green end of the Tri-Color Cartridge should never be inserted in the ultrasonic cleaner. 2. Do not allow the Cartridge nozzle plate to rest on the bottom of the ultrasonic cleaner. CAUTION CADJET 2 If the Cartridge continues to misfire, remove the Cartridge again. Use an ultrasonic cleaner (the type used to clean technical pens or jewelry, typically found in drafting supply stores or department stores) with water (distilled water preferred but not necessary). Hold the bottom end (nozzle plate end) of the Cartridge in the water. 3-9 Maintenance Set the timer for 10-20 seconds, then remove. Dry the Cartridge body (avoid touching the jet area). Reinstall Cartridge and run PRIME again. Repeat steps as often as necessary to improve PRIME. After a satisfactory PRIME plot is obtained, perform the Cartridge Calibration. See Chapter 6, Section 12.0 of this service manual. 4. NOTE 3-10 If priming and the above maintenance procedures fail to unclog a Cartridge, the Cartridge may be out of ink. Note: Also see Chapter 4, Section 11.7 “Ink Cartridge Problems”. CADJET 2 Maintenance 6.3 Other Causes of Misfiring Cause Solution 1. Cartridge is not seated properly in the Cartridge Holder. Reinstall Cartridge into the Cartridge Holder. Lower the Cartridge straight down into the Cartridge Holder and gently press down and forward so that the Cartridge moves forward slightly. Push the lever up until it stops. 2. Ink spills (buildup) or other debris on the Cartridge or the Flex Cable. Clean the Flex Cable in the Cartridge Holder and the electrical contact and jet areas on the Cartridge gently with a Q-Tip moistened with distilled water (tap water is OK if distilled water is unavailable). Do not use Acetone or any other harsh cleaner because these may cause damage to the Flex Cable. If ink buildup continues, replace the Cartridge. 3. Buildup of ink in the Service Station. Clean the Service Station. See Section 4.0. 4. Cartridge damage (due to dropping, improper storage, or tapping Cartridge on a hard surface). If damaged, replace with a new Cartridge. CADJET 2 3-11 Maintenance 6.4 Storage of Cartridges During Extended Periods of Inoperation If the Cartridges are left in the plotter: 1. If the plotter is not used for an extended period of time, it is preferred that the Cartridges remain in the plotter with the Carriage parked at the Service Station. Make sure that the Cartridges are properly capped in the Service Station. 2. When you are ready to use the plotter again, you may need to run the PRIME plot several times. You may need to refer to the procedures above in Section 6.1 “Initial Installation of Cartridge” and in Section 6.2 “Cleaning Cartridges” if the PRIME plot is unsatisfactory. If the Cartridges are removed for an extended period of time: 6.5 1. Blot the ink off the nozzle plate area (the nozzle plate area must be completely dry or the protective tape will not stick). 2. Put the protective tape back on the Cartridge and return the Cartridge to the original container. 3. Place the container in a plastic bag with the jets facing up so that ink won't drain or leak out, causing clogging. 4. Store the Cartridge in a closed area (desk or storage cabinet) at room temperature for best results. Keep the Cartridge out of direct sunlight and away from heating or air conditioning vents. They can also be stored in a refrigerator. 5. After stored Cartridges are reinstalled, follow the procedures above in Section 6.1 “Initial Installation of Cartridge.” Refilled Cartridges ENCAD does not recommend or support the use of refilled Cartridges. 3-12 CADJET 2 Maintenance 7.0 Upper and Lower Rollers 1. Do not use alcohol or any other cleansers to clean the Upper and Lower Rollers. Use only distilled water and a lintfree cloth. 2. NEVER attempt to clean the Upper and Lower Rollers by using the plotter’s FEED MEDIA key and the UP or DOWN ARROWS on the Display Keypad. The cloth could become jammed in the plotter and cause severe damage. ALWAYS disconnect the power cord and manually turn the 96 Teeth Gear on the Lower Drive Assembly. WARNING In order to prevent erratic media movement during plotting, it is necessary to periodically clean the Upper and Lower Rollers. To clean the Upper and Lower Rollers: CADJET 2 1. Park the Carriage Assembly in the Service Station. 2. Disconnect the power cord from the plotter. 3. Raise the plotter top cover. 4. Manually turn the 96 Teeth Gear on the Lower Drive Assembly (the gear is near the Service Station) as you hold a lint-free cloth that has been moistened with distilled water against the rollers. Do not allow the cloth to slip between the Upper and Lower Rollers. 3-13 Maintenance Chapter 3 MAINTENANCE 3-1 1.0 Introduction ........................................................................................................ 3-1 2.0 External Cleaning ............................................................................................... 3-2 3.0 Slide Shaft Maintenance .................................................................................... 3-3 4.0 Service Station Maintenance.............................................................................. 3-5 5.0 Encoder Strip Maintenance ................................................................................ 3-6 6.0 Ink Cartridge Maintenance ................................................................................. 3-7 6.1 Initial Installation of Cartridges .................................................................... 3-7 6.2 Cleaning Cartridges .................................................................................... 3-9 6.3 Other Causes of Misfiring.......................................................................... 3-11 6.4 Storage of Cartridges During Extended Periods of Inoperation ................ 3-12 6.5 Refilled Cartridges..................................................................................... 3-12 7.0 Upper and Lower Rollers.................................................................................. 3-13 3-14 CADJET 2 Chapter 4 TROUBLESHOOTING 1.0 Introduction 1. These repair and replacement procedures are intended for trained personnel. 2. Disconnect the power cord and remove the interface cables before fixing the plotter. An electrical shock hazard may result if these procedures are not followed. 3. Never allow liquids to come in contact with the plotter electrical circuitry. Failure to follow this procedure may result in an electrical shock hazard and damage to the plotter. This chapter contains the CADJET 2 Decision Logic Tables (DLT’s), Service Menu information, instructions for using the Front Keypad and Side Panel keys, and the actions to take when the operation of the plotter does not appear to be normal. The Decision Logic Tables list possible remedies to various conditions of the plotter. Information on using the DLT’s is given below in Section 2.1. Other information in this chapter covers situations that could not be adequately addressed in a DLT. The Service Menu and the Front and Side Panel figures aid in the understanding of the plotter tests and how to scroll through the menu. CADJET 2 4-1 Troubleshooting 2.0 2.1 NOTE Decision Logic Tables Procedure for Using Decision Logic Tables Note: Always check the information at the top of the DLT carefully so that you are aware of any warnings, references to other manuals, any “Begin with” or “Exit to” information, and the assumptions upon which the particular DLT is constructed. After this information has been reviewed, locate the condition with which you are dealing. The section of the DLT labeled “CONDITIONS” asks questions concerning various conditions which can be answered “Yes” or “No” (Y or N). The section of the DLT labeled “ACTIONS” provides actions which can be performed. The actions are listed progressively from simple to complex, with the lowest cost/time factor first. The information is listed in this order: Hardware, Software, Mechanical, and Electrical. Use the following hypothetical condition to familiarize yourself with the DLTs. CONDITION The media does not load. The plotter is a CADJET 2 and is receiving power. PROCEDURE 1. 4-2 After reviewing all information at the top of Table Chapter 4 .1, DLT 1, it has been determined that DLT 1 is the proper table to use. CADJET 2 Troubleshooting 2. NOTE Note: 3. NOTE 2.2 Read the conditions listed in the DLT and answer each question. For this DLT 1, if the answer to the question is “YES” (Y), proceed to the next condition. In some of the DLT’s, you proceed to the next condition if the answer to the condition is “NO.” When a question (condition) is answered “NO” (N), look across the row for the letter “N.” Look down the column containing the letter “N” for the actions to be taken. For our example, “media does not load,” the condition on DLT 1 reads “DOES PAPER LOAD?” and column 7 contains the “NO” answer for this condition. Note: In some of the DLT’s, if the answer to the condition is “YES,” you look for the letter “Y” in that row and then look down the column containing the “Y” for the actions to be taken. 4. Look down column 7 for the number 1. The ACTION for the row containing the number 1 in column 7 is “CHECK STEPPER MOTOR CONNECTOR (JP5).” This is the first action which should be performed to correct the condition of the media not loading. 5. If the first action does not correct the condition, proceed to the number 2 in column 7. If, after performing the listed action, the condition is not corrected, proceed to the next number in column 7 until one of the actions corrects the condition. 6. If none of the actions corrects the condition, the last action that will be provided is “CALL ENCAD TECHNICAL SUPPORT.” This does not necessarily mean that you have performed an action incorrectly or that you have misdiagnosed the problem; not every situation can be covered in a DLT. Decision Logic Tables The Decision Logic Tables begin on the next page. CADJET 2 4-3 Troubleshooting Table Chapter 4 .1: Decision Logic Table One (DLT 1) WARNING: OBSERVE ALL STANDARD STATIC AND SAFETY PRECAUTIONS REFERENCES: CALIBRATION PROCEDURES (USER’S GUIDE & SERVICE MANUAL) BEGIN WITH: ASSUMPTIONS LISTED BELOW EXIT TO: THE DECISION LOGIC TABLE INDICATED AT THE END OF THIS TABLE ASSUMPTIONS: 1. CADJET 2 SERIES PLOTTER 2. INPUT POWER COLUMN NUMBERS CONDITIONS 1 2 3 4 5 6 7 8 9 DOES DISPLAY COME ON? Y N DOES MEMORY COUNT UP? Y N DOES EPROM REVISION DISPLAY? Y N IS CARRIAGE SEQUENCE COMPLETE? Y N DOES THE KEYPAD FUNCTION? Y N DOES PAPER LOAD? Y N DOES FAN POWER UP? Y N DOES SELF TEST RUN? Y N ACTIONS VERIFY INPUT POWER 1 VERIFY INPUT POWER ON MPCB 2 RESEAT DISPLAY CONNECTOR (J1) 3 REPLACE MPCB 4 CLEAN SIMMS CONTACTS 1 TEST ANY EXTRA SIMMS AND REPLACE IF DEFECTIVE 2 REPLACE MPCB 3 VERIFY MPCB POWER 1 REPLACE MPCB 2 INSURE CARRIAGE MOVES FREELY 1 CLEAN AND INSPECT ENCODER STRIP 2 VERIFY BELT POSITION 3 VERIFY TENSIONER SPRING POSITION 4 RESEAT SERVO MOTOR POWER CONNECTOR (J6) 5 REPLACE SERVO MOTOR ASSEMBLY 6 REPLACE MPCB 7 RESEAT KEYPAD CONNECTOR (J1) 1 EVALUATE KEYPAD ACTION 2 VERIFY INSTALLATION OF LATEST EPROM REVISION 3 REPLACE MPCB 4 CHECK STEPPER MOTOR CONNECTOR (JP5) 1 REPLACE STEPPER MOTOR 2 REPLACE MPCB 3 RESEAT FAN CONNECTOR (J5) 1 REPLACE FAN ASSEMBLY 2 REPLACE MPCB 3 CALL ENCAD TECHNICAL SUPPORT (see Chapter 1, Section 3.0) 5 4 3 8 5 4 4 GO TO DECISION LOGIC TABLE 2 (DLT 2) X X 4-4 CADJET 2 Troubleshooting Table Chapter 4 .2: Decision Logic Table Two (DLT 2) WARNING: OBSERVE ALL STANDARD STATIC AND SAFETY PRECAUTIONS REFERENCES: CALIBRATION PROCEDURES (USER’S GUIDE & SERVICE MANUAL) BEGIN WITH: DECISION LOGIC TABLE ONE (DLT 1) EXIT TO: DECISION LOGIC TABLE THREE (DLT 3) ASSUMPTIONS: 1. CADJET 2 SERIES PLOTTER 2. POWER ON SEQUENCE OK COLUMN NUMBERS CONDITIONS 1 2 3 4 5 PLOTTER INTERMITTENTLY REBOOTS N Y INTERNAL FUSE (THERMAL) BLOWS N Y TRANSIENT INTERMITTENT MPCB FAILURES N Y SMOKE N Y ACTIONS CLEAN AND RESEAT ANY EXTRA SIMMS 1 TEST AND REPLACE ANY EXTRA SIMMS 2 REPLACE SERVO MOTOR 1 REPLACE MPCB 2 VERIFY INPUT POWER QUALITY 1 CHECK AND REPLACE INPUT XFORMER AS REQUIRED 2 REPLACE MPCB 3 POWER OFF AND CALL ENCAD TECHNICAL SUPPORT (see Chapter 1, Section 3.0) 3 3 4 1 CADJET 2 4-5 Troubleshooting Table Chapter 4 .3: Decision Logic Table Three (DLT 3) WARNING: OBSERVE ALL STANDARD STATIC AND SAFETY PRECAUTIONS REFERENCES: CALIBRATION PROCEDURES (USER’S GUIDE & SERVICE MANUAL) BEGIN WITH: DECISION LOGIC TABLE TWO (DLT 2) OR PLOTTING ERRORS ASSUMPTIONS: 1. CADJET 2 SERIES PLOTTER 2. POWER ON SEQUENCE OK COLUMN NUMBERS CONDITIONS 1 2 3 4 5 6 7 8 9 10 11 CARRIAGE AXIS FAILURE N Y INTERNAL ERROR # 1 N Y MEMORY HIGH / LOW N Y MEMORY FULL N Y CHECKSUM ERROR N Y PROCESSES BUT DOES NOT PLOT N Y OVER INK OF MEDIA N Y POOR VERTICAL LINE QUALITY N Y POOR HORIZONTAL LINE QUALITY N Y BANDING N Y INK SMEARING N ACTIONS VERIFY BELT TENSION 1 RESEAT SERVO MOTOR POWER CONNECTOR (J6) 2 CLEAN & INSPECT ENCODER STRIP FOR DAMAGE 3 REPLACE SERVO MOTOR 4 REPLACE MPCB 5 CLEAN & INSPECT ANY EXTRA SIMMS 1 VERIFY PROPER SIMMS SIZE & SPEED 2 TEST ANY EXTRA SIMMS & REPLACE IF DEFECTIVE 3 REPLACE MPCB OR SIMMS SOCKET 4 SET RASTER MEMORY TO MAX & RESEND PLOT 1 ADD MEMORY SIMMS 2 CHECK INPUT POWER CONDITIONING 1 REPLACE EPROMS 2 REPLACE MPCB 3 USE ROLL FEED SOFTWARE DRIVER 1 SET WAIT TIME TO 5 SECONDS 2 RUN DEMO PLOT. IF OKAY, CHECK SOFTWARE 1 RETEST WITH ENCAD SUPPORTED QUALITY MEDIA 2 RUN VERTICAL CALIBRATION 1 VERIFY DEAD BAND ADJUSTMENT 2 SEE CARRIAGE AXIS FAILURE 3 RUN HORIZONTAL CALIBRATION 1 VERIFY POSITION & CONDITION OF SLIDER & PATH 2 VERIFY ENHANCED MODE 1 VERIFY CARRIAGE HORIZONTAL CALIBRATION 2 VERIFY PRIME & REPLACE CARTRIDGE AS REQUIRED 3 VERIFY X/Y CALIBRATION 4 REPLACE MPCB 5 CARRIAGE HEIGHT ADJUSTMENT VERIFY FAN OPERABLE & REPLACE IF REQUIRED CALL ENCAD TECHNICAL SUPPORT (see Chapter 1, Section 3.0) 4-6 6 5 3 4 3 3 4 3 6 12 Y 1 2 3 CADJET 2 Troubleshooting Table Chapter 4 .4: Decision Logic Table Four (DLT 4) WARNING: OBSERVE ALL STANDARD STATIC AND SAFETY PRECAUTIONS BEGIN WITH: ASSUMPTIONS: CONDITIONS 1. RS422/232 ERROR STATUS 2. ON LINE SYSTEM CONNECTION CONDITIONS COLUMN NUMBERS I/O ERROR # 0 (NO I/O ERROR HAS OCCURRED.) 1 2 3 4 5 6 7 8 9 10 11 I/O ERROR # 10 N Y I/O ERROR # 11 N Y I/O ERROR # 12 N Y I/O ERROR # 13 N Y I/O ERROR # 14 N Y I/O ERROR # 15 N Y I/O ERROR # 16 N Y I/O ERROR # 17 N Y I/O ERROR # 18 N Y I/O ERROR # 19 N Y I/O ERROR # 20 N I/O ERROR # 21 N ACTIONS OUTPUT INSTRUCTION RECEIVED WHILE ANOTHER 1 OUTPUT INSTRUCTION IS BEING EXECUTED. THE FIRST IS EXECUTED WHILE THE NEXT INSTRUCTIONS ARE IGNORED. CHECK FOR PROPER SYNTAX IN ESCAPE SEQUENCES. CHECK FOR VALID CONTROL INSTRUCTION DATA. VERIFY PARAMETERS DO NOT EXCEED S.C. LIMITS. TOO MANY PARAMETERS RECEIVED. ADDITIONAL PARAMETERS AFTER THE CORRECT NUMBER ARE IGNORED. CONFIRM MATCHING PARITY AND DATA BITS. WRONG HANDSHAKE. CHECK DTR NORM/HARDWIRE. INPUT BUFFER OVERFLOW. THIS WILL RESULT IN THE LOSS OF DATA AND PROBABLY AN HP-GL EMULATION ERROR. VERIFY CABLE CONFIGURATION. MATCH BAUD RATE ON PLOTTER AND COMPUTER. TRY LOWER BAUD RATE. CHECK FOR EXCESSIVE CABLE LENGTH. LINE DRIVER/LINE RECEIVER DEFECTIVE. RS422/232 SERIAL XTDA/XRDA FAILURE. (OCCURS ONLY WITH A LOOP BACK CONNECTOR IN TEST.) RS422/232 DTR OR CTS TEST FAILURE. (OCCURS ONLY WITH A LOOP BACK CONNECTOR IN TEST.) CADJET 2 12 13 Y Y 1 1 1 1 1 2 1 2 1 1 2 1 1 1 4-7 Troubleshooting 3.0 Service Menu A Service Menu has been built into the plotter firmware to aid in troubleshooting the plotter. You should have received a copy of the Service Menu chart with this Service Manual. (If you did not receive the chart, please call the ENCAD Help Desk at the number given in Chapter 1, Section 3.0.) It contains all the necessary instructions for navigating the Service Menu. At the present time, one Service Menu structure is currently in use, based upon the firmware revision level of the plotter. Information about the revision level is found by scrolling to the following display, which is located in the SERVICE INFORMATION level of the Service Menu: ROM REVISION CADJet V1.5xx From time to time, revisions of the firmware may be released by the Company. These revisions will be available on new releases of the Utilities Disk and on ENCAD 's Technical Support BBS, which is listed in Chapter 1 of this manual. The Service Menu has three levels or submenus. Detailed descriptions of these three levels are given in Section 4.0 below. 4-8 CADJET 2 Troubleshooting 4.0 Service Menu Description NOTE Note: Consult your copy of the Service Menu chart for instructions for navigating the Service Menu. If you did not receive the chart, please call the ENCAD Help Desk at the number given in Chapter 1, Section 3.0. The Service Menu begins at the following display: UTILITIES SERVICE→ This option has three levels or submenus: z z z CADJET 2 SERVICE INFORMATION, SERVICE DIAGNOSTICS, and SERVICE CALIBRATION. 4-9 Troubleshooting 4.1 Service Information SERVICE INFORMATION→ This level provides information about the User Settings. There are two sub-levels: z z 4.1.1 Information Display Settings INFORMATION DISPLAY SETTINGS DATE: TIME: 4-10 INFORMATION DISPLAY SETTINGS and INFORMATION PRINT SETTINGS. XX-XX-XX XX:XX:XX This option displays only the current user’s User Settings. (No changes can be made to the User Settings from the Service Menu. Changes must be made in the USER SETTINGS level of the Main Menu.) Current time and date settings in use. ROM REVISION CADJet V1.5xx Shows current CADJET 2 Revision Level. RELEASE INFO REV 1.5xx ROM Shows the release date of the current firmware. TOTAL MEMORY XXXXXXXX BYTES Shows the number of bytes available. MEMORY CONFIG I/O=128K RAS=3M Shows buffer memory bank and raster memory available. EMULATE LANGUAGE HPGL2 Shows the Emulation Language in use. The CADJET 2 is programmed for HP-GL and HP-GL/2. CADJET 2 Troubleshooting BAUD RATE 9600 Shows the number of bits per second that are transmitted or received. PARITY EVEN,7BITS Reports voltage fluctuations or memory chip failure. HANDSHAKE HARDWIRE Allows time for processing hardwire communication. DTR NORMAL If DTR=NORMAL, Data Terminal Ready for information; if DTR=BYPASS, data transfer start or stop is sent to the buffer via the transmit receive lines. PRINT MODE NORMAL Shows draft, normal, quality, or enhanced line resolution. PRINT DIRECTION BI Shows choice of bi-directional or uni-directional jet firing. PRINT COLOR COLOR Shows the method of printing, including dots per inch. Options are: MONO 300X300, GRAY 300X300, COLOR 300X300, MONO 600X600, and GRAY 600X600. FIRING RATE 5000 Shows the current speed at which the ink is fired onto the media in 100 Hz increments from 3000 Hz to 10,000 kHz. CADJET 2 4-11 Troubleshooting MAX PWM/POSITION 14 84 0 The first number shows the currently recorded maximum PWM (Pulse Width Modulator) value, which is a value between zero and 255. The second number refers to the Encoder position where the error occurred. (There are 600 Encoder units per inch.) The third number is the maximum duration of time (in milliseconds) that the threshold PWM has been reached. PWM/SATURATION 0 245 0 -1 Shows the current PWM as last viewed. You can go into this display while the plotter is running to view the power being applied to the Servo Motor. The first number is a signed value (positive or negative, depending upon which direction the motor is going). The second number is the threshold PWM, which is always 245 in the current firmware version. The third number tells the current state of the Carriage: 0 = stopped, 1 = accelerating, 2 = moving at constant speed, and 4 = decelerating. The fourth number is the filtered velocity in Encoder units per millisecond. A negative number indicates left to right movement and a positive number indicates right to left movement. (If you multiply Encoder units per millisecond by 1,000 and divide by 600, the result is inches per second.) STOP/MAX/DISABLE 0 50 0 The first number shows the current stopped time. This will usually be zero unless there has been a failure (Carriage Axis Failure). The second number is the maximum amount of time in milliseconds that an error will be allowed to continue past the time at which the threshold PWM was reached before the unit shuts down. The third number is usually at zero unless a function is being performed (such as cutting the paper) during which the shutdown criteria are disabled. 4-12 CADJET 2 Troubleshooting ERROR/CMD/POS 0 0 0 If an error occurs, this display provides information which shows the type of error. It also shows the command and Encoder position where the error occurred. If you have an unexplained error and need to call ENCAD’s Technical Support department, this display can give the technician more information to enable the error to be diagnosed. ON TIME XX:XX:XX Displays how long the plotter has been turned on. PLOT TIME XX:XX:XX Records the time used on plotter. 4.1.2 INFORMATION PRINT SETTINGS CADJET 2 Information Print Settings This option prints all eight stored User Settings. Media must be loaded in order to print them. 4-13 Troubleshooting 4.2 Service Diagnostics SERVICE DIAGNOSTICS→ This level contains the following firmware tests to detect and isolate plotter malfunctions: • • • • • • • • Paper Sensor Serial Port Parallel Port Cartridge Carriage Vibration Color Test Key Pad LCD • • • • • • • LED ROM RAM Speaker Servo Motor Paper Motor Fan DIAGNOSTICS PAPER SENSOR This option tests the Paper Sensor and reports the available plotting area in inches and millimeters. DIAGNOSTICS SERIAL PORT This option tests the serial port and reports any errors. You must have the Loopback plug in place to perform this test. DIAGNOSTICS PARALLEL PORT This option tests the parallel port and reports any errors. You must have the Loopback plug in place to perform this test. DIAGNOSTICS CARTRIDGE This option tests the Cartridges by printing a test pattern (PRIME). DIAGNOSTICS CARRIAGE VIBRATE This option tests the Carriage vibration by printing a test pattern which consists of five sets of three parallel lines. 4-14 CADJET 2 Troubleshooting DIAGNOSTICS COLOR TEST=XX% Four 1” bands of each color in various saturations can be printed. This allows you to try different percentages of ink with different media, and tests for the accuracy of the saturation level. This test is also useful in determining whether the Carriage height is tilted. DIAGNOSTICS KEYPAD This option causes any one of the four keys on the LCD keypad to beep if the key tests OK. DIAGNOSTICS LCD This option causes the LCD to briefly display two rows of 16 eights if the LCD tests OK. DIAGNOSTICS LED This option causes all the lights on the plotter to light for two seconds (note that the lights for READY and either MONO or COLOR are always lit). DIAGNOSTICS ROM This test returns a value of OK or ERROR. DIAGNOSTICS RAM This test returns a value of OK or ERROR. DIAGNOSTICS SPEAKER This option causes the speaker to sound for one second. DIAGNOSTICS SERVO MOTORÆ This test gives the option of testing the Servo Motor at either slow or fast speed. You can enter the number of cycles for the Servo Motor test (500 is recommended). CADJET 2 4-15 Troubleshooting DIAGNOSTICS PAPER MOTORÆ This test feeds the paper (media) forward a specific number of inches (do not exceed 5 inches) in either slow or fast speed. DIAGNOSTICS FAN This option will start the Fan. The Fan will run until the SELECT key is pressed. 4-16 CADJET 2 Troubleshooting 4.3 Service Calibration SERVICE CALIBRATION→ This level contains firmware instructions for performing the electrical calibration of the plotter. See Chapter 6, Sections 9.0 through 14.0 of this manual for the procedures for performing the electrical calibration. CALIBRATION DEADBAND=XX This option prints the deadband test and allows the value to be changed. CALIBRATION VERT LINES(ONE) This option prints two 1-1/2” vertical lines within each of the 16 regions in uni-directional mode. CALIBRATION VERT LINES(ALL) This option prints two 1-1/2” vertical lines within each of the 16 regions in bi-directional mode. CALIBRATION SLOW DEADBAND This option prints 1 line of deadband across all 16 regions. CADJET 2 4-17 Troubleshooting 5.0 LED Keys Ready Indicates that the plotter is on-line. Blinks when processing data or printing. Media Out Indicates that the plotter is out of media. Ink Low Indicates that an ink cartridge has reached the Ink Low level set by user. Mono/Color Indicates whether the plotter is set for monochrome or color printing. Offline/Reset Pressing Offline/Reset once takes the plotter offline and allows you to load media, replace cartridges, clear paper jams, or perform other maintenance. All plotter keypad and menu functions are available while plotter is offline. The current plot continues when Offline/Reset is pressed again. To reset the plotter and clear the print buffer, you press Offline/Reset once, use the UP ARROW to choose RESET=YES, and then press SELECT. Access Cartridges Moves the Carriage out of the Service Station. Prime Fires the Cartridges to help clear the inkjets. Cut Cuts roll media. Feed Media Interacts with display and arrow keys to move media forward or backward. Load Loads and positions the media for printing. 4-18 Figure Chapter 4 .1: LED Keys CADJET 2 Troubleshooting 6.0 LCD Keypad z The plotter goes into sleep mode after 7 minutes of inactivity. Pressing any key puts it into ready mode. z Press the MENU key to return to a previous menu level. z Use the ARROW keys to scroll through the menus and options. z Press SELECT to choose a menu, or to change and save a setting in displays with an equals sign (=). To change a setting, press SELECT once (equals sign blinks) and use the ARROW KEYS to scroll through the choices. Press SELECT to save your choice (blinking stops). z Submenu items with an arrow (Æ) have additional submenus. MENU MAIN MENU PRINT MODE SELECT Figure Chapter 4 .2: LCD Keypad CADJET 2 4-19 Troubleshooting 7.0 Keypad Messages The Keypad and LCD display messages will be of considerable help in determining the status of the plotter and possible corrective action when operation does not appear to be normal. See Sections 5.0 and 6.0 to understand how the keys function. 7.1 Plot Received PLOT RECEIVED UNABLE TO CHANGE 7.2 Drying Plot DRYING PLOT x MIN x SEC 7.3 Data has been received, but no media has been loaded. Load media for plotting. Memory Full MEMORY FULL PRESS ANY KEY 4-20 With Roll-Feed enabled, the plotter waits a specified amount of time before cutting the media and allowing the plot to fall. If cut sheet media is being used, there will be no plotter action after the dry-time elapses. The user may release the media at any time. Insert Media INSERT MEDIA USE LOAD KEY 7.4 This indicates that the user has attempted to make a change to the plotter parameters after the plot data has been received. Plotting parameters must be set prior to the data transmission. When you set each of the parameters, be sure to press SELECT to save the settings. The I/O buffer has overflowed. The plot being sent will probably not be complete. Buffer allocation should be reset. If this does not resolve the problem, increase the buffer memory by upgrading the SIMMS module to a larger size (maximum of 64MB). Refer to the CADJET 2 User's Guide for the acceptable sizes, manufacturers, and installation procedures. CADJET 2 Troubleshooting 7.5 RAM OK RAM OK: REV X 4MB 7.6 Checksum Error CHECKSUM ERROR 7.7 The Carriage has stopped moving in its normal direction due to an obstruction such as a paper jam or a hand in the way. Turn the plotter OFF and remove any obvious obstruction and the media. Turn the plotter ON, load new media, and resend the plot. If this same message appears, call ENCAD's Technical Support and Service department at the number listed in Chapter 1, Section 3.0 for further instructions. Ready to Replot READY TO REPLOT XXXXX CADJET 2 A Checksum error during the initialization sequence is an indication of a probable ROM error. The Main Printed Circuit Board must be replaced. Refer to Chapter 5, Sections 4.3 of this manual for the replacement procedures. Plotter Error PLOTTER ERROR CARRIAGE AXIS 7.8 The plotter stops at this point in the initialization sequence and does not display the LOAD message on the display. This may indicate a RAM error (see Section 10.0 of this chapter), even though the RAM test has indicated RESULT=OK. Check the RAM installation on the Main Printed Circuit Board. Make sure that the RAM is fully seated. Incompatible SIMMS may also cause this problem. See the CADJET 2 User’s Guide for acceptable SIMMS sizes and the replacement procedure. For cut sheet only. This display indicates the plotter is ready to generate another copy of the same image which has already been transmitted to the plotter and printed. This display will remain until a piece of cut sheet media is loaded. Line two of the display indicates the quantity of replots remaining. 4-21 Troubleshooting 8.0 Initialization Sequence A variety of checks are automatically performed by the plotter. When power is connected, the initialization process begins. The plotter will briefly display a copyright message and then start the internal initialization. The Fan will turn on and the Carriage will move from right to left and back to the Service Station. The first message reads: ROLL=OFF CUT=ON SAVE MEDIA=ON The Carriage will then move across the plotter, engage the Cutter and move back to the Service Station, cutting the media if a roll of media is installed. At this point the initialization sequence is complete, and the plotter will wait for user input or action. If the sequence is interrupted and is not completed, or if any error messages are displayed, refer to the Decision Logic Tables in Section 2.2 of this chapter for corrective action. When the plotter is not used for seven minutes, it will go into “sleep” mode. Pressing any key or sending data to the plotter will wake it up. 4-22 CADJET 2 Troubleshooting 9.0 RS-422/RS-232 Error Messages The following error messages can appear as a result of communication problems. Reference Section 11.3.1 for the Parallel Interface and Serial Interface Loop Back Tests. CADJET 2 ERR 0 No I/O error has occurred. ERR 10 Output instruction received while another output instruction is being executed. The first is executed while the next instructions are ignored. ERR 11 Invalid byte received after the first three characters, ESC., in a device control instruction. ERR 12 Invalid byte received while parsing a device control instruction. The parameter containing the invalid byte and all following parameters are defaulted. ERR 13 Parameter out of range. ERR 14 Too many parameters received. Additional parameters after the correct number are ignored. ERR 15 A framing error, parity error, or overrun error has occurred. ERR 16 Input buffer overflow. This will result in the loss of data and probably an HP-GL emulation error. ERR 17 Baud rate mismatch. ERR 18 I/O error indeterminate. ERR 20 RS-422/RS-232 serial xtda/xrda failure. with a loop back connector in test.) ERR 21 RS-422/RS-232 DTR or CTS test failure. (Occurs only with a loop back connector in test.) (Occurs only 4-23 Troubleshooting 10.0 RAM Error At Initialization, a message of RAM HIGH or RAM LOW may appear for one of the following reasons: 4-24 1. The most common cause of this message is the incorrect installation of any extra RAM (SIMMS). Refer to the removal and replacement procedures in Chapter 5, Section 4.5 and check the SIMMS installation if any extra RAM was installed on the plotter. 2. The SIMM may be defective or not compatible with the plotter circuits. The SIMM type needs to meet parity by 8 or 9 bits and the speed needs to be 70 nanoseconds or faster. See the CADJET 2 User’s Guide for information concerning the acceptable SIMMS sizes and the replacement procedure in Chapter 5, Section 4.5 of this service manual. 3. The socket on the MPCB may be defective. In this case, replace the MPCB according to the procedure in Chapter 5, Section 4.3. CADJET 2 Troubleshooting 11.0 Operation Problems The information in this section will help to solve a variety of operational problems which may occur with the CADJET 2 plotter. Follow the procedures carefully. Establish a logical procedure for troubleshooting by referencing the Troubleshooting Chart in Section 2.0 of this chapter. 11.1 CADJET 2 Plotter Does Not Turn On 1. Make sure the AC power cord is securely connected to the plotter and to a functioning AC outlet. 2. Disconnect the Power Cable from the JP1 connector on the MPCB (see Chapter 5, Sections 4.1 and 4.2.) and check for voltage coming out of the Power Cable. If there is voltage, the fuse on the Power Supply is good. If there is not voltage, you need to check the fuse (Step 3 below). 3. Turn off power and disconnect the power cord. Make sure the fuse on the Power Supply is good. See Chapter 5, Section 9.0. Use only a 250 Volt 2 Amp Fast Blow fuse, 5mm x 20mm. (Be careful not to mistakenly use a 32 Volt fuse.) 4-25 Troubleshooting 11.2 Plotter Slow to Initialize If the plotter takes an excessive amount of time (30 seconds or more) to complete the initialization sequence: 1. 2. 4-26 If any extra SIMMS has been installed: a. The SIMMS contacts may need to be cleaned. Clean the SIMMS contacts. b. The SIMMS may be defective. Replace the extra SIMMS if cleaning the contacts does not improve the performance. See Chapter 5, Section 4.5 for the procedures for replacing the SIMMS. c. If performance is not improved after replacing the extra SIMMS, the SIMMS socket may be defective. In this case, you must replace the MPCB. See Chapter 5, Section 4.3. there may be a defective Flash EPROM on the Main Printed Circuit Board. Because the Flash EPROM is soldered to the MPCB, it is necessary to replace the MPCB. Refer to Chapter 5, Section 4.3 of this manual for the removal and replacement procedures for the MPCB. CADJET 2 Troubleshooting 11.3 Plotter Will Not Plot 1. Do not press the Cartridge downward too hard. This could damage the Cartridge Covers. 2. When installing the Cartridges, lower them straight down into the Cartridge Covers. Tilting the Cartridges at an angle may cause damage to the Carriage Flex Cable. CAUTION CADJET 2 1. Make sure the ink cartridges are properly seated. The most common cause of plot failure is that the ink cartridges are not fully seated in the Cartridge Covers. The copper area on the Cartridges must be in contact with the flex cables at the back of the Carriage Assembly. Pull the levers downward to open the Cartridge Covers and remove the Cartridges. When reinstalling them, lower them straight down into the Cartridge Covers and gently push down and forward so that the Cartridges slide forward slightly. Push the levers up until they stop (do not use excessive force). 2. Check for a loose interface Trailing Cable at the Carriage Assembly or at the Main PCB. See Chapter 5, Section 8.6 for correct installation procedures. 3. Make sure the system is properly initialized. See Section 8.0 in this chapter. You may need to perform the interface test described in Section 11.3.1 of this chapter. 4-27 Troubleshooting 4. Verify communication between the plotter and the computer by transmitting the following BASIC program to the plotter (character codes are enclosed in [ ] ): [ESC]%-1BBPIN;SP1;PA500,500; LBPLOTTER/INTERFACE TEST OK[CHR$(3)] SP0;PA0,0;PG; The plotter should print out “Interface Test OK.” Did the plot run correctly? 5. 4-28 If YES: the plotter and communicating. the computer are properly If NO: check the settings of the plotter interface. Correct any settings, cycle the power to the plotter, and run the test again. If the plot fails again, have the interface cable and computer’s interface card tested. Run the Demo Plot from MAIN MENU DEMO PLOT on the plotter. If the plot runs correctly, the problem is not in the plotter. CADJET 2 Troubleshooting 11.3.1 Parallel Interface and Serial Interface Tests If communications problems exist with the parallel interface or serial interface, a test of the plotter's internal parallel or serial interface circuits may be performed. This "Loop Back Test" will verify that the parallel or serial communications circuits of the plotter are functioning correctly. See Figure Chapter 4 .3. This test requires the use of a Centronics plug (for the parallel test) or an 8-PIN plug (for the serial test), both made according to the directions in Figure Chapter 4 .3. To perform the test, proceed as follows: CADJET 2 1. Remove the interface cable from the rear of the plotter. 2. Insert the plug into the interface connector. 3. Advance the menu on the plotter to the SERVICE DIAGNOSTICS display. Press SELECT. Press the DOWN ARROW once to go to DIAGNOSTICS SERIAL PORT display, or press the DOWN ARROW twice to go to the DIAGNOSTICS PARALLEL PORT display. (Refer to the CADJET 2 Service Menu chart if necessary.) 4. At either the DIAGNOSTICS SERIAL PORT display or the DIAGNOSTICS PARALLEL PORT display, press SELECT and observe the display on the keypad. If it displays RESULT=ERROR, the communications circuits are not communicating correctly and the Main PCB must be replaced. 5. If it displays RESULT=OK, then the communications circuits of the plotter are functioning correctly. The interface problem is in the configuration of the plotter, or in the parallel or serial interface cable, or in the external circuits. 4-29 Troubleshooting Figure Chapter 4 .3: Parallel and Serial Loop Back Tests 4-30 CADJET 2 Troubleshooting 11.4 No Movement in the Carriage Axis 1. Is power applied to the plotter? 2. Is the front panel display ON? If NO: If YES: a. Check the Keypad cable’s connection (J1) to the Main Printed Circuit Board. Be certain that it is fully seated. See Chapter 5, Section 6.2. b. Disconnect the Power Cable from the JP1 connector on the MPCB (see Chapter 5, Sections 4.1 and 4.2.) and check for voltage coming out of the Power Cable. If there is voltage, the fuse on the Power Supply is good. If there is not voltage, you need to check the fuse (Step d below). c. Check for voltages at the Main Printed Circuit Board. d. Turn power off and disconnect the power cord. Check the fuse on the Power Supply. See Chapter 5, Section 9.0. Use only a 250 Volt 2 Amp Fast Blow fuse, 5mm x 20mm. (Be careful not to mistakenly use a 32 Volt fuse.) Is the CARRIAGE AXIS FAILURE message displayed? a. Turn off the plotter and then turn it on again to see if the same message appears. If YES: Make sure that nothing is blocking the movement of the Carriage Assembly. Turn off the plotter and move the Carriage Assembly from left to right to make sure it moves freely. CADJET 2 4-31 Troubleshooting If the Carriage Assembly does move freely, but the CARRIAGE AXIS FAILURE message is still displayed after powerup: 1) The Servo Motor needs to be replaced. See Chapter 5, Section 5.0 for the removal and reinstallation procedures. 2) The MPCB Servo Driver may be defective. Replace the MPCB. See Chapter 5, Section 4.3. If the Carriage Assembly does not move freely, check the following: 1) The Cutter Wheel may be engaged (down) and is interfering with Carriage Assembly movement. 2) The Carriage Belt tension may be incorrect. See Chapter 5, Section 8.8. 3) The Slide Shaft may be dirty. See Chapter 3, Section 3.0 for cleaning procedures. 4) There may be debris on the Encoder Strip. See Chapter 3, Section 5.0 for cleaning procedure. 5) The Upper Roller Supports may be at an angle and are hitting the Carriage Assembly. See Chapter 5, Section 14.0 if they need to be replaced. 6) There may be a loose bushing on the Carriage Assembly. See Chapter 5, Section 8.0 for instructions on removing the Carriage Assembly so this can be checked. 7) The Carriage Height may not be correct. See Chapter 6, Section 6.2. 4-32 CADJET 2 Troubleshooting If NO: the problem is most likely in the Servo Motor, the Main PCB, or the Encoder strip. 1) Check the Trailing Cable connections. See Chapter 5, Section 8.6. 2) Replace the Servo Motor. Chapter 5, Section 5.0. See 3) If replacing the Servo Motor doesn’t correct the problem, replace the MPCB. See Chapter 5, Section 4.0. 4) If the problem is not solved after both the Servo Motor and the MPCB are replaced, replace the Stabilizer Bracket Assembly, which contains the Encoder Strip. See Chapter 5, Section 10.0. CADJET 2 4-33 Troubleshooting 11.5 Media Problems 11.5.1 Cut Sheet Media Won’t Load If cut sheet media won’t load: 1. Check to see if the plotter is set for roll-feed media. From the Main Menu, press one of the arrow keys to advance to the display shown below: MAIN MENU PRINTER SETUP Press SELECT and press the DOWN ARROW three times. If the following display appears, PRINTER SETUP ROLL=ON the plotter is set for roll-feed media and needs to be changed for cut sheet. To change the setup, press SELECT (the equals sign (=) will blink) and one of the arrow keys so that the display reads as follows: PRINTER SETUP ROLL=OFF Press SELECT to save the change (the equals sign (=) will stop blinking). Align a sheet of media on the Platen and press the LOAD button. The media will be sized and pulled to the back of the plotter until it reaches the starting position on the Platen. 4-34 CADJET 2 Troubleshooting CADJET 2 2. In media with a preprinted border, the optical sensor on the Carriage Assembly may sense the preprinted border as the edge of the media if the preprinted border is too wide. Use the Manual Load function (see Chapter 2 in the CADJET 2 User’s Guide for instructions). 3. Certain media types may cause difficulty in loading. Use the Manual Load function (see Chapter 2 in the CADJET 2 User’s Guide for instructions). 4. The paper sensor may be defective. As an intermediate measure, use the Manual Load function. See Chapter 2 in the CADJET 2 User’s Guide for instructions. In order to test the paper sensor, see Chapter 6, Section 6.5 for the Paper Sensor Potentiometer Adjustment. If it fails this adjustment, replace the Carriage Assembly. See Chapter 5, Section 8.0 for the removal and installation procedures. 4-35 Troubleshooting 11.5.2 Media Feeds Out of Plotter When Plot is Completed If the plotter feeds the media out of the plotter after the plot is completed, there are three possible causes: a. The media has been loaded incorrectly. The narrower edge of the media must be placed under the rollers when the media is loaded. The plotter determines media size by checking the narrow edge of the media. Rotate the media and load again. b. Non-standard media has been loaded. The plotter determines media size by measuring the width and makes a determination of the length based upon standard media sizes. Refer to Tables 1.1 or 1.2 in Chapter 1 for acceptable sizes. Example: Set the plotter to MEDIA=ARCH if you use “C” size Architectural media. c. Paper Axis Calibration is out. Perform the Paper Axis Calibration in Chapter 6, Section 10.2. d. Image is too small for paper size selected in application. SAVE MEDIA=ON on the plotter. 11.5.3 Set Media Skews or Ripples If the media skews or ripples as it moves through the plotter, there are two possible causes: 4-36 a. The media was not loaded properly. carefully load it again. Remove the media and b. The Upper Roller Supports which hold the media have become dirty, misaligned or excessively worn. Refer to the alignment procedures in Chapter 6, Sections 7.0 and 8.0 and/or to the removal and replacement procedures in Chapter 5, Section 14.0 of this manual. CADJET 2 Troubleshooting 11.5.4 Loaded Media Not Detected, Media Size Not Detected, or Plotter Has Incorrect Plot Area If the plotter doesn’t detect that media is loaded, doesn’t sense the media size, or has an incorrect plot area, there are five possible causes: CADJET 2 a. In some cases, the CADJET 2 will not sense or correctly size certain media, whether roll-feed or sheet media. If this happens, use the Manual Media Loading feature in the Advanced menus. Refer to Chapter 2 of the CADJET 2 User’s Guide for the procedure. b. The optical sensor circuit (Paper Sensor) may be defective, or a connector may be loose. Go to the SERVICE DIAGNOSTICS Menu and run DIAGNOSTICS PAPER SENSOR. You will need to replace the Carriage Assembly if the Paper Sensor is not working properly. Refer to the Disassembly/Assembly procedures in Chapter 5, Section 8.0. c. The Slide Shaft may be set incorrectly. Check the alignment of the Carriage. Refer to Chapter 6, Sections 6.0, 6.1, and 6.2 of this manual for the Cartridge Head Height. d. The Paper Sensor voltage may be set incorrectly. See Chapter 6, Section 6.5 “Adjustment of the Potentiometer” for the testing and correction procedures. e. The Trailing Cable may be defective. See Chapter 5, Sections 8.5 and 8.6 for the removal and installation procedures. 4-37 Troubleshooting 11.5.5 Keypad Display Shows LOAD MEDIA Message When Rollfeed Media is Loaded If the Keypad Display shows a LOAD MEDIA message, but you have rollfeed media loaded, the plotter may not be configured for roll media. From the Main Menu, press one of the arrow keys to advance to the display shown below: MAIN MENU PRINTER SETUP Press SELECT and press the DOWN ARROW three times. If the following display appears, PRINTER SETUP ROLL=OFF the plotter is set for cut sheet media and needs to be changed for rollfeed. To change the setup, press SELECT (the equals sign (=) will blink) and one of the arrow keys so that the display reads as follows: PRINTER SETUP ROLL=ON Press SELECT to save the change (the equals sign (=) will stop blinking). Align the rollfeed media on the Platen and press the LOAD button. 4-38 CADJET 2 Troubleshooting 11.5.6 Loud Grinding Noise When Media Loads a. Loose Drive Shaft Support Brackets. Check to see if the brackets are secured firmly to the Platen. Refer to Chapter 5, Section 11.4 (Figure 5.26) if necessary. b. The large 96 Teeth Gear may on the Lower Drive Assembly may be broken. See Chapter 5, Section 11.0 for instructions for replacing the Lower Drive Assembly. c. The Stepper Motor may be defective. Go to the SERVICE DIAGNOSTICS Menu and perform the DIAGNOSTICS PAPER MOTOR test to run the motor from 0 to 1 inches (do not exceed 1 inches) for error results. If the test runs correctly, this is not causing the grinding noise. If the test does not run correctly, replace the Stepper Motor. See Chapter 5, Section 11.3 for the replacement procedure. You should also take into consideration the possibility that the Gear on the Stepper Motor may be broken, in which case the Stepper Motor will need to be replaced. d. The MPCB Stepper Driver may be defective. Replace the MPCB. See Chapter 5, Section 4.3. e. Defective ROM or RAM. Go to the SERVICE DIAGNOSTICS menu and perform the ROM and RAM tests to obtain an OK or ERROR message. If the read-out is RESULT=OK, this is not causing the grinding noise. For the ROM test, a read-out of RESULT=ERROR could indicate: CADJET 2 1. that the Flash EPROM has failed. Replace the MPCB. See Chapter 5, Section 4.3 for the procedure. 2. the socket on the MPCB is defective. Replace the MPCB. See Chapter 5, Section 4.3 for the procedure. 4-39 Troubleshooting For the RAM test, a read-out of RESULT=ERROR could indicate: 4-40 1. Any extra SIMMS may be installed incorrectly or not fully seated. See Chapter 5, Section 4.5 for the procedure. 2. The extra SIMMS may be defective or not compatible with the plotter circuits. See the User’s Manual for information concerning the acceptable SIMMS sizes. See Chapter 5, Section 4.5 for the replacement procedure. 3. The socket on the MPCB may be defective. Replace the MPCB. See Chapter 5, Section 4.3 for the procedure. CADJET 2 Troubleshooting 11.6 NOTE Media Cutting Problems Note: Certain media is more abrasive than other types of media. Media which is very abrasive (such as canvas) may shorten the life of the Cutter Wheel. If the cut edges of the media are ragged, or the cut is not complete across the media, you need to replace the Cutter Wheel. This part is available from your local authorized dealer, or directly from ENCAD. CADJET 2 4-41 Troubleshooting 11.7 Ink Cartridge Problems 1. Ink used in the Cartridges may be harmful if swallowed. Avoid getting ink in the mouth. Keep Cartridges away from small children. 2. Use the ACCESS CARTRIDGES button on the LED panel to move the Carriage. Do not move the Carriage by hand. Damage to the Carriage may result. WARNING Table Chapter 4 .5: Decision Logic Table Five (DLT 5) WARNING: OBSERVE ALL STANDARD STATIC AND SAFETY PRECAUTIONS BEGIN WITH: ASSUMPTIONS LISTED BELOW ASSUMPTIONS: 1. CARTRIDGE NOT DAMAGED BY DROPPING, IMPROPER STORAGE, OR TAPPING ON A HARD SURFACE. (REPLACE IF DAMAGE IS SUSPECTED OR KNOWN.) 2. CARTRIDGE IS NOT OUT OF INK. (SEE “Determining Ink Level” BELOW TO DETERMINE WHETHER CARTRIDGE IS OUT OF INK.) COLUMN NUMBERS CONDITIONS PORTIONS OF LINES ARE MISSING RANDOM OR INDIVIDUAL NOZZLES (LESS THAN 5) FAIL VARIOUS NOZZLES ARE CLOGGED A SERIES OR BLOCK OF NOZZLES (MORE THAN 5) FAIL PRIME PLOT GRID SHOWS A ONE ON/ONE OFF PATTERN FOR A CARTRIDGE ACROSS THE PLOT 1 2 3 4 5 6 N Y N Y N Y N Y N Y ACTIONS REPEAT PRIME SEVERAL TIMES. SEE SECTION 11.8 IN THIS CHAPTER FOR INFORMATION ABOUT EVALUATING THE PRIME PLOT. REMOVE AND REINSTALL CARTRIDGE; REPEAT PRIME. REFER TO CHAPTER 3, SECTION 6.3, CAUSE #1. REMOVE AND CLEAN CARTRIDGE; REPEAT PRIME. REFER TO CHAPTER 3, SECTION 6.2. CLEAN SERVICE STATION; CLEAN CARTRIDGE AGAIN; REPEAT PRIME. REFER TO CHAPTER 3, SECTION 4.0. CLEAN CARRIAGE FLEX CABLE AND CARTRIDGE ELECTRICAL CONTACTS; REPEAT PRIME. REFER TO CHAPTER 3, SECTION 6.3, CAUSE #2. PERFORM “Cartridge Failure Test Procedure” IN SECTION 11.9 OR 11.10 BELOW. REPLACE CARTRIDGE IF NECESSARY; REPEAT PRIME. REFER TO CHAPTER 3, SECTION 6.1. REPLACE CARRIAGE; REPEAT PRIME. REFER TO CHAPTER 5, SECTION 8.0 for removal and installation of Carriage Assembly. REPLACE MPCB; REPEAT PRIME. REFER TO CHAPTER 5, SECTION 4.3 for removal of the MPCB. CALL ENCAD TECHNICAL SUPPORT (see Chapter 1, Section 3.0). 4-42 1 1 1 1 1 2 2 2 2 2 3 3 3 3 3 4 4 4 4 4 5 5 5 5 5 6 6 6 6 6 7 7 7 7 7 8 8 8 8 8 9 9 9 9 9 CADJET 2 Troubleshooting 11.7.1 Dried Up Cartridge If the Cartridge has dried up, it will need to be replaced. In order to prevent this from happening in the future, there are two “preventive maintenance” procedures that should be done: 1. Check for space between the Cartridge nozzle area and the seals of the Service Station. If light is seen, check the Seals for wear/damage. Replace the Service Station if the Seals are worn/damaged. See the removal and reinstallation procedures in Chapter 5, Section 7.0 of this manual. Using a new Cartridge, run the PRIME plot after installing the new Service Station. You may need to repeat the PRIME two or three times before a satisfactory plot is obtained. See Section 11.8 below for information about evaluating the PRIME plot. 2. If the Seals are not worn, damaged, or dirty (if ink becomes encrusted and builds up on seals, the cartridges won’t seal properly -- see Chapter 3, Section 4.0 for cleaning procedure), check the Cartridge Height Adjustment. See Chapter 6, Sections 6.0, 6.1, and 6.2 of this manual. After the Carriage Height has been adjusted, install a new Cartridge and run the PRIME plot. You may need to repeat the PRIME two or three times before a satisfactory plot is obtained. See Section 11.8 below for information about evaluating the PRIME plot. CADJET 2 4-43 Troubleshooting 11.7.2 Determining Ink Level If the Ink Level Estimator option is being used: You can check to see which Cartridge is low by using the Current Ink Level menu. See Chapter 4 of the CADJET 2 User’s Guide for information about this feature. If necessary, replace the Cartridge, load media, and run the PRIME plot. It may be necessary to run the PRIME plot several times in order to obtain a satisfactory plot. See Section 11.8 below for information about evaluating the PRIME plot. If a satisfactory plot cannot be obtained, refer to Table Chapter 4 .5 above. If the Ink Level Estimator feature is not being used: The black Cartridge has an ink-level indicator on the front of the Cartridge. If the Cartridge is out of ink, discard the Cartridge and replace it. If necessary, replace the Cartridge, load media, and run the PRIME plot. It may be necessary to run the PRIME plot several times in order to obtain a satisfactory plot. See Section 11.8 below for information about evaluating the PRIME plot. If a satisfactory plot cannot be obtained, refer to Table Chapter 4 .5 above. The Tri-Color Cartridge does not have the ink-level indicator on the front of the Cartridge. Therefore, the only option is to replace the Cartridge, load media, and run the PRIME plot. It may be necessary to run the PRIME plot several times in order to obtain a satisfactory plot. See Section 11.8 below for information about evaluating the PRIME plot. If a satisfactory plot cannot be obtained, refer to Table Chapter 4 .5 above. 4-44 CADJET 2 Troubleshooting 11.8 PRIME Plot Before printing and at regular intervals during printing, the plotter wipes the ink cartridge jets at the Service Station. The ink cartridge jets can still become clogged, however, especially with prolonged exposure to the air or with disuse. Use the PRIME function to clear the jets and to check that the ink cartridges fire properly. We recommend that you prime the Cartridges when they have not been used for a few days to ensure the best possible print quality. When you press PRIME, a test pattern is printed. The test pattern consists of one wide band of black, three thin bands of each color from the Tri-Color Cartridge, and a series of segmented sloping lines. Each segment in the sloping lines represents one jet. The bands should be smooth without dark streaks or white lines. The sloping (diagonal) lines should not look fuzzy or contain gaps. If you see discrepancies in the pattern, prime the Cartridges several more times. If you still see discrepancies after priming the plotter several times, you should clean the Cartridges. See Chapter 3, Section 6.2 for cleaning procedures. If you suspect that an ink cartridge has become clogged during printing, press PRIME. The Cartridges will fire into the Service Station, which will purge the jets. Printing will resume after this purging. CADJET 2 4-45 Troubleshooting 11.9 Tri-Color Cartridge Failure Test Procedure Figure Chapter 4 .4: Tri-Color Cartridge Flex 1. This test procedure is for the Tri-Color Cartridge Flex only. If you need to test the Black Cartridge, see Section 11.10 below. 2. Do NOT touch the Cartridge Flex with your fingers. Oils on the skin can damage the circuit. WARNING Using a DVM, verify the resistance between the following points on the suspect Cartridge: Pin 80 Pin 64 Pin 60 Pin 33 to to to to 65 thru 70, 74 thru 76, 81 thru 84 61, 71 thru 73, 77 thru 79, 85 thru 88 (not Pins 62 & 63) 38 thru 41, 51 thru 57 (not Pins 58 & 59) 34 thru 37, 42 thru 50 36 OHM 36 OHM 36 OHM 36 OHM If the resistance measured is 0 OHM or OPEN, the Cartridge jet resistor is defective and the Cartridge must be replaced. An incorrect resistance reading will affect print quality. The Cartridge should be replaced. 4-46 CADJET 2 Troubleshooting 11.10 Black Cartridge Failure Test Procedure 1. This test procedure is for the Black Cartridge (HP® No. 51640A) Flex only. If you need to test the Tri-Color Cartridge, see Section 11.9 above. 2. Do NOT touch the Cartridge Flex with your fingers. Oils on the skin can damage the circuit. WARNING The failure rate on the Black Cartridge Flex is very low, so it is not likely that you will need to perform this test. If the Black Cartridge is not performing as you expect, you should first try running the Prime plot several times to try to clear the jets. If this does not solve the problem, please refer to Table Chapter 4 .5, Decision Logic Table (DLT 5) in this chapter for cleaning procedures. If you perform the cleaning procedures listed in the Table Chapter 4 .5 and arrive at Action Number 6 “PERFORM ‘Cartridge Failure Test Procedure,’ ” you will need to perform the procedures given in this section. CADJET 2 4-47 Troubleshooting 11.10.1 Running the Cartridge Diagnostic Test You will need to run the plotter’s Cartridge Diagnostic Test to determine which, if any, of the jets are not firing. To run the Cartridge Diagnostic Test: 1. Turn on the plotter (you do not need to have it connected to your computer in order to run this test). If power is already on, make sure the following menu is displayed: MAIN MENU PRINT MODE 2. Press the DOWN ARROW once. The display will read: MAIN MENU UTILITIES 3. Press SELECT once. The display will read: UTILITIES CALIBRATION→ 4. Press the DOWN ARROW once. a. If the display reads: UTILITIES OPTIONS=ADVANCED press the UP ARROW twice. The display will read: UTILITIES SERVICE→ Go to Step 5. 4-48 CADJET 2 Troubleshooting b. If the display reads: UTILITIES OPTIONS=EASY press SELECT once, press the UP ARROW once, and press SELECT once. The display should now read: UTILITIES OPTIONS=ADVANCED Press the UP ARROW twice. The display will read: UTILITIES SERVICE→ Go to Step 5. 5. Press SELECT once. The display will read: SERVICE INFORMATION→ 6. Press the DOWN ARROW once. The display will read: SERVICE DIAGNOSTICS→ 7. Press SELECT once and the DOWN ARROW three times. The display will read: DIAGNOSTICS CARTRIDGE 8. Press SELECT once. The unit will now plot the Cartridge Diagnostics Test. Press MENU three times and the DOWN ARROW once to return to the MAIN MENU, PRINT MODE display. Advance the media and press the CUT key. To interpret this plot, see Section 11.10.2 below. CADJET 2 4-49 Troubleshooting 11.10.2 Interpreting the Cartridge Diagnostic Test This test plot has a Black band about 1/4” high and 4 sets of Yellow, Magenta, and Cyan bands. Above the colored bands will appear two rows of numbers and a Black diagonal line which is divided into 104 sections. The two row of numbers, the Black diagonal line, and its first ten sections are illustrated in Figure Chapter 4 .5 below. (For the purposes of this procedure, you will not need to be concerned with the two rows of numbers and the colored lines printed above the Black diagonal line.) Each section of the Black diagonal line corresponds to one jet on the Black Cartridge. The numbers below the Black diagonal line are read from right to left (and from top to bottom for two- and three-digit numbers) to identify each jet. For example, beginning with the bottom row of numbers and reading from the right side of the plot, jet number 1 is the portion of the diagonal line between the numbers 1 and 2, jet number 2 is the portion of the diagonal line between numbers 2 and 3, and jet number 9 is the portion of the diagonal line between numbers 9 and 10. See the sample in Figure Chapter 4 .5 below. 1 0 9 8 7 6 5 4 3 2 1 Figure Chapter 4 .5: Sample of Black Cartridge Diagnostics Test If any jets are not firing, the section of the diagonal line for that jet will be missing. If any jets are not firing (that is, there are gaps in the diagonal line), go on to Section 11.10.3 “Black Cartridge Flex Test” below. 4-50 CADJET 2 Troubleshooting 11.10.3 Black Cartridge Flex Test The purpose of this test is determine whether the flex on the Black Cartridge is OK. In order to perform the Black Cartridge Failure Test, you will need a 9 Volt Battery plus the necessary probes and resistors and either an LED or an Ohm Meter. The cartridge has 13 address lines, 8 power pins, and 8 grounds. Each power pin has a ground line. There are a total of 104 jets. In the diagrams in Figure Chapter 4 .6 below, P = power pin, A = address line, and G = ground. Use one of the two diagrams below to arrange the setup for the test. 510Ω P Cartridge P Cartridge LED 30Ω 30Ω OR 10KΩ A + Ω- 10KΩ A 9V Battery 9V Battery G Setup with LED (no Ohm Meter) G Setup with Ohm Meter (no LED) Figure Chapter 4 .6: Black Cartridge Failure Test Setups CADJET 2 4-51 Troubleshooting Figure Chapter 4 .7 below shows the Black Cartridge Flex Dimple Pattern. The Black Cartridge Flex Test Matrix in Table Chapter 4 .6 below shows the grounds, power pins, address lines, and jet numbers for each jet. Once you have identified the jet number(s) of the non-functioning jet(s) by examining the plot printed during the Cartridge Diagnostic Test, use the Black Cartridge Flex Test Matrix to determine which ground, pin, and address line to test. Conduct the test as follows: 4-52 1. Connect 1 probe from the Ohm Meter to one of the 8 power pins. 2. Connect 1 probe from the Ohm Meter to the 9 Volt Battery and to the correct ground for the power pin. 3. Connect the 10K resistor from the 9 Volt Battery to the appropriate address line(s) (one at a time) in order to test the jet(s). 4. You should see 36.4Ω (+ 1.0Ω - 2.0Ω) 5. If you are testing another jet(s) that has a different ground and power pin, move the probes to that ground and power pin and connect the 10K resistor to the appropriate address line(s). 6. If the jet(s) tested shows the proper result, you can assume that the flex is OK. In that case, return to Table Chapter 4 .5 in this chapter for further instructions, beginning with “REPLACE CARTRIDGE IF NECESSARY” (in Action Number 6). CADJET 2 Troubleshooting Figure Chapter 4 .7: Black Cartridge Flex Dimple Pattern CADJET 2 4-53 4-54 GRND 2 / P 2 GRND 3 / P 3 GRND 4 / P 4 GRND 5 / P 5 GRND 6 / P 6 GRND 7 / P 7 GRND 8 / P 8 79 - A13 81 - A09 83 - A05 85 - A01 87 - A10 89 - A06 91 - A02 93 - A11 95 - A07 97 - A03 99 - A12 101 - A08 103 - A04 80 - A10 82 - A06 84 - A02 86 - A11 88 - A07 90 - A03 92 - A12 94 - A08 96 - A04 98 - A13 100 - A09 102 - A05 104 - A01 78 - A01 76 - A05 74 - A09 72 - A13 70 - A04 68 - A08 66 - A12 64 - A03 62 - A07 60 - A11 58 - A02 56 - A06 54 - A10 77 - A04 75 - A08 73 - A12 71 - A03 69 - A07 67 - A11 65 - A02 63 - A06 61 - A10 59 - A01 57 - A05 55 - A09 53 - A13 52 - A01 50 - A05 48 - A09 46 - A13 44 - A04 42 - A08 40 - A12 38 - A03 36 - A07 34 - A11 32 - A02 30 - A06 28 - A10 51 - A04 49 - A08 47 - A12 45 - A03 43 - A07 41 - A11 39 - A02 37 - A06 35 - A10 33 - A01 31 - A05 29 - A09 27 - A13 26 - A01 24 - A05 22 - A09 20 - A13 18 - A04 16 - A08 14 - A12 12 - A03 10 - A07 08 - A11 06 - A02 04 - A06 02 - A10 25 - A04 23 - A08 21 - A12 19 - A03 17 - A07 15 - A11 13 - A02 11 - A06 09 - A10 07 - A01 05 - A05 03 - A09 01 - A13 JET - ADDRESS JET - ADDRESS JET - ADDRESS JET - ADDRESS JET - ADDRESS JET - ADDRESS JET - ADDRESS JET - ADDRESS GRND 1 / P 1 Troubleshooting Table Chapter 4 .6: Black Cartridge Flex Test Matrix CADJET 2 Troubleshooting 11.11 Memory Full MEMORY FULL PRESS ANY KEY If the MEMORY FULL error message displays while a plot is being transmitted to the plotter, the I/O buffer has overflowed and the plot will probably be incomplete. The plotter memory is allocated between the HP-GL I/O and the Raster. The I/O buffer is for the transfer and configuration of the incoming data. The Raster buffer is used for the storage of the incoming plot. The default configuration of the allocation is I/O = 128K and Raster = 1M. If you are sending Raster files, increase the size of the I/O buffer to decrease the transfer time, freeing up the computer sooner. If you are sending vector files or merged vector/raster files, increase the size of the Raster buffer to allow as much space as possible to store and rasterize the complete file. To reset the allocation, go to the following menu: MAIN MENU PRINT MODE Press the UP ARROW 4 times to go to MAIN MENU PRINTER SETUP Press SELECT. Press the UP ARROW twice to go to PRINTER SETUP MEMORY CONFIG→ Press SELECT to go to MEMORY I/0 = 128K CADJET 2 CONFIG RAS=1M 4-55 Troubleshooting Press SELECT. Try increasing the amount of memory allocated to the I/O by pressing the arrow keys. Press SELECT to save the new values in memory. Press MENU twice and the DOWN ARROW 4 times to return to the MAIN MENU, PRINT MODE. Run the file again. If this does not resolve the MEMORY FULL problem when transferring plots, additional memory must be added to the plotter (refer to Appendix B of the CADJET 2 User's Guide), or purchase ENCAD’s Vector to Raster Conversion Utility. Another solution may be to ask your software vendor for an HP-RTL device driver. HP-RTL files don’t require raster conversion by the plotter, so memory is not an issue. 11.12 Plotter Hesitates During Plotting Refer to the procedures in Section 11.11 in this chapter. 11.13 Plot Appearance is not as Expected 4-56 1. Keypad commands were not saved by pressing SELECT after they were entered. Reset the parameters and be sure to press SELECT after entering each parameter to save the commands. 2. Plotter emulation mode is not set correctly. Check to see that the proper mode is entered and save by pressing SELECT. 3. Check to see that the proper driver is installed and selected. CADJET 2 Troubleshooting 11.14 Plots are Cut Off. CADJET 2 1. Check the setting of the MARGINS option in the PAGE FORMAT menu. When MARGINS is set to NORMAL (the default), the plot area is smaller than when MARGINS is set to EXPAND. Try setting the MARGINS option to EXPAND to make the plot area larger. See Chapter 1, Tables 1.1 and 1.2 of this Service Manual for the Normal and Expanded plot areas for the different media standards. 2. Check the defined plot area for the loaded media by selecting the PLOT AREA option in the PAGE FORMAT menu. The plot area is defined by the width of the loaded media, by the setting for the MARGINS option, and by the selected MEDIA STANDARD in the PAGE FORMAT menu (see explanation in the previous paragraph). 3. If the plot area displayed by the PLOT AREA option is not large enough for the image to be printed, try loading wider media. See Chapter 1, Tables 1.1 and 1.2 of this Service Manual for the plot areas for the different media standards. 4. The plotter may not have correctly sized the media. Use the MANUAL LOAD option to load the media. See “Manual media loading” in Chapter 2 of the CADJET 2 User’s Guide. You may also want to refer to Section 11.5.4 in this chapter for further assistance. 4-57 Troubleshooting 11.15 Plotter is Noisy 1. Noisy operation may be caused by a dirty Slide Shaft. Refer to the “Slide Shaft Maintenance” procedures in Chapter 3, Section 3.0. 2. Check for tightness of the Roller Supports by tightening the hardware. See Chapter 6, Section 8.2 3. The Lower Drive Shaft Rollers may be misaligned. 4. The Fan Assembly may have something that has fallen into it or it may need to be replaced. Remove the Fan Assembly first to see if anything is loose inside of it. If not, then replace the Fan Assembly. See Chapter 5, Section 11.0. 11.16 User Parameters Not Saved When Power Is Cycled If the user parameters are not as expected when the plotter is turned on, the parameters were not saved by pressing SELECT before turning off the plotter. Go to the desired menu and display the desired menu parameter. While this value or setting is displayed and the equals sign (=) is flashing, press the SELECT button to save. Save the desired default settings to “USER1.” This User number will be used when the plotter is powered up. 4-58 CADJET 2 Troubleshooting 11.17 Plotter Carriage Moves Erratically If the plotter Carriage does not move smoothly while plotting or the plot quality is poor, perform the actions below until the problem is corrected. 1. The Slide Shaft may be dirty. See “Slide Shaft Maintenance” in Chapter 3, Section 3.0. 2. Run the Carriage Vibration Test in the DIAGNOSTICS Menu: DIAGNOSTICS CARRIAGE VIBRATE This option tests for Carriage vibration by printing a test pattern of 5 sets of 3 parallel lines bi-directionally. If there is vibration, check for debris in the grooves of the Servo Motor Pulley and the Idler Pulley and/or on the inside of the Carriage Belt. A brush (such as a clean toothbrush) or toothpick can be used to dislodge any debris in the pulley grooves. A clean, dry cloth can be used to clean the inside of the Carriage Belt. Although the pulleys and belt can be cleaned with the belt in place on the pulleys, you may find it easier to do the cleaning by removing the belt from the Servo Motor Pulley. See Chapter 5, Sections 8.7 and 8.8 for instructions on removing and replacing the Carriage Belt. Carriage vibration may also be caused by the belt rubbing on the Frame Tensioner or by a noisy Servo Motor. 3. Run the Servo Motor Test. DIAGNOSTICS SERVO MOTOR Select FAST or SLOW speed to cycle the Servo Motor. Display message will be either RESULT=OK or RESULT=ERROR. If ERROR appears, the Servo Motor or driver circuits may be faulty. Replace the Servo Motor first. See Chapter 5, Section 5.0 for instructions. If ERROR still appears, replace the MPCB. See Chapter 5, Section 4.3 for instructions. CADJET 2 4-59 Troubleshooting 4. CAUTION The Carriage Belt may not be properly tensioned. a. Check the idler assembly frame tensioner, spring, and pulley at the top left end of the plotter. See Chapter 5, Section 5.18. b. Make sure the belt is properly installed in the Belt Clamp. Also check to see if the Belt Clamp is cracked. Refer to Chapter 5, Section 8.8. 5. Servo Motor cabling may be intermittent. Check the connections. 6. Check the screws which hold the Servo Motor in place to make sure the Carriage Belt is not rubbing on the screws. (If the screws were installed at an angle, they may work out of the hole and could interfere with the belt.) See Chapter 5, Section 5.0. 7. The Slide Shaft alignment may be too low, causing the Cartridges to drag on the media or hit the Upper Roller Supports. Refer to the alignment procedures for the shaft in Chapter 6, Sections 6.0 and 6.1 “Slide Shaft Profile Adjustment (Carriage Height Adjustment).” 8. There may be debris on the inside of the metal bushings of the Carriage Assembly. The debris may be removed using a dry Q-Tip or a lint-free cloth. Using a sharp or metal object to remove debris from the inside of the metal bushings will damage the bushings. See Chapter 5, Sections 8.2 and 8.3 “Removal of Carriage Assembly” and “Reinstallation of Carriage Assembly” for removal and reinstallation procedures. If cleaning the bushings does not resolve the problem, replace the Carriage Assembly. After replacing the Carriage Assembly, see Chapter 6 for calibration instructions (you will not need to perform the Slide Shaft Profile Adjustment procedure in Section 6.1, but all other sections will need to be done). 4-60 CADJET 2 Troubleshooting 11.18 Media Movement Erratic If the media moves erratically during plotting or the plot quality is poor, perform the following actions until the problem is corrected. CADJET 2 1. The Stepper Motor connector (JP5) on the MPCB may be loose or intermittent. Check the cabling and seat the connector. See Chapter 5, Section 11.3.2. 2. Drive circuits may be faulty. Replace the Stepper Motor (see Chapter 5, Section 11.3). You may also need to replace the MPCB (be sure to reprogram the Flash EPROM). See Chapter 5, Section 4.3 and Appendix A. 3. The media may be slipping due to: a. Upper Roller Supports are not in proper adjustment. See Chapter 6, Sections 7.0 and 8.0 for the “Paper Skew Adjustment.” b. Upper Rollers and/or Lower Rollers are dirty. To clean the rollers, see Chapter 3, Section 7.0. c. Upper Rollers are worn. If the Upper Roller Supports need to be replaced, see Chapter 5, Section 14.0. 4-61 Troubleshooting 11.19 LCD or LED Key(s) Inoperative If there is no response when pressing the LCD or LED key(s): 1. NOTE For LCD keys only. Keypad cable connections are loose. Check the connections at J1 on the Main Printed Circuit Board and J1 on the Keypad PCB. See Chapter 5, Section 6.0. Notes: For Step 2 below: 1. If one of the arrow keys is the key which is not responding, use the other arrow key to scroll through the menus in order to reach the DIAGNOSTICS KEYPAD display. 2. If the MENU key is not responding, turn off the plotter and then turn it on again so that the display will be at the MAIN MENU, PRINT MODE display. You will then be able to scroll to the DIAGNOSTICS KEYPAD display. 3. If the SELECT key is not responding, you will not be able to scroll to the DIAGNOSTICS KEYPAD display to test the circuitry. Turn off the plotter and then turn it on again. If it still does not respond, follow the instructions in Step 2.a. below. 2. For LCD or LED keys. If a particular key appears to be inoperative, test that key for operation. Go to the SERVICE DIAGNOSTICS menu (see your Service Menu chart) and press the DOWN ARROW to go to: DIAGNOSTICS KEYPAD Each of the keys will beep when pressed to test circuitry. If the key does not beep when pressed, turn the plotter off and then turn it on again so that the plotter resets. Try the DIAGNOSTICS KEYPAD test again. 4-62 CADJET 2 Troubleshooting 3. CADJET 2 a. For the LCD keys: If the key still does not beep, remove the Keypad Top Assembly (see Chapter 5, Section 6.1 for the procedure) and press the inoperative key several times. Check to see if the plastic portion of the key is pushing down the metal button on the Keypad PCB. If necessary, remove the three screws which hold the Keypad PCB to the Keypad Top and, with the power on, press the metal button on the Keypad PCB. Check to see if the plotter responds. If the plotter does not respond, replace the Keypad PCB. b. For the LED keys: If the key still does not beep, remove the Right Cover Assembly (see Chapter 5, Section 4.1 for the procedure) and, with the power on, press the metal button on the MPCB several times. If the plotter does not respond, replace the MPCB Assembly. See Chapter 5, Section 4.3. For LCD keys only. If Steps 1 and 2 above have been performed and the key is still not responding, the Main PCB is defective. Replace the Main PCB. Refer to the procedures in Chapter 5, Section 4.3. 4-63 Troubleshooting 11.20 Front Keypad Display Inoperative If there are no characters displayed on the Keypad Display, but other plotter functions are correct, perform the following actions until the problem is corrected. 4-64 1. Keypad Display cable connections are bad. Check the connection at J1 of the MPCB. See Chapter 5, Section 6.0. 2. Try reprogramming the Flash EPROM. See Appendix A. 3. The Keypad Display has failed. Chapter 5, Section 6.0. 4. The Main Printed Circuit Board circuitry has failed. Replace the Main Printed Circuit Board (see Chapter 5, Section 4.3), and reprogram the EPROM. 5. EPROM or Flash EPROM failure. Chapter 5, Section 4.3. 6. The Display Cable may have been installed backwards. Check the orientation of the flex fingers. See Chapter 5, Section 6.2. Replace the Display. Replace the MPCB. See See CADJET 2 Troubleshooting Chapter 4 TROUBLESHOOTING 4-1 1.0 Introduction .........................................................................................................4-1 2.0 Decision Logic Tables .........................................................................................4-2 2.1 Procedure for Using Decision Logic Tables.....................................................4-2 2.2 Decision Logic Tables .....................................................................................4-3 3.0 Service Menu ......................................................................................................4-8 4.0 Service Menu Description ...................................................................................4-9 4.1 Service Information........................................................................................4-10 4.1.1 Information Display Settings ...................................................................4-10 4.1.2 Information Print Settings........................................................................4-13 4.2 Service Diagnostics .......................................................................................4-14 4.3 Service Calibration.........................................................................................4-17 5.0 LED Keys ..........................................................................................................4-18 6.0 LCD Keypad......................................................................................................4-19 7.0 Keypad Messages.............................................................................................4-20 7.1 Plot Received ................................................................................................4-20 7.2 Drying Plot .....................................................................................................4-20 7.3 Insert Media...................................................................................................4-20 7.4 Memory Full...................................................................................................4-20 7.5 RAM OK ........................................................................................................4-21 7.6 Checksum Error.............................................................................................4-21 7.7 Plotter Error ...................................................................................................4-21 7.8 Ready to Replot.............................................................................................4-21 8.0 Initialization Sequence ......................................................................................4-22 9.0 RS-422/RS-232 Error Messages ......................................................................4-23 10.0 RAM Error .......................................................................................................4-24 11.0 Operation Problems ........................................................................................4-25 11.1 Plotter Does Not Turn On ............................................................................4-25 11.2 Plotter Slow to Initialize................................................................................4-26 11.3 Plotter Will Not Plot......................................................................................4-27 11.3.1 Parallel Interface and Serial Interface Tests .........................................4-29 11.4 No Movement in the Carriage Axis ..............................................................4-31 CADJET 2 4-65 Troubleshooting 11.5 Media Problems ..........................................................................................4-34 11.5.1 Cut Sheet Media Won’t Load................................................................4-34 11.5.2 Media Feeds Out of Plotter When Plot is Completed ...........................4-36 11.5.3 Media Skews or Ripples .......................................................................4-36 11.5.4 Loaded Media Not Detected, Media Size Not Detected, or Plotter Has Incorrect Plot Area ...........................................................................................4-37 11.5.5 Keypad Display Shows LOAD MEDIA Message When Rollfeed Media is Loaded.............................................................................................................4-38 11.5.6 Loud Grinding Noise When Media Loads.............................................4-39 11.6 Media Cutting Problems ..............................................................................4-41 11.7 Ink Cartridge Problems................................................................................4-42 11.7.1 Dried Up Cartridge................................................................................4-43 11.7.2 Determining Ink Level ...........................................................................4-44 11.8 PRIME Plot..................................................................................................4-45 11.9 Tri-Color Cartridge Failure Test Procedure .................................................4-46 11.10 Black Cartridge Failure Test Procedure ....................................................4-47 11.10.1 Running the Cartridge Diagnostic Test ...............................................4-48 11.10.2 Interpreting the Cartridge Diagnostic Test ..........................................4-50 11.10.3 Black Cartridge Flex Test ...................................................................4-51 11.11 Memory Full...............................................................................................4-55 11.12 Plotter Hesitates During Plotting................................................................4-56 11.13 Plot Appearance is not as Expected .........................................................4-56 11.14 Plots are Cut Off........................................................................................4-57 11.15 Plotter is Noisy ..........................................................................................4-58 11.16 User Parameters Not Saved When Power Is Cycled ................................4-58 11.17 Plotter Carriage Moves Erratically .............................................................4-59 11.18 Media Movement Erratic ...........................................................................4-61 11.19 LCD or LED Key(s) Inoperative .................................................................4-62 11.20 Front Keypad Display Inoperative .............................................................4-64 4-66 CADJET 2 Troubleshooting Figure 4.1: LED Keys.................................................................................................4-18 Figure 4.2: LCD Keypad ............................................................................................4-19 Figure 4.3: Parallel and Serial Loop Back Tests........................................................4-30 Figure 4.4: Tri-Color Cartridge Flex ...........................................................................4-46 Figure 4.5: Sample of Black Cartridge Diagnostics Test ...........................................4-50 Figure 4.6: Black Cartridge Failure Test Setups ........................................................4-51 Figure 4.7: Black Cartridge Flex Dimple Pattern........................................................4-53 Table 4.1: Decision Logic Table One (DLT 1) .............................................................4-4 Table 4.2: Decision Logic Table Two (DLT 2) .............................................................4-5 Table 4.3: Decision Logic Table Three (DLT 3)...........................................................4-6 Table 4.4: Decision Logic Table Four (DLT 4).............................................................4-7 Table 4.5: Decision Logic Table Five (DLT 5) ...........................................................4-42 Table 4.6: Black Cartridge Flex Test Matrix...............................................................4-54 CADJET 2 4-67 Chapter 5 DISASSEMBLY/ASSEMBLY 1.0 Introduction Chapter 5 contains the procedures for removal and replacement of the CADJET 2 plotter assemblies and mechanisms. Illustrations are provided for clarity. Steps for each replaceable part may depend on parts already removed in previous disassembly directions. It is recommended that you read through each procedure before beginning the removal or replacement. Replacement parts are listed in Chapter 7 and may be ordered through the ENCAD Technical Support and Service Department (see Chapter 1, Section 3.0). CADJET 2 5-1 Disassembly/Assembly NOTE Note: Whenever components or parts are removed and replaced, calibration of the plotter is necessary. Refer to the Calibration Procedures in Chapter 6. Also refer to Chapter 1, Sections 8.0 and 9.0 for information on Line Length Accuracy and Skew. Removal of the following parts will require complete hardware and firmware calibration after reassembly: 5-2 l Servo Motor Assembly l MPCB l Carriage Assembly l Carriage Belt l Idler Tensioner Assembly l Stabilizer Bracket l Y-Arm Assembly l Slide Shaft l Lower Drive Shaft Assembly l Stepper Motor l Fan Assembly l Upper Roller Supports (only the portions listed in Section 14.2) CADJET 2 Disassembly/Assembly WARNING CAUTION NOTE CADJET 2 Disconnect both the power cord and the interface cables before beginning any disassembly procedures. Failure to do this can cause damage to the electronic components of the plotter and expose you to high voltage circuits and possible personal injury. Integrated circuits can be weakened or inactivated by electrical discharge. It is recommended that you be grounded to a static station by a wrist strap to prevent ESD damage. Anti-static bags are highly recommended for storage or shipment of printed circuit boards. Note: It is recommended that the plotter be removed from the stand and placed on a stable work surface on foam blocks for servicing. 5-3 Disassembly/Assembly 2.0 Tools and Equipment Required Figure Chapter 5 .1 illustrates the CADJET 2 Hardware Kit Assembly, which is listed in Chapter 7. Figure Chapter 5 .2 illustrates the following tools which are recommended to disassemble and reassemble the plotter: l l l l l l l l l l l l l l l l l l l l l l l Torque Screwdriver #1-B6 Special Phillips Bit #1 Phillips Screwdriver #2 Phillips Screwdriver #2 Stub Phillips Screwdriver 1/8” x 6” Slotted Screwdriver 1/4” x 6” Slotted Screwdriver 11/32 Magnetized Nut Driver 5/16 Hex Nut Driver 7/64 Hex Nut Driver 1/4” Open End Wrench 1/4” Open/Box End Angle Wrench Wire Cutters Needle Nose Pliers Angled Flat Reamer/ Straight Fork Tip Machinist Scriber * Tweezers X-ACTO Knife ESD Wrist Strap 4-1/2” x 1” x 1/32” Oil Hardened Precision Ground Flat Stock 4-1/2” x 2” piece of Translite media Fixture, Trailing Cable, Tape, Location, P/N 204142 (optional) Fixture, Trailing Cable, Location, P/N 204483 (optional) * Machinist Scriber should have one straight point and one 90° bent point. The following materials also are required: l Isopropyl Alcohol l Q-Tips l Lint Free Cloth or Tissue 5-4 l Double Sided Tape (1/16” thick) l Loctite Blackmax, P/N 200172 CADJET 2 Disassembly/Assembly Figure Chapter 5 .1: CADJET 2 Hardware Kit Assembly CADJET 2 5-5 Disassembly/Assembly Figure Chapter 5 .2: CADJET 2 Final Assembly Tools 5-6 CADJET 2 Disassembly/Assembly 3.0 Stand If you need to ship the plotter to ENCAD for servicing, please observe all the instructions given below. You must contact ENCAD’s Technical Support and Service Department prior to shipping the plotter. See Chapter 1, Section 3.0. NOTE 3.1 Note: When returning the plotter to ENCAD for servicing, remove any extra SIMMS that have been installed. Label all hardware and parts for ease of reassembly. It is not necessary to ship the Stand, Basket, or hardware. Removing the Plotter from the Stand There are two types of stands: a desktop (throwaway) stand and a floor stand which includes a basket. Some of the directions below apply only to the floor stand. CADJET 2 1. Disconnect the power cord and interface cables. 2. Lock both of the stand’s locking casters if you have the floor stand. 3. Remove any extra SIMMS that have been installed. See Section 4.5.1 “Extra Memory (SIMM) Removal” in this chapter. 4. Remove any roll feed and/or sheet media. 5. Remove both ink Cartridges. 6. Clean both parts of the Service Station. Section 4.0 for cleaning procedures. 7. Move the Carriage Assembly so that it sits on the Service Station. See Figure Chapter 5 .3. 8. Insert the Carriage Packing and the Fixed Blade Packing as shown in Figure Chapter 5 .3. If these are not available, use the alternate method shown in Section 3.3. See Chapter 3, 5-7 Disassembly/Assembly Figure Chapter 5 .3: Preparing the Plotter for Shipping 5-8 CADJET 2 Disassembly/Assembly CAUTION To avoid risk of personal injury or damage to the plotter, we recommend that you have someone help you turn the plotter over to place it in the shipping box. 9. Remove the eight screws which hold the plotter on the stand. 10. Stand close to the plotter. Place one hand around the plotter and grasp the front of the Platen with the other hand. Lift the plotter straight up approximately 4” to clear the legs. 11. Place the plotter upside down in the original shipping box with foam support blocks in place. 3.2 Replacing the Plotter on the Stand See the CADJET 2 User’s Guide for the plotter assembly procedures if you are using the desktop stand. If you are using the floor stand, have someone help you position the plotter on the stand and hold it in place while you insert and tighten the eight screws which hold the plotter on the stand. CADJET 2 5-9 Disassembly/Assembly 3.3 Alternate Method for Securing Carriage Assembly and Fixed Blade 1. Position the Carriage Assembly over the Service Station. 2. Place two pieces of nylon filament tape (about two inches long) across the Fixed Blade and press them down onto the Platen, as shown in Figure 5.4. 3. Use a tiewrap to lock the Carriage Assembly in place, as shown in Figure 5.4. (If you do not have a tiewrap, use a heavy-duty rubberband and place it in the same location as you would the tiewrap. Loop the rubberband through itself and knot it securely.) Do not use tape to hold the Carriage Assembly in place. Figure Chapter 5 .4: Preparing the Plotter for Shipping - Alternate Method 5-10 CADJET 2 Disassembly/Assembly 4.0 Right Cover Assembly, MPCB, and SIMMS 4.1 Removing the Right Cover Assembly Removing the Right Cover Assembly provides access to the SIMMS, MPCB, and all MPCB connectors (Stepper Motor, Servo Motor, Fan, Keypad, and Trailing Cable). CAUTION NOTE There is a screw and nut in approximately the middle near the top edge of the Right Side Plate. These have been set at the factory to a specific torque. DO NOT tighten or loosen this screw and nut at any time. See Figure Chapter 5 .25. Note: If the LED Keypad on the Right Cover Assembly needs to be replaced, the entire Right Cover Assembly must be replaced. Figure Chapter 5 .5: Inside View of Right Cover Assembly CADJET 2 5-11 Disassembly/Assembly To remove the Right Cover Assembly: 5-12 1. Remove the Top Cover. Keep the right end of the Top Cover tilted up so that the Retracting Stop and Compression Spring don’t fall out. 2. You may find it helpful to wrap a rubberband around the connector clips on the parallel port to hold them out of the way while the Right Cover Assembly is being removed. 3. Move the Carriage Assembly to the middle of the Platen. 4. Using a #2 Phillips screwdriver, loosen the top and front screws (which are captive) and remove the bottom back screw on the inside of the Right Cover (see Figure Chapter 5 .5). 5. Remove the Right Cover. Move the Right Cover towards the back of the unit as you remove it so that it clears the parallel port on the back of the unit. Be very careful when removing the Right Cover so that the LED’s on the MPCB are not damaged. CADJET 2 Disassembly/Assembly 4.2 Removing the MPCB Connectors 1. Power must be disconnected. 2. Reference Figure Chapter 5 .6 for the locations of the connectors. 3. Grasp the connector, not the wires, to remove the cables. 4. Do not pull the cables from the connectors on the J1 location (Keypad Cable) and JP4 location (Trailing Cable) until they are unlocked. Doing so may cause damage to the cable fingers. Do not pull the lock too hard as you unlock the connectors or the lock may break off. 5. Integrated circuits can be weakened or inactivated by electrical discharge. It is recommended that you be grounded to a static station by an ESD wrist strap to prevent ESD damage. WARNING Disconnect all 6 connectors on the MPCB so that the MPCB can be removed (see Figure Chapter 5 .6 for positions of the connectors), as follows: CADJET 2 1. Disconnect the Keypad Cable connector at the J1 location. Use the reamer to pull forward on the connector lock and remove the flex cable from the connector. 2. Disconnect the Trailing Cable connector at the JP4 location. Use the thumb and forefinger to pull forward on the connector lock and remove the Trailing Cable from the connector. 3. Disconnect the Servo Motor connector (Red and Blue wires) at the J6 location. Grasp the Servo Motor connector with the thumb and forefinger and pull straight out. 4. Disconnect the Fan connector (Red and Black wires) at the J5 location. Grasp the Fan connector with the thumb and forefinger and pull straight out. 5. Disconnect the Stepper Motor connector at the JP5 location. Grasp the Stepper Motor connector with the thumb and forefinger and pull straight out. 6. Disconnect the Power Supply connector at the JP1 location. Grasp the Power Supply connector with the thumb and forefinger 5-13 Disassembly/Assembly and pull straight out. At this point, all 6 connectors should be disconnected. 5-14 CADJET 2 Disassembly/Assembly Figure Chapter 5 .6: MPCB Connectors CADJET 2 5-15 Disassembly/Assembly 4.3 MPCB 1. Power must be disconnected. 2. Integrated circuits can be weakened or inactivated by electrical discharge. It is recommended that you be grounded to a static station by an ESD wrist strap to prevent ESD damage. For storage or shipment of printed circuit boards, anti-static bags are highly recommended. WARNING NOTE Note: Remove any extra SIMMS that have been installed if you are shipping the MPCB for servicing or replacement. 4.3.1 Removing the MPCB To remove the MPCB: 5-16 1. Put on an ESD wrist strap. 2. Use a #2 6” Phillips screwdriver to remove the three screws holding the MPCB onto the side plate. The screws are located to the right of J1, to the left of JP4, and to the right of JP1. See Figure Chapter 5 .6. Hold the top of the MPCB while removing the screws. 3. Place the MPCB in an ESD bag (anti-static bag) in preparation for shipment to ENCAD for replacement or repair, or if it is to be stored for repair at your facility. CADJET 2 Disassembly/Assembly 4.3.2 Reinstalling the MPCB To reinstall the MPCB, reverse the steps followed when removing the MPCB: CADJET 2 1. Put on an ESD wrist strap. 2. Remove the MPCB from the ESD bag. 3. Hold the MPCB in place on the Right Side Plate while putting in the three screws in the holes located to the right of J1, to the left of JP4, and to the right of JP1. See Figure Chapter 5 .6. Use a #2 6” Phillips screwdriver to tighten the screws until firmly tightened. 5-17 Disassembly/Assembly 4.4 NOTE Reinstalling the MPCB Connectors 1. Reinstall the Stepper Motor connector at JP5. 2. Reinstall the Fan connector (Red and Black wires) at J5. 3. Reinstall the Servo Motor connector (Red and Blue wires) at J6. 4. Reinstall the Trailing Cable at JP4. Note: The silver fingers on the Trailing Cable should be facing down while inserting the Trailing Cable into the JP4 connector. When inserting the Trailing Cable connector, apply pressure on the locking clip towards the MPCB in order to lock the connector in place. Test to make sure the connector is locked by pulling slightly on the cable to see if it comes out. 5. NOTE Reinstall the Keypad Cable at J1. Note: The fingers on the Keypad Cable should be facing the back of the machine when inserting the Keypad Cable into the J1 connector. When inserting the Keypad Cable connector, apply pressure on the locking clip towards the MPCB in order to lock the connector in place. Test to make sure the connector is locked by pulling slightly on the cable to see if it comes out. NOTE 5-18 Note: If the MPCB is replaced, the Flash EPROM must be programmed because the Flash EPROM will be blank when the MPCB is shipped from ENCAD. See Appendix A at the end of this manual in order to program the Flash EPROM. CADJET 2 Disassembly/Assembly 4.5 Extra Memory (SIMM) 1. Power must be disconnected. 2. Integrated circuits can be weakened or inactivated by electrical discharge. It is recommended that you be grounded to a static station by an ESD wrist strap to prevent ESD damage. For storage or shipment of printed circuit boards, anti-static bags are highly recommended. WARNING 4.5.1 1. Extra Memory (SIMM) Removal The SIMM slots are at a 45° angle. Facing the top of the SIMM, push the side clips gently to the outside (away from the SIMM) and lift up and pull out, being careful not to damage the fingers on the top. See Figure Chapter 5 .7, Figure Chapter 5 .8, and Figure Chapter 5 .7: Location of SIMM Figure Chapter 5 .9. Figure Chapter 5 .8: Closeup View of Clip CADJET 2 5-19 Disassembly/Assembly Figure Chapter 5 .9: Side View of SIMM Removal 5-20 CADJET 2 Disassembly/Assembly 4.5.2 WARNING NOTE Extra Memory (SIMM) Installation For proper specifications and dimensions for the SIMM, please refer to the CADJET 2 User’s Guide, Appendix B. The SIMM must be within ENCAD’s specifications and tolerances. Note: 1. If you are installing two SIMMS, you must install the bottom one first. 2. If you are installing two SIMMS, the SIMM in the top slot MUST contain AS MUCH OR MORE capacity than the SIMM in the bottom slot. For example: 16 MB in top slot, 4 MB in bottom slot, or 8 MB in top slot, 8 MB in bottom slot, or 32 MB in top slot, bottom slot empty. 1. The SIMM slots are at a 45° angle. Place the SIMM straight into the connector as shown in Figure Chapter 5 .10. 2. Slowly push the SIMM down until the two side clips snap into place. Make sure the SIMM is fully seated. 3. Go to Section 4.6 of this chapter for instructions on replacing the Right Cover Assembly. Figure Chapter 5 .10: Side View of SIMM Installation CADJET 2 5-21 Disassembly/Assembly 4.6 5-22 Reinstalling the Right Cover Assembly 1. Make sure that all wires are inside the Right Cover Assembly area as you begin to put the Right Cover Assembly back on so that none of the wires are pinched between the Right Cover Assembly and the Right Side Plate. 2. Align the back of the Right Cover Assembly over the connector clips on the parallel port. Remove the rubber band holding the connector clips together. 3. Reinsert the bottom back screw on the inside of the Right Cover Assembly. See Figure Chapter 5 .5. Using a #2 Phillips screwdriver, tighten the bottom back screw and the top and front screws. All three screws should be firmly tightened. Do not overtighten. 4. Put the Top Cover back on. CADJET 2 Disassembly/Assembly 5.0 Servo Motor 5.1 Removing the Servo Motor CAUTION While removing the Carriage Belt and the screws on the Servo Motor, don’t touch the Encoder Strip with any tools. NOTE Note: The Stand has a cutout in it which allows you to remove the Servo Motor without removing the Plotter from the Stand. To remove the Servo Motor, proceed as follows: CADJET 2 1. Disconnect the power cord and the interface cables. 2. Remove the Top Cover. 3. Remove the Trailing Cable Cover from the Y-Arm in order to have easier access to the Frame Tensioner and to the screws which hold the Servo Motor in place. Use a 5/16 Hex Nut Driver to remove the three nuts which secure it to the back of the Y-Arm. 4. Use a #2 6” Phillips screwdriver to remove the back screw on the Servo Motor. See Figure Chapter 5 .11. 5. Loosen the front screw on the Servo Motor. See Figure Chapter 5 .11. 6. See Figure Chapter 5 .12 and Figure Chapter 5 .11. While you compress the back of the Frame Tensioner with your left index finger, use your right hand or the straight end of the Scriber to gently remove the Carriage Belt from the Servo Motor pulley. 5-23 Disassembly/Assembly CAUTION Make sure that the wires are not scraped against the opening in the bottom of the Platen during the removal of the Servo Motor to avoid accidentally cutting them. 7. Support the Servo Motor with one hand and remove the front screw. 8. Carefully lower the motor part way out of the opening in the bottom of the Platen. 9. Unlock the connector lock on the Servo Motor. Pull the cable out of the connector and finish removing the Servo Motor from the opening. Figure Chapter 5 .11: Servo Motor 5-24 CADJET 2 Disassembly/Assembly Figure Chapter 5 .12: Compression of Frame Tensioner CADJET 2 5-25 Disassembly/Assembly 5.2 Replacing the Servo Motor 1. Make sure that the wires of the Servo Motor cable are not scraped against the opening in the bottom of the Platen during the reinstallation of the Servo Motor to avoid accidentally cutting them. 2. Also, make certain that the connector on the Servo Motor faces the BACK of the Platen. If the connector faces the front of the Platen, the cable will be stretched too tight and may be damaged. 1. Partially reinsert the Servo Motor inside the opening in the bottom of the Platen. 2. Plug the Servo Motor cable into the connector on the Servo Motor. Make sure that it snaps into place. 3. Guide the Servo Motor into the Platen. 4. Push the Servo Motor pulley through the Platen and Y-Arm and, at the same time, rotate the Servo Motor so that the connector is facing the BACK side of the Platen. Align the screw holes with the screw hole openings. 5. Insert one screw into the Servo Motor and tighten it slightly. 6. Insert the second screw into the Servo Motor and tighten it. Make sure both screws are tight. 7. Compress the back of the Frame Tensioner with your left index finger and wrap the Carriage Belt over the Servo Motor pulley. Make sure that the three guides on the inside of the belt are inserted in the three pulley grooves. 8. Move the Carriage Assembly back and forth to check the Carriage Belt tension. 9. Reinstall the Trailing Cable Cover and the Top Cover. CAUTION 5-26 CADJET 2 Disassembly/Assembly 6.0 Display Assembly 6.1 Removing the Display Assembly 1. Disconnect the power cord and the interface cables. 2. Using a #1 Phillips screwdriver, remove the 3 screws from the back of the Keypad Top Assembly (and, if the Keypad Bottom is damaged, the 2 screws from the underside of the front of the Keypad Bottom and the three screws which hold the Keypad Bottom to the Platen). See Figure Chapter 5 .13. 3. If the Right Cover Assembly has not been removed from the plotter, you will need to lift up the left side of Keypad Top Assembly and pull it slightly to the left in order to get the Keypad Shim on the right end of the Keypad Top Assembly to clear the overhang from the Right Cover Assembly. 4. Turn the Keypad Top Assembly over. Figure Chapter 5 .13: Display Assembly CADJET 2 5-27 Disassembly/Assembly 4. With thumb and index finger, release the connector lock on the Keypad Cable connector at J1. See Figure Chapter 5 .14. 5. Remove the Keypad Cable. 6. Leave the Keypad Bottom attached to the plotter unless it is damaged. Figure Chapter 5 .14: Keypad PCB NOTE 6.2 Note: The Keypad PCB is not available separately. It is included as part of the Keypad Top Assembly. See Chapter 7 for the part number. Reinstalling the Display Assembly Reinstall Display Assembly by reversing the procedure used to remove it. When reinserting the Keypad Cable, make sure that the silver fingers on the end of the cable face the Keypad PCB. Also, make sure that the lip on the right side of the Keypad Top Assembly is under the Right Cover Assembly. 5-28 CADJET 2 Disassembly/Assembly 7.0 Service Station Assembly 7.1 Removing the Service Station Assembly CAUTION Be sure to clean the Service Station Assembly BEFORE removing it so that ink is not spilled. See Chapter 3, Section 4.0 for the cleaning procedure. NOTE Note: The screw in the bottom of the Service Station Assembly must be in place to attract the magnet on the underside of the top of the Service Station Assembly. Figure Chapter 5 .15: Service Station Assembly CADJET 2 5-29 Disassembly/Assembly NOTE 5-30 1. Move the Carriage Assembly to the center of the Platen. Clean the top and bottom parts of the Service Station Assembly per the procedure in Chapter 3. Remove the top of the Service Station Assembly before removing the bottom of the Service Station Assembly. 2. Use a #1 Phillips screwdriver to remove the right Cam Actuator. See Figure Chapter 5 .15. Note: As you remove the Service Station Bottom, you may want to place a piece of paper or an index card underneath your screwdriver to avoid scratching the paint on the Platen. Also, be careful not to exert too much force in order to avoid breaking the Service Station Bottom. 3. The Service Station Bottom is held in place by two plastic tabs underneath the rim of the Service Station Bottom. See Figure Chapter 5 .15. Place the tip of the 1/8” x 6” Slotted screwdriver between the front of the Y-Arm and the back rim of the Service Station Bottom and carefully turn the screwdriver to create enough space for the tip of the 1/4” x 6” Slotted screwdriver. Turn the 1/4” x 6” Slotted screwdriver until the back of the Service Station Bottom pops out of the opening in the Platen. 4. Pull up slightly on the right end of the Service Station Bottom with the Machinist Scriber. 5. Push in with the 1/4” x 6” Slotted screwdriver on the front edge of the Service Station Bottom until the front tab clears the opening in the Platen. 6. Pull up with your fingers (or with the Machinist Scriber) on the right end of the Service Station Bottom while lifting up the left front edge of the Service Station Bottom with your 1/4” x 6” Slotted screwdriver until the Service Station Bottom is out of the Platen. CADJET 2 Disassembly/Assembly 7.2 NOTE CADJET 2 Reinstalling the Service Station Assembly Note: Be sure the bottom of the Service Station Assembly is oriented properly when reinstalling it. See Figure Chapter 5 .15. 1. If the top of the Service Station Assembly is already in the bottom of the Service Station Assembly, slide it out. Make sure that the screw is in place in the bottom of the Service Station Assembly. 2. Snap the bottom of the Service Station Assembly into the Platen. 3. Slide the top of the Service Station Assembly into the bottom of the Service Station Assembly and push it to the far left position. 4. Use a #1 Phillips screwdriver to reattach the plastic right Cam Actuator back into place on the front of the Y-Arm. Be careful not to overtighten the screw or the plastic may break. 5-31 Disassembly/Assembly 8.0 8.1 CAUTION 5-32 Left Cover Assembly, Left Side Plate, Carriage Assembly, Trailing Cable, and Carriage Belt Removing the Left Cover Assembly and Left Side Plate There is a screw and nut in approximately the middle near the top edge of the Left Side Plate. These have been set at the factory to a specific torque. DO NOT tighten or loosen this screw and nut at any time. See Figure Chapter 5 .25. 1. Remove both Cartridges and the Top Cover. 2. Using a #2 12” Phillips screwdriver, remove the screw located at the bottom back of the inside of the Left Side Plate. See Figure Chapter 5 .16. 3. Using a #2 12” Phillips screwdriver, remove the 2 screws on the inside of the Left Side Plate. One screw is located at the top back of the inside of the Left Side Plate. The other screw is located at the front of the inside of the Left Side Plate and is inside the Block Filler. See Figure Chapter 5 .16. (The screw inside the Block Filler cannot come out of the Block Filler unless you unscrew the Block Filler from the Left Side Plate.) 4. Slide the Left Cover Assembly off the end of the unit and set it aside. 5. Using a #2 8” Phillips screwdriver, remove the 4 screws on the outside of the Left Side Plate and set it aside. CADJET 2 Disassembly/Assembly Figure Chapter 5 .16: Inside View of Left Side Plate CADJET 2 5-33 Disassembly/Assembly 8.2 NOTE Removing the Carriage Assembly Note: 1. When removing the Carriage Assembly, the Cartridges, Top Cover, Left Cover Assembly, and Left Side Plate must first be removed. See Section 8.1 of this chapter. 2. The replacement of the Carriage PCB, the Paper Sensor Assembly, and the Paper Sensor Flex is very complex and requires special tools and fixtures. Therefore, if any of these components of the Carriage Assembly has failed and needs to be replaced, it is necessary to replace the entire Carriage Assembly. 1. Power must be disconnected. 2. It is recommended that you be grounded to a static station by an ESD wrist strap to prevent ESD damage whenever you are handling the Carriage Assembly. 3. Do not touch the Encoder Strip with any tools when removing the Carriage Belt from the Servo Motor Pulley. 4. Always handle the Trailing Cable with care. Do not twist or turn the cable. 1. Remove the Trailing Cable Cover from the back of the Y-Arm. Use a 5/16 Hex Nut Driver to remove the three nuts which secure it to the back of the Y-Arm. 2. Use wire cutters to cut the tie wrap holding the Trailing Cable on the Carriage PCB. Be careful not to cut the Trailing Cable. See Figure Chapter 5 .17. 3. Unlock the Trailing Cable connector (J1) on the Carriage PCB, carefully pull the Trailing Cable away from the double-sided tape, and remove the Trailing Cable. See Figure Chapter 5 .17. WARNING 5-34 CADJET 2 Disassembly/Assembly Figure Chapter 5 .17: Trailing Cable Connector Lock on Carriage PCB CADJET 2 4. See Figure Chapter 5 .12. While you compress the back of the Frame Tensioner with your left index finger, use your right hand or the straight end of the Scriber to gently remove the Carriage Belt from the Servo Motor pulley. 5. Remove the Compression Spring from the Frame Tensioner and set it aside. 6. Push the Carriage Belt through the Frame Tensioner enough to remove the Idler Pulley Assembly from the Frame Tensioner, and then set aside the Idler Pulley Assembly and the Frame Tensioner. (See Figure Chapter 5 .18 for part names, if necessary.) 7. Use a #1 Phillips screwdriver to remove the plastic Cam Actuator from the left front side of the Y-Arm. See Figure Chapter 5 .18. 5-35 Disassembly/Assembly Figure Chapter 5 .18: Left End of Y-Arm NOTE 8. Move the Carriage Assembly to the left end of the Slide Shaft and remove it from the Slide Shaft. 9. Place the Carriage Assembly in an ESD (anti-static) bag in preparation for shipment to ENCAD for replacement or repair, or if it is to be stored for repair at your facility. Note: 1. If the Trailing Cable needs to be replaced, see Section 8.5. 2. If the Carriage Belt needs to be replaced, see Section 8.7. 5-36 CADJET 2 Disassembly/Assembly 8.3 NOTE Reinstalling the Carriage Assembly Note: 1. Never use Isopropyl Alcohol to clean the brass bushings on the Carriage Assembly. Use only a dry cloth. 2. When you slide the Carriage Assembly onto the Slide Shaft, make sure that the Encoder Strip fits into the slot in the Slider and the Encoder which are on the Carriage PCB. 1. Make sure the left end of the Trailing Cable extends out beyond the left end of the Stabilizer Bracket. 2. Slide the Carriage Assembly onto the left end of the Slide Shaft, making sure that the Encoder Strip fits into the slot in the Slider and the Encoder on the Carriage PCB. Use your right index finger to guide the belt as you slide the Carriage Assembly from left to right on the Slide Shaft. 3. Move the Carriage Assembly to the left end of the Slide Shaft and align the left bushing on the Carriage Assembly with the left end of the Slide Shaft. CAUTION CADJET 2 Make sure you clean the Slide Shaft before installing the Carriage Assembly. You may use Isopropyl Alcohol to clean it. Be sure it is dry before installing the Carriage Assembly. 5-37 Disassembly/Assembly CAUTION 5-38 Make sure that the silver fingers on the Trailing Cable face up before inserting the Trailing Cable into the J1 connector lock. See Figure Chapter 5 .19. 4. Connect the Trailing Cable to the J1 connector lock on the Carriage PCB. Make sure the silver fingers on the Trailing Cable face up before inserting it into the lock. See Figure Chapter 5 .19. Slide both sides of the connector lock shut simultaneously. 5. Press the Trailing Cable down onto the double-sided tape on the Carriage PCB. 6. Put the tie wrap down into the back hole in the Carriage PCB (see Figure Chapter 5 .19), feed it up through the front hole, and put the end through the fastener. 7. Grasp the loose end of the tie wrap next to the fastener with the side (not the point) of a pair of needlenose pliers. Turn the pliers away from the fastener in order to pull the tie wrap snug. Cut off the excess length of the tie wrap. 8. Slide the Carriage Assembly to about the middle of the Slide Shaft and stretch out the Carriage Belt. CADJET 2 Disassembly/Assembly Figure Chapter 5 .19: Reinstalling the Trailing Cable in J1 Connector CADJET 2 5-39 Disassembly/Assembly NOTE Note: 1. You may want to refer to Figure Chapter 5 .18 while doing Step 9 through Step 14. 2. One side of the Idler Pulley Assembly has a thicker ring of plastic than the other side. When you insert the Idler Pulley Assembly between the Frame Tensioner and the Carriage Belt, the side with the thicker ring of plastic must face up. See Figure Chapter 5 .18. 9. Insert the Carriage Belt into the Frame Tensioner so that the belt extends about an inch past the Frame Tensioner. 10. Holding the Carriage Belt and Frame Tensioner in one hand, insert the Idler Pulley Assembly into the loop of the belt. Make sure that the side of the Idler Pulley Assembly with the thicker ring of plastic is facing up. 11. Once the Idler Pulley Assembly is in position, pinch the belt to hold the Idler Pulley Assembly in place and pull it into the Frame Tensioner so that the axle rests in the V-shaped grove in the Frame Tensioner. 12. Insert the Compression Spring into the opening in the back of the Frame Tensioner so that the end of the spring fits over the post inside the opening. 13. Fit the Compression Spring over the post at the back of the Y-Arm. 14. Fit the notch in the front end of the Frame Tensioner over the notch in the front of the Y-Bracket. 5-40 CADJET 2 Disassembly/Assembly 15. With your left hand, push the back of the Frame Tensioner towards the right end of the Y-Bracket and, with your right hand, slip the Carriage Belt over the Servo Motor pulley on the right end of the unit. Make sure that the guides in the Carriage Belt are properly fitted over the Servo Pulley. 16. Gently move the Carriage Assembly from end to end and make sure that the Carriage Belt is not rubbing against any other parts. 17. Use a #1 Phillips screwdriver to reattach the plastic left Cam Actuator back onto the front of the Y-Arm. Before careful not to overtighten the screw or the plastic may break. Make sure the orientation is correct (see Figure Chapter 5 .18). 18. Reattach the Trailing Cable Cover to the back of the Y-Arm. 19. Proceed to Section 8.4. CADJET 2 5-41 Disassembly/Assembly 8.4 5-42 Reinstalling the Left Side Plate and Left Cover Assembly 1. Align the Left Side Plate against the left end of the Platen, insert the 4 screws, and tighten with a #2 8” Phillips screwdriver as tight as possible. 2. Push the Left Cover Assembly all the way onto the Left Side Plate. 3. Insert the screw into the top back hole on the inside of the Left Side Plate and tighten slightly. See Figure Chapter 5 .16. 4. Insert the second screw inside the block filler into the Left Side Plate and tighten slightly. See Figure Chapter 5 .16. 5. Insert the third screw into the bottom back hole of the inside of the Left Cover Assembly and tighten slightly. See Figure Chapter 5 .16. 6. Tighten the three screws with a #2 12” Phillips screwdriver. 7. Put the Top Cover back on. 8. Reinstall the Cartridges. CADJET 2 Disassembly/Assembly 8.5 Removing the Trailing Cable Handle the Trailing Cable with care. Do not twist or turn the cable. CAUTION NOTE Note: 1. Perform this procedure only if the Trailing Cable is being replaced. 2. If you are replacing only the Trailing Cable, it is not necessary to remove the Carriage Assembly from the Slide Shaft. 3. If you have already removed the Carriage Assembly from the Slide Shaft in order to replace the Carriage Assembly (and you are replacing the Trailing Cable as well), you will need to do only Steps 3, 4 and 7 of this section. 4. The placement of the double-sided tape which holds the Trailing Cable to the center of the Stabilizer Bracket is important for proper movement of the Carriage Assembly. You may want to obtain P/N 204142 “Fixture Trailing Cable, Tape, Location” which is used for the exact placement of both tapes when installing the Trailing Cable. To accurately install the Trailing Cable on the tapes, obtain P/N 204483 “Fixture Trailing Cable, Location”. CADJET 2 1. Remove the Top Cover. 2. Remove the Trailing Cable Cover from the back of the Y-Arm. Use a 5/16 Hex Nut Driver to remove the three nuts which secure it to the back of the Y-Arm. 3. Remove the Right Cover Assembly. See Section 4.1. 5-43 Disassembly/Assembly 5-44 4. Disconnect the Trailing Cable connector at the JP4 location on the MPCB. Use the thumb and forefinger to pull forward on the connector lock and remove the Trailing Cable from the connector. See Figure Chapter 5 .6 if necessary. 5. Use wire cutters to cut the tie wrap holding the Trailing Cable on the Carriage PCB. Be careful not to cut the Trailing Cable. See Figure Chapter 5 .17. 6. Unlock the Trailing Cable connector (J1) on the Carriage PCB, carefully pull the Trailing Cable away from the double-sided tape, and remove the Trailing Cable. See Figure Chapter 5 .17. 7. Pull the Trailing Cable away from the double-sided tape on the Stabilizer Bracket. Remove the Trailing Cable from the plotter unit. CADJET 2 Disassembly/Assembly 8.6 Reinstalling the Trailing Cable WARNING Make sure that the silver fingers on the Trailing Cable face up before inserting the Trailing Cable into the J1 connector lock. See Figure Chapter 5 .19. NOTE Note: CADJET 2 The placement of the double-sided tape which is in the center of the Trailing Cable is important for proper movement of the Carriage Assembly. You may want to obtain P/N 204142, “Fixture Trailing Cable, Tape, Location,” which is used for the exact placement of both tapes when installing the Trailing Cable, and P/N 204483, “Fixture Trailing Cable, Location,” which is used to accurately install the Trailing Cable. 1. See Figure Chapter 5 .20 during this procedure. Place P/N 204142 (Fixture, Tape, Trailing Cable, Location) flat on the Stabilizer Bracket so that the two cutouts are facing you and the right end of the fixture fits over the left edge of the approximately 2 inch cutout at the right end of the Stabilizer Bracket. Apply 2 pieces of 2” double-sided tape to the Stabilizer Bracket. Do not remove the top protective cover on the tapes yet. Remove the fixture after the tapes are in place. 2. Place the Trailing Cable on the Stabilizer Bracket. 3. Route the right end of the Trailing Cable through the Right Side Plate (see Figure Chapter 5 .29) and connect the Trailing Cable connector at the JP4 location on the MPCB. Be sure to slide both sides of the connector lock shut at the same time. See Figure Chapter 5 .6 if necessary. 4. Connect the Trailing Cable to the J1 connector lock on the Carriage PCB. Make sure the silver fingers on the Trailing Cable face up before inserting it into the lock. See Figure Chapter 5 .19. Slide both sides of the connector lock shut at the same time. 5-45 Disassembly/Assembly Figure Chapter 5 .20: Positioning the Trailing Cable on the Stabilizer Bracket 5-46 CADJET 2 Disassembly/Assembly 5. Press the Trailing Cable down onto the double-sided tape on the Carriage PCB. 6. Put the tie wrap down into the back hole in the Carriage PCB (see Figure Chapter 5 .19), feed it up through the front hole, and put the end through the fastener. 7. Grasp the loose end of the tie wrap next to the fastener with the side (not the point) of a pair of needlenose pliers. Turn the pliers away from the fastener in order to pull the tie wrap snug. Cut off the excess length of the tie wrap. 8. Move the Carriage Assembly to the very left end of the Slide Shaft. 9. Place the Trailing Cable Location Fixture, P/N 204483, flat on the Stabilizer Bracket against the back wall of the Stabilizer Bracket. 10. Remove the top protective cover on the 2” double-sided tape on the right end of the Stabilizer Bracket and press the right end of the Trailing Cable onto the tape. 11. With the Carriage Assembly still at the very left end of the Slide Shaft and with the Trailing Cable still in line with the Trailing Cable Location Fixture, P/N 204483, remove the top protective cover on the 2” double-sided tape in the center of the Trailing Cable and press the Trailing Cable onto the tape. 12. Remove the fixture. Slide the Carriage Assembly back and forth several times to make sure that the Trailing Cable does not catch on anything and to make sure that the Carriage Assembly will travel the full length of the Slide Shaft. CADJET 2 5-47 Disassembly/Assembly 8.7 NOTE Removing the Carriage Belt from Carriage Assembly Note: 1. All of the procedures covered under this section are based upon the assumption that the Carriage Assembly has already been removed from the Slide Shaft. Refer to Sections 8.1 and 8.2 in this chapter if it has not been removed. 2. Once the Carriage Belt has been installed (Section 8.8), refer to Sections 8.3 and 8.4 in this chapter for reinstallation of the Carriage Assembly. Replace the Carriage Belt if it is frayed, cracked, worn, or otherwise damaged. 1. Use the tip of a Slotted screwdriver to release the tension on the end of the metal Belt Clip which goes under the plastic on the Carriage so that it slides out from under the plastic. See Figure Chapter 5 .21. 2. Remove the Belt Clip. The Carriage Belt can now be removed. Figure Chapter 5 .21: Removing the Carriage Belt 5-48 CADJET 2 Disassembly/Assembly 8.8 CAUTION Installing the Carriage Belt on Carriage Assembly The placement of the Carriage Belt on the plastic grooves which are on the Carriage Assembly is important so that the belt does not rub on anything. The belt should not be placed flush with the outer end of the plastic grooves. It should be positioned as close to the Carriage PCB as possible while still being on the plastic grooves. See Figure Chapter 5 .22. 1. The “bumps” on the belt (where the ends of the belt are joined together to make the belt continuous) should be positioned over the notches on the Carriage Assembly. 2. Use the metal Belt Clip to secure the belt to the Carriage Assembly. Make sure there is no gap between the Belt Clip and the Carriage. Use the tip of a Slotted screwdriver to push the ends of the Belt Clip under the plastic on the Carriage Assembly. See Figure Chapter 5 .21. 3. Once the Carriage Belt has been installed, refer to Sections 8.3 and 8.4 in this chapter for reinstallation of the Carriage Assembly. Figure Chapter 5 .22: Placement of Carriage Belt on Carriage CADJET 2 5-49 Disassembly/Assembly 9.0 9.1 WARNING NOTE Power Supply and ON/OFF Switch Removing the Power Supply and ON/OFF Switch Make sure that the Power Cord is disconnected from the plotter before beginning this procedure. Note: 1. The Top Cover, Left Cover Assembly, and Left Side Plate must be removed in order to remove either the Power Supply or the ON/OFF Switch. See Section 8.1. 2. You must have the plotter removed from the Stand in order to access all of the screws on the bottom of the Platen which hold the Power Supply in place. See Section 3.1 if necessary. 5-50 1. Remove the Top Cover, Left Cover Assembly, and the Left Side Plate. See Section 8.1. 2. Using a #2 Phillips screwdriver, remove the 4 screws on the bottom of the Platen which hold the Power Supply in place. 3. Pull the Power Supply part way out of the Platen, grasp the connector on the black and white ON/OFF Switch Cable, and remove the cable from the Power Supply. 4. Pull the Power Supply the rest of the way out of the Platen, grasp the connector on the Power Cable coming from the MPCB, and remove the Power Cable from the Power Supply. 5. If the ON/OFF Switch needs to be replaced, push the top of the switch out of the back of the Platen, pry up on the bottom of the switch with a screwdriver (from inside the Platen), and push the switch out of the Platen. Remove the ground wire from the Platen. CADJET 2 Disassembly/Assembly 9.2 NOTE CADJET 2 Installing the Power Supply and ON/OFF Switch 1. If the ON/OFF Switch was removed, push the new switch into place. Position it so the switch is on top and the prongs for the Power Cord are on the bottom (see Chapter 1, Figure 1.3). Connect the ground wire to the inside of the Platen (see Figure Chapter 5 .24). 2. Connect the Power Cable coming from the MPCB to the connector on the Power Supply. Make sure that the ground from the Power Cable is still connected to the inside of the Platen, at the same location as the ground from the ON/OFF Switch (see Figure Chapter 5 .24). 3. Insert the Power Supply part way into the Platen. 4. Connect the Power Switch cable to the connector on the Power Supply. Note: You may find it easier to align the screws with the Power Supply if you turn the Platen onto its back side. 5. Position the Power Supply in place inside the Platen and insert the screws through the bottom of the Platen and into the Power Supply. Use a #2 Phillips screwdriver to tighten the screws. (Do not overtighten them). 6. Reinstall the Left Side Plate, Left Cover Assembly, and the Top Cover. See Section 8.4. 5-51 Disassembly/Assembly 10.0 Stabilizer Bracket and Encoder Strip NOTE Note: 1. If the Encoder Strip is not damaged, do not remove it. It cannot be reused. 2. If the Encoder Strip is damaged, the entire Stabilizer Bracket must be replaced. Follow the directions under Sections 10.1 and 10.2 in this chapter. Contact ENCAD’s Technical Support and Service department to obtain an RMA number (see Chapter 1, Section 3.0). Be sure to specify whether you have a D-Size or E-Size model. A new Stabilizer Bracket will be sent to you which will already have the new Encoder Strip installed on it, as well as the tapes for the Trailing Cable. The person taking your call will explain the procedure for the exchange. The Encoder Strip is attached to the Stabilizer Bracket with doublesided 3M tape. The Stabilizer Bracket is held on the Y-Arm by means of three screws which go into the back of the Y-Arm. The Encoder Strip should be inspected for visual damage to windows, noting any cracks, scratches, or bends in the mylar. Figure Chapter 5 .23: Encoder Strip 5-52 CADJET 2 Disassembly/Assembly 10.1 Removing the Stabilizer Bracket Refer to the appropriate sections of this chapter and to Figure Chapter 5 .23 while removing the parts listed below: CADJET 2 1. Remove the Cartridges and the Top Cover. 2. Remove the Left Cover Assembly and Left Side Plate. Section 8.1. 3. Remove the Trailing Cable Cover, Frame Tensioner, Left Cam Actuator, and Carriage Assembly. See Section 8.2. 4. Remove the Trailing Cable from the tapes on the Stabilizer Bracket. See Figure Chapter 5 .23. 5. Use a 7/64 Hex Nut Driver to remove the three screws from the back of the Y-Arm which hold the Stabilizer Bracket on the Y-Arm and remove the Stabilizer Bracket. See Figure Chapter 5 .23. See 5-53 Disassembly/Assembly 10.2 Reinstalling the Stabilizer Bracket CAUTION Be very careful not to damage the Encoder Strip as you install the Stabilizer Bracket. NOTE Note: You may want to clean the Slide Shaft and the brass bushings on the Carriage Assembly prior to reinstalling the Carriage Assembly. You may use Isopropyl Alcohol to clean the Slide Shaft, but you should NOT use it to clean the brass bushings. Use only a clean, dry cloth to clean the brass bushings. The new Stabilizer Bracket will already have the new Encoder Strip as well as new tapes for the Trailing Cable attached to it. Refer to Figure Chapter 5 .23 and to the appropriate sections of this chapter during this procedure. To reinstall the Stabilizer Bracket: 5-54 1. Attach the Stabilizer Bracket to the Y-Arm with the three screws which go through the back of the Y-Arm into the Stabilizer Bracket. It is easier to do this if you first attach one end, then the other end, and then the center. Put the screws down to the bottom of the slot in the Y-Arm and use the 7/64 Hex Nut Driver to tighten them. (The exact positioning of the screws in the slot will be done later during the Carriage Height Adjustment in Section 6.2 of Chapter 6. 2. Follow all the steps in Section 8.3 for reinstalling the Carriage Assembly through Step 17. (The Trailing Cable Cover will be reattached later.) CADJET 2 Disassembly/Assembly CADJET 2 3. Slide the Carriage Assembly back and forth a few times to make sure it moves easily. Make certain that it travels easily all the way to the left end of the Slide Shaft so that the Left Cam Actuator engages the Cutter. 4. Once you have checked the movement of the Carriage Assembly, go to Section 8.6, Steps 8-12 for the procedure for attaching the Trailing Cable to the tapes on the Stabilizer Bracket. 5. Reattach the Trailing Cable Cover. 6. Reattach the Left Side Plate and Left Cover Assembly. Section 8.4. 7. Reinstall the Cartridges and the Top Cover. See 5-55 Disassembly/Assembly 11.0 Lower Drive Assembly, Fan Assembly, and Stepper Motor Assembly (Inner Platen Parts) The Inner Platen contains the Lower Drive Assembly, the Fan Assembly, the Stepper Motor Assembly, the Drive Shaft Supports, and the Foam Block. See Figure Chapter 5 .24. These parts are referred to collectively as the Inner Platen Parts. (Although the Power Supply and ON/OFF Switch are also inside the Platen, for the purposes of this manual they are not included when a reference to the Inner Platen Parts is made.) Figure Chapter 5 .24: Inner Platen Parts 5-56 CADJET 2 Disassembly/Assembly 11.1 Disassembly of Plotter Before Removing the Inner Platen Parts Refer to the indicated sections of this chapter and Figure Chapter 5 .25 as necessary during this procedure. To obtain access to the Inner Platen Parts: CAUTION 1. Remove the Top Cover, the Left Cover Assembly and the Left Side Plate. See Section 8.1. 2. Remove the Right Cover Assembly. See Section 4.1. 3. Disconnect all the connectors from the MPCB. See Section 4.2. 4. Remove the MPCB. See Section 4.3.1. There is a screw and nut in approximately the middle near the top edge of the Left and Right Side Plates. These have been set at the factory to a specific torque. DO NOT tighten or loosen this screw and nut at any time. See Figure Chapter 5 .25. 5. Remove the Right Side Plate. See Figure Chapter 5 .25. Be sure to disconnect the Power Cable Ground from the inside of the Right Side Plate. 6. Remove the Display Assembly. See Section 6.1. 7. Remove the Left and Right Rollguides from the back of the Platen. 8. Remove the Trailing Cable Cover. 9. Remove the Power Supply. See Section 9.1. 10. Remove the Servo Motor. See Section 5.1, Steps 4-9. 11. Clean and remove the entire Service Station. See Chapter 3, Section 4.0 for cleaning procedure and Chapter 5, Section 7.1 for the removal procedure. 12. Go to Section 11.2 below. CADJET 2 5-57 Disassembly/Assembly Figure Chapter 5 .25: Disassembly of Plotter Prior to Removing the Inner Platen Parts 5-58 CADJET 2 Disassembly/Assembly 11.2 CAUTION Removing the Inner Platen Parts When you remove the Lower Drive Assembly, make sure that the Lower Rollers do not catch on any of the openings, screws, or cap nuts inside the Platen. If the Lower Rollers catch on any of these items, they can become damaged, which would affect the Skew and make it necessary to replace the entire Lower Drive Assembly. Refer to Figure Chapter 5 .24 and Figure Chapter 5 .26 during this procedure. NOTE CADJET 2 1. Lay Platen on its back. 2. Use a flat screwdriver to pry out the Snap Plug on the bottom side of the Platen. 3. Using a #1 6” or 8” Phillips screwdriver, remove the four screws on the bottom of the Platen which hold the Exhaust in place. 4. Insert your left hand into the opening for the Exhaust and hold the Fan Assembly in place while using a #2 6” or 8” Phillips screwdriver to remove the 3 flat-head screws on the bottom of the Platen which hold the Fan Assembly in place. Do not allow the screws to come out at an angle. 5. Lay the Platen on its bottom. 6. Using a #1 6” or 8” Phillips screwdriver, remove the 4 black flathead screws which hold the left and middle Drive Shaft Supports in place. There are two screws in the center of the Platen, and two screws approximately three inches to the left of the left brass bracket. See Figure Chapter 5 .26. Note: Don’t remove the two screws holding the Stepper Motor Assembly until Step 9. See Figure Chapter 5 .26. 5-59 Disassembly/Assembly Figure Chapter 5 .26: Removing the Lower Drive Shaft Screws 5-60 CADJET 2 Disassembly/Assembly 7. NOTE Remove the left Drive Shaft Support through the left end of the Platen and the middle Drive Shaft Support through the Snap Plug opening. Note: 8. Be very careful when removing the Foam Block so that it does not tear. If it does tear, however, it must be replaced with a new one so that the Inner Platen has sufficient vacuum. Remove the Foam Block which is beside the Stepper Motor Assembly by putting your index finger into the opening in the top of the Foam Block and pulling it towards you. See Figure Chapter 5 .27. Figure Chapter 5 .27: Removing the Foam Block CADJET 2 5-61 Disassembly/Assembly During Step 9: CAUTION When you remove the two screws from the right Drive Shaft Support which hold the Stepper Motor Assembly (see Figure Chapter 5 .26), hold the Stepper Motor Assembly with your right hand. If the Stepper Motor Assembly drops and hits hard on the Platen, the wires and/or the Stepper Motor may be damaged. 9. Using a #1 6” or 8” Phillips screwdriver, loosen but do not remove the 2 black flat-head screws which hold the Stepper Motor Assembly. Hold the Stepper Motor Assembly with your right hand so it does not drop suddenly and use your left hand to finish unscrewing the two screws and remove them. During Step 10: CAUTION 1. Make sure that the Lower Drive Gear on the right end of the Lower Drive Shaft Assembly does not catch on the edge of the opening in the Platen. 2. Support the Lower Rollers so they do not catch on any of the openings, screws, or cap nuts inside the Platen. If the Lower Rollers catch on any of these items, they can become damaged, which would affect the Skew and make it necessary to replace the entire Lower Drive Assembly. 3. Do not allow the Fan Assembly to drop as it comes out of the right end of the Platen. 10. Reach into the Fan opening on the bottom of the Platen and use your fingertips to hold up the Fan Assembly so that it clears the openings, screws, and cap nuts on the inside of the Platen while simultaneously pulling the Stepper Motor Assembly and Lower Drive Shaft Assembly out of the right end of the Platen. 11. Go to Section 11.3 below if the Stepper Motor Assembly needs to be removed. Otherwise, go to Section 11.4. 5-62 CADJET 2 Disassembly/Assembly 11.3 Stepper Motor 11.3.1 NOTE Removing the Stepper Motor Note: 1. If the Stepper Motor needs to be replaced, all of the steps from the beginning of Section 11.0 (including all subsections) must be performed. 2. If removing only the Stepper Motor, do not remove the Bowed Washer, Washer, and Retaining Ring which are between the end of the Lower Drive Assembly and the Stepper Motor Bracket. See Figure Chapter 5 .28. 3. Do not remove the 20 Teeth Gear from the Stepper Motor. See Figure Chapter 5 .28. 4. Do not remove the Oilite Bushing from the Stepper Motor Bracket. (If it should happen to fall out, press it back in as far as it will go.) 5. Do not clean the Oilite Bushing with alcohol. Wipe it with a clean, dry cloth only. See Figure Chapter 5 .28. CADJET 2 1. Once the Inner Platen Parts have been removed, remove the Stepper Motor from the Stepper Motor Bracket by unhooking the Extension Spring from the post on the Stepper Motor Bracket. See Figure Chapter 5 .28. 2. Unscrew the Retainer Spring Post from the Spring Post and remove them from the Stepper Motor Bracket and Stepper Motor Assembly. 3. Unscrew the Pivot Screw and Pivot Nut and remove them from the Stepper Motor Bracket and Stepper Motor Assembly. 4. Remove the Stepper Motor from the end of the Lower Drive Assembly. 5. If you are replacing the Stepper Motor Bracket, you will need to remove the Retaining Ring, Washer, and Bowed Washer which are between the end of the Lower Drive Assembly and the Stepper Motor Bracket. 5-63 Disassembly/Assembly Figure Chapter 5 .28: Lower Drive Assembly and Stepper Motor Assembly 5-64 CADJET 2 Disassembly/Assembly 11.3.2 NOTE Reinstalling the Stepper Motor Note: 1. If the Oilite Bushing came out of the Stepper Motor Bracket, make sure that it has been reinstalled. Press it into the bracket as far as possible. There should be no gap between the bushing and the bracket. 2. If you did not remove the Stepper Motor Bracket from the Lower Drive Assembly, skip Step 1. 3. If you are installing a new Stepper Motor Assembly, the gear should have been on the shaft of the motor when you received the motor. 1. Be very careful when you install the Stepper Motor Assembly onto the Stepper Motor Bracket so that you do not damage the gears on the motor and the Lower Drive Assembly. 2. Overtightening the Pivot Screw (Step 3 below) can prevent the Stepper Motor from pivoting as intended. DO NOT OVERTIGHTEN. 1. If you are replacing the Stepper Motor, put the Stepper Motor Bracket onto the Lower Drive Assembly and then put the Bowed Washer, the Washer, and the Retaining Ring on over the end of the Lower Drive Assembly. Make sure that the Retaining Ring snaps into the groove in the end of the Lower Drive Assembly. 2. Gently place the Stepper Motor Assembly onto the Stepper Motor Bracket. Be careful not to damage the gears. Make sure that the gears are meshing with each other. 3. Use the Pivot Screw and Pivot Nut to secure the Stepper Motor Assembly to the Stepper Motor Bracket. Torque to 6 IN-LB. 4. Hook the Extension Spring onto the Spring Post. 5. Place the Spring Post through the Stepper Motor Assembly and the Stepper Motor Bracket and secure it with the Retainer Spring Post. Torque to 6 IN-LB. 6. Hook the Extension Spring onto the post on the Stepper Motor Bracket. 7. Complete the reinstallation of the Inner Platen Parts by following the procedures listed below in Section 11.4. WARNING CADJET 2 5-65 Disassembly/Assembly 11.4 CAUTION Reinstalling the Inner Platen Parts When you reinstall the Lower Drive Assembly, make sure that none of the Lower Rollers or the Gear catch on the screws, cap nuts, or openings inside the Platen. If the Lower Rollers catch on any of these items, they can become damaged, which would affect the Skew and make it necessary to replace the entire Lower Drive Assembly. Refer as needed to Figure Chapter 5 .24, Figure Chapter 5 .25, Figure Chapter 5 .26, Figure Chapter 5 .27, and Figure Chapter 5 .29 during this procedure. 5-66 1. Insert the Lower Drive Shaft Assembly and Stepper Motor Assembly part way into the right end of the Platen. 2. Place the Fan Assembly under the Lower Drive Shaft beside the right Lower Drive Gear. Make sure that the Fan Assembly wires face the right end of the Platen and the opening in the Fan Assembly faces the left end of the Platen. 3. Lay the Stepper Motor Assembly on the palm of your right hand and use your fingertips to hold up the Fan Assembly as you push the Lower Drive Shaft into the Platen. While inserting, you must lift the Fan Assembly over the cap nuts on the inside of the bottom of the Platen and make sure you do not strike the Lower Rollers or the Gear on the Lower Drive Shaft against the screws, cap nuts, or openings in the Platen. 4. Align the right Lower Drive Shaft Support with the screw holes and insert the screws. Using a #2 6” or 8” Phillips screwdriver, tighten them slightly. 5. Insert the middle Lower Drive Shaft Support through the Snap Plug opening (see Figure Chapter 5 .26), align it with the screw holes, and insert the screws. Using a #2 6” or 8” Phillips screwdriver, tighten them slightly. CADJET 2 Disassembly/Assembly CAUTION 6. Insert the left Lower Drive Shaft Support in the left end of the Platen so that the shaft goes through the brass bushing in the support. The support should be oriented in the same manner as the support which is by the Stepper Motor. See Figure Chapter 5 .26. Align it with the screw holes, and insert the screws. Using a #2 6” or 8” Phillips screwdriver, tighten them slightly. 7. Tighten all the screws in the supports until they are snug. 8. Insert the Foam Block. Make sure that the Power Supply Cable is in the opening in the front of the Foam Block. Also make sure that the Stepper Motor Assembly and Fan Assembly cables are at the back corner of the Foam Block. See Figure Chapter 5 .27. Push the Foam Block in until it is flush against the Stepper Motor Assembly. Make sure it is not tilted at an angle. 9. Turn the Platen onto its back. Do not overtighten the screws which hold the Fan Assembly in place. The threads in the screw holes will strip very easily. 10. Reach through the opening for the Fan Assembly with your left hand, align the opening in the Fan Assembly with the right edge of the opening in the Platen, and align the three screw holes. If necessary, push the Power Supply Cable up towards the front edge of the Platen so that it is out of the way of the Fan Assembly. 11. Hold the Fan in place with your left hand and insert the screws. Make sure that the screws go in straight. Using a #2 6” or 8” Phillips screwdriver, tighten them just until snug. Do not overtighten or the threads on the screw holes will strip. CADJET 2 5-67 Disassembly/Assembly CAUTION The Exhaust must be oriented correctly in order to achieve the proper vacuum inside the Platen. See Figure Chapter 5 .24. 12. Reinstall the Exhaust on the outside of the bottom of the Platen. Using a #2 6” or 8” Phillips screwdriver, tighten the screws until snug. 13. Reinsert the Snap Plug in the bottom of the Platen and turn the Platen onto its bottom side. 14. Go to Section 11.5. 5-68 CADJET 2 Disassembly/Assembly 11.5 Reassembly of Plotter After Reinstalling the Inner Platen Parts 1. Reinstall the Servo Motor. See Section 5.2. 2. Reinstall the Display Assembly. See Section 6.2. 3. Reinstall the Service Station Assembly. See Section 7.2. 4. Make sure the Ground from the Power Cable is still connected to the inside of the Platen, at the same location as the ON/OFF Switch Ground. See Figure Chapter 5 .24. Reinstall the Power Supply. See Section 9.2. 5. Reinstall the Left and Right Rollguides. 6. Reinstall the Left Side Plate. See Section 8.4, Step 1. 7. Attach the Ground from the Power Cable to the inside of the Right Side Plate (near the front edge). Route all the wires from the Servo Motor Assembly, Stepper Motor Assembly, Fan Assembly, and Power Supply through the bottom slot on the Right Side Plate. See Figure Chapter 5 .29. Secure the Right Side Plate to the Platen with four screws. See Figure Chapter 5 .25. 1. Feed the Trailing Cable and the Keypad Flex Cable through the openings in the Right Side Plate. Make sure they are not over the top of the Right Side Plate. 2. Make sure the silver fingers are facing up when they are routed through the Right Side Plate. See Figure Chapter 5 .29. CAUTION 8. CADJET 2 Route the Trailing Cable (with the silver fingers facing up) through the top slot in the Right Side Plate. 5-69 Disassembly/Assembly Figure Chapter 5 .29: Routing of Wires and Cables on Right Side Plate and MPCB 5-70 CADJET 2 Disassembly/Assembly 9. Secure the MPCB to the Right Side Plate using three screws. See Section 4.3.2 and Figure Chapter 5 .29. Make sure the Trailing Cable is not pinched between the stand-off and the MPCB. 10. Bring the Trailing Cable around the bottom of the MPCB and connect it at the JP4 connector. Make sure the silver fingers face down when the Trailing Cable is inserted into the connector. 11. Route the Keypad Cable through the top left hole in the Right Side Plate. Bring the Keypad Cable down around the flat edge of the MPCB beneath the J1 connector. Connect the Keypad Cable at the J1 connector on the MPCB. The silver fingers must face the back side of the plotter when the Keypad Cable is inserted into the connector. 12. Reconnect the Servo Motor wire (Red and Blue) to the J6 connector, the Stepper Motor wire to the JP5 connector, and the Fan wire (Red and Black) to the J5 connector. Reference Figure Chapter 5 .6. 13. Reinstall the Trailing Cable Cover. 14. Reinstall the Right Cover Assembly. Make sure that none of the harnesses or cables are pinched between the cover assembly and the Right Side Plate. See Section 4.6. 15. Reinstall the Left Cover Assembly and the Filler Block. Section 8.4, Steps 2-6. See 16. Reinstall the Top Cover. The entire plotter is now reassembled. CADJET 2 5-71 Disassembly/Assembly 12.0 Fixed Blade 12.1 Removing the Fixed Blade These instructions are given even though it is very unlikely that the Fixed Blade will ever need to be replaced. 1. Park the Carriage Assembly at the Service Station and disconnect the power. 2. Use a flat tip screwdriver or the Machinist Scriber to remove the Fixed Blade. Pry up gently on one end of the Fixed Blade and carefully loosen it along the length of the Platen. 3. If any of the Fixed Blade Spacers come loose when the Fixed Blade is removed, reattach them according to the instructions in Section 12.2 below Figure Chapter 5 .30: Fixed Blade 5-72 CADJET 2 Disassembly/Assembly 12.2 NOTE CADJET 2 Reinstalling the Fixed Blade Note: You will not need to perform this step if all the Fixed Blade Spacers remained in place during the removal of the Fixed Blade. 1. See Figure Chapter 5 .30. Place the Fixed Blade Spacers 2”(13 for E-Size and 9 for D-Size) and the Fixed Blade Spacer 1” into the groove in the Platen. Be sure to keep all spacers away from the openings for the Upper Rollers. 2. Place the Fixed Blade into the groove. The right end of the Fixed Blade should be about 1/2” to the left of the edge of the Service Station. Make sure that the angled ends of the Fixed Blade point towards the back of the Platen, as shown in Figure Chapter 5 .30, to avoid damage to the Cutter. 3. Install the Fixed Blade Clips (14 for E-Size and 10 for D-Size) into the groove. A Fixed Blade Clip should be placed opposite each Fixed Blade Spacer. Make sure that the Fixed Blade Clips are seated all the way to the bottom of the groove. Also make sure that the Fixed Blade is seated all the way to the bottom of the Fixed Blade Spacers. 4. Secure the Fixed Blade and the Fixed Blade Spacers (if any came out during the removal of the Fixed Blade) to the Platen, using the Blackmax Loctite at the “B” locations shown in Figure Chapter 5 .30. 5-73 Disassembly/Assembly 13.0 Cutter Wheel 13.1 WARNING Removing the Cutter Wheel Be very careful whenever you handle the Cutter Assembly. The Cutter Wheel is extremely sharp. In the event that the Cutter Wheel should become dull, it may be replaced with a new wheel. It is not necessary to replace the entire Cutter Assembly. Use the following procedure: 5-74 1. Disconnect the power to the plotter. 2. Move the Carriage Assembly to the center of the Platen. 3. Use a pair of needle nose pliers to unhook the spring on the left side of the Cutter Assembly from the Carriage Assembly. 4. Lift the Cutter Assembly away from the Carriage Assembly. 5. Remove the four screws (Item 9 in Figure Chapter 5 .31) from the Cover Cutter (Item 2). 6. Remove the Cutter Wheel (Item 7) from the Lower Link Cutter (Item 4). CADJET 2 Disassembly/Assembly Figure Chapter 5 .31: Cutter Assembly CADJET 2 5-75 Disassembly/Assembly 13.2 Replacement of Cutter Wheel If the entire Cutter Assembly came apart when the Cutter Wheel was removed, begin with Step 1. If the Cutter Assembly did not come apart, begin with Step 4. NOTE 1. Place the Delta Link Cutter (Item 3 in Figure Chapter 5 .31) onto the Frame Cutter (Item 1). 2. Place the Cutter Toggle Spring (Item 8) between the two Cutter Spring Pivots (Item 6). Then place them into the Delta Link Cutter (Item 3). 3. Place the Lower Link Cutter (Item 4) onto the Delta Link Cutter (Item 3). 4. Place the Cutter Wheel (Item 7) onto the Lower Link Cutter (Item 4). Note: 5. NOTE 5-76 The Cutter Wheel is flat on one side and is beveled on the other side. The beveled edge of the Cutter Wheel must face the Cover Cutter. See Figure Chapter 5 .31. Place and secure the Cover Cutter (Item 2) to the Frame Cutter (Item 1), using the four screws (Item 9). Note: The Cover Cutter and the Frame Cutter must be aligned accurately with each other when reassembling the Cutter; that is, the edges must match up and the Cutter Wheel must turn freely. If this is not done correctly, the Cutter Wheel will bind and will not function properly. 6. Place the Actuator Link Cutter (Item 5) on the back of the Frame Cutter (Item 1). 7. Reinstall the Cutter Assembly on the Carriage Assembly. 8. Use a pair of needle nose pliers to reattach the spring on the left side of the Cutter Assembly to the Carriage Assembly. CADJET 2 Disassembly/Assembly 14.0 Upper Roller Supports NOTE Note: 1. This procedure is to be used only if the Upper Roller Supports become worn or damaged. 2. It is highly recommended that ALL the Upper Roller Supports be replaced at the same time rather than just those that are worn or damaged. This will ensure that all rollers have an equal amount of use time and wear. 3. You will need the 4-1/2” x 1” x 1/32” piece of Oil Hardened Precision Ground Flat Stock and also the piece of Translite media in the list of recommended tools and fixtures in Section 2.0. 4. If you need assistance during this procedure, call ENCAD's Technical Support and Service department. See Chapter 1, Section 3.0. CADJET 2 5-77 Disassembly/Assembly 14.1 Removing the Upper Roller Supports 1. During the removal procedure, especially Steps 5, 6, 7, and 8, you must be very careful not to damage the Lower Drive Assembly Rollers, the Slide Shaft, the Encoder Strip, the Carriage Belt, and the Trailing Cable. The Upper Roller Supports and any tools used should not be allowed to come into contact with any of these parts. 2. Never attempt to repair and reuse the Upper Roller Supports once you have removed them. Always replace them with new Upper Roller Supports. 1. Remove the Top Cover, Left Cover Assembly, and the Left Side Plate. See Section 8.1. 2. Use the Hex Nut Driver #5/16 to remove the 3 nuts which secure the Trailing Cable Cover to the back of the Y-Bracket and remove the Trailing Cable Cover. 3. Depress the back of the Frame Tensioner (see Figure Chapter 5 .12) and slip the Carriage Belt off the Servo Motor Pulley. (The Carriage Belt only needs to be loose during this procedure; it does not need to be removed. Lift both sides of the Carriage Belt out of the Y-Bracket and loop them over the front of the Slide Shaft.) CAUTION CAUTION During Step 4: YOU MUST NOT DISTURB THE 3 SCREWS ON THE BACK OF THE Y-BRACKET WHICH HOLD ON THE STABILIZER BRACKET (see Figure Chapter 5 .23). If these are in any way disturbed, the Carriage Head Height will be changed, which will affect the line quality. 5-78 CADJET 2 Disassembly/Assembly 4. Use the #1 Phillips Screwdriver to remove the screws which hold the far left Upper Roller Support on the Y-Bracket. (The screws are located on the back of the Y-Bracket. See Figure Chapter 5 .35.) MAKE SURE YOU ARE LOOSENING THE CORRECT SCREWS AND NOT THE ONES WHICH HOLD ON THE STABILIZER BRACKET (see Figure Chapter 5 .23)! 5. Using your fingers, pull the Upper Roller Support forward. Insert the 4-1/2” x 1” x 1/32” piece of Oil Hardened Precision Ground Flat Stock underneath the Upper Roller Support and push the Flat Stock towards the back of the unit so that it completely covers the Lower Roller. Bend the front of the Upper Roller Support up with your fingers. As you bend up the front end of the Upper Roller Support , the bottom back part of it will also be bending up slightly. It should be bent as shown below in Figure Chapter 5 .32. Figure Chapter 5 .32: Upper Roller Support - Normal and Bent for Removal CADJET 2 5-79 Disassembly/Assembly 6. After the Upper Roller Support is bent as much as possible, replace the Flat Stock with the piece of Translite media to protect the Lower Roller. Push the Upper Roller Support towards the back of the unit and grasp the lower tab of it with the Needlenose Pliers. Guide the lower tab of the Upper Roller Support up past the front of the Stabilizer Bracket. See Figure Chapter 5 .33. Make sure the Upper Roller Support does not catch on the front edge of the Trailing Cable and that it does not damage the Slide Shaft. Figure Chapter 5 .33: Removing the Old Upper Roller Support 5-80 CADJET 2 Disassembly/Assembly CADJET 2 7. If the Upper Roller Support does not come out easily, repeat Step 5 again to put more of a bend in the Upper Roller Support and then try to remove it. If the Upper Roller Support still does not come out easily, you may find it necessary to use a pair of Needlenose Pliers to bend up the bottom tab of the Upper Roller Support. Use extreme caution so that the pliers do not damage the Slide Shaft or the Encoder Strip. 8. Working from the far left Upper Roller Support to the far right Upper Roller Support, follow Steps 4 through 7 for each of the remaining Upper Roller Supports. As you do so, be sure to keep the Carriage Belt looped over the front of the Slide Shaft so it is not damaged. ALSO, MAKE SURE YOU ARE LOOSENING THE CORRECT SCREWS AND NOT THE ONES WHICH HOLD ON THE STABILIZER BRACKET! 5-81 Disassembly/Assembly 1. When you remove the far right Upper Roller Support, you may need to lift up the double-sided tape which holds down the Trailing Cable at that point on the Stabilizer Bracket so that the Trailing Cable can be moved slightly to prevent damage as you remove the Upper Roller Support. See Figure Chapter 5 .20. We recommend using an X-Acto Knife to lift up the tape (leave the tape attached to the Trailing Cable). Before loosening the tape, you should mark its exact position with a pen or marker. 2. There is also a tape in the center of the Stabilizer Bracket, but it should not be necessary to loosen it in order to remove the Upper Roller Supports near it. If you do need to loosen it, however, you should not loosen the other tape at the right-hand side of the Stabilizer Bracket at the same time. Always mark the exact position of the tapes and leave one of the tapes in place while the other is loose. Correct positioning of these tapes is essential for the proper operation of the Carriage Assembly. 3. Be sure to press the tape back down again after the roller is removed. If you have to use a new piece of tape, make sure it is put down in exactly the same place on the Stabilizer Bracket by using the Fixture, Trailing Cable, Tape, Location (P/N 204142). CAUTION 5-82 CADJET 2 Disassembly/Assembly 14.2 CAUTION Installing the Upper Roller Supports Make sure that you do not install the Upper Roller Supports upside down. Once they are inside the Y-Bracket, you will have to destroy them in order to take them out. See Figure Chapter 5 .35 for the correct orientation of the Upper Roller Supports. Have the piece of Translite media in place so that the Lower Roller is protected while you install the new Upper Roller Supports. Make sure that the Carriage Belt is kept looped over the front of the Slide Shaft while installing the new Upper Roller Supports, as follows: 1. Place the roller end of an Upper Roller Support behind the Slide Shaft (between the back of the Slide Shaft and the front of the Stabilizer Bracket) and push it forward as far as possible through the Upper Roller Support opening in the front of the Y-Bracket. See Figure Chapter 5 .34. Figure Chapter 5 .34: Inserting New Upper Roller Supports CADJET 2 5-83 Disassembly/Assembly 2. Push forward very firmly on the back of the Upper Roller Support until the back of it clears the front of the Stabilizer Bracket and snaps into place so that the entire Upper Roller Support is down inside the Y-Bracket. 3. Grasping the roller between your fingers, move the Upper Roller Support into place. Make sure the point on top back of the Upper Roller Support is in its hole in the Y-Bracket. See Figure Chapter 5 .35. Figure Chapter 5 .35: Positioning Upper Roller Supports 5-84 CADJET 2 Disassembly/Assembly 4. NOTE Keep pressure on the front of the Upper Roller Support while putting in the screws. Make sure the Upper Roller Support is centered in its opening. Tighten the screws until snug (no more than 3.0 In. Lbs. + 0.5 if using a torque screwdriver). MAKE SURE YOU ARE TIGHTENING THE CORRECT SCREWS AND NOT THE ONES WHICH HOLD ON THE STABILIZER BRACKET! Note: To help center the Upper Roller Support, we suggest you: 1. Push the front of the Upper Roller Support towards the right side of the opening as you put in the left screw and tighten it a few turns. 2. Push the front of the Upper Roller Support towards the left side of the opening as you put in the right screw and tighten it a few turns. 3. Alternate between the two screws as you tighten them evenly so that both sides become snug at about the same time. 5. CADJET 2 Repeat Steps 1 through 4 for the rest of the Upper Roller Supports. 5-85 Disassembly/Assembly 6. Put the Carriage Belt back into place in the Y-Bracket. a. See Section 8.3, Steps 8 through 15 and Figure Chapter 5 .18 for the correct assembly of the Frame Tensioner Assembly. b. Make sure that the Carriage Belt is not twisted. One way to check this is by standing at the left end of the plotter and looking down the length of the inside of the Y-Bracket. c. You can also check for twisting by moving the Carriage Assembly as far as possible to the left end of the Slide Shaft. d. Once you are certain there is no twisting of the Carriage Belt, slide the Carriage back and forth a few times to make sure that it slides smoothly. 7. Reattach the Trailing Cable Cover to the Y-Bracket using the 5/16 Hex Nut Driver to tighten the 3 nuts. 8. Reattach the Left Side Plate and the Left Cover Assembly. See Section 8.4 9. Because you have replaced the Upper Roller Supports, it is necessary to perform the following portions of Chapter 6: l Section 7.0, “Paper Skew Setup” l Sections 8.0 through 8.4.4, “Paper Skew Adjustment” Because the Carriage Belt was loosened during this procedure, you will need to verify the Deadband Adjustment by performing the following portions of Chapter 6: l Sections 11.0 through 11.2.1, “Deadband Calibration” 10. Replace the Top Cover after you have finished Step 9. 5-86 CADJET 2 Disassembly/Assembly Chapter 5 DISASSEMBLY/ASSEMBLY 5-1 1.0 Introduction......................................................................................................... 5-1 2.0 Tools and Equipment Required .......................................................................... 5-4 3.0 Stand .................................................................................................................. 5-7 3.1 Removing the Plotter from the Stand .............................................................. 5-7 3.2 Replacing the Plotter on the Stand ................................................................. 5-9 3.3 Alternate Method for Securing Carriage Assembly and Fixed Blade ............ 5-10 4.0 Right Cover Assembly, MPCB, and SIMMS ..................................................... 5-11 4.1 Removing the Right Cover Assembly............................................................ 5-11 4.2 Removing the MPCB Connectors ................................................................. 5-13 4.3 MPCB............................................................................................................ 5-16 4.3.1 Removing the MPCB .............................................................................. 5-16 4.3.2 Reinstalling the MPCB............................................................................ 5-17 4.4 Reinstalling the MPCB Connectors ............................................................... 5-18 4.5 Extra Memory (SIMM) ................................................................................... 5-19 4.5.1 Extra Memory (SIMM) Removal ............................................................. 5-19 4.5.2 Extra Memory (SIMM) Installation .......................................................... 5-21 4.6 Reinstalling the Right Cover Assembly ......................................................... 5-22 5.0 Servo Motor ...................................................................................................... 5-23 5.1 Removing the Servo Motor ........................................................................... 5-23 5.2 Replacing the Servo Motor............................................................................ 5-26 6.0 Display Assembly ............................................................................................. 5-27 6.1 Removing the Display Assembly................................................................... 5-27 6.2 Reinstalling the Display Assembly ................................................................ 5-28 7.0 Service Station Assembly................................................................................. 5-29 7.1 Removing the Service Station Assembly ...................................................... 5-29 7.2 Reinstalling the Service Station Assembly .................................................... 5-31 8.0 Left Cover Assembly, Left Side Plate, Carriage Assembly, Trailing Cable, and Carriage Belt........................................................................................................... 5-32 8.1 Removing the Left Cover Assembly and Left Side Plate .............................. 5-32 8.2 Removing the Carriage Assembly................................................................. 5-34 CADJET 2 5-87 Disassembly/Assembly 8.3 Reinstalling the Carriage Assembly .............................................................. 5-37 8.4 Reinstalling the Left Side Plate and Left Cover Assembly............................ 5-42 8.5 Removing the Trailing Cable......................................................................... 5-43 8.6 Reinstalling the Trailing Cable ...................................................................... 5-45 8.7 Removing the Carriage Belt from Carriage Assembly .................................. 5-48 8.8 Installing the Carriage Belt on Carriage Assembly........................................ 5-49 9.0 Power Supply and ON/OFF Switch .................................................................. 5-50 9.1 Removing the Power Supply and ON/OFF Switch........................................ 5-50 9.2 Installing the Power Supply and ON/OFF Switch.......................................... 5-51 10.0 Stabilizer Bracket and Encoder Strip.............................................................. 5-52 10.1 Removing the Stabilizer Bracket................................................................. 5-53 10.2 Reinstalling the Stabilizer Bracket .............................................................. 5-54 11.0 Lower Drive Assembly, Fan Assembly, and Stepper Motor Assembly (Inner Platen Parts) .......................................................................................................... 5-56 11.1 Disassembly of Plotter Before Removing the Inner Platen Parts................ 5-57 11.2 Removing the Inner Platen Parts ................................................................ 5-59 11.3 Stepper Motor ............................................................................................. 5-63 11.3.1 Removing the Stepper Motor ............................................................... 5-63 11.3.2 Reinstalling the Stepper Motor............................................................. 5-65 11.4 Reinstalling the Inner Platen Parts.............................................................. 5-66 11.5 Reassembly of Plotter After Reinstalling the Inner Platen Parts................. 5-69 12.0 Fixed Blade .................................................................................................... 5-72 12.1 Removing the Fixed Blade.......................................................................... 5-72 12.2 Reinstalling the Fixed Blade ....................................................................... 5-73 13.0 Cutter Wheel .................................................................................................. 5-74 13.1 Removing the Cutter Wheel........................................................................ 5-74 13.2 Replacement of Cutter Wheel .................................................................... 5-76 14.0 Upper Roller Supports.................................................................................... 5-77 14.1 Removing the Upper Roller Supports ......................................................... 5-78 14.2 Installing the Upper Roller Supports ........................................................... 5-83 5-88 CADJET 2 Disassembly/Assembly Figure 5.1: CADJET 2 Hardware Kit Assembly ........................................................... 5-5 Figure 5.2: CADJET 2 Final Assembly Tools .............................................................. 5-6 Figure 5.3: Preparing the Plotter for Shipping ............................................................. 5-8 Figure 5.4: Preparing the Plotter for Shipping - Alternate Method ............................ 5-10 Figure 5.5: Inside View of Right Cover Assembly ..................................................... 5-11 Figure 5.6: MPCB Connectors .................................................................................. 5-15 Figure 5.7: Location of SIMM .................................................................................... 5-19 Figure 5.8: Closeup View of Clip ............................................................................... 5-19 Figure 5.9: Side View of SIMM Removal................................................................... 5-20 Figure 5.10: Side View of SIMM Installation.............................................................. 5-21 Figure 5.11: Servo Motor .......................................................................................... 5-24 Figure 5.12: Compression of Frame Tensioner ........................................................ 5-25 Figure 5.13: Display Assembly.................................................................................. 5-27 Figure 5.14: Keypad PCB ......................................................................................... 5-28 Figure 5.15: Service Station Assembly ..................................................................... 5-29 Figure 5.16: Inside View of Left Side Plate ............................................................... 5-33 Figure 5.17: Trailing Cable Connector Lock on Carriage PCB.................................. 5-35 Figure 5.18: Left End of Y-Arm ................................................................................. 5-36 Figure 5.19: Reinstalling the Trailing Cable in J1 Connector .................................... 5-39 Figure 5.20: Positioning the Trailing Cable on the Stabilizer Bracket........................ 5-46 Figure 5.21: Removing the Carriage Belt .................................................................. 5-48 Figure 5.22: Placement of Carriage Belt on Carriage ............................................... 5-49 Figure 5.23: Encoder Strip ........................................................................................ 5-52 Figure 5.24: Inner Platen Parts ................................................................................. 5-56 Figure 5.25: Disassembly of Plotter Prior to Removing the Inner Platen Parts ......... 5-58 Figure 5.26: Removing the Lower Drive Shaft Screws.............................................. 5-60 Figure 5.27: Removing the Foam Block .................................................................... 5-61 Figure 5.28: Lower Drive Assembly and Stepper Motor Assembly ........................... 5-64 Figure 5.29: Routing of Wires and Cables on Right Side Plate and MPCB .............. 5-70 Figure 5.30: Fixed Blade ........................................................................................... 5-72 Figure 5.31: Cutter Assembly.................................................................................... 5-75 Figure 5.32: Upper Roller Support - Normal and Bent for Removal.......................... 5-79 CADJET 2 5-89 Disassembly/Assembly Figure 5.33: Removing the Old Upper Roller Support .............................................. 5-80 Figure 5.34: Inserting New Upper Roller Supports ................................................... 5-83 Figure 5.35: Positioning Upper Roller Supports........................................................ 5-84 5-90 CADJET 2 Chapter 6 CALIBRATION 1.0 Introduction When using the CADJET 2 to plot drawings with both color and black, the “Cartridge Calibration - Horizontal and Vertical” procedure in Section 12.0 of this chapter must be performed each time you remove or change one of the ink Cartridges. (This procedure aligns the Tri-Color Cartridge to the Black Cartridge.) The other procedures presented in this chapter should be performed only by authorized ENCAD Service Centers after the plotter has been serviced or anytime there appears to be a problem with plot quality. See Chapter 5, Section 1.0 for a list of parts whose servicing or replacement requires the calibration of the plotter. NOTE Note: 1. The procedures in this chapter should be performed in the order in which they are presented. 2. For your convenience in recording the readings during procedures in this chapter, photocopy the CADJET 2 Calibration Worksheet (Figure Chapter 6 .16) at the end of this chapter. 1. In order to prevent possible damage to the Cutter, it is extremely important that you always verify -- and, if necessary, perform -- the Slide Shaft Profile Adjustment (Section 6.1) and the Cartridge Head Height Adjustment (Section 6.2) prior to downloading firmware or performing any other function which will activate the Cutter. If the adjustments are incorrect and the Cutter is activated, the Cutter will be damaged by contact with the Platen’s Fixed Blade. If adjustments are necessary, begin with Section 6.0, “Adjustments Prior to Calibration.” 2. Whenever you move the Carriage with the Height Gauge installed, lift up the gauge tip to prevent damage to the gauge. WARNING CADJET 2 6-1 Calibration 2.0 6-2 Required Supplies and Tools l Media: l U.S.A. 110V power cord (P/N 200353) l Cartridge, Black, 104 JET (P/N 203280) l Cartridge, Tri-Color (P/N 203115) l 36" long precision ruler l 1/4" open and box end wrench, C.A.L. l Static Station with wrist strap l Phillips screwdriver #1 & #0 l Torque screwdriver pre-set at 12 in. lbs., with 7/64 Allen bit l Torque screwdrivers pre-set at 3 in. lbs., with P0 Phillips bilts l Screwdriver, 1.6 mm., flat blade, and GLIPTAL (P/N 200697) l IBM Compatible Computer, 386SX - 16 MHz, 2 MEG OF RAM 40 MEG HD MINIMUM l Parallel Cable l Special firmware download Serial Cable (P/N 203977) Architectural, 4 mil, 24 LBS. opaque E (36" x 48"), D (36" x 24") and B (11" x 17") sizes CADJET 2 Calibration NOTE CADJET 2 l Ultrasonic Cleaner l Fixture, Carriage Height Test Cartridge (P/N 204279) l Fixture, Carriage Height and Tilt Measurement (P/N 204278) l Fixture, Shaft/Platen Profile Measurement (P/N 204171) l Linear Gauge, Slim type, (MITUTOYO) (optional) l Linear Gauge Counter, LGm1E, code #542-330 (MITUTOYO) (optional) l Display Unit, code #572-031A (MITUTOYO) (optional) l Linear Gauge, code #575-312 (MITUTOYO) (optional) l MITUTOYO User’s Manual (optional) l Multimeter, BECKMAN IND. #DM15XL or equivalent l Calculator, magnifier, and flash light Note: LGB-110E, code #542-232 A dial micrometer alignment gauge will be available shortly to replace the MITUTOYO system. 6-3 Calibration 3.0 Required Documentation and Files The following documentation and files will be necessary in order to perform the procedures described in this chapter: l Final Assembly Drawings - refer to Appendix C of this Service Manual l CADJET 2 User’s Guide l Emergency Flash ROM Boot Procedure - refer to Appendix A of this Service Manual. The files for this procedure are available on the CADJET 2 Utilities Disk which is provided with the plotter. The Utilities Disk may also be obtained from ENCAD’s Technical Support and Service BBS (see Chapter 1, Section 3.0 of this manual). To download the Utilities Disk from the BBS, follow the instructions given below under “Downloading Files From the BBS.” This procedure is used to download the firmware if the plotter is “brain dead” (i.e., the Flash EPROM is blank or corrupt). l Printer Firmware Upgrade Procedure - refer to Appendix B of this Service Manual. The files for this procedure are included on the CADJET 2 Utilities Disk. This procedure is used to download the firmware if the plotter does not have the current version of the firmware (the Flash EPROM is not blank or corrupt). l Line Quality Acceptance Standards - ENCAD ships a “Gold Standard” plot with each plotter. This is a Master Plot sample which can be used for comparison purposes when you are servicing a plotter. Section 14.0 gives the instructions for performing the “Line Quality Plot (Computer) Test.” The results of this test should be compared to the “Gold Standard” shipped with each plotter. In order to perform this test, you will need to download the following files from the BBS: CJ2GS.PLT (for E-Size plotters) CJ2GSD.PLT (for D-Size plotters) 6-4 CADJET 2 Calibration 4.0 Downloading Files From the BBS See Chapter 1, Section 3.0 for the ENCAD Technical Support and Service BBS telephone numbers. 1. At the BBS Main Menu, press “F” for the Files Menu. 2. At the Files Menu, press “D” to download a file. 3. To download the CADJET DOS Utilities Disk, type: CJDOS15.ZIP 4. To download the Line Quality Acceptance Standards, type: CJ2GS.PLT for E-Size plotters CJ2GSD.PLT for D-Size plotters 5. After the files have been downloaded and communications have been ended, the CADJET DOS Utilities Disk files need to be unzipped onto a floppy disk. Insert a floppy disk into your B: drive (or A: drive, depending upon your particular configuration) and, at the C:\ prompt, type: PKUNZIP CJDOS15.ZIP B: (or, CJDOS15.ZIP A:) CADJET 2 6-5 Calibration 6. Type DIR B: (or DIR A:) to make certain that you have the files listed below: INSTALL.EXE* INSTALL.DAT* DISK.ID* USERGUID.TXT CADUTIL.001* 205495.ZIP** ENCADXXX.ROM GO.EXE MENUTREE.RTL HOUSED.XPF 4775CD.XPF * Files marked with “ * ” will not be transferred to your hard drive when the installation is performed. ** 205495.ZIP contains the following files and will also need to be unzipped: DOWNLOAD.EXE DOWNLOAD.HLP DOWNLOAD.CFG BDM_CODE.BDC BDM2CODE.BDC BDM_DATA.BDT BDM2DATA.BDT 6-6 7. If all the above files are present on your floppy disk, at the C:\ prompt type B:\INSTALL (or A:\INSTALL) to install the Utilities Disk files onto your hard disk. (Be sure you unzip 205495.ZIP first.) 8. To use the Emergency Flash ROM Boot Procedure, see Appendix A of this service manual. To do a Printer Firmware Upgrade, see Appendix B of this service manual. 9. The files CJ2GS.PLT and CJ2GSD.PLT for the Line Quality Acceptance Standards should be saved for use in Section 14.0, “Line Quality Plot (Computer) Test.” CADJET 2 Calibration 5.0 Numbering Sequence of Upper Roller Supports Note: NOTE When performing the adjustments, be aware of the numbering sequence of the Upper Roller Supports as shown in Figure Chapter 6 .1. Figure Chapter 6 .1: Upper Roller Supports Numbering Sequence CADJET 2 6-7 Calibration 6.0 Adjustments Prior to Calibration WARNING 1. Unplug the plotter from the power supply. 2. For static control, you must be grounded to a static station by a wrist strap. This is important whenever you are removing or installing the Carriage or the MPCB. WARNING NOTE Note: The procedures given in Sections 6.1 and 6.2 are for use with the MITUTOYO system. A new dial micrometer adjustment gauge will be available shortly to replace the MITUTOYO system. The following steps must be performed after unplugging the plotter: 6-8 1. Power-up the Digital Carriage Height Measurement System per instructions in the manufacturer's manual (MITUTOYO User's Manual). 2. Wipe clean the Encoder Strip’s top surface (no cleaning fluid). See Chapter 3, Section 5.0 of this Service Manual for maintenance procedures for the Encoder Strip. 3. Wipe clean the Slide Shaft with a lint-free cloth (Scott Rags-In-ABox or equivalent). See Chapter 3, Section 3.0. 4. Remove the Trailing Cable Support. CADJET 2 Calibration 6.1 NOTE Slide Shaft Profile Adjustment Note: This procedure is for use with the MITUTOYO system. A new dial micrometer adjustment gauge will be available shortly to replace the MITUTOYO system. The purpose of this procedure is to verify the absolute height and profile of the Slide Shaft with respect to the Platen. You will need the following: l Shaft/Platen Profile Measurement Fixture, P/N 204171; l MITUTOYO’s Linear code #542-232; and l MITUTOYO’s Linear Gauge Counter, LGm1E, code #542-330. l A copy of the CADJET 2 Calibration Worksheet (see Figure Chapter 6 .16), which will be referred to as “the Calibration Worksheet.” Gauge, Slim type, LGB-110E, 1. Prior to performing any test, park the Carriage on the Service Station. 2. Holding the gauge in your hand, push (in this sequence) the ZERO, PSET, and LOAD buttons on the display unit. It should read: 1.5340. 3. Install the Shaft/Platen Profile Measurement Fixture on the Slide Shaft. Make sure that the tip of the probe touches the Platen. 4. Once the gauge is installed: a. lift the gauge, b. move it to the right, and c. park it at the starting position (aligned with the Inner Stand Off Screw - see Figure Chapter 6 .2). This will allow you to obtain the most stable reading. d. CADJET 2 Record the display's reading in the box marked “RIGHT” in Part 1 of the Calibration Worksheet. 6-9 Calibration Figure Chapter 6 .2: Inner Stand Off Screws and Turnbuckle 6-10 CADJET 2 Calibration 5. 6. 7. a. Lift the gauge and move it to the center position of the shaft (left of the Turnbuckle Block - see Figure Chapter 6 .2). b. Record the display's reading in the box marked “CENTER” in Part 1 of the Calibration Worksheet. a. Lift the gauge and move it to the left position of the shaft (aligned with the Inner Stand Off Screw - see Figure Chapter 6 .2). b. Record the display's reading in the box marked “LEFT” in Part 1 of the Calibration Worksheet. a. On the lines marked “LEFT” and “RIGHT” in Part 1 of the Calibration Worksheet, write the readings obtained in the left and right positions and add them up. b. Divide the result by two and write down the result (the average). c. If the gauge's reading in the center is equal to this result (the average), then no profile adjustment is necessary; otherwise, lift the gauge and move the Carriage to the center position and perform the following adjustment: Adjust the Shaft Profile/Height in the center of the Platen by turning the Turnbuckle up/down (see Figure Chapter 6 .2). Observe the display and set the height at the average number (within +/- .001" tolerance) obtained above in Step 7.b. above. 8. Once the Shaft Profile/Height to Platen is measured and recorded in all three locations, verify that the height numbers (all measurements) fall within 1.4340 +/- .0100”. If the measured numbers do not fall within 1.424-1.444”, stop the procedure and call ENCAD’s Technical Support and Service department. See Chapter 1, Section 3.0. CADJET 2 6-11 Calibration 6.2 NOTE Cartridge Head Height Adjustment Note: This procedure is for use with the MITUTOYO system. A new dial micrometer adjustment gauge will be available shortly to replace the MITUTOYO system. 6.2.1 Gauge Setup Procedure You will need the following: NOTE l the Carriage P/N 204278; l MITUTOYO’s Linear Gauge, code #572-312; and l the Display Unit, code #572-031A. Height and Tilt Measurement Fixture, Note: 1. The Display Unit should have a Display Preset Number on a label attached above the LCD. This Display Preset Number is determined when the gauge is calibrated by ENCAD and equals the zero point for that gauge. 2. The Linear Gauge should also have a number on a label attached to the gauge. This number is the variance (+/-) allowed from the Display Preset Number. 6-12 1. Holding the Linear Gauge in your hand, push the PSET button twice on the Display Unit. The number on the LCD should match the number on the label attached above the LCD on the Display Unit. 2. Check that the Linear Gauge is functional by pressing the tip of the Linear Gauge all the way inwards against a flat surface. When you do so, check the number on the LCD. The number on the LCD should read within the variance allowed from the Display Preset Number. If it does not, call ENCAD’s Technical Support and Service department. See Chapter 1, Section 3.0. CADJET 2 Calibration CADJET 2 3. Install the Carriage Height and Tilt Measurement Fixture, P/N 204278. See Figure Chapter 6 .3. 4. Unlatch the levers on the Carriage to make space for the insertion of the Linear Gauge. 5. Hold the Linear Gauge by the Cartridge body and insert it into the space by pressing it down until it makes contact with the bottom of the Carriage. 6. Holding the Cartridge body in position, push the Cartridge towards the rear until its vertical wall completely bottoms out with the Carriage. The Indexing Edge on the Cartridge should slide completely under the Carriage Overhang, and you should hold the Cartridge down while pushing the Cartridge towards the back of the plotter. Maintain pressure on the Cartridge while you turn the lever up to firmly position the Cartridge head against the Flex Cable and lock it inside the Carriage. See Figure Chapter 6 .4 (which shows the procedure for installing a typical Black Cartridge). 6-13 Calibration Figure Chapter 6 .3: Carriage Height Measurement Fixture 6-14 CADJET 2 Calibration Figure Chapter 6 .4: Installation of Typical Black Cartridge CADJET 2 6-15 Calibration Table 6.1 below is to be used to select the Carriage height settings based on the absolute shaft height/profile settings recorded on the Calibration Worksheet during the Slide Shaft Profile Adjustment procedure in Section 6.1 above. Table Chapter 6 .1: Carriage Height Settings Chart 6-16 CADJET 2 Calibration 6.2.2 WARNING Cartridge Head Height Adjusting Procedure Use extreme care to make sure that the Carriage does not scratch the Code Strip (Encoder Strip) during this procedure. Adjustment of the Cartridge head heights is performed using the three screws on the back of the Y-Arm which attach the Stabilizer Bracket to the Y-Arm. See Chapter 5, Figure 5.23 for identification of these screws. Do not loosen all three screws at the same time. The sequence of adjustment must be followed as described below: NOTE a. loosen, adjust, and tighten the left screw b. loosen, adjust, and tighten the center screw c. loosen, adjust, and tighten the right screw. 1. Move the gauge to the left position. Loosen the left screw. Moving the screw head up/down will move the Stabilizer Bracket up/down until it is at the required height. Check the counter's display while adjusting. Look at the Calibration Worksheet and find the shaft height at the left position. Go to Table Chapter 6 .1 above and find the Carriage height value associated with that shaft height. Once the required height is selected and adjusted to, tighten the screw gently. 2. Move the gauge and park it in the center position. Loosen the center screw, select the height from the chart in Table Chapter 6 .1, and adjust the center screw. Tighten the screw gently. 3. Move the gauge and park it in the right position. Loosen the right screw, select the height from the chart in Table Chapter 6 .1, and adjust the right screw. Tighten the screw gently. 4. Tighten all screws and torque the three screws to 8 in.-lbs. Note: 1. Tightening of the screws will change the reading on the display. When adjusting, always allow for a change in the height of up to .002". 2. Do not adjust the screws out of sequence. If you find that a screw has to be readjusted, the adjusting procedure must be repeated from Step 1 of Section 6.2.2. CADJET 2 6-17 Calibration 6.2.3 6-18 Verify Head Height Values 1. Move the Carriage (with the gauge installed in the holder for the Black Cartridge) to the center of the Platen, next to the Turnbuckle (see Figure Chapter 6 .2). Record the reading in Part 2 of the Calibration Worksheet. 2. Move the Carriage (with the gauge installed in the holder for the Black Cartridge) to the left location of the Platen. Record the reading in Part 2 of the Calibration Worksheet. 3. Move the Carriage (with the gauge installed in the holder for the Black Cartridge) to the right location of the Platen. Record the reading in Part 2 of the Calibration Worksheet. 4. If the values are not within specification, repeat the adjustment procedure. Remove the gauge if all values are within specification. 5. Install a set of full Cartridges and proceed to Section 6.3, “Encoder Strip Location/Visual Check.” CADJET 2 Calibration 6.3 Encoder Strip Location/Visual Check Check that the Encoder Strip clears both sides and the bottom of the Encoder module. 1. Make sure that the Slider does not come into contact with or deflect the Encoder Strip at any point during the Carriage Axis travel. 2. Make sure that the Encoder does not come into contact with the Stabilizer Bracket. CAUTION If contact is visually detected or heard (squeaking noise), then readjust the tilt/height of Carriage until clearance is obtained. Repeat all the steps from Section 6.0, “Adjustments Prior to Calibration,” up to and including this Section 6.3, “Encoder Strip Location/Visual Check.” CADJET 2 6-19 Calibration 6.4 Idler Pulley and Belt Position Check The Idler Pulley must be in a horizontal position. It must not be misaligned or move up and down, causing the belt to rub against the tensioning mechanism. The belt must always clear the tensioner housing. If there should be a problem with the alignment of the Belt, refer to Chapter 5, Figure 5.18 of this CADJET 2 Service Manual for information concerning the proper alignment of the Idler Pulley Assembly in the Frame Tensioner. The side of the Idler Pulley Assembly with the thicker ring of plastic must face up. If the Idler Pulley is in the correct position and the problem is still present, report the unit to ENCAD’s Technical Support and Service department. See Chapter 1, Section 3.0. Note that the spring must be engaged in the assembly and clearance should be achieved with no manual intervention. The Carriage Belt must clear the bottom of the Stabilizer Bracket by at least .015.” Run the Carriage from left to right and back. Observe the motion of the Carriage Belt. Insert a 0.15” flat shim stock under the Stabilizer Bracket. If the shim deflects the Carriage Belt when it is flush under the Stabilizer Bracket, call ENCAD’s Technical Support and Service department. See Chapter 1, Section 3.0. 6-20 CADJET 2 Calibration 6.5 Power Up and ROM Verification Test 6.5.1 Functional Test 1. IF THE MACHINE DOESN'T POWER-UP, IT MUST BE TURNED OFF IMMEDIATELY TO ELIMINATE ANY DAMAGE UNTIL THE PROBLEM CAN BE RESOLVED. 2. For static control, you must be grounded to a static station by a wrist strap. This is important when removing or installing EPROM's, Carriage, and MPCB. 3. Do not slide the Carriage at any time when the power is "ON." This may damage the plotter. Use the ACCESS CARTRIDGES key instead. 4. When moving the plotter around, disconnect the power from the plotter each time. WARNING All you need to do for the Functional Test is to connect power to the unit and turn the ON/OFF Switch to the “ON” position. The purpose of this test is to verify that the unit powers up. If it does not power up, see the Decision Logic Tables in Chapter 4. CADJET 2 6-21 Calibration NOTE Note: 1. If the plotter is “brain dead” (i.e., the Flash EPROM is blank or corrupt), the firmware must be downloaded to the plotter using the Serial Port and the “Emergency Flash ROM Boot Procedure” on the CADJET 2 Utilities Disk. See Appendix A of this service manual for the procedure. 2. If the plotter is not “brain dead” (i.e., the Flash EPROM is not blank or corrupt) but does not have the latest firmware version, the firmware may be loaded through the Parallel Port or the Serial Port (parallel is faster) using the Printer Firmware Upgrade on the CADJET 2 Utilities Disk. See Appendix B of this service manual for the procedure. 3. If the Carriage Assembly has been removed or changed, or if the Carriage Height has been changed, you must do whichever firmware download is appropriate (even if the plotter has the latest firmware version) and perform the “Adjustment of the Paper Sensor Potentiometer” in Section 6.5.2 below during the download. 6-22 CADJET 2 Calibration 6.5.2 Adjustment of the Paper Sensor Potentiometer 1. When adjusting the Potentiometer, take extreme care not to touch any of the components with the probe other than the Test Point Pad on the board. See Figure Chapter 6 .5. 2. For static control, you must be grounded to a static station by a wrist strap. WARNING Figure Chapter 6 .5: Top View of Carriage Board CADJET 2 6-23 Calibration NOTE Note: 1. You will not use any media during this adjustment procedure. 2. During this procedure, the Carriage Assembly must not be positioned over the openings in the Platen for the Lower Rollers. 3. The range for the voltage will be 1.4 to 1.6 Volts. 4. After the Paper Sensor Potentiometer Adjustment, any change in the Carriage Height will require readjustment of the Paper Sensor Value for that height. 5. The voltage at the Potentiometer Adjustment Test Point will vary slightly with temperature. If the voltage is rechecked at a later time, it does not need to be readjusted if it is in the range of 1.4 to 1.6 Volts. 6-24 1. Perform the procedure in Appendix A or Appendix B for the firmware download. During the download, the Fan will come on. During this time, adjust the Paper Sensor Potentiometer. 2. Adjust the Potentiometer on the Paper Sensor Harness Assembly using the flowchart in Table Chapter 6 .2 below. CADJET 2 Calibration Table Chapter 6 .2: Potentiometer Adjustment Flowchart CADJET 2 6-25 Calibration 3. Wait for the download to finish. The plotter will briefly show a copyright message on the Keypad Display and then perform internal diagnostics. The following display indicates that the automatic diagnostic tests were acceptable and the firmware 4 MG RAM is installed. MAIN MENU PRINT MODE 6-26 4. The Carriage should move from the right side to the left side and return to the Service Station. The Cutter will be activated at the left side of the Platen and de-activated at the Service Station when the Carriage returns. 5. Proceed to Section 7.0, “Paper Skew Setup.” CADJET 2 Calibration 7.0 Paper Skew Setup 1. Power must be connected to the plotter. display: Go to the following MAIN MENU PRINT MODE 2. Press the Down Arrow 4 times. The display will read: MAIN MENU PRINTER SET UP 3. Press SELECT. The display will read: PRINTER SETUP EMULATION=HPGL2 4. Press the Down Arrow 2 times. The display will read: PRINTER SETUP ROLL FEED=ON 5. Press SELECT. The display will read: PRINTER SETUP ROLL FEED=ON 6. Press the Down Arrow. The display will read: PRINTER SETUP ROLL FEED=OFF 7. Press SELECT, then MENU, and then the Down Arrow 4 times until the display reads: MAIN MENU PRINT MODE 8. CADJET 2 Proceed to Section 8.0, “Paper Skew Adjustment.” 6-27 Calibration 8.0 Paper Skew Adjustment The purpose of the Paper Skew Adjustment is to make certain that the Pinch Roller in the Upper Roller Support stays centered on its shaft and/or has a gap when the Lower Roller is rotated forward for approximately two full revolutions. In other words, the Pinch Roller should not drift rapidly to the left or to the right when the Lower Roller is rotated forward for two full revolutions. (Slow drifting is acceptable.) Use the torque screwdriver with the P0 bit to adjust the Upper Roller Support mounting screws. NOTE Note: 1. Use the sequence given in Section 8.1 as you do the steps given in Section 8.4. 2. Read and follow ALL of the information in Sections 8.1, 8.2, and 8.3 before you begin Section 8.4. 6-28 CADJET 2 Calibration 8.1 Paper Skew Adjustment Sequence It is very important that the sequence for the adjustment given in this section be observed. Refer to Figure Chapter 6 .1 for the numbering sequence of the Upper Roller Supports. NOTE NOTE Note: 1. Load a sheet of B-Size paper and adjust Rollers #8, #7, and #6, following the directions in Section 8.4. 2. Load a sheet of D-Size paper and adjust Rollers #5 and #4, following the directions in Section 8.4. Note: 3. CADJET 2 The rollers should be adjusted moving from the right side of the Platen to the left side of the Platen. If you are not working with an E-Size unit, Step 3 below will not be used. Load a sheet of E-Size paper and adjust Rollers #3, #2, and #1, following the directions in Section 8.4. 6-29 Calibration 8.2 NOTE Mounting Screw Information Note: Read everything in Section 8.2 before beginning Section 8.4. Make sure you understand this material before you proceed to Section 8.4. 1. The torque requirements for the Upper Roller Support mounting screws is 3 In.-Lbs. ± 0.5. 2. Turning the mounting screw clockwise will tighten the screw. Turning the mounting screw counterclockwise will loosen the screw. 3. Figure Chapter 6 .6 shows the Upper Roller Support and the mounting screws. You must stand behind the plotter in order to adjust the mounting screws on the Upper Roller Supports. Figure Chapter 6 .6: Upper Roller Support and Mounting Screws 6-30 CADJET 2 Calibration CADJET 2 4. If the mounting screw on the right side is loosened (turned counterclockwise), the roller will move to the left. If the mounting screw on the left side is loosened (turned counterclockwise), the roller will move to the right. NEVER LOOSEN OR TIGHTEN BOTH MOUNTING SCREWS AT THE SAME TIME ON THE SAME UPPER ROLLER SUPPORT. 5. If you have loosened one of the mounting screws and the roller has moved, and you need to move the roller in the opposite direction, you must tighten that mounting screw BEFORE loosening the other screw to move the roller in the opposite direction. When tightening the first screw, turn it clockwise with the torque screwdriver until the maximum torque is reached. Then loosen the other screw. AGAIN, NEVER LOOSEN OR TIGHTEN BOTH MOUNTING SCREWS AT THE SAME TIME ON THE SAME UPPER ROLLER SUPPORT. 6. It is extremely important that you maintain downward pressure (towards the floor) on the head of each screw at the same time as you tighten or loosen the screws. Each screw must be completely at the bottom edge of its hole in the back of the Y-Bracket. If this is not done, the Upper Roller Support will not be perfectly level and will not perform its function properly. 7. Following all of the information in Section 8.2 precisely will ensure that the Upper Roller Support springs are deflected and the lower tail of the springs will always be pressed against the Y-Arm’s vertical wall (without a gap) as shown in Figure Chapter 6 .7. 6-31 Calibration Figure Chapter 6 .7: Correct Positioning of the Spring in the Upper Roller Support 6-32 CADJET 2 Calibration 8.3 Other Functional Requirements The paper skew has a tendency to increase as the size of paper increases (B-Size through E-Size). When adjusting the skew, make sure that: 1. the skew for B-Size paper is as close to the low end of the range as possible; and 2. a minimum gap still remains between all Upper Roller Supports and the Y-Arm. The test for acceptable gap is that a piece of bond paper can be inserted through the gap without interference; that is, the gap must be at least the thickness of a piece of bond paper. See Figure Chapter 6 .8. Avoid adjusting the Upper Roller Supports so that they touch the Y-Arm's cut outs. Figure Chapter 6 .8: Test for Minimum Acceptable Gap CADJET 2 6-33 Calibration 8.4 NOTE Adjustment of Upper Roller Supports Note: 8.4.1 Be sure to perform the adjustment according to the sequence given in Section 8.1. Visual Verification Make sure that the roller is centered in the Y-Arm. The gap between the roller and the Y-Arm should be approximately equal on both sides of the roller. See Figure Chapter 6 .9. Figure Chapter 6 .9: Visual Verification of Gap between Roller and Y-Arm 6-34 CADJET 2 Calibration 8.4.2 To adjust Load Rollers #8, #7, and #6 B-Size paper, with 11” side against rollers Rollers #5 and #4 D-Size paper, with 24” side against rollers Rollers #3, #2, and #1 E-Size paper, with 36” side against rollers 1. NOTE Position a sheet of the appropriate size paper for loading. The cut corner should be the top right corner of the paper as you load it. Make sure the correct side is up against the rollers, and the righthand side is aligned with the Front Media Alignment Mark on the front of the Platen. Note: 2. CADJET 2 Observation of Paper Skew at Rear Media Alignment Mark Make sure that there is no gap between the right edge of the paper and the left edge of the Front Media Alignment Mark on the Platen. Hold the media and press LOAD. The paper will be pulled in past the Platen's groove. The paper will roll forward (out) and stop. 6-35 Calibration 3. Check to make sure that the gap between the right edge of the paper and the left edge of the Rear Media Alignment Mark (on back of the Platen) is within 2 line widths (0.12”). See Figure Chapter 6 .10. Figure Chapter 6 .10: Paper Skew Acceptance Range for Rear Media Alignment Mark 6-36 CADJET 2 Calibration 8.4.3 Observation of Paper Skew at Front Media Alignment Mark 1. Press FEED MEDIA and then the UP ARROW to move the media forward while you observe the paper skew at the Front Media Alignment Mark. 2. The paper should be returning to its pre-loading location, preferably without any skew (gap). Engineering specification requires the skew to be within 0.00” - 0.06” (approximately one width of Platen's line). See Figure Chapter 6 .11. Figure Chapter 6 .11: Paper Skew Acceptance Range for Front Media Alignment Mark NOTE Note: 1. If the criteria in Sections 8.4.2 and 8.4.3 is not met, adjust the rollers according to Section 8.4.4 until the criteria is met. 2. If the criteria is met for Rollers #8, #7, and #6, adjust Rollers #5 and #4, beginning with Section 8.4.1. After Rollers #5 and #4 are adjusted (if you have an E-Size model), adjust Rollers #3, #2, and #1, beginning with Section 8.4.1. Once all rollers are adjusted, proceed to Section 9.0. CADJET 2 6-37 Calibration 8.4.4 Adjustment of the Mounting Screws Figure Chapter 6 .12 shows how the motion (rapid drifting to the right or to the left) of the roller determines which mounting screw should be tightened in order to eliminate the motion of the roller so that the roller stays in the center of the shaft and/or there is a gap when the Lower Roller is rotated forward. NOTE Note: Pay attention to the orientation in Figure Chapter 6 .12. Figure Chapter 6 .12: Motion of Rollers and Adjustment of Mounting Screws NOTE Note: After the mounting screw has been tightened to the maximum torque setting available on the screwdriver, if the roller still moves rapidly and touches, loosen the other mounting screw to gain more adjustment range. Once you have completed the adjustment of Rollers #8, #7, and #6, adjust Rollers #5 and #4, beginning with Section 8.4.1. After Rollers #5 and #4 are adjusted (if you have an E-Size model), adjust Rollers #3, #2, and #1, beginning with Section 8.4.1. Once all rollers are adjusted, proceed to Section 9.0. 6-38 CADJET 2 Calibration 9.0 Plotting PRIME Pattern In preparation for plotting the PRIME pattern and for performing the Electrical Calibration procedures, do the following: 1. The plotter should already be powered up and you should be at (or, if necessary, go to) the following display: MAIN MENU PRINT MODE 2. Press the DOWN ARROW once. The display will read: MAIN MENU UTILITIES 3. Press SELECT. The display will read: UTILITIES CALIBRATION→ 4. Press the DOWN ARROW. The display will read: UTILITIES OPTIONS=EASY 5. Press SELECT and immediately press the UP ARROW. display will read: The UTILITIES OPTIONS=ADVANCED 6. Press SELECT and MENU. The display will read: MAIN MENU UTILITIES CADJET 2 6-39 Calibration 7. Press the UP ARROW until the display reads: MAIN MENU PRINT MODE 8. Load D-Size paper with the 36" side up against the rollers on the Platen. 9. Press ACCESS CARTRIDGE. The Carriage will move out of the Service Station. 10. Install a new Tri-Color Ink Cartridge and a new Black-104 JET Cartridge, following the procedures for Cartridge installation in the CADJET 2 User’s Guide. CAUTION NOTE Do not ever wipe the ink Cartridges with any highly fibrous materials like tissues or paper towels. The Service Station automatically wipes the ink Cartridges. Note: 1. When installing the Black Cartridge, refer to Figure Chapter 6 .4. Make sure that the Indexing Edge completely slides under the Carriage Overhang. Hold the Cartridge down while pressing forward, and keep pressure on the Cartridge while turning the lever up to lock the Cartridge into place. 2. Do not push either Cartridge down AFTER the lever has been turned up to lock the Cartridge into place. When the lever is turned up, the Cartridge will automatically be put into the desired position for the best contact with the Flex Cable. 11. Press ACCESS CARTRIDGE. The Carriage will automatically return to the Service Station. Press MENU. The display will read: MAIN MENU PRINT MODE 6-40 CADJET 2 Calibration 12. Press PRIME. The plotter will fire the heads and plot the prime pattern. Examine the pattern for the following problems: l streaks or white lines within the color bands, and/or l gaps or fuzzy lines in the sloping horizontal lines. If these conditions are present, a. prime the heads at least 3 times to make sure all inkjets are firing. b. If the inkjets still misfire, press ACCESS CARTRIDGE. Pull out the misfiring Cartridge and immerse its jet plate in an ultrasonic cleaner for about 20 seconds, gently blot dry, and reinstall it in the Carriage. (The jet plate should not rest on the bottom of the ultrasonic cleaner.) Repeat the prime test. c. If failure is still evident, pull out the Cartridge and replace it with a new Cartridge and repeat the test. Make sure that there is no misfiring using the new Cartridge. If misfiring is observed, contact ENCAD’s Technical Support and Service department (see Chapter 1, Section 3.0.). 13. The plotter has passed the PRIME test if misfiring is no longer observed using a second set of Cartridges. CADJET 2 6-41 Calibration NOTE Note: During these tests check the overall functioning of the plotter. Listen for: 1. any loud sounds from the Stepper Motor Assembly, 2. squeaking from the Roller Assemblies, 3. rubbing noises from the Drive Shaft, 4. or the Belt rubbing against the Pulleys or Stabilizer Bracket. Also, 5. watch the tensioning mechanism for any adverse movement, such as the tension being too tight on the belt or rubbing, squeaking, or "chirping" noises. 6. check for Servo Motor noises or any visible Carriage vibration. Readjust the plotter if these sounds or conditions are present. If the problem persists and cannot be corrected, call ENCAD's Technical Support and Service department (see Chapter 1, Section 3.0). 6-42 CADJET 2 Calibration 10.0 XY Calibration CADJET 2 1. This procedure allows you to calibrate the X-Axis (also referred to as the Paper Axis or Vertical Axis) and the Y-Axis (also referred to as the Carriage Axis or Horizontal Axis). 2. The XY Calibration values are only used when the USE XY CALIBRATION option is set to ON. 3. When you set the XY Calibration values, all subsequent images are plotted using the new values until you manually reset the calibration. 4. XY calibration should not be used for merged vector/raster images. 6-43 Calibration 10.1 Calibrating the Y-Axis (Carriage Axis or Horizontal Axis Calibration) 1. Load a sheet of D-Size paper (24” side against the rollers). Press DOWN ARROW. The display will read: MAIN MENU UTILITIES 2. Press SELECT. The display will read: UTILITIES CALIBRATION→ 3. Press SELECT. The display will read: CALIBRATION CARTRIDGE 4. Press DOWN ARROW. The display will read: CALIBRATION USE XY CALIB=NO 5. Press SELECT, DOWN ARROW, and SELECT. The display will read: CALIBRATION USE XY CALIB=YES 6. Press DOWN ARROW. The display will read: CALIBRATION XY=ENGLISH 6-44 CADJET 2 Calibration 7. Press DOWN ARROW. The display will read: CALIBRATION PAPER AXIS 8. Press DOWN ARROW. The display will read: CALIBRATION CARRIAGE AXIS 9. Press SELECT. The plotter will draw a horizontal line that it expects to be 21.00” +/- 0.05” long. The display will read: CARRIAGE AXIS WIDTH=21.00” 10. Press FEED MEDIA and DOWN ARROW to unload the paper and measure the line that was drawn. If the line is 21.00” +/- 0.05” long, proceed to Section 10.2 below and perform the X-Axis Calibration. If the line is not 21.00” +/- 0.05” long, press SELECT, and then press the UP ARROW or DOWN ARROW until the displayed value matches the distance that you measured. Press SELECT to save the new value. Reload the paper. The display will read: ROLL=OFF CUT=ON SAVE MEDIA=ON Press MENU. Press SELECT. Another 21.00” line will be drawn. Press FEED MEDIA and DOWN ARROW to unload the paper. Verify that the line length is correct. Proceed to Section 10.2 and calibrate the X-Axis. CADJET 2 6-45 Calibration 10.2 Calibrating the X-Axis (Paper Axis or Vertical Axis Calibration) 1. Load a sheet of D-Size paper (24” side against the rollers). The display will read: ROLL=OFF CUT=ON SAVE MEDIA=ON 2. Press MENU and UP ARROW. The display will read: CALIBRATION PAPER AXIS 3. Press SELECT. The display will read: PAPER AXIS LENGTH=33.00 4. The plotter will draw an upside down “T” on the top center of the paper, will feed the paper into the plotter, and will draw another “T” on the bottom center of the paper. Unload the paper. 5. Measure the distance between the horizontal lines from the top center to the bottom center. The distance should be 33.00” +/- 0.05”. If the distance is correct, proceed to Section 11.0 and perform the Deadband Calibration. If the distance is not 33.00” +/- 0.05”, press SELECT and then press the UP ARROW or DOWN ARROW until the displayed value matches the distance you measured. Press SELECT to save the new value. Reload the paper and press MENU and SELECT. The plotter will redraw the marks. Unload the paper and verify that the distance between the horizontal lines is correct. Then proceed to Section 11.0, “Deadband Calibration”. 6-46 CADJET 2 Calibration 11.0 Deadband Calibration Deadband Calibration compensates for minute differences created when bi-directional plotting is used. Figure Chapter 6 .13 shows how to correct the differences. The CADJET 2 Service Menu provides for both Slow Deadband and Fast Deadband Calibration. NOTE Note: → Uni-directional plotting is not affected by deadband. ← Figure Chapter 6 .13: Deadband Alignment CADJET 2 6-47 Calibration 11.1 Slow Deadband Calibration The SLOW DEADBAND calibration shows the speed-dependent Carriage height at 16 regions across the Platen with the values shown in ZERO OR ONE. This value is displayed on both the menu and on paper. The plotter setup must be in the "NORMAL" mode to run deadband. 1. Press MENU until the display reads: MAIN MENU UTILITIES 2. Press SELECT. The display will read: UTILITIES CALIBRATION→ 3. Press the UP ARROW once. The display will read: UTILITIES SERVICE→ 4. Press SELECT & the DOWN ARROW twice. read: The display will SERVICE CALIBRATION→ 5. Press SELECT. The display will read: CALIBRATION DEADBAND=XX * 6-48 * = DEFAULT NUMBER CADJET 2 Calibration 6. Press the DOWN ARROW three times. The display will read: CALIBRATION SLOW DEADBAND=X * * = DEFAULT VALUE 7. Load a sheet of D-Size paper turned sideways along the 36" length. 8. Press SELECT. The plotter will print several vertical lines in 16 regions. See Figure Chapter 6 .13. Each line consists of 3 smaller segments. The speed values will also be printed for each region. Look at the alignment of the center segments with the upper/lower segments over all 16 regions. 9. If the 3 segments in each line across all the regions are not visually aligned, press the UP ARROW once. The display will read: CALIBRATION SLOW DEADBAND=1 10. Press SELECT twice. The plotter will print the deadband plot again. Look at the alignment of the center segments with the upper/lower segments over all 16 regions. If the 3 segments in each line across all 16 regions are aligned, press SELECT. You have just chosen the Slow Deadband value that best suits this plotter. Record this value in Part 3 of the Calibration Worksheet. 11. If the alignment is still not satisfactory, return to CALIBRATION SLOW DEADBAND=0 and press SELECT. Do not choose any other values. Record this value in Part 3 of the Calibration Worksheet. CADJET 2 6-49 Calibration 11.2 Fast Deadband (Height Calibration) The FAST DEADBAND (also called the HEIGHT CALIBRATION) shows the region-dependent Carriage height at 16 regions across the Platen with the values shown in mils, or 1/1000s of an inch. This value is displayed on both the menu and on paper. 1. Press the DOWN ARROW once. The display will read: CALIBRATION DEADBAND=XX 2. 6-50 Press SELECT. The plotter will print two fast deadband patterns with the speed and height values in 16 regions in two consecutive rows. The lower row of deadband will be printed at a slower speed than the upper row of deadband. Therefore, if the upper row segments are aligned and acceptable, the lower row segments will also be as good or better in the alignment with each other. Record this value in Part 3 of the Calibration Worksheet. CADJET 2 Calibration 11.2.1 Adjusting Fast Deadband; Vertical Lines (All) and Vertical Lines (One) If the alignment is not satisfactory, then a different DEADBAND number must be selected until a satisfactory result is achieved. See Figure Chapter 6 .13. Adjustment is made by increasing or decreasing the value for DEADBAND, as follows: 1. Press the UP ARROW or DOWN ARROW to change the number to a higher or lower value. 2. Once the desired value is reached (usually 54, 66, or 79, but not limited to these values), press SELECT. 3. Press SELECT again. The plotter will print a new set of lines (visually inspect over the entire 16 regions). If the results are still not acceptable, repeat the above steps to obtain the best fast deadband value. Record this value in Part 5 of the Calibration Worksheet. 4. Press SELECT and the DOWN ARROW twice. The display will read: CALIBRATION VERTICAL LINES (ALL) 5. 5 (31,0) Press SELECT. This causes 16 single 1.5" high vertical lines to be drawn one segment at a time in bi-directional mode. See Figure Chapter 6 .14 for a sample. 4 (31,0) 3 (31,0) (31,0) 2 ALL,F,S(31,0) 1 Figure Chapter 6 .14: Vertical Lines (All) CADJET 2 6-51 Calibration 6. Press the UP ARROW. The display will read: CALIBRATION VERTICAL LINES (ONE) 7. 6 (31,0) Press SELECT. The plotter will draw 16 single 1.5" high vertical lines one line at a time in uni-directional mode. See Figure Chapter 6 .15 for a sample. 5 (31,0) 4 (31,0) 3 (31,0) (31,0) 2 ONE,F,S(31,0) 1 Figure Chapter 6 .15: Vertical Lines (One) 8. Visually inspect the lines and compare against the printout of the Line Quality Acceptance Standards files CJ2GS.PLT or CJ2GSD.PLT (see “Required Documentation and Files” in Section 3.0 of this chapter). If sub-standard lines at various regions exist, repeat Steps 1-7 above and change the numbers to a more acceptable value which will meet the line quality minimum acceptance criteria for Line Quality and White Space. 9. Continue as needed until the DEADBAND lines in NORMAL mode are showing a satisfactory deadband calibration. If after 10 minutes and/or a total of 8 trials of various values the minimum standard cannot be met, stop and call ENCAD's Technical Support and Service department. See Chapter 1, Section 3.0. 10. Press MENU 3 times. The display will read: MAIN MENU UTILITIES 6-52 CADJET 2 Calibration 12.0 Cartridge Calibration - Horizontal and Vertical NOTE Note: 1. When plotting drawings with both color and black, the Cartridge Calibration must be performed each time the Cartridges are removed or changed. 2. If the plotting being done does not require any use of the Tri-Color Cartridge, Sections 12.0 and 13.0 can be skipped. This procedure aligns the Tri-Color Cartridge to the Black Cartridge. Horizontal Calibration performs an adjustment between the nozzles of the Cartridges horizontally. Vertical Calibration performs an adjustment between the nozzles of the Cartridges vertically. Minute differences may occur between Cartridges due to Cartridge alignment in the Carriage Assembly. The Horizontal and Vertical Calibration allows the user to minimize these variables. 1. Begin at the following display: MAIN MENU UTILITIES 2. Press SELECT. The display will read: UTILITIES CALIBRATION→ 3. Press SELECT. The display will read: CALIBRATION CARTRIDGE CADJET 2 6-53 Calibration 4. Press SELECT. The display will read: CALIBRATION HORIZONTAL=0 The plotter will begin printing three sets of color line patterns (see the CADJET 2 User’s Guide, Appendix A for samples of these patterns): a. CURRENT HEADS The first pattern shows the horizontal/vertical values of the heads. The heads are properly aligned when the colored +’s line up horizontally and vertically with the black alignment marks. b. COLOR HORIZONTAL HEAD-TO-HEAD CALIBRATION The second pattern is used to align the two Cartridge heads horizontally. The number below each set of lines represents an alignment value. c. COLOR VERTICAL HEAD-TO-HEAD CALIBRATION The third pattern is used to align the two Cartridge heads vertically. The number below each set of lines represents an alignment value. 6-54 CADJET 2 Calibration 12.1 Adjusting the Horizontal Head-to-Head Calibration If adjustment is required for horizontal Head-to-Head, adjust the values as follows: 1. With the display set at CALIBRATION HORIZONTAL=X (X = current alignment value) press SELECT and then the UP ARROW or DOWN ARROW to select the alignment value matching the best horizontal alignment in the horizontal print out. 2. Once the matching alignment value is reached, press SELECT to save the setting. 3. If adjustment is required for vertical Head-to-Head, proceed to Section 12.2. If no adjustment is required for vertical Head-to-Head, press MENU and press SELECT again. The plotter will print a new set of three patterns. The new head-to-head pattern will reflect the latest settings which you have chosen. Make sure that the “CURRENT HEADS” printout is properly aligned. If it is still not satisfactory, repeat the adjustment until satisfactory results are obtained. Then proceed to Section 13.0. CADJET 2 6-55 Calibration 12.2 Adjusting the Vertical Head-to-Head Calibration If adjustment is required for vertical Head-to-Head, then adjust the values as follows: 1. With the display set at CALIBRATION HORIZONTAL=X press the DOWN ARROW to change the display to: CALIBRATION VERTICAL=X 6-56 (X = current alignment value) 2. Press SELECT and then the UP ARROW or DOWN ARROW to select the alignment value matching the best vertical alignment in the vertical print out. 3. Once the matching alignment value is reached, press SELECT to save the setting. 4. Press MENU and press SELECT again. The plotter will print a new set of three patterns. The new head-to-head pattern will reflect the latest settings which you have chosen. Make sure that the “CURRENT HEADS” printout is properly aligned. If it is still not satisfactory, repeat the adjustment until satisfactory results are obtained. Then proceed to Section 13.0. CADJET 2 Calibration 13.0 Color Deadband Calibration NOTE Note: If the plotting being done does not require any use of the Tri-Color Cartridge, Section 13.0 can be skipped. The purpose of the Color Deadband Calibration is to adjust the color cartridge so that it prints the straightest lines possible. 1. Press MENU twice. The display will read: UTILITIES CALIBRATION→ 2. Press the UP ARROW twice. The display will read: UTILITIES MANUFACTURING→ 3. Press SELECT and the DOWN ARROW. The display will read: MANUFACTURING COLOR DB→ 4. Press SELECT. The display will read: COLOR DB YELLOW DB=X X = CURRENT VALUE FOR YELLOW DB The plotter will begin printing two rows of four vertical lines (black, cyan, magenta, and yellow) 1/2” long across the paper one segment at a time. The black lines will appear thinner and straighter than the color lines. The color segments should be as close to being a straight line as you can detect. If the COLOR DB is acceptable, record the value in Part 3 of the Calibration Worksheet and proceed to Section 14.0. If it is not acceptable, proceed to Section 13.1. CADJET 2 6-57 Calibration 13.1 Adjusting the Color Deadband Value When adjusting the COLOR DB values, the value for each color is adjusted separately. Usually, a value of zero or one are the best values that can be selected for this calibration. 1. With the display set at COLOR DB YELLOW DB=X X = CURRENT VALUE FOR YELLOW DB press SELECT and the UP ARROW or DOWN ARROW to change the value. Press SELECT to save the new value. 2. Press the DOWN ARROW. The display will read: COLOR DB MAGENTA DB=X 3. Press SELECT and the UP ARROW or DOWN ARROW to change the value. Press SELECT to save the new value. 4. Press the DOWN ARROW. The display will read: COLOR DB CYAN DB=X 5. 6-58 X = CURRENT VALUE FOR MAGENTA DB X = CURRENT VALUE FOR CYAN DB Press SELECT and the UP ARROW or DOWN ARROW to change the value. Press SELECT to save the new value. CADJET 2 Calibration 6. Press MENU. The display will read: MANUFACTURING→ COLOR DB 7. CADJET 2 Press SELECT. A new pattern for COLOR DEADBAND will be printed. Compare these patterns with the previous pattern and choose between them for the straightest color lines. If neither pattern is satisfactory, perform the adjust again with another value until you have selected the DEADBAND values which achieve the best results. Record the value in Part 3 of the Calibration Worksheet and proceed to Section 14.0. 6-59 Calibration 14.0 Line Quality Plot (Computer) Test 1. Press MENU twice. The display will read: MAIN MENU UTILITIES 2. Press the UP ARROW until the display reads: MAIN MENU PRINT MODE 3. Press SELECT. The display will read: PRINT MODE MODE=NORMAL The plotter is now set to NORMAL mode. 4. Connect the parallel cable from the computer to the rear of the plotter. Load a D-Size sheet with the 36 inch side against the upper rollers. 5. Turn the computer on. At the C: prompt, type on the keyboard: GO CJ2GS.PLT (for CADJET 2 E-Size plotters) or, GO CJ2GSD.PLT (for CADJET 2 D-Size plotters) 6-60 CADJET 2 Calibration 6. Press RETURN to send the plot file to the plotter. COMPUTER screen will show: The GO NJ-----.PLT SENDING......... 7. On the plotter, the display will read: PROCESSING ---K If the display does not show PROCESSING ---K, the MPCB has FAILED the communication test. Check to see if the parallel cable is the correct type and is connected. If so, perform diagnostics of the MPCB. 8. When the processing of the plot is successfully completed, the Carriage will move to the left and the paper will be cut. The Cutter must cut the full length of the paper in one pass and the Cutter Wheel must travel inside the Platen's groove freely and without any obstruction due to the adjusted position of the Carriage Assembly/Slide Shaft. If a Cutter malfunction is experienced, call ENCAD's Technical Support and Service department (see Chapter 1, Section 3.0). If no further adjustment is needed and the Cutter performs satisfactorily, compare the plot against the “Gold Standard” plot sample for this plotter (see Section 3.0). The plotter is now fully calibrated and ready to use. CADJET 2 6-61 Calibration SERIAL #: SIZE: D E SOFTWARE REVISION: SLIDE SHAFT PROFILE ADJUSTMENT PART 1: LEFT CENTER RIGHT SHAFT HEIGHT: LEFT: ACTUAL RIGHT: + SUM: DIVIDED BY 2 = PART 2: AVERAGE AFTER CARTRIDGE HEIGHT ADJUSTMENT LEFT CENTER RIGHT BLACK NOTE: ALL VALUES MUST BE BETWEEN .050 AND .070 PART 3: DEADBAND VALUES BLACK SLOW DEADBAND VALUE: DEADBAND (FAST) VALUE: TRI-COLOR SLOW DEADBAND VALUE: Figure Chapter 6 .16: CADJET 2 Calibration Worksheet 6-62 CADJET 2 Calibration Chapter 6 CALIBRATION 6-1 1.0 Introduction......................................................................................................... 6-1 2.0 Required Supplies and Tools ............................................................................. 6-2 3.0 Required Documentation and Files .................................................................... 6-4 4.0 Downloading Files From the BBS....................................................................... 6-5 5.0 Numbering Sequence of Upper Roller Supports ................................................ 6-7 6.0 Adjustments Prior to Calibration ......................................................................... 6-8 6.1 Slide Shaft Profile Adjustment ........................................................................ 6-9 6.2 Cartridge Head Height Adjustment ............................................................... 6-12 6.2.1 Gauge Setup Procedure......................................................................... 6-12 6.2.2 Cartridge Head Height Adjusting Procedure........................................... 6-17 6.2.3 Verify Head Height Values ..................................................................... 6-18 6.3 Encoder Strip Location/Visual Check............................................................ 6-19 6.4 Idler Pulley and Belt Position Check ............................................................. 6-20 6.5 Power Up and ROM Verification Test ........................................................... 6-21 6.5.1 Functional Test....................................................................................... 6-21 6.5.2 Adjustment of the Paper Sensor Potentiometer ..................................... 6-23 7.0 Paper Skew Setup............................................................................................ 6-27 8.0 Paper Skew Adjustment ................................................................................... 6-28 8.1 Paper Skew Adjustment Sequence............................................................... 6-29 8.2 Mounting Screw Information ......................................................................... 6-30 8.3 Other Functional Requirements .................................................................... 6-33 8.4 Adjustment of Upper Roller Supports............................................................ 6-34 8.4.1 Visual Verification ................................................................................... 6-34 8.4.2 Observation of Paper Skew at Rear Media Alignment Mark .................. 6-35 8.4.3 Observation of Paper Skew at Front Media Alignment Mark.................. 6-37 8.4.4 Adjustment of the Mounting Screws ....................................................... 6-38 9.0 Plotting PRIME Pattern..................................................................................... 6-39 10.0 XY Calibration................................................................................................. 6-43 10.1 Calibrating the Y-Axis (Carriage Axis or Horizontal Axis Calibration).......... 6-44 10.2 Calibrating the X-Axis (Paper Axis or Vertical Axis Calibration) .................. 6-46 11.0 Deadband Calibration..................................................................................... 6-47 CADJET 2 6-63 Calibration 11.1 Slow Deadband Calibration ........................................................................ 6-48 11.2 Fast Deadband (Height Calibration) ........................................................... 6-50 11.2.1 Adjusting Fast Deadband; Vertical Lines (All) and Vertical Lines (One)6-51 12.0 Cartridge Calibration - Horizontal and Vertical ............................................... 6-53 12.1 Adjusting the Horizontal Head-to-Head Calibration .................................... 6-55 12.2 Adjusting the Vertical Head-to-Head Calibration ........................................ 6-56 13.0 Color Deadband Calibration ........................................................................... 6-57 13.1 Adjusting the Color Deadband Value.......................................................... 6-58 14.0 Line Quality Plot (Computer) Test .................................................................. 6-60 6-64 CADJET 2 Calibration Figure 6.1: Upper Roller Supports Numbering Sequence ........................................... 6-7 Figure 6.2: Inner Stand Off Screws and Turnbuckle ................................................. 6-10 Figure 6.3: Carriage Height Measurement Fixture .................................................... 6-14 Figure 6.4: Installation of Typical Black Cartridge ..................................................... 6-15 Figure 6.5: Top View of Carriage Board.................................................................... 6-23 Figure 6.6: Upper Roller Support and Mounting Screws ........................................... 6-30 Figure 6.7: Correct Positioning of the Spring in the Upper Roller Support ................ 6-32 Figure 6.8: Test for Minimum Acceptable Gap.......................................................... 6-33 Figure 6.9: Visual Verification of Gap between Roller and Y-Arm............................. 6-34 Figure 6.10: Paper Skew Acceptance Range for Rear Media Alignment Mark......... 6-36 Figure 6.11: Paper Skew Acceptance Range for Front Media Alignment Mark ........ 6-37 Figure 6.12: Motion of Rollers and Adjustment of Mounting Screws......................... 6-38 Figure 6.13: Deadband Alignment ............................................................................ 6-47 Figure 6.14: Vertical Lines (All) ................................................................................. 6-51 Figure 6.15: Vertical Lines (One) .............................................................................. 6-52 Figure 6.16: CADJET 2 Calibration Worksheet......................................................... 6-62 Table 6.1: Carriage Height Settings Chart ................................................................ 6-16 Table 6.2: Potentiometer Adjustment Flowchart ....................................................... 6-25 CADJET 2 6-65 Chapter 7 REPLACEMENT PARTS LIST 1.0 Introduction This chapter lists the part names and part numbers for field replaceable parts and assemblies of the CADJET 2 Color Inkjet Plotter. Section 2.0 is the numerical listing, Section 3.0 is the alphabetical listing, and Section 4.0 is an alphabetical listing with drawings. Each section is subdivided as follows: 1. Parts used on both the D-Size and the E-Size models. 2. Parts used only on the D-Size model. 3. Parts used only on the E-Size model. The parts and assemblies may be ordered through your local authorized dealer or ENCAD, Inc.’s Technical Support and Service department (see Chapter 1, Section 3.0). CADJET 2 7-1 Replacement Parts List 2.0 2.1 PART # Numerical Listing Parts Used in both D-Size and E-Size (Numerical) DESCRIPTION 200172.......................................................................................... LOCTITE BLACK MAX 200353............................................................................. CORD, LINE, SJT, GRAY 9 FT a 202010 .........................................................SPRING, COMPRESSION (TOP COVER) 202512 (P/N will be changing) ..................................... CASTER, NON-LOCKING, TWIN 202513 (P/N will be changing) ...............................................CASTER, LOCKING, TWIN 203233...................................................................................ASSY, SERVICE STATION 203265........................................................................................ ASSY, SERVO MOTOR b 203343-1 ..................................................................................... FRAME, TENSIONER b 203345-1 .................................................................................................. ASSY, IDLER c 203440-1 .........................................................................................KEYPAD, BOTTOM 203443............................................................................................................ASSY, FAN b 203447 ................................................................... SPRING, COMPRESSION (IDLER) 203477-2.............................................................................. ASSY, ROLLGUIDE, RIGHT 203476......................................................................................... ASSY, COVER, RIGHT 203480-1..................................................................................... FOAM, BOTTOM, LEFT 203481-1...................................................................................FOAM, BOTTOM, RIGHT d 203485 ..............................................................................................SCREWS, STAND c 203488.......................................................................................... ASSY, KEYPAD TOP c 205111................................................................................................ CABLE, KEYPAD 203533........................................................................................... ASSY, COVER, LEFT 203556-2......................................................SUPPORT, DRIVE SHAFT (middle support) 203614.................................................................................................... ASSY, CUTTER 203622-1.............................................................................................. CUTTER, WHEEL 203637-2......................................................................................ASSY, PINCH ROLLER 203644-1.........................................................................................................CLIP, BELT 203646................................................................ CAM, ACTUATOR (LEFT AND RIGHT) 203788-1............................................................................................. FOAM, TOP, LEFT 203789-1...........................................................................................FOAM, TOP, RIGHT 203868-1................................................................................................ROLL SUPPORT 203918-2...................................................................................SPRING, ROLL HOLDER 203977......................................................................................................CABLE, RS422 204973..............................................................................................SIDEPLATE, RIGHT 204968................................................................................................ SIDEPLATE, LEFT a 204246 ........................................................................................ STOP, RETRACTING 204384.................................................................................................. ASSY, EXHAUST e 205329 ......................................................................................................ASSY, MPCB 204849..................................................................................................POWER SUPPLY 204599................................................... ON/OFF SWITCH (POWER ENTRY MODULE) 7-2 CADJET 2 Replacement Parts List PART # DESCRIPTION 204854 ................................................................................................ ASSY, CARRIAGE 205377 ................................................................................................... MANUAL, USER 204859 ..................................................................ASSY, ADI DRIVER DISK, CADJET 2 204860 ..................................................... ASSY, WINDOWS DRIVER DISK, CADJET 2 204861 ................................................................ ASSY, DOS UTILITY DISK, CADJET 2 204916 .................................. ASSY, BRACKET, DRIVE SHAFT (left bracket w/bushing) 204967 ..............................................................................................MANUAL, SERVICE 204969 ................................................................................... ASSY, ROLLGUIDE, LEFT 204994 ................................................................................ LABEL, SET (identifies keys) 205079 ......................................................................................................FOAM, BLOCK 205107 ................................................................................... LABEL, LOGO, CADJET 2 205128 ......................................... ASSY, STEPPER MOTOR SERVICE (includes Gear) d 205188................................................. ASSY, HARDWARE KIT CADJET 2, SERVICE 205350 ........ ASSY, STEPPER MOTOR BRACKET, SERVICE (right bracket w/bushing) NOTE CADJET 2 Note: a If you are ordering the Assy, Top Cover (either P/N 204367-5 or P/N 204367-7; see Sections 2.2 or 2.3), the Stop, Retracting (P/N 204246) and the Spring, Compression (P/N 202010) are not included. They must be ordered separately. b These parts make up the Idler Service Assembly. If the whole assembly is being replaced, you may order P/N 203940 Assy, Idler Service rather than ordering the individual pieces. c These parts make up the entire Display Keypad. P/N 203488 includes the Keypad PCB, the Cover, and the Keys; it does not include the Keypad Cable or the Keypad Label. If the Keypad Cable (P/N 205111) or the Keypad Label (included in P/N 204994), they must be ordered in addition to P/N 203488. d The 8 Stand Screws (P/N 203485) are not included in the Assy, CADJET 2 Hardware Kit, (P/N 205188). Also not included in the Hardware Kit are the 4 long Stand Screws (P/N has not yet been determined) which are 1/4 x 20 x 2.5. All of the Stand Screws are included with the Floor Stand when it is ordered. e The MPCB has the Flash EPROM already mounted, but it is not programmed. 7-3 Replacement Parts List 2.2 D-Size Unique Parts (Numerical) PART # DESCRIPTION 203800-32.............................................................................. ANGLE, TRAILING CABLE 205175..................................................................................ASSY, LEGS AND BASKET 203772-2.............................................................................. BOX, PLOTTER, CADJET 2 203778................................................................................................ CABLE, TRAILING 203903...................................................................................................... BELT, RIBBED 204007-31.................................................................................................. SLIDE SHAFT a 204367-5 ........................................................................................ ASSY, TOP COVER 204551...........................................................ASSY, STABILIZER BRACKET, SERVICE 204848............................................................................................PLATEN, MACHINED 204917-31.....................................................................................ASSY, LOWER DRIVE NOTE 7-4 Note: a If you are ordering the Assy, Top Cover, the Stop, Retracting (P/N 204246) and the Spring, Compression (P/N 202010) are not included. They must be ordered separately. CADJET 2 Replacement Parts List 2.3 E-Size Unique Parts (Numerical) PART # DESCRIPTION 203230 .......................................................................................................... BELT, 3 RIB 203448 ................................................................................................ CABLE, TRAILING 203479-2 ..............................................................................BOX, PLOTTER, CADJET 2 205174 ................................................................................. ASSY, LEGS AND BASKET 203800-3 ................................................................................ANGLE, TRAILING CABLE 204007-2 .................................................................................................... SLIDE SHAFT a 204367-7.........................................................................................ASSY, TOP COVER 204550 ...........................................................ASSY, STABILIZER BRACKET, SERVICE 204847 ........................................................................ PLATEN, MACHINED, CADJET 2 204917-1 ...................................................................................... ASSY, LOWER DRIVE NOTE CADJET 2 Note: a If you are ordering the Assy, Top Cover, the Stop, Retracting (P/N 204246) and the Spring, Compression (P/N 202010) are not included. They must be ordered separately. 7-5 Replacement Parts List 3.0 3.1 Alphabetical Listing Parts Used in both D-Size and E-Size (Alphabetical) DESCRIPTION PART # ASSY, ADI DRIVER DISK, CADJET 2 ..................................................................204859 ASSY, BRACKET, DRIVE SHAFT (left bracket w/bushing)...................................204916 ASSY, CARRIAGE.................................................................................................204854 ASSY, COVER, LEFT............................................................................................203533 ASSY, COVER, RIGHT .........................................................................................203476 ASSY, CUTTER.....................................................................................................203614 ASSY, DOS UTILITY DISK, CADJET 2.................................................................204861 ASSY, EXHAUST ..................................................................................................204384 ASSY, FAN ............................................................................................................203443 d ASSY, HARDWARE KIT CADJET 2, SERVICE .................................................205188 b ASSY, IDLER .................................................................................................. 203345-1 c ASSY, KEYPAD TOP ..........................................................................................203488 e ASSY, MPCB.......................................................................................................205329 ASSY, PINCH ROLLER..................................................................................... 203637-2 ASSY, ROLLGUIDE, LEFT....................................................................................204969 ASSY, ROLLGUIDE, RIGHT ............................................................................. 203477-2 ASSY, SERVICE STATION ...................................................................................203233 ASSY, SERVO MOTOR ........................................................................................203265 ASSY, STEPPER MOTOR BRACKET, SERVICE (right bracket w/bushing) ........205350 ASSY, STEPPER MOTOR SERVICE (includes Gear) ..........................................205128 ASSY, WINDOWS DRIVER DISK, CADJET 2......................................................204860 c CABLE, KEYPAD ................................................................................................205111 CABLE, RS422 ......................................................................................................203977 CAM, ACTUATOR (LEFT AND RIGHT) ................................................................203646 CASTER, LOCKING, TWIN ...............................................202513 (P/N will be changing) CASTER, NON-LOCKING, TWIN......................................202512 (P/N will be changing) CLIP, BELT........................................................................................................ 203644-1 CORD, LINE, SJT, GRAY 9 FT .............................................................................200353 CUTTER, WHEEL ............................................................................................. 203622-1 FOAM, BLOCK ......................................................................................................205079 FOAM, BOTTOM, LEFT .................................................................................... 203480-1 FOAM, BOTTOM, RIGHT .................................................................................. 203481-1 FOAM, TOP, LEFT ............................................................................................ 203788-1 FOAM, TOP, RIGHT .......................................................................................... 203789-1 b FRAME, TENSIONER ..................................................................................... 203343-1 c KEYPAD, BOTTOM......................................................................................... 203440-1 LABEL, LOGO, CADJET 2 ....................................................................................205107 LABEL, SET (identifies keys).................................................................................204994 7-6 CADJET 2 Replacement Parts List DESCRIPTION PART # LOCTITE BLACK MAX ......................................................................................... 200172 MANUAL, SERVICE ............................................................................................. 204967 MANUAL, USER ................................................................................................... 205377 ON/OFF SWITCH (POWER ENTRY MODULE)................................................... 204599 POWER SUPPLY ................................................................................................. 204849 ROLL SUPPORT ............................................................................................... 203868-1 d SCREWS, STAND.............................................................................................. 203485 SIDEPLATE, LEFT................................................................................................ 204968 SIDEPLATE, RIGHT ............................................................................................. 204973 b SPRING, COMPRESSION (IDLER) ................................................................... 203447 a SPRING, COMPRESSION (TOP COVER)......................................................... 202010 SPRING, ROLL HOLDER .................................................................................. 203918-2 a STOP, RETRACTING......................................................................................... 204246 SUPPORT, DRIVE SHAFT (middle support) ..................................................... 203556-2 NOTE CADJET 2 Note: a If you are ordering the Assy, Top Cover (either P/N 204367-5 or P/N 204367-7; see Sections 2.2 or 2.3), the Stop, Retracting (P/N 204246) and the Spring, Compression (P/N 202010) are not included. They must be ordered separately. b These parts make up the Idler Service Assembly. If the whole assembly is being replaced, you may order P/N 203940 Assy, Idler Service rather than ordering the individual pieces. c These parts make up the entire Display Keypad. P/N 203488 includes the Keypad PCB, the Cover, and the Keys; it does not include the Keypad Cable or the Keypad Label. If the Keypad Cable (P/N 205111) or the Keypad Label (included in P/N 204994), they must be ordered in addition to P/N 203488. d The 8 Stand Screws (P/N 203485) are not included in the Assy, CADJET 2 Hardware Kit, (P/N 205188). Also not included in the Hardware Kit are the 4 long Stand Screws (P/N has not yet been determined) which are 1/4 x 20 x 2.5. All of the Stand Screws are included with the Floor Stand when it is ordered. e The MPCB has the Flash EPROM already mounted, but it is not programmed. 7-7 Replacement Parts List 3.2 D-Size Unique Parts (Alphabetical) DESCRIPTION PART # ANGLE, TRAILING CABLE ............................................................................. 203800-32 ASSY, LEGS AND BASKET ..................................................................................205175 ASSY, LOWER DRIVE .................................................................................... 204917-31 ASSY, STABILIZER BRACKET, SERVICE ...........................................................204551 a ASSY, TOP COVER........................................................................................ 204367-5 BELT, RIBBED ......................................................................................................203903 BOX, PLOTTER, CADJET 2 ............................................................................. 203772-2 CABLE, TRAILING.................................................................................................203778 PLATEN, MACHINED............................................................................................204848 SLIDE SHAFT.................................................................................................. 204007-31 NOTE 7-8 Note: a If you are ordering the Assy, Top Cover, the Stop, Retracting (P/N 204246) and the Spring, Compression (P/N 202010) are not included. They must be ordered separately. CADJET 2 Replacement Parts List 3.3 E-Size Unique Parts (Alphabetical) DESCRIPTION PART # ANGLE, TRAILING CABLE................................................................................ 203800-3 ASSY, LEGS AND BASKET ................................................................................. 205174 ASSY, LOWER DRIVE ...................................................................................... 204917-1 ASSY, STABILIZER BRACKET, SERVICE .......................................................... 204550 a ASSY, TOP COVER ........................................................................................ 204367-7 BELT, 3 RIB .......................................................................................................... 203230 BOX, PLOTTER, CADJET 2.............................................................................. 203479-2 CABLE, TRAILING................................................................................................ 203448 PLATEN, MACHINED, CADJET 2........................................................................ 204847 SLIDE SHAFT .................................................................................................... 204007-2 NOTE CADJET 2 Note: a If you are ordering the Assy, Top Cover, the Stop, Retracting (P/N 204246) and the Spring, Compression (P/N 202010) are not included. They must be ordered separately. 7-9 Replacement Parts List 4.0 4.1 Alphabetical Listing with Drawings Drawings - Parts Used in both D-Size and E-Size Figure Chapter 7 .1: Assy, Bracket, Drive Shaft - P/N 204916 (left bracket w/bushing) Figure Chapter 7 .2: Assy, Carriage - P/N 204854 7-10 CADJET 2 Replacement Parts List Figure Chapter 7 .3: Assy, Cover, Left - P/N 203533 Figure Chapter 7 .4: Assy, Cover, Right - P/N 203476 Figure Chapter 7 .5: Assy, Cutter - P/N 203614 CADJET 2 7-11 Replacement Parts List Figure Chapter 7 .6: Assy, Exhaust - P/N 204384 Figure Chapter 7 .7: Assy, Fan - P/N 203443 NOTE Note: 1. See Chapter 5, Figure 5.1 for the contents of the Hardware Kit. 2. The Hardware Kit does not include the stand screws. See Figure Chapter 7 .36, P/N 203485. Figure Chapter 7 .8: Assy, Hardware Kit CADJET 2, Service - P/N 205188 Figure Chapter 7 .9: 7-12 b Assy, Idler - P/N 203345-1 CADJET 2 Replacement Parts List Figure Chapter 7 .10: c Assy, Keypad Top - P/N 203488 Figure Chapter 7 .11: CADJET 2 e Assy, MPCB - P/N 205329 7-13 Replacement Parts List Figure Chapter 7 .12: Assy, Pinch Roller - P/N 203637-2 Figure Chapter 7 .13: Assy, Rollguide, Left - P/N 204969 Figure Chapter 7 .14: Assy, Rollguide, Right - P/N 203477-2 7-14 CADJET 2 Replacement Parts List Figure Chapter 7 .15: Assy, Service Station - P/N 203233 Figure Chapter 7 .16: Assy, Servo Motor - P/N 203265 Figure Chapter 7 .17: Assy, Stepper Motor Bracket, Service - P/N 205350 (right bracket w/bushing) CADJET 2 7-15 Replacement Parts List Figure Chapter 7 .18: Assy, Stepper Motor Service (includes Gear) - P/N 205128 Figure Chapter 7 .19: 7-16 c Cable, Keypad - P/N 205111 CADJET 2 Replacement Parts List Figure Chapter 7 .20: Cable, RS422 Mini-DIN8 - P/N 203977 Figure Chapter 7 .21: Cam, Actuator (Left and Right) - P/N 203646 Figure Chapter 7 .22: Caster, Locking, Twin - P/N 202513 (P/N will be changing) CADJET 2 7-17 Replacement Parts List Figure Chapter 7 .23: Caster, Non-Locking, Twin - P/N 202512 (P/N will be changing) Figure Chapter 7 .24: Clip, Belt - P/N 203644-1 7-18 CADJET 2 Replacement Parts List Figure Chapter 7 .25: Cutter, Wheel - P/N 203622-1 Figure Chapter 7 .26: Foam, Block - P/N 205079 Figure Chapter 7 .27: Foam, Bottom, Left - P/N 203480-1 CADJET 2 7-19 Replacement Parts List Figure Chapter 7 .28: Foam, Bottom, Right - P/N 203481-1 Figure Chapter 7 .29: Foam, Top, Left - P/N 203788-1 Figure Chapter 7 .30: Foam, Top, Right - P/N 203789-1 7-20 CADJET 2 Replacement Parts List Figure Chapter 7 .31: Figure Chapter 7 .32: b Frame, Tensioner - P/N 203343-1 c Keypad, Bottom - P/N 203440-1 Figure Chapter 7 .33: ON/OFF Switch (Power Entry Module) - P/N 204599 CADJET 2 7-21 Replacement Parts List Figure Chapter 7 .34: Power Supply - P/N 204849 Figure Chapter 7 .35: Roll Support - P/N 203868-1 Figure Chapter 7 .36: NOTE 7-22 Note: d Screws, Stand - P/N 203485 There are also four long Stand Screws which are 1/4 x 20 x 2.5. The P/N for them has not yet been determined. All of the Stand Screws are included with the Floor Stand when it is ordered. CADJET 2 Replacement Parts List Figure Chapter 7 .37: Sideplate, Left - P/N 204968 Figure Chapter 7 .38: Sideplate, Right - P/N 204973 CADJET 2 7-23 Replacement Parts List Figure Chapter 7 .39: Figure Chapter 7 .40: a b Spring, Compression (Idler) - P/N 203447 Spring, Compression (Top Cover) - P/N 202010 Figure Chapter 7 .41: Spring, Roll Holder - P/N 203918-2 7-24 CADJET 2 Replacement Parts List Figure Chapter 7 .42: a Stop, Retracting - P/N 204246 Figure Chapter 7 .43: Support, Drive Shaft (middle support) - P/N 203556-2 CADJET 2 7-25 Replacement Parts List 4.2 Drawings - D-Size Unique Parts Figure Chapter 7 .44: Angle, Trailing Cable - P/N 203800-32 NOTE Note: The stand and basket assembly shown below is changing. Drawings of it were not available at the time of publication. However, the Part Number shown below is the Part Number for the NEW stand and basket assembly. Figure Chapter 7 .45: Assy, Legs and Basket - P/N 205175 7-26 CADJET 2 Replacement Parts List Figure Chapter 7 .46: Assy, Lower Drive - P/N 204917-31 Figure Chapter 7 .47: Assy, Stabilizer Bracket, Service - P/N 204551 Figure Chapter 7 .48: CADJET 2 a Assy, Top Cover - P/N 204367-5 7-27 Replacement Parts List Figure Chapter 7 .49: Belt, Ribbed - P/N 203903 Figure Chapter 7 .50: Cable, Trailing - P/N 203778 Figure Chapter 7 .51: Platen, Machined - P/N 204848 7-28 CADJET 2 Replacement Parts List Figure Chapter 7 .52: Slide Shaft - P/N 204007-31 CADJET 2 7-29 Replacement Parts List 4.3 Drawings - E-Size Unique Parts Figure Chapter 7 .53: Angle, Trailing Cable - P/N 203800-3 NOTE Note: The stand and basket assembly shown below is changing. Drawings of it were not available at the time of publication. However, the Part Number shown below is the Part Number for the NEW stand and basket assembly. Figure Chapter 7 .54: Assy, Legs and Basket - P/N 205174 7-30 CADJET 2 Replacement Parts List Figure Chapter 7 .55: Assy, Lower Drive - P/N 204917-1 Figure Chapter 7 .56: Assy, Stabilizer Bracket, Service - P/N 204550 Figure Chapter 7 .57: CADJET 2 a Assy, Top Cover - P/N 204367-7 7-31 Replacement Parts List Figure Chapter 7 .58: Belt, 3 Rib - P/N 203230 Figure Chapter 7 .59: Cable, Trailing - P/N 203448 Figure Chapter 7 .60: Platen, Machined - P/N 204847 7-32 CADJET 2 Replacement Parts List Figure Chapter 7 .61: Slide Shaft - P/N 204007-2 NOTE CADJET 2 Note: a If you are ordering the Assy, Top Cover (either P/N 204367-5 or P/N 204367-7; see Sections 2.2 or 2.3), the Stop, Retracting (P/N 204246) and the Spring, Compression (P/N 202010) are not included. They must be ordered separately. b These parts make up the Idler Service Assembly. If the whole assembly is being replaced, you may order P/N 203940 Assy, Idler Service rather than ordering the individual pieces. c These parts make up the entire Display Keypad. P/N 203488 includes the Keypad PCB, the Cover, and the Keys; it does not include the Keypad Cable or the Keypad Label. If the Keypad Cable (P/N 205111) or the Keypad Label (included in P/N 204994), they must be ordered in addition to P/N 203488. d The 8 Stand Screws (P/N 203485) are not included in the Assy, CADJET 2 Hardware Kit, (P/N 205188). Also not included in the Hardware Kit are the 4 long Stand Screws (P/N has not yet been determined) which are 1/4 x 20 x 2.5. All of the Stand Screws are included with the Floor Stand when it is ordered. e The MPCB has the Flash EPROM already mounted, but it is not programmed. 7-33 Replacement Parts List Chapter 7 REPLACEMENT PARTS LIST 7-1 1.0 Introduction ........................................................................................................ 7-1 2.0 Numerical Listing................................................................................................ 7-2 2.1 Parts Used in both D-Size and E-Size (Numerical)......................................... 7-2 2.2 D-Size Unique Parts (Numerical) .................................................................... 7-4 2.3 E-Size Unique Parts (Numerical) .................................................................... 7-5 3.0 Alphabetical Listing ............................................................................................ 7-6 3.1 Parts Used in both D-Size and E-Size (Alphabetical) ..................................... 7-6 3.2 D-Size Unique Parts (Alphabetical) ................................................................ 7-8 3.3 E-Size Unique Parts (Alphabetical)................................................................. 7-9 4.0 Alphabetical Listing with Drawings ................................................................... 7-10 4.1 Drawings - Parts Used in both D-Size and E-Size ........................................ 7-10 4.2 Drawings - D-Size Unique Parts ................................................................... 7-26 4.3 Drawings - E-Size Unique Parts.................................................................... 7-30 7-34 CADJET 2 Replacement Parts List Figure 7.1: Assy, Bracket, Drive Shaft - P/N 204916 (left bracket w/bushing) .......... 7-10 Figure 7.2: Assy, Carriage - P/N 204854 .................................................................. 7-10 Figure 7.3: Assy, Cover, Left - P/N 203533............................................................... 7-11 Figure 7.4: Assy, Cover, Right - P/N 203476 ............................................................ 7-11 Figure 7.5: Assy, Cutter - P/N 203614 ...................................................................... 7-11 Figure 7.6: Assy, Exhaust - P/N 204384 ................................................................... 7-12 Figure 7.7: Assy, Fan - P/N 203443 .......................................................................... 7-12 Figure 7.8: Assy, Hardware Kit CADJET 2, Service - P/N 205188............................ 7-12 Figure 7.9: b Assy, Idler - P/N 203345-1.................................................................... 7-12 Figure 7.10: c Assy, Keypad Top - P/N 203488......................................................... 7-13 Figure 7.11: e Assy, MPCB - P/N 205329 ................................................................. 7-13 Figure 7.12: Assy, Pinch Roller - P/N 203637-2........................................................ 7-14 Figure 7.13: Assy, Rollguide, Left - P/N 204969 ....................................................... 7-14 Figure 7.14: Assy, Rollguide, Right - P/N 203477-2.................................................. 7-14 Figure 7.15: Assy, Service Station - P/N 203233 ...................................................... 7-15 Figure 7.16: Assy, Servo Motor - P/N 203265........................................................... 7-15 Figure 7.17: Assy, Stepper Motor Bracket, Service - P/N 205350 (right bracket w/bushing)........................................................................................................... 7-15 Figure 7.18: Assy, Stepper Motor Service (includes Gear) - P/N 205128 ................. 7-16 Figure 7.19: c Cable, Keypad - P/N 205111 .............................................................. 7-16 Figure 7.20: Cable, RS422 Mini-DIN8 - P/N 203977................................................. 7-17 Figure 7.21: Cam, Actuator (Left and Right) - P/N 203646 ....................................... 7-17 Figure 7.22: Caster, Locking, Twin - P/N 202513 (P/N will be changing).................. 7-17 Figure 7.23: Caster, Non-Locking, Twin - P/N 202512 (P/N will be changing) .......... 7-18 Figure 7.24: Clip, Belt - P/N 203644-1 ...................................................................... 7-18 Figure 7.25: Cutter, Wheel - P/N 203622-1............................................................... 7-19 Figure 7.26: Foam, Block - P/N 205079 .................................................................... 7-19 Figure 7.27: Foam, Bottom, Left - P/N 203480-1 ...................................................... 7-19 Figure 7.28: Foam, Bottom, Right - P/N 203481-1.................................................... 7-20 Figure 7.29: Foam, Top, Left - P/N 203788-1 ........................................................... 7-20 Figure 7.30: Foam, Top, Right - P/N 203789-1 ......................................................... 7-20 Figure 7.31: CADJET 2 b Frame, Tensioner - P/N 203343-1 ...................................................... 7-21 7-35 Replacement Parts List Figure 7.32: c Keypad, Bottom - P/N 203440-1......................................................... 7-21 Figure 7.33: ON/OFF Switch (Power Entry Module) - P/N 204599 ........................... 7-21 Figure 7.34: Power Supply - P/N 204849.................................................................. 7-22 Figure 7.35: Roll Support - P/N 203868-1................................................................. 7-22 Figure 7.36: d Screws, Stand - P/N 203485 .............................................................. 7-22 Figure 7.37: Sideplate, Left - P/N 204968................................................................. 7-23 Figure 7.38: Sideplate, Right - P/N 204973 .............................................................. 7-23 Figure 7.39: b Spring, Compression (Idler) - P/N 203447 ......................................... 7-24 Figure 7.40: a Spring, Compression (Top Cover) - P/N 202010................................ 7-24 Figure 7.41: Spring, Roll Holder - P/N 203918-2 ...................................................... 7-24 Figure 7.42: a Stop, Retracting - P/N 204246............................................................ 7-25 Figure 7.43: Support, Drive Shaft (middle support) - P/N 203556-2 ......................... 7-25 Figure 7.44: Angle, Trailing Cable - P/N 203800-32 ................................................. 7-26 Figure 7.45: Assy, Legs and Basket - P/N 205175 ................................................... 7-26 Figure 7.46: Assy, Lower Drive - P/N 204917-31...................................................... 7-27 Figure 7.47: Assy, Stabilizer Bracket, Service - P/N 204551 .................................... 7-27 Figure 7.48: a Assy, Top Cover - P/N 204367-5........................................................ 7-27 Figure 7.49: Belt, Ribbed - P/N 203903 .................................................................... 7-28 Figure 7.50: Cable, Trailing - P/N 203778 ................................................................ 7-28 Figure 7.51: Platen, Machined - P/N 204848............................................................ 7-28 Figure 7.52: Slide Shaft - P/N 204007-31 ................................................................. 7-29 Figure 7.53: Angle, Trailing Cable - P/N 203800-3 ................................................... 7-30 Figure 7.54: Assy, Legs and Basket - P/N 205174 ................................................... 7-30 Figure 7.55: Assy, Lower Drive - P/N 204917-1........................................................ 7-31 Figure 7.56: Assy, Stabilizer Bracket, Service - P/N 204550 .................................... 7-31 Figure 7.57: a Assy, Top Cover - P/N 204367-7........................................................ 7-31 Figure 7.58: Belt, 3 Rib - P/N 203230 ....................................................................... 7-32 Figure 7.59: Cable, Trailing - P/N 203448 ................................................................ 7-32 Figure 7.60: Platen, Machined - P/N 204847............................................................ 7-32 Figure 7.61: Slide Shaft - P/N 204007-2 ................................................................... 7-33 7-36 CADJET 2 Appendix A EMERGENCY FIRMWARE DOWNLOAD PROCEDURE NOTE Note: 1. This procedure should be used to download firmware if the Flash EPROM is blank or corrupt, or if the firmware upgrade using the parallel cable does not work. 2. This procedure must be performed with a RS422 Serial Cable only. A parallel cable will not work. This cable is available from ENCAD, Inc. The Part Number is 203977. See Chapter 7 of this manual. If you prefer to make your own cable, see Figure Appendix A .1 at the end of this appendix. 1. Connect the RS422 Serial Cable to the computer and the plotter. 2. You should use the most current version of the firmware, which is CJDOS15.ZIP (as of the date of publication of this manual). It is available on ENCAD’s BBS. You may also contact our Help Desk to obtain the most recent version if you do not have access to the BBS. See Chapter 1, Section 3.0. 3. Type B:\INSTALL and press <Enter>. (Or, type A:\INSTALL if your floppy drive is designated as “A.”) CADJET 2 4. Answer “YES” or “NO” to “Do you want USERGUIDE.TXT now?” and press <Enter>. to print the 5. Select the disk drive on which you want the DOS Utilities installed. Press <Enter>. 6. Specify the destination subdirectory where the files are to be installed. Press <Enter>. 7. Select the parts of the DOS Utilities you want to install by pressing SPACEBAR to toggle between “YES” and “NO.” Press <Enter>. A-1 Appendix A 8. NOTE After the installation is completed, type CD CADUTIL (or CD and the subdirectory specified in Step 6 above) and press <Enter>. Note: 9. If you are already in the subdirectory where the files were installed, this step is not necessary. Type CADUTIL and press <Enter>. 10. Type 3 and press <Enter> <Enter>. 11. Press and hold the "PRIME" Key on the plotter and power up the plotter. 12. Release the "PRIME" Key when the plotter’s Fan comes on. 13. Press <Enter> on the computer. 14. The Emergency Download will now clear and reload your plotter’s Firmware. DO NOT HALT THIS PROCESS UNTIL IT IS COMPLETED. WARNING 15. When the process is completed, reset the plotter’s User Settings to the desired selections and start plotting again. 16. If you need assistance with the above procedures, please call ENCAD's Help Desk at the number listed in Chapter 1, Section 3.0 of this manual. A-2 CADJET 2 Appendix A Figure Appendix A .1: Cable, RS422 Mini-DIN8, P/N 203977 CADJET 2 A-3 Appendix B PRINTER FIRMWARE UPGRADE PROCEDURE NOTE Note: 1. This procedure can be performed with a parallel cable or a RS422 Serial Cable (parallel is faster). The RS422 Serial Cable is available from ENCAD, Inc. The Part Number is 203977. See Chapter 7 of this manual. If you prefer to make your own cable, see Figure A.1 at the end of Appendix A. 2. This procedure cannot be used if the Flash EPROM is blank or corrupt). See Appendix A. 1. Connect the Parallel Cable (or the RS422 Serial Cable) to the computer and the plotter. 2. Insert the Utilities Disk provided with your plotter. You should use the most current version of the firmware, which is CJDOS15.ZIP (as of the date of publication of this manual). It is also available on ENCAD’s BBS. You may also contact our Help Desk to obtain the most recent version if you do not have access to the BBS. See Chapter 1, Section 3.0. 3. Power up the plotter. Wait until the Carriage has traveled across the Platen and returned to the Service Station. Type B:\INSTALL and press <Enter>. (Or, type A:\INSTALL if your floppy drive is designated as “A.”) CADJET 2 4. Answer “YES” or “NO” to “Do you want USERGUIDE.TXT now?” and press <Enter>. to print the 5. Select the disk drive on which you want the DOS Utilities installed. Press <Enter>. 6. Specify the destination subdirectory where the files are to be installed. Press <Enter>. B-1 Appendix B NOTE 7. Select the parts of the DOS Utilities you want to install by pressing SPACEBAR to toggle between “YES” and “NO.” Press <Enter>. 8. After the installation is completed, type CD CADUTIL (or CD and the subdirectory specified in Step 6 above) and press <Enter>. Note: 9. If you are already in the subdirectory where the files were installed, this step is not necessary. Type CADUTIL and press <Enter>. 10. Type 1 and press <Enter>. 11. After a few seconds, the download will stop and the following message will appear on your computer: WARNING! THE NEXT PROCEDURE WILL ERASE THE CURRENT PRINTER OPERATING SYSTEM. THIS PROCEDURE MUST NOT BE INTERRUPTED. PLEASE INSURE THAT THE PRINTER IS NOT DISTURBED DURING THIS TIME. 12. Press <Enter> to continue with the download. NOTE Note: If at this point there is an error message reporting “PLOTTER NOT ON LINE,” the parallel download is not going to work. In this case, you need to call ENCAD’s Help Desk (see Chapter 1, Section 3.0) and order ENCAD’s RS422 Serial Cable P/N 203977. (Be sure to tell the Help Desk that you have received this error message.) 13. After the Firmware has been upgraded, disconnect the power cord and power up the plotter again. 14. When the process is completed, reset the plotter’s User Settings to the desired selections and start plotting again. 15. If you need assistance with the above procedures, please call ENCAD's Help Desk at the number listed in Chapter 1, Section 3.0 of this manual. B-2 CADJET 2 Appendix C FINAL ASSEMBLY DRAWINGS This appendix contains the Final Assembly Drawings for the CADJET 2. Callouts of the part numbers and descriptions for all numbered items are provided on the pages preceding the drawings. When ordering parts, please be aware that not all the parts listed on these pages are available at a component level; they may be available only as part of an assembly. See Chapter 7 of this manual for parts and assemblies which are available. CADJET 2 C-1 Appendix C D-Size Final Assembly Callouts ITEM # PART # DESCRIPTION 4 5 6 7 8 9 10 12 13 15 16 17 18 19 21 23 26 28 29 30 32 33 35 36 38 39 40 41 42 47 48 79 80 82 84 400010 204848 204973 200172 203556-2 201013 203440-1 203443 203433 201042 203411-32 203828-2 203423 203828-1 204599 204929-31 204959 203477-2 204969 203442 204386 400011 203658-1 204968 203742 205329 205109 205111 204994 203918-2 205079 204917-31 202518 203831 205350 86 88 103 128 205128 204920 203488 203233 H, KEPNUT, 6-32 PLATEN, MACHINED, CADJET 2 - D SIDEPLATE, RIGHT H, LOCTITE BLACK MAX SUPPORT, DRIVE SHAFT H, SCREW, 6-32 X 3/8 PFH BLK KEYPAD, BOTTOM ASSY, FAN SCREW, #10 X 3/4, PFH, ZN H, SCREW, 6-32 X 1/2 PPH BLADE, FIXED - D SPACER, FIXED BLADE, 2 IN CLIP, FIXED BLADE SPACER, FIXED BLADE, 1 IN ON/OFF SWITCH (ASSY, POWER ENTRY MODULE) ASSY, CABLE, OUTPUT - D CLAMP, CABLE 1/4 ASSY, ROLLGUIDE RIGHT ASSY, ROLLGUIDE LEFT SCREW, 8-32 X 3/4 SEM H, SCREW 8-32 X 1/2 PPH H, KEPNUT, 8-32 BLOCK, FILLER SIDEPLATE, LEFT PLUG, PLATEN ASSY, PCB MAIN LABEL, GROUND CABLE, KEYPAD LABEL, SET SPRING, ROLL HOLDER FOAM, BLOCK ASSY, LOWER DRIVE - D H, WASHER, .380 ID X .625 RING, RETAINING, C-TYPE ASSY, STEPPER MOTOR BRACKET, SERVICE (right bracket w/bushing) ASSY, STEPPER MOTOR WASHER, BOWED ASSY, KEYPAD TOP ASSY, SERVICE STATION C-2 CADJET 2 Appendix C D-Size Final Assembly Callouts (continued) ITEM # PART # DESCRIPTION 223 243 263 283 317 318 319 320 321 322 323 203476 203533 204384 204916 204449 204828 205107 205110 204367-5 202010 204246 ASSY, COVER, RIGHT ASSY, COVER, LEFT ASSY, EXHAUST ASSY, BRACKET, DRIVE SHAFT (left bracket w/bushing) LIT, IMPORTANT NOTICE LABEL, ID REAR, CADJET 2 - D LABEL, LOGO, CADJET 2 INSERT, MENU TREE ASSY, TOP COVER, CADJET 2 - D SPRING, COMPRESSION STOP, RETRACTING 378 N/A ASSY, Y-ARM, CADJET 2 - D Breakout of Major Components of ASSY, Y-ARM: 163 204854 ASSY, CARRIAGE 380 204007-31 SHAFT, SLIDE, CADJET 2 - D 383 203637-2 ASSY, PINCH ROLLER 389 204551 ASSY, STABILIZER BRACKET, SERVICE, CADJET 2 - D 390 203778 CABLE, TRAILING, CADJET 2 - D 392 203265 ASSY, SERVO MOTOR 428 203800-32 CADJET 2 ANGLE, TRAILING CABLE - D C-3 Appendix C E-Size Final Assembly Callouts ITEM # PART # DESCRIPTION 4 5 6 7 8 9 10 12 13 15 16 17 18 19 21 23 26 28 29 30 32 33 35 36 38 39 40 41 42 47 48 79 80 82 84 400010 204847 204973 200172 203556-2 201013 203440-1 203443 203433 201042 203411-2 203828-2 203423 203828-1 204599 204929-1 204959 203477-2 204969 203442 204386 400011 203658-1 204968 203742 205329 205109 205111 204994 203918-2 205079 204917-1 202518 203831 205350 86 88 103 128 205128 204920 203488 203233 H, KEPNUT, 6-32 PLATEN, MACHINED, CADJET 2 - E SIDEPLATE, RIGHT H, LOCTITE BLACK MAX SUPPORT, DRIVE SHAFT H, SCREW, 6-32 X 3/8 PFH BLK KEYPAD, BOTTOM ASSY, FAN SCREW, #10 X 3/4, PFH, ZN H, SCREW, 6-32 X 1/2 PPH BLADE, FIXED - E SPACER, FIXED BLADE, 2 IN CLIP, FIXED BLADE SPACER, FIXED BLADE, 1 IN ON/OFF SWITCH (ASSY, POWER ENTRY MODULE) ASSY, CABLE, OUTPUT - E CLAMP, CABLE 1/4 ASSY, ROLLGUIDE RIGHT ASSY, ROLLGUIDE LEFT SCREW, 8-32 X 3/4 SEM H, SCREW 8-32 X 1/2 PPH H, KEPNUT, 8-32 BLOCK, FILLER SIDEPLATE, LEFT PLUG, PLATEN ASSY, PCB MAIN LABEL, GROUND CABLE, KEYPAD LABEL, SET SPRING, ROLL HOLDER FOAM, BLOCK ASSY, LOWER DRIVE - E H, WASHER, .380 ID X .625 RING, RETAINING, C-TYPE ASSY, STEPPER MOTOR BRACKET, SERVICE (right bracket w/bushing) ASSY, STEPPER MOTOR WASHER, BOWED ASSY, KEYPAD TOP ASSY, SERVICE STATION C-4 CADJET 2 Appendix C E-Size Final Assembly Callouts (continued) ITEM # PART # DESCRIPTION 223 243 263 283 317 318 319 320 321 322 323 203476 203533 204384 204916 204449 205106 205107 205110 204367-7 202010 204246 ASSY, COVER, RIGHT ASSY, COVER, LEFT ASSY, EXHAUST ASSY, BRACKET, DRIVE SHAFT (left bracket w/bushing) LIT, IMPORTANT NOTICE LABEL, ID REAR, CADJET 2 - E LABEL, LOGO, CADJET 2 INSERT, MENU TREE ASSY, TOP COVER, CADJET 2 - E SPRING, COMPRESSION STOP, RETRACTING 378 N/A ASSY, Y-ARM, CADJET 2 - E Breakout of Major Components of ASSY, Y-ARM: 163 204854 ASSY, CARRIAGE 380 204007-2 SHAFT, SLIDE, CADJET 2 - E 383 203637-2 ASSY, PINCH ROLLER 389 204550 ASSY, STABILIZER BRACKET, SERVICE, CADJET 2 - E 390 203448 CABLE, TRAILING, CADJET 2 - E 392 203265 ASSY, SERVO MOTOR 428 203800-3 CADJET 2 ANGLE, TRAILING CABLE - E C-5 Appendix C Figure Appendix C .1: CADJET 2 D-Size Final Assembly Drawing CADJET 2 C-6 Appendix C Figure Appendix C .2: CADJET 2 E-Size Final Assembly Drawing CADJET 2 C-7 Appendix D SCHEMATICS This section contains the CADJET 2 Schematics for: PART DESCRIPTION PART # Main PCB Assembly Keypad PCB Assembly Carriage PCB Assembly Flex Circuit 205329 203455-1 204941 204950 SCHEMATIC DOC. # 205325 203456 204937 204946 REVISION # OF PAGES A A A A 9 pages 1 page 2 pages 1 page * _____________ * There is a typographical error on this schematic in the bottom right-hand corner. It currently reads: Sheet 2 of 1. Since there is only one page for this schematic, it should read: Sheet 1 of 1. CADJET 2 D-1 8 7 6 5 4 3 2 1 Notes: 1. Circuitry to keep OrCAD from rejecting note sheet J P1 +5V C 84 0.001uF PO WER C 85 0.001uF C 75 220uF 10V 3 VI VO 2 +5V ADJ +24V C 76 2200uF 35V D R155 1K 1% 1 D U 42 LM317T +24V 1 2 3 4 5 6 R156 2.49K 1% 2. Memory Map 0000 (See 0C00 2000 3. 0000 204579 0000 0000 - 00FF FFFF for 0FFF FFFF 3FFF FFFF Flash RAM EPLD-generated select terms.) Base DRAM Optional SIMM RAM OrCAD Page Link Statements |LINK | cpu.sch | glue.sch | dram.sch | flash.sch | simm.sch | io.sch | io2.sch | stepper.sch C C 4. Because the industry standard for 128 megabyte SIMM's has not assigned a pin to A12, the current design does not support single bank 128 megabyte SIMM's. Dual bank 128 megabyte SIMM's must be used until A12 is defined, A26 and A27 are mux'ed and provided as A12 to the SIMM, and the EPLD equations modified. 5. REVISION HISTORY Initial Release: ECN No. 84108 A TO B: ECN No. B TO C: ECN No. 84324 Added capacitors C92 to C96 for CISPR22-A compliance. C TO D: ECN No. 84458 Changed R86 and R87 from 4.7Kohms to 2Kohms. D TO E: ECN No. 84457 Changed R17 to R28 from 75 ohms to 33 ohms. Added test jumpers to flash chip selects for use with EST. Changed R157 to R172 from 75 ohms to 33 ohms. Added square test post holes to DRAMOE* and GACS*. Changed taps on delay line from 10/30 nsec to 15/30 nsec. B 84196 B 16-SEP-97 UPDATED PER ECN 86088. F ENCAD, Incorporated A A 6059 Cornerstone Court West San Diego, CA 92121-3734 Title Enhanced Main Board 8 7 6 5 4 3 (205325.sch) Size B Document Number 205325 Date: Monday, November 04, 2002 2 R ev F Sheet 1 of 1 9 8 7 6 5 D[0..15] 3 2 1 (3D4,5B6,6B7,7D4,8D6, D[0..15] +5V 4 +5V U1 1 2 3 D A0 A1 A2 EED ATA 5 6 7 SDA SCL TEST D0 D1 D2 D3 D4 D5 D6 D7 D8 D9 D 10 D 11 D 12 D 13 D 14 D 15 (2C3) R174 24C08 75 T306 (2B3) EECLK +5V R2 4.7K R1 4.7K R179 4.7k R180 4.7k R4 4.7K R3 4.7K T14 T15 T16 T17 T18 T19 T20 T21 T30 T31 BE RR 109 110 111 112 115 116 117 118 119 120 121 122 125 127 128 129 11 10 9 7 8 T313 +5V U3 DS1233D (3B2) (3B2) +5V 3 C 1 RES D REQ1* D REQ2* T34 T35 93 96 94 97 T36 12 T37 T38 BDOUT T39 141 142 GND RES ET* 4 (3C5) (3C5) D SACK0* D SACK1* (3C5) RXDO (3C5) BKPT* (3B1) SERDATA TXD0 R5 47K J1 KYBD/DSP 1 2 3 4 R 15 BDIN BKPT* 47K T40 F R EEZE DTRCLK (7B7) +5V B 95 98 T314 T315 (3C8,5A8,8D6,9C8) RESET* T32 T33 T41 88 T43 76 77 81 SERD ATA (7B8) T44 T45 84 85 87 R 10 RXD1 R 11 TXD1 +5V 4.7K T316 4.7K (3B1) TOUT2 (3B4) 28 30 29 75 73 74 T48 T49 TGATE2* 24 25 26 27 T310 T311 T312 31 32 33 34 T305 MOTOROLA BDM PORT R175 10K J7 +5V 2 4 6 8 10 BE RR BKPT* F R EEZE BDIN BDOUT BR BGACK BG DONE1 DONE2 DREQ1 DREQ2 DACK1 DACK2 RESET DSACK0 DSACK1 RTSA/OP0 RTSB/OP1 OP4 OP6 SCLK RXD0 TXD0 CTS0 CS0*/AVEC* CS1*/IRQ1*/PB1 CS2*/IRQ2*/PB2 CS3*/IRQ4*/PB4 RXD1 TXD1 CTS1 DS AS TIN1 TGATE1 TOUT1 R/W RMC TIN2 TGATE2 TOUT2 FC0 FC1 FC2 FC3 TCK TMS TDI TDO SIZE0 SIZE1 VCCSYN XFC CLOCK XTAL +5V R7 92 10M X2 140 72 71 70 67 66 65 64 63 62 61 58 57 56 54 53 52 49 48 47 46 45 44 43 3.6864MHz A0 A1 A2 A3 A4 A5 A6 A7 A8 A9 A10 A11 A12 A13 A14 A15 A16 A17 A18 A19 A20 A21 A22 A23 T81 T80 T79 T78 T77 130 131 132 133 136 137 138 139 T76 T75 T74 T73 T72 T71 T70 OPTO 22 105 101 100 99 T68 T67 T66 T65 T64 80 86 82 83 T63 T62 T61 T60 108 107 106 104 T59 5 6 T55 T54 2 1 T53 T318 40 39 38 37 T322 T319 T320 T321 4 3 T317 R141 4.7K R142 4.7K A28 R144 4.7K +5V R146 4.7K +5V D +5V C3 0.1uF +5V C4 0.1uF +5V C5 0.1uF A29 R145 4.7K +5V C2 0.1uF +5V C 77 10uF 10V +5V C6 0.1uF C7 0.1uF C8 0.1uF C (3C5) T69 SPARE1 (2D7) EED ATA (3B1) D TR (3B1,5A8) D O NE/PROG* F AN (8D4) EECLK (2D7) (7D1) (7D1) (7D7) DS* +5V (3C8,5C6) (3C8,5C3) (3C8) (3C8) F L0CS* F L1CS* SIMM1CS* SIMM2CS* OPTO C O LOR K Y5 (3B4) (3C5) D R EQS* EPLDCTRL EPLDCT RL T57 T56 A27 R143 4.7K C1 0.1uF R147 10K B (3B8) DS* A S* (3D8) (3C8,6A8) RW* T52 19 A26 +5V A24 A25 A26 A27 A28 A29 SPARE1 (3D8,5B6,6D8) A[0..29] A25 (3C8) S IZ0 C9 0.1uF +5V X2 R6 150 C ONN_BDM A0 A1 A2 A3 A4 A5 A6 A7 A8 A9 A10 A11 A12 A13 A14 A15 A16 A17 A18 A19 A20 A21 A22 A23 PB0/MODCK PB3/IRQ3* PB5/IRQ5* PB6/IRQ6* PB7/IRQ7* IPIPE/BDOUT IFETCH/BDIN BKPT/BDCLK FREEZE A[0.. 29] A24 PA0/A24 PA1/A25 PA2/A26 PA3/A27 PA4/A28 PA5/A29 PA6/A30 PA7/A31 16 14 20 T186 T50 EXTAL C 11 0.01uF R 14 C 10 0.1uF 75 R9 10M X1 GND GND GND GND GND GND GND GND GND GND GND GND GND GND GND GND RES ET* A 1 3 5 7 9 HALT BERR U2 68340 R 13 10M C LOCK R8 470K (3C8,5A5) A ENCAD, Incorporated 18 X1 144 135 126 124 114 13 21 36 42 51 55 60 69 79 91 103 DS* 89 D0 D1 D2 D3 D4 D5 D6 D7 D8 D9 D10 D11 D12 D13 D14 D15 +5V +5V +5V +5V +5V +5V +5V +5V +5V +5V +5V +5V +5V +5V +5V 102 90 15 17 23 41 50 59 68 78 123 134 143 35 113 R 12 4.7K Title Enhanced Main Board (CPU.sch) C 12 22pF 8 7 6 C 13 22pF 32.768KHz C 15 22pF C 92 10pF 5 4 C 14 22pF C 93 10pF 3 Size B Document Number 205325 Date: Monday, November 04, 2002 2 R ev F Sheet 2 of 1 9 8 C 78 1 0uF 10V 7 C 17 0.1uF C 18 0.1uF C 19 0.1uF C 20 0.1uF 6 C 21 0.1uF 5 4 3 R185 10K C 94 0.1uF 2 R187 10K R186 10K 1 +5V +5V 57 59 P D2 P D1 T15 T30 C L OCK C F L0CS* F L1CS* SIMM1CS* SIMM2CS* T256 T257 C L OCK 81 80 79 62 61 84 83 1 82 58 44 9 51 52 2 3 63 +5V S IZ0 H S KIN BDMEN RESET* PBDMCLK PBDMDATA SERDATA RW* DS* T185 T187 T188 DS* RES ET* PD6 PD5 PD2 PD1 MUXSEL DSACK0* DSACK1* GACS* STLEDCS* KYPARCS* DRAMOE* T10 T30 CLOCK FL0CS* FL1CS* SIMM1CS* SIMM2CS* MSTRRST* SIZ0 HSKIN BDMEN* RESET* PBDMCLK PBDMDATA SERDATA RW* DS* XC7372-10PC84C BKPT* RXDO FLOE* N/A N/A N/A N/A N/A N/A N/A N/A N/A N/A N/A G ACS* T193 T192 T191 A2 A3 A4 KYPA RCS* A CK B U SY BKPT* RXDO FLOE* SPARE1 EPLDCT RL STB R 184 0 XCHKC LK 16 +5V NC NC NC TAP1 TAP2 TAP3 TAP4 TAP5 TAP6 TAP7 TAP8 TAP9 TAP10 T15 T30 2 4 6 8 17 15 13 11 1 19 8 GND 2 3 15 IN T197 T198 T199 T200 T201 T202 T203 T204 A5 A6 A7 A8 A9 A10 A11 A12 A13 8 OEA OEB YA0 YA1 YA2 YA3 YB0 YB1 YB2 YB3 VCC GND RAS23* C AS0* C AS1* C AS2* C AS3* A14 A15 A16 A17 A18 A19 A20 A21 A23 T205 T206 T207 T208 T209 2 4 6 8 17 15 13 11 RW* R176 1 19 75 7 T307 IA0 IA1 IA2 IA3 IB0 IB1 IB2 IB3 OEA OEB U7 74F244 6 T286 T287 T288 T289 T290 T291 T292 T293 R128 R129 R130 R131 R132 R133 R134 R135 20 10 U8 74F244 A[0.. 29] A IA0 IA1 IA2 IA3 IB0 IB1 IB2 IB3 18 16 14 12 3 5 7 9 VCC GND T280 T281 T282 T283 T284 T285 VCC VCC +5V D HA0 HA1 HA2 HA3 HSTB* SHIFT C 27 0.1uF 26 28 9 7 5 6 83 84 RA0 RA1 RA2 RA3 RA4 RA5 80 81 78 82 79 73 T224 T225 T226 T227 T228 T25 10 9 8 7 6 5 19 18 26 20 36 37 39 42 T229 T230 T231 T232 T233 T234 T235 T236 11 12 13 15 16 17 18 19 2 3 T237 T238 27 22 A0 A1 A2 A3 A4 A5 NC U4 6264 1 KYCSN 18 16 14 12 3 5 7 9 RES ET* 35 74 54 13 8 10 63 RW* 30 75 75 75 75 75 75 75 75 T254 T255 T301 TOO_LOW_A TOO_LOW_B RD0 RD1 RD2 RD3 RD4 RD5 RD6 RD7 BUSY ACK STB GACS CCLK RESET PGACLK PAPER_F CARRSTAT DREQSN DREQHN DREQPN R/W 25 21 SELECT DTR DTRCLK LED4 DONE/PROG PTRRTS TGATE2 PARCLK PE EXA EXB 77 TOUT2 58 47 TOO_LOW_A TOO_LOW_B BRAS0* S1RAS0* S1RAS2* S1RAS1* S1RAS3* S2RAS0* S2RAS2* S2RAS1* SRAMWR SRAMOE LEFTA RIGHTA LEFTB RIGHTB STPLTCHA STPLTCHB 71 65 T239 16 48 49 14 55 17 11 61 34 T294 T295 T296 T297 T298 75 75 75 75 75 S2RAS3* BCAS0* BCAS1* BCAS2* BCAS3* T299 R127 75 B W E* 20 10 WE OE CS1 4 3 25 24 21 23 2 20 T241 T249 T248 52 57 50 51 76 75 B LEFT_A RIGH T_A LEFT_B RIGH T_B STPLTCHA STPLTCHB T243 T242 XC3042A-7PC84C C 83 0.001uF +5V A ENCAD, Incorported Title +5V Enhanced Ma in Board (GLUE.sch) C 29 0.1uF 5 A6 A7 A8 A9 A10 A11 A12 SELECT D TR DTRCLK LED4 D O NE/PROG* PTRRTS TGATE2* P ARCLK PE R 182 4.7K C 79 10uF 10V R136 R137 R138 R139 R140 C D0 D1 D2 D3 D4 D5 D6 D7 D REQ1* D REQ2* +5V C 28 0.1uF YA0 YA1 YA2 YA3 YB0 YB1 YB2 YB3 45 29 68 PGACLK PGACLK OPTO OPTO CARR STAT CARRSTAT D R EQS* D R EQS* T223 RASB0* RAS10* RAS12* RAS11* RAS13* RAS20* RAS22* RAS21* PWMP P WMN A2 A3 A4 XCHKCLK EXA EXB U6 DS1010S-050 14 4 13 5 12 6 11 7 10 9 T250 T251 T252 T195 SPARE1 EPLDCTRL TOUT2 1 46 72 4 67 B A S* D0 D1 D2 D3 D4 D5 D6 D7 59 60 DRAMOE* +5V C 16 0.1uF HA0 HA1 HA2 HA3 HEADSTB SHIFT A[0.. 29] SP2 STPLEDCS* S P1 65 56 69 23 24 28 27 40 38 41 44 PWMP PWMN CS2 VCC R181 10K MUXSEL D SACK0* D SACK1* D8 D9 D 10 D 11 D 12 D 13 D 14 D 15 D0 D1 D2 D3 D4 D5 D6 D7 +5V T194 68 75 74 11 10 12 71 23 24 25 26 28 29 66 34 35 67 15 D[0..15] C AS0* C AS1* C AS2* C AS3* 77 33 76 36 M0 M1 M2 PWRDN D[0..15] 8 16 27 42 49 60 30 20 40 41 43 GND GND GND GND GND GND N/A N/A N/A N/A N/A DS* RW* CAS0* CAS1* CAS2* CAS3* 32 31 33 12 GND 5 6 P D6 P D5 RAS0* RAS1* RAS2* RAS3* RAS4* RAS5* RAS6* RAS7* RAS8* RASB0* RAS10* RAS12* RAS11* RAS13* RAS20* RAS22* RAS21* RAS23* 70 21 39 19 18 17 37 14 13 M0 M1 M0 M1 U5 14 A S* A29 A28 A27 A26 A25 A24 A22 A1 A0 AS* C 26 0.1uF GND GND A S* 45 46 47 48 50 53 54 55 31 32 C 25 0.1uF 1 43 22 38 64 73 78 A29 A28 A27 A26 A25 A24 A22 A1 A0 C 24 0.1uF U9 VCCIO VCCINT VCCIO VCCINT VCCINT/PP A[0.. 29] A[0..29] D C 23 0.1uF 22 64 C 22 0.1uF 4 3 Size B Document Number 205325 Date: Monday, November 04, 2002 2 R ev F Sheet 3 of 1 9 4 BRAS0* BCAS0* B W E* 4 23 3 22 A0 A1 A2 A3 A4 A5 A6 A7 A8 A9 RAS CAS WE OE DQ0 DQ1 DQ2 DQ3 VSS MD 15 MD 14 MD 13 MD 12 1 2 24 25 26 MA0 MA1 MA2 MA3 MA4 MA5 MA6 MA7 MA8 MA9 9 10 11 12 14 15 16 17 18 5 BRAS0* BCAS0* B W E* 4 23 3 22 A0 A1 A2 A3 A4 A5 A6 A7 A8 A9 RAS CAS WE OE +5V DQ0 DQ1 DQ2 DQ3 VSS 1 2 24 25 MD 11 MD 10 MD9 MD8 26 MA0 MA1 MA2 MA3 MA4 MA5 MA6 MA7 MA8 MA9 9 10 11 12 14 15 16 17 18 5 BRAS0* BCAS1* B W E* 4 23 3 22 +5V A0 A1 A2 A3 A4 A5 A6 A7 A8 A9 RAS CAS WE OE U 13 MT4C4001J DQ0 DQ1 DQ2 DQ3 VSS 1 2 24 25 MD7 MD6 MD5 MD4 26 MA0 MA1 MA2 MA3 MA4 MA5 MA6 MA7 MA8 MA9 9 10 11 12 14 15 16 17 18 5 BRAS0* BCAS1* B W E* 4 23 3 22 +5V C 30 0.1uF R150 1 U 12 MT4C4001J 13 9 10 11 12 14 15 16 17 18 5 13 D MA0 MA1 MA2 MA3 MA4 MA5 MA6 MA7 MA8 MA9 VCC MD0 MD1 MD2 MD3 MD4 MD5 MD6 MD7 MD8 MD9 MD 10 MD 11 MD 12 MD 13 MD 14 MD 15 U 11 MT4C4001J 2 A0 A1 A2 A3 A4 A5 A6 A7 A8 A9 RAS CAS WE OE 13 U 10 MT4C4001J MD[0. .15] 3 DQ0 DQ1 DQ2 DQ3 MD3 MD2 MD1 MD0 1 2 24 25 D VSS 26 VCC 5 13 6 VCC 7 VCC 8 +5V C 31 0.1uF C 32 0.1uF C 33 0.1uF T124 75 MA[0..11] MA[0..11] C C MD[0. .15] MD[0. .15] 26 MA0 MA1 MA2 MA3 MA4 MA5 MA6 MA7 MA8 MA9 9 10 11 12 14 15 16 17 18 5 BRAS0* BCAS2* B W E* 4 23 3 22 A0 A1 A2 A3 A4 A5 A6 A7 A8 A9 RAS CAS WE OE DQ0 DQ1 DQ2 DQ3 VSS 1 2 24 25 MD 11 MD 10 MD9 MD8 MA0 MA1 MA2 MA3 MA4 MA5 MA6 MA7 MA8 MA9 26 BRAS0* BCAS3* B W E* 9 10 11 12 14 15 16 17 18 5 4 23 3 22 +5V +5V C 37 0.1uF C 80 10uF 10V A0 A1 A2 A3 A4 A5 A6 A7 A8 A9 RAS CAS WE OE DQ0 DQ1 DQ2 DQ3 VSS 1 2 24 25 MD7 MD6 MD5 MD4 MA0 MA1 MA2 MA3 MA4 MA5 MA6 MA7 MA8 MA9 26 BRAS0* BCAS3* B W E* 9 10 11 12 14 15 16 17 18 5 4 23 3 22 A0 A1 A2 A3 A4 A5 A6 A7 A8 A9 RAS CAS WE OE DQ0 DQ1 DQ2 DQ3 VSS MD3 MD2 MD1 MD0 1 2 24 25 26 B VCC RAS CAS WE OE VSS MD 15 MD 14 MD 13 MD 12 1 2 24 25 13 MA0 MA1 MA2 MA3 MA4 MA5 MA6 MA7 MA8 MA9 M A10 M A11 4 23 3 22 DQ0 DQ1 DQ2 DQ3 13 BRAS0* BCAS2* B W E* A0 A1 A2 A3 A4 A5 A6 A7 A8 A9 U 14 MT4C4001J VCC MA[0..11] 9 10 11 12 14 15 16 17 18 5 U 15 MT4C4001J 13 MA0 MA1 MA2 MA3 MA4 MA5 MA6 MA7 MA8 MA9 U 16 MT4C4001J VCC B U 17 MT4C4001J BRAS0* BCAS0* BCAS1* BCAS2* BCAS3* 13 BRAS0* BCAS0* BCAS1* BCAS2* BCAS3* B W E* VCC B W E* +5V +5V C 36 0.1uF C 35 0.1uF C 34 0.1uF T125 R 151 75 A A ENCAD, Incorporated Title Enhanced Main Board (DRAM.sch) 8 7 6 5 4 3 Size B Document Number 205325 Date: Monday, November 04, 2002 2 R ev F Sheet 4 of 1 9 8 7 6 5 4 3 2 1 +5V D F L0CS* 24 22 FLOE* FL0CSA* 32 A0 A1 A2 A3 A4 A5 A6 A7 A8 A9 A10 A11 A12 A13 A14 A15 A16 A17 A18 OE CE 12 11 10 9 8 7 6 5 27 26 23 25 4 28 29 3 2 30 1 31 24 22 A0 A1 A2 A3 A4 A5 A6 A7 A8 A9 A10 A11 A12 A13 A14 A15 A16 A17 A18 VCC D8 D9 D 10 D 11 D 12 D 13 D 14 D 15 13 14 15 17 18 19 20 21 WE D0 D1 D2 D3 D4 D5 D6 D7 D8 D9 D 10 D 11 D 12 D 13 D 14 D 15 13 14 15 17 18 19 20 21 C WE OE CE 28F020/29F040 29F040 2 1 16 F L0CS* D0 D1 D2 D3 D4 D5 D6 D7 U 19 GND 31 B W E* A0 A1 A2 A3 A4 A5 A6 A7 A8 A9 A10 A11 A12 A13 A14 A15 A16 A17 VPP/A18 U 20 16 R188 1 0k 12 11 10 9 8 7 6 5 27 26 23 25 4 28 29 3 2 30 1 C 38 0.1uF GND A0 A1 A2 A3 A4 A5 A6 A7 A8 A9 A10 A11 A12 A13 A14 A15 A16 A17 A18 +5V C 32 C 39 0.1uF VCC D J P7 JUMPER F LOE* A[0.. 29] D[0..15] D[0..15] A19 A20 A21 A22 A23 A24 A25 A26 A27 A28 A29 B D0 D1 D2 D3 D4 D5 D6 D7 J P6 1 2 J UMPER E1 E3 +5V XCHKCLK XCHKCLK D O NE/PROG* D O NE/PROG* A3 PE RESET* PE RES ET* E2 E4 E6 M0 M1 XCH KTRIG E16 E18 C L OCK PGACLK E7 E9 E11 T350 E15 E17 B R189 F L1CS* F L1CS* FL1CSA* +5V 10K 2 1 A[0..29] J P8 JUMPER M0 M1 XCHKTRIG C L OCK PGACLK A A ENCAD, Incorporated Title Enhanced Main Board (FLASH.sch) 8 7 6 5 4 3 Size B Document Number 205325 Date: Monday, November 04, 2002 2 R ev F Sheet 5 of 1 9 8 7 6 5 4 3 2 1 +5V +5V +5V 9 T169 R 17 0 MA2 T170 R 19 0 MA3 12 +5V A/B G C 44 0.1uF 74F157 U 22 2Y 4Y T171 R 24 0 MA4 7 T172 R 22 0 MA5 9 T173 R 21 0 MA6 T174 R 23 0 MA7 12 1A 1B 2A 2B 3A 3B 4A 4B 1 15 1Y 2Y 3Y 4Y 4 T175 R 27 0 MA8 7 T176 R 26 0 MA9 9 T177 R 25 0 12 T178 R 28 0 M A10 M A11 44 34 45 33 43 40 42 41 47 S2RAS0* S2RAS2* S2RAS1* S2RAS3* A/B G C +5V +5V 10 30 59 U 23 2 3 5 6 11 10 14 13 4 0DEG C 43 0.1uF 74F157 A9 A19 A20 A21 A23 A22 A24 A25 PD1 PD2 +5V A/B G R177 75 67 68 69 70 MD 15 MD 14 MD 13 MD 12 MD 11 MD 10 MD9 MD8 3Y 4 MD7 MD6 MD5 MD4 MD3 MD2 MD1 MD0 C 1 15 1Y PRD1 PRD2 PRD3 PRD4 MD 15 MD 14 MD 13 MD 12 MD 11 MD 10 MD9 MD8 ICT T308 1A 1B 2A 2B 3A 3B 4A 4B D MD7 MD6 MD5 MD4 MD3 MD2 MD1 MD0 2 3 5 6 11 10 14 13 RAS0 RAS2 RAS1 RAS3 CAS0 CAS1 CAS2 CAS3 WE M A11 M A10 MA9 MA8 MA7 MA6 MA5 MA4 MA3 MA2 MA1 MA0 A5 A15 A6 A16 A7 A17 A8 A18 44 34 45 33 43 40 42 41 47 S1RAS0* S1RAS2* S1RAS1* S1RAS3* BCAS0* BCAS1* BCAS2* BCAS3* B W E* D24 D25 D26 D27 D28 D29 D30 D31 MA1 MA0 50 52 54 56 58 60 62 64 T168 0 D16 D17 D18 D19 D20 D21 D22 D23 7 R 18 3 5 7 9 21 23 25 27 4Y 0 D8 D9 D10 D11 D12 D13 D14 D15 3Y R 20 49 51 53 55 57 61 63 65 2Y T167 4 R 30 R 31 10K 10K U 26 SIMM72 C 81 10uF 10V R 33 R 34 10K 10K U 27 SIMM72 +5V +5V +5V 1 15 MUXSEL 1Y GND GND GND 1A 1B 2A 2B 3A 3B 4A 4B MA0 MA1 MA2 MA3 MA4 MA5 MA6 MA7 MA8 MA9 MA10 MA11 D 2 3 5 6 11 10 14 13 12 13 14 15 16 17 18 28 31 32 19 29 A10 A11 A2 A12 A3 A13 A4 A14 1 39 72 U 21 C 82 10uF 10V +5V +5V +5V 10 30 59 MA[0..11] D0 D1 D2 D3 D4 D5 D6 D7 MA[0..11] C 42 0.1uF 2 4 6 8 20 22 24 26 A[0.. 29] A[0..29] RAS0 RAS2 RAS1 RAS3 CAS0 CAS1 CAS2 CAS3 WE PRD1 PRD2 PRD3 PRD4 67 68 69 70 PD5 PD6 B 75 75 75 75 75 75 75 75 MD0 MD1 MD2 MD3 MD4 MD5 MD6 MD7 R 159 R 160 R 161 R 162 R 163 R 164 R 165 R 166 75 75 75 75 75 75 75 75 MD8 MD9 MD 10 MD 11 MD 12 MD 13 MD 14 MD 15 D24 D25 D26 D27 D28 D29 D30 D31 D16 D17 D18 D19 D20 D21 D22 D23 D8 D9 D10 D11 D12 D13 D14 D15 50 52 54 56 58 60 62 64 3 5 7 9 21 23 25 27 49 51 53 55 57 61 63 65 19 1 74F245 U 25 D8 D9 D 10 D 11 D 12 D 13 D 14 D 15 A 2 4 6 8 20 22 24 26 B MD 15 MD 14 MD 13 MD 12 MD 11 MD 10 MD9 MD8 G DR R 158 R 157 R 167 R 168 R 169 R 170 R 171 R 172 MD7 MD6 MD5 MD4 MD3 MD2 MD1 MD0 VCC GND 2 3 4 5 6 7 8 9 MD 15 MD 14 MD 13 MD 12 MD 11 MD 10 MD9 MD8 C45 0.1uF A1 A2 A3 A4 A5 A6 A7 A8 MD7 MD6 MD5 MD4 MD3 MD2 MD1 MD0 20 10 +5V B1 B2 B3 B4 B5 B6 B7 B8 M A11 M A10 MA9 MA8 MA7 MA6 MA5 MA4 MA3 MA2 MA1 MA0 18 17 16 15 14 13 12 11 1 39 72 12 13 14 15 16 17 18 28 31 32 19 29 D[0..15] U 24 D0 D1 D2 D3 D4 D5 D6 D7 D0 D1 D2 D3 D4 D5 D6 D7 D[0..15] GND GND GND MA0 MA1 MA2 MA3 MA4 MA5 MA6 MA7 MA8 MA9 MA10 MA11 74F157 18 17 16 15 14 13 12 11 20 10 +5V C 46 0.1uF B1 B2 B3 B4 B5 B6 B7 B8 A1 A2 A3 A4 A5 A6 A7 A8 VCC GND G DR 2 3 4 5 6 7 8 9 A[0.. 29] MD[0. .15] A0 A1 A26 A27 A28 A29 MD[0. .15] A 19 1 ENCAD, Incorporated 74F245 Title Enhanced Main Board (SIMM.sch) R W* DRAMOE* 8 7 6 5 4 3 Size B Document Number 205325 Date: Monday, November 04, 2002 2 R ev F Sheet 6 of 1 9 8 7 6 5 4 3 2 1 S6 T101 +5V +5V D[0..15] D[0..15] S2 R 43 4.7K S3 R 44 4.7K R 46 4.7K R 45 4.7K R 47 4.7K C 51 0.1uF R 42 4.7K U 31 U 28 K Y0 K Y1 K Y2 K Y3 K Y4 K Y5 D S4 15 17 8 6 4 2 11 13 T102 T103 T104 T105 AUTOFD IN IT SLCT IN S5 1 19 BDMEN S1 KYPA RCS* K Y5 I1 I2 I3 I4 I5 I6 I7 I8 O1 O2 O3 O4 O5 O6 O7 O8 D0 D1 D2 D3 D4 D5 D6 D7 5 3 12 14 16 18 9 7 15 17 8 6 4 2 11 13 ACK B USY PE SELECT PTRRTS OPTOUB C O LORUB 1 19 T259 I1 I2 I3 I4 I5 I6 I7 I8 O1 O2 O3 O4 O5 O6 O7 O8 T116 T117 T118 T119 T120 5 3 12 14 16 18 9 7 R 36 R 37 R 38 R 39 R 40 R 66 74HCT244 R 67 R 68 G1 G2 R 50 1K R69 T309 ICT R178 75 R 49 R62 R 63 R 64 R 65 1K 1K 1K 1K 1K 1K 1K 1K KYPA RCS* D STB OPTO C O LOR 74LS244 G1 G2 A CKB BUSYB PEB SELECTB PT RRTSB 33 33 33 33 33 +5V 1K +5V +5V G17 U 32 R 41 4.7K T107 D8 D9 D 10 D 11 D 12 D 13 D 14 D 15 C O LORUB S7 C +5V C 52 0.1uF 2 5 6 9 12 15 16 19 C 49 0.1uF Q0 Q1 Q2 Q3 Q4 Q5 Q6 Q7 D0 D1 D2 D3 D4 D5 D6 D7 OE CLK 3 4 7 8 13 14 17 18 T108 T109 T110 T111 T112 T113 T114 T115 R 54 R 55 R 56 R 57 R 58 R 59 R 60 R 61 1 2 3 4 5 6 7 8 9 10 11 12 13 14 15 16 17 18 P D0 P D1 P D2 P D3 P D4 P D5 P D6 P D7 1K 1K 1K 1K 1K 1K 1K 1K A CKB BUSYB PEB SELECTB 1 11 74HCT374 P ARCLK KYPA RCS* R 48 +5V 19 20 21 22 23 24 25 26 27 28 29 30 31 32 33 34 35 36 +5V +5V +5V R153 1K R 35 1K R 51 H S KIN +5V R 52 11 VCC T189 B RXD RXDTXD+ 4 TXD0 TXD TXD- 5 DTRCLK DTR 10 HSKI.R 9 GPI SHDN RXEN TXEN CPEN T122 C2+ C2- 1 T123 VEE PGND GND 13 12 T154 21 C1- C 91 1 uF 10V PBDMCLK G1 G8 G2 G7 G3 G6 G4 G5 G9 R 53 G11 G10 G12 1K R 183 20K 14 PT RRTSB B J3 15 8 5 6 3 19 20 18 G14 G13 5 8 G15 G16 2 1 2 7 4 16 AUTOFD 1 4 3 7 6 17 MINI_DIN_8 23 T121 22 C 86 1 uF 10V G18 G19 G20 G21 G22 G23 G24 C1+ 2 8 HSKI GPI 7 8 6 3 A HSKO IEEE1284 J2 PBDMDATA C 50 1 uF 10V RXD+ SLCT IN 1K R154 1K 24 SERDATA IN IT 1K 1K +5V C R152 1K T196 A U 29 LTC1323CS ENCAD, Incorporated C 73 1 uF 10V 7 Title Enhanced Main Board 6 5 4 3 (IO.sch) Size B Document Number 205325 Date: Monday, November 04, 2002 2 R ev F Sheet 7 of 1 9 8 7 6 5 4 3 2 D[0..15] D[0..15] +24V +5V D C 56 0.1uF U 35 11 1 STPLEDCS* RESET* +24V D1 D2 D3 D4 D5 D6 D7 D8 Q1 Q2 Q3 Q4 Q5 Q6 Q7 Q8 XCH KTRIG 2 5 6 9 12 15 16 19 XCHKTRIG BEEPER L ED0 L ED1 L ED2 L ED3 T10 T11 T12 T13 1 2 3 4 5 6 7 LED4 F AN CLK CLR I1 I2 I3 I4 I5 I6 I7 R73 150 1 2 R71 150 1 YELL OW D3 2 R72 150 1 YELL OW D 2A 2 R74 150 16 15 14 13 12 11 10 RES ET* C 65 0.1uF R 88 GR EEN D 13 C 66 T1 4 GR EEN D4 8 74HCT273 O1 O2 O3 O4 O5 O6 O7 D D 2B 3 U 33 MC1413 9 3 4 7 8 13 14 17 18 V+ D8 D9 D 10 D 11 D 12 D 13 D 14 D 15 GND D0 D1 D2 D3 D4 D5 D6 D7 +24V 1 1 R173 2 0.01uF RES ET* C PWMP P WMN 11 5 7 ENBL VS 2 U 36 L6203 BOOT1 IN1 OUT1 IN2 OUT2 C 62 0.01uF 4 J6 1 2 3 3 1 C 8 C 63 0.01uF VREF GND 150 GR EEN C 95 .033uF C 96 .033uF 9 6 10 SENSE BOOT2 12 +24V J5 1 2 3 C 64 0.1uF OPTOUB LS1 T253 +5V +5V C 61 0.01uF +5V B EXA EXB U 34 15 17 8 6 4 2 11 13 HSTB* SHIFT H A0 H A1 H A2 H A3 1 19 +5V I1 I2 I3 I4 I5 I6 I7 I8 O1 O2 O3 O4 O5 O6 O7 O8 T2 T3 5 3 12 14 16 18 9 7 T4 T5 T6 T7 G1 G2 +5V R 77 33 R 78 R 79 33 33 R 80 R 81 33 33 R 82 74HCT244 C 57 0.1uF 2 +24V C 58 0.1uF R 76 47K HMB-06 L7 1 2 L6 1 2 L5 1 2 L4 1 2 L3 1 2 L2 1 2 L1 1 2 R 87 2K 1K C ARIGE1 C ARIGE2 C ARIGE3 C ARIGE4 C ARIGE5 C ARIGE6 C ARIGE7 C ARIGE8 C ARIGE9 CARIGE10 CARIGE11 CARIGE12 CARIGE13 CARIGE14 CARIGE15 CARIGE16 B 1 2 3 4 5 6 7 8 9 10 11 12 13 14 15 16 C O NN16 C O NN20 R 84 T9 JP4 1 2 3 4 5 6 7 8 9 10 11 12 13 14 15 16 17 18 19 20 T8 A + - JP3 C ARIGE1 C ARIGE2 C ARIGE3 C ARIGE4 C ARIGE5 C ARIGE6 C ARIGE7 C ARIGE8 C ARIGE9 CARIGE10 CARIGE11 CARIGE12 CARIGE13 CARIGE14 CARIGE15 CARIGE16 33 R 86 2K 1 R 85 A 1K ENCAD, Incorported C 60 0.001uF C 59 0.001uF CARRSTAT Title Enhanced Main Board (IO2.sch) 8 7 6 5 4 3 Size B Document Number 205325 Date: Monday, November 04, 2002 2 R ev F Sheet 8 of 1 9 7 6 5 +24V 3 2 1 +24V 1 +5V 4 C 67 0.1uF D5 1N5818 +5V D6 1N5818 2 GND SENSE U39A L298 R 90 11 1% 2 3 MC34074 U 38A R 102 1% R 89 T155 10K 0.1% 1 4.99K R 94 2K 1% T261 +24V 1 1 1% D9 1N5818 1% 10 12 OUT1 IN2 OUT2 0.5 14 SENSE U39B L298 D 11 1N5818 R114 2K 0.1% 1% +5V 1% 13 CLK CLR 10K +5V 1% 20K T161 10K 0.1% 14 MC34074 U 3 8D R 120 T270 12 R107 T164 MC34074 U 3 8C T166 7 5 TOO_LOW_B U37B LM393 +5V 0.001uF R 119 T266 4.99K 1% T263 A R 118 T265 10K T264 6 C 72 R112 2K 1% R126 20K 1% A R 110 1K R113 1K 1% T279 R111 2K 1% 1% 10 +5V 8 + 4.99K T162 9 C 71 0.01uF R 122 T163 - 2.49K 10K 0.1% R 121 ENCAD, Incorporated 1% Title R 117 20K 7 B R 108 R 123 T267 T268 T269 74HCT273 8 R115 2K 0.1% 1% + - 11 1 2.49K 1W 1% 2 R 116 T165 U 41 D 12 1N5818 2 R 124 U N U S ED EN 15 11 R109 13 1 RIGHT_B IN1 1 20K LEFT_B D 10 1N5818 2 R 99 T271 Q1 Q2 Q3 Q4 Q5 Q6 Q7 Q8 C +24V 1% 10K D1 D2 D3 D4 D5 D6 D7 D8 0.001uF TOO_LOW_A U37A LM393 +5V R 100 T272 2 5 6 9 12 15 16 19 T278 1 3 R 101 T273 3 4 7 8 13 14 17 18 2 C 69 R125 20K 1% B R 92 1K R 95 1K 1% T158 2K 1% +24V 5 +5V 7 MC34074 U 38B R 93 T159 2 D7 D6 D5 D4 D3 D2 D1 D0 +5V 1% 20K +5V 4 10K T156 6 C 68 0.01uF R 103 CLK CLR T157 4 1% R 104 4.99K D 10K 0.1% 8 2.49K T277 STPLTCHB R 97 2K 0.1% R 105 T274 T275 T276 74HCT273 D 15 D 14 D 13 D 12 D 11 D 10 D9 D8 R 96 2K 0.1% + - Q1 Q2 Q3 Q4 Q5 Q6 Q7 Q8 D7 1N5818 + 11 1 STPLTCHA RESET* D1 D2 D3 D4 D5 D6 D7 D8 2 5 6 9 12 15 16 19 + - 3 4 7 8 13 14 17 18 2.49K 1% 1 2 3 4 5 6 1W 1% 2 R 98 T160 U 40 D8 1N5818 2 R 106 U N U SED EN 8 1 6 D 15 D 14 D 13 D 12 D 11 D 10 D9 D8 OUT2 0.5 3 - D[0..15] C IN2 D[0..15] J P5 R 91 2 1 RIGHT_A OUT1 + - D 7 IN1 1 5 LEFT_A VCC V+ 2 9 4 C 70 0.1uF 1 8 Enhanced Main Board (STEPPER.sch) 1% 6 5 4 3 Size B Document Number 205325 Date: Monday, November 04, 2002 2 R ev F Sheet 9 of 1 9 8 7 6 PAPER SENSOR 5 4 3 2 1 VCC +5V 12 +24V 1 2 3 4 5 6 7 8 9 10 11 12 13 14 15 16 +5V (1C6) SHIFT HA2 HA1 HSTB* (1C7) HSTB* +5V HA0 EXB (1A5,1B6,1D4) (1A5,1B6,1D6) (1A5,1B6,1D4) (1A5,1B6,1D4) HA0 HA1 HA2 HA3 EXA HEADER 16 VCC I/CLK I/O I/O I/O I/O I/O I/O I/O I/O I/O I/O GND GND HA3 PSEL2 PSEL8 QP9* QP10* QP11* QP12* +24V J3 4 3 2 1 13 12 (1C7) (1C4) (1B4) (1B6) (1B6) (1B6) (1B6) (1C6) PSEL3 9 8 +5V PSEL1 3 4 PSEL2 1 2 R9 23.2 J2 +5V C12 0.1uF 20% +5V C3 (1C4) (1C4) PQ4 QP11* QP12* (1C4) QP10* (1C7) (1C7) (1C7) (1C7) (1C5) HA3 HA2 HA1 HA0 QP9* 1 2 3 4 5 6 7 8 9 10 11 12 13 14 15 16 PQ3 10uF PQ2 PQ1 (1C6) PSEL4 5 6 PSEL6 11 10 (1C4) PSEL8 11 10 TRICOLOR CARTRIDGE (1C7) U6 LM2576T-ADJ 6 A OFF GND VO TAB VI 1 FB 2 +12.1V 220uH D1 MUR410 4 R15 10K 1% C1 1000uF 80% 25V (1C7) HA1 Q2 2907A POWER1 1 R39 R41 C 620 R40 47 +12.1V Q3 2907A POWER2 1 R45 R47 620 R46 47 +12.1V Q5 2907A POWER4 1 +12.1V R51 R53 620 R52 47 +12.1V J4 Q7 2907A POWER6 1 (1A3) (1A3) R57 R59 620 R58 47 +12.1V (1A3) (1A3) Q9 2907A POWER8 1 16 15 14 13 12 11 10 9 8 7 6 5 4 3 2 1 POWER5 POWER7 POWER3 CHA3* CHA2* POWER1 POWER2 POWER4 CHA1* CHA0* POWER6 POWER8 8 R11 4.7K 5 R12 4.7K R13 4.7K R14 4.7K 6 Encad, Inc. (1C7) HA3 CHA0* CHA1* CHA2* CHA3* 3 4 (1B1) (1B1) (1B1) (1B1) A 6059 Cornerstone Court San Diego, CA 92121 Title SCH, CADJET CARRIAGE BOARD U4B 7406 7 6 5 B HEADER 16 U4C 7406 R16 1.13K 1% 8 +12.1V 104 CARTRIDGE 9 HA2 47 +12.1V U4D 7406 (1C7) R38 620 R37 2 U4A 7406 L1 R36 620 U3E 7406 5 +24V C2 1000uF 80% 3 1 HA0 Q4 2907A POWER3 1 620 U4E 7406 HEADER 16 +12.1V 620 U3C 7406 (1C6) 47 3 +5V R10 23.2 R44 620 R43 3 R8 23.2 R42 3 R7 23.2 Q8 2907A POWER7 1 620 U3A 7406 HEADER 4 47 620 U3B 7406 (1D4) 620 R55 +12.1V 620 U3D 7406 (1C6) R56 620 U4F 7406 PA7024-PLCC +5V PSEL7 (1B4) (1C4) (1C4) (1B4) (1D4) (1D4) PSEL4 PSEL1 PSEL3 PSEL6 PSEL7 PSEL5 C B VCC I/O I/O I/O I/O I/O I/O I/O I/O I/O I/O I/CLK2 NC NC 28 27 26 25 24 23 21 20 19 18 17 16 22 8 D 3 +5V U1 1 2 3 4 5 6 7 9 10 11 12 13 14 15 R54 2 R6 1K 3 R5 1K 2 R4 1K 3 R3 1K 2 R2 1K Q6 2907A POWER5 1 3 R1 1K J1 U3F 7406 C11 0.1uF 20% 47 620 3 D PPRSNRC 620 R49 2 13 +12.1V 2 PSEL5 R50 2 (1C6) +5V R48 2 OPTO OPTO 2 (2C1) 4 3 Size B Document Number 204937 Date: Thursday, November 09, 2000 2 Rev D Sheet 1 of 1 2 8 7 6 5 4 3 2 1 +24V C6 0.1uF 3 TP1 + 2 - R31 100K +24V 3 J5 1 2 3 4 2 R20 CW 10K 2 5 + 6 - U8B LM324 7 PEAK+ 3 D2 BAV99 R32 200K THRESHOLD +5V 10 + 9 R28 150 1/8W U8D LM324 14 12 C9 22uF 35V D3 BAV99 U8C LM324 8 +5V 3 - R29 150 1/8W R33 200K 2 PEAK- 1 C10 22uF 35V C 9 +5V 8 10K D4 SFH409 C8 0.1uF U9C 74HC00 R25 4 C 13 1 C5 0.1uF R19 10K HEADER 4 D BRIGHTNESS 10 LATCH_ENABLE 1 U9A 74HC00 R27 3 2 3 3 11 OPTO (1D8) 1K 12 4 13 7 R30 20K 2 3 14 CCW 11 1 D U8A LM324 1 1 2 4 +24V + Q1 SFH309F - 1 +24V 6 5 U9B 74HC00 U9D 74HC00 4 +24V + 2 - R26 10K U10A LM324 1 R34 30K R23 10K 11 3 R21 R18 10K 1M B 12 13 + U10D LM324 14 10 R22 10K 9 + U10C LM324 8 - +5V - 5 + 6 - B U10B LM324 7 +24V R17 R35 30K 10K C7 0.1uF NOTES: UNLESS OTHERWISE SPECIFIED (PEAK+) - (PEAK-) 1. ALL RESISTORS ARE IN OHMS, 5%, 1/10W. ALL CAPACITORS ARE IN MICROFARADS, 10%, 50V. 2 ADJUST R30 TO PRODUCE 18-20V AT U1 PIN 1 LOOKING AT WHITE BOND AT A DISTANCE OF 0.200". 3 D4 AND Q1 ARE ATTACHED THROUGH A CABLE. THE PIN NUMBERS REFER TO THE CONNECTOR PIN NUMBERS. R24 10K Encad, Inc. A A 6059 Cornerstone Court San Diego, CA 92121 Title SELF CALIBRATING PAPER EDGE DETECTOR 8 7 6 5 4 3 Size B Document Number 204937 Date: Thursday, November 09, 2000 2 Rev D Sheet 2 of 1 2 Service Menu MAIN MENU PRINT MODE SERVICE DIAGNOSTICS→ press DOWN ARROW DIAGNOSTICS SERIAL PORT press DOWN ARROW UTILITIES OPTIONS=EASY SERIAL PORT RESULT=OK RESULT=OK RESULT=ERROR press SELECT press DOWN ARROW UTILITIES SERVICE→ DIAGNOSTICS PARALLEL PORT press SELECT INFORMATION DISPLAY SETTINGS press SELECT press DOWN ARROW once to go to “SERVICE DIAGNOSTICS,” or twice to go to “SERVICE CALIBRATION” press DOWN ARROW INFORMATION PRINT SETTINGS press SELECT to display the current user’s User Settings (go to “MAIN MENU USER SETTINGS” to change the User Settings) XX-XX-XX XX:XX:XX press DOWN ARROW ROM REVISION CADJET 2 V1.50 PRINT DIRECTION BI press DOWN ARROW RELEASE INFO REV 1.50 ROM press DOWN ARROW PRINT COLOR COLOR press DOWN ARROW TOTAL MEMORY XXXXXXXX BYTES press DOWN ARROW FIRING RATE 5000 press DOWN ARROW MEMORY CONFIG I/O=128K RAS=3M press DOWN ARROW MAX PWM/POSITION 14 84 0 press DOWN ARROW EMULATE LANGUAGE HPGL2 press DOWN ARROW PWM/SATURATION 0 245 0 -1 press DOWN ARROW BAUD RATE 9600 press DOWN ARROW STOP/MAX/DISABLE 0 50 0 press DOWN ARROW PARITY EVEN,7BITS press DOWN ARROW ERROR/CMD/POS 0 0 0 press DOWN ARROW HANDSHAKE HARDWIRE press DOWN ARROW DTR NORMAL press DOWN ARROW PRINT MODE NORMAL press DOWN ARROW PARALLEL PORT RESULT=OK press DOWN ARROW PLOT TIME XX:XX:XX press SELECT to print all 8 stored User Settings If media is already loaded, all 8 User Settings will print. press MENU to return to “SERVICE INFORMATION” If no media is loaded, the following will be displayed: INSERT MEDIA PRESS LOAD KEY After media is loaded, all 8 User Settings will print. press MENU to return to “SERVICE INFORMATION” RESULT=OK RESULT=ERROR press DOWN ARROW twice DIAGNOSTICS CARTRIDGE press SELECT (draws PRIME pattern) press DOWN ARROW DIAGNOSTICS CARRIAGE VIBRATE press SELECT (draws 5 sets of 3 parallel lines) press DOWN ARROW DIAGNOSTICS COLOR TEST=35% COLOR TEST=10%, 25%, 35%, 50%, 65%, 75%, 100% press SELECT press UP or DOWN ARROWS to change value press SELECT to enter the value (four 1” bands of each color will be drawn) press DOWN ARROW DIAGNOSTICS KEYPAD press SELECT (“beep” will sound if OK) press all other keys to test ( “beep” will sound if OK) press SELECT press DOWN ARROW DIAGNOSTICS LCD press SELECT (2 rows of 16 eights should display briefly) 8888888888888888 8888888888888888 press DOWN ARROW press MENU to return to “INFORMATION DISPLAY SETTINGS” DIAGNOSTICS LED press SELECT (all lights flash on, unless they are already on) press DOWN ARROW DIAGNOSTICS ROM press SELECT CALIBRATION DEADBAND=XX RESULT=OK RESULT=ERROR press DOWN ARROW twice XX = 52 to 69 (do not exceed this range of values; 52 & 61 work best) press SELECT to draw 2 lines of 16 regions of deadband at XX (The “=“ will blink while deadband is drawn.) (press UP or DOWN ARROWS to change value press SELECT twice to draw deadband at new value) press SELECT to stop “=“ from blinking press DOWN ARROW DIAGNOSTICS RAM press SELECT press SELECT OPTIONS=EASY OPTIONS=ADVANCED If MENU=EASY, press SELECT, press UP ARROW once, then press SELECT. press UP ARROW twice press SELECT press SELECT ROM RESULT=OK press SELECT (reads paper size & displays information) press DOWN ARROW twice press SELECT UTILITIES CALIBRATION → SERVICE INFORMATION→ SERVICE CALIBRATION → press SELECT DIAGNOSTICS PAPER SENSOR MAIN MENU UTILITIES DATE: TIME: press DOWN ARROW CALIBRATION VERT LINES (ONE) RAM RESULT=OK press SELECT to draw 16 regions of vertical lines uni-directional press DOWN ARROW RESULT=OK RESULT=ERROR press DOWN ARROW twice CALIBRATION VERT LINES (ALL) DIAGNOSTICS SPEAKER press SELECT to draw 16 regions of vertical lines bi-directional press DOWN ARROW press SELECT (beeps once if OK) press DOWN ARROW CALIBRATION SLOW DEADBAND=0 DIAGNOSTICS SERVO MOTOR→ SLOW DEADBAND=0 or 1 press SELECT to draw 1 line of 16 regions of deadband (The “=“ will blink while deadband is drawn.) (press UP or DOWN ARROWS to change value and press SELECT twice to draw deadband at new value) press SELECT to stop “=“ from blinking press MENU three times to return to “MAIN MENU UTILITIES” press UP ARROW to return to ‘MAIN MENU PRINT MODE” press SELECT SERVO MOTOR SPEED=FAST SPEED=SLOW SPEED=FAST press SELECT press UP or DOWN ARROWS to change value press SELECT, then DOWN ARROW SERVO MOTOR CYCLES=1 0 to 1,000,000 (500 recommended) press SELECT press UP or DOWN ARROWS to change value press SELECT to run test press MENU, then DOWN ARROW after test DIAGNOSTICS PAPER MOTOR→ press SELECT PAPER MOTOR SPEED=FAST SPEED=SLOW SPEED=FAST press SELECT press UP or DOWN ARROWS to change value press SELECT, then DOWN ARROW PAPER MOTOR INCHES=1 0 to 1 inches press SELECT press UP or DOWN ARROWS to change value press SELECT to do Stepper Motor quality test press MENU, then DOWN ARROW DIAGNOSTICS FAN press SELECT to test Fan press SELECT to end test press MENU to return to “SERVICE DIAGNOSTICS” NAVIGATING THE MENU 1. Press any of the four LCD keys to wake up the plotter. The plotter will wake up at the MAIN MENU level and at the first MAIN MENU (PRINT MODE). 2. Press the arrow keys to scroll through the MAIN MENUs (either forward or backward). 3. Press SELECT to enter the desired menu. 4. Press the arrow keys to scroll through the selected menu. 5. To change a value or parameter, press SELECT. The equal sign (=) will blink, indicating that you are now in change mode. Press the arrow keys to scroll through the available values or parameters. The new value or parameter will blink , indicating that it is different from the currently saved value or parameter. Press SELECT again to save the changed value or parameter and leave the change mode. 6. Press the MENU key to move back up to the previous level of the menu tree. KEY Submenu items with an arrow (→) have additional submenus. DIAGNOSTICS COLOR TEST=35% The values shown in the boxes are the default values for each option. COLOR TEST=10%, 25%, 35%, 50%, 65%, 75%, 100% press SELECT press UP or DOWN ARROWS to change value press SELECT to enter the value (four 1” bands of each color will be drawn) press DOWN ARROW A color version of this menu is available on our BBS, filename: C2SVCMNU.ZIP It may be printed on any of our inkjet plotters. The text below the boxes shows any additional values for each option, indicates steps to be followed, and gives other information. Encad, Inc. 6059 Cornerstone Court West San Diego, CA 92121 Technical Support: 619-452-4350 Technical Support FAX: 619-546-0659 Technical Support BBS: 619-452-2653 or 619-452-3768 Technical Support Internet WEB Address: http://www.thegroup.net/encad/ 09/18/95