1
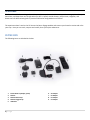
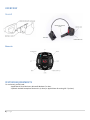
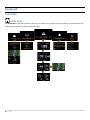
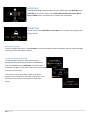
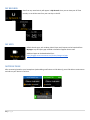
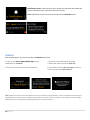
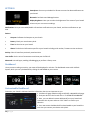
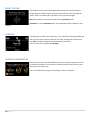
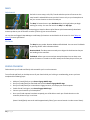
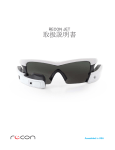
USER MANUAL
ReconOS 4
i|Page
Safety Information
ii | P a g e
Contents
SAFETY INFORMATION ......................................................................................................................................................................II
WELCOME ......................................................................................................................................................................................... 5
IN THE BOX ............................................................................................................................................................................................. 5
OVERVIEW SNOW2 .................................................................................................................................................................................. 6
Remote .............................................................................................................................................................................................. 6
SYSTEM REQUIREMENTS ....................................................................................................................................................................... 6
SETUP ................................................................................................................................................................................................ 7
GET STARTED ......................................................................................................................................................................................... 7
RECON ENGAGE WEBSITE ...................................................................................................................................................................... 7
RECON ENGAGE MOBILE APP ................................................................................................................................................................ 8
Connecting Your Smartphone - Android (4.1 or later) ....................................................................................................................... 8
Connect Your Smartphone - iPhone (4S or later, iOS 7 or higher) ..................................................................................................... 8
ON SNOW2 ........................................................................................................................................................................................ 9
FEATURES .............................................................................................................................................................................................. 9
HOME MENU: .................................................................................................................................................................................... 9
QUICK NAV: ..................................................................................................................................................................................... 10
START DAY ....................................................................................................................................................................................... 10
MY RECORDS ................................................................................................................................................................................... 11
MY APPS .......................................................................................................................................................................................... 11
NOTIFICATIONS ............................................................................................................................................................................... 11
SHARING .......................................................................................................................................................................................... 12
SETTINGS ......................................................................................................................................................................................... 13
Dashboard ....................................................................................................................................................................................... 13
Customizable Dashboard................................................................................................................................................................. 13
MUSIC PLAYER ................................................................................................................................................................................. 14
COMPASS......................................................................................................................................................................................... 14
COMPASS CALIBRATION .................................................................................................................................................................. 14
MAPS ............................................................................................................................................................................................... 15
FRIEND TRACKING ........................................................................................................................................................................... 15
BATTERY .......................................................................................................................................................................................... 16
Tip:................................................................................................................................................................................................... 16
REMOTE BATTERY ................................................................................................................................................................................ 16
To replace the battery on the remote: ............................................................................................................................................ 16
STATUS BAR ICONS .......................................................................................................................................................................... 17
TROUBLESHOOTING ........................................................................................................................................................................ 18
GPS ...................................................................................................................................................................................................... 18
AGPS (Assisted GPS) for your Snow2 ............................................................................................................................................... 18
FACTORY RESET ................................................................................................................................................................................... 18
REMOTE PAIRING................................................................................................................................................................................. 18
Pairing your Remote to your Snow2 ................................................................................................................................................ 18
MAINTENANCE ................................................................................................................................................................................ 20
iii | P a g e
STORING YOUR DEVICE (OFF-SEASON) ................................................................................................................................................... 20
CHARGING ........................................................................................................................................................................................... 20
To charge your device using a PC or Mac: ....................................................................................................................................... 20
To charge your device using the provided AC adapter: ................................................................................................................... 20
FIRMWARE UPDATES ...................................................................................................................................................................... 21
HOW TO KEEP YOUR SNOW2 UPDATED TO THE LATEST SOFTWARE VERSION: ........................................................................................................ 21
SUPPORT ......................................................................................................................................................................................... 22
WARRANTY ............................................................................................................................................................................................. 22
BATTERY DISPOSAL INFORMATION ............................................................................................................................................................... 22
TECHNICAL SPECIFICATIONS ........................................................................................................................................................................ 22
PROCESSOR SUBSYSTEM ............................................................................................................................................................................ 22
Sensor Technology........................................................................................................................................................................... 22
Power requirements ........................................................................................................................................................................ 23
Remote Control ............................................................................................................................................................................... 23
COMPLIANCE INFORMATION .......................................................................................................................................................... 24
iv | P a g e
Welcome
The Recon Snow2 has been designed to enrich your alpine experience – it delivers crisp, widescreen graphics when you
want them, and keeps them out-of-sight when you don’t. Speed, vertical descent, jump airtime, navigation, and
distance are all delivered using built-in precision GPS and an integrated suite of sensors.
The experience doesn’t end on the hill. Access the Recon Engage website and connect your Snow2 to review and relive
your trips. Here you can track, compare and socially share your alpine adventures.
IN THE BOX
The following items are included in the box:
1.
2.
3.
4.
5.
Snow2 Heads-up Display (HUD)
Remote
Remote Wrist Strap
Remote Goggle Strap
USB Cable
5|Page
6.
7.
8.
9.
AC Adapter
UK Adapter
EU Adapter
US Adapter
OVERVIEW
Snow2
Remote
SYSTEM REQUIREMENTS
To use Snow2, you will need:
- Apple Mac OS X v10.8 or later, Microsoft Windows 7 or later.
- Optional: Android Smartphone Version 4.1 (or later) or Apple iPhone 4S running iOS 7 (or later).
6|Page
SETUP
GET STARTED
Your Snow2 needs to be activated and registered before you use it up on the mountain. To get started, please follow the
instructions below.
1. Create your Engage Account at reconinstruments.com/getstarted and follow the prompts to Get Started with
your Snow2 HUD.
2. Once you’ve created your account, download and install the Recon Uplink Desktop Application on your
computer in order to get the most up-to-date software for your HUD (ReconOS).
3. Customize Fit:
•
Snap fit your Snow2 into your goggle. Gently remove your goggle’s lens and snap fit your Snow2 into
your ‘Recon Ready’ goggle frame. The HUD sits in the right hand side of the goggle, while the battery sits
on the left. Watch this tutorial for assistance with installation: http://youtu.be/RLsE-e83CLQ
•
Adjust your goggles fit. Adjust the strap sliders on your goggle’s strap; fit the goggle to your face so that
it sits upon your face comfortably and securely.
•
Once you have installed Snow2 into your goggle, turn it on by pressing and holding down the power
button. The power button is found on the right-side of your goggle. Wait until the power button
shows a blue light to indicate the device is switched on.
•
Adjust the orientation of your Snow2 display to optimize visibility of the HUDs screen. With your
fingers, gently pivot and rotate your Recon HUD until the screen is fully visible when comfortably
wearing the goggle. For assistance with display adjustment, visit this page:
http://reconinstruments.desk.com/customer/portal/articles/547048-can-the-angle-of-the-mod-livehud-display-be-adjusted-
•
Choose strap for your HUDs remote. Choose your preferred remote strap mount (wrist or goggle) and
snap-fit onto the remote. Watch this tutorial for assistance with installation:
https://www.youtube.com/watch?v=y4v0gX1V6iw&feature=youtu.be
RECON ENGAGE WEBSITE
Use the Recon Engage website to activate and register your
Snow2. Upload your trips to view where you went, and what
you did on the mountain. Review stats, milestones, and maps of
your trips shown in info graphic form, which you can share
socially, directly from your account. Engage is also your go-to
spot to keep your Snow2’s firmware updated with the latest
features. Visit https://engage.reconinstruments.com/ to learn
more.
7|Page
RECON ENGAGE MOBILE APP
The Recon Engage Mobile App (for Android and iOS) provides
connected features between your Smartphone and Snow2.
These features include Friend Tracking to see where your
buddies are in real-time while you’re on the mountain, and
control of music stored on your Smartphone (as well as control
of music apps installed on your Smartphone) via Music Player.
You can use the Recon Engage Mobile App to see a list of your
accomplishments and share them across your favorite social
networks.
To unlock additional features on your Snow2, download the
Recon Engage Mobile App to your Smartphone from either the
Google Play Store or Apple App Store.
Connecting Your Smartphone - Android (4.1 or later)
1. Download the free Recon Engage Mobile App for Android from Google Play Store.
2. On your Snow2, open the Quick Nav menu by pressing and holding the SELECT button on your remote.
3. From the Quick Nav menu, press RIGHT on your remote to select Smartphone, and then choose Android.
4. Follow onscreen instructions on your Snow2 to complete set up.
Connect Your Smartphone - iPhone (4S or later, iOS 7 or higher)
1. Download the free Recon Engage Mobile App for iPhone from the Apple App Store.
2. On your Snow2, open the Quick Nav menu by pressing and holding the SELECT button on your remote.
3. From Quick Nav menu, press RIGHT on your remote to select Smartphone, and then choose iPhone.
4. Follow onscreen instructions on Snow2 to complete set up.
8|Page
On Snow2
FEATURES
HOME MENU:
The Home Menu is the hub of Snow2's interface. This is where you can start tracking a new trip, view notifications and
records, adjust settings, and launch Third Party Apps.
9|Page
QUICK NAV:
Pressing and holding the SELECT button on your remote opens the Quick Nav menu.
Quick Nav gives you easy access to your Home Menu, Notification Center, Music
Player, Options menu, and allows you to connect your Smartphone.
START DAY
At the center of your Home Menu is Start Day. This is how you start tracking a new
day on the hill.
Start A New Activity:
To start tracking a new activity, select Start Day. You will be launched into your Dashboard, and your activity will begin
tracking as soon as you acquire a GPS fix.
View Day In Progress & Finish
To view your day in progress, Pause your activity by
pressing SELECT on your remote while on the Dashboard,
then press DOWN to choose VIEW DAY. You will be taken
to the Day In Progress screen, where you can see all your stats
from your current activity.
To finish your activity, press SELECT while in the Day In
Progress screen to invoke the Finish Day confirmation. From
here and you can choose to Save, Share or Discard your
activity.
10 | P a g e
MY RECORDS
Stats from any saved activity will appear in My Records. Here you can view your All Time
records, or see all the stats from your Last Day on the hill.
MY APPS
Default Snow2 apps, such as Maps, Music Player and Compass can be launched from
My Apps. Any third party app installed on Snow2 will appear here as well.
Additional apps can be downloaded from:
http://engage.reconinstruments.com/forums/categories/apps
NOTIFICATIONS
After connecting Snow2 to your Smartphone (and enabling notifications on iOS devices), you will be able to receive texts
and calls on your device in real time.
11 | P a g e
Notifications Center is where all your texts, missed calls and other notifications are
collected. Review all your notifications from this location.
Note: Notification Center can also be accessed from the Quick Nav menu.
SHARING
After completing your trip, share your day on Facebook with friends.
1. Log in to your Recon Engage Mobile App on your
Smartphone via Facebook.
3. Start Day on the HUD and hit the slopes.
4. Pause your activity and select View Day.
2. Now connect your Snow2 to your Smartphone.
5. Press SELECT from the Day In Progress screen to
Finish Day, then select Share & Save.
Note: Update your Snow2 to the latest software version from the Recon Engage website. (You’ll be informed by the Recon Uplink
Desktop App if your Snow2 requires a software update when you connect it to your computer). Also, update your Recon Engage
Mobile App (on your Smartphone) through Apple App Store or Google Play Store.
12 | P a g e
SETTINGS
Smartphone: Connect your Android or iPhone to access the advanced features on
your Snow2.
Bluetooth: Pair Device and Manage Devices.
Display-Brightness: Here you can alter the brightness of the screen of your Snow2
to best suit your current surroundings.
Notifications: Here you can enable/disable calls and text notifications on your Snow2, and clear notifications as you
wish.
Devices:
•
Compass: Calibrate the Compass on your Snow2.
•
Battery: Check your exact battery level.
•
Time: Set the time on your Snow2.
•
About: Find technical information specific to your Snow2 including serial number, firmware version and more.
Activity: Clear all stats from previously saved activities.
User Profile: Set the unit of measurement and view your Profile Info.
Advanced: Uninstall apps, enabling USB debugging or perform a factory reset.
Dashboard
Once you start tracking an activity, your stats will be displayed in real-time. The Dashboard comes with 4 default
layouts, which you can cycle between by clicking UP and DOWN on your remote.
Customizable Dashboard
Customize your Snow2's dashboard with the information that is most important to you.
1. Visit Recon Engage website and go to DEVICES > MANAGE HUD page.
2. Find your device in the list and click on "CUSTOMIZE DASHBOARD".
3. Here, you can add and remove dashboards from your Snow2 and
customize their lay outs and stats. Click "SAVE" to confirm your
selection.
4. Your new custom dashboard will be downloaded to your Snow2 the
next time you connect your device with Uplink.
13 | P a g e
MUSIC PLAYER
Use Snow2 to control your favorite Music Apps installed on your Smartphone.
Change songs and adjust volume using the remote while you carve through the
snow – there is no need to take your phone out of your pocket again.
Note: Music Player can also be accessed from the Quick Nav menu.
(Reminder: To access Quick Nav menu, press and hold the SELECT button on your
remote.)
COMPASS
Compass tells you where you’re heading. If you have Friend Tracking enabled, you
will see your friend’s position relative to your own, including how far away they
are. (Note: Friends tracking requires Smartphone connection)
You can access the Compass from My Apps.
COMPASS CALIBRATION
The first time you use your Snow2 (ReconOS 4.0) you will be prompted on-screen
to calibrate your device. This will take 15 seconds, and will require you to rotate
the device across three-axis.
You can recalibrate the compass from Settings > Device > Compass.
14 | P a g e
MAPS
Default mode
See built-in resort maps, trails, lifts, friends and other points of interest on the
map. Snow2's onboard GPS means you don't have to rely on your Smartphone to
see your current location or what's around you.
The Map* is located next to your Dashboard (one click right) when you begin
tracking an activity. You can also launch the Map from My Apps.
* Download the latest map data by connecting your Snow2 to Recon Uplink. Recon Uplink automatically downloads
street map data to your HUD within a radius of 50 km of your current location.
You can also use Engage's Map Manager to add maps for locations not included in the ski resort list. Visit "Maps on
Snow2" for more information.
Find mode
The Map has two modes: Rotation Mode and Find Mode. You can enter Find Mode
by pressing SELECT while in Rotation Mode.
Rotation Mode: The Map rotates around you to align with the direction that you
are heading on the mountain.
Find Mode: Allows you to zoom and pan around the Map. You can hover over
points of interest or Friends to see their name/how far away they are from you.
FRIEND TRACKING
Find and track your friends and family with ease while you’re on the mountain.
To see friends and family on the Map screen of your Snow2 while you’re skiing or snowboarding, ensure you have
completed the following steps:
•
•
•
•
•
•
Add your friends/family to your Recon Engage Mobile App.
Get your friends/family to download and install the Recon Engage Mobile App.
Get your friends/family to create a Recon Engage account, and accept your friend requests.
Enable Friend Tracking on your Recon Engage Mobile App.
Connect your Snow2 to your Smartphone.
Once your friend requests have been accepted, you will be able to track your friends location on the
mountain, direct-to-eye, in real time.
(Note: Friends/family must to be within approximately 5km of your current location in order to track them).
15 | P a g e
BATTERY
Snow2 Battery (3.7V Lithium Polymer Rechargeable)
A full charge of the battery of your Snow2 lasts from 5-6 hours, even at temperatures as low as -10°C / 14°F.
Usage under temperatures equal to or below -20°C / -4°F will mean that battery depletion occurs at a faster rate.
Fully Charged Battery
Nearly Fully Charged Battery
Partially Charged Battery
Low Battery
Extremely Low Battery
No Charge Left
Battery is charging via USB to micro-USB cable
Tip:
•
Preserve battery life on your Snow2 by turning off the display. To do this, open the Quick Nav menu and press
DOWN on your remote to access Power Options then select Display Off.
Note: The battery performance of your Snow2 will vary depending on the amount and / or activity of connected
Bluetooth devices (ex: Smartphone, Third Party Hardware such as POV cameras, Heart Rate Monitors, etc.)
Never attempt to service the Snow2 yourself – this includes attempting to remove or replace the lithium battery.
REMOTE BATTERY
The remote which accompanies your Snow2 connects to the HUD via BLE sensor technology. This is a very low energy
connection, allowing you to navigate your HUD with ease. Please be aware that you may need to replace the remote’s
single three-volt CR2032 battery approximately once every three years.
To replace the battery on the remote:
1.
2.
3.
4.
5.
Remove the battery cover found on the underside of your remote.
Using a coin or flathead screwdriver, turn the cover counter clockwise until you reach the unlock symbol.
Remove battery and insert a replacement.
Replace the battery cover on the back of the remote.
Using a coin or flathead screwdriver, turn the cover clockwise until the arrow aligns with the closed lock symbol.
16 | P a g e
STATUS BAR ICONS
12:45
17 | P a g e
Battery
Battery Level Indicator
Activity Tracking
Snow2 is recording your activity
Activity Paused
Snow2 stopped recording your activity
Bluetooth
Bluetooth is enabled
Smartphone
Smartphone is connected
Smartphone
Smartphone is connected with data access
Remote Connected
Remote is paired and connected to Snow2
Remote Not
Connected
Remote is not paired and not connected to Snow2
GPS
GPS is searching for a signal
GPS
GPS fix acquired
USB
USB connected
Time
Current local time
Troubleshooting
GPS
GPS technology works best in open spaces with a clear view of the sky. Obstructions such as buildings and trees can
degrade the GPS signal. Your Snow2 will automatically acquire a GPS fix each time you use your snow2.
If you are having difficulty acquiring a GPS fix on your Snow2, this may be due to one of the following factors:
•
•
•
You are using the device indoors.
Your device is trying to acquire a GPS fix for the first time.
Your device has not been used for an extended period of time.
AGPS (Assisted GPS) for your Snow2
AGPS helps to locate satellites within your local area, helping speed up the process of getting a GPS fix for your Snow2.
To activate AGPS, connect your Snow2 to your computer and run Recon Uplink. Recon Uplink will then automatically
sync your Snow2 to your Recon Engage account and transfer AGPS files to your HUD for your current location.
If you still experience difficulty when trying to acquire a GPS fix, try powering down your Snow2 and restarting it
outdoors (away from any obstructions, if possible).
FACTORY RESET
A factory reset clears all data that your Snow2 has recorded. It also un-pairs the remote, clears your settings, uninstalls
any third-party apps, and restores the device back to the default settings and original firmware the Snow2 was shipped
with.
• To perform a factory reset, go to Settings > Advanced > Factory Reset
REMOTE PAIRING
Your remote automatically comes paired with your Snow2. However, if you perform a factory reset or happen to lose
your remote/purchase a new one, you will be required to re-pair the remote to your Snow2 again.
To un-pair remote, simultaneously press and hold the Left and Right buttons on the remote until you see the LED
Indicator on your remote flash amber. Your Snow2 status bar will have the remote is not paired and not connected to
Snow2 icon.
Pairing your Remote to your Snow2
Note the ID number on the back of the remote printed on white label.
1. Power off your Snow2 and power it on again.
2. Press any button on the remote and wait for prompt on your Snow2 to select the remotes ID number.
3. Use the Snow2 power button to select the remotes ID number that corresponds to your remote. Click power button
to select corresponding remote. A countdown will begin - wait for the counter to reach “0” on your Snow2 screen.
18 | P a g e
4. Now check if the remote is paired:
• You will see the remote is paired and connected to Snow2 icon on the left of the status bar on your HUD.
• Press any button on your remote and you will see the remote LED Indicator flash blue. You’re remote is now
paired.
19 | P a g e
Maintenance
STORING YOUR DEVICE (Off-Season)
Your Snow2 requires a full charge before storing it for an extended period of time. We recommend you to charge your
device once every 2-3 months during the off-season.
CHARGING
To charge your device using a PC or Mac:
1. First, connect the micro USB cable to your Snow2 then plug the USB cable into the USB port on your computer.
2. Check that a red LED light above the USB port on your Snow2 appears - this shows that your device is charging.
3. Keep charging until the red LED light turns off - this indicates your device is fully charged.
To charge your device using the provided AC adapter:
1. Connect the micro USB cable to Snow2 then plug the USB cable into the AC adapter shipped with your unit. Plug
the AC adapter into a wall outlet.
2. Check that a red LED light above the micro USB port appears - this shows that your device is charging.
3. Keep charging until the red LED light turns off - this indicates your device is fully charged.
Note: In optimal conditions, your Snow2 can achieve a fast charge (80% of battery) using your computer or AC adapter
in just one hour. Charge your Snow2 for 4 hours to achieve a fully charged battery.
20 | P a g e
FIRMWARE UPDATES
How to keep your Snow2 updated to the latest software version:
1. Visit Recon Engage website (engage.reconinstruments.com) and create an account (if you already have an Engage
account jump to the next step).
2. Log into your Engage account and navigate from DEVICES > MANAGE HUD page.
3. Download Recon Uplink Desktop App on your computer (download from the right hand side of the MANAGE HUD
page).
4. Power up your Snow2 and connect it to your computer using the provided USB cord.
5. Wait for Recon Uplink Desktop App to recognize your Snow2 and then follow the prompts to register your Heads-up
Display. (NOTE: You may be required to open the Recon Uplink Desktop App on your computer, if it didn't launch
automatically).
6. Wait for Recon Uplink Desktop App to sync your Snow2 data to your Recon Engage account, then update your Snow2
to the latest firmware version (if available).
7. On your Snow2 HUD, select "OK" on the firmware update popup using your Snow2 remote to initiate the firmware
update.
Your HUD will then reboot automatically and will go through the software update process. Once the software update is
complete, you will be prompted to press any button on your remote to reconnect it with your Snow2.
Operational notes:
Features and functionality of Recon Engage are supported by internet connection.
IMPORTANT: Make sure Snow2 is fully charged before performing a firmware update. If your battery is not sufficiently
charged and Snow2 loses power during the upgrade, your device can be permanently damaged. Recon recommends
that you plug your device into the AC wall charger while doing the firmware update.
To verify that your device has been successfully updated, navigate to Software Version under About in the Settings menu
of your Snow2.
21 | P a g e
SUPPORT
For additional service, support, tutorials, and FAQs, please visit:
http://reconinstruments.desk.com
Or email [email protected].
Warranty
http://reconinstruments.desk.com/customer/portal/articles/520749-warranty
Battery Disposal Information
http://reconinstruments.desk.com/customer/portal/articles/843025
Technical Specifications
Processor Subsystem
Processing
On-board Memory
1 GHz Dual-core ARM Cortex-A9 with PowerVR SGX540
1GB DDR2 SDRAM | 2GB Flash
Mechanical Specifications
Weight - ~65Grams (~2.3oz)
Storage Temperature Range - -20°C to 60°C (-4°F to 140°F)
Operating Temperature Range - -20°C to 30°C (-4°F to 86°F)
Vibration Resistance - 4.4g rms 5 Hz to 2000 Hz
Shock / Drop Resistance - 40 g, 15-23 ms, ½ Sine (1m Vertical Drop)
Enclosure - Water Resistant Enclosure, IP65
Sensor Technology
9-Axis Sensors - 3D Accelerometer | 3D Gyroscope | 3D Magnetometer
Pressure Sensor - Altimeter & Barometer Application
Display & Virtual Image
Display Resolution - Widescreen 16:9 WQVGA Ultra-compact Display 428x240
Display Type - LCD Micro Display
Virtual Image Size - 14” from 5 ft
Color Depth - High Color 16-bit (5:6:5)
22 | P a g e
Brightness & Contrast Control - High Contrast & Brightness for Readability in High Ambient Light – Adjustable
Power-saving Sleep Mode
Networking Subsystem
Bluetooth 4.0 (Bluetooth Smart)
Apple MFi Bluetooth Support
Wi-Fi (IEEE802.11a/b/g/n)
GPS - INS Kalman Filtering Fusion Algorithm
USB/Micro-USB 2.0 (5-pin) - Device Charging/Power & Data Transfer
Power requirements
Primary Supply Voltage - 3.7 Lithium Polymer Rechargeable Battery
Charge Time - 3hrs = 100% – Device Fully Charged
Battery Size & Life - 1200 mAh = 6 Hours+ Per Charge
Remote Control
Wireless BLE 6-Button Remote- Allows for UI Control
Waterproof - Suitable for use in All Weather Conditions. Designed for use while Wearing Winter Gloves
System Requirements
Windows PC - Intel Pentium 4 or Higher, Windows 7 or Higher
Mac - Intel Core Duo or Higher, Mac OS X v10.6.8 or Later
Environmental Considerations
RoHS Compliant
Brominated Flame-retardant-free
Mercury-free
23 | P a g e
Compliance Information
FCC Compliance Class B Digital Device
This equipment has been tested and found to
comply with the limits for a Class B digital device, pursuant
to part 15 of the FCC Rules. These limits are designed to
provide reasonable protection against harmful interference
in a residential installation. This equipment generates uses
and can radiate radio frequency energy and, if not installed
and used in accordance with the instructions, may cause
harmful interference to radio communications. However,
there is no guarantee that interference will not occur in a
particular installation. If this equipment does cause harmful
interference to radio or television reception, which can be
determined by turning the equipment off and on, the user
is encouraged to try to correct the interference by one or
more of the following measures:
Industry Canada Compliance
Snow2 and Recon-Ready Remote were certified
with IC numbers 9717A-008 and 9717A-001, respectively.
These devices comply with Industry Canada license exempt
RSS standard(s). Operation is subject to the following two
conditions: (1) this device may not cause interference, and
(2) this device must accept any interference, including
interference that may cause undesired operation of the
device.
Cet appareil est conforme avec les normes de l’Industrie
Canada-sans les standards RSS (s). L’utilisation est soumise
aux deux conditionssuivantes: (1) cet appareil ne peut pas
provoquer d’interférences et (2) cet appareil doit accepter
toute interférence, y compris les interférences qui peuvent
causer un mauvais fonctionnement de l’appareil.
• Reorient or relocate the receiving antenna.
• Increase the separation between the equipment and
receiver.
• Connect the equipment into an outlet on a circuit
different from that to which the receiver is connected.
• Consult the dealer or an experienced radio/TV technician
for help.
Changes or modifications not expressly approved by the
party responsible for compliance could void the user’s
authority to operate the equipment.
FCC Declaration of Conformity
Snow2 (FCC ID: ZW5008) and Recon-Ready Remote (ZW5001)
comply with FCC standard CRF 47 Part 15 subpart B and
subpart C – section 15.249. Operation is subject to the
following two conditions:
• This device may not cause harmful interference, and
• This device must accept any interference received,
including interference that may cause undesired operation.
24 | P a g e
Japanese Radio Law and Japanese
Business Law Compliance
Snow2 (R: 202-SMB048, T: D 13-0023
202) is granted pursuant to the Japanese Radio Law
(ordinance of MPT No. 37,1981) and the Japanese Business
Law (Article 56, Paragraph 1).