1
CellaVision® DM1200
CellaVision ® Peripheral Blood Application
USER´S MANUAL 3.0
CellaVision® DM1200
User´s Manual
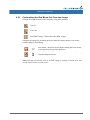
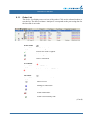
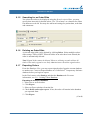
Optional Software & Applications
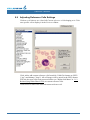
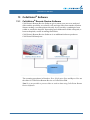
CellaVision® Remote Review Software
CellaVision Remote Review Software gives remote users access
to analyzed slides and the possibility to reclassify cells and sign
slides from another location. Smears needing a second opinion
can easily be reviewed by a pathologist from within or outside the
hospital.
CellaVision® Competency Software
CellaVision Competency Software is a program for education and
competency testing of manual blood cell differentials in
laboratories. The product allows labs to ensure that staffs are
trained to report results consistent with lab policies.
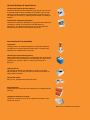
Accessories & Consumables
Light tower
The light tower is an additional product to CellaVision DM1200.
The light tower visually indicates system status. The light tower
also allows an audible alarm to be used.
HemaPrep®, blood smearing device
With HemaPrep® the laboratory can standardize the smear quality
irrespective of the staff experience. By adjusting the speed of the
spreader, the operator is able to control smear length and
thickness.
Label printer kit
Label printer kit enables the laboratory to print it´s own slide
barcode labels. The kit also consists of a hand-held scanner for
easy handling of labels.
QC barcode labels
Easy to use, preprinted slide barcode labels.
Slide magazines
Replacement pack with new slide magazines for peripheral blood
(orange).
CellaVision Immersion oil pack
CellaVision Immersion oil pack are supplied in packages of two
immersion oil pack.
May not be available on all markets.
CellaVision™ DM1200
1 INTRODUCTION
7
1.1 About this User's Manual. . . . . . . . . . . . . . . . . . . . . . . . . . . . . . . . . . . . . . . . . . . . . . . . .7
1.1.1 Warnings and Precautions . . . . . . . . . . . . . . . . . . . . . . . . . . . . . . . . . . . . . . . . . . .7
1.2 Intended Use of CellaVision DM1200 . . . . . . . . . . . . . . . . . . . . . . . . . . . . . . . . . . . . . . .9
1.2.1 Peripheral Blood Application . . . . . . . . . . . . . . . . . . . . . . . . . . . . . . . . . . . . . . . . . .9
1.3 General Description of CellaVision DM1200 . . . . . . . . . . . . . . . . . . . . . . . . . . . . . . . . .10
1.3.1 Peripheral Blood Application . . . . . . . . . . . . . . . . . . . . . . . . . . . . . . . . . . . . . . . . .10
1.4 Components and Mechanical Operation . . . . . . . . . . . . . . . . . . . . . . . . . . . . . . . . . . . .12
1.4.1 Major Parts of the System . . . . . . . . . . . . . . . . . . . . . . . . . . . . . . . . . . . . . . . . . . .12
1.4.2 Control Unit Wiring . . . . . . . . . . . . . . . . . . . . . . . . . . . . . . . . . . . . . . . . . . . . . . . .15
2 OPERATING PROCEDURES
17
2.1 Starting the System . . . . . . . . . . . . . . . . . . . . . . . . . . . . . . . . . . . . . . . . . . . . . . . . . . . .17
2.2 System Control View . . . . . . . . . . . . . . . . . . . . . . . . . . . . . . . . . . . . . . . . . . . . . . . . . . .18
2.3 Slides and Magazines . . . . . . . . . . . . . . . . . . . . . . . . . . . . . . . . . . . . . . . . . . . . . . . . . .19
2.3.1 Barcodes . . . . . . . . . . . . . . . . . . . . . . . . . . . . . . . . . . . . . . . . . . . . . . . . . . . . . . . .19
2.4 Loading Slides into a Magazine. . . . . . . . . . . . . . . . . . . . . . . . . . . . . . . . . . . . . . . . . . .20
2.5 Processing Slides . . . . . . . . . . . . . . . . . . . . . . . . . . . . . . . . . . . . . . . . . . . . . . . . . . . . .21
2.5.1 Adding Magazine . . . . . . . . . . . . . . . . . . . . . . . . . . . . . . . . . . . . . . . . . . . . . . . . .21
2.5.2 Starting the Slide Processing . . . . . . . . . . . . . . . . . . . . . . . . . . . . . . . . . . . . . . . .21
2.5.3
Magazine Status. . . . . . . . . . . . . . . . . . . . . . . . . . . . . . . . . . . . . . . . . . . . . . . . . .22
2.5.4 Slide Status . . . . . . . . . . . . . . . . . . . . . . . . . . . . . . . . . . . . . . . . . . . . . . . . . . . . . .23
2.6 Ejecting Magazine . . . . . . . . . . . . . . . . . . . . . . . . . . . . . . . . . . . . . . . . . . . . . . . . . . . . .24
2.7 Shutting Down the System . . . . . . . . . . . . . . . . . . . . . . . . . . . . . . . . . . . . . . . . . . . . . .24
3 QUALITY CONTROL
25
3.1 Cell Location Performance . . . . . . . . . . . . . . . . . . . . . . . . . . . . . . . . . . . . . . . . . . . . . .25
3.1.1 Cell Location for Peripheral Blood. . . . . . . . . . . . . . . . . . . . . . . . . . . . . . . . . . . . .25
3.2 Self Tests . . . . . . . . . . . . . . . . . . . . . . . . . . . . . . . . . . . . . . . . . . . . . . . . . . . . . . . . . . . .29
4 VERIFYING PROCESSED SLIDES, PERIPHERAL BLOOD
31
4.1 White Blood Cell Classification . . . . . . . . . . . . . . . . . . . . . . . . . . . . . . . . . . . . . . . . . . .31
4.1.1 Customizing Views . . . . . . . . . . . . . . . . . . . . . . . . . . . . . . . . . . . . . . . . . . . . . . . .34
4.1.2 Reclassifying White Blood Cells . . . . . . . . . . . . . . . . . . . . . . . . . . . . . . . . . . . . . .36
4.1.3 E-mail . . . . . . . . . . . . . . . . . . . . . . . . . . . . . . . . . . . . . . . . . . . . . . . . . . . . . . . . . .38
4.1.4 Copying Images to Disk . . . . . . . . . . . . . . . . . . . . . . . . . . . . . . . . . . . . . . . . . . . .39
4.2 Red Blood Cell Characterization . . . . . . . . . . . . . . . . . . . . . . . . . . . . . . . . . . . . . . . . . .39
4.2.1 Customizing the Red Blood Cell Overview Image . . . . . . . . . . . . . . . . . . . . . . . .41
4.2.2 Characterizing Red Blood Cell Morphology . . . . . . . . . . . . . . . . . . . . . . . . . . . . .42
User’s Manual
User’s
Manual
1
CellaVision™ DM1200
4.2.3 Excluding the Red Blood Cell Analysis. . . . . . . . . . . . . . . . . . . . . . . . . . . . . . . . . 42
4.3 Estimating Platelets. . . . . . . . . . . . . . . . . . . . . . . . . . . . . . . . . . . . . . . . . . . . . . . . . . . . 43
4.3.1 Counting Platelets in the Overview Image . . . . . . . . . . . . . . . . . . . . . . . . . . . . . . 44
4.3.2 Estimating the Platelet Concentration Level . . . . . . . . . . . . . . . . . . . . . . . . . . . . . 46
4.3.3 Excluding the Platelet Analysis. . . . . . . . . . . . . . . . . . . . . . . . . . . . . . . . . . . . . . . 46
4.4 Comments. . . . . . . . . . . . . . . . . . . . . . . . . . . . . . . . . . . . . . . . . . . . . . . . . . . . . . . . . . . 46
4.4.1 Adding Comments . . . . . . . . . . . . . . . . . . . . . . . . . . . . . . . . . . . . . . . . . . . . . . . . 47
4.5 Order Data . . . . . . . . . . . . . . . . . . . . . . . . . . . . . . . . . . . . . . . . . . . . . . . . . . . . . . . . . . 48
4.6 Signing a Slide . . . . . . . . . . . . . . . . . . . . . . . . . . . . . . . . . . . . . . . . . . . . . . . . . . . . . . . 49
4.6.1 White Blood Cells, Red Blood Cells and Platelets . . . . . . . . . . . . . . . . . . . . . . . . 50
5 REPORTING RESULTS
51
5.1 Merging Slides . . . . . . . . . . . . . . . . . . . . . . . . . . . . . . . . . . . . . . . . . . . . . . . . . . . . . . . 52
5.2 Report Preview . . . . . . . . . . . . . . . . . . . . . . . . . . . . . . . . . . . . . . . . . . . . . . . . . . . . . . . 55
5.3 Signing an Order (result). . . . . . . . . . . . . . . . . . . . . . . . . . . . . . . . . . . . . . . . . . . . . . . . 55
5.4 Sending an Order to the LIS . . . . . . . . . . . . . . . . . . . . . . . . . . . . . . . . . . . . . . . . . . . . . 55
5.5 Canceling an Order . . . . . . . . . . . . . . . . . . . . . . . . . . . . . . . . . . . . . . . . . . . . . . . . . . . . 56
6 DATABASE AND ARCHIVING DATA
57
6.1 Database: Processed Orders . . . . . . . . . . . . . . . . . . . . . . . . . . . . . . . . . . . . . . . . . . . . 57
6.1.1 Order List . . . . . . . . . . . . . . . . . . . . . . . . . . . . . . . . . . . . . . . . . . . . . . . . . . . . . . . 59
6.1.2 Slide List . . . . . . . . . . . . . . . . . . . . . . . . . . . . . . . . . . . . . . . . . . . . . . . . . . . . . . . . 61
6.1.3 Opening an Order/Slide . . . . . . . . . . . . . . . . . . . . . . . . . . . . . . . . . . . . . . . . . . . . 62
6.1.4 Protecting an Order . . . . . . . . . . . . . . . . . . . . . . . . . . . . . . . . . . . . . . . . . . . . . . . 62
6.1.5 Searching for an Order/Slide . . . . . . . . . . . . . . . . . . . . . . . . . . . . . . . . . . . . . . . . 63
6.1.6 Deleting an Order/Slide . . . . . . . . . . . . . . . . . . . . . . . . . . . . . . . . . . . . . . . . . . . . 63
6.1.7 Exporting Orders. . . . . . . . . . . . . . . . . . . . . . . . . . . . . . . . . . . . . . . . . . . . . . . . . . 63
6.1.8 Copying Images to Disk . . . . . . . . . . . . . . . . . . . . . . . . . . . . . . . . . . . . . . . . . . . . 64
6.1.9 Printing Orders . . . . . . . . . . . . . . . . . . . . . . . . . . . . . . . . . . . . . . . . . . . . . . . . . . . 65
6.1.10 The Worklist . . . . . . . . . . . . . . . . . . . . . . . . . . . . . . . . . . . . . . . . . . . . . . . . . . . . . 65
6.2 Database: Pending Orders . . . . . . . . . . . . . . . . . . . . . . . . . . . . . . . . . . . . . . . . . . . . . . 66
6.2.1 Peripheral Blood: Pending Orders Dialog. . . . . . . . . . . . . . . . . . . . . . . . . . . . . . . 67
6.3 Archiving Data. . . . . . . . . . . . . . . . . . . . . . . . . . . . . . . . . . . . . . . . . . . . . . . . . . . . . . . . 67
6.4 Usage Log. . . . . . . . . . . . . . . . . . . . . . . . . . . . . . . . . . . . . . . . . . . . . . . . . . . . . . . . . . . 68
6.4.1 Statistics . . . . . . . . . . . . . . . . . . . . . . . . . . . . . . . . . . . . . . . . . . . . . . . . . . . . . . . . 68
6.4.2 Specification . . . . . . . . . . . . . . . . . . . . . . . . . . . . . . . . . . . . . . . . . . . . . . . . . . . . . 68
6.5 Export Log Files . . . . . . . . . . . . . . . . . . . . . . . . . . . . . . . . . . . . . . . . . . . . . . . . . . . . . . 69
6.6 Backup and Recovery of the Database. . . . . . . . . . . . . . . . . . . . . . . . . . . . . . . . . . . . . 69
2
User’s Manual
CellaVision™ DM1200
7 DIGITAL SLIDES
71
7.1 Scanning a Slide . . . . . . . . . . . . . . . . . . . . . . . . . . . . . . . . . . . . . . . . . . . . . . . . . . . . . .71
7.1.1 Slide and Magazine Requirements . . . . . . . . . . . . . . . . . . . . . . . . . . . . . . . . . . . .71
7.2 Scan Overview Image . . . . . . . . . . . . . . . . . . . . . . . . . . . . . . . . . . . . . . . . . . . . . . . . . .72
7.2.1 Overview . . . . . . . . . . . . . . . . . . . . . . . . . . . . . . . . . . . . . . . . . . . . . . . . . . . . . . . .72
7.2.2 Navigating . . . . . . . . . . . . . . . . . . . . . . . . . . . . . . . . . . . . . . . . . . . . . . . . . . . . . . .73
7.2.3 Tagging Regions of Interest . . . . . . . . . . . . . . . . . . . . . . . . . . . . . . . . . . . . . . . . .74
7.2.4 Copying Regions of Interest to Disk . . . . . . . . . . . . . . . . . . . . . . . . . . . . . . . . . . .75
7.2.5 Adding Comments. . . . . . . . . . . . . . . . . . . . . . . . . . . . . . . . . . . . . . . . . . . . . . . . .75
7.2.6 Order Data . . . . . . . . . . . . . . . . . . . . . . . . . . . . . . . . . . . . . . . . . . . . . . . . . . . . . .75
7.3 Database View. . . . . . . . . . . . . . . . . . . . . . . . . . . . . . . . . . . . . . . . . . . . . . . . . . . . . . . .76
7.3.1 Processed Orders . . . . . . . . . . . . . . . . . . . . . . . . . . . . . . . . . . . . . . . . . . . . . . . . .76
7.3.2 Pending Orders . . . . . . . . . . . . . . . . . . . . . . . . . . . . . . . . . . . . . . . . . . . . . . . . . . .76
7.4 Customizing the System . . . . . . . . . . . . . . . . . . . . . . . . . . . . . . . . . . . . . . . . . . . . . . . .78
7.4.1 Adjusting Database, Users and Language . . . . . . . . . . . . . . . . . . . . . . . . . . . . . .78
7.4.2 Adjusting Default Scan Area . . . . . . . . . . . . . . . . . . . . . . . . . . . . . . . . . . . . . . . . .78
7.4.3 Adjusting Analysis . . . . . . . . . . . . . . . . . . . . . . . . . . . . . . . . . . . . . . . . . . . . . . . . .79
7.4.4 Adjusting Autodelete . . . . . . . . . . . . . . . . . . . . . . . . . . . . . . . . . . . . . . . . . . . . . . .80
8 SYSTEM INFORMATION
81
9 CUSTOMIZING THE SYSTEM
83
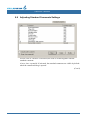
9.1 Adjusting Database Settings . . . . . . . . . . . . . . . . . . . . . . . . . . . . . . . . . . . . . . . . . . . . .84
9.1.1 Creating a New Database . . . . . . . . . . . . . . . . . . . . . . . . . . . . . . . . . . . . . . . . . . .85
9.1.2 Deleting a Database . . . . . . . . . . . . . . . . . . . . . . . . . . . . . . . . . . . . . . . . . . . . . . .86
9.1.3 Creating a New Database Connection . . . . . . . . . . . . . . . . . . . . . . . . . . . . . . . . .86
9.1.4 Deleting a Database Connection. . . . . . . . . . . . . . . . . . . . . . . . . . . . . . . . . . . . . .86
9.1.5 Compressing a Database . . . . . . . . . . . . . . . . . . . . . . . . . . . . . . . . . . . . . . . . . . .86
9.1.6 Setting User Restrictions. . . . . . . . . . . . . . . . . . . . . . . . . . . . . . . . . . . . . . . . . . . .87
9.2 Adjusting Users Settings . . . . . . . . . . . . . . . . . . . . . . . . . . . . . . . . . . . . . . . . . . . . . . . .87
9.3 Adjusting Analysis Settings . . . . . . . . . . . . . . . . . . . . . . . . . . . . . . . . . . . . . . . . . . . . . .89
9.4 Adjusting Reclassification Settings . . . . . . . . . . . . . . . . . . . . . . . . . . . . . . . . . . . . . . . .90
9.5 Adjusting RBC Precharacterization Settings . . . . . . . . . . . . . . . . . . . . . . . . . . . . . . . . .91
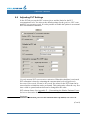
9.6 Adjusting PLT Settings . . . . . . . . . . . . . . . . . . . . . . . . . . . . . . . . . . . . . . . . . . . . . . . . .92
9.7 Adjusting Report/Sign Settings . . . . . . . . . . . . . . . . . . . . . . . . . . . . . . . . . . . . . . . . . . .93
9.8 Adjusting Standard Comments Settings . . . . . . . . . . . . . . . . . . . . . . . . . . . . . . . . . . . .94
9.9 Adjusting Reference Cells Settings . . . . . . . . . . . . . . . . . . . . . . . . . . . . . . . . . . . . . . . .96
9.10
Adjusting E-mail Settings . . . . . . . . . . . . . . . . . . . . . . . . . . . . . . . . . . . . . . . . . . . . . . .97
User’s Manual
User’s
Manual
3
CellaVision™ DM1200
9.11 Adjusting Archiving Settings . . . . . . . . . . . . . . . . . . . . . . . . . . . . . . . . . . . . . . . . . . . . . 97
9.12 Adjusting Language Settings . . . . . . . . . . . . . . . . . . . . . . . . . . . . . . . . . . . . . . . . . . . 102
10 MAINTENANCE
103
10.1 Weekly Maintenance. . . . . . . . . . . . . . . . . . . . . . . . . . . . . . . . . . . . . . . . . . . . . . . . . . 103
10.1.1 Cleaning of Objectives and LED table . . . . . . . . . . . . . . . . . . . . . . . . . . . . . . . . 103
10.1.2 Delete Unsigned Orders . . . . . . . . . . . . . . . . . . . . . . . . . . . . . . . . . . . . . . . . . . . 103
10.1.3 Clean Bottom Plate. . . . . . . . . . . . . . . . . . . . . . . . . . . . . . . . . . . . . . . . . . . . . . . 104
10.2 Preventive Maintenance . . . . . . . . . . . . . . . . . . . . . . . . . . . . . . . . . . . . . . . . . . . . . . . 105
10.3 Remedial Maintenance . . . . . . . . . . . . . . . . . . . . . . . . . . . . . . . . . . . . . . . . . . . . . . . . 105
10.3.1 Change Immersion Oil Pack . . . . . . . . . . . . . . . . . . . . . . . . . . . . . . . . . . . . . . . . 105
10.4 Database Performance . . . . . . . . . . . . . . . . . . . . . . . . . . . . . . . . . . . . . . . . . . . . . . . . 107
10.4.1 Controlling the Database Size . . . . . . . . . . . . . . . . . . . . . . . . . . . . . . . . . . . . . . 107
12 TROUBLESHOOTING
109
12.1 Troubleshooting Steps. . . . . . . . . . . . . . . . . . . . . . . . . . . . . . . . . . . . . . . . . . . . . . . . . 109
12.2 Troubleshooting Chart. . . . . . . . . . . . . . . . . . . . . . . . . . . . . . . . . . . . . . . . . . . . . . . . . 109
12.2.1 General Startup Problems . . . . . . . . . . . . . . . . . . . . . . . . . . . . . . . . . . . . . . . . . 109
12.2.2 Error Message List . . . . . . . . . . . . . . . . . . . . . . . . . . . . . . . . . . . . . . . . . . . . . . . 110
12.2.3 General Processing Problems . . . . . . . . . . . . . . . . . . . . . . . . . . . . . . . . . . . . . . 113
12.2.4 LIS Errors . . . . . . . . . . . . . . . . . . . . . . . . . . . . . . . . . . . . . . . . . . . . . . . . . . . . . . 115
12.2.5 Cell Location Problems. . . . . . . . . . . . . . . . . . . . . . . . . . . . . . . . . . . . . . . . . . . . 116
12.2.6 Barcode Problems . . . . . . . . . . . . . . . . . . . . . . . . . . . . . . . . . . . . . . . . . . . . . . . 118
12.2.7 Staining Problems. . . . . . . . . . . . . . . . . . . . . . . . . . . . . . . . . . . . . . . . . . . . . . . . 119
12.2.8 Gripper Service. . . . . . . . . . . . . . . . . . . . . . . . . . . . . . . . . . . . . . . . . . . . . . . . . . 120
13 CELLAVISION® SOFTWARE
121
13.1 CellaVision® Remote Review Software . . . . . . . . . . . . . . . . . . . . . . . . . . . . . . . . . . . 121
13.1.1 Working with Orders/Slides . . . . . . . . . . . . . . . . . . . . . . . . . . . . . . . . . . . . . . . . 122
13.2 CellaVision® Competency Software . . . . . . . . . . . . . . . . . . . . . . . . . . . . . . . . . . . . . . 122
APPENDIX A — SYSTEM SPECIFICATION
123
APPENDIX B — STORAGE AND HANDLING
131
APPENDIX C — BUTTONS AND INDICATORS
133
APPENDIX D — RECOMMENDED WORKFLOW
135
Workflow Single Slides / Confirm Cell Counter Results . . . . . . . . . . . . . . . . . . . 136
Workflow Duplicate Slides . . . . . . . . . . . . . . . . . . . . . . . . . . . . . . . . . . . . . . . . . 137
4
APPENDIX E — USER AUTHORIZATION LEVELS
139
APPENDIX F — DETERMINING THE PLATELET ESTIMATE FACTOR
141
User’s Manual
CellaVision™ DM1200
APPENDIX G — SLIDE PREPARATION GUIDELINES
143
Slide Preparation for Peripheral Blood . . . . . . . . . . . . . . . . . . . . . . . . . . . . . . . . . . . .143
Example Smears . . . . . . . . . . . . . . . . . . . . . . . . . . . . . . . . . . . . . . . . . . . . . . . . . . . . .145
APPENDIX H— GLOSSARY
User’s Manual
User’s
Manual
151
5
CellaVision™ DM1200
Preface
CellaVision® is a trademark of CellaVision AB.
All other trademarks used in this document are property of their respective owners.
No part of this document or the products it describes may be reproduced or
transmitted by any means or in any form without prior consent in writing from
CellaVision AB.
U.S. patents no. 7450762, 6341180, 6268611 and 7034883. Swedish patent no.
9902863. German patents no. 602004008471. French patents no. 1646964. U.K.
patents no. 1646964.
Caution
US federal law restricts this device to sale by or on the order of a physician (or
properly licensed medical practitioner).
Article No. PM-10364
Revision 2009-06-17
Copyright © 2009 CellaVision AB. All rights reserved.
Headquarters
CellaVision AB
Ideon Science Park
SE-223 70 Lund
Sweden
Phone +46 (0) 46 286 44 00
Fax +46 (0) 46 286 44 70
6
User’s Manual
CellaVision™ DM1200
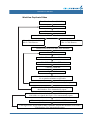
1 Introduction
1.1
About this User's Manual
This User's manual will guide you step-by-step through the activity sequence of
normal use of CellaVision DM1200 (also referred to as the system), aiming for an
efficient way to give you good understanding and knowledge of the system and its
features. References are made to appendices providing additional information.
Some self-explaining dialogs have been left out in the text.
Typographical conventions:
• Names of keys and on-screen objects with which you interact are presented in
italics: e.g. click PRINT.
1.1.1
Warnings and Precautions
Study the meaning of symbols and safety alerts carefully and always use the
system in the safest possible manner. Read all instructions carefully before starting
to use the system. Using it without being suitably qualified, or in a manner not
specified in this User's manual, may damage or deteriorate the system, cause
misleading results or even lead to injury.
Warning alerts appear in this manual as follows:
Alert
Explanation
WARNING
May cause injury.
Caution
May cause damage to the system.
Important
May cause misleading results.
(Cont'd)
User’s
User’s Manual
Manual
7
CellaVision™ DM1200
(Cont'd)
Place the system on a steady table. Do not place it where it is exposed to bumps or
vibrations, excessive temperature variations or direct sunlight. The system must be
connected to grounded electrical sockets only. Authorized personnel should do the
initial installation and reinstallation after moving the system. Do not install or run
any software not supplied with the system. To maintain electromagnetic
compatibility, use only original components. Spillage of fluid on the surfaces of the
system may cause malfunctions or deterioration. Wipe off spilled fluids
immediately with a soft tissue.
WARNING
The system should be serviced by authorized personnel only.
WARNING
If the equipment is used in a manner not specified by the
manufacturer, the protection provided by the equipment may be
impaired.
The following symbols are found on the system:
Symbol
Explanation
Documentation needs to be consulted.
In vitro diagnostic medical device
40°C
10°C
Temperature limitation
This symbol is only valid in the European Community and
indicates separate disposal of waste of electrical and
electronic equipment
Standby (Supply).
8
User’s Manual
CellaVision™ DM1200
1.2
Intended Use of CellaVision DM1200
CellaVision DM1200 is an automated system intended for in-vitro diagnostic use.
CellaVision DM1200:
• Scans a user-defined part of a microscope slide;
• Automatically locates and presents images of cells on smears from various
specimens;
• Is intended to be used by skilled operators.
1.2.1
Peripheral Blood Application
The peripheral blood application (PB) is intended for differential count of white
blood cells, characterization of red blood cell morphology and platelet estimation.
The system automatically locates and presents images of blood cells on peripheral
blood smears. The operator identifies and verifies the suggested classification of
each cell according to type.
User’s
User’s Manual
Manual
9
CellaVision™ DM1200
1.3
General Description of CellaVision DM1200
CellaVision DM1200 consists of an optic unit consisting of a microscope and
camera (referred to as a slide scanning unit) and a computer system containing the
acquisition and classification software CellaVision DM software. It is important
that slide preparation is performed according to standardized methods (see
Appendix G — Slide Preparation Guidelines).
General Functionality of the System:
•
•
•
•
1.3.1
Receives order information from and sends results to the LIS;
Locates and presents images of every located cell or object found on the smear;
Stores images and results in a database;
Presents an overview image of a user-defined area on a slide.
Peripheral Blood Application
General Functionality
• Presents an image on a screen of every located cell or object;
• Organizes and suggests cell classification (preclassification) for white blood
cells;
• Makes it possible to identify, confirm or modify (reclassification) the suggested
classification of white blood cells;
• Presents and suggests morphological characteristics (precharacterization) in an
overview image of red blood cells;
• Makes it possible to confirm or modify the precharacterization of red blood cell
morphology;
• Presents an overview image and facilitates platelet estimation.
WBC Preclassification
The system preclassifies the following WBC classes: Band neutrophils, Segmented
neutrophils, Eosinophils, Basophils, Lymphocytes, Monocytes, Promyelocytes,
Myelocytes, Metamyelocytes, Blast cells, Lymphocytes variant forms and Plasma
cells.
The system preclassifies the following non-WBCs: Erythroblasts (NRBC), Giant
thrombocytes, Thrombocyte aggregations, Smudge cells and Artefacts. Non-WBCs
are reported as number of cells or objects /100 WBCs.
Unidentified is a class for cells and objects which the system has preclassified with
a low confidence level.
(Cont'd)
10
User’s Manual
CellaVision™ DM1200
(Cont'd)
WBC Reclassification for Peripheral Blood
Besides the cell classes mentioned above, the operator can reclassify cells into the
following classes: Immature eosinophils, Immature basophils, Promonocytes,
Prolymphocytes, Large granular lymphocytes, Hairy cells, Sézary cells, Other,
Megakaryocytes, Not classed and 15 user defined cell classes.
Other should be used for cells which the operator identifies as a WBC, but of a
type other than those listed. WBCs put here will be included in the differential
count.
Not classed should be used for cells and objects which the operator cannot identify
and wants to exclude from the differential count.
RBC Precharacterization
The system precharacterizes the following RBC morphology characteristics in an
overview image: Polychromasia, Hypochromasia, Anisocytosis, Microcytosis,
Macrocytosis and Poikilocytosis.
RBC characterization
The operator can characterize to Target cells, Schistocytosis, Helmet cells, Sickle
cells, Spherocytosis, Elliptocytosis, Ovalocytosis, Tear drop cells, Stomatocytosis,
Acanthocytosis, Echinocytosis, Howell-Jolly bodies, Pappenheimer bodies,
Basophilic stippling, Parasites and 10 user defined characteristics.
Platelet Estimation
The operator counts or estimates platelets in an overview image.
Sample Preparation
To perform a peripheral blood differential count a thin blood film is wedged on a
glass slide (a blood smear) from a peripheral blood sample and stained with
Romanowsky stain (see Appendix G — Slide Preparation Guidelines) for
recommended staining recipes).
User’s
User’s Manual
Manual
11
CellaVision™ DM1200
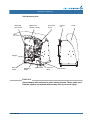
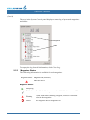
1.4
1.4.1
Components and Mechanical Operation
Major Parts of the System
The system comprises the following major units:
• Computer system
• Slide scanning unit (SSU)
– Motorized microscope
– Digital color camera
– Immersion oil unit
– Robot gripper unit
– Barcode reader
– Control unit
– Casing
Computer System
A PC system running Microsoft® Windows® XP and CellaVision® DM software.
12
User’s Manual
CellaVision™ DM1200
Slide Scanning Unit:
Motorized
microscope
Digital color
camera (inside)
Immersion
oil unit
Control
unit
Hood
Gripper
Barcode
reader
Magazine
holder
Status lamp
Power on
lamp
Main switch
WARNING
Never tamper with sensors or other safety devices. These make sure
that the system can operate without any risk of personal injury.
User’s
User’s Manual
Manual
13
CellaVision™ DM1200
Motorized Microscope
The motorized microscope is an upright light microscope with a LED illumination
system. It has one 10x objective and one 100x objective and intermediate optics
switching between 1.0x and 0.5x magnification which combined yields images
with 5x, 10x, 50x, or 100x magnification.
Digital Color Camera
The camera is a high-quality progressive-scan CCD color camera, for maximum
image quality and high speed image acquisition.
Immersion Oil Unit
The unit automatically applies drops of immersion oil to a slide. An optical drop
counter controls the procedure. The oil pack contains 150 ml.
Robot Gripper Unit
The robot gripper unit enables fully automated focusing and XY-positioning of the
slide during process. It transports a slide from a magazine and back again after the
slide has been processed.
Barcode Reader
The barcode reader scans the barcode of both the slide and the magazine. For
maximum safety, the barcode of the slide is scanned before processing. See
Appendix A — System Specification for more information about barcodes.
Magazine
The magazine can be loaded with up to 12 slides (clipped/round corner slides).
Control Unit
The control unit controls motors, sensors, oil applying and illumination. It
functions as a slave computer to the PC via an unshared 100 Mbit Ethernet
connection.
Casing
The casing comprises a metal cabinet and the main hood.
14
User’s Manual
CellaVision™ DM1200
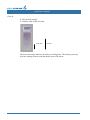
1.4.2
Control Unit Wiring
The image shows intenal cable connections to the CCU.
User’s
User’s Manual
Manual
15
CellaVision™ DM1200
16
User’s Manual
CellaVision™ DM1200
2 Operating Procedures
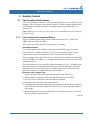
2.1
Starting the System
The CellaVision® DM system computer is configured with a Windows policy
restricting access to the operating system for the normal user. When starting the PC
the user will automatically be logged onto Windows and then the CellaVision DM
Software logon window will be displayed.
Start the system as follows:
1. Switch on the slide scanning unit.
2. Switch on the system computer.
Wait until the status lamp on the slide scanning unit is flashing or continuously
lit (see picture in 1.4.1 Major Parts of the System).
3. In the Log On dialog, type username, password and select the desired database.
The following icons indicate available database types:
Processing database
Export database
CellaVision Competency Software database
Scan database
4. Click OK.
User’s Manual
17
CellaVision™ DM1200
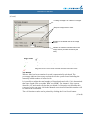
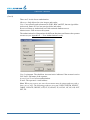
2.2
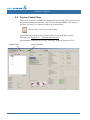
System Control View
The System Control View shows the ongoing slide processing, gives an overview of
the preclassification and presents a log of processed slide holders. The layout of
the System Control View depends on the type of application.
Click System Control View in the toolbar.
Information in Toolbar
System indicators show oil level, hood position. For a description of these
indicators, see Appendix C — Buttons and Indicators.
System status is shown as a text: Idle, Analyzing, Stopped, Paused or Error.
System status
18
System indicators
User’s Manual
CellaVision™ DM1200
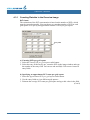
2.3
2.3.1
Slides and Magazines
Barcodes
Important
Only slides labeled with barcodes can be processed. Use only barcode formats
appropriate for the system (see Appendix A — System Specification).
Magazine ID
The barcode on the magazine is the magazine ID. When the system has no LIS
connection, the magazine ID determines the analysis type.
• Orange magazines with barcodes consisting of prefix ‘PB’ followed by digits a peripheral blood analysis will be performed. The barcode needs to consist of
at least 3 digits.
Note! LIS order will override the magazine barcode in determining analysis type.
(Cont'd)
User’s Manual
19
CellaVision™ DM1200
(Cont'd)
Slide ID
The Slide ID is the barcode printed on the slide's label.
Note! The slide ID may not begin with ‘PB’.
When processing a slide the system searches for order data in the following order:
1.
2.
3.
4.
2.4
In the database, unsigned orders with the same Order ID.
In the database, pending orders.
From the LIS.
Default values defined in the Analysis tab in Settings.
Loading Slides into a Magazine
Load the slide into the magazine with the barcode upwards and towards the open
end. 12 slides can be loaded into a magazine. The slide positions in the magazine
are numbered 1-12 from the bottom up. Make sure that slides are fully inserted in
the magazine before using the magazine.
Caution
Use only clipped/round/beveled corner slides. Failing to do so may cause jams and
excessive wear on magazines and the system.
Note! The same magazine can be used up to 100 times. When this limit is reached
a warning is shown.
Caution
If you want to process an already processed slide, carefully wipe the oil off and
make sure the barcode is clean and undamaged.
20
User’s Manual
CellaVision™ DM1200
2.5
Processing Slides
View the processing in the animated tutorial.
Open the animated tutorial, goto Help&Tutorial.
Click Analyze.
2.5.1
Adding Magazine
Slide the magazine into the magazine holder. The magazine must have the barcode
turned upwards and the open end of the magazine inwards.
When all slides in a magazine have been processed, the magazine is automatically
ejected.
2.5.2
Starting the Slide Processing
The processing starts automatically when a magazine is inserted into the system.
You have to manually start the processing if the system has been stopped, restarted
or if an error has occurred.
Start button
Autostart - Replaces the Start button.
Stop button
(Cont'd)
User’s Manual
21
CellaVision™ DM1200
(Cont'd)
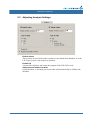
The tree in the System Control panel displays a status log of processed magazines
and slides.
Magazine
Slide
To empty the log from all information, click Clear Log.
2.5.3
Magazine Status
The following information is available for each magazine:
Magazine status Magazine ID (barcode).
PB2345678912
Magazine Status:
Analyzing
22
Finished
The slide holder is processed and all slides have status OK.
Warning
A slide with status Warning, Stopped, Failed or Cancelled
exists in the magazine.
Failed
The magazine has no magazine ID.
User’s Manual
CellaVision™ DM1200
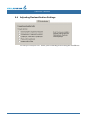
2.5.4
Slide Status
The following information is available for each slide:
Slide status
Slide position
Order/Slide ID
(barcode)
Error/warning
text
7
PB2345678912
Default values
Slide Status:
Processing
OK
Slide processed with no warning or error.
Warning
Stopped
Error
Cancelled
Empty
Empty
Slide processed with a warning, see
warning texts below. Results exist.
Slide processing stopped by user. No
results exist.
All ordered analyses failed, see error texts
below. No results exist.
The slide was cancelled in the LIS. Slide
not processed.
Empty slide position in the magazine.
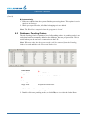
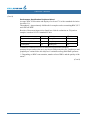
Warning Texts:
Default values
The order was not found in the LIS.
The required number of WBCs were not found or one
Incomplete analysis
of the ordered analyses failed.
Error Texts:
Invalid slide PID
Analysis failure
Critical failure
Invalid batch PID
Invalid barcode on the slide.
Slide processing failed.
A critical error occurred.
Invalid barcode on the magazine.
Slide Information Dialog
Double-click on a slide to open the Slide Information dialog. Additional
information on the processed slide, e.g. the cause of an error, is displayed here.
User’s Manual
23
CellaVision™ DM1200
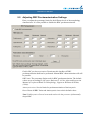
2.6
Ejecting Magazine
The magazine currently being processed can be ejected.
1. Click Stop.
Note! Always stop processing before ejecting the magazine.
2. Select Eject in Tools menu.
2.7
Shutting Down the System
Shut down the system as follows:
1.
2.
3.
4.
24
Eject and remove the magazine from the system.
Select Exit in the File menu.
Switch off the system computer.
Switch off the slide scanning unit.
User’s Manual
CellaVision™ DM1200
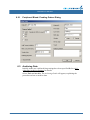
3 Quality Control
3.1
Cell Location Performance
The Cell location test is used to verify the slide preparation process and the system
hardware. The cell location performance shall be verified at regular intervals and
after changes in staining procedure or staining solutions by running the Cell
location test.
Note! Running the test once or twice a day is a recommended interval at the highload laboratory.
3.1.1
Cell Location for Peripheral Blood
The test establishes how many percent of the nucleated cells (i.e., WBC and
NRBC) that are found on a slide.
The Cell Location tool may be accessed in the Tools menu.
Slide Requirements
Use a blood sample with a WBC count in the normal WBC range. To reduce
processing time, a WBC count above 7x10⁹/l is recommended. If the system
cannot locate at least 100 nucleated cells, the result will be discarded.
The percentage of non-nucleated cells (i.e., all other objects that are not identified
as being a WBC or an NRBC, e.g. smudge cells) must not exceed 30% of the total
number of objects.
The slides must have a barcode label, starting with the text "QC". All slides with
this kind of label are automatically treated as cell location test slides. When the
slide has been processed it will only be available in the Cell Location tool. Preprinted QC labels are available from your local dealer.
Running a Cell Location Test
1.
2.
3.
4.
5.
Select a slide that meets the requirements and put a QC label on it.
Put the slide in a magazine, place it in the DM and process the slide.
Go to the Cell Location tool when the slide has finished.
Select the new slide at the top of the slide list.
Go through all the images belonging to the slide and examine them for missed
nucleated cells. Enter the number of missed cells, if any, in the input field for
each image.
6. When all images have been examined the result will appear at the end. Check
that it is within acceptable limits.
(Cont'd)
User’s Manual
25
CellaVision™ DM1200
(Cont'd)
Examining a Cell Location Slide
Select the slide in question from the list of cell location slides.
Slide status
Empty
Slide has no result (not all images have been examined).
Slide has a result and no missed nucleated cells (all images
have been examined).
Slide has a result but contains missed nucleated cells (all
images have been examined).
Slide error, probably due to a failure in slide processing (e.g.,
not enough nucleated cells were found).
Go through each image in the list of overview images and check if they contain
any missed nucleated cells. Green boxes mark the nucleated cells and blue boxes
mark other found objects that are not nucleated cells (e.g. artefacts). Missed
nucleated cells are those cells not marked with a box in the image. Double-click in
the overview image to magnify the area of interest.
Black boxes mark the number of cells that were located but not needed for the test,
indicating that the system has located enough cells for the test and is coming to an
end.
Note! On screen, cell images are not always presented in the same order as the
system is working. Cells marked with black boxes may occur in the middle of the
test, not only towards the end.
(Cont'd)
26
User’s Manual
CellaVision™ DM1200
(Cont'd)
Looking at image X of a total of Y images.
Step one image back or forth.
Number of nucleated cells in the image
shown.
Number of missed nucleated cells in the
image shown (number entered by the
user).
Image status
Empty
Image has not been viewed.
Image has been viewed and has no missed nucleated cells.
Image has been viewed but contains missed nucleated cells.
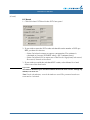
The Result
When a slide has been examined a result is automatically calculated. The
percentage indicates how many nucleated cells the system found including the
manually added number of missed cells.
It is possible to adjust the total number of found nucleated cells, if it is determined
that some found cells are neither WBC nor NRBC. For instance, if the system
identifies 187 nucleated cells but the user thinks 3 of them do not fall under this
category, he/she can enter 184 in the Manual correction field and this number will
be used in the calculation.
The cell location results can be printed by clicking the Print Result button.
(Cont'd)
User’s Manual
27
CellaVision™ DM1200
(Cont'd)
Total number of nucleated cells and nonnucleated cells found in all the images.
Manual correction of nucleated cells found.
Total number of nucleated cells missed in all the
images.
Percentage of how many nucleated cells were
found compared to the actual number of
nucleated cells on the images.
Messages about faulty slide analysis etc
The result should be compared to the laboratory's own established limits.
Performance characteristics when using standardized staining and smear
preparation procedures are presented in Appendix A — System Specification.
If any of the requirements regarding the number of nucleated cells or nonnucleated cells are not fulfilled, an error message will be shown in the Total result
panel.
The cell location results can be printed by clicking the Print Result button.
Deletion of Cell Location Slides
Slides older than five days are automatically deleted at program startup/logon.
28
User’s Manual
CellaVision™ DM1200
3.2
Self Tests
The system performs self-tests during startup of the software, and at certain points
during the operation of the system. When the software starts, the system is checked
before the operator can start analyses. During this phase, both the hardware and the
software components are tested for anomalies, as well as various requirements for
the operation of the system. If the LIS communication is enabled, the program will
also check the connection to the LIS.
After each slide the system has processed, it checks the positioning of the motors.
While the program is running, the database size is compared intermittently to the
rules set for archiving or automatic deletion of old entries, thus ensuring that the
database is kept at a reasonable and maintainable size.
The communication with, and response of the hardware, is tested continuously
during the operation of the system, and a message will inform the operator if an
error occurs during slide processing or other operations on the system.
User’s Manual
29
CellaVision™ DM1200
30
User’s Manual
CellaVision™ DM1200
4 Verifying Processed Slides, Peripheral Blood
Opening an unsigned slide leads directly to the Verification View, where various
tabs can be selected in order to review WBC, RBC and PLT and to Sign the Slide.
To open a slide, see 6.1.3 Opening an Order/Slide.
Click Verification View in the toolbar.
Note! With DMConfiguration tool it is possible to add user defined WBC cell
classes and RBC characteristics. To do this, contact your service personnel.
4.1
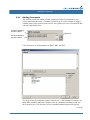
White Blood Cell Classification
You can view all WBCs identified by the system. You may also reclassify WBCs
and add comments.
WBC panel
Worklist
Opened
order/slide
Main
gallery
Non-WBCs panel
Add cell
class
comment
Add WBC
comment
Shortcuts to
reference
cells
2nd gallery
3rd gallery
(Cont'd)
User’s Manual
31
CellaVision™ DM1200
(Cont'd)
All cell classes handled by the system are displayed in the figure on the following
page. WBCs and non-WBCs automatically preclassified by the system are marked
with a small dot or an arrow. In settings (see 9.4 Adjusting Reclassification
Settings), you may choose to auto-forward preclassified WBCs to another cell
class as follows:
Band neutrophil to Segmented neutrophil
Metamyelocyte to Segmented neutrophil
Lymphocyte, variant form to Lymphocyte
Plasma cell to Lymphocyte
Blast cell, Metamyelocyte, Myelocyte and Promyelocyte to Other.
32
User’s Manual
CellaVision™ DM1200
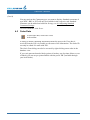
An arrow indicates that pre-classified WBCs are auto-forwarded to another cell
class, for settings see 9.4 Adjusting Reclassification Settings. Place the cursor over
the arrow to see the destination cell class.
Arrow indicating an
auto-forwarded cell
class
Destination cell class
Preclassified by the
system
Pen icon - Indicates
Cell class comments.
Tick mark - All images
have been viewed
Blue - Contains at
least one reclassified
cell or object.
WBC panel
Non-WBC panel
User’s Manual
Green - Contains no
reclassified cells or
objects.
33
CellaVision™ DM1200
4.1.1
Customizing Views
Galleries
WBCs are presented, by class, in galleries. The main gallery is always shown
together with up to two additional galleries. Click WBC Galleries to change the
number of galleries.
WBC Galleries
Left- and right-clicking in the WBC and Non-WBCs panels also changes cell class
in the main and the 2nd gallery, respectively. You can also select cell class in the
drop-down list.
The system keeps track of all WBCs viewed by the operator. A tick mark appears
when all WBCs of a cell class have been displayed. It is not possible to sign the
slide unless all cell classes have been viewed.
Reference Cells
A library of reference cells for different cell classes is provided with the system.
These cells are marked with a CellaVision logo. The main gallery always displays
WBCs from the slide, while the other show reference cells when checkbox
Reference cells is activated. The main gallery has shortcuts to display reference
cells in the other galleries. Click Ref.cells in Gallery 2 and the 2nd gallery will
display reference cells of the cell class selected in the main gallery.
Indicates reference cell provided with the system
You may expand this library by saving WBCs from processed slides as custom
reference cells.
1. Right-click on the WBC.
2. Select Save as custom ref. cell in the menu.
3. Restart the program.
The WBC will be displayed at the top of the 2nd or 3rd galleries, followed by the
reference cells provided with the system. If you want to organize your custom
reference cells, see 9.9 Adjusting Reference Cells Settings.
(Cont'd)
34
User’s Manual
CellaVision™ DM1200
(Cont'd)
Cell Class Comments
Click Comment in the galleries to add a cell class comment. A pen icon will appear
to the right in the WBC and Non-WBCs panels. Click this icon to view, edit or add
more comments (see 4.4 Comments).
WBC Full Screen View
Click WBC Full Screen View to display all WBCs sorted by class.
WBC Full Screen View
Note! Cell classes that have been fully displayed in WBC Full Screen View will
also be tick marked.
Adjusting Image Color and Brightness
Click Color/Brightness to display the Image adjustment dialog.
Color/Brightness
Color sliders
Brightness
Color sliders: Changes the color composition of the image.
Brightness: Adjusts the brightness of the image.
Reset: Restores original settings.
Save: Stores individual settings.
Load: Gets individual settings.
(Cont'd)
User’s Manual
35
CellaVision™ DM1200
(Cont'd)
Individual settings can also be switched using Toggle Color/Brightness.
Toggle Color/Brightness
Adjusting Magnification
Click Zoom In or Zoom Out to change the magnification in all galleries and in the
WBC Full Screen View.
Zoom In
Zoom Out
Note! You may also double-click on a WBC to enlarge it, and use the wheel button
to zoom in/out.
4.1.2
Reclassifying White Blood Cells
Reclassify WBCs by dragging and dropping them from one gallery to another:
1. Place cursor over the cell image.
2. Click and hold down left mouse button.
3. Move cursor to the destination gallery then release button.
You may also drag and drop cells to the WBC and Non-WBCs panels. Press Ctrl or
Shift to select multiple cells.
Reclassified cells always appear at the top of the gallery.
A cell class containing at least one reclassified cell is marked blue in the WBC and
Non-WBCs panels. If a cell is reclassified to its own cell class, it is considered
reclassified and moved to the top of the gallery.
Note! You can never reclassify WBCs on a signed slide.
(Cont'd)
36
User’s Manual
CellaVision™ DM1200
(Cont'd)
Splitting Cells
If more than one cell is displayed in an image it can be difficult to determine which
cell the system has actually identified. Click Cell Marker and a green square
appears, marking the cell.
Cell Marker
Sometimes the system fails to separate WBCs and the green square will cover
more than one cell. It is now possible to split cells using the right-click menu and
select Split cell. A dialog appears explaining the procedure. The green square is
never changed for split cells. Instead, if you click on Cell Marker, a red cross
marks the cell.
Note! Cells created by splitting can always be removed, using the right-click menu.
WBC Attributes
Each cell is associated with attributes.
Indicates the order
in the class
Cell has been
forwarded from
another cell class
Reclassified cell
Cell comments exist
Cell is selected for
e-mail.
WBC attributes are shown by default. Click WBC Attributes to show/hide them.
WBC Attributes
(Cont'd)
User’s Manual
37
CellaVision™ DM1200
(Cont'd)
Right-click Menu
Right-click on a cell to set/view attributes. A menu appears, allowing the following
options:
1.
2.
3.
4.
5.
6.
7.
4.1.3
View DM's 1st, 2nd and 3rd suggestions of classification.
Reclassify cell.
Add/view cell comments (see 4.4 Comments).
Split cell or remove split cell.
Select cell for e-mail.
Save cell as custom reference cell.
Save images to disk.
E-mail
You may send cell images by e-mail.
1. Select select for e-mail, using the right-click menu.
2. Select Tools/Send E-mail and the New E-mail dialog appears.
For default values, see E-mail tab in Settings.
3. If desired, change receiver address.
4. If desired, add Subject and Message.
5. Click Send.
Note! You may only send cells from one slide in each e-mail.
Note! No patient data is sent in the e-mail.
38
User’s Manual
CellaVision™ DM1200
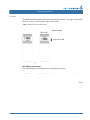
4.1.4
Copying Images to Disk
You may copy selected images to disk.
1. Select cells for copying.
2. In the right-click menu select Copy images to disk… and the Copy images to
disk dialog appears.
3. Specify the destination path where you want the images to be saved.
4. Click OK.
Note! The directory you specify in the destination path must exist.
4.2
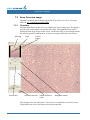
Red Blood Cell Characterization
The RBC overview image corresponds to the area of 8 microscopic high power
fields (HPF) (100x objective and a 22mm ocular). See 9.5 Adjusting RBC
Precharacterization Settings.
The RBC panel is used for characterization of the RBC morphology. All
morphologies handled by the system are listed. Morphologies pre-characterized by
the system are marked with a small dot.
(Cont'd)
User’s Manual
39
CellaVision™ DM1200
(Cont'd)
The columns labeled 0 to 3 grade the morphology characteristics.
Normal
Slight
Moderate
Marked
Green dot in column 0 indicates a normal level.
Red dot in column 1 indicates that the morphology is present at a
low level.
Red dots in column 1-2 indicate that the morphology is present at a
moderate level.
Red dots in column 1-3 indicate that the morphology is present at a
high level.
The rightmost column shows the percentage of RBCs in the overview image with
the characteristic in question. If the precharacterization is overridden by manual
characterization, the percentage is shown dimmed.
In the bottom right-hand corner of the RBC image there is a cross-shaped ruler that
represents 14 µm across. As the image magnification is increased, numbers will
appear at the ends of the ruler to indicate the scale in micrometers. The ruler can be
moved around the RBC image by moving the mouse pointer (in either zoom mode
or scroll mode) over the ruler, depressing the left mouse button and then by
dragging it to its desired placement.
The ruler will be placed back in the bottom right corner whenever the view is
changed.
The ruler shape can be toggled between the default cross shape and a line shape by
double-clicking on it. The shape will not change back to the cross when shifting
views.
A thin window frame appears around the ruler when the mouse pointer is moved
over it to indicate that the ruler can be moved or have its shape changed.
40
User’s Manual
CellaVision™ DM1200
4.2.1
Customizing the Red Blood Cell Overview Image
Change the magnification of the image by using these buttons:
Zoom In
Zoom Out
Entire RBC Image - Shows the entire RBC image.
Navigate the image by switching between different control modes. The mouse
pointer changes accordingly.
Zoom Mode - Hold left mouse button down and zoom in/out
by moving the mouse pointer up/down.
Scroll Mode - Hold left mouse button down and scroll in any
direction using the mouse.
Note! You may also double-click in the RBC image to enlarge a limited area, and
use the wheel button to zoom in/out.
User’s Manual
41
CellaVision™ DM1200
4.2.2
Characterizing Red Blood Cell Morphology
There are two ways to report the RBC result:
a) Report all as normal
1. Select radio button Report all as 0 - Normal.
b) Use characterization
1. Select radio button Use characterization.
2. If you disagree with a pre-characterization, click the dot that corresponds to
your opinion.
Click Reset to Pre-haracterization to restore the pre-characterization result done
by the system. All manual characterization will be lost.
Note! If you want to remove a specific type of morphology from the report, deselect
the dot by clicking on it.
4.2.3
Excluding the Red Blood Cell Analysis
Click Exclude RBC Analysis to exclude the RBC analysis results from the slide.
42
User’s Manual
CellaVision™ DM1200
4.3
Estimating Platelets
The complete PLT overview image (same image as for RBC) corresponds to the
area of 8 microscopic high power fields (HPF) (100x objective and a 22mm
ocular). The overview image is divided into 4, 9 or 16 sub-images (grid squares) as
defined by the grid size. The grid size options are 2x2, 3x3 and 4x4. The 4x4 grid
size gives the largest magnification of the image. There are as many entry fields as
there are grid squares.
By clicking Help Lines in the toolbar, a grid of lines is drawn over the
image to facilitate the counting of PLTs.
There are two ways, or modes to perform the PLT estimation. This is determined in
PLT settings (see 9.6 Adjusting PLT Settings).
1. Counting PLTs in the overview image
2. Estimating the PLT concentration level
Note! When a slide is opened for the first time, the slide gets mode according to the
settings and the mode can then not be changed for that order. The system ensures
that all slides in a multi-slide order have the same mode.
User’s Manual
43
CellaVision™ DM1200
4.3.1
Counting Platelets in the Overview Image
PLT Count
The estimation of the PLT concentration is based on the number of PLTs, which
must be counted manually. You can choose to count the number of PLTs in each
grid square or to specify an approximate number of PLTs per grid square.
Entry field
a) Counting PLTs per grid square
1. Select the Count PLTs per grid square radio button.
2. Select the entry fields one by one, count the PLTs in the image window and type
the number in the entry field. You can use tab and Shift+Tab to move between
entry fields.
b) Specifying an approximate PLT count per grid square
1. Select the Approximate PLTs per grid square radio button.
2. Use the entry fields to view different grid squares.
3. Estimate the average PLT count per grid square and type this value in the field.
(Cont'd)
44
User’s Manual
CellaVision™ DM1200
(Cont'd)
PLT Result
1. Click Calculate PLT Result in the PLT Count panel.
2. If you wish to report the PLT results calculated from the number of PLTs per
HPF, you have two choices:
– Select Calculated estimate to report a concentration. The estimate is
calculated as [Average PLTs/HPF value] x [PLT estimate factor].
– Select Calculated level to report one of four levels: Significantly decreased,
Decreased, Normal or Increased.
3. If you wish to override the calculated PLT results, select Manual level and
choose one of the four levels.
Important
You have to determine your own PLT estimate factor and enter it in PLT settings. By
default, it is set to "0".
Note! In the calculations, several decimals are used. The presented results are
truncated to 1 decimal.
User’s Manual
45
CellaVision™ DM1200
4.3.2
Estimating the Platelet Concentration Level
The PLT concentration level can be estimated by setting it to four levels:
Significantly decreased, Decreased, Normal or Increased directly from viewing the
image.
Entry field
1. Use the entry fields to view all parts of the overview image.
2. Select Concentration level.
4.3.3
Excluding the Platelet Analysis
Click Exclude PLT Analysis to exclude PLT analysis results from the slide.
4.4
Comments
For each slide, you can add comments to the WBC, RBC and PLT results. For
WBC analyses, you can also add comments to cell classes and individual cells.
WBC, RBC and PLT comments are added in Verification View in each tab
respectively. Cell class and cell comments are added in the WBC tab in Verification
View.
Note! All comments, except comments on individual cells, are printed in the report.
46
User’s Manual
CellaVision™ DM1200
4.4.1
Adding Comments
The system records the author of each comment, except for comments to cell
classes and individual cells. If another operator logs in, each comment is tagged
with the name of the operator who wrote it. An operator can view all comments but
can only edit his/her own.
Comment added by
operator "admin".
Comments
Comment added by
operator "author".
Click Comments to add comments to WBC, RBC and PLT.
You may write/edit comments in the Comment box. Click Standard Comments to
show/hide standard comments. Double-click on a standard comment to add it to
the Comment box. You may also select a standard comment and click Append.
(Cont'd)
User’s Manual
47
CellaVision™ DM1200
(Cont'd)
You may activate the Comment types you want to display. Standard comments of
type WBC, RBC or PLT will only be available in the respective tab. Standard
comments can be added and edited in Settings, see 9.8 Adjusting Standard
Comments Settings.
To clear comments, click Erase.
4.5
Order Data
To edit order data, click Order Data
in the toolbar.
A dialog is shown containing information about the open order. If no data is
received from the LIS it is possible to edit some of the information. The Order ID
can only be edited if it starts with 'ER'.
The Order Data dialog can also be accessed by right-clicking on an order in the
database view.
If you can't generate barcode labels (printer is broken, out of printer ribbon, or out
of labels) you can use pre-printed labels with the prefix 'ER' (available through
your local dealer).
48
User’s Manual
CellaVision™ DM1200
4.6
Signing a Slide
A summary of the WBC, RBC and PLT analyses is presented in the Sign Slide tab.
The signing procedure is as follows:
1. Click Sign. The Sign Slide dialog appears.
2. Enter User name and Password.
3. Activate/deactivate the automatic options Sign order when signing slide, Send
to LIS and Print order.
4. Click OK.
Note! If the slide is part of a multi-slide order, all slides in the order must be signed
before the operator is given the option to sign the order.
Note! Slide data cannot be changed after signing. Comments may still be added.
If all ordered analyses have been viewed when the Sign Slide tab is selected, the
Sign Slide dialog will automatically appear. Default values for the Sign Slide dialog
are set in Settings under Report/Sign. The option to send results to the LIS is
activated in Analysis in settings.
When the last slide is signed in a multi slide order, the operator has the option to
sign the order.
User’s Manual
49
CellaVision™ DM1200
4.6.1
White Blood Cells, Red Blood Cells and Platelets
Before signing a slide, all ordered analyses must have been viewed by the operator.
The following conditions must be fulfilled:
WBC
• All cell classes must have been viewed, i.e. there should be tick marks after
each cell class.
• No WBCs remain in Unidentified.
RBC
An RBC characterization must be reported or excluded from the analysis:
Report a characterization, by selecting one of
the following options:
OR:
• Click Exclude RBC Analysis.
PLT
A PLT concentration must be reported or excluded from the analysis:
• Report a PLT concentration as described in 4.3 Estimating Platelets.
OR:
• Click Exclude PLT Analysis.
50
User’s Manual
CellaVision™ DM1200
5 Reporting Results
For detailed information on settings, see 9.7 Adjusting Report/Sign Settings.
Click Report View in the toolbar.
Compare slide results and exclude slides from the reported result in the Report
View. You can also:
•
•
•
•
User’s Manual
Sign or cancel an order
Send order data to the LIS
Write a general comment on the order
Preview the report by clicking on the Report Preview tab.
51
CellaVision™ DM1200
5.1
Merging Slides
Compile analysis results for the whole order based on one or several slides in the
Slide Merge tab. You can also view all comments associated with an order.
Result Panel
Here you see the results of each slide in the order. In the Reported Result column
you see the summarized results. An unsigned slide has a Slide ID written together
with slide number in cerise color.
(Cont'd)
52
User’s Manual
CellaVision™ DM1200
(Cont'd)
Including and Excluding Slides in/from the Reported Result
Signed slides are automatically included in the reported result.To include or
exclude a slide, activate/deactivate the checkbox next to the Slide ID.
When excluding slides, a dialog is shown where you may write a comment
explaining the exclusion.
Note! You can only include signed slides.
Note! You should not merge slides if one or more slides have a "confirm cell
counter result" flag. If you do, the calculated result in the reported result column
will be displayed incorrectly.
Changing the Reported Result
It is possible to change the RBC results and the PLT concentration for the order, if
reported as a level. Changeable results are written in bold text.
1. Click on the result to change.
2. Change the value in the dialog.
3. Click OK.
Note! If you include or exclude a slide, all manually changed values will be
replaced by new, automatically calculated values.
(Cont'd)
User’s Manual
53
CellaVision™ DM1200
(Cont'd)
Comment Panel
View all comments associated with the order in the Comment panel. All comments
will be included in the report. Note that only the beginning of the comment is
shown. To view the whole comment, click on it.
It is not possible to edit comments in this panel.
54
User’s Manual
CellaVision™ DM1200
5.2
Report Preview
Click on the tab Report Preview to preview the report. The report’s format is
template based and can be selected in Settings. Refer to 9.7 Adjusting Report/Sign
Settings for more details.
5.3
Signing an Order (result)
1. Click Sign Order.
2. If not prefilled, type Username and Password
3. Select whether the order should be sent to the LIS and/or printed.
4. Click OK.
5.4
Sending an Order to the LIS
If the LIS is activated in the Analysis tab in Settings, it is possible to send signed
order results to the LIS.
1. Open a signed order.
2. Select the Slide Merge tab in the Report View.
3. Click Send to LIS.
User’s Manual
55
CellaVision™ DM1200
5.5
Canceling an Order
To cancel an order: sign the order with no included slides.
1.
2.
3.
4.
5.
Open the order in the Database View.
Select the Slide Merge tab in the Report View.
Make sure no slides are included.
Click Sign Order. (The Sign Order dialog appears).
Sign the order as described in 5.3 Signing an Order (result).
Note! When the order is sent to the LIS the order will be reported as cancelled.
56
User’s Manual
CellaVision™ DM1200
6 Database and Archiving Data
Click Database View in the toolbar.
Processed and pending orders are stored in the database. Switch between the two
using the tabs Processed Orders and Pending Orders.
6.1
Database: Processed Orders
You can search for and open processed orders and slides stored in the system.
Orders are displayed according to the Search Criteria. For more information on
Search Criteria, see 6.1.5 Searching for an Order/Slide.
(Cont'd)
User’s Manual
57
CellaVision™ DM1200
(Cont'd)
In the Processed Orders tab and Worklist the text colors indicate:
• Blue: opened order and slide.
• Red: order is locked by another user.
• Highlighted in blue or grey: selected order or slide.
Worklist
Opened order and slide
Orders locked by another
user
Slides in
selected order
Selected order
Data for selected order
Selected slide
Data for selected slide
An order/slide opened by another operator on a CellaVision Remote Review/
CellaVision DM is written in red text. In the Order data and Slide data panels,
Locked by indicates who has opened the order/slide (the person logged on to
Windows) and on which computer.
58
User’s Manual
CellaVision™ DM1200
6.1.1
Order List
The Order List displays an overview of the orders. Click on the column headers to
sort the list. The date in column “Analyzed” corresponds to the processing date for
the last slide in an order.
Order status
Empty field
No slide is signed.
At least one slide is signed.
Order is signed.
Order is cancelled.
STAT mark
Empty field
Not a STAT order.
Order is marked as a STAT order.
LIS status
Empty field
No data sent or received.
Data received.
Waiting to send result.
Result is sent.
Result send failure.
Result is successfully sent.
(Cont'd)
User’s Manual
59
CellaVision™ DM1200
(Cont'd)
Process status
Empty field
All slides in the order have process status OK.
Slide with process error in the order.
Stopped slide in the order.
Slide with process status in the order.
Archive status
Empty field
Order is unprotected.
Order is protected. Order and slides in this order cannot be
deleted or archived.
Order is archived.
Comments
Empty field
No comments.
Comments exist.
Order type
Empty field
60
Peripheral blood order.
User’s Manual
CellaVision™ DM1200
6.1.2
Slide List
Comments, slide- and processing status are indicated in the slide list.
Processing status
Comments
Slide status
Process status
Slide processing OK.
Slide processing stopped. No result exists.
The required numbers of WBCs were not found, one of the
ordered analyses failed, or the order was not found in the LIS,
slide processed with default values.
Processing error. No result exists.
Slide status
Empty field
Not signed.
Signed
Comments
Empty field
No comments.
Comments exist.
User’s Manual
61
CellaVision™ DM1200
6.1.3
Opening an Order/Slide
Opening an order automatically opens a slide belonging to it. In the same manner,
opening a slide automatically opens the order it belongs to. The currently opened
order and slide are always shown in the toolbar.
Order status
Slide status
Double-click on an order in the Order list, and the first slide of that order opens.
You can also click Open in the Order panel. In the Slide list you can open specific
slides in the same way.
You may close the order and slide using the Close Order/Slide button in the
toolbar:
Close Order and Slide
6.1.4
Protecting an Order
You may protect orders to prevent slides from being deleted or archived.
1. Select the order.
2. Click Protect/Unprotect.
You may select multiple orders using Ctrl or Shift.
62
User’s Manual
CellaVision™ DM1200
6.1.5
Searching for an Order/Slide
You select the orders to be displayed using the Search criteria. Here, you may
specify date intervals for desired orders. Use "View latest" as a shortcut for orders
less than one week old. You may also add search strings for patient data, order data
and comments.
6.1.6
Deleting an Order/Slide
A selected order/slide can be deleted by clicking Delete. Select multiple orders/
slides using CTRL or SHIFT. When all slides in an order have been deleted, the
order is automatically deleted.
Note! Signed slides cannot be deleted. However, deleting an order deletes all
slides in the order, signed or not. Only Administrators can delete signed orders.
6.1.7
Exporting Orders
From the Database View, you may export signed orders from the current database
to another one. Create an Export database or a CellaVision® Competency Software
database before you begin to export.
In the Tools menu, select Settings and then the Database tab. For more
information, see 9.1.1 Creating a New Database.
Exporting to an Export database
1.
2.
3.
4.
Select one or several orders.
Click Export.
Select an Export database from the list.
Check Delete orders after export. If not, the order will remain in the database
you exported from.
5. Click Export.
(Cont'd)
User’s Manual
63
CellaVision™ DM1200
(Cont'd)
Exporting to a CellaVision Competency Software database
1.
2.
3.
4.
Select one or several orders.
Click Export.
Select a CellaVision Competency Software database.
Click Export. (Note that patient data and orders are not copied or deleted.)
Restrictions
• Only signed orders can be exported.
• Orders imported to an Export database will always have a "protected" flag
preventing them from being autodeleted (if autodelete is enabled).
• Only peripheral blood orders can be exported to CellaVision Competency
Software databases.
• Orders residing in a Scan database cannot be exported.
6.1.8
Copying Images to Disk
You can copy all images from selected orders to disk.
1.
2.
3.
4.
Click on Database View
Select one or several orders.
Right-click and select Copy images to disk
In the Copy images to disk dialog, specify the destination path where you want
to save the images.
5. Per default, WBC images and Overview images are checked. Uncheck according
to preferences.
6. Click OK.
Note! The specified directory in the destination path must exist.
64
User’s Manual
CellaVision™ DM1200
6.1.9
Printing Orders
Print order data and data for all slides belonging to it by selecting the order or slide
of choice in the Database View and then Print in the File menu.
Note! Order results exist only if the order contains at least one signed slide.
6.1.10
The Worklist
The Worklist contains shortcuts to slides facilitating an automatic workflow (see
Appendix D — Recommended Workflow). The Worklist is active in the Database
View and the Verification View to simplify opening of new slides.
Open slides by double-clicking or click Open. Remove slides by clicking Remove.
Note that signed and closed slides are automatically removed.
Note! Show or hide the Worklist by pressing CTRL + W on the keyboard.
Adding Slides to the Worklist
Add slides manually or automatically.
A) Manually
1. Select one or more orders.
2. Click Add to worklist. All slides belonging to the order(s) are added.
(Cont'd)
User’s Manual
65
CellaVision™ DM1200
(Cont'd)
B) Automatically
1. Slides are added when the system finishes processing them. This option is set in
Analysis in Settings.
2. When you open an order, all slides belonging to it are added.
Note! The Worklist is emptied when the program is closed
6.2
Database: Pending Orders
The tab Pending Orders contains a list of all pending orders. A pending order is an
order that has been manually added to the database, but not yet processed. This is
useful when you do not have a connection to the LIS.
Note! When an order has been processed it will be removed from the Pending
Orders list and added to the Processed Orders list.
STAT mark
Empty field
Not a STAT order.
Order is marked as a STAT order.
Order type
Empty field
Peripheral blood order.
1. Click Add to add a new pending order.
2. Double-click on a pending order, or click Edit, to view/edit the Order Data.
66
User’s Manual
CellaVision™ DM1200
6.2.1
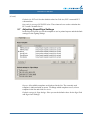
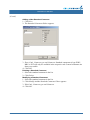
6.3
Peripheral Blood: Pending Orders Dialog
Archiving Data
Initially, make sure valid archiving settings have been specified.Refer to9.11
Adjusting Archiving Settings for details.
Select Tools and Archive. The Archiving Guide will appear, explaining the
procedure on how to archive data.
User’s Manual
67
CellaVision™ DM1200
6.4
Usage Log
The system continuously saves data of processed slides and stores it in a Usage
Log. To view the log select Tools and View Log. The log consists of two pages:
Statistics and Specification.
6.4.1
Statistics
The Statistics page contains dates and times of program installation and creation
and modification of the Usage log. It also displays the number of successfully
processed and failed slides, the number of signed analyses and the total processing
time. The information can be selected for a specific month by entering Year and
Month and clicking Update.
6.4.2
Specification
The Specification page is only accessible to Administrators. It contains a list of
dates and times for events that have occurred in the system, e.g. start and
completion of slide processing and hardware malfunctions. You may specify the
month the same way as described above.
68
User’s Manual
CellaVision™ DM1200
6.5
Export Log Files
It is possible to export all logging information from the system. If a system error
occurs, the information is needed for trouble shooting. Select Tools/ Export Log
Files. The log files can be burnt directly to a CD, or exported to the LAN (and
then, for instance, attached to an e-mail). The export log files dialog is only
accessible to Administrators.
Note! CellaVision® DM must be idle during export. Otherwise, the export will not
be complete.
6.6
Backup and Recovery of the Database
It is important to backup the database quite often. If a hard disk crash occurs, the
whole database will be lost. It will only be possible to recover the data up to the
time when the last backup was made. For more information, see CellaVision IT
Configuration Guidelines or contact your distributors.
User’s Manual
69
CellaVision™ DM1200
70
User’s Manual
CellaVision™ DM1200
7 Digital Slides
With CellaVision® DM1200 it is possible to create digital slides.
Important
The digitalized image generated provides a general overview of the prepared
sample within the intended use of the CellaVision DM1200 applications. All other
use is for research use only and not for use in diagnostic procedures.
7.1
Scanning a Slide
Make sure that a Scan Database is available on your CellaVision DM. To create a
Scan Database, see 9.1.1 Creating a New Database.
Log on to a Scan Database, see 2.1 Starting the System.
To customize your system, such as scan area and magnification, see 7.4
Customizing the System.
7.1.1
Slide and Magazine Requirements
Requirements for the slides used when scanning:
•
•
•
•
•
•
Glass
Size in mm: 75.0-76.0 x 25.0-26.0 x 0.9-1.2
Ground edges
Clipped or round corners
Barcode labeled
Frosted end
Note! Coverslipped slides are supported as long as the total thickness of the slide
is within the requirements.
Note! When using cover slips, make sure the scanning area is within the cover slip
area.
Note! Any type of CellaVision DM1200 magazines can be used for a scan analysis.
User’s Manual
71
CellaVision™ DM1200
7.2
Scan Overview Image
Opening a scanned slide leads directly to the Scan Verification View. To open a
slide, see 6.1.3 Opening an Order/Slide.
7.2.1
Overview
The Mini Map shown in the Overview displays the entire sample area. To enlarge a
specific area of the sample, click in the Mini Map. The magnified area will be
displayed in the large image on the screen. On the Mini Map, a red rectangle marks
the area requested for enlargement. A blue trace marks an already viewed area.
Mini Map
Zoom panel
Trace
Current
position
Add scan comment
Region of interest
panel
Navigation buttons
The enlarged area can either have a 10x zoom or a combined 10x and 50x zoom.
Using both zoom levels will increase the processing time.
72
User’s Manual
CellaVision™ DM1200
7.2.2
Navigating
Move efficiently in the Mini Map by using the keyboard arrows or the Navigation
Buttons.
The image shown in the right part of the screen is an enlargement of the area inside
the red rectangle shown in the Mini map. Click on the Mini map to enlarge another
part of the sample. A blue trace in the Mini map indicates which parts of the
overview image that have been viewed by the operator.
Hold left mouse button down and scroll in any direction using
the mouse.
Switch between 10x and 50x zoom levels by right-clicking in the enlarged image.
Adjust the zoom level by dragging the sliders in the Zoom panel.
User’s Manual
73
CellaVision™ DM1200
7.2.3
Tagging Regions of Interest
To save an enlarged area as a region of interest for later reference, click Tag region.
Identify your region of interest by adding a comment.
74
User’s Manual
CellaVision™ DM1200
7.2.4
Copying Regions of Interest to Disk
You can copy a region of interest to disk.
1.
2.
3.
4.
7.2.5
Select a tagged region of interest in the list.
Right-click and select Copy the image to disk….
Specify the destination path where you want the image to be saved.
Click OK.
Adding Comments
To add a comment to the Overview, click Scan comment.
Scan comment
7.2.6
Order Data
To view information about the order, e.g. scanned area and comments, click Order
Data in the toolbar. The Order Data dialog can also be accessed by right-clicking
on an order in the database view.
To edit order data, click Order Data
in the toolbar.
User’s Manual
75
CellaVision™ DM1200
7.3
Database View
To view processed and pending orders, click Database View.
Click Database View in the toolbar.
7.3.1
Processed Orders
Scanned slides are automatically signed. For more details about Processed orders,
see 6.1 Database: Processed Orders.
7.3.2
Pending Orders
A pending order has manually been added to the database and has not yet been
processed. Pending Orders are useful when defining scan area for individual slides.
To add an order, click Add.
To view or edit order data, double-click on an order or click Edit.
(Cont'd)
76
User’s Manual
CellaVision™ DM1200
(Cont'd)
To define scan area for the slide, click Area. Define the area that you want to scan
on this particular slide.
Note! If no scan area is defined, the default scan area setting will be used.
User’s Manual
77
CellaVision™ DM1200
7.4
Customizing the System
To customize the system, go to the Tools menu and select Settings.
7.4.1
Adjusting Database, Users and Language
To adjust the settings for database, users and language, see 9.1 Adjusting Database
Settings, 9.2 Adjusting Users Settings and 9.12 Adjusting Language Settings.
7.4.2
Adjusting Default Scan Area
To adjust the default scan area, go to Tools/Settings/Default Scan Area.
To adjust the scan area settings for individual slides, click Database View and
select Pending Orders. See 7.3.2 Pending Orders.
78
User’s Manual
CellaVision™ DM1200
7.4.3
Adjusting Analysis
To adjust the default analysis settings, 10x or 10x and 50x magnification, go to
Tools/Settings/Analysis.
To adjust the analysis settings for individual slides, click Database View and
choose Pending Orders. See 7.3.2 Pending Orders.
User’s Manual
79
CellaVision™ DM1200
7.4.4
Adjusting Autodelete
It is not possible to archive the orders. All orders will be autodeleted after a
specified number of days.
Autodelete Strategy
The autodelete strategy depends on your throughput and the need for saving
images for future use. The autodelete settings are database specific, enabling each
database to have its own autodelete strategy.
Delete all images:
All orders and images are permanently deleted when the time has expired.
Keep Region of interest images:
The orders are not deleted, but all images except the Region of interest and Mini
map images are deleted when the time has expired.
80
User’s Manual
CellaVision™ DM1200
8 System Information
In the toolbar, click Help and then System Information for information about your
system.
The information presented depends on your system and installed software. Some
of the following information is present in the System Information dialog:
•
•
•
•
•
•
•
•
•
User’s Manual
Serial number of your system.
The type of Artificial Neural Network (ANN) used
The computer name.
The computer's IP address.
Free disk space.
Free physical and virtual memory.
Total physical and virtual memory.
Licensed software.
License expiry date.
81
CellaVision™ DM1200
82
User’s Manual
CellaVision™ DM1200
9 Customizing the System
Settings are stored in either the system or the database.
A setting that is stored in the system applies to that system only. Other systems
connected to the same database as the system may have other values of the setting.
A setting that is stored in the database applies to all systems connected to the same
database. If you change the setting, it will be changed for all systems connected to
the database.
The following settings are stored in the database:
•
•
•
•
•
•
•
•
•
•
•
•
•
•
Restricted user search options
User settings
Analysis default values
Enable LIS
Add processed slide to worklist
WBC reclassification settings
RBC precharacterization settings
PLT settings
Active report template
Report template contents
Default settings for sign dialogs
Standard comments
Custom reference cells
Autodelete/Archiving settings
The following settings are stored in the system:
• Email settings
• Language
Select Tools, followed by Settings and the appropriate tab to customize the system.
Different users are allowed to edit different settings (see Appendix E — User
Authorization Levels).
User’s Manual
83
CellaVision™ DM1200
9.1
Adjusting Database Settings
Here you create new databases and new database connections. In the Log On
dialog you select which database to use. It is also possible to compress an existing
local database.
Local database
Remote database
84
User’s Manual
CellaVision™ DM1200
9.1.1
Creating a New Database
1. Click Create. A dialog appears, where you may enter Database name,
Description, Home directory and Database size.
2. Select one of the following types of database:
• Processing database, a database for processing slides.
• Export database, a database that is used when you want to export orders from
another database. This type cannot be used for processing slides.
• CellaVision Competency Software database, a database for use with
CellaVision Competency Software. A CellaVision Competency Software
database cannot be used for processing slides.
• Scan database, a database for scanned slides.
3. Click Create. A new folder with the chosen Database name will be created in
the specified Home directory.
Creating a database requires that there is sufficient free disk space. A processing
database requires 20 GB, a scan database requires 20 GB, an export database
requires 1 GB and a CellaVision Competency Software database requires 100 MB.
Note! Having many databases affects system performance negatively.
Note! A database can be created only on your local computer.
User’s Manual
85
CellaVision™ DM1200
9.1.2
Deleting a Database
1. Select the database in the list.
2. Click Delete.
9.1.3
Creating a New Database Connection
1. Click Connect. A dialog appears where you may enter Database name,
Description and Remote computer.
2. Click OK. A new connection will be shown in the list.
Note! On the remote computer, select Help/System Information to find out the
name of the computer.
9.1.4
Deleting a Database Connection
1. Select the connection in the list.
2. Click Disconnect.
9.1.5
Compressing a Database
1. Select the database in the list.
2. Click Compress. A dialog appears.
3. Click Compress database.
4. Click Close.
A compressed database will occupy less space on the hard disk. The performance
might also be improved.
Note! It can take a long time to compress a database. If the database is >10 GB in
size it can take some hours. The process requires free disk space twice the size of
the database to be compressed.
Note! During compression, no client may be connected to the database! This
means that you cannot compress the database you are currently logged on to.
86
User’s Manual
CellaVision™ DM1200
9.1.6
Setting User Restrictions
Here you set the available database search criteria for the Restricted user. Select
the desired Restricted user search options.
9.2
Adjusting Users Settings
Show inactive users: Activate this checkbox if inactive users shall be shown in the
list.
New: Add a new user (see dialog below).
Edit: Edit user information (see dialog below).
Delete: Delete selected users.
(Cont'd)
User’s Manual
87
CellaVision™ DM1200
(Cont'd)
There are 5 levels of user authorization:
Observer: Only allowed to view images and results.
User: Can reclassify and recharacterize WBC, RBC and PLT, but not sign slides.
Authorized: Same as User, but can sign slides and orders.
Restricted: Same as Authorized, but with restricted database access.
Administrator: Full access to the system.
The authorization level determines the different functions and features the operator
can access (see Appendix E — User Authorization Levels).
User: Login name. The checkbox Account Active indicates if the account is active.
Full Name: Full name of the operator.
Access Level: Level of user authorization.
E-mail: The operator's e-mail address.
Note! When you create a new user the username must be unique and start with a
letter (a-z or A-Z). The following words are reserved: USER, SYSTEM, SELECT,
TABLE, UPDATE, CREATE, GET, IF, IS, GRANT, IN, LOCAL, OF, ON, OR, OUT,
SET, TO.
88
User’s Manual
CellaVision™ DM1200
9.3
Adjusting Analysis Settings
Default values
These values are used if the order to analyze is not found in the database or in the
LIS. Type of order is the analysis to perform.
Enable LIS
Activate this checkbox and restart the program if the LIS will be used.
Add processed slide to worklist
If this checkbox is activated, processed slides will automatically be added to the
Worklist.
User’s Manual
89
CellaVision™ DM1200
9.4
Adjusting Reclassification Settings
Forward preclassified cells: Select your forwarding criteria using the checkboxes.
90
User’s Manual
CellaVision™ DM1200
9.5
Adjusting RBC Precharacterization Settings
Here you adjust the percentage limits for the different levels of the morphology
characteristics. It is also possible to disable the RBC precharacterization.
Enable RBC precharacterization: Deactivate this checkbox if RBC
precharacterization shall not be performed. Manual RBC characterization will still
be possible.
RBC limits: The percentage limits used for RBC precharacterization. The default
values are set according to (O'Connor, Barbara H, A Color Atlas and Instruction
Manual of Peripheral Blood Cell Morphology, Lippincott Williams & Wilkins,
(1984)).
Anisocytosis sizes: Set size limits for precharacterization of Anisocytosis.
Reset: Resets all RBC limits and Anisocytosis sizes to their default values.
Note! Poikilocytosis: General term used to describe the presence of abnormally
shaped RBC.
User’s Manual
91
CellaVision™ DM1200
9.6
Adjusting PLT Settings
In the PLT tab you set the PLT estimate factor and the limits for the PLT
concentration levels. You also set the default settings for the grid size, PLT count
and PLT concentration result. It is also possible to enable the option to use manual
PLT concentration estimation.
Use only manual PLT concentration estimation: When this checkbox is activated
PLT estimation is done by estimating the concentration level to Significantly
decreased, Decreased, Normal or Increased. No values for the PLT count can be
entered and no calculation can be performed. This setting takes effect the very first
time a slide is opened and can then not be changed for the order.
PLT estimate factor: See Appendix F — Determining the Platelet Estimate Factor
for how to determine the PLT estimate factor.
Important
You have to determine your own PLT estimate factor. By default, it is set to "0".
(Cont'd)
92
User’s Manual
CellaVision™ DM1200
(Cont'd)
Defaults for PLT tab: Sets the default values for Grid size, PLT count and PLT
concentration.
Intervals for average PLTs/HPF value: These intervals are used to calculate the
PLT result Calculated level.
9.7
Adjusting Report/Sign Settings
In the Report/Sign tab you set the template to use in printed reports and the default
settings for the signing dialogs.
Report: All available templates are displayed in the list. The currently used
template is indicated with an arrow. To change which template to use, select a
template in the list and click Set Active.
Default settings for Sign dialogs: Here you set the default values for the Sign Slide
and Sign Order dialogs.
User’s Manual
93
CellaVision™ DM1200
9.8
Adjusting Standard Comments Settings
Include code in comment: If activated, the code is written together with the
standard comment.
Always show expanded: If activated, the standard comments are visible by default
when the comment dialog is opened.
(Cont'd)
94
User’s Manual
CellaVision™ DM1200
(Cont'd)
Adding a New Standard Comment
1. Click New.
2. The Standard Comments Editor appears.
3. Enter Code, Comment type and Comment. Standard comments of type WBC,
RBC or PLT will only be available in the respective tab. General comments are
always accessible.
4. Click OK.
Deleting a Standard Comment
1. Select the standard comment in the list.
2. Click Delete.
Modifying a Standard Comment
1.
2.
3.
4.
User’s Manual
Select the standard comment in the list.
Click Modify and the Standard Comments Editor appears.
Edit Code, Comment type and Comment.
Click OK.
95
CellaVision™ DM1200
9.9
Adjusting Reference Cells Settings
Click on a cell class to see a list of all Custom reference cells belonging to it. Click
on a specific cell to display it in the Preview window.
Click Add to add custom reference cells from disk. Valid file formats are JPEG
(".jpg") and bitmap (".bmp"). All cell images will be stored in the JPEG format.
You can also store cells from processed slides (see "Right-click Menu" in 3.1.2
Reclassifying White Blood Cells) as custom reference cells.
Click Delete to remove the selected custom reference cell.
96
User’s Manual
CellaVision™ DM1200
9.10
Adjusting E-mail Settings
Enter Default recipient of e-mail, specify Mail server and E-mail from, i.e. sender
of e-mail.
9.11
Adjusting Archiving Settings
For storage safety reasons and limited hard disk capacity, it is recommended that
you regularly archive the cell images or delete the orders. When you archive, the
cell images and comments are transferred from the database to a CD or a hard disk.
However, if you delete an order with archived images, you will not be able to
access these images again.
(Cont'd)
User’s Manual
97
CellaVision™ DM1200
(Cont'd)
Note! Only images from signed slides can be archived.
Orders Archiving Strategy
The archiving strategy depends on your daily throughput and the need for saving
images for future use. The autodelete/archiving settings are database specific,
enabling each database to have its own archiving strategy.
(Cont'd)
98
User’s Manual
CellaVision™ DM1200
(Cont'd)
1. Autodelete (Autodelete instead of archive, activated)
All signed orders are permanently deleted when the time has expired. However,
autodelete will not begin until the specified number of candidates has been
reached.
Example: With the setting above, autodelete will not begin until there are 300
orders older than 30 days.
2. Archive images (Autodelete instead of archive, deactivated)
Keep locally at least: Specify the minimum number of days that images from
signed slides shall be stored.
Warn when candidates reach: Specify the minimum number of non-archived
signed orders at which the program shall prompt the user with a warning message
Archive Media
Select your archive media
• CD Archiving
• Network path or local drive
Archived Images
The images are divided into groups. Use the radio buttons to archive either a
certain number of images from each cell class in a group, or all available images,
or no images at all from a group.
(Cont'd)
User’s Manual
99
CellaVision™ DM1200
(Cont'd)
PB Cell images
Overview images: RBC and PLT
Normal cells:
Segmented neutrophils
Lymphocytes
Abnormal cells:
Band neutrophils
Promyelocytes
Myelocytes
Metamyelocytes
Blast cells
Monocytes
Eosinophils
Basophils
Lymphocytes variant forms
Plasma cells
Immature eosinophils
Immature basophils
Promonocytes
Non-WBCs:
Other
Giant thrombocyte
Not classed
Thrombocyte aggregation
Erythroblast (NRBC) Megakaryocyte
100
Prolymphocytes
Large granular lymphocytes
Hairy cells
Sézary cells
User defined WBCs
Smudge cell
Artefacts
User defined Non-WBCs
User’s Manual
CellaVision™ DM1200
Archiving Recommendations
It is recommended to keep the size of the database below 20 GB for optimal
database performance.
Always combine archiving with a backup of the database. The database contains
the path to the archived images. If a hard disk crash occurs, it will not be possible
to restore the archived images, unless a backup exists.
Note! Select Compress Database to view the database size (see 9.1.5 Compressing
a Database).
Hard Disk Space Requirements Peripheral Blood
A processed slide with 100 WBCs collected will require about 3 MB of hard disk
space. RBC and PLT use the same overview image and will require about 1 MB. A
processed slide with 100 WBCs and RBC and/or PLT ordered will require about
4 MB of hard disk space.
Note! Always delete unsigned or failed orders!
User’s Manual
101
CellaVision™ DM1200
9.12
Adjusting Language Settings
In the Language tab you set language for the user interface and manual.
102
User’s Manual
CellaVision™ DM1200
10 Maintenance
Caution
Be careful not to bend or put excessive force to any part of the system interior.
10.1
10.1.1
Weekly Maintenance
Cleaning of Objectives and LED table
Clean the objectives and the LED table folllowing the intructions in the animated
tutorial. Use lens paper to clean the objectives and the LED table.
Open the animatad tutorial, goto Help/Tutorial.
Click Clean.
Important
Make sure there is no oil on the low power (10x) dry objective.
Note! When needed use Isopropylalcohol to clean the objectives.
10.1.2
Delete Unsigned Orders
Delete unsigned and failed orders to minimize the size of the database.
User’s Manual
103
CellaVision™ DM1200
10.1.3
Clean Bottom Plate
Pull out the bottom plate and wipe clean any immersion oil.
104
User’s Manual
CellaVision™ DM1200
11.1.2
10.2
Preventive Maintenance
No preventive maintenance by the user is necessary. Preventive maintenance is to
be performed by CellaVision authorized personnel.
10.3
10.3.1
Remedial Maintenance
Change Immersion Oil Pack
Change the oil pack following the intructions in the animated tutorial.
Open the animatad tutorial, goto Help/Tutorial.
Click Change oil pack.
WARNING
The oil may cause sensitization by skin contact. We recommend
using gloves.
Caution
Use only immersion oil recommended by CellaVision AB (see Appendix A —
System Specification).
Change Oil Pack
a) Open the hood.
b) Place clip on hose.
c) Push down on the oil hose connection and pull out the hose.
(Cont'd)
User’s Manual
105
CellaVision™ DM1200
(Cont'd)
d)
e)
f)
g)
Change the oil pack and connect the hose.
Remove the clip from the hose.
Goto Maintenance/Oil.
Click Reset Oil Drop Counter.
Note! If the oil pack and all hoses are emtpy, Click Prime Oil before Reseting oil
drop counter.
106
User’s Manual
CellaVision™ DM1200
10.4
Database Performance
To maintain a high database performance, it is very important to control the size of
the database. It is also recommended to restart the system computer at least once a
week.
10.4.1
Controlling the Database Size
A large database will have lower performance (access time, database search time
etc.) compared to a smaller database. The size of the database can be controlled by
two methods:
1. Activate autodelete of orders.
2. Archive images onto CD-R/RW or LAN.
Recommendation:
Keep the maximum size of the database to approx 20 GB. See 9.11 Adjusting
Archiving Settings for more information.
Note! Select Compress Database to view the database size (see 9.1.5 Compressing
a Database).
Note! Delete all unsigned and failed orders.
User’s Manual
107
CellaVision™ DM1200
108
User’s Manual
CellaVision™ DM1200
12 Troubleshooting
12.1
Troubleshooting Steps
If a problem occurs, follow these steps:
1.
2.
3.
4.
12.2
12.2.1
User’s Manual
Observe any unusual circumstances surrounding the problem.
Note any error messages displayed.
See 12.2 Troubleshooting Chart to find possible remedies.
If the problem remains, contact your distributor for assistance.
Troubleshooting Chart
General Startup Problems
Problem
Cause
Action
Message box:
The program has already
been started and you
cannot start another until
the previous one is
closed.
Previous
program has
not closed.
Make sure the program is closed. Wait
10 seconds and try again.
Message box:
Could not log on to the
system. Make sure you
typed your username and
password correctly.
Wrong
username and/
or password.
Enter correct username and password.
Caps Lock is
activated.
Deactivate Caps Lock.
Message box:
Could not log on to the
system. Network
connection error!
The database
server could not
be reached.
If the database is stored on the system
computer, restart the computer and the
program. Otherwise, check the
network connection and that the
computer that stores the database is
turned on.
Message box:
Disk space exhausted.
The database is
located on the
C:\ drive.
Move the database to the E:\ drive.
Logging on to the system
takes time.
The database
server needs to
be restarted.
Restart the system computer, or the
computer on which the database
resides.
The database is
too large.
Keep the database size at the
recommended level (see 10.4
Database Performance).
The database
files are
fragmented.
Compress the database (see 9.1.5
Compressing a Database).
109
CellaVision™ DM1200
12.2.2
Error Message List
a
Error Message
Cause
Action
The system is not ready
Temporary
software error.
Restart the SSU and the system
computer.
The configuration of the
Control Unit is incorrect
The Control unit
has lost its
configuration.
Contact your local vendor’s technical
support.
Communication failure
No connection
between the
SSU and the
system
computer.
Check the connection between the
SSU and the system computer. Check
power connection to the SSU. Restart
the system and the program.
The hood was open
during startup
The hood was
open.
Close the hood. Restart the system
and the program.
Startup error messages
110
Jam error occurred during At least the
initialization
motor specified
in the message
box reported a
positioning
failure
Restart the SSU and the program. If
error persists, contact your local
vendor’s technical support.
Internal error
Temporary
software error.
Restart the SSU and the system
computer.
Temperature is too high
The air filter is
dirty.
Check that the air filter on the back of
the SSU is not dirty. Change if needed.
The fan in the
control unit
does not
function.
The fan has to be exchanged.
File system or registry
failure
The File system
or registry is
corrupt.
Reinstall the program.
A slide was detected in
the gripper during startup
A slide is in the
gripper
Move gripper to service position and
remove slide (see 12.2.8 Gripper
Service). Restart the SSU and the
program.
Barcode reader failure
The barcode
reader cable is
disconnected.
Make sure that the barcode reader
cable is connected to both the barcode
reader and the CCU. Restart the
program.
User’s Manual
CellaVision™ DM1200
a
Error Message
Cause
Action
Hardware errors during analysis/eject/maintenance
This operation can not be
performed at this time
Communication
error between
SSU and
system
computer.
Restart the SSU and the program.
Communication failure
No connection
between the
SSU and the
system
computer.
Check the connection between the
SSU and the system computer. Check
power connection to the SSU. Restart
the system and the program.
Temperature is too high
The air filter is
dirty.
Check that the air filter on the back of
the SSU is not dirty. Change if needed.
The fan in the
control unit
does not
function.
The fan has to be exchanged.
Oil dispensing failed
The oil bag is
empty
Change oil bag (see 10.3.1 Change
Immersion Oil Pack).
File system or registry
failure
The File system
or registry is
corrupt.
Reinstall the program.
Internal error
Temporary
software error.
Restart the SSU and the system
computer.
Magazine eject failure
The magazine
is stuck.
Remove the magazine manually.
Restart the SSU and the program.
Positioning failure
At least the
motor specified
in the message
box reported a
positioning
failure
Move gripper to service position and
remove slide (see 12.2.8 Gripper
Service). Restart the SSU and the
program. If error persists, contact your
local vendor’s technical support.
The slide is
Move gripper to service position and
stuck or broken. remove slide (see 12.2.8 Gripper
Service). Restart the SSU and the
program.
Verify that the hood is
closed
User’s Manual
Magazine is
broken, and
fragments are
blocking the
slide.
Remove any magazines and slides.
Load the slides to a new magazine.
Restart the SSU and the program. If
error persists, contact your local
vendor’s technical support.
The barcode
could not be
read after the
slide was
processed.
Wipe off oil from the barcode label.
The hood was
open.
Close the hood.
111
CellaVision™ DM1200
Error Message
Cause
Action
The slide gripper has
unexpectedly lost the
slide
Gipper has
dropped slide
Pull out bottom tray and remove slide.
Restart the SSU and the program.
The slide could not be
returned to the magazine
Magazine is
broken, and
fragments are
blocking the
slide.
Move gripper to service position and
remove slide (see 12.2.8 Gripper
Service). Restart the SSU and the
program.
Barcode reader failure
The barcode
reader cable is
disconnected.
Make sure that the barcode reader
cable is connected to both the barcode
reader and the system computer.
Restart the program.
A slide is not fully inserted
in the Magazine
Slides not fully
inserted.
Eject the magazine and insert the slide
fully. Restart the SSU and the
program.
Error Message
Cause
Action
No camera found
The camera
cable is
disconnected.
Make sure that the camera cable is
connected to both the camera and the
system computer. Restart the program.
Critical error. No
connection with the
database
Connection with Check network connection. Restart the
the database
system computer, or the computer on
has been lost.
which the database resides.
Critical internal error
during cell collection
Temporary
software error.
Restart the SSU and the system
computer.
Critical internal error
Temporary
software error.
Restart the SSU and the system
computer.
aa
Errors during analysis
Camera initialization error The camera
cable is
disconnected.
112
Make sure that the camera cable is
connected to both the camera and the
system computer. Restart the program.
User’s Manual
CellaVision™ DM1200
12.2.3
General Processing Problems
Problem
Cause
Action
WBC images are not
centered on the cell, but
the cell can still be
seen.
System needs
calibration or
alignment.
Contact your local vendor’s technical
support.
Slide status:
Too small monolayer Prepare the slides with longer blood
found.
films.
Incomplete
analysis
Less than the ordered
number of cells are
collected.
Slide status:
Artefacts (staining
precipitates) on the
slide.
Make sure that the solutions are
changed according to the
recommendations in Appendix G.
Dust on objectives.
Perform weekly maintenance on the
current objective (see 10.1.1 Cleaning
of Objectives and LED table)
Oil on the slide.
Clean the oil off the slide and process it
again.
No monolayer
found.
Make sure that the slides are prepared
according to the recommendations in
Appendix G.
Oil on the slide.
Clean the oil off the slide and process it
again.
Oil or dust on the
objective.
Perform weekly maintenance on
objectives (see 10.1.1 Cleaning of
Objectives and LED table)
Incomplete
analysis
Could not find RBC
monolayer
Slide status:
Analysis failure
View the Slide
Information dialog for
more details.
Images are not in focus. Dust on the
objective.
Seemingly normal
slides get slide status:
Empty or no slide PID.
User’s Manual
Perform weekly maintenance on
objectives (see 10.1.1 Cleaning of
Objectives and LED table
Incorrect objective
settings.
Contact your local vendor’s technical
support
The barcode reader
is not connected.
Check the cabling of the barcode
reader.
No barcode found.
Check positioning and size of the
barcode (see Appendix A — System
Specification).
The barcode could
not be read due to
bad print quality.
Clean the barcode printer head.
Replace the printer ribbon on the
barcode printer.
113
CellaVision™ DM1200
Database access is
slow.
Seemingly normal scan
slides get slide status:
Analysis failure, with the
additional information:
No image data in
scanned area
114
The database server
needs to be
restarted.
Restart the system computer, or the
computer on which the database is
stored.
The database is too
large.
Keep the database size at the
recommended level (see 10.4
Database Performance).
The database files
are fragmented.
Compress the database (see 9.1.5
Compressing a Database.
Too little specimen
on the slides.
Prepare a slide with more specimen.
Wrong area
selected.
Select the correct area and process the
slide again.
User’s Manual
CellaVision™ DM1200
12.2.4
LIS Errors
Problem
Cause
Action
Slide status:
The orders are not in
the LIS.
Make sure that orders for the slides that
are to be processed are already
available in the LIS.
The connection to the
LIS is broken.
Make sure that the cable to the LIS is
connected.
Default values
The slides are
analyzed with default
values even though
LIS is used for order
information.
LIS status:
User’s Manual
The connection to the Make sure that the cable to the LIS is
LIS has been broken. connected.
Results are automatically resent when
connection is established.
Critical error in the
database.
The Order ID
contains more than
24 characters.
Do not use an Order ID with more than
24 characters.
Could not find the
order in the LIS.
Leading spaces in
the Order ID.
Remove leading spaces in the Order ID.
Also see section 12.2.5 Cell Location
Problems for LIS errors.
115
CellaVision™ DM1200
12.2.5
Cell Location Problems
Cell Location Problems Peripheral Blood
Problem
Cause
Action
Too many nonnucleated cells.
Too many smudge
cells.
Run another slide with less smudge
cells.
Verify smear preparation process.
Too many artefacts.
Increase wash step
Filter the stain.
Ensure that the stain has not exceeded
the expiration date
Cells misclassified as
non-nucleated cells.
Run another slide and if the problem
remains prepare new staining solutions.
Low WBC count
Prepare a new slide with a higher WBC
count.
Too short smear.
Prepare longer smears.
Poor smear quality.
Verify smear preparation procedure.
Nearly all boxes are
far from the cells.
Stage or calibration
error.
Contact your local vendor’s technical
support.
Too many missed
cells.
Too high WBC count
Do not process slides with a WBC count
that exceeds 100x109/l.
Poor staining.
Verify staining procedure.
Low WBC count.
Prepare a new slide with a higher WBC
count.
Poor staining.
Verify staining procedure.
Too few nucleated
cells located.
Long processing
time.
116
User’s Manual
CellaVision™ DM1200
12.2.6
User’s Manual
Barcode Problems
Problem
Cause
Action
The barcode could
not be read.
Blurry barcode,
caused by
immersion oil on the
barcode.
Make sure the barcode is resistant to
immersion oil.
There is no quiet
zone.
Make sure there is a quiet zone
according to specifications (and that the
barcode is not printed too close to a
logotype, if applicable)
Symbology contrast
is too low.
Adjust the printer.
The barcode is
damaged (barcode
cells are missing).
Adjust the printer.
Print the barcode as defined in Appendix
A — System Specification.
Use slides with a white, smooth, frosted
area.
Use slides with a white, smooth, frosted
area.
117
CellaVision™ DM1200
12.2.7
Staining Problems
Problem
Cause
Action
The red cells appear
bright red, the white
cells will appear
indistinct with pale
blue rather than
purple nuclei, and
brilliant red
eosinophilic
granules will be
seen
microscopically.
Understaining.
The fixation and staining time may be
increased.
Overwashing.
The washing technique may be
corrected so that it is adequate but not
excessive.
Use of stain, buffer
or wash water that
is too acidic.
The pH of the buffer may be checked
with a pH meter and adjusted.
The increased
acidity is due to
exposure of the
stain or buffer to
acid fumes.
Use a new batch of stain or buffer.
Pale, inadequatelystained red cells,
nuclei or
eosinophilic
granules.
Understaining.
The fixation and staining time may be
increased.
Overwashing.
The washing technique may be
corrected so that it is adequate but not
excessive.
The erythrocytes
appear blue or
green, the nuclear
chromatin is deep
blue or black and
the granules of the
neutrophilic
granulocytes are
deeply overstained
and appear large
and prominent. The
granules of the
eosinophils are blue
or gray.
Overstaining.
Decrease the fixation time.
Samples have dark
areas of stain or
other artefacts.
Drying is occurring
during the period of
staining.
Ensure the adequate drying of samples
previous to staining.
Unclean slides.
Use clean slides.
The amount of stain used may be
decreased (shorten the staining time)
and the amount of buffer increased
(increase the stain/buffer time).
Inadequate
washing.
Increase the wash step.
Too high an
alkalinity of stain or
buffer.
The pH of the buffer may be checked
with a pH meter and readjusted to a
lower pH.
Thick blood smears. Prepare a thinner blood smear.
Inadequate washing Increase wash step.
(not washing
enough to remove
the metallic scum).
A stain is forming
precipitate in the
solution.
118
Filter the stain.
Ensure that the stain has not exceeded
the expiration date
User’s Manual
CellaVision™ DM1200
12.2.8
Gripper Service
WARNING
A broken slide can cause serious cuts and poses a danger of
infection. Always use protective gloves and tweezers when removing
glass shards from the system.
Open the animated tutorial, goto Help/Tutorial.
Click Gripper service.
Move Gripper to Service position
a)
b)
c)
d)
e)
f)
User’s Manual
Goto Maintenance/Gripper Service.
Click OK.
Wait until the gripper is in service position dialog appears.
Open the hood and remove the slide.
Close the hood.
Restart the SSU and the progam.
119
CellaVision™ DM1200
13 CellaVision® Software
13.1
CellaVision® Remote Review Software
CellaVision® Remote Review Software gives remote users access to analyzed
slides and the possibility to reclassify cells and sign slides from another location.
Smears needing a second opinion can easily be reviewed by a pathologist from
within or outside the hospital. Networking and collaboration within a hospital, or
between hospitals, results in staffing flexibilities.
CellaVision® Remote Review Software is an additional software product to
CellaVision DM Analyzers.
Database
The operating procedures in Database View, Verification View and Report View are
the same for CellaVision Remote Review as CellaVision DM.
Note! It is not possible to process slides or archive data using CellaVision Remote
Review Software.
User’s Manual
121
CellaVision™ DM1200
13.1.1
Working with Orders/Slides
When opening an order/slide with CellaVision DM1200 or a CellaVision Remote
Review the order and the slide will be locked for other operators. In all other
CellaVision Remote Review and CellaVision DM systems connected to the
database this is indicated with red text in the Order list and Slide list in the
Database View (see 6.1 Database: Processed Orders).
A locked order/slide can be opened but not modified, i.e. no changes can be done
in Verification View and Report View. In the Order data and Slide data panels
“Locked by” indicates who has opened the order/slide (the person logged on to
Windows) and on which computer.
13.2
CellaVision® Competency Software
CellaVision Competency Software is a program for education and competency
testing of manual blood cell differentials in laboratories. The product allows labs to
ensure that staffs are trained to report results consistent with lab policies.
CellaVision Competency Software prints graphs and charts allowing identification
and documentation of areas for improvement.
122
User’s Manual
CellaVision™ DM1200
Appendix A — System Specification
Climate Specification
CellaVision® DM1200 is designed to be safely operated at 18 °C to 31 °C (64 °F to
88 °F), at a maximum relative humidity of 90% with no condensation allowed,
indoor use and altitudes up to 2000 m.
Physical Specification
Weight: 80 kg, excluding PC and monitor
Size (WxDxH): 57x49x71 cm, 22.4x19.3x27.9 inches
Electric Specification (monitor not included)
Voltage input: 100-240 VAC
Current input for the system computer: 6-3A
Current input for the slide scanning unit: 2-1A
Total current input for the system: 8-4 A
Voltage frequency: 50/60 Hz
Pollution degree: 2
Installation category: II
Over voltage category: II
Mains supply voltage fluctuations not to exceed ± 10 percent of the nominal
voltage.
WARNING
Connect to ground sockets only.
WARNING
The mains supply cord and plug of the equipment shall comply with
any national regulations.
WARNING
External computing devices connected to the communication
connector (LAN) of the system have to comply with the standard
UL 60950.
WARNING
The mains supply cord shall be used for disconnection from mains
supply.
(Cont'd)
User’s Manual
123
CellaVision™ DM1200
(Cont'd)
Performance Specification Peripheral blood
Average WBC cell-location and display of at least 97 % with a standard deviation
less than 2 %.
Throughput*: Approximately 20slides/h for complete orders containing RBC, PLT
and 100-cell WBC.
Results of short-term imprecision found in a clinical evaluation on 230 patient
samples, based on NCCLS standard H-20A:
Cell class
Segmented neutrophils
Band neutrophils
Eosinophils
SD (%)
Cell class
SD (%)
3.8
1.6
1.0
Basophils
Lymphocytes
Monocytes
0.7
3.4
2.0
Limitations: Distinctions between band and segmented neutrophils,
metamyelocytes and myelocytes, myelocytes and promyelocytes, lymphocyte and
lymphocytes variant forms are subjects to variations among individual operators.
* “Depending on WBC concentration, number of non-WBCs and the quality of the
smear.”
(Cont'd)
124
User’s Manual
CellaVision™ DM1200
(Cont'd)
Performance Specification Scan
Throughput data and disk space requirements for the scanned slides:
Analysis area size
Overview images
Processing time
Disk space
5x5 mm
10x
1.5 min
10 MB
5x5 mm
10x+50x
12 min
130 MB
10x10 mm
10x
3 min
45 MB
10x10 mm
10x+50x
45 min
500 MB
The given values are approximate. Processing time and required disk space vary
depending on the sample.
Materials Specification
Immersion oil: Trak 300™ Automated Differential System Immersion Oil.
Refractive index 1.5150. Viscosity 300 cSt. PCB free. 150ml oil bag should be
sufficient for approximately 3000 analyses.
CellaVision slide magazines.
Stain: May Grünwald Giemsa, Wright, or Wright Giemsa.
Slide requirements (mm): glass, 75.0-76.0 x 25.0-26.0 x 0.9-1.2, ground edges,
clipped or round corners.
(Cont'd)
User’s Manual
125
CellaVision™ DM1200
(Cont'd)
Slide descriptions:
Round corner
Clipped corners
Images provided by Erie Scientific (www.eriesci.com)
Caution
Use only clipped/round corner slides. Failing to do so may cause jams and
excessive wear on magazines and the system.
Caution
Using the magazines more than 100 times may damage the system.
Barcode
The system requires high quality barcode labels on the slides. Maximize the
barcode width for best result.
Note! The magazines are supplied with barcode labels. If you replace the barcode
label, the new barcode must not contain the '/' character.
Barcode Scanner
The following barcode formats are accepted by the system:
UPC-A
UPC-E
EAN-13
CODE 39
CODE 128
Interleave 2 of 5
Industrial 25
Matrix 25
CODABAR/NW7
CODE 93
CODE 11
China Postage
MSI/PLESSEY
CODE 32
BC412
The minimum barcode resolution shall be 7 mil.
(Cont'd)
126
User’s Manual
CellaVision™ DM1200
(Cont'd)
The label should be positioned as shown in the figure below. The edges of the label
shall be at least 1 mm from the edges of the slide.
Note! Avoid oil on the slide label.
Barcode length
Barcode width
or
2D-D Barcode Scanner
The following barcode formats are accepted by the system:
Linear codes
CODE 39
2D-D codes
DataMatrix
CODABAR/NW7
Code 128
Interleave 2 of 5
QR
(Cont'd)
User’s Manual
127
CellaVision™ DM1200
(Cont'd)
Requirements
Sample ID
When using either a DataMatrix or a QR code the only information allowed in the
code is a sample ID (i.e. no other data), which may be at most 24 characters long
but which may be padded with spaces (ASCII code 32). No leading spaces are
allowed.
Print quality
The printed barcode shall be resistant to immersion oil and be printed with a high
contrast ratio between background and the printed barcode. If the barcode is
printed directly onto a slide, it must be printed on a white, smooth, frosted area of
the slide.
Barcode size
The following barcode resolutions have been verified at CellaVision.
Supported code resolution
Code
Cell size, mil
QR
DataMatrix
Code 39
Code 128
Codabar/NW7
Interleave 2 of 5
13
9
7
7
7
7
(Cont'd)
128
User’s Manual
CellaVision™ DM1200
(Cont'd)
Quiet zone
The recommended quiet zone is listed in the table below.
Symbology
DataMatrix
QR
Vertical quiet zone, cells
Top
Bottom
1
1
4
4
Horizontal quiet zone, cells
Top
Bottom
1
1
4
4
Barcode position
The barcode shall be positioned within the area as illustrated in the figure below.
Y
Area where
the 2D
barcode can
be printed
Y
X2
X1
Where
X1 < 18mm; X2 > 6mm; Y > 4mm
User’s Manual
129
CellaVision™ DM1200
Firefighting Procedures
Fire and explosion hazard:
Flash point: >300ºF / 149ºC
Upper explosive limit: N/A
Lower explosive limit: N/A
Fire fighting media: Carbon dioxide, Foam, dry chemical, and waterfog.
Fire response procedures: Fire fighters must use self-contained breathing
apparatus.
Unusual fire and explosion hazards: Containers should be kept cool in the event of
fire.
130
User’s Manual
CellaVision™ DM1200
Appendix B — Storage and Handling
Storage
The system shall be stored within the following climate condition: 10 °C to 40 °C
(50 °F to 104 °F), at a maximum relative humidity of 80% with no condensation
allowed.
Transporting the System
The system shall be packaged, transported and unpacked by CellaVision
authorized personnel/carrier only. We recommend saving the package for possible
future transports.
Disposal Information
Magazines: As combustible plastics (PC + ABS).
The system: Please contact your distributor.
User’s Manual
131
CellaVision™ DM1200
132
User’s Manual
CellaVision™ DM1200
Appendix C — Buttons and Indicators
If you place the mouse-pointer over the buttons or indicators, you can view tool
tips in the Status bar (bottom left-hand corner).
Buttons
CellaVision® DM software
System Control View
F4
Database View
F5
Verification View
F6
Report View
F7
Close Order and Slide
Order Data
Help Lines
Enables help lines for PLT
estimate.
Confirm Cell Counter Results
Comments
WBC Full Screen View
WBC Galleries
Zoom Mode
Zoom In/Zoom Out
Scroll Mode
User’s Manual
133
CellaVision™ DM1200
Color/Brightness
Adjusts image color and
brightness.
Toggle Color/Brightness
Toggles between default color
and lights settings and
personal settings.
Cell Marker
Shows/Hides square for cell
identification.
WBC Attributes
Shows/Hides WBC attributes.
Entire RBC Image
Shows the entire RBC image.
Start
Stop
Indicators
Autostart
Automatic start of slide
processing.
Oil Level Indicators
Indicates an empty oil pack.
Indicates need for changing oil
pack.
Indicates a full oil pack.
Hood Indicator
Indicates hood is closed.
Indicates hoood is open.
Keyboard shortcuts
Ctrl+w
Show/hide Worklist.
134
User’s Manual
CellaVision™ DM1200
Appendix D — Recommended Workflow
Laboratories handle their peripheral blood differential counts in different ways
making it hard to suggest one general workflow suitable for all laboratories. See
flowcharts of the three workflows below.
Recommended Settings (see 9.7 Adjusting Report/Sign Settings)
1. Single slide differentials
Pre-fill password: Enabled
Sign order when signing the slide: Enabled
Send order to LIS when signed: Enabled
Review the cells in the WBC Galleries.
2. Confirmation of cell counter results - Quickly scanned slides for verification of
cell counter results.
Pre-fill password: Enabled
Sign order when signing the slide: Enabled
Send order to LIS when signed: Enabled
Review the analysis type you want to confirm and then click Confirm Cell Counter
Results.
Confirm Cell Counter Results
When using the Confirm Cell Counter Result for any analysis type (WBC, RBC, or
PLT) the normal sign slide checks (cells in the Unidentified class, all cells
reviewed etc.) are disabled.
Note! When using Confirm Cell Counter Results the results sent to the LIS are: a
WBC confirmation flag, a RBC confirmation flag and/or a PLT confirmation flag
For a slide it is possible to report the WBC result and a RBC confirmation flag and
a PLT result or any other combination.
3. Duplicate slides - An order consists of two slides. Two persons sign one slide
each.
Pre-fill password: Enabled
Sign order when signing the slide: Disabled
Send order to LIS when signed: Enabled
Review the cells in the WBC Galleries.
User’s Manual
135
CellaVision™ DM1200
Workflow Single Slides / Confirm Cell Counter Results
Go to Database View (Shift+F1).
Select orders.
Click Add to worklist.
Double-click on the first slide in the Worklist.
Verify WBC.
Click RBC tab.
Perform RBC review.
Click PLT tab.
Perform PLT review.
Click Sign Slide tab.
Sign the slide. The next slide in the Worklist
will automatically be opened.
When the last slide in the worklist has been signed,
the Database View automatically opens.
136
User’s Manual
CellaVision™ DM1200
Workflow Duplicate Slides
Go to Database View (Shift+F1).
Select orders.
Click Add to worklist.
Click on the Slide Nbr header in the Worklist.
Select all slides with Slide
Nbr 2. Click Remove.
Select all slides with Slide
Nbr 1. Click Remove.
Double-click on the first slide in the Worklist.
Verify WBC.
Click RBC tab. Perform RBC review.
Click PLT tab. Perform PLT review.
Click Sign Slide tab.
Sign the slide.
When the last slide in the order is signed, answer
No to question whether to sign order.
The next slide in the worklist will automatically be opened.
When the last slide in the worklist has been signed,
the Database View automatically opens.
Double-click on the Order you would like to report.
If all slides are signed, the Report View automatically opens.
If necessary, adjust the calculated RBC and PLT results.
Click Sign Order. If you want to make a printout, activate the checkbox Print Order.
The Database View automatically opens.
User’s Manual
137
CellaVision™ DM1200
138
User’s Manual
CellaVision™ DM1200
Appendix E — User Authorization Levels
Action/Setting
Observer
Authorized
Administrator
X
X
X
X
X
X
X
X
X
Sign slides and reports
X
X
X
X
X
X
X
X
Send results to the LIS
X
X
X
X
X
Export orders
X
X
X
X
Protect order from
archiving
X
X
X
X
Start slide processing
User
Restricted
X
Search in the database
on Order ID and
Patient ID
X
X
Search in the database
on other criteria
X
X
Verify and comment
WBC, RBC and PLT
X
X
Edit Order data
Add/edit pending orders
X
Delete unsigned slides/
orders
Delete signed orders
Archive
Send images with
e-mail
X
X
X
Export log files
X
X
X
Database settings
Users settings
Analysis settings
Default values
Add processed slide to
worklist
X
X
Enable LIS
X
WBC reclassification
settings
X
RBC precharacterization
settings
X
User’s Manual
139
CellaVision™ DM1200
Action/Setting
Observer
User
Restricted
Authorized
Administrator
X
X
X
X
PLT settings
Use only manual PLT
concentration estimation
Defaults for PLT
PLT estimate factor
Intervals for average
PLTs/HPF
X
Report/Sign settings
X
Standard comments
settings
X
X
Reference cells settings
X
X
X
X
E-mail settings
Archiving settings
140
User’s Manual
CellaVision™ DM1200
Appendix F — Determining the Platelet Estimate Factor
Follow the procedure below to determine the PLT estimate factor.
1. Perform automated PLT counts with a cell counter on 30 consecutive blood
samples.
2. Prepare and stain one smear for each sample.
3. Perform PLT analyses on the system. Let the system calculate the average PLTs/
HPF values for each sample.
4. Divide the cell counter PLT value by the system average PLTs/HPF value for
each sample to get the conversion factors.
5. Add all 30 conversion factors and divide by 30 to get the PLT estimate factor.
6. Enter the PLT estimate factor in the PLT tab in Settings.
User’s Manual
141
CellaVision™ DM1200
142
User’s Manual
CellaVision™ DM1200
Appendix G — Slide Preparation Guidelines
Slide Preparation for Peripheral Blood
WARNING
Always use protective gloves when in contact with blood.
Sample
Collect blood from a vein or by skin puncture in an EDTA sample tube (K2EDTA
or K3EDTA, 1.5± 0.15 mg/ml in liquid or powder form). Mix the sample carefully
with the anticoagulant. Store the tube at room temperature. Prepare the blood films
within four hours of blood collection.
Preparing Blood Films
1. Mix the tube (20 complete inversions by hand) before preparation.
2. Use a clean dry microscope glass slide (see Appendix A — System
Specification for required slide types). Note that glass slides may lose their
wetability on exposure to air, resulting in a poor smear.
3. Use the wedge technique performed manually or by a mechanical spreader.
Manual wedge technique: Place a drop of blood near the labeled end of the
slide. Narrow a spreader slide with polished edges at a 30- to 45-degree angle to
the smear slide. Allow the blood to spread almost over the entire width of the
slide. Then rapidly and smoothly push the spreader slide to the opposite end of
the slide. There should be a gradual transition in thickness, ending in a squared
or straight edge, without any grainy streaks, troughs, ridges, holes or bubbles.
The blood film must be at least 30 mm in length, terminating 5- 15 mm from the
edge.
(Cont'd)
User’s Manual
143
CellaVision™ DM1200
(Cont'd)
4. Dry the slide rapidly.
5. Stain the slide within one hour.
5-15 mm
33 mm
The dot in the image indicates the analysis starting point. The analysis proceeds
from the starting point towards the thinner part of the smear.
144
User’s Manual
CellaVision™ DM1200
Example Smears
The line in the images indicates the analysis starting point.
Accepted
These slides are all prepared according to the specifications and will be accepted in
the DM1200.
Not Accepted
These slides are not prepared according the specifications and might not be
accepted in the DM1200.
(Cont'd)
User’s Manual
145
CellaVision™ DM1200
(Cont'd)
Recommended Staining Recipes
CellaVision® DM is optimized to analyze samples stained with May Grünwald
Giemsa (MGG) stain, Wright stain and Wright Giemsa stain. Dip the slides in the
solutions according to one of the following recipes.
MGG Stain
Note! Differences in staining results may be cause by alterations in pH, reagents
etc. Local adjustments may be needed to achieve best results. Be aware of pH
variations in water.
Alternative 1
Solution
Reaction time
Change solution
1
May Grünwald stock solution a
5 min
Twice a week
2
May Grünwald working solution b 15 min
Every day
3
Buffer working solution d
Quick rinsing
Every day
4
Giemsa working solution f
30 min
Every day
5
Buffer working solution d
Extensive rinsing
Every day
Solution
Reaction time
Change solution
1
May Grünwald stock solution a
5 min
Twice a week
2
Buffer working solution d
Quick rinsing
Every day
3
Giemsa working solution f
10 min
Every day
4
Buffer working solution d
Extensive rinsing
Every day
Alternative 2
(Cont'd)
146
User’s Manual
CellaVision™ DM1200
(Cont'd)
a
May Grünwald stain, stock solution:
Merck M1424 Eosin-methylenblue
solution, modified for microscopy
(contains methanol).
Store at +15 ºC to +25 ºC.
b
May Grünwald working solution:
Dilute 1 part of May Grünwald stock
solution with 1 part buffer work solution.
Stable for 8 hours.
c
Buffer stock solutions 1 and 2:
1) 9.07g KH2PO4 (0.067M) ad 1000ml
deionized water
Store at +4 ºC to +8 ºC.
2) 9.45 g Na2HPO4 (0.067M) ad
1000ml deionized water
Store at +4 ºC to +8 ºC.
d
Buffer working solution, pH 6.8
Combine 127 ml KH2PO4 stock
solution with 123 ml Na2HPO4 stock
solution ad 5000 ml deionized water.
Adjust to pH 6.8.
Store at +4 ºC to +8 ºC.
Durable for a month at +4 ºC.
e
Giemsa stain, stock solution:
Merck M9204 Azur-eosinemethylenblue solution for microscopy
(contains methanol).
Store at +15 ºC to +25 ºC.
Durable for several months if kept in a
dark bottle.
f
Giemsa working solution:
Dilute 1 part Giemsa stock solution with
19 parts buffer work solution.
Stable for 8 hours.
(Cont'd)
User’s Manual
147
CellaVision™ DM1200
(Cont'd)
Wright Stain
Note! Differences in staining results may be cause by alterations in pH, reagents
etc. Local adjustments may be needed to achieve best results. Be aware of pH
variations in water.
Alternative 1: Sysmex SMS SP 100 slide stainer
Solution
Reaction time
1
Wright stain
2 min
2
Wright stain diluted 1:10 with phosphate buffer
pH 6.8
7 min
3
Rinse in deionized water
30 sec
Alternative 2: Beckman Coulter GENS slide stainer
Solution
Reaction time
1
Methanol
30 sec
2
TruColor Wright stain
2 min 30 sec
3
TruColor Wright stain diluted 1:6 with phosphate
buffer pH 7.2
6 min 30 sec
4
Rinse in phosphate buffer pH 7.2
1 min 15 sec
5
Rinse in deionized water
45 sec
Wright stain alternative 2 can also be used for manual dip method.
148
User’s Manual
CellaVision™ DM1200
(Cont'd)
Wright Giemsa Stain
Note! Differences in staining results may be cause by alterations in pH, reagents
etc. Local adjustments may be needed to achieve best results. Be aware of pH
variations in water.
Beckman Coulter LH755 slide stainer or manual dip method.
User’s Manual
Solution
Reaction time
1
Methanol
1 min 30 sec
2
Wright Giemsa stain
3 min 30 sec
3
Wright Giemsa stain diluted 1:10 with phosphate
buffer pH 6.8
3 min
4
Rinse in pH adjusted distilled water 1 min
1 min
5
Rinse in pH adjusted distilled water 1 min
1 min
149
CellaVision™ DM1200
150
User’s Manual
CellaVision™ DM1200
Appendix H— Glossary
Description
User’s Manual
Analysis
Starts with the loading of slides and ends with the finished
report.
Confirmation
The operator approves the preclassification.
Duplicate slide differential
Two different persons sign one slide each in the order. The
average result is presented.
Grid square
Sub-images of a PLT overview.
In-vitro
Outside the living body; in an artificial environment.
LIS
Laboratory Information System
Magazine
A container transporting up to 12 slides in the system.
Magazine ID
The barcode no. on the magazine label for magazine
identification.
MGG
May Grünwald Giemsa; a Romanowsky stain for blood
smears.
Mini map
Overview image of analysis area.
Multi-slide order
An order including more than one slide from one sample.
Non-WBCs
Cells and objects identified as not being WBCs.
Not classed
Cells and objects the operator cannot identify and wants to
exclude from the differential count.
Operator
The person who works with the system.
Order
The name of the ordered analyses on the slides from the
same sample.
Order ID
Order identifier. There can be several slides with the same
Order ID but different slide numbers.
Patient ID
Unique number identifying the patient.
Pending order
An order manually added to the database, waiting to be
processed.
PID
Positive Identifier. The barcode on the slide.
PLT
Platelet, thrombocyte
PLT estimate
Estimation of the PLT concentration.
PLT estimate factor
A predetermined factor to calculate the PLT estimate.
Precharacterization
The system suggests RBC morphology characteristics.
Preclassification
The system suggests WBC classification.
Processing slides
The sequence of events from when the slide holder is put
on the conveyer to when they are ejected to the output
drawer.
Quick scans
Quickly scanned slides for cell counter verification. The
results are not sent to the LIS.
RBC
Red blood cell, erythrocyte
Reclassification
The operator changes the preclassification.
Reference cells
Cells with typical characteristics available in the 2nd and
3rd galleries.
151
CellaVision™ DM1200
152
Romanowsky stain
An eosin-methylenblue solution for staining of blood
smears. Wright and MGG are examples of different
Romanowsky stains.
Signing
Finally confirming analysis results before locking and
reporting them.
Slide ID
The barcode number on the slide (PID). Same as Order ID.
Slide number
A number that uniquely identifies slides within the same
order.
Slide position
The position of a slide in the magazine.
Unidentified
Cells and objects which the system cannot preclassify.
Verification
The operator's review of WBC, RBC and PLT, e.g.
reclassification and confirmation of WBCs.
WBC
White blood cell, leukocyte
Wright
A Romanowsky stain for blood smears.
Wright Giemsa
A Romanowsky stain for blood smears.
User’s Manual
CellaVision™ DM1200
CellaVision™ DM1200
A
Archive status . . . . . . . . . . . . . . . . . . . . . . . .60
Archiving . . . . . . . . . . . . . . . . . . . . . . . . . . .97
Authorization Levels . . . . . . . . . . . . . . . . .139
Autostart . . . . . . . . . . . . . . . . . . . . . . . .21, 134
B
Backup . . . . . . . . . . . . . . . . . . . . . . . . . . . . .69
Barcode . . . . . . . . . . . . . . . . . . . . . . . .19, 118
Batch Status . . . . . . . . . . . . . . . . . . . . . . . . .22
Blood Films . . . . . . . . . . . . . . . . . . . . . . . .143
Buttons . . . . . . . . . . . . . . . . . . . . . . . . . . . .133
C
Canceling an Order . . . . . . . . . . . . . . . . . . .56
Color and Brightness . . . . . . . . . . . . . . . . . .35
Comment Panel . . . . . . . . . . . . . . . . . . . . . .54
Comments . . . . . . . . . . . . . . . . .46, 60, 61, 94
Creating a New Database . . . . . . . . . . . . . . .85
D
Database View . . . . . . . . . . . . .31, 57, 76, 133
Default values . . . . . . . . . . . . . . . . . . . . . . . .23
Deleting a Database . . . . . . . . . . . . . . . . . . .86
Digital Slides . . . . . . . . . . . . . . . . . . . . . . . .71
Disposal Information . . . . . . . . . . . . . . . . .131
Duplicate Slides . . . . . . . . . . . . . . . . . . . . .137
E
E-mail . . . . . . . . . . . . . . . . . . . . . . . . . . . . . .38
entry fields . . . . . . . . . . . . . . . . . . . . . . . . . .43
Error texts . . . . . . . . . . . . . . . . . . . . . . . . . . .23
Estimating . . . . . . . . . . . . . . . . . . . . . . . . . .43
Excluding the Platelet Analysis . . . . . . . . . .46
Excluding the Red Blood Cell Analysis . . . .42
F
Full Screen View . . . . . . . . . . . . . . . . . . . . .35
G
Galleries . . . . . . . . . . . . . . . . . . . . . . . . . . . .34
grid squares . . . . . . . . . . . . . . . . . . . . . . . . .43
H
high power fields . . . . . . . . . . . . . . . . . .39, 43
User’s
Manual
User’s Manual
I
Indicators . . . . . . . . . . . . . . . . . . . . . . 133, 134
Inserting the slide holder . . . . . . . . . . . . . . . 21
L
LIS . . . . . . . . . . . . . . . . . . . . . . . . . . . . . . . . 55
LIS status . . . . . . . . . . . . . . . . . . . . . . . 59, 115
Loading Slides . . . . . . . . . . . . . . . . . . . . . . . 20
M
Magazine ID . . . . . . . . . . . . . . . . . . . . . . . . 19
Magazine Status . . . . . . . . . . . . . . . . . . . . . 22
main gallery . . . . . . . . . . . . . . . . . . . . . . . . . 34
Maintenance . . . . . . . . . . . . . . . . . . . . . . . 103
May Grünwald Giemsa . . . . . . . . . . . . . . . 125
Mini Map . . . . . . . . . . . . . . . . . . . . . . . . 72, 73
N
Navigating . . . . . . . . . . . . . . . . . . . . . . . . . . 73
O
Observer . . . . . . . . . . . . . . . . . . . . . . . . . . . 88
Oil Refill . . . . . . . . . . . . . . . . . . . . . . . . . . 105
Order status . . . . . . . . . . . . . . . . . . . . . . . . . 59
Overview Image . . . . . . . . . . . . . . . . . . . . . 72
P
PB . . . . . . . . . . . . . . . . . . . . . . . . . . . . . . . . . 9
PLT Count . . . . . . . . . . . . . . . . . . . . . . . . . . 44
PLT estimate factor . . . . . . . . . . . . . . . . 45, 92
PLT Result . . . . . . . . . . . . . . . . . . . . . . . . . 45
Process status . . . . . . . . . . . . . . . . . . . . . . . 61
R
RBC characterization . . . . . . . . . . . . . . . . . 91
RBC limits . . . . . . . . . . . . . . . . . . . . . . . . . . 91
RBC overview image . . . . . . . . . . . . . . . . . 39
Reference Cells . . . . . . . . . . . . . . . . . . . 34, 96
Regions of Interest . . . . . . . . . . . . . . . . . . . 75
Report . . . . . . . . . . . . . . . . . . . . . . . . . . . . 133
Report Preview . . . . . . . . . . . . . . . . . . . . . . 55
Report template . . . . . . . . . . . . . . . . . . . . . . 83
Report View . . . . . . . . . . . . . . . . . . . . . . . 133
Restricted user . . . . . . . . . . . . . . . . . . . . . . . 83
Result Panel . . . . . . . . . . . . . . . . . . . . . . . . . 52
Right-click Menu . . . . . . . . . . . . . . . . . . . . 38
153
CellaVision™ DM1200
CellaVision™ DM1200
S
Scanning a Slide . . . . . . . . . . . . . . . . . . . . . . 71
Settings . . . . . . . . . . . . . . . . . . . . . . . . . . . . 135
Shut down . . . . . . . . . . . . . . . . . . . . . . . . . . 24
Signing a Slide . . . . . . . . . . . . . . . . . . . . . . . 49
Signing an Order . . . . . . . . . . . . . . . . . . . . . 55
Single slide differentials . . . . . . . . . . . . . . 135
Slide ID . . . . . . . . . . . . . . . . . . . . . . . . . . . . 20
Slide Information Dialog . . . . . . . . . . . . . . . 23
Slide Preparation . . . . . . . . . . . . . . . . . . . . 143
Slide scanning unit . . . . . . . . . . . . . . . . . 12, 13
Slide Status . . . . . . . . . . . . . . . . . . . . . . . . . 23
Splitting Cells . . . . . . . . . . . . . . . . . . . . . . . 37
SSU . . . . . . . . . . . . . . . . . . . . . . . . . . . . . . . 12
Staining Recipes . . . . . . . . . . . . . . . . . . . . 146
Standard Comment . . . . . . . . . . . . . . . . . . . 95
Start . . . . . . . . . . . . . . . . . . . . . . . . 17, 21, 134
Storage . . . . . . . . . . . . . . . . . . . . . . . . . . . . 131
System Control . . . . . . . . . . . . . . . . . . . . . . 18
System indicators . . . . . . . . . . . . . . . . . . . . . 18
T
Tagging Regions of Interest . . . . . . . . . . . . . 74
Toolbar . . . . . . . . . . . . . . . . . . . . . . . . . . . . . 18
Troubleshooting . . . . . . . . . . . . . . . . . . . . . 109
V
Verification View . . . . . . . . . . . . . . . . 31, 133
W
Warning texts . . . . . . . . . . . . . . . . . . . . . . . . 23
WBC Attributes . . . . . . . . . . . . . . . . . . . . . . 37
WBC Galleries . . . . . . . . . . . . . . . . . . . . . . . 34
WBC panel . . . . . . . . . . . . . . . . . . . . . . . . . . 31
Workflow . . . . . . . . . . . . . . . . . . . . . . . . . . 135
Worklist . . . . . . . . . . . . . . . . . . . . . . . . . . . . 31
Wright . . . . . . . . . . . . . . . . . . . . . . . . . . . . 148
154
User’s Manual
CellaVision AB
Ideon Science Park
SE-223 70 Lund
Sweden
Phone +46 (0) 46 286 44 00
Fax +46 (0) 46 286 44 70
[email protected]
www.cellavision.com