1
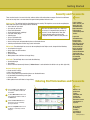
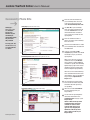
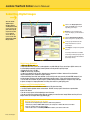
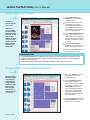
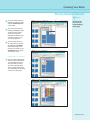
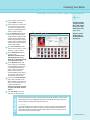
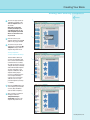
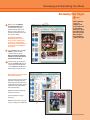
Table of Contents Getting Started The Basic Steps ................................................ 1 Internet Requirements ...................................... 1 Logging In and Home Page ............................... 2 Security and Passwords ................................... 3 Editing Staff Information and Passwords.......... 3 Searching ......................................................... 4 Planning Your Book Using Your Calendar and Calendar Notes ......... Book Configuration and Key Dates ................... Entering Your Staff Information ........................ Selecting Fonts for Your Book .......................... Setting Styles for Your Book ............................. Using Your Page Ladder to Plan Your Book........ Moving Pages ................................................... Printable Ladder ............................................... Community Photo Site ...................................... 1 2 2 3 3 4 5 5 6 Photos and Images Photo Submission Guidelines ............................ 1 Submitting Printed Photographs ....................... 1 Submitting Digital Images ................................. 2 Submitting Portrait Photos (CD) ........................ 3 Submitting Artwork and Collages ..................... 3 Using Your Image Library .................................. 4 Community Photo Site ....................................... 5 Table of Contents 1 Table of Contents Creating Your Book Using Your Page Ladder .................................... 1 Using Your Page Designer ................................. 2 Using Jostens Pre-Designed Templates ............ 2 Using Click-N-Go! Templates ............................. 3 Rotating Elements ............................................. 3 Creating Photo Shapes ..................................... 4 Placing Shaped Elements ................................. 5 Placing Images ................................................. 6 Ghosting Photos ................................................ 7 Using Note-It ..................................................... 7 Placing Text ....................................................... 8 Using Spell Check ............................................. 9 Autograph and Division Pages ......................... 10 Backgrounds and Borders ............................... 10 Portrait Panel Pages (Automatic)..................... 12 Saving and Sharing Templates ........................ 15 Creating Your Index ......................................... 16 Reviewing and Submitting Other FAQs Table of Contents 2 Reviewing Your Pages ....................................... 1 Submitting Your Pages ...................................... 2 Page and Photo Deadlines ................................ 3 Yearbook Summary Report ................................ 1 Cover Information ............................................. 2 Contacting Jostens Information ........................ 2 Ordering Supplies ............................................. 3 FAQs ................................................................. 1 Notes ................................................................. 5 Getting Started The Basic Steps 1. Plan your yearbook project. (staff, fonts, styles) See the Planning Your Book section of this manual for more information. 2. Complete your Page Ladder. (assign pages, set templates) See Planning Your Book – page 4 for more information. 3. Mail in or upload photos and images for your Image Library. See Photos and Images section for more information. 4. Create your pages. Start from the Page Ladder or Page Designer to select a page and edit images and text. See Creating Your Book section for more information. 5. Before submitting, print out page preview(s) to check/review your page(s). Once you submit a page, you will no longer be able to make changes to it. Changes requested after submission can result in extra charges. Contact your plant consultant for assistance. See Reviewing and Submitting – page 1 for more information. 6. Submit your page(s). See Reviewing and Submitting – page 2 for more information. Creating your book using Jostens YearTech Online is an easy and enjoyable process. The six basic steps involved in creating your yearbook are listed to the left. You can find more detailed information about these steps throughout this user’s manual. Note: Some of these functions are only available to the adviser and editor login. Program Requirements Hardware requirements: Windows or Macintosh Operating System • Intel Pentium processor or PowerPC processor based on OS requirements • Windows 2000, XP, XP Pro or Vista • Mac OS 10.1 or higher • 128 MB of available RAM (256 MB or more recommended) • Video card with 24-bit, high resolution display Internet requirements: Although Jostens recommends high speed internet (DSL, Cable, T1) a 56K modem will work. Browser requirements: • Windows: Internet Explorer 6.0 and above or Firefox 1.5 and above • Mac: Safari 1.2 and above or Firefox 1.5 and above Flash requirements: Flash 8.0 or higher. Flash is a free download from www.adobe.com. Most newer computers come with Flash installed. If you do not have version 8 or above, the first time you try to access the Page Ladder or Page Designer, you will see a message asking you to download the software. If you do not have rights to install software, you may need to contact your network administrator. For Jostens Technical Support: (800) 328-2435 USA (800) 665-7597 Canada Welcome to Jostens YearTech Online, the easiest way to create a yearbook online. Using YearTech Online you can work on your book from anywhere you have a high speed internet connection and an internet browser. Jostens YearTech Online User’s Manual Logging In and Home Page Yearbook Avenue is the overall comprehensive site that provides status information, ideas, selling tools, educational tools, and planning tools for your yearbook. 1 1 Enter the Year your Login ID, Password and Job Number. Click Sign In to enter your web site. YearTech Online is the creation tool that you will access through Yearbook Avenue. Your Home Page is customized with information pertinent to your school and book. 2 Use the menus on the header bar throughout your site for navigation. 2 3 4 3 Adviser’s Common Tasks & Tools contains direct links to the most commonly used areas of your site. 4 The Messages and Notes section will display the most recent messages from your Jostens plant. 5 5 The Ideas & Tips section contains timely tips and information. 6 7 6 The Book Status links provide you with visual reminders of where you are in the process of creating your yearbook. 7 Use your Virtual Book Viewer to flip through the pages of your yearbook online and see how they are progressing. Getting Started 2 Getting Started Security and Passwords There are four levels of access to the site: adviser, editor, staff and business manager. Each role has different levels of security. Here is an overview of the permissions provided with each role. Take Note: Adviser login: The adviser login has the highest level of security. This login has access to do everything the editor and staff login can do, along with the following: • Select fonts for your book • Set styles for your book Because the Adviser login has a high level • Enter staff information of access, it is important that you keep it • Create portrait pages (autoflow) secure. It is also important to close your • Lock and unlock pages internet browser when you leave your • Submit pages computer so others cannot access your site. • Set up a yearbook offer • Enter sales information • Access selling tools and promotional pieces on Yearbook Avenue • Submit personalization and final copy count information Editor login: The editor login has access to do everything the staff login can do, along with the following: • Set templates for pages • Assign pages to staff members • Move pages • Create an index • Move photos from staff inbox to image library Staff login: The staff login has access to do the following: • Create/edit pages • View ladder • Access staff and community inboxes (if Inbox Access is selected when the Adviser sets up their login info) If your school is new to Jostens, you will receive your Yearbook Avenue login information in the back-toschool mailing from Jostens. If you used Yearbook Avenue last year, your existing adviser login will carry over to your 2008 book. The first time you log in, you will be asked to provide contact information and change your login and password to something you will easily remember. Business Manager login: • Create an offer in ItPays • Enter sales information • Access selling tools and promotional pieces on Yearbook Avenue • Set yearbook and advertising sales goals • Create an index • Move photos from staff inbox to image library Entering Staff Information and Passwords 1 1 Choose Staff from the Plan menu to access your Adviser and Staff information. 2 To add a New Staff member enter their information and then click on the Add button. 2 3 Check the Inbox Access box to allow access to the community photo upload inbox. 3 4 Click on the Update button next to an Adviser or Staff entry to make changes. 4 Advisers can update their contact information and change the password for themselves or their staff members at any time. We recommend periodically changing passwords to help maintain Getting Started 3 Jostens YearTech Online User’s Manual Searching Yearbook Avenue is equipped with a comprehensive search engine. If you need help finding a specific topic, just click on the Search button which is located in the upper right corner of every Yearbook Avenue page. 1 1 Use the Search link that is located in the upper right-hand corner of each Yearbook Avenue page to access the search page. 2 2 Enter the word(s) you would like to search for in the field provided. 3 3 Click on the Go button to begin your search. 4 Getting Started 4 4 Review the results and click on the link containing the information you would like to view. Yearbook Avenue will take you directly to that page. Planning Your Book Using Your Calendar and Calendar Notes 1 You will see your Messages and Notes on your Home page when you log in. Three types of messages are included: 1. Global messages are notes to all Jostens customers using a specific product. Example: a reminder about an upcoming personalization deadline. 2. School-Specific messages include information specific to your book. Example: your page deadlines. 3. User-Entered messages are notes which can be input by your yearbook representative, your Jostens plant consultant or you. These notes can be about anything and are simple to add to your calendar. 2 Your Calendar and Calendar Notes are valuable tools to help you keep your yearbook on track throughout the year. 1 3 2 To view your entire Calendar click on See Full Calendar on your Home page. 3 Use the calendar thumbnails along the left-hand side of your screen and the links along the top to change the current calendar view. 4 6 4 Click on the Add Note link to enter a new calendar item. 7 5 You will be directed to a Calendar Input Form in which you can enter your item. The title, which can be tagged with a color, is the only thing which will appear on the Welcome Page. 5 6 Click on the Edit link to edit an existing Calendar item. 7 Click on the Delete link to remove a Calendar item. Planning Your Book 1 Jostens YearTech Online User’s Manual Book Configuration and Key Dates You can access your Book Configuration and Key Dates information under the Stay Organized link in the Plan menu. 1 You can see the number of pages in your book, your book size and how many copies you have planned in the Current Book Statistics section. 1 2 2 If you have ordered options for your yearbook, they will be listed in the Options section. 3 3 Important dates will be listed in the Key Dates section. Entering Your Staff Information Before you begin planning your yearbook, use the Staff page under the Plan menu on your header bar to enter your staff information. 1 In the designated fields, enter the name, e-mail address, a unique login ID, password and role of the staff member you would like to add. 1 2 Click on the Add button to add the information to your staff list. 2 3 To change existing staff information, click on the Update button and enter the new information in the pop-up window. 4 Use the Delete button to remove a staff member from your list. Take Note: 3 Planning Your Book 2 4 It may be helpful to use a formula you can remember when setting up staff logins. One example is last name plus first initial. If a staff member forgets their password you can Update their information and give them a new password. Planning Your Book Selecting Fonts for Your Book Use the Plan menu on your header bar to access the Font page. (Only the Adviser login can be used to make changes to the font selections.) 1 Choose fonts to view by selecting from the drop-down menus. 2 You will see a preview of the currently selected font in the Font Preview window. 1 2 3 Click the Add button to add a font to your collection. Note: When creating your book, 3 your staff will only be able to select from the fonts you choose for your collection. 4 Click the Delete button to delete a font from your collection. Note: If you delete a font that was already used on a page, no changes will be made to page(s) using the font. However, the font will not be available for selection on new text boxes or pages. 4 Setting Styles for Your Book 2 1 Enter the name of the Style Type you would like to create (Headline, Body Text, etc.). Then enter the font specifications in the Font, Size and Attribute fields. You can set font styles for your entire book on the Style page. You will be able to change styles on an individual page. 1 2 You will see previews of the fonts you have selected in the boxes next to the style fields. Use the Plan menu on your header bar to access the Style page. (Only the Adviser login can be used to make changes to the style selections.) 3 Click on the Apply Changes link to apply the default styles to your book. You will be able to manually change the font selections on individual pages. 3 Planning Your Book 3 Jostens YearTech Online User’s Manual Using Your Page Ladder to Plan Your Book 4 Jostens Page Ladder is a wonderful tool to help you organize your yearbook. Access the Page Ladder under the Plan menu. 5 2 9 1 8 5 3 1 You can plan your book pageby-page. Section, Description, Deadline, Staff and Page Type can all be edited by clicking on them and entering information in the field that appears. 2 Use the Display Range dropdown menu at the top of the page to move through the book in 16-page increments. 3 The color coding will help you keep track of individual page status. 3 6 4 Click on the Print All button to print a hard copy of your yearbook ladder. 5 The Lock All and Unlock All buttons change the lock settings throughout the book, while the Locks on the thumbnails only affect the individual page. 6 The Adviser login can Hide a page and a Top Secret image will appear on the ladder. 7 7 Use the Filters and Templates tabs to move between ladder functions. 10 8 Use the drop-downs under the Filters tab to view your pages by Staff, Deadline, Page Type, Page Status or Lock Status. 9 Click on the Save All button to save the changes you’ve made to your ladder. 10 Under the Template tab, use the Template drop-down to select a template category. Adviser’s Note: To place a template, drag it from the Templates section and drop it on your selected page. Planning Your Book 4 • You will be able to assign up to two staff members to a page. • If you assign staff to a page, only the assigned staff along with the Adviser and Editor will be able to edit the page. • If you wish to allow editing access to all staff leave pages unassigned. Planning Your Book Moving Pages 1 The color key will help you track your pages at a glance. To access the Move Pages screen, click on the Page Mover link under the Create menu. To move a page, simply click on the 2 page you would like to move, then drag and drop the selected page over the page you would like to exchange 3 it with. Note: You cannot move pages that are locked. 1 Take Note: To select a group of pages to move all at once, Shift+click on the left page of the group then, holding down the shift key, click on the right page of the group. The group of pages will become highlighted and you can drag and drop them to their new location. 2 Use the Save button to save the changes you have made. 3 The Page Preview shows a thumbnail of the selected page. This allows you to see a page before you move it. • When you move pages you are simply swapping pages with each other. • Double page spreads should be moved together to maintain the spread design. Printable Ladder To access your Printable Ladder, click on the Print link on your Page Ladder. 1 Your Printable Ladder shows thumbnails and details for each of your pages. To print the Page Ladder, select print from the Page Ladder screen. 1 Planning Your Book 5 Jostens YearTech Online User’s Manual Community Photo Site Setting up a Community Photo Site will allow parents and members of your community to submit their photos for your use in the yearbook. To set up your site, use the Community Site link under the Plan menu. 1 Enter the start and end dates for your Community Photo Site on the setup screen that you accessed under Plan/Community Photo Site. Setup Page (found under Plan menu) 2 The User ID for your Community Photo Site will be provided. You can select the Password. The User ID and Password will be needed for users to login to your web site and upload photos. 1 3 Enter the maximum number of photos you want in your Community Inbox at one time. 2 3 5 4 Community Photo Site (ID/Password required to access) 4 Check the Site Enabled box to enable your Community Photo Site and click the Save button. 5 Send an e-mail with the URL assigned (along with the User ID and Password) to anyone you want to upload photos. When a user accesses your Photo Submission site, they will Browse their computer to find the JPG they would like to upload. (See Submitting Digital Images, page 2 of the Photos and Images section, for more information on digital image guidelines.) 6 After the user has checked that they have read and understood the terms and conditions, they can upload their image using the Upload Chosen Image button. 6 The user will then need to provide their contact information along with information about the photo they are uploading. 7 Your Image Library (found under Create menu) 8 Planning Your Book 6 7 After the user clicks Save Details the image will appear in your Image Library. 8 You can view the uploaded photos and contact information in the Community Inbox category of your Image Library. Adviser’s Note: An image in the Community Inbox will not be available for staff use until someone with inbox access approves it by dragging the thumbnail of the image into a photo category folder in your Image Library. Photos and Images Photo Submission Guidelines You will receive a copy schedule from Jostens with your page deadline due dates. It is important to note that all photo deadlines for Jostens-scanned photos are due a minimum of three weeks prior to your page submission deadline. This will allow time for Jostens to upload your images and for your yearbook staff to create, finalize and submit your pages. You can upload digital images to your web site at anytime in the process. These images will be available immediately for you to use in your book. Regardless of whether you upload images yourself or send photos to Jostens for scanning and uploading, there is an advantage to limiting the number of candid and activity photos you submit. If you submit only those photos that have real possibilities for use in your yearbook, you’ll be much more organized and will be able to find needed photos more quickly and more efficiently. See the Image Library Info section on your Yearbook Avenue Home page for information on how many images are currently submitted. Take Note: You are allowed to have up to 60 Photo Categories. You will find it easiest to locate your photos when creating pages if you utilize your available categories and sort your photos before you submit them. Jostens is not responsible for editing or screening images and assumes no responsibility for content submitted by schools. It is good practice to keep copies of all images you submit to Jostens. If submitting baby photos, keep copies with proper identification for your use when you create your book. Submitting Printed Photographs (Mail to Jostens) 1 Once you have your photos organized, use the Photo Stickers to label them. Your job number is printed on the top of your Photo Stickers. Using a No. 2 pencil, write the photo category on the sticker. Note: To avoid leaving indentations, write on the stickers before you put them on the back of your photos. Do not use ink because the ink may bleed onto other photos when mailing. 2 1 2 After you have your photos labeled, fill out your Photo Sorting Envelopes. Make sure to print your school name, job number, address information, photo category name, and number of photos included on each envelope. 3 Put each group of photos in the appropriate Photo Sorting Envelope and place all of your Photo Sorting Envelopes in a Return Photo Mailer. To address your Photo Mailer, use the address labels you received in your back to school mailing or write in the address located under Contact Us on your web site. Write FINAL on the outside of your photo mailer when you send in your last photo submission. Start by collecting and organizing your photos. Categorize your photos into groups that make sense to you. This will make it easier to find your photos on your web site when you start creating your book. 3 Photos and Images 1 Jostens YearTech Online User’s Manual Submitting Digital Images You can submit digital images on CD or disk by sending them in the Activity CD Mailer to your Jostens plant or you can use the Create menu to access the Image Upload screen and upload your digital images online. 2 1 1 Click on the Image Upload link under the Create menu to begin uploading your images. 4 2 Browse on your computer and select the images you would like to upload. 3 Click the Upload Chosen Images button to begin the upload process. 3 4 In the pop-up window enter the Image Information for each of your images. 5 Click Apply to complete the upload process. Your images will now be available in the Image Library. (See page 4 of this section for more information on your Image Library.) 5 Digital Image Guidelines: • .JPG and .TIF files only • High resolution files. If you are scanning photos, use 400–500 dpi. If you are using a digital camera, set it to the highest resolution setting. Camera phones will not provide a quality image. • Maximum file size is 25 MB. • RGB file format only (no CMYK). • Submit your photos on CD or disk. Organize your categories in folders. Jostens will use the folder names to organize your categories on your web site. • When submitting more than one deadline via CD or disk, make sure you only include NEW images. If you include images that have already been submitted (same file name), it may cause issues with your site. • Do not alter the resolution of your image in a photo editing software program. Doing this may allow you to place an image in a larger photo box, but it may also result in a poor quality print. Category and File Naming Guidelines: Take Note: • Category and File names should be a maximum of 20 characters long. • Use only English alphabet letters and numbers. Do NOT use any special characters or punctuation marks in the names. • Do not use any spaces at the beginning or end of names. • Do not use the same name on more than one category or more than one image. Make sure they all have unique names (for example: BBall1.jpg, BBall2.jpg). Photos and Images 2 Mailing Digital Images to Jostens: If you want to mail digital images to Jostens, follow these guidelines: • Submit your photos on CD or disk. Organize your categories in folders. We will use the folder names as category names on your web site. • Mail the CD or disk in the Activity CD Mailer included in your YearTech Online Kit. Photos and Images Submitting Portrait Photos (CD) When you receive your Portrait CD from your photographer, write your job number on the label to help us keep track of it at Jostens. 1 1 Use the Portrait CD Mailer included in your YearTech Online Kit to mail your CD to Jostens. Begin by filling out the return address area and entering your job number on the mailer. 3 2 On the back label, check the sorting option box that describes the portrait page layout you want. Also indicate whether your CD includes black and white or color portraits. Note: All portraits on your CD will be sorted the same. If you are a K-12 school and want to sort elementary and high school differently, you need to send in separate CDs for each sorting option. Talk to your Jostens yearbook representative to make sure your Portrait CD meets all of the Jostens photo guidelines. 2 Submitting Portrait Photos not on CD We recommend you submit your portraits on the CD provided by your photographer. If you cannot get a portrait CD from your photographer, submit your portraits using the Photo Sorting Envelopes. There will be additional scanning time needed for portraits not on CD. When submitting portraits, follow these guidelines: • All portraits must be at least wallet size. • Portraits must be labeled with Photo Stickers. • Portraits must be sorted in Photo Sorting Envelopes. 1 Use the mounting boards to lay out your custom collages and artwork. The blue border on the mounting board will show up in scans, so be sure to keep all of your design elements inside the border. Use a separate mounting board for each page design or piece of custom artwork. Note: For best quality, use processed photos and original artwork. Photocopies and digital copies do not scan well and will reproduce poorly in your book. Your mounting board creations will be scanned exactly as they are submitted. 2 Before you submit your mounting board designs to Jostens, be sure to enter your school name, job number and photo category you want your design placed under on your web site. Place your Mounting Board designs in the Return Photo Mailer with your photos and mail to Jostens to be scanned and entered on your web site. Submitting Artwork and Collages 1 2 Take Note: Take Note: 3 To address your CD Mailer, use the address labels you received in your back to school mailing or write in the address under Contact Us on your web site. Use the Mounting Boards found in your YearTech Online Kit to create and submit custom collages, ads and artwork for your book. Submitting Ads to Jostens: 1) Remember to place lines between all of your ads. 2) Artwork for ads is scanned and uploaded as one .jpg. Visible backgrounds, grid lines, tape and other materials will show in the scanning. Photos and Images 3 Jostens YearTech Online User’s Manual Using Your Image Library 1 Use the Categories window to select the category of images you want to view. Your Image Library will help keep your images organized. Use the Create menu to access your Image Library. 5 3 4 1 8 9 10 11 2 12 7 6 2 A preview of the selected image will appear at the top of the Image Library window. 3 Enter the name of the photographed individuals in the Name fields. Click on the + button to add each name. 4 Highlight a name on the list and click on the - button to remove the name. 5 Enter the Keywords you would like associated with the selected photo in the Keywords field. Note: Entering information in the Name and Keywords fields will make finding and tracking photos in your yearbook much easier. And, if you enter accurate name information for each photo, you can have YearTech Online create your index for you. 6 The Red Exclamation Point designates an image that still needs to have name information added. 7 The Green Indicator marks an image that has already been used in your book. You may use an image more than once if you want. 8 Use the Rotate buttons to flip your image. 9 Click on the Save Image button to save the changes you have made. 10 Use the Delete Image button to remove an image from your Image Library. Note: You can delete digital images you uploaded as long as they have not been placed in your book. 13 11 Use the Add button to create a new photo category in your Image Library. 14 12 Click on the PDF button to create a PDF of the images in the category you are currently viewing. 15 13 Click on the Search tab to access the Image Library search functionality. 14 Designate if you’d like to search the Name and/or Keyword fields using the check boxes. 15 Enter the text you are searching for and click the Find button. 16 Photos and Images 4 16 Images matching the search criteria will appear in the Search Results window. Photos and Images Community Photo Site 1 Enter the start and end dates for your Community Photo Site on the setup screen that you accessed under Plan/Community Photo Site. 2 The User ID for your Community Photo Site will be provided. You can select the Password. The User ID and Password will be needed for users to login to your web site and upload photos. Note: This won’t take them to your Yearbook Avenue site, but to a special site where they can upload photos for your book. 1 2 3 5 4 Check the Site Enabled box to enable your Community Photo Site and click the Save button. To set up your site, use the Community Photo Site link under the Plan menu. 4 Community Photo Site (ID/Password required to access) 5 Send an e-mail with the URL assigned (along with the User ID and Password) to anyone you want to upload photos. After the user has checked that they have read and understood the terms and conditions, they can upload their image using the Upload Chosen Image button. Setting up a Community Photo Site will allow parents and members of your community to submit their photos for your use in the yearbook. Setup Page (found under Plan menu) 3 Enter the maximum number of photos you want in your Community Inbox at one time. When a user accesses your Photo Submission site, they will Browse their computer to find the JPG they would like to upload. (See Submitting Digital Images on page 2 of this section for more information on digital image guidelines.) 6 7 6 The user will then need to provide their contact information along with information about the photo they are uploading. Your Image Library (found under Create menu) 7 After the user clicks Save Details the image will appear in your Image Library Community Inbox. 8 You can view the uploaded photos and corresponding contact information in the Community Inbox category of your Image Library. Adviser’s Note: An image in the Community Inbox will not be available for staff use until someone with Inbox access approves it by dragging the image into a photo category folder in your Image Library. 8 Photos and Images 5 Creating Your Book Using Your Page Ladder 1 You can plan your book pageby-page. Section, Description, Deadline, Staff and Page Type can all be edited by clicking on them and entering information in the field that appears. 2 Use the Display Range dropdown menu at the top of the page to move through the book in 16-page increments. 3 The color coding will help you keep track of individual page status. 4 5 2 9 1 8 Use the Jostens Online Ladder to organize your yearbook. You can access the Page Ladder under the Plan menu on your header. 5 3 4 Click on the Print All button to print a hard copy of your yearbook ladder. 3 5 The Lock All and Unlock All buttons change the lock settings throughout the book, while the Locks on the thumbnails only affect the individual page. 6 6 The Adviser login can Hide a page and a Top Secret image will appear on the ladder. 7 Use the Filters and Templates tabs to move between ladder functions. 7 10 8 Use the drop-downs under the Filters tab to view your pages by Staff, Deadline, Page Type, Page Status or Lock Status. 9 Click on the Save All button to save the changes you’ve made to your ladder. 10 Under the Template tab, use the Template drop-down to select a template category. Adviser’s Note: To place a template, drag it from the Templates section and drop it on your selected page. • You will be able to assign up to two staff members to a page. • If you assign staff to a page, only the assigned staff along with the Adviser and Editor will be able to edit the page. • If you wish to allow editing access to all staff leave pages unassigned. Creating Your Book 1 Jostens YearTech Online User’s Manual Using Your Page Designer Use the Create menu to select the Page Designer. Jostens Page Designer provides you with powerful layout tools to help you create exciting pages for your yearbook. Using the Page Designer you can place and crop images, edit text, add clip art and backgrounds 3 1 4 2 1 Use the Images, Pages and Template tabs to navigate while creating your page. 2 To begin working on a page, click on the Pages tab to bring up a thumbnail view of the ladder. Click on the thumbnail of the page that you would like to work on and it will appear in the Page Designer. 3 Use the Page Designer Toolbars to edit your page layout. There is one standard toolbar and separate photo, text and shape toolbars that appear depending on which page element is selected. 4 You can add Ruler Guides by dragging them onto your page from the vertical and horizontal rulers. 5 5 Right-click on the Ruler to access a column guide pop-up menu. Page Designer Tools • Use the Keyboard Arrow Keys to nudge elements on the page. (The Snap to Grid needs to be disabled in order to nudge elements by points. If the grid is enabled the arrow keys will move the element to the nearest pica marker, and then in 1/2 pica increments.) • To align several elements simultaneously, hold down the Shift key while you select the elements. Using Jostens Pre-Designed Templates We have provided you with hundreds of pre-designed layout templates to help make the yearbook creation process easier. These templates can be used as-is, or modified in the Page Designer. 1 2 3 1 Click on the Templates tab in the Page Designer to access the available templates. 2 Use the Template drop-down menu to select a template category. You can access templates you “Saved as a Template” in the My Templates category. (See Saving and Sharing Templates on page 15 of this section for more information on saving templates and sharing them through Jostens Template Exchange.) 3 To place a template drag it from the Template thumbnails section and drop it on your selected page. Creating Your Book 2 Creating Your Book Using Click-N-Go! Templates 1 Choose the Click-N-Go! category you want to view from the template dropdown menu. 2 To place a Click-N-Go! drag it from the Template thumbnails section and drop it on your selected page. Note: When you drop the Click-N-Go! on the page the elements will be grouped together and highlighted in red. At this point you will be able to move all of the elements simultaneously. Use Jostens predesigned Click-NGo! templates to easily add Headline, Infographic, Photo Pres, Quote, Scoreboard and Sidebar elements to your layouts. 1 These templates can be used as-is, or modified in the Page Designer. 3 Edit the Click-N-Go! the same way you edit other templates. (See Placing Images, page 6, and Placing Text, page 8, of this section for more information on editing templates. 2 3 Rotating Elements Take Note: 1 When a page element that can be rotated is selected, a red circle will appear at the top of the element. To rotate the object, click and hold on the red circle while dragging your mouse in the direction you want to rotate the object. Note: Text can only be rotated 180 degrees. Page Designer will automatically rotate the selected element in 15 degree increments. You can rotate the selected element in one degree increments by holding down the Shift key while you do the rotation. You can rotate photo boxes and shapes through Page Designer. 1 Creating Your Book 3 Jostens YearTech Online User’s Manual Creating Photo Shapes 2 1 Click on the photo box you would like to edit, or place a new photo box on your page. You can use the Page Designer to edit photo boxes and create exciting photo shapes on your layout. 2 To change the shape of the selected photo box click on the Arrow next to the Place New Shape button and choose the shape you like from the drop-down menu. 3 To place an image in your shaped photo box select an Image from the Image thumbnails section and drop it on top of the photo box on your page. 1 4 The image will appear in the shape of your photo box. (See Placing Images on page 6 of this section for more information on placing images.) 3 4 Creating Your Book 4 Creating Your Book Placing Shaped Elements 1 1 Select the element shape you would like to add to your page using the Place Shape button on the toolbar. You can use the Page Designer to easily add shapes to your page. 2 You can resize the shape by clicking and dragging a square (along the border) until you reach the size you want. Hold down the Shift key while resizing your shape to keep the resize proportional. 3 You can change the color of the shape when it is selected by clicking on the Paint Can button and choosing a color from the color palette. Use the Paint Brush button to change the stroke (line color). Tracking colors on your pages: 4 The color palette automatically tracks the colors being used on each page. When you access the color palette you will see the colors used along the top. This is especially helpful when two staff members are assigned to work on the same page. 2 3 4 Creating Your Book 5 Jostens YearTech Online User’s Manual Placing Images 5 3 1 Click on the Images tab in the Page Designer to access the available images. 2 Use the Images drop-down menu to select an image category. Jostens clip art is listed by category under the clip art header in the drop-down menu. 1 2 3 When you use the Search button the returned images will appear in the image column. Note: The search is looking through words and names you entered for each image in the Image Library. (See Using Your Image Library on page 4 of the Photos and Images section for more information.) 4 4 To place an image drag it from the Image thumbnails section and drop it on the photo box you would like it placed in. Click on the image in the box. When your cursor turns into a hand you can use your mouse to reposition the image in the box. 5 With the photo selected, use the zoom in and zoom out buttons to adjust cropping. (You won’t be allowed to zoom more than the photo resolution will allow.) To move a photo box, click on the edge until your cursor becomes a 4-sided arrow. Then use your mouse to reposition the image box. Photo/Image Tool Bar Image Width Creating Your Book 6 Change Line Width Image Height X and Y coordinates of image on the page Change Line Color Ghost Image Menu Shape Menu Rounded Corners Zoom Out Rotate Flip Right Vertical Make Flip Zoom Rotate Left Horizontal Background In Creating Your Book Ghosting Photos Use the Ghosting feature to create fun photos. 1 While in Page Designer, select the photo or page element you want to ghost. 1 original image 2 With the image selected, use the Ghost Image drop-down menu to choose a percentage for your ghosting. You can also use the numbers on your keyboard to apply a ghost to the image. number ghost 1 10% 2 20% 3 30% 4 40% 5 50% 6 60% 7 70% 8 80% 9 90% 0 100% 2 30% ghost applied Using Note-It 1 1 Click on the Note-It button to place a new note on your page. 2 Enter your message in the white box, then click Post. You can minimize a note by double clicking on it, and you can remove a note by highlighting it and hitting the Delete key on your keyboard. 2 Use the Jostens Note-It feature to communicate with your staff. You can see a list of all pages containing notes by clicking View Notes on your Home Page. Creating Your Book 7 Jostens YearTech Online User’s Manual Placing Text 1 3 2 1 Enlarge your Page View using the drop-down menu so that you will be able to see the text on your monitor as you edit it. You can also use Shift+ the scroll wheel on your mouse to zoom in and out. 2 Choose the text box you would like to edit by selecting it with your mouse, or click on the text box button on the tool bar to add a new text box. Highlight and delete the default text and enter your own text. 3 Use the tools in the Text Toolbar (see enlargement below) to change the font attributes and alignment for your text. (See Selecting Fonts for Your Book on page 3 of the Planning Your Book section for more information on fonts.) 4 4 You can change the attributes, alignment and style of a text box by right clicking on the text box and choosing from the pop-up menu. To move a text box, click on the edge until your cursor becomes a 4-sided arrow. Then use your mouse to reposition the text box. Text Tool Bar X and Y coordinates of image on the page Text Box Height Text Box Width Creating Your Book 8 Change Line Color Change Fill Color Change Line Width Change Font Change Text Color Font Size Italics Align Left Bold Underline Align Right Rotate Text Left Align Justify Rotate Center Text Right Creating Your Book Using Spell Check 1 Use the Spell Check feature in Page Designer to double check your text before submitting your final pages to the plant. 1 You can spell check a page by clicking on the Check Spelling button on the toolbar. If you have Facing Pages open it will check the text on both pages. Note: You can spell check one text box at a time by selecting a text box before clicking on the Check Spelling button. 2 The Spell Check pop-up window will display possible misspelled words from the selected text box. 3 You can Ignore or Change the displayed word. You can also choose to Add a word to your dictionary so it will not be mistaken for a misspelled word when you run future spell checks. 2 3 4 You will receive a Spell Check Complete pop-up window once you have finished checking your text. Take Note: 4 All names imported when you autoflow your portrait panel pages will be automatically added to your spell check dictionary. (See Portrait Panel Pages, pages 12-14 of this section, for more information on creating your portrait pages.) Creating Your Book 9 Jostens YearTech Online User’s Manual Autograph and Division Pages Autograph and division Pages can be placed throughout your book. Start by placing a full-page bleed template on the page you have selected. 1 For autograph and division pages use template Opening 8090 which has one photo box that fills the whole page and bleeds off the edges of the page. Note: Use this same template to place the custom collage designs you submitted on mounting boards. 2 Click on the Images Tab to access your images. 1 3 Choose the Autograph-Division category from the Image menu. Then choose the autograph or division page artwork you would like to place. 4 Select the image you would like to use and place it on your page. You do not need to edit the autograph and division images if you place them in a full-page photo box. 2 3 Take Note: 4 You can place text on a division or autograph page by opening the page in your Page Designer and adding a text box. Backgrounds and Borders You can add backgrounds and borders to pages very easily using the Jostens Make Background tool. Creating Your Book 10 1 Open the page you would like to place a background or border on in the Page Designer. 1 Use the Add Photo Box button to add a new photo box to the page. Creating Your Book 2 Place the image you would like as your background in the photo box you just created. Note: Borders can be found in the Jostens Clip Art Borders category. 2 3 3 With the photo box selected, click on the Make Background button on the toolbar. This will enlarge the selected image and send it to the back of your page. If you click the Make Background button again the image will return to the original photo box. You can also delete the background by selecting it and clicking the Delete button. Take Note: When you place images and text you will see that they appear in front of the background you placed. When you place a border on your page, you may need to edit other page elements in the Page Designer to make sure they fit within the border. Creating Your Book 11 Jostens YearTech Online User’s Manual Portrait Panel Pages (Automatic) We recommend using the auto flow function available on the YearTech Online web site to create your portrait pages. This auto flow functionality will save you considerable time. In order to use the auto flow functionality, you must submit a Portrait CD from your photographer. (Have your photographer follow Jostens Panel Flow instructions when creating your portrait CD. More information is available at http://www.jostens.com/yearbook/tech_panel.asp) If you decide to create your portrait pages using the auto flow functionality, follow these steps: 1 Submit your portrait CD to Jostens in the Portrait CD mailer included in your kit. 2 Edit your student image information in the Image Library. Then print out a category preview to create your own “photo proofs” to edit. Enter all changes into the Image Library before you flow your pages. 3 Auto flow your portrait categories into your book. Take Note: 4 Make all corrections in the Image Library. This will ensure that the edited information shows up correctly when you do your Index. Creating Your Book 12 Creating and Editing Portrait Pages if you did not send in a Portrait CD If you submitted photos to be scanned, you will create your portrait pages just like you create your other pages. See Creating Your Book – page 2 to learn how to select the template for your pages. Once you have your portrait templates, you can manually place your photos and text according to the instructions on Creating Your Book – pages 6-8. Creating Your Book Editing Portrait Panel Pages (Automatic) 1 You can change a person’s name using the Name entry fields. 2 If you need to move a person from one portrait category to another you can do so by clicking on their image preview and dragging their image to another category. 3 Use the Portrait Type drop-down menu to tag a record as Teacher, Assistant Teacher, Student or Other. Portraits will place alphabetically within each portrait type category, and the categories will place in the following order: Teacher, Assistant Teacher, Student, Other. 7 6 3 Choose the portrait category you would like to work in from the Categories dropdown menu in your Image Library. 1 4 Click on a portrait thumbnail to edit the information for that portrait. 5 4 Use the Use Portrait drop-down menu to choose whether to use the 2 portrait or “no photo" artwork. 5 Use the Delete Image button to remove an entry. Note: We recommend against deleting images in case you decide to use them later, instead select "Don't Use Portrait." 6 Use the Keywords field to add names, categories or information to make that image appear in the results window when doing an image search for those words. Names or other information associated with the image that you do not want to occur in the Index should be placed in this field. 7 If you select the Index This Photo option, all the information in the Names field will be included in the Index. The Index feature does not read the Keywords field. Note: If you do not want an entry to appear in the index, uncheck this box. 8 Take Note: 8 Click Save Image to save your changes to the portrait record. Before you flow your panel pages, it is important that you edit the “No Grade” category in the Image Library. If you do not redistribute these photos to the appropriate category before you flow your pages, the photos will not appear in your book. Proofing Tips: If you need assistance from classroom teachers or others to review the portrait information and provide feedback you can print out category previews by clicking on the PDF button at the bottom of the Image Categories tab in the Image Library. Then enter all changes into the Image Library before you flow your pages. Creating Your Book 13 Jostens YearTech Online User’s Manual Creating Portrait Panel Pages (Automatic) After you submit your portrait CD (from your photographer) to Jostens, you can use the auto flow functionality on YearTech Online to create your portrait pages. Note: Have your photographer follow Jostens Panel Flow instructions when creating your portrait CD. More information is available at http://www.jostens. com/yearbook/tech_ panel.asp Under the Create menu, select Panel Pages to begin creating your portrait section. 2 1 Use the Image Category drop-down menu to choose the category you would like to work on. 2 Use the Pages tab to select the page you would like to flow your portrait panel pages onto. You can also select the starting page number by typing it into the ‘Start on Page’ field in the center of the Overwrite These Pages bar 3 1 4 5 6 7 3 Move to the Builder tab to set the parameters for your portrait pages. 4 Use the available menus to select the Portrait Size and Shape, Border Width, Name Location, Name Font and Size for the category you have selected. 5 Edit the Column and Row Spacing and Margins to alter the layout of your portrait page. Note: Make sure to leave adequate margin space at the top and bottom of your pages if you would like headlines, candid photos or stories on your pages. You can add these elements in the Page Designer after the names and images have been flowed. 6 Click Preview to see how your pages will flow. If you don't like how your page preview looks, just adjust your settings and preview the page again. 7 Once you are satisfied with the preview use the Save button to flow your portraits. 8 Creating Your Book 14 8 You can edit a portrait page in the Page Designer. Once in the Page Designer you can add activity photos, headlines and other page elements. Creating Your Book Saving and Sharing Templates 1 1 You can save page layouts as Templates by clicking on the Save as Template button on the toolbar. Note: This is especially useful if you design your own division pages or any other templates you would like to use more than once in your book. 2 Enter the name for your template and click on the Save button in the pop-up window. 2 3 You can access your saved templates by selecting the My Templates category from the template drop-down menu. Sharing Templates: Jostens Template Exchange YearTech Online allows you to share your templates with other Jostens YearTech Online customers who are creating the same size book as you. The Template Exchange Community folder will hold 500 templates at a time. Each time a new template is added the oldest template will be purged. If you see a template you like in the Template Exchange copy it to one of your pages and save it as one of your personal templates (see steps 1-3 above). 3 4 4 Click on the Share button next to the template you would like to share. (Only the Adviser login can Share templates.) 5 Once you share a template it will appear under the Template Exchange/ Community category in the template drop-down menu. 5 Creating Your Book 15 Jostens YearTech Online User’s Manual Creating Your Index Use the Jostens Online Index creation tool to quickly and easily create the index for your book. You can access the Indexing tool by selecting Index under the Create menu on your header. 1 1 Use the Pages tab to select the page you would like to flow your index onto. 2 Move to the Builder tab to set the parameters for your index pages. 3 Use the available menus to select the Name Format, Divider and Body Fonts and Number of Columns for your index. 2 3 4 5 4 Edit the Margins to alter the layout of your index. Note: Make sure to leave adequate margin space at the top and bottom of your pages if you would like headlines, candid photos or stories on your pages. You can add these elements in the Page Designer after you flow your index. 5 Click Preview to see how your pages will flow. 6 Once you are satisfied with the preview use the Save button to flow your index. 7 Creating Your Book 16 7 You can edit your index by opening it in the Page Designer. Once in the Page Designer you can add activity photos, headlines and other page elements. Take Note: 6 The indexing tool uses the information you entered in the Name fields in your Image Library to create your index. The name fields in the Image Library are set up so that entries are formatted correctly for placement in the index. It is important to keep the information in the Image Library up to date so that the index is correct. Reviewing and Submitting Your Book Reviewing Your Pages Before submitting a page, do a complete review and carefully check for misspellings and incorrect photo placement. Correct any errors you find. Once a page has been submitted, it cannot be changed. 1 1 When you use the Highlight Incomplete Elements button YearTech Online will display possible problems such as text that is too large to fit in the text box and text and photo boxes that have not been edited. The Highlight Incomplete Elements function does not check content, spelling, photo cropping, etc. It is important that you print a PDF and review your page before submitting it to the plant. 2 Use the Printer Icon on the Page Ladder to create a medium resolution PDF of your page. Note: You will not be allowed to Submit your page until you have generated this PDF proof. 3 To print a hard copy of your page, click on the printer icon at the top of the Print Preview PDF window, or select Print from the File menu while viewing your Page Preview. When reviewing your page, check the following carefully: 2 1) Check all text for proper spelling, punctuation and placement. (See Using Spell Check, on page 9 of the Creating Your Book section, for more information on using Spell Check with YearTech Online.) 2) Double-check the spelling and accuracy of all names. 3) Check all photos for proper placement. 4) Print out a final copy of the page for your records prior to submission. 3 Reviewing and Submitting 1 Jostens YearTech Online User’s Manual Submitting Your Pages Before submitting a page, do a complete review and carefully check for misspellings and incorrect photo placement. Correct any errors you find. Once a page has been submitted, it cannot be changed. 1 1 When you are working in your Page Ladder (found under the Plan and Create menus), you will notice the pages are color-coded to indicate their status. You will also notice when a page is in process, a Complete button is available. 3 2 3 After a page is marked as complete, you will see two new buttons -- Submit and Return. Note: The Submit and Return buttons are only available with the Adviser login. If you decide the page still needs modification, simply select the page and make the changes. You also have the option to Return which requires the page to be set Complete again when you are finished with your editing. 5 4 Take Note: 6 Reviewing and Submitting 2 Only the Adviser login has the ability to submit pages. If you choose to share this privilege with an editor or staff member you are still responsible for the pages they submit. Be very certain that all pages are thoroughly reviewed before they are submitted. 2 The page status turns yellow after you click the Complete button. You can use the Complete button only after you have edited all of the photo and text boxes on your page. Note: Use the Highlight Incomplete Elements button on the Page Designer toolbar to see which elements you still need to edit on a page. 4 Before you can submit your page you will need to view the Proof PDF for final confirmation that the page is correct. Click on the printer icon on the Page Ladder to generate the Proof PDF. Once you view the PDF version of the page you will be able to hit the Submit button. 5 After you thoroughly review your page and determine it is ready for submission, click on the Submit button. Note: Once you submit a page, you will no longer be able to make changes to it. Changes requested after submission can result in extra charges. Contact your plant consultant for assistance. 6 Once a page has been submitted, it will appear on your Page Ladder with green color-coding. Submitted pages cannot be changed. Reviewing and Submitting Your Book Page and Photo Deadlines You will receive a copy schedule from the plant with your page deadline due dates. Please keep in mind that photos to be scanned by Jostens must be submitted and received a minimum of three weeks prior to your page deadlines. (Example: A November 21 page deadline would create a November 1 deadline for submission of photos to the plant for upload.) This will allow enough time for you to review photos and make final photo selections for the pages on that deadline. We do recommend that you submit your photos and Panel Flow CDs to the plant as quickly as possible. Use the school upload functionality only for late additions and changes. Remember you have been allocated an average of 14 photos/images per page. (This does not include portrait photos.) Refer to the Home Page of Yearbook Avenue for the number of photos contained in your Image Library. Since you will be reviewing each page prior to submission, there will be NO PROOFS coming from Jostens. Please review each page carefully prior to submission. Helpful Hints for Planning Deadlines Utilize your copy schedule when setting up the Planning Ladder for completion of ontime deadlines. ___ Even though you may submit single pages, plan your submissions to equal complete multiples by the page deadline if you are on a multiple submission schedule (your copy schedule from the plant will reflect this). You should also plan to submit complete color multiples. ___ Plan to submit photos to be scanned and uploaded by the plant three weeks prior to the page deadline. Plan to upload images directly into the Image Library only for last minute or emergency situations. ___ CDs with digital images or photographer CDs should be sent to the plant as soon as possible, even though uploading digital images will not require as much time as for images that need to be scanned. Photo CDs still need to be sent to the plant BEFORE the page deadlines. ___ Utilize staff member planning to be able to allocate work and deadlines to the editors and staff members for best resource management. Take Note: ___ Helpful Definitions Signature — a 16-page group of pages that are printed on both sides of one large sheet of paper. Note: A signature — two multiples — is printed, folded, bound with other signatures and then cut to create a yearbook. Multiple — also called a flat, is one-half of a signature; the eight pages that are printed together on one side of a single piece of paper. Example: one multiple would include pages 1, 4, 5, 8, 9, 12, 13 and 16 OR pages 2, 3, 6, 7, 10, 11, 14 and 15. The flat would be printed on one side of a large piece of paper. Reviewing and Submitting 3 Other Yearbook Summary Report 1 Under Contacts you will find contact information for your yearbook representative, your consultant and technical support. 2 Your Current Book Statistics provides you with book size and copy details. 3 Yearbook Options You’ve Ordered provides details concerning your ordered options. Example: If you are offering Personalization on your books, it will be listed here. 4 Your Yearbook Cover Information details your cover specifications. Use the Yearbook Summary report available online to help you track your yearbook details. 1 2 3 You can access your Yearbook Summary Report by clicking on the Summary Report link under the Status menu. 4 5 5 Your Endsheet Information contains all of the specifications regarding your endsheet selections. 6 Page Submission Deadlines details your page submission status. 7 Page Submissions Received and Page Submissions Totals will help you track your page submission progress. 8 Your Key Dates will list important dates that are coming up. 9 Scheduled Deposits and Payments Received will help you track your finances. 10 Your Latest Page Submission Message will show the latest message from the plant. 6 7 8 9 10 Other 1 Jostens YearTech Online User’s Manual Cover Information You can view your cover and endsheet details online. To access this information, select Cover Information under the Status menu. 1 The Cover Information section contains the specifications for your cover as well as proof out and return dates. 1 2 The Endsheet Information section contains all of the specifications regarding your endsheet selections. Note: To change your cover and endsheet specifications contact your yearbook representative. 2 Contacting Jostens Information Under the Contact Us menu, select My Jostens Contacts. All the information you need to quickly contact Jostens is available on the this page. 1 2 1 Click on your Sales Representative’s Name to be taken to their Web page complete with their photo and phone numbers. You can send an e-mail from their Web page or by clicking on the e-mail address link on the contact page. 2 Contact your plant consultant by calling the phone number for your printing plant or by clicking on their e-mail address link. 3 Use the listed technical Support Numbers or the listed e-mail link to get assistance from Jostens technical support personnel. 3 For Technical Support contact Jostens: U.S.: 1-800-328-2435 e-mail: [email protected] Other 2 Canada: 1-800-665-7597 e-mail: [email protected] Other Ordering Supplies * 1 Select the category you would like to order from. 1 2 Click on the Details link to learn more about a specific item. 3 Use the Add to Cart button to purchase an item. You can easily remove items from your cart if you decide not to purchase them. 4 As you purchase items, you will see them in your Shopping Cart. To purchase other items, click Continue Shopping. It is very easy to find and order all the yearbook supplies you need right on Yearbook Avenue. Use the Order Supplies link under Common Tasks and Tools on your main page to access the shopping page. 2 5 You can update the quantity of an item by changing the number in the Qty field and clicking the Update Qty button. 3 6 Click on the trash can graphic to remove an item from your cart. 7 When you are ready to place your order, click the Secure Checkout button and follow the instructions. 6 5 4 7 * Canadian Customers please contact your Yearbook Sales Representative for product information and pricing. Other 3 Frequently Asked Questions How do I get my Login ID and Password? If your school is new to Jostens, you will receive your Yearbook Avenue login information in the back-to-school mailing from Jostens. If you used Yearbook Avenue last year, your existing adviser login will carry over to your 2008 book. The first time you log in, you will be asked to provide contact information and change your login and password to something you will easily remember. What are the technical requirements to use Yearbook Avenue and YearTech Online? Hardware requirements: Windows or Macintosh Operating System • Intel Pentium processor or PowerPC processor based on OS requirements • Windows 2000, XP, XP Pro or Vista • Mac OS 10.1 or higher • 128 MB of available RAM (256 MB or more recommended) • Video card with 24-bit, high resolution display Internet requirements: Although Jostens recommends high speed internet (DSL, Cable, T1) a 56K modem will work. Browser requirements: • Windows: Internet Explorer 6.0 and above or Firefox 1.5 and above • Mac: Safari 1.2 and above or Firefox 1.5 and above Flash requirements: Flash 8.0 or higher. Flash is a free download from www.adobe.com. Most newer computers come with Flash installed. If you do not have version 8 or above, the first time you try to access the Page Ladder or Page Designer, you will see a message asking you to download the software. If you do not have rights to install software, you may need to contact your network administrator. Will pop-up blockers prevent the site from working correctly? Some functions in Yearbook Avenue require using pop-up windows. If you are using a pop-up blocker, please set it to allow pop-ups from the yearbookavenue.jostens.com site. Where do I mail my photos and photo CDs so Jostens can load them onto my site? Use the Photo Mailers and the Jostens address labels found in your kit to mail your photos to Jostens. (See the Photos and Images section of the manual for more information.) FAQs 1 Jostens YearTech Online User’s Manual How long will it take to get my photos/CD uploaded once the plant receives them? It will generally take 3-5 days after the plant receives your images to load them onto your site. Can I move a folder into another folder in the image library? No. You can move images from one category to another, but not an entire folder. How do I move images in the image library? In the Image Library, click on the thumbnail of the image you would like to move and drag it to a category folder in the tab on the left. Make sure the folder you are moving the image to is highlighted and has an underscore on the name before you let go of the image. Can I delete images from my Image Library? Yes. You can also delete categories by first deleting all of the images in that category. You cannot delete images that have been used in your book. Note: Do NOT delete portrait images from your library. Instead, use the “Use Portrait” drop down box and choose “Don’t Use Portrait” instead of deleting an image. Where are the images that my Staff members have uploaded? All images uploaded by staff go into the Staff Inbox in the Image Library. Even Staff members with Inbox Access will upload into the Staff Inbox, but they will have the ability to go into the Image Library and move images to another category. How do I access/approve photos uploaded into the Community and Staff Upload Inboxes? Advisers, Editors, and Staff members with Inbox Access can move images from the Community and Staff Inboxes into any other category. In the Image Library, click on the thumbnail of the image you would like to use and drag it to a category folder in the tab on the left. Make sure the folder you are moving the image to is highlighted and has an underscore on the name before you let go of the image. How do I upload a photo to my Portrait Categories? We suggest that you send your portraits on a CD into the plant to be uploaded because it is much quicker than uploading them yourself. However, If you need to upload portraits follow these steps: • Choose Image Upload from the Create menu and upload up to 10 photos at a time. • When uploading your photos, create a new category. eg: “Grade 09” FAQs 2 Frequently Asked Questions • Choose Image Library from the Create menu. • In the Image Library, highlight the category “Portrait.” • Click on the Add button at the bottom of the page. • Enter a new category name, such as “09." Note: You will not be able to use the same category name you originally created when uploading your images. • Choose the original category with your images (Grade 09). • Select all the image thumbnails by holding down the Shift key while clicking on the images with your mouse. • Drag the images into the new portrait category (09). Can I edit photo boxes or add backgrounds on portrait pages? Yes. After you auto flow your portrait pages open them in the Page Designer to edit them. When will I get my original photos back once they are uploaded? Your original materials will be returned with the shipment of your books. How do I draw a straight vertical or horizontal line? Select the arrow to the right of the Add Shape button to get the drop-down menu that lists the various shape choices. Choose Vertical or Horizontal rule from the menu and a line will appear on your page. You can edit the line by selecting it in Page Designer. How do I lock elements on a page? With the item selected, click the Padlock icon on the toolbar. The section points around the object will turn into locks. Is there a Page Enhancer for the YearTech Online program like InDesign and PageMaker? No. Items can be copied and pasted, flipped and rotated but there is no actual Page Enhancer. How do I save as a template? Click on the Save as Template button on the toolbar. After you name and save the template it will appear under the My Templates section in the Template categories. FAQs 3 Jostens YearTech Online User’s Manual What does review proof pdf mean? YearTech Online requires that you view the full-page PDF before it will allow you to submit your final page. Click the printer icon from the Page Ladder or within the Page Designer to create a PDF version of a page. I am trying to submit a page, but I keep getting an error that says the photo and text boxes are not complete. What do I need to do? If you are attempting to submit a page and an error appears indicating you have photo and text boxes that are incomplete, you will need to go back into your page to fix it. First, make sure your page is unlocked and not set as complete (if it is, click on the Reject button). Next, open the page in Page Designer. Use the Highlight Incomplete Elements button on the toolbar to find the elements you need to finish before you can submit your page. Once you have edited or deleted these elements and viewed your page PDF you will be able to submit your page. I ordered a book through shop.jostens.com, when will that be reflected on Sell/ ItPays? The payment should be reflected in ItPays in 2 to 3 business days. For Jostens Technical Support: USA phone: (800) 328-2435 e-mail: [email protected] Canada phone: (800) 665-7597 e-mail: [email protected] FAQs 4 Frequently Asked Questions Notes FAQs 5 Jostens YearTech Online User’s Manual Notes FAQs 6