1
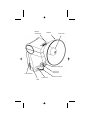
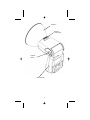
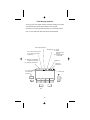
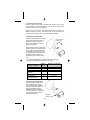
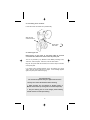
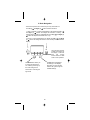
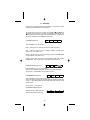
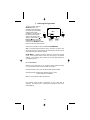
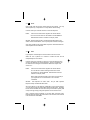
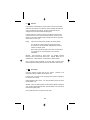
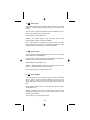
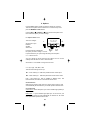
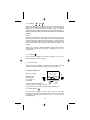
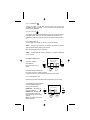
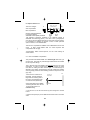
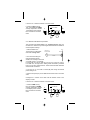
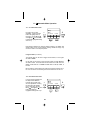
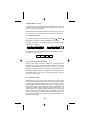
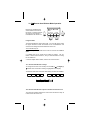
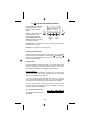
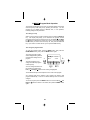
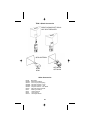
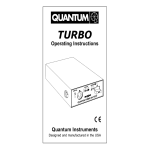
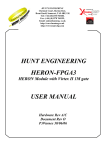
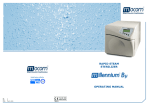
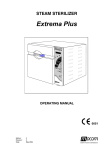
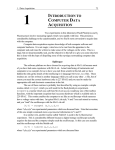
Qflash® Trio QF8
Shoe Mount Digital Flash
Operating Instructions
Quantum Instruments
Designed and manufactured in the USA
Reflector
Locking Ring
Reflector
Flash Tube
Power Cable Input
Auto Focus
Assist Light
Flash Indicator
Shoe lock wheel
USB
Auto Sensor
Reflector
Reflector
Locking Ring
Release
Button
Flash Indicator
1
Flash Display Symbols
The top portion of the display contains information relating to the status
of the internal radio, and the options that are set on the flash.
See Section 8 for setting the radio and Section 9 for setting the options.
Note : in some modes the radio mode will be set automatically.
Flash compensation set
Reflector type N – normal
D – diffusor
wide angle dome
soft box
B – bare bulb reflector
or bare bulb
1234 – Zones that are turned
on. If a zone is off it will be
replaced by a “-“.
Tx – Radio set as Transmitter
for SYNC / LINK / QTTL
Speaker on
Rx – Radio set as Receiver
Flash LED
indicators on
CH 4 TX 12-4
N
CH – Channel setting
of internal radio,
0 through 7.
Flash ready
-
+
FIRE
OPT
SAVE
MODE
/OK
RADIO
SET
2
Table of Contents
Section
1. Introduction
2. Warnings
3. Advanced Features Summary
4. Getting started
5. Basic Navigation
6. Basic Options
7. Choosing the right mode
8. Radio set up
9. Options
10. Q QTTL Mode
11. A Automatic Mode
12. AF Auto Fill Mode
13. QR QTTL Ratio Mode
14. M Manual Mode
15. RL Remote – Linked to local Qflash Mode
16. RA Remote Auto Wireless Mode
17. RG Remote Group mode
18. AM Advanced Multi Mode
19. PRGM Program mode
20. Updating the Trio
21. Customer service
1. INTRODUCTION
Quantum’s “Trio” series flash integrates camera dedication, Qflash
quality light, and Quantum’s FreeXWire radio technology. A Trio
mounted in a camera hot shoe wirelessly controls remote Trios in
multiple modes.
And, many features of the Trio will enhance your lighting control when
used with Qflash 5d-R and FreeXWire FW7Q, FW8R, FW9T, and
FW10w.
While powerful and extremely versatile, the operation of the Trio is
intuitive and straightforward. Many of the wireless modes will set the
Radio to Transmit (Tx) or Receive (Rx) automatically. We encourage
you to start pushing buttons and explore the operation of the Trio.
Older Qflash models will work with some of the Trio modes and can also
be upgraded to increase their compatibility with the new Trio. Visit
www.qtm.com to download instructions for using older model Qflashes
with the new Trio and information about upgrades.
Note : Trio models are dedicated to only one brand of camera. Example,
QF8N for Nikon, QF8C for Canon. Use only the Trio model for your
camera brand.
3
2. WARNINGS
CAUTION
RISK OF ELECTRIC
SHOCK. DO NOT OPEN.
WARNING : TO REDUCE THE RISK OF ELECTRICAL SHOCK, DO
NOT OPEN THE QFLASH. NO USER SERVICEABLE PARTS INSIDE.
REFER SERVICING TO QUALIFIED SERVICE PERSONNEL.
The lightning flash with arrowhead symbol within an
equilateral triangle is intended to alert the user to the
presence of uninsulated “dangerous voltage” within the
Qflash’s enclosure that may be of sufficient magnitude to
constitute a risk of electric shock to the person.
The exclamation point within an equilateral triangle is
intended to alert the user to the presence of important
operating instructions accompanying the Qflash.
DISCONNECT EXTERNAL POWER BEFORE CHANGING THE FLASH
TUBE, CONNECTING OR DISCONNECTING TO/FROM CAMERAS,
POWER PACKS, OR ANY OTHER EQUIPMENT.
OPERATE ONLY WITH A FLASH TUBE IN THE SOCKET
DO NOT TOUCH THE FLASH TUBE SOCKET WITH METAL
OBJECTS
THIS IS A PROFESSIONAL INSTRUMENT.
CHILDREN
KEEP AWAY FROM
TO REDUCE THE RISK OF ELECTRIC SHOCK, DO NOT EXPOSE
QFLASH TO RAIN OR MOISTURE.
4
3. Advanced Features Summary
The chart below summarizes the advanced features for various Qflash
series. A “U” means the Qflash model will have this feature when
upgraded to series 5d-R. An “F” means this feature is available in the
model shown. An “N” means the feature is not available. Visit qtm.com
for upgrade procedures and costs.
Feature
Wireless Control in Nikon/Canon
systems with Qnexus
Wireless multiple ratio TTL
( Qf5d-R requires Dw-R Adapters
& FreeXWire)
Wireless preflash TTL
( Qf5d-R requires Dw-R Adapters
& FreeXWire)
Wireless remote Auto / Auto Fill
mode
Zone control of FW7Q from panel
of Qflash
Flash ready indication in camera
viewfinder
(camera detects flash and sets
shutter)
Shutter speed control
Rear Curtain Sync
High speed sync
Auto focus assist
Auto Fill ratio
Flash exposure lock
QF4d
QF5d
QF5d-R
Trio
U
U
F
N
U
U
F
F
U
U
F
F
U
F
F
F
U
F
F
F
F
F
F
F
F
F
N
F
F
N
F
F
N
F
F
N
F
F
N
F
F
N
F
F
F
F
F
F
4. Getting Started
4.1 Restoring Factory settings
You can restore the factory settings by the following method:
1. Turn Turbo OFF, connect Trio to Turbo.
2. Press and hold any button on the Trio.
3. Turn Turbo ON.
4. The Qflash will display a reset message and some soft key options
See section 9.1 for display of reset message.
RESET ALL - will restore all the factory settings.
KEEP P1 P8 - will keep your stored Program modes, but reset
everything else to factory settings.
EXIT – will exit the reset menu without changes
5
4.2 Inserting the Flash Tube
Match the red dot on the base of the flash tube with the red dot in the
socket of Qflash. Push the flash tube in until it is seated snugly into the
socket. Excessive force is not required.
Replace the flash tube only with Quantum type QF30 or QF30uv for
Qflash model T5d / T5d-R. Other flash tubes will not provide proper
exposure, may not work at all, or they may damage the Qflash.
4.3 Reflectors and Bare Bulb
Reflectors are secured by the locking
ring near the base of the reflector.
Rotate the ring in the directions
shown in the diagram to loosen or
tighten the reflectors.
Tighten Reflector
Locking Ring
When inserting a reflector, first slowly
rotate it until the notch in the reflector
“drops” fully into head of the Qflash.
Then tighten the locking ring. If you
do not let the reflector drop fully into
the Qflash before locking it, the
reflector may become loose during
use.
The “normal” QF60 reflector is supplied with Trio. Other light
modifiers are available as options from your dealer.
Reflector / modifiers
Normal QF60
QF60 w/flat diffuser
QF67A Dome diffuser
QF62Bs/g Bare Bulb
Reflector
QF63B Tele Reflector
QF 68 Soft Box
QF69 Mini Soft Box
Approx.
Angle
Guide No. for ISO 200
55
90
120
180
150ft / 49m
100ft / 30m
80ft / 26m
62ft / 27m
20
170
322ft / 98m
62ft / 27m
4.4 Bounce and Swivel Head
The head position is locked and
can be changed with a single
button (see diagram). Press and
hold this button, then adjust the
head to the desired position.
Release the button, and slightly
move the head until it “clicks” and
locks the head into the vertical
and horizontal planes.
RELEASE
BUTTON
6
4.5 Connecting Trio to a Camera
Loosen Shoe lock until metal “foot” protrudes fully.
Slide Trio into
camera hot shoe.
Tighten shoe
lock wheel
4.6 Powering the Trio
Before turning on any power to Trio always make all electrical
connections first, both to the camera and to the power pack.
The Trio is powered by any Quantum Turbo Battery including Turbo,
Turbo 2x2, Turbo Compact, Turbo SC, Turbo AC and Turbo Z.
Plug the Trio power cable into the flash, then into the output connection
of the power pack.
If a “Check Turbo” message appears on the Trio display, turn off the
Turbo, wait one second, and turn it on again. If the message appears
again, the power pack needs recharging.
Very Important Tips
For consistent exposures with your digital camera and Trio.
● Always do a custom white balance before shooting
● When shooting TTL use Aperture or Shutter priority or
Manual camera modes (P mode gives inconsistent exposures)
● Set your metering area to center weight, partial metering
instead of matrix or multi-spot metering.
7
5. Basic Navigation
This Section explains how to maneuver your way around the Trio
The Left (-) Å and Right (+) Æ buttons have two functions.
1. When a selection or setting is highlighted on the display the Left (-) Å
and Right (+) Æ buttons will change that selection or setting. For
example if the F/number is highlighted then the Left (-) Å and Right (+)
Æ buttons will adjust the F/number down or up.
2. If there is nothing highlighted on the display the Left (-) Å and Right
(+) Æ buttons will change the function of the soft keys located under the
display.
-
+
MODE
/OK
SET
There are four soft keys
located at the bottom of
the display. These soft
keys
will
change
function based on flash
mode or user operation.
The Set button will highlight
the settings on the display.
Each time you press the Set
button it will cycle through the
available settings.
The Mode button allows you
to change the mode of the
Trio. Pushing it will bring up
the mode change menu.
See Section 7 Choosing the
right mode
8
6. Soft keys
There are four soft keys located under the display. The function of these
soft keys will change based on user operation.
To change the function of the soft keys use the Left (-) Å and Right (+)
Æ buttons when no selection or setting is highlighted on the display. The
soft keys assignment will change to the next available one. Note that not
all soft key assignments are available for all modes
6.1 Default assignment
FIRE
OPT
SAVE
RADIO
(DEFAULT)
This is available for all Trio modes
FIRE – Test fire the Trio, and any remotes if the radio is turned on
OPT – Enter the options screen to change, speaker, indicator lights,
reflector, etc. See section 9.0
SAVE – Save this set up as one of the eight programs in PRGM MODE
(Program Mode). See section 19.0
RADIO – Enter radio set up menu to select radio mode (OFF, SYNC,
LINKED/QTTL, Rx), change zones and channels See section 8.0
6.2 Sensor Limit assignment
5
10
15 –20
(SENSOR LIMIT)
This is available for any Trio mode where
exposure is controlled by the sensor located on the front of the flash.
See section 11.5 for details on using the Sensor Limit
6.3 Radio Zones assignment
1 ON
2 ON
3 OFF
4 OFF
(RADIO ZONES)
This is available when the radio is turned on
and for all modes except for QTTL Ratio (QR) and Advanced Multi (AM)
modes. In QTTL Ratio (QR) and Advanced Multi (AM) modes all zones
default to ON.
See section 8.1 on using zones.
6.3 Quick turn off assignment
Available for QTTL Ratio (QR) and
Advanced Multi (AM) modes only.
LOCAL
R1
R2
ON OFF
(QUICK TURN OFF)
9
7. Choosing the right mode
To select a mode, press the
MODE/OK button. The
available modes will appear
across the top of the display,
with the current mode
highlighted. The full name of
the current mode will also
appear in the center of the
display. Use the Left (-) Å and
Right (+) Æ arrow buttons to
Highlight the mode you want.
Then press the MODE/OK or SET
buttons to select the mode and exit.
Q
Q
A AF QR M RL RA RG AM
QTTL
-
OFF
+
PRGM
MODE
MODE
/OK
SET
There are two soft keys in this menu, OFF and PRGM MODE
OFF – This will prevent the flash from firing. Use this if you want to turn
off the light from the on-camera flash, but still want any remotes you are
using to fire when the shutter is pressed.
PRGM MODE - Pressing this button will bring you into the program
mode. In the program mode you can store up to eight of your favorite
settings. You can easily jump between any of these eight settings for
quick lighting set ups.
On- or Off-camera ?
While the Trio can be used on- or off-camera, some modes are strictly
on- or off-camera modes, and other modes can be either.
On-camera modes : QTTL, Auto Fill, QTTL Ratio, Advanced Multi
Off-camera modes : Remote Auto, Remote Groups 1 and 2,
Remote Linked to Local Qflash
Either on- & off-camera modes: Manual, Auto
The following pages contain a description of each mode and its
operation. This will aid you in choosing the mode that is best for the
desired lighting .
10
7.1 Q
QTTL
QTTL mode uses the exposure system built into the camera. You may
offset exposure by 2 stops above or 3 stops below camera setting.
Use this mode if you want the camera to control the exposure.
Radio:
Can be set to send a SYNC signal to fire remote flashes.
Or it can be set to send TTL information to remote Qflashes.
Remote flash must be in Linked to Local (RL) mode.
Benefits : Simplest of all the QTTL modes while still being able to fire
and/or control remote flashes, such as power packs used for room lights
Note : Not possible to ratio remote flash exposures. Remotes will be the
same exposure as the local flash.
7.2 A
Auto
Light output is controlled by the sensor located on the front of Trio.
When the Trio is placed on a camera F number and ISO are set
independently from the camera.
Use this mode if you want the Trio sensor to control the exposure and
set up a ratio between the camera and flash. Sensor Limit feature can
be used when the background is located far behind the subject. See
section 11.5
Radio:
Can be set to send a SYNC signal to fire remote flashes.
Or it can be set to send a LINK signal to fire and control
the exposure of remote Qflashes. Remote flash must be in
Linked to Local (RL) mode.
When used off camera the radio can be set to receive (RX) a
sync signal from an on-camera flash or an on-camera
FreeXWire.
Benefits : Fast response for action shots.
Exposure easily checked with flash meter.
No pre flash required.
Since the settings on the flash are independent of the camera settings,
you can use this mode to quickly adjust camera to flash ratios. Example:
If both camera and flash are set to F8.0 and you would like to quickly add
a stop more light, simply change the aperture on the camera to F5.6.
Note : Requires some knowledge of how auto flash exposure works.
Remote exposure setting will be the same for all remotes, when Remote
is set to Linked to Local Qflash.
11
7.3 AF
A
Auto Fill
Light output is controlled by the sensor located on the front of the flash.
When the Trio is placed on a camera F number and ISO information are
sent to the flash from the camera. As the F number and ISO are
changed on the camera the flash will display them.
Use this mode if you want Trio’s sensor to control the exposure, but F
number and ISO on Trio to track the camera settings. A Sensor Limit
feature can be used in situations with no background, like an open field.
See sections 11.5 and 11.6.
Radio:
Can be set to send a SYNC signal to fire remote flashes.
Or it can be set to send a LINK signal to fire and control
the exposure of remote Qflashes. Remote flash must be in
Linked to Local (RL) mode.
When used off camera the radio can be set to receive (RX) a
sync signal from an on-camera flash or an on-camera
FreeXWire.
Benefits : Fast response for action shots. No pre-flash required.
Exposure easily checked with flash meter. Remote Qflash can be
adjusted from –3 stops below to +2 stops above camera settings.
Note : Requires some knowledge of how auto flash exposure works.
Remote exposure setting will be the same for all remotes, when linked
7.4 QR
QTTL Ratio
Uses the exposure system built into the camera.
independent ratios of multiple remote Qflash / Trio.
Possible to set
Use this mode if you want to set up lighting ratios that are controlled by
the camera’s TTL system.
Radio: Defaults to QTTL mode. TTL ratio information will be sent to the
remote Qflash / Trio.
Benefits : Allows for ratios between remote flashes without entering the
more complex Advanced Multi mode. Remote Qflash / Trio must be set
Remote Group (RG) mode.
Note : Slower response, not good for action shots.
12
7.5 M
Manual
Light output is controlled by fixed power output of flash.
When Trio is placed on a camera F number and ISO information are sent
to the flash from the camera. As the F number and ISO are changed on
the camera the flash will display them, and show the corresponding flash
to subject distance for proper exposure. (Provided the correct reflector is
set in the Options. See section 9.5)
Use this mode if you want the most accurate and repeatable exposures
possible
Radio:
Can be set to send a SYNC signal to fire remote flashes.
Or it can be set to send a LINK signal to fire and control
the exposure of remote Qflashes. Remote flash must be in
Linked to Local (RL) mode.
When used off camera the radio can be set to receive (RX) a
sync signal from an on-camera flash or an on-camera
FreeXWire.
Benefits : Most accurate of all flash modes.
Note : Requires some knowledge of exposures, distance, and the use of
a flash meter.
7.6 RL
Remote Linked to local Qflash
Quick and easy set up for a remote Qflash Trio. Light output is
controlled by the local flash.
Use this mode as the simplest way to set up remote flash systems.
If the local Qflash is in QTTL mode then the exposure on the Remote will
match the output of the local Qflash.
If the local Qflash is in Auto, the Remote Trio can be set 2 stops above
or 3 stops below the local flash. This is achieved by adjusting the
‘LINKED” setting on the local Qflash.
Radio: Defaults to receive (RX) mode.
Benefits : Not difficult to set up, and works for all modes of the local
flash. No time delay between shutter and flash.
Note : Most basic type of multiple flash mode, and therefore does not
lend itself to complicated ratios. There is only one exposure setting for
all remotes.
13
7.7 RA
Remote Auto
Light output is controlled by the sensor located on the front of the remote
Qflash. F number and ISO information are sent to the flash from the
camera.
Use this mode if you want a remote flash to have the dedication of a TTL
flash, but the simplicity of the automatic sensor.
Radio: Defaults to receive (RX) mode.
Benefits : No pre flash required. Very quick mode. No time delay
between shutter and flash. Sensor limit available.
Note : Since exposure is controlled by the sensor on flash, user needs
to be mindful of camera placement. If the camera and flash are in widely
different locations, the picture may not be properly exposed.
7.8 RG
RG
Remote Group
Allows full control of remote Qflashes whose mode is set on the control
panel located on the local Qflash Trio.
Use this mode if you plan on making frequent changes to the settings on
the remote flash, such as mode, f number, and power
Radio: Defaults to receive (RX) mode.
Benefits : Greatest flexibility in flash set up without leaving camera
position.. Multiple flashes in mixed modes possible.
Note : Slower response, not good for action shots.
7.9 AM Advanced Multi
This mode allows the user to have full control over three remote Qflash
groups. There is no limit to how many flashes can be set to any one
group. Mode, F number, power, and even linking the exposure of a
remote flash group can all be set from the push buttons on the local
flash.
Radio: Defaults to QTTL mode. TTL ratio information will be sent to the
remote Qflash / Trio.
Benefits : Possible to set up mixed mode lighting set ups and make
changes without walking over to the remotes. Good mode to use if the
remotes are inaccessible.
Note : Slow to use, not good for action shots.
14
8. Radio set up
Press the RADIO soft key to enter the radio set up menu. To exit the
set up menu press the MODE/OK or SET buttons.
ZONES
Zones can be used to control
individual units within a
Channel Code group.
-
RADIO OFF
OFF
OFF
SYNC
RX
LINK
Channel Codes
The Channel Codes allow the Trio to work
together with FreeXWires and other Trios.
Set all units that you want to work together
to the same Channel Code. If you desire
independent groups (to work in the same
area but not interfere), assign each group
it’s own Channel Code.
+
CH. 4
ZONES
MODE
/OK
SET
Radio modes
OFF
Radio “off”(no signal sent).
SYNC
Trio sends a sync only signal to remotes.
A remote flash can be another Trio, any Qflash using an FW7Q, FW8R,
FW10w or any studio strobe using an FW8R, FW10w.
RX
A remote Trio will fire when local flash sends a sync signal. Local flash can
also control exposure of Trio set to RX.
Local flash can be a Trio, a Qflash 5d-R using an FW9T or FW10w, or a QTTL
adapter with an FW9T.
LINK / QTTL
Trio will send a sync signal plus exposure control signals to remotes.
A remote flash can be another Trio or Qflash 5d-R using an FW7Q,
FW8R or FW10w. Rx will appear in upper left corner of display of the Trio.
8.1 Using Zones
Zones can be used to control individual remote units within a channel
group. Set each of the remote units to a different zone. For example :
room lights on Zone 1, an assistant with a light pole on zone 2,
background light on zone 3.
You can prevent any of the remotes from firing by simply turning that
zone off on the local Trio at the camera.
15
9. Options
Press the OPT (options) soft key to enter the options set up menus.
There are four options menus to select from. To exit the set up menu
press the MODE/OK or SET buttons
Use the LEFT (-) Å or RIGHT (+) Æ arrows to select the options menu
that contains the option you want to change.
9.1 Options menu 1 of 4
OPTIONS MENU 1 OF 4
This menu changes :
Sensor limit or Sync
Reflector
Speaker
Auto Focus
-
USE Å OR Æ FOR
MORE OPTIONS
SL
SYNC
N
OFF
+
AF
OFF
Press the soft key located below
MODE
SET
/OK
the option you want to change. Continue
to press that soft key to cycle through the settings for that option.
9.1.1 Sensor limit SL
You may change the sensor limit from this options menu or use the
softkeys when the flash is in Auto or Auto Fill mode.
See Section 11.5 for details on using the sensor limit.
9.1.2 Sync type
F, R, HSS
There are three settings for the sync.
F – Front curtain sync. Flash fires just after the first curtain opens.
R – Rear curtain sync . Flash fires just before second curtain closes.
HSS – high speed sync. HSS is available in Manual, QTTL, and
QTTLwR modes, for both the on-camera and remote TRIO.
Off-camera flash
When using a remote in HSS, there is no need to set any options. HSS
will automatically be selected when your shutter speed is set above 250.
On-camera flash
Canon users – Select HSS option if you want to enable High Speed Sync
on your camera.
Nikon users – If you’ve selected high speed sync on the menu of your
camera, high speed sync will automatically be selected on the TRIO
when your shutter speed is set above 250.
16
9.1.3 Reflector
N,
D,
B
Setting the reflector type is important so that the displayed distance,
guide number and f/# correspond to the reflector in use. The choices are
NORM (for the reflector supplied with Qflash), DIFF (for diffusers
supplied with Qflash, optional QF67A Dome diffuser, QF68 Soft Box, or
QF69 Mini Soft Box), BBE (optional Bare Bulb Enhancers QF62Bs and
QF62Bg) .
Notes:
When using QF62B s/g the manual parameters are accurate only for an
open area. In medium and small rooms the very widely dispersed light
will bounce off nearby walls and increase exposure. A practical solution
when using QF62B in small rooms is to meter the light, or use Auto, TTL,
or QTTL modes which will provide better exposures and attractive, soft
lighting.
When using a Telephoto Reflector QF63B the Auto mode cannot be
used because the flash sensor is blocked. Use Manual, TTL, QTTL or
Linked modes.
9.1.4 Speaker
You may want the speaker off for sensitive shooting, or turn it on for
audible confirmation of flash exposure.
9.1.5 AF Auto Focus
The Auto focus light responds to a signal from the camera. Turn this
option OFF if you want the light to ignore the camera and stay off.
9.2 Options menu 2 of 4
This menu changes :
OPTIONS MENU 2 OF 4
-
USE Å OR Æ FOR
MORE OPTIONS
Flash indicators
Button lock out
P1 –P8 lock out
Display light
P1-P8
+
DL
OFF
Press the soft key located below
MODE
SET
/OK
the option you want to change. Continue
to press that soft key to cycle through the settings for that option.
9.2.1 Flash indicators
The green Flash Indicators on either side of the Trio give visual
indication that a flash fired, whether the exposure was good, over, under,
or no flash, indicating that the flash did not fire. You can enable or
disable the lights.
17
9.2.2 Lock Buttons
Turning this option on will lock out the buttons and prevent any
accidental changing of settings. To unlock the Trio Press the outer two
soft keys when prompted.
9.2.3 P1 – P8 lock
This options prevents accidental changes to your P1 through P8 settings
in Program mode. While you can make adjustments during use, any
changes you make will not be saved into P1 through P8 while the lock is
on.
9.2.4 Display light DL
The back light of the display can be set to one of the following.
AUTO : The back light will come on whenever any button is pressed.
This includes the shutter button of the camera
ON : The back light will be on all the time.
DARK : The back light will come on, and stay on, whenever a darkened
room is entered.
9.3 Options menu 3 of 4
This menu changes :
OPTIONS MENU 3 OF 4
-
USE Å OR Æ FOR
MORE OPTIONS
Flash distance
Sync (See section 9.1.2)
Reset
F/M
SYNC
+
RESET
SET
MODE
Press the soft key located below
/OK
the option you want to change. Continue
to press the soft key to cycle through the settings for that option.
9.3.1 Flash distance F/M
Option selects whether flash distances are displayed in feet or meters.
9.3.2 Resetting to factory defaults
Press the RESET soft key to
bring up the reset menu.
RESET ALL - will restore all
the factory settings.
KEEP P1 P8 - will keep your
stored Program modes, but
reset everything else to factory
settings.
EXIT – will exit the reset menu
without changes
QFLASH
-
VER.
QF08xxxx
RESET KEEP
ALL
P1 P8
MODE
/OK
18
TRIO
EXIT
Set
+
9.3 Options menu 4 of 4
This menu changes :
OPTIONS MENU 4 OF 4
-
USE Å OR Æ FOR
MORE OPTIONS
Auto compensation
Man compensation
AUTO
+
MAN
Quantum calibrates Qflashes
to American National
SET
MODE
Standards Institute (ANSI) standards
/OK
with laboratory equipment traceable to the National Institute of
Standards and Technology (NIST). From time to time, photographers
may wish to fine tune Qflash exposures to match their exposure meters,
to compensate for variations in cameras or films, to match particular
styles, for effects, or for individual taste.
There are two compensations available- one for Manual and one for Auto
mode.
In QTTL modes Qflash does not control exposure and
compensation will not apply.
“Compensation” affects overall exposure, not fill or ratio settings of
various modes.
9.4.1 Auto mode Qflash Compensation
This procedure will calibrate Qflash to a reflected light flash meter you
use and trust. Note that only reflected light measurements are reliable
for auto exposure settings.
This is because auto mode flashes read reflected light from the scene
and subject. In order to compare those readings to a meter, the meter
must also be reading the same reflected light. The reflected light is
affected by the subject and background, and the incident light reading
will not typically provide the same reading (unless the subject is an 18%
gray card).
WALL
1.Place the Trio 10 feet from a
blank wall. The wall should be
larger than the metering area of
the meter, and preferably a wall
of continuous tone (blank wall).
TRIO SET TO
AUTO MODE
10 FEET
2.Place flash meter next to Qflash
Trio facing the blank wall. Be sure
to set the flash meter for a
reflected reading.
METER
3. Turn the Trio on, set the mode to Auto (A) and change the f/ number
to F8.0
4. Set the film speed (iso) on the Qflash and the flash meter to the same
value.
19
5. Fire the Trio. Note the F/number on the flash meter.
6. Press the AUTO soft key,
then use the UP and DOWN
soft keys, adjust the F/ number
in the display until it matches
the F/ number from the flash
meter.
COMPENSATION
-
+0 AUTO
+0
AUTO
F 5.6 7
+
MAN
SET
MODE
/OK
9.4.2 Manual mode Qflash Compensation
This procedure will calibrate Qflash to an incident light flash meter you
use and trust. Note that only incident light measurements are reliable for
manual exposure settings.
1. Place the Qflash Trio
10 feet from the incident flash
meter that is facing Qflash.
WALL
TRIO SET TO
MANUAL MODE
METER
10 FEET
2. The area surrounding the
meter and flash should be
similar to the shooting environment
you usually work in. For example,
in a large hall, there will be little light bouncing from walls and ceilings.
In a small room, the light meter reading will be increased by whatever
bounce occurs from nearby surfaces. These factors will affect calibration
and should be considered.
3. Turn the Trio on, set mode to manual (M) and change the manual
power setting to 1/8.
4. Set the film speed (iso) on the Qflash and the flash meter to the same
value.
5.Change the F number on the flash until the distance shown in the
display is 10 feet.
6. Fire the Trio. Note the F/number on the flash meter.
7. Press the MAN soft key,
then use the UP and DOWN
soft keys, adjust the F/ number
in the display until it matches
the F/ number from the flash
meter.
COMPENSATION
-
+0 MAN
+0
AUTO
MAN
MODE
/OK
20
F 5.6 7
SET
+
10. Q QTTL Mode Operation
F/number and ISO are sent
to the flash from the camera.
Only the fill setting is user
adjustable. Press the Set
button to highlight the fill
setting. Use the left (-) Å and
right (+) Æ arrow buttons to
adjust the fill down or up.
QTTL
F 5.6 7
-
FIRE
OPT
FILL +0
ISO 200
SAVE
MODE
+
RADIO
SET
/OK
The fill setting is used to adjust the flash
output from 3 stops below (-3) the camera
setting to 2 stops (+2) above the camera setting.
The fill can be adjusted in 1/3 steps.
Using the Radio
The internal radio can be used to trigger remote flashes, or room lights,
set radio SYNC.
Or the radio can be used to control the light output of remote Qflashes,
set radio QTTL. The remote flash can be another Trio in RL mode or a
Qflash model 5d-R set to Linked to Local with an FW7Q, FW8R or
FW10w.
Be sure that the channel and zones match the channel and zones set on
the Trio. See section 8.0 for setting the Channel and Zones on the Trio.
10.1 QTTL mode soft keys
If the radio is turned off, there are only
the default soft key functions available
If the radio is on, then the zone control
soft keys are available. Press a
soft key to turn a zone on or off.
21
FIRE
OPT
SAVE
RADIO
(DEFAULT)
1 ON
2 ON
3 OFF
(RADIO ZONES)
4 OFF
A Automatic Mode Operation
11. A
11.1 On camera Auto mode
F/number, ISO are user
adjustable. Pressing the Set
button will highlight them in
that order. Use the left (-) Å
and right (+) Æ arrow buttons
to adjust the highlighted setting
down or up.
-
AUTO
F 5.6 7
2.4 –22 FT
FIRE
OPT
MODE
/OK
ISO
SAVE
200
+
RADIO
SET
Flash distance displays the working distance between your Qflash and
Subject based on the current settings. Moving outside this range may
result in an under or overexposed picture.
Using the Radio (on camera)
The internal radio can be used to trigger remote flashes, or room lights.
Set radio to SYNC.
Or the radio can be used to control the light output of remote Qflashes.
Set radio to LINK. The remote flash can be another Trio in RL mode or a
Qflash model 5d-R set to Linked to Local with an FW7Q, FW8R, or
FW10w.
Be sure that the channel and zones match the channel and zones set on
the Trio. See section 8.0 for setting the Channel and Zones on the Trio
11.2 Off Camera Auto mode
In the off camera operation the
Fill adjust will be disabled,
however the F/number, ISO
are user adjustable. Pressing
the Set button will highlight
them in that order. Use the
left (-) Å and right (+) Æ arrow
buttons to adjust the
highlighted setting down or up.
-
AUTO
F 5.6 7
2.4 –22 FT
FIRE
OPT
MODE
/OK
22
ISO
SAVE
200
RADIO
SET
+
Using the Radio (off camera)
To enable the Trio to be fired remotely set the internal radio to RX. An
FW9T or FW10w must be located at the camera position, or you can use
another Trio at the camera position.
Be sure that the channel and zones match the channel and zones set on
the Trio. See section 8.0 for setting the Channel and Zones on the Trio
11.3 Auto mode soft keys
To change the function of the soft keys use the Left (-) Å and Right Æ
buttons when no selection or setting is highlighted on the display.
If the radio is turned off, the Default and Sensor Limit soft key functions
available are shown below.
FIRE
OPT
SAVE
RADIO
5
10
15 –20
(SENSOR LIMIT)
(DEFAULT)
If the radio is on, then the zone control soft keys are available. Press a
soft key to turn a zone on or off.
1 ON
2 ON
3 OFF
4 OFF
(RADIO ZONES)
11.4 Auto mode exposure indications
There are three types of exposure indications. The display will blink
either OK, Over, or Undr. The display will also indicate how much over or
under the last exposure was, from +3 stops to -3 stops. If an arrow
appears then the exposure error is more than 3 stops (for example -3Å).
If activated in Options (Section 9.3) the Speaker will sound after a flash.
The audible signal is one “beep” for “OK and flash ready”, and three
“beeps” for “Undr” or “Over”.
11.5 Auto Sensor Limit
Setting Qflash to Auto mode makes picture taking fast and easy.
However, an automatic flash has a flaw: the sensor on the flash expects
the subject to be wide, flat, and to fill the view of the sensor. A person
standing against a wall fits this description; people in a catering hall or in
a park at night do not. When the background is located far behind the
subject, the automatic flash struggles to produce even lighting. The
result is often an over exposed subject, sometimes by as much as two
stops. When a photo lab develops film with a greatly over exposed
subject, it will ‘print down’ to bring the flesh tones back into range. Or,
time will be spent adjusting a digital image, with the resultant loss of
detail and image quality.
23
To solve this problem use the Flash Sensor Limit.
∞ - No limit placed on sensor distance
5ft / 2m, 10ft / 3m, 15ft / 4m, 20ft / 6m
When the Flash Sensor Limit is set to ∞ the flash will produce the
desired f/# for a subject within the flash’s minimum and maximum flash
distance.
With Auto Sensor Limit turned on, a ‘Limit’ indicator is activated. After a
flash, if the subject’s distance exceeds the sensor limit currently set (5,
10, 15 or 20ft. / 2, 3, 4, 6m) the word ‘Limit’ will appear in the display.
Three beeps and/or 3 blink warning may also occur (if those features are
set in Options). If the subject is within the current Sensor Limit normal
exposure indicators (OK, Undr, Over) will apply.
11.6 Using the Auto Sensor Limit
The flash Sensor Limit function essentially cuts down on the distance
that Qflash attempts to illuminate. When using Sensor Limit it is no
longer necessary for the subject to be centered in the frame, as long as
the subject is in the Sensor Limit. See the examples shown below.
NO BACKGROUND
(OPEN FIELD IN PARK)
Open field
The subject is located 15 feet from the
camera. The background is an open field
in a park. By setting the Sensor Limit to
15 feet, the flash will read only the light
reflected back from the subject area
within 15 feet, ignoring anything further.
SUBJECT
15 FEET
TRIO IN AUTO WITH SENSOR
LIMIT SET TO 15 FEET
BACKGROUND
SUBJECT
SUBJECT
15 FEET
TRIO IN AUTO WITH SENSOR
LIMIT SET TO 15 FEET
Two subjects separated by a gap
Sometimes two subjects are
separated by a gap. When this
occurs the sensor is ‘looking’
between the two subjects and may
miss them. The Sensor Limit will
correct for this by reading only the
light from objects within the limit
set, in this case, 15 feet. The light
from objects further away will be
ignored.
24
12. AF Auto Fill Mode Operation
12.1 On camera Auto Fill mode
F/number, ISO are sent to the
flash from the camera. Only
the Fill flash setting is user
adjustable. Press the Set
button to highlight the Fill
setting. Use the left (-) Å and
right (+) Æ arrow buttons to
adjust the Fill down or up.
-
AUTO FILL
F 5.6 7
3.6 –32 FT
FIRE
OPT
MODE
/OK
+0
ISO
SAVE
200
+
RADIO
SET
The Fill setting is used to adjust the flash output from 3 stops (-3) below
the camera setting to 2 stops (+2) above the camera setting. The Fill
can be adjusted in 1/3 steps.
Flash distance displays the working distance between your Qflash and
Subject based on the current settings. Moving outside this range may
result in an Under or Overexposed picture.
Using the Radio
The internal radio can be used to trigger remote flashes, or room lights,
set radio to SYNC.
Or the radio can be used to control the light output of remote Qflashes,
set radio to LINK. The remote flash can be another Trio in RL mode or a
Qflash model 5d-R set to Linked to Local with an FW7Q, FW8R, or
FW10w.
Be sure that the channel and zones match the Channel and Zones set
on the Trio. See section 8.0 for setting the channel and zones on the Trio
12.2 Auto Fill mode soft keys
See section 11.3
12.3 Auto Fill mode exposure indications
See section 11.4
12.4 Auto Fill Sensor Limit
See section 11.5
12.5 Using the Sensor Limit
See section 11.6
25
QR QTTL Ratio Mode Operation
13. QR
F/number, ISO are sent to the
flash from the camera.
Independent fill flash ratios can
be set on the Local (on-camera)
flash and Remote Groups 1
and 2
QTTLWR
F 5.6 7
-
ISO
200
FIRE
OPT
FILL +0
R1 +1
R2 -1
SAVE
+
RADIO
Pressing the Set button will
MODE
SET
/OK
highlight them in that order. Use
the left (-) Å and right (+) Æ
arrow buttons to adjust the highlighted setting down or up.
When you Press the Set button, an ON/OFF soft key will appear on the
right of the display. You can use this soft key to prevent the Local, R1 or
R2 flashes from firing.
To prevent a Qflash from firing, press the Set button until the flash you
want to turn off is highlighted. Then press the OFF soft key, the word
“OFF” will appear next to that flash.
Using the Radio
Radio will default to QTTL mode. TTL ratio information will be sent to the
remote Qflash / Trio. You may still need to select the proper channel to
match the channel on the remote flashes. See section 8.0 for setting the
Channel on the Trio.
The remote Qflashes may be :
1. A Trio set to RG mode, Remote Group R1 or Remote Group R2.
2. A Qflash model 5d-R with a FW7Q or FW8R or FW10w, set to either
Wireless Remote Group R1 or Wireless Remote Group R2.
13.1 QTTL Ratio mode soft keys
Only the default soft key functions are available
FIRE
OPT
SAVE
(DEFAULT)
26
RADIO
14. M Manual Mode Operation
14.1 On camera Manual Mode
F/number, ISO are sent to the
flash from the camera. Only the
power setting is user adjustable.
-
MAN 1/8
F 5.6 7
7.7 FT
FIRE
Press the Set button to highlight
the power setting. Use the
Left (-) Å and Right (+) Æ
arrow buttons to adjust the
power down or up.
GN 55
ISO
OPT
MODE
/OK
SAVE
200
+
RADIO
SET
Power settings are adjustable in
1/3 steps from full power to 1/32nd power like this: 1/1, 1/1-, 1/2+, 1/2,
1/2- …… 1/32.
The distance in the display shows the correct subject to camera distance
for proper exposure. (Provided the correct reflector is set in the Options.
See section 9.5)
Using the Radio
The internal radio can be used to trigger remote flashes, or room lights,
set radio to SYNC.
Or the radio can be used to control the light output of remote Qflashes,
set radio to LINK. The remote flash can be another Trio in RL mode or a
Qflash model 5d-R set to Linked to Local with an FW7Q, FW8R, or
FW10w.
Be sure that the channel and zones match the channel and zones set on
the Trio. See section 8.0 for setting the Channel and Zones on the Trio
14.2 Off camera Manual Mode
For the off-camera operation Power, F/number, ISO are all user
adjustable. Pressing the Set button will highlight them in that order. Use
the left Å and right Æ arrow buttons to adjust the highlighted setting up
or down.
Using the Radio
To enable the Trio to be fired remotely set the internal radio to RX. A
FW9T or FW10w must be located at the camera position, or you can use
another Trio at the camera position.
Be sure that the channel and zones match the channel and zones set on
the Trio. See section 8.0 for setting the channel and zones on the Trio
27
14.3 Manual mode soft keys
To change the function of the soft keys use the Left (-) Å and Right (+)
Æ buttons when no selection or setting is highlighted on the display.
If the radio is turned off, there is only
the default soft key functions available
If the radio is on, then the zone control
soft keys are available. Press a
soft key to turn a zone on or off.
FIRE
OPT
SAVE
RADIO
(DEFAULT)
1 ON
2 ON
3 OFF
4 OFF
(RADIO ZONES)
14.4 Manual shooting made easy
Nothing can beat the combination
of a flash meter and a flash set
manually. Automatic and TTL are
a compromise based on the need
for speed. Setting the flash for a
manual power setting and taking an
incident meter reading takes time
and resources the average
photographer may not have. So we
use automatic flash exposure and
know that in some situations the
sensor may be fooled.
SUBJECT
8 FEET
The Trio allows for easy manual shooting without metering. Above is an
example of how this is accomplished.
In this example Qflash will produce an F8.0 at the subject (8 ft), and it will
be quickly accomplished without metering.
The F number and Film speed will come from your camera, adjust the
power setting until the Qflash distance shown matches the subject
distance as closely as possible.
28
RL Remote – Linked to Local Qflash
15. RL
Operation
Light output of this flash will
equal the light output of the
Local Qflash.
-
REMOTE – LINKED
TO LOCAL QFLASH
FIRE
OPT
SAVE
MODE
/OK
Using the Radio
+
RADIO
SET
The internal radio will default to receive (Rx) mode. You may still need
to select the proper channel to match the channel set on the local flash.
See section 8.0 for setting the channel and zones on the Trio.
The local flash may be :
1. A Trio in any mode, the radio of the local Trio must be set to LINK or
QTTL.
2. A Qflash 5d-R in any mode with an FW9T or FW10w. The TTL
feature / switch must be turned on, see your FW instructions for turning
the TTL feature on.
3. A QTTL adapter with an FW9T, with the TTL switch turned on. In this
case the remote Trio is linked directly to the camera.
15.1 Remote – Linked to Local Qflash soft keys
To change the function of the soft keys use the Left (-) Å and Right (+)
Æ buttons when no selection or setting is highlighted on the display.
Both the default and radio zones soft key functions are available
FIRE
OPT
SAVE
RADIO
1 ON
2 ON
3 OFF
(RADIO ZONES)
(DEFAULT)
29
4 OFF
16. RA Remote Auto Wireless Mode Operation
Exposure is controlled by the
sensor located on the front of
the remote. F/number and ISO
are sent from the camera or
local Qflash to the remote Trio.
REMOTE AUTO W
F 5.6 7
-
2.4 –22 FT
FIRE
OPT
ISO
SAVE
MODE
/OK
Using the Radio
200
+
RADIO
SET
The radio will default to receive (Rx) mode. You may still need to select
the proper Channel to match the Channel on the Local Qflashes. See
section 8.0 for setting the Channel and Zones on the Trio.
The Local flash may be :
1. A Trio in any mode, the radio of the local Trio must be set to LINK or
QTTL.
2. A Qflash 5d-R in any mode with an FW9T or FW10w. The TTL
feature / switch must be turned on, see your FW instructions for turning
the TTL feature on.
3. A QTTL adapter with an FW9T, with the TTL switch turned on
16.1 Remote Auto Wireless soft keys
To change the function of the soft keys use the Left (-) Å and Right (+)
Æ buttons when no selection or setting is highlighted on the display.
The default, radio zones and sensor limit soft key functions are available.
FIRE
OPT
SAVE
RADIO
1 ON
2 ON
3 OFF
4 OFF
(RADIO ZONES)
(DEFAULT)
5
10
15 –20
(SENSOR LIMIT)
16.2 Remote Auto Wireless exposure indicators and Sensor Limit
The exposure indicators and Sensor Limit function the same as they do
in Auto mode. See section 11.4
30
17. RG Remote Group Mode Operation
When the RG mode is selected
the display will prompt you to
select one of three possible
groups.
-
REMOTE GROUP R1
AUTO
F 5.6 7
3.6 –32 FT
FIRE
Group L – Remote flashes set
to this group will have the
same exposure as the local
flash. Remote-linked to local
Qflash will appear on the display
if this group is selected
OPT
ISO
SAVE
MODE
/OK
200
+
RADIO
SET
Group R1 / R2 – The operation of remotes set to this group depend on
the mode of the local flash.
Group R3 – This group is for use with the Pilot.
Changing the Remote Group
If after selecting the Remote Group you wish to change it, press the Set
button and the Group will highlight. Use the Left (-) Å and Right (+) Æ
buttons to scroll through the Remote Group choices or use the Remote
Group soft keys that appear.
Using the Radio
The radio will default to receive (Rx) mode. You may still need to select
the proper channel to match the Channel on the local Qflashes. See
section 8.0 for setting the Channel and Zones on the Trio. The function
of the remote Trio depends on the settings of the local Qflash.
If the local Qflash is :
1. A Trio set to advanced multi (AM), see section 18. Or if a 5d-R set to
Wireless Control, then mode, power, F/number and ISO for the remote
Trio is set on the display of the Local flash.
2. A Trio (or 5d-R) set to QTTLwR (QR), see section 13. Then the
remote Trio will automatically be set QTTL ratio. The ratio adjustments
for Groups R1 and R2 would be done on the display of the local flash.
3. A Trio (or 5d-R) is set to any other mode, then the remote Trio set to
Group R1 and R2 would default to Linked to local Qflash, and produce
the same exposure as the local flash.
17.1 Remote Group soft keys
FIRE
Only the default soft key functions
are available
OPT
SAVE
(DEFAULT)
31
RADIO
18. AM Advanced Multi Mode Operation
This mode gives full control of
the Mode and all the settings
of the Local flash plus two
Remote Groups.
-
ADV. MULTI
FIRE
Press the Set button until you
reach the setting that you want
to change is highlighted. Then
use the Left (-) Å and Right (+)
Æ buttons to adjust the highlighted
setting down or up.
ISO
200
LOCAL MAN 1/8
7
R1 AUTO F5.6
3
R2 AUTO F8.0
OPT
SAVE
MODE
/OK
+
RADIO
SET
When the Set button is pressed, the soft keys allow you to “jump” to a
setting without having to scroll through all the settings.
Using the Radio
In Advanced Multi mode the radio is set automatically and all zones are
ON. You may still need to select the proper Channel to match the
channel on the Remote flashes. See section 8.0 for setting the Channel
and Zones on the Trio.
The Remote flashes can be another Trio or a Qflash model 5d-R with an
FW10w, FW8R, or FW7Q.
The Remote flash must be set to one of the three following groups,
Group L, Group R1, or Group R2.
18.1 Advanced Multi mode soft keys
To change the function of the soft keys use the Left (-) Å and Right Æ
buttons when no selection or setting is highlighted on the display.
FIRE
The default soft key functions are
available
OPT
SAVE
RADIO
(DEFAULT)
The soft keys can also be used to
quickly turn off the Local flash or any
of the remote groups
LOCAL
R1
R2
ON OFF
(QUICK TURN OFF)
To turn off any group first press the soft key for that Group, then press
the ON / OFF soft key. When the group has been turned off, the word
OFF will appear next to that group.
If the local flash is set to Auto then the
sensor limit functions are available
32
5
10
15 –20
(SENSOR LIMIT)
19. PRGM
PRGM Program Mode Operation
The Program mode allows you to store your favorite settings and set-ups
and then quickly recall them just by pressing the soft keys. You can
program up to 8 Qflash set-ups of Manual, Auto, or TTL operation,
including settings for all parameters.
19.1 Saving a set up
When you find a set up you like and want to store it, press the SAVE soft
key. The display will prompt you to determine the program number
(Pnumber) that you want to save the set up as. Use Left (-) Å and Right
(+) Æ buttons to adjust the P number up or down. Once you’ve selected
the P number you want to store the set up as, then press the save soft
key. If you wish to not save the set up, then press the exit soft key.
19.2 Using the program mode.
To enter the program mode, press the MODE button, then press the
PRGM MODE soft key, then press the MODE button again.
The current program number
will be displayed along with the
mode and the settings for that
program.
-
The soft keys allow you to
change to a different program
number quickly.
P1 QTTL
F 5.6 7
P1-P2
P3-P4
FILL +0
ISO 200
P5-P6
+
P7-P8
MODE
SET
You can change the function of
/OK
the soft keys by pressing the
Left (-) Å and Right Æ buttons when nothing is highlighted.
The available soft key functions depend on the mode of the program.
Any changes made to the settings of any program are saved to that
program automatically. There is no need to take any action to save the
changes.
To exit the program press the MODE button, then use the Left (-) Å and
Right (+) Æ buttons to select a new mode, then press the MODE button
again.
33
20. Updating the Trio
Quantum Instruments is always expanding the capabilities of its products
to meet the demands of newer cameras.
As new features are added to the TRIO, Quantum will post these
updates on it’s website.
The TRIO can be updated right from your home PC computer using the
included USB cable.
For updates and a detailed set of instructions visit. www.qtm.com
34
21. Customer service
Having any trouble using your Quantum product? We are here to help.
Mail, call, fax, or email our Service Department:
Service department
Quantum Instruments
10 Commerce Drive
Hauppauge, NY 11788
Tel: (631) 656-7400
Fax: (631) 656-7410
Website: www.qtm.com
Troubleshooting tips are available at www.qtm.com, Support, Customer
Support, FAQ. If you suspect a malfunction or require adjustment, return
the unit to us with an accurate description of the problem. please be
sure your problem is not caused by improper operating procedure or
malfunctions in your other equipment. Send all equipment carefully
packaged and insured to our address above.
An estimate of repair cost on out-of-warranty merchandise may be
forwarded if you desire. This will require that we contact you for approval
before proceeding and will delay return of your equipment. For fastest
repair time, you may pre-approve repairs up to the limit of $85 with your
credit card. We will bill only for the actual costs up to the limit. If repair
costs exceed your pre-approval, we will contact you.
Paying by check will delay the repair until the check clears (up to 15
days). payment by money order is acceptable.
Normal repair time is 10 – 15 business days. For expedited service,
contact our Service Department.
Summary:
•
Ship via UPS, Parcel Post, or other carrier, insured.
•
Give a clear, detailed description of the problem.
•
Give your mailing address and daytime phone number, fax #, and/or
email.
•
For warranty repairs include a copy of the receipt.
In addition, for out-of-warranty repairs with pre-approval:
•
Provide your Visa, MasterCharge, or American Express card # and
expiration date.
•
Give us authority to charge costs up to $95.00.
•
Provide your billing address.
Note: Please do not e-mail your credit card information.
Limited Warranty
Quantum products have a 1 year limited warranty. Please refer to the
Limited Warranty card for complete details, conditions, and terms.
35
TRIO / Qflash Accessories
QF69 FOLDING SOFT BOX &
HOT SPOT REDUCER
QF68 SOFTBOX
QFT4d/X4d
QFT5d/X5d
QF8N
QF8C
Other Accessories
Model
QF60B
QF61B
QF62Bs
QF62Bg
QF63B
QF63s
QF64
QF65
QF66
QF67A
Description
replacement reflector
“snoot” for pinpoint lighting
bare bulb enhancer - silver
bare bulb enhancer - gold
telephoto reflector – incl. QF63s
flash tube spacer for QF63
diffusing UV filter kit
clear UV filter kit
color gel pack
wide angle diffuser
36
Other Quantum Products
PILOT
FREE X WIRE
QNEXUS
FW7Q
TURBO 2X2
TURBO SC
TURBO
COMPACT
F
tested to comply with FCC standards
CANADA : 3707A-2811
FCC ID: CEXQFTRIO
Qflash Trio
This device complies with Part 15 of the FCC Rules and with
RSS-210 of Industry & Science Canada. Operation is subject
to the following conditions: 1) this device may not cause harmful
interference, and 2) this device must accept any interference
received including that which may cause undesired operation of
the device
IMPORTANT – CAUTION
Changes or modifications to this equipment could
void your authority to use this product under the
equipment authorization granted by the regulating
agencies
0678
!
Declaration of Conformity:
Quantum Instruments, Inc.
declares that Qflash Trio satisfies all the technical regulations
applicable to the product within the scope of Council Directive
1999/e/EC.
Quantum Instruments Inc.
10 Commerce Drive, Hauppauge NY 11788-3968 USA
Tel: 1-631-656-7400 Fax: 1-631-656-7410
www.qtm.com
P641-3