1
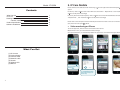
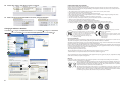
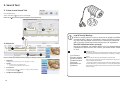
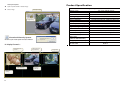
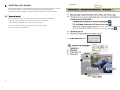
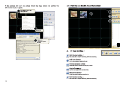
Video monitoring on Android Phone z User’s Manual To use the Android Market, Android phone must be connected to the Internet. Mysec24 Lite is free; you can download it without charge. Once you download it, it’s immediately installed on your Android phone.Then follow the steps below:! Model No.: IP-562M Motion-JPEG IP Camera with Plug n Play Network Remote Viewing Function From Android “Market” Key in ID & PWs Of the IP CAM your Android Phone For instant Viewing “Add” to add IP Camera Live video from IP CAM are now show in screen Press snapshot will save Photo to phone memory PLEASE READ CAREFULLY AND SAVE This manual contains important information about this product's operation. If you are installing this product for others, you must leave this manual -or a copy- with the end user. 23 23 Model: IP-562M Please download the dedicated video monitoring so ware for Apple OS4 and Android opera system. For iPhone, make a so ware search from APP store and look for “ MySec24 Lite ” then install the Contents What You Get FCC/ CE Knowing the Camera Camera Installation Product Specification Software Installation 3. IP Cam Mobile 1 2 3 3 6 7 so ware to the phone accordingly. For smart phone with Android system, make a so ware search from Android Market and look for “ MySec24 Lite ” , then install the so ware to the phone accordingly. Please refer to the example for iPhone Android phone below and refer to the user’s manual of details. your phone for more opera z Video monitoring on iPhone To use the App Store, iPhone must be connected to the Internet. MySec24 Lite is free; you can download it without charge. Once you download it, it’s immediately installed on your iPhone. Then follow the steps below:! ! ! ! ! ! ! ! ! ! ! Search for ! ! "MySec24 Lite" ! Launch ! ! App Store Lanch ! ! "MySec24 Lite" ! ! ! ! ! ! ! ! ! ! ! ! Select a Camera ! ! P2P IPCam What You Get (1) IP Camera (2) Power adaptor (3) Camera stand (4) Network cable (5) Screws (6) Software CD (7) Manual !Launch Select se ng to set up IPCam info !for rst ! ! !! Your device ID/Password (Ex. AAAA0001/12345678) User ID/Password (Set on Search Tool) ! 1 22 n ! ! Please click "search", then select an "IP cam" on the list.! Set IP address for PC and Camera ! ! o Make sure the IPs of LAN and IPCAM are the same, except the last block! ! ! Important Safety Precautions Please read before installing and using this product Damages caused by non-compliance with this operating manual will void the warranty! We will not assume any liability for damages to items or persons caused by improper handling or non-compliance with the safety notices! Any warranty claim will be null and void in such cases. 1. Do not drop, puncture or disassemble the camera or receiver; otherwise the warranty will be voided. 2. Avoid all contact with water, and dry hands before using. 3. Never tug on the power cords. Use the plug to unplug it from the wall outlet. 4. Do not expose the camera or receiver to high temperature or leave it in direct sunlight. Doing so may damage the camera or cause camera temporary malfunction. 5. Use the devices with care. Avoid pressing hard on the camera or receiver body. 6. For your own safety, avoid using the camera or power off the camera when there is a storm or lightning. 7. Remove the power adapter during long periods between usages. 8. Use only the accessories and power adapters supplied by the manufacturer. 9. To meet the regulations pertaining to parental responsibility, keep the devices out of the reach of infants. 10. Check power cables, do not get crushed or damaged by sharp edges whenever the devices are in operation. ! Changing IP Address in Windows Click Startbu onRight click My Network Places iconclick Proper esRight click Local Area iconClick Proper esclick Internet Protocol[TCP/IP] iconclick Proper es ! ! FCC/CE WARNING Products with CE Marking comply with EMC Directive (2004/108/EC) Issued by the Commission of the European Community. Compliance with these directives implies conformity to the following European Norms: EMC: EN55024 LVD:EN60950 This equipment has been tested and found to comply with limits for a Class B digital device, pursuant to Part 15 of the FCC rules These limits are designed to provide reasonable protection against harmful interference in residential installations. This equipment generates, uses, and can radiate radio frequency energy, and if not installed and used in accordance with the instructions, may cause harmful interference to radio communications. However, there is no guarantee that interference will not occur in a particular installation. If this equipment does cause interferenc to radio or television equipment reception, which can be determined by turning the equipment off and on, the user is encouraged to try to correct the interference by one or more of the following measures: -Reorient or relocate the receiving antenna. -Move the equipment away from the receiver. -Plug the equipment into an outlet on a circuit different from that to which the receiver is connected. -Consult the dealer or an experienced radio/television technician for additional suggestions. ! ! ! ! ! ! ! You are cautioned that any change or modifications to the equipment not expressly approved by the party responsible for compliance could void Your authority to operate such equipment. ! ! ! ! ! ! ! FCC Compliance Statement: This device complies with Part 15 of the FCC Rules. Operation is subjected to the following two conditions: (1) this device may not cause harmful interference, and (2) this device must accept any interference received, including interference that may cause undesired operation. IP address in Disposal If the camera system no longer functions or can no longer be repaired, it must be disposed of according to the valid statutory regulations. Disposal of spent batteries / accumulators: You are required by law (Battery Ordinance) to return all spent batteries and accumulators. Disposing of spent batteries/accumulators with common household waste is prohibited! Batteries/accumulators that contain hazardous substances are marked with the symbols on the side. These symbols indicate that it is prohibited to dispose of these batteries/ accumulators in the household waste. The abbreviations for the respective heavy metals are: Cd= cadmium, Hg= mercury, Pb= lead. You can return spent batteries and accumulators that can no longer be charged to the designated collection points in your community, outlets or wherever batteries or accumulators are sold. Following these instructions will allow you to fulfill the legal requirements and contribute to the protection of our environment! ! ! 21 2 B. Basic S Knowing the Camera ngs ! Environment: Night/ Indoor/ Outdoor* IP Camera 6. Frequency: 50 Hz or 60Hz based on your AC power’s frequency. USA and countries in South America: 60Hz 9. 1. Camera Lens 2. 2. IR LED 3. EDS Taiwan: 60Hz Japan: 50Hz / 60Hz both Most of countries in European / Middle East / Africa: 50Hz 4. T-boIt 5. Camera stand ! 6. Weather-proof body 4. 7. RJ45 Port C. Authen ca on 1. 8. DC IN 9.Data Transmission LED (RED) 7. 8. 5. 10. 10.Link LED(Green) 3. Camera Installation: Select a suitable installation and monitoring site. A suitable installation site has the following features: - Dry - Good Air Circulation ! ! Set up your personal account and password. Once been set, It can only be changed or deleted under local network. ! No User Authority is for the security use, we strongly suggest you to set up your own ID and password once you begin to use the product. - As Dust-Free as Possible - Solid Surface wiithout Vibration - Electrical Outlet in Close Vicinity Camera should not directly face the sun or other bright light. Prior to mounting the camera, it is recommended that you test the operation and location of the camera. 2. 2 Connect IP Cam and computer Use Search Tool to start the co ! ! Fastening the wall bracket - Select the desired mounting place (near power outlet if possible) - Use supplied screws to attach wall bracket to wall or suitable platform. Use dowels if necessary. - Align the camera and screw the T - bolt tight. Disable Auto DHCP S ng ! ! ! ! ! ! ! ! ! ! 3 20 2. Search Tool 2. 1 How to use Search Tool Click "IPCAM Set up" Search Tool helps se ng up your IP cam directly. Note! This so ware can be operated under the local network only ! ! ! ! Authen ca of Device ! Basic Se ngs ! ! Legal & Security Warnings ! Be sure to comply with the country or local laws in regards to publishing recorded images / videos or surreptitious viewing and videos monitoring. Users are responsible for the secure of camera ID & passwords; and we strongly recommend all users setup user’s ID & password ! ! A. Device List Read this instructions before you begin ! ! Info of camera found ! 1 During the installation, the software will test your PC’s firewall settings. If prompted to allow access to the network, you should answer “Allow” or “Yes” 2 Setup the camera (1) Follow the instruction to assemble the stand and also onto the camera (2) The camera can be placed on flat surface or mounted up on ceiling or wall !! Search for cameras under local network Note: In this preview window, all the changes are directly saved to your device. ݷBrightness Select brightness by clicking on "Low", "Standard", or "High". ݷQuality "+ ": for clear picture and bigger le size "ɡ": for less picture quality and smaller le size (1) IP Camera (2) Power adaptor (3) Camera stand (4) Network cable (5) Screws (6) Software CD (7) Manual 3 Set up (3a) Connect the camera to power adaptor and network cable (3b) or (3c) Connect the other end of the network cable to LAN port on internet router or Wireless internet device ! This product requires a common subnet environment supported by Router. Look for WAN port on your internet device; if no such port, please acquire a Router that has a WAN port build in and then connect the camera with the router’s LAN port. ݷEnvironment Please select the "Indoor" or "Outdoor" or "Night" mode, depending on. on the environment co ݷPosi on: Normal/Flip/Mirror 19 4 Shortcut 1 Right click on the display channel ! ݷDisconnectǺ Disconnect the device. ݷStretch videoǺ (1) (2) (3) Stretch video display. ݷEdit deviceǺ Edit device Basic Info/Alarm Se ng and Schedule recording. ݷDelete this deviceǺ Delete the selected device. (4) (5) (6 (7) ݷSnapshotǺ Take picture of the selected device. ݷManual recordingǺ 2 Start recording instantly. (1) (2) E. Device Control ݷSelected deviceǺ Shows the IP address/ Device ID of the selected camera ݷPan/Tilt Control For control the camera angle. (For selected model only) ݷVideo adjustǺ Adjust light co Light c 3 a Resol n/resolu on/video quality. on: Indoor/Outdoor/Night vision onǺ640*480/320*240/160*120 Video quality: From highest to lowest 3 5 b 3 c 18 History of snapshot Product Specification n Open snapshot folder or delete image o Select image System Specification Image history About Sec24 Security System: Version of your IP Cam System and User’s Manual. Sensor Type Picture Element Lens Viewing Angle Video Resolution Frame Rate/Sec. CompressionFormat Weather-proof housing Number of IR LEDs Night-viewing Range Internal Connection Network protocols Camera Housing 1/4” Color CMOS sensor 640x480 pixels 3.6 mm H:53° V: 40° VGA/QVGA/QQVGA VGA@15FPS/QVGA & QQVGA @ 25 FPS M-JPEG IP-66 10 Up to 5 Meters LAN TCP/IP, UDP, uPnP, DHCP Metal Camera housing & Stand Power Consumption Dimension (Without Stand & Cable) Weight (Without Stand) IR Off: 190 mA/ IR-On: 330 mA IR-Cut Filter 84 Ø 41.5mm 188 gm Built-in D. Display Channels濣 Video source via Internet Video source via local network Relay Mode Video recording Snapshot manually Frames per second 17 6 Sec24 Security System ݷStatus Bar Status Bar Sec24 Security System is a PC software that allow users to view video of IP cameras on PC from local or remote location via Internet connection, this system also provide advances features like camera configuration, video recording to PC, alarm and E-mail alert functions. n o Insert the software CD to your CD-R device, start the PC software installation according to your language by check the disc content and click the "Sec24 Security System_EN" file to open the start up page. After launching the software setup program then follow the steps below to complete the installation. , under this mode,it is normal that the video fame rate received from IPCAM are slower than in LAN or P2P Mode. ) p q 7 16 B. Display Se ng 1.1. 1 Click "Next" to start the installa 4 Channel 9 Channel 6 Channel 16 Channel 1.1. 2 Click "Next" Full Screen Mode: Double le click mouse of selected channel to switch to full screen mode, double le click again to switch back. C. Main func Search ToolǺ History Use to set up IP Cam (Local network only) 1.1. 3 Click "Install" Search Tool System Se ng About IP Cam System System Se ngǺ ݷReconnect IP CamǺ Auto reconnects IP Cam when disconnected. 1.1. 4 Click "Finish" to complete Sec24 Security System ݷAlarm Se ng installa on. Sound ects leǺ Select your preferable sound when alarming. ݷSnap shot and video recording path: Setup save folder for the recorded les and snapshots. Overwrite videoǺ Set up the occupy disk space. Run DB Upgrade Tool to check if your applica on is ready for an upgrade. Click Upgrade if it ݷSet up the system start status: video stretch/status bar/conrm when system close prompts "Incompa ble database version" as gure. Then close DB Upgrade Tool and restart IP Cam System. ݷStretch Video Tips: Start Menu All Programs IP Cam System DBUpgrade Tool Normal Mode 15 Stretch video Right click mouse on selected image 8