1
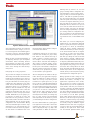
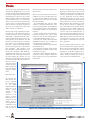
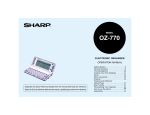
Application support has a
new name:
DAvE–
The Digital
Application
Engineer from
Siemens
Microcontrollers
by Ioannis Kabitoglou
Are you an embedded systems programmer?
Is it your job to design the most appropriate
microcontroller into a complex embedded
control application, in the shortest possible
time and the best possible quality? If so, be
honest, haven’t you often wished you wouldn’t have to gather information from several
different sources and many different documents, in order to make an informed decision on which device is most suitable for you?
Haven’t you often wished you wouldn’t have
to flip through hundreds of pages of text to
teach yourself everything you need to know
about the selected microcontroller and how
to use it? Haven’t you wished you wouldn’t
have to get to know every bit in every register in person in order to write the code that
will drive the device’s peripherals according
to your requirements? Haven’t you wished
you wouldn’t have to spend so much time
debugging, just when you thought that everything was at last over and done with? In
other words, haven’t you often wished that
semiconductor manufacturers would find
new, innovative ways to support you in applying their products, without you having to
spend precious money trying to get this support elsewhere?
Well, some of us must have wished for all of
the above, and since wishes sometimes do
come true, let me introduce you to DAvE, the
Digital Application Engineer from Siemens
Microcontrollers.
Ioannis Kabitoglou is Product Manager for DAvE with
the Siemens Semiconductor Group in Munich.
Page 36
DAvE is a unique CD-ROM based application
support tool engineered to aid embedded
systems developers in designing
applications
with
Siemens’ range of 8- and 16bit microcontrollers. DAvE
will help you select the
device most suitable for your
applicationís requirements,
provide you with object oriented, context sensitive
access to all standard information and documentation
on this device, guide you
step-by-step through the configuration of each of its on-chip modules, and
automatically generate the appropriate
device drivers (i.e. fully tested, documented
and customizable C code) for your application; and all this at the click of a button,
directly within your development environment.
Selecting an appropriate microcontroller
Let's assume, for example, that you are working on an embedded system, for which you
require a 16-bit microcontroller with at least
32 KB on-chip ROM, 2 KB on-chip RAM, five
timers/counters, ten capture/compare channels, four PWM channels, one USART unit
and four A/D converter channels. The first
thing to do is start the DAvE Application on
your PC and go to the Products menu, in
which you will find all standard Siemens
microcontroller derivatives, listed according
to the family they belong to. In order to
select a microcontroller for evaluation you
can either consult the Family Overview document and make your selection directly, or
you can use the Smart Search feature. Smart
Search allows you to specify the features you
are looking for in a device as well as their relative importance, and then tells you which
devices meet your needs and to what extent.
In our example, the two microcontrollers
most appropriate for your application would
be the C167CR and the C167S.
After selecting a microcontroller, DAvE will
take you into the chip and reveal the modules, which comprise its architecture. To
access the documentation and information
on the selected device you have two possibilities: you can either click on the dedicated
button located on the top left, which will give
you point & click access to the functional
highlights of the device, its product information sheet, its user’s manual, the respective
data sheets as well as the instruction set
Figure 1: DAvE
manual, or you can browse with your mouse
to any of the on-chip modules and click on
the right mouse button, which pops up a context sensitive menu with links to the functional highlights of the module and the specific position within the user’s manual where
the module is described. In addition to the
affecting with my action?’). So, for each
group of settings within a configuration wizard, DAvE offers a context sensitive menu –
it pops up when you click on the right mouse
button - with links to explanatory information, the position within the user’s manual
where the specific functionality is explained,
as well as the registers affected by your settings. The links to the registers take you to
the Register Viewer, which is a tool you can
use to view the actual values of the bits of a
selected register. And since the displayed
values are changed dynamically as you make
your settings within the configuration wizard, you can always see the relation between
the functional level, on which you’re working, and the bit level, on which DAvE’s working.
Figure 2: Intuitive access to information and documentation.
above-mentioned documents, the dedicated
documentation button, will give you access
to a search engine for the available application notes as well as to general information
concerning development tools and contacts.
Having all this concentrated knowledge at
you fingertips, directly in your development
environment, makes evaluating Siemens
microcontrollers easy. Even more, it makes
DAvE an invaluable aid and an important reference source through the whole development process.
Configuring the on-chip peripherals
To go on with our example, let’s assume that
after having selected and evaluated both the
C167S and the C167CR you have chosen to
use the later in your project. Here comes the
best part. DAvE will now actually help you
configure the chip’s modules for your application and will automatically generate an
application specific set of customizable C
functions, that will initialize the chip and
enable your application’s code to control the
peripherals’ functionality. The first step in
doing this is to create a new project with the
C167CR. DAvE will ask you to specify a project directory, in which the C source and
header files are to be generated, as well as a
project name, which is the name of the file in
which DAvE will save the project specific
configuration of the microcontroller. Having
done this, DAvE will again reveal the chip’s
architecture to you, only this time the context sensitive menu for each of the peripherals will include an additional menu item
labeled Configure, which calls the ‘configuration wizard’ of the module.
Configuration wizards are the most important tools when working on a project. They
look similar to the wizards that help us
install a modem or a printer, only they are
more complex – due to the complexity of the
mater at hand – and much more intelligent.
They consist of a module specific, sequentially ordered set of tabs, each handling a different aspect of the module’s configuration.
The tabs contain several groups of settings,
which allow you to specify how you want to
use the module in your application.
The nice thing about the wizards is that you
talk to them in your application’s language.
No matter which bits in which register set
Timer 2 to count up every time a positive
transition on a specific pin occurs, you just
have to ask for it and DAvE will handle all
the details. No matter what the reload value
for some baudrate generator register must be
in order to operate the USART at 9600 baud,
you just have to wish for it and DAvE will
handle the rest. And as if that’s not enough,
while you are configuring, DAvE will automatically check the effect your settings may
have on other settings, and dynamically
make adjustments to the wizards, to prevent
you from making an erroneous configuration.
Of course, DAvE wouldn’t be a good application engineer if he wasn’t able to answer the
questions that might occur in your mind
while configuring the chip (e.g. ‘Why is this
setting disabled?’ or ‘Which bit field am I
Now before you can start configuring the
peripherals for your application, DAvE will
ask you to specify the very basic settings for
your project as a whole, by automatically
calling the Project Settings configuration
wizard. In this wizard you set the exact type
of the microcontroller and the C compiler
you want use, as well as the clock and the
startup configuration of your system. Note
that when you change the value of the CPU
clock, either by selecting a different clock
mode or entering a different external oscillator frequency, DAvE will automatically calculate and display the timing characteristics of
all peripherals, thus giving you an overview
of how this basic setting affects the whole
device. Automatic calculations like these are
another major feature of the configuration
wizards, which you will surely find very helpful throughout the configuration process.
Having specified the basic settings of your
project, you can now start configuring each
module after another, according to your
application’s requirements. Let’s assume,
that you need to use a timer to trigger the
transmission of a byte over the asynchronous
serial interface and that you’ve decided to
use timer 2, located in the GPT1 peripheral
(General Purpose Timer Unit 1), for this purpose. After calling the appropriate configuration wizard, you get a tab dedicated to timer
2, in which you set the Timer operating
mode, enable external control of the count
direction, set the timer input to Fcpu/64 and
enable the related interrupt. By enabling
external control of the count direction you
are actually setting bit T2UDE in register
T2CON and at the same time occupying pin
15 in port 5. You can get this information by
clicking on the right mouse button while
over the External Up/Down Enable group
Page 37
and you can actually call the Register Viewer
and watch bit T2UDE being set, or you can
just leave all these details to DAvE and move
on with your configuration. One thing worth
mentioning here, is that if you were to Save
& Close the GPT1 wizard and call the configuration wizard for Port 5, you wouldn’t be
able to set pin 15 to function as general input
any more, since you’ve already dedicated it to
timer 2. And if you should ask yourself why
this is the case, a right mouse click would
suffice to answer your question.
The next steps in the configuration of timer
2 would be to set the level and the group of
the related interrupt - which is a simple drag
& drop affair - and finally select the C functions that DAvE should generate for you, by
moving forward to the Functions tab. The
functions you would need for your application would be the initialization function
GT1_vInit – without it the peripheral won’t
be used in your application –, the functions
GT1_vStartTmr, GT1_vStopTmr and
GT1_vLoadTmr, as well the interrupt service
routine GT1_viIsrTmr2, which DAvE has
automatically selected for you, since you had
enabled the timer 2 interrupt in a previous
tab. After making your selection, you can
change the function-names and the names of
the source file and header file in which the
functions will be
generated, and you
also have the possibility to enter some
notes regarding the
module’s configuration.
ahead and generate code, by clicking on the
‘magic button’.
After the code generation process has been
completed, you can use the File Viewer tool,
to explore the files DAvE generated in the
specified project directory. In our example
these files would be:
• the documentation file (docu.rtf), which
contains a tailored documentation of the
project, the generated files, the initialization
of the peripherals, and the API (Application
programming interface) of the generated
functions.
• the C source file and the C header file for
the GPT1 peripheral (gt1.c, gt1.h), which
contain the code for the functions/macros
you had asked DAvE to generate for you.
• the main.c file, which contains the main
initialization function and a template for
your application’s main function.
• the main.h file with all the general definitions and inclusions.
• the startup file (start.asm) which contains
the appropriately modified assembler start
routine for your project.
• and finally a simple batch file (make.bat),
which you can use to compile and link your
project using the tools in your development
environment.
By double-clicking on these files, DAvE will
display their content, and you will see, that
although you haven’t written a single line of
code yet, you already have a basic framework
for your application with the Siemens
C167CR microcontroller, as well as a set of
professionally written, fully commented and
tested functions you can use to control the
GPT1 peripheral. The next thing you would
have to do now, would be to configure the
rest of the modules in the intuitive manner
described above, have DAvE ‘compile’ your
configuration wishes to C code, and add your
own user code in the designated areas, in
order to integrate your application level software with the hardware. Having done this,
DAvE will have saved you from a lot of time
consuming and error prone work, and will
have helped you understand the chip and
how to program it.
You are probably asking yourself now “And
how much would I have to pay for all this?”.
Well, we don’t feel that application support
for our customers is an option for us. It is an
obligation. So, to all those working or interested in working with Siemens microcontrollers, DAvE is available for free-go to
(www.smi.siemens.com/DAvE.html).
❏
Generating code
By pressing the
Save & Close button you conclude
the configuration
of
the
GPT1
peripheral and can
either move on to
another module
directly or first
generate
an
overview of your
project, in which
DAvE will tell you
exactly how each
module used in
your application is
configured. In our
case we will skip
both and just go
Page 38
Figure 3: Easy configuration of the chip and automatic code generation.