1
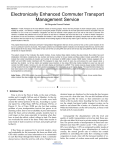
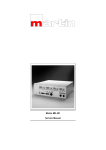
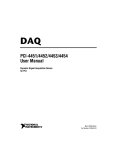
KVM312IC / KVM314IC
2/4 PORT PS/2 KVM Switch
User Manual
TABLE OF CONTENTS
Introduction .............................................................................P1
Equipment Requirements .......................................................P1
Features .................................................................................P2
Package Contents ..................................................................P2
Specifications .........................................................................P3
Overview.................................................................................P4
Display Diagrams ...................................................................P6
Installation ..............................................................................P7
Pre-Configuration ..............................................................P7
Hardware Installation ........................................................P8
Operation .............................................................................. P11
Powering Up the Systems ............................................... P11
Selecting Computers Using Front-panel Selectors ......... P11
Selecting Computers Using keyboard Hot Key Commands P11
INTRODUCTION
Thank you for purchasing AMCONN’s ExsorVew PS/2 KVM
Switch. The ME series allows users to control 2 (KVM312IC) and
up to 4 (KVM314IC) PS/2 computers from a single PS/2 console
(PS/2 keyboard, PS/2 mouse and monitor).
The KVM312IC / KVM314IC is both compact and portable, its
small desktop footprint is ideal for on or under your desktop.
Setup is fast and easy. There is no software to configure. It has
keyboard, mouse and video emulation for error free boot-ups and
support is also provided for Microsoft Intellimouse. The KVM312IC
/ KVM314IC supports high video resolutions, up to 1920 x 1440
without deterioration of the image quality. Switching between
PCs can be accomplished in two ways: via keyboard Hot Key
commands or by using the convenient front-panel pushbutton
controls. The series comes standard with AMCONN’s limited
warranty.
EQUIPMENT REQUIREMENTS
Cables
You will need the following equipment for each PS/2 computer to
connect to the AMCONN ExsorView Series KVM Switch.
Switch Port
Computer Port
PS/2 Mini Din 6 pin Male
(Keyboard)
HDDB 15 pin Male
HDDB 15 pin Male
PS/2 Mini Din 6 pin Male
(Mouse)
The following all-in-one AMCONN cable sets are recommended;
K5C6 (1.8m)
K5C9 (3.0m)
K5C0 (4.8m)
-1n
n
n
KV M 3 1 2 / 3 1 4 I C
FEATURES
n
n
n
n
n
n
n
n
n
n
n
Allows users to control 2 (KVM312IC) or up to 4 (KVM314IC)
computers from single PS/2 console (PS/2 mouse, PS/2 keyboard
and monitor)
Easy switching via Hotkeys or manual port selectors
Easy installation - no software to install
Easy access - logically designed front panel keyboard & mouse
ports
Keyboard and mouse emulation allows error-free booting
Caps Lock, Scroll Lock and Num Lock status is stored for
each PC
Supports high resolution video - up to 1920 x 1440 @75MHz;
VGA, SVGA monitors and MultiSync monitors
AutoScan mode for convenient automatic switching
Front panel status LEDs give a clear indication of the active
computer
Audible feedback when switching between computers
Works with Windows® 95,98,ME,2000,NT,XP, Linux, Free BSD
PACKAGE CONTENTS
Item
KVM312/314IC
K5C4
K5C6
User Manual
Qty
1
1/2
1/2
1
Remark
PS/2 KVM Switch
1.2m Cable(s)
1.8m Cable(s)
-2-
SPECIFICATIONS
Computer connections:
Keyboard/Mouse/Monitor 2/4 sets: HDDB 15 pin Female
Console Connections:
Keyboard
Mouse
1 set: PS/2 Mini Din 6 pin Female
1 set: PS/2 Mini Din 6 pin Female
Monitor
Port LEDs
1 set: HDDB15 pin Female
2/4
Hot Keys
Yes
Resolution
1920 x 1440 @75Hz
Dimensions(W x D x H)
133 x 64 x 22mm / 214x 79 x 22mm
Weight
125g / 213g
Operating Temp
32˚ to 104˚F (0˚-40˚C)
Storage Temp
-4˚ to 140˚F (-20˚-60˚C)
Humidity
0 – 80% RH, non-condensing
Power Supply (Optional)
DC 9V, 600mA adapter
Warranty
18 months
Note: Specifications are subject to change without notice.
-3-
KV M 3 1 2 / 3 1 4 I C
OVERVIEW
Hot Keys
The Hot key feature allows you to use designated keyboard
commands to select ports, start AutoScan, and enable / disable
the “beeper” sound. You can control multiple computers by using a
simple hot key sequence on your keyboard.
AutoScan
The AutoScan function allows you to automatically scan and
monitor all computers - one by one, that are connected to your
KVM Switch.
Superior Video Resolution
With a 400MHz video bandwidth, the KVM312IC / KVM314IC
can support video resolutions of up to 1920 x 1440 @75Hz. (To
preserve signal integrity at high resolutions, a 75-Ohm coaxial
VGA cabling is required)
Easy Console Access
Logically designed front panel console keyboard & mouse ports for
a hassle free setup.
Manual Port Selectors
Push buttons conveniently located on the top panel of the
KVM312IC / KVM314IC provide simple manual port selection.
-4-
LED Display
Port LEDs allow for easy status monitoring. A lit LED indicates
which computer the KVM console currently has control of. The
LED will light with the corresponding active port when switching
between the computers.
PS/2 Interface Support
The Switch supports computers with PS/2 input devices (keyboard
and mouse).
Optional “Beeper” Setup
Users can customize their setup to enable/disable the “Beep”
sound when switching between computers.
-5-
KV M 3 1 2 / 3 1 4 I C
DISPLAY DIAGRAMS
Front View
2
3
KVM312IC
1
KVM314IC
2
1
1. Console PS/2 keyboard and PS/2 mouse ports
2. Direct access port selector/s
• Lights RED indicating that the connected computer has the
KVM focus (SELECTED).
3. LEDs
Rear View
2
1
ME201
ME401
1
2
1. Console VGA port
2. Computer VGA ports
Side View
1
ME201
1
ME401
1. Power Jack (9V DC, 600mA)
-6-
INSTALLATION
Where to Place the KVM Switch:
The ExsorView KVM Switch is small, portable and designed to
fit right on the desktop. Before installation consider the following
when deciding where to place the KVM Switch;
• whether or not you intend to use the manual port selectors for
port switching
• the length of the cables attached to your keyboard, mouse,
and monitor
• the location of your computers from your console
• the length of the cables you use to connect your computers to
the KVM
Cable Distance Requirements:
For PS/2 computers: VGA signals are best retained when
transmitted up to 25 feet (7.5m). Beyond 25 feet (7.5m),
probability of video degradation increases with an increase in
distance. For this reason, your PS/2 computer should be placed
within 25 feet (7.5m) of the KVM Switch.
Cautions and Warnings:
Avoid placing cables near machines that create electrical noise
such as fluorescent lighting, air conditioning equipment, etc.
-7-
KV M 3 1 2 / 3 1 4 I C
HARDWARE INSTALLATION
This section provides you complete instructions for the basic
hardware setup of a single KVM312IC / KVM314IC.
Important Note:
Before you begin, make sure that the powers to the
entire your computer you will be connecting up have
been powered off.
To prevent damage to your installation due to ground
potential difference, make sure that all computers on
the installation are properly grounded. Failure to follow
these instructions can result in damage to computers and
or the Switch.AMCONN Corporation will not be responsible
for
damaged caused in this way.
Connecting the Console
1. Power off all computers.
2. Connect your PS/2 keyboard and PS/2 mouse directly into the
PS/2 keyboard and mouse ports (as designated by the console
“keyboard” and “mouse” symbols) on the front of your KVM
Switch.
Mouse
Keyboard
-8-
3. Connect the male VGA connector (HDDB-15 pin) from your
monitor to the console VGA port on your on the back of the KVM
Switch.
Monitor
Powering-Up the KVM Switch (Optional)
1. Connect the barrel of 9V, 600mA power adapter to the power
jack on the rear of the Switch. Then plug the power adapter
cable into an available power outlet.
-9-
KV M 3 1 2 / 3 1 4 I C
Connecting the Computers
1. Using AMCONN’s all-in-one cable set (see Cables section),
connect
the PS/2 keyboard and PS/2 mouse from your first computer.
2. Connect the male VGA connector to the corresponding female
VGA port on the back of the computer. Take the other male VGA
cable end and connect it to the rear of the Switch designated as
”PC1”.
3. Repeat steps 1 and 2 for all computers.
4. Power on your computers. Your computer’s operating system
should recognize your KVM Switch.
-10-
OPERATION
Powered Up and Ready
Once all cables have been connected and all computers have
been powered up, the Switch emulates mouse and keyboard
signals on each port allowing your computer to boot normally. Your
KVM312IC / KVM314IC is now ready for use.
Controlling your computers with the KVM312IC / KVM314IC couldn
’t be easier. The KVM312IC / KVM314IC allows you to instantly
access the computers using two methods of port selection:
• Manual Port Selectors
• Simple Hot Key combinations from the keyboard
Selecting computers via Manual Port Selectors
You can instantly select any computer by pressing the Port
selectors on the top of the KVM Switch. The corresponding LED
will light “RED” to indicate current port selection.
Selecting computers via Hot Keys
You can directly switch the KVM focus to any computer via the
simple keyboard command sequence using the SCROLL LOCK
key and entering the switch port number. Each computer is
assigned a numeric ID.
1. To invoke the Hot key mode press the “SCROLL LOCK” key
twice within two seconds. Note that a signal ‘beep’ will be given
as confirmation.
2. Enter your desired switch port number (1- 4).
-11-
KV M 3 1 2 / 3 1 4 I C
For example, if you press [SCROLL LOCK], [SCROLL LOCK], “2”
the computer on port 2 will be selected.
Alternatively, you can switch the KVM focus to any computer via
the simple keyboard command sequence using the SCROLL
LOCK key and Up and Down arrow keys.
1. To invoke the Hot key mode press the “SCROLL LOCK” key
twice within two seconds. Note that a signal ‘beep’ will be given
as confirmation.
2. Press the Up or Down arrow keys to switch to the Previous or
Next port respectively.
Hot Key Commands
■
Switch to PC “X”
Previous active PC
■ Next active PC
■ Auto Scan
■ Stop Auto Scan
■ Enable / Disable “Beep” Sound
X
■
O
Any key
S
(X=1,2,3,4)
Note: After switching ports there is a delay of up to 1-2 seconds
before the video displays. This is normal and is due to the
refresh rate of the video signal.
-12-
AutoScan Mode
The AutoScan feature allows you to monitor the activity of the
connected computers at regular 10 second intervals so that you
can monitor the computer activity without having to take the trouble
of switching yourself. This time interval cannot be changed.
To invoke Auto Scan Mode press [SCROLL LOCK], [SCROLL
LOCK], “0”.
Note: 1.The interval between these two keys should be no more
than 0.5 seconds. Once the scanning begins, it continues
until you press any key to exit AutoScan Mode.
2. A flashing port LED indicates that the connected
computer is under Auto Scan mode.
©2003 AMCONN Labs. All rights reserved. The ExsorView series is a trade mark of
AMCONN. All trade names are registered trademarks of their respective owners.
-13-
KV M 3 1 2 / 3 1 4 I C
FCC CERTIFICATIONS
This equipment has been tested and found to comply with the limits for a
Class B digital device, pursuant to Part 15 of the FCC Rules. These limits
are designed to provide reasonable protection against harmful interference
in a residential installation. This equipment generates uses and can radiate
radio frequency energy and, if not installed and used in accordance with
the instructions, may cause harmful interference to radio communications.
However, there is no guarantee that interference will not occur in a particular
installation. If this equipment does cause harmful interference to radio or
television reception, which can be determined by turning the equipment off
and on, the user is encouraged to try to correct the interference by one or
more of the following measures:
• Reorient or relocate the receiving antenna.
• Increase the separation between the equipment and receiver.
• Connect the equipment into an outlet on a circuit different from that
to which the receiver is connected.
• Consult the dealer or an experienced radio/TV technician for help.
• Shielded interface cables must be used in order to comply with
emission limits.
• You are cautioned that changes or modifications not expressly
approved by the party responsible for compliance could void
your authority to operate the equipment.
• This device complies with Part 15 of the FCC rules. Operation is
subject to the following two conditions: (1) This device may not
cause harmful interference, and (2) This device must accept any
interference received, including interference that may cause
undesired operation.
CE Mark Warning
This is a Class B product. In a domestic environment, this product may
cause radio interference, in which case the user may be required to take
adequate measures.
-14-
VCCI Warning
LIMITED WARRANTY
AMCONN provides this limited warranty for its product only to the person or
entity who originally purchased the product from AMCONN or its authorized
reseller or distributor.
Limited Hardware Warranty:
AMCONN warrants that the hardware portion of the AMCONN products
described below (Hardware) will be free from material defects in
workmanship and materials from the date of original retail purchase of the
Hardware, for the period set forth below applicable to the product type
(Warranty Period ) if the Hardware is used and serviced in accordance with
applicable documentation; provided that a completed Registration Card is
returned to an Authorized AMCONN Service Office within ninety (90) days
after the date of original retail purchase of the Hardware.
If a completed Registration Card is not received by an authorized AMCONN
Service Office within such ninety (90) period, then the Warranty Period shall
be ninety (90) days from the date of purchase.
Product Type
Product (excluding power supplies and fans)
Power Supplies and Fans
Spare parts and spare kits
Warranty Period
One (1) Year
One (1) Year
Ninety (90) days
AMCONN’s sole obligation shall be to repair or replace the defective
Hardware at no charge to the original owner. Such repair or replacement will
be rendered by AMCONN at an Authorized AMCONN Service Office.
The replacement Hardware need not be new or of an identical make, model
or part; AMCONN in its discretion may replace the defective Hardware (or
any part thereof) with any reconditioned product that AMCONN reasonably
determines is substantially equivalent (or superior) in all material respects to
the defective Hardware.
-15-
KV M 3 1 2 / 3 1 4 I C
The Warranty Period shall extend for an additional ninety (90) days after any
repaired or replaced Hardware is delivered. If a material defect is incapable
of correction, or if AMCONN determines in its sole discretion that it is not
practical to repair or replace the defective Hardware, the price paid by the
original purchaser for the defective Hardware will be refunded by AMCONN
upon return to AMCONN of the defective Hardware. All Hardware (or part
thereof) that is replaced by AMCONN, or for which the purchase price is
refunded, shall become the property of AMCONN upon replacement or
refund.
Limited Software Warranty:
AMCONN warrants that the software portion of the product ( Software ) will
substantially conform to AMCONN’s then current functional specifications for
the Software, as set forth in the applicable documentation, from the date of
original delivery of the Software for a period of ninety (90) days ( Warranty
Period ), if the Software is properly installed on approved hardware and
operated as contemplated in its documentation. AMCONN further warrants
that, during the Warranty Period, the magnetic media on which AMCONN
delivers the Software will be free of physical defects. AMCONN’s sole
obligation shall be to replace the non-conforming Software (or defective
media) with software that substantially conforms to AMCONN’s functional
specifications for the Software. Except as otherwise agreed by AMCONN in
writing, the replacement Software is provided only to the original licensee,
and is subject to the terms and conditions of the license granted by AMCONN
for the Software. The Warranty Period shall extend for an additional
ninety (90) days after any replacement Software is delivered. If a material
non-conformance is incapable of correction, or if AMCONN determines in its
sole discretion that it is not practical to replace the non-conforming Software,
the price paid by the original licensee for the non-conforming Software will be
refunded by AMCONN; provided that the non-conforming Software (and all
copies thereof) is first returned to AMCONN. The license granted respecting
any Software for which a refund is given automatically terminates.
What You Must Do For Warranty Service:
Registration Card. The Registration Card provided at the back of this
manual must be completed and returned to an Authorized AMCONN Service
Office for each AMCONN product within ninety (90) days after the product is
purchased and/or licensed. The addresses/telephone/fax list of the nearest
-16-
Authorized AMCONN Service Office is provided in the back of this manual. (
Failure to properly complete and timely return the registration card may affect
the warranty for this product.)
Submitting A Claim. Any claim under this limited warranty must be submitted
in writing before the end of the Warranty Period to an Authorized AMCONN
Service Office. The claim must include a written description of the Hardware
defect or Software non conformance in sufficient detail to allow AMCONN to
confirm the same. The original product owner must obtain a Return Material
Authorization (RMA) number from the Authorized AMCONN Service Office
and, if requested, provide written proof of purchase of the product (such as
a copy of the dated purchase invoice for the product) before the warranty
service is provided. After an RMA number is issued, the defective product
must be packaged securely in the original or other suitable shipping package
to ensure that it will not be damaged in transit, and the RMA.
What Is Not Covered:
This limited warranty provided by AMCONN does not cover:
Products that have been subjected to abuse, accident, alteration,
modification, tampering, negligence, misuse, faulty installation, lack of
reasonable care, repair or service in any way that is not contemplated in the
documentation for the product, or if the model or serial number has been
altered, tampered with, defaced or removed; Initial installation, installation
and removal of the product for repair, and shipping costs; Operational
adjustments covered in the operating manual for the product, and normal
maintenance; Damage that occurs in shipment, due to act of God, failures
due to power surge, and cosmetic damage; and Any hardware, software,
firmware or other products or services provided by anyone other than
AMCONN.
Disclaimer Of Other Warranties:
(Except for the limited warranty specified herein, the product is provided as-is
without any warranty of any kind including, without limitation, any warranty
of merchantability, fitness for a particular purpose and non-infringement. If
any implied warranty cannot be disclaimed in any territory where a product is
sold, the duration of such implied warranty shall be limited to ninety (90) days.
Except as expressly covered under the limited warranty provided herein, the
entire risk as to the quality, selection and performance of the product is with
the purchaser of the product.)
-17-
KV M 3 1 2 / 3 1 4 I C
Limitation of Liability:
To the maximum extent permitted by law, AMCONN is not liable under any
contract, negligence, strict liability or other legal or equitable theory for any
loss of use of the product, inconvenience or damages of any character,
whether direct, special, incidental or consequential (including, but not
limited to, damages for loss of goodwill, work stoppage, computer failure or
malfunction, loss of information or data contained in, stored on, or integrated
with any product returned to AMCONN for warranty service) resulting from the
use of the product, relating to warranty service, or arising out of any breach
of this limited warranty, even if AMCONN has been advised of the possibility
of such damages. The sole remedy for a breach of the foregoing limited
warranty is repair, replacement or refund of the defective or non-conforming
product.
Governing Law:
This Limited Warranty shall be governed by the laws of the state of California.
Some states do not allow exclusion or limitation of incidental or consequential
damages, or limitations on how long an implied warranty lasts, so the
foregoing limitations and exclusions may not apply. This limited warranty
provides specific legal rights and the product owner may also have other
rights which vary from state to state.
Trademarks:
Copyright 2005 AMCONN Technology Inc. Contents of product are subject to
change without prior notice.
Copyright Statement:
No part of this publication may be reproduced in any form or by any means or
used to make any derivative such as translation, transformation, or adaptation
without permission from AMCONN Technology Inc, as stipulated by the
United States Copyright Act of 2005.
-18-