1
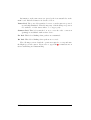
Documentation Author
Arnaud Maye and Pierre Bureau for K-Team S.A.
Ch. de Vuasset, CP 111
1028 Préverenges
Switzerland
email: [email protected]
Url: www.k-team.com
Trademark Acknowledgments:
IBM PC: International Business Machine Corp.
Macintosh: Apple Corp.
SUN Sparc-Station: SUN Microsystems Corp.
LabView: National Instruments Corp.
MatLab: MathWorks Corp.
Webots: Cyberbotics
Khepera: K-Team and LAMI
Legal Notice:
• The content of this manual is subject to change without notice.
• All effort have been made to ensure the accuracy of the content of
this manual. However, should any error be detected, please inform
K-Team S.A.
• The above notwithstanding K-Team can assume no responsibility for
any error in this manual.
K-Team S.A.
1
Table Of Contents
1 Introduction
1.1 Safety Precautions . . . . . . . . . . . . . . . . . . . . . . . .
1.2 Unpacking and inspection . . . . . . . . . . . . . . . . . . . .
3
3
3
2 The High Speed Radio Turret
2.1 Overview . . . . . . . . . . . . . . . . . . . . . . . . . . . . .
4
4
3 Connections
3.1 Hardware Configuration . . . . . . . . . . . . . . . . . . . . .
3.1.1 Device Identification . . . . . . . . . . . . . . . . . . .
6
6
6
4 Linux Configuration
4.1 Bluez Package Installation and Configuration . . . . . . . . .
4.2 Device Binding . . . . . . . . . . . . . . . . . . . . . . . . . .
4.3 Testing the Connection . . . . . . . . . . . . . . . . . . . . .
8
8
9
10
5 Windows Configuration
11
6 Assembling Instructions
14
7 Sample Configuration File
15
K-Team S.A.
2
1 Introduction
1.1
Safety Precautions
Don’t plug or unplug any connector or turret when the robot is
powered (either with batteries or external power supply).
To prevent damage to the hardware, all cables and turrets must be properly plugged before switching the robot On, or before connecting power
supply to the interface.
Switch Off the robot if not used during a day or longer.
Please unplug the power supply from the wall socket as well.
1.2
Unpacking and inspection
Please check your package that should contain a High Speed radio turret
and the documenation your are reading currently. Check the turret against
figure 2.1. Check that the pins bellow the turret are not broken or damaged.
If you notice any damage, please contact your K-Team products dealer.
K-Team S.A.
3
2 The High Speed Radio Turret
2.1
Overview
The High speed radio turret is a wireless communication device which enables communication between a Khepera and a remote PC. It is different
from a regular Khepera turret as it replaces the RS232 serial link between
the robot and the PC, it does not use the KNet bus to communicate with
the Khepera.
That means the turret is not identified when using the net command on
the robot, and the regular serial connection to the Khepera is not available
when connected with the High Speed radio.
The turret is designed as a simple cable replacement between the PC and
the robot, it does not support direct communication between two robots.
However, up to seven Khepera can be connected to the same PC with a
115200 bps communication speed.
The turret supports both 115200 and 38400 communication speed, refer
to section 3.1 for details on speed settings.
Reset switch
Antena
Dip switch settings
Power led
Connect led
Tx led
Rx led
6
1
Serial Connector
Figure 2.1: Overview of the radio turret.
K-Team S.A.
4
Information on the turret state are given by the four status Leds on the
main board. Each Led function is described below.
Power Led: The power led is switched on as soon as the turret is powered
up and fully initialized. This led may stay off if the Khepera power is
not available or if the turret fails to boot up properly.
Connect Led: This led is switched on as soon as the radio connection
(pairing) is established with another device.
Tx Led: This led is blinking when packets are transmited.
Rx Led: This led is blinking when packets are received.
The following sections detail the operations required to set up and tune
the High Speed radio turret. Please refer to appendix 6 for instructions on
turret assembling and disassembling.
K-Team S.A.
5
3 Connections
The high speed radio turret is replacing the RS232 serial cable to enable
communication between the Khepera and a remote PC. No connections are
required on the turret beside assembling the turret properly.
The serial connector is only provided for testing purpose or to provide
external power supply to the robot for application development.
The serial connector can be connected to a Khepera RS232 InterfaceCharger to supply the robot. In that case the RS232 cable should not ne
connected from the PC to the Interface-Charger. If a cable is connected,
it will prevent the communication between the radio turret and the remote
PC.
3.1
Hardware Configuration
The only required hardware configuration is to set the Khepera running
mode and to select the corresponding communication speed on the radio
turret.
The Khepera running mode should be set to serial communication mode
at 38400 bps or 115200 bps. If the Khepera mode is not properly selected,
the communication between the turret and the robot will not be possible.
The serial mode can be tested by using the serial connector on the turret
and connecting a regular Khepera serial cable to a remote PC (plese refer
to the Khepera user manual). With a terminal properly configured, the
Khepera boot message should be displayed when switching on the robot.
The radio communication speed must be selected using the dip switch
on the turret as displayed on figure 3.1.
ON
1
115200 bps
OFF
1
38400 bps
Figure 3.1: Speed Selection using the dip switch settings.
3.1.1
Device Identification
When using several Khepera equiped with radio turret, it may be useful
to differentiate them within an application. The dip switch can be used to
K-Team S.A.
6
modify the device identification string as it will be displayed by a Bluetooth
scan tool.
The standard radio turret device name is kheradio, by using the switch,
a turret ID can be added to the name. For example if the three ID switch
are set to 010. The device name will be kheradio 02. The switch order and
position is described on figure 3.2.
switch 4: device id bit0
switch 3: device id bit1
switch 2: device id bit2
Figure 3.2: Device ID Selection using the dip switch settings.
K-Team S.A.
7
4 Linux Configuration
4.1
Bluez Package Installation and Configuration
The bluez package and tools should be properly installed on the Linux machine before using the Khepera High Speed radio. Complete packages are
available for most distributions, please refer to your distribution support for
instructions on installing a package.
The bluez source code is available from sourceforge at http://bluez.sourceforge.net.
To check the package installation, the following command should list
available BlueTooth interfaces. Running hciconfig on a computer with an
integrated BlueTooth controller will list at least one interface. Otherwise
the USB-BlueTooth dongle must be inserted before running the command.
Please check that the USB device is properly detected using dmesg.
>dmesg
usb 2-1: new full speed USB device using address 3
Bluetooth: HCI USB driver ver 2.7
usbcore: registered new driver hci_usb
Bluetooth: HIDP (Human Interface Emulation) ver 1.0
>hciconfig
hci0:
Type: USB
BD Address: 00:0C:76:B1:07:18 ACL MTU: 192:8 SCO MTU: 64:8
UP RUNNING PSCAN ISCAN
RX bytes:107 acl:0 sco:0 events:14 errors:0
TX bytes:300 acl:0 sco:0 commands:13 errors:0
The hci stack configuration file should be checked to make sure it contains
the correct options. A sample configuration file is inserted in appendix 7.
The important Options are disabling the security encryption and disabling
the pairing.
security none;
pairing none;
The device section should be modified to add the option lm slave,accept;
and comment out all the others lm lines.
Finaly, the HCI and SDP daemon must be running to enable the connections with other devices. The daemons can be invoked from the command
line as root user.
>hcid
>sdpd
K-Team S.A.
8
4.2
Device Binding
The HCI scan tool should be first invoked to check that the Khepera turret
is detected from the host PC.
>hcitool scan
Scanning ...
00:04:3E:C3:31:85
kheradio
If more than one robot is in range, each one should appear on the scan
with other BlueTooth devices which may be detected such as mobile phones.
Each device should have a different hardware address.
If the Khepera radio is properly detected, the rfcomm layer must be configured to bind the device with a virtual serial port. For each robot, and corresponding serial port, a new entry should be added in the /etc/bluetooth/rfcomm.conf
file. Each entry specify the device name for the virtual port, hardware address for the binded device, and communication channel.
rfcomm0 {
# Automatically bind the device at startup
bind yes;
# Bluetooth address of the device
device 00:04:3E:C3:31:85; # khepera
# RFCOMM channel for the connection
channel 1;
# Description of the connection
comment "KheperaII Bluetooth device #0";
}
rfcomm1 {
# Automatically bind the device at startup
bind yes;
# Bluetooth address of the device
device 00:04:3E:C1:11:B0; # khepera
# RFCOMM channel for the connection
channel 1;
# Description of the connection
comment "KheperaII Bluetooth device #1";
}
Once configured, the rfcomm service should be restarted using:
K-Team S.A.
9
> /etc/rc.d/init.d/bluetooth restart
Then the device can be binded and the connection checked using:
>rfcomm bind all
>rfcomm
rfcomm0: 00:04:3E:C3:31:85 channel 1 clean
If the channel is indicated as clean a virtual serial port named /dev/rfcomm0
is available and can be used as a regular serial port to communicate with
the Khepera.
4.3
Testing the Connection
The easiest way to test the connection is using minicom. The serial port
settings should be set as usual using a rfcomm device such as /dev/rfcomm0.
The serial communication speed should be set to match the turret communication speed as described in section 3.1.
When minicom is launched, the connect led should switch on, if the
connect led doesn’t switch on the rfcomm configuration and status should
be checked.
If the Khepera is reset, the connection and device binding process should
be restarted.
K-Team S.A.
10
5 Windows Configuration
The Khepera can be connected to a windows computer using the integrated
Bluetooth manager. A Bluetooth adapater device must be configured first
except if the computer already includes a Bluetooth adapter device.
The Windows device manager should be checked for existing adapter. If
an USB Bluetooth dongle is used, it should apper in the devide manager
under the USB device section and be supported by a working driver.
Figure 5.1: Windows device manager.
K-Team S.A.
11
Once the adapter device is properly configured, the area can be scanned
for remote devices as displayed on figure 5.2. In the Bluetooth manager, the
command Bluetooth→Search for devices should display all the powered up
khepera radio turret in the area.
Figure 5.2: Bluetooth manager scan device.
If the Khepera turrets are properly detected, they can be paired to establish the serial connection. But before pairing the device the secure connection option must be disabled using The Windows control panel, as displayed
on figure 5.3. The option must be disable for each virtual serial port that
should be connected to a khepera radio device.
The Khepera turret can then be paired with the computer, and it will
be associated with a virtual serial port, as displayed in the Bluetooth device
properties. The serial connection with the robot can then be configured
as usual using this serial port, and the communication will be managed as
when using a serial cable.
K-Team S.A.
12
Figure 5.3: Disable secure connection for the virual serial port.
K-Team S.A.
13
6 Assembling Instructions
Assembling and disassembling the turret are delicate operations. Please
operate very carefuly to avoid breaking or bending the connection pins.
Assembling is the easiest part of the job. Simply make sure the pins
are correctly aligned with the corresponding socket and press gently the top
board.
Disassembling requires a platic tool to use as a lever. It is easy to bend
pins by trying to remove the top board too quickly. The best method to
operate safely is to slightly unplug the board on one side using the lever,
then slighty unplug the opposite side. After a few press on each side, the
boards should be loose enough for an easy removal.
Figure 6.1: Assembling and disassembling the turret
K-Team S.A.
14
7 Sample Configuration File
#
# HCI daemon configuration file.
#
# $Id: hcid.conf,v 1.3 2002/07/18 18:12:46 maxk Exp $
#
# HCId options
options {
# Automatically initialize new devices
autoinit yes;
# Security Manager mode
#
none - Security manager disabled
#
auto - Use local PIN for incoming connections
#
user - Always ask user for a PIN
#
security none; # was auto
# Pairing mode
#
none - Pairing disabled
#
multi - Allow pairing with already paired devices
#
once - Pair once and deny successive attempts
pairing none; # was multi
# PIN helper
#pin_helper /usr/bin/bluepin;
#dbus_pin_helper;
# A dbus PIN daemon can be found at
# ftp://ftp.handhelds.org/pub/projects/gpe/source/bluez-pin-0.20.tar.gz
}
# Default settings for HCI devices
device {
# Local device name
#
%d - device id
#
%h - host name
name "%h-%d";
K-Team S.A.
15
# Local device class
class 0x120104;
# Default packet type
#pkt_type DH1,DM1,HV1;
pkt_type DM1,DM3,DM5,DH1,DH3,DH5,HV1,HV2,HV3;
# Inquiry and Page scan
iscan enable; pscan enable;
# Default link mode
#
none
- no specific policy
#
accept - always accept incoming connections
#
master - become master on incoming connections,
#
deny role switch on outgoing connections
#
#lm accept,master;
#
#lm accept;
lm slave,accept;
# Default link policy
#
none
- no specific policy
#
rswitch - allow role switch
#
hold
- allow hold mode
#
sniff
- allow sniff mode
#
park
- allow park mode
#
#lp hold,sniff;
#
lp hold,sniff,park;
# Authentication and Encryption
#auth enable;
#encrypt enable;
}
K-Team S.A.
16