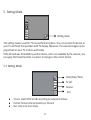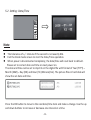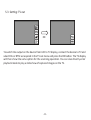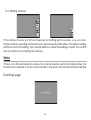
1
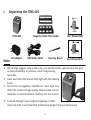
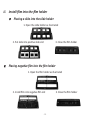
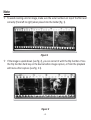
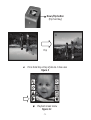
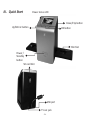
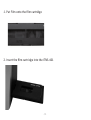
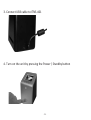
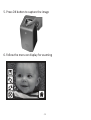
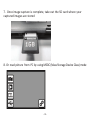
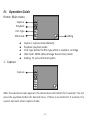
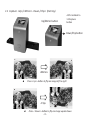
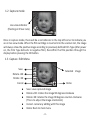
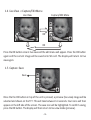
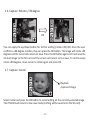
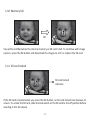
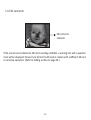
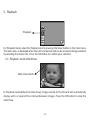
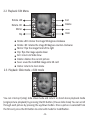
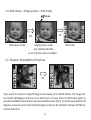
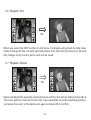
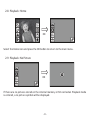
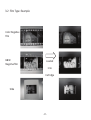
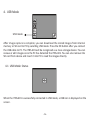
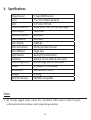
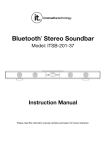
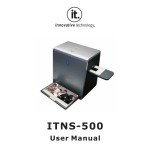
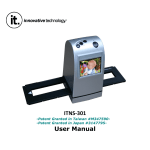
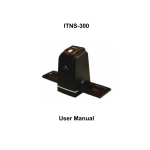
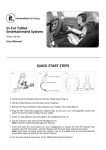
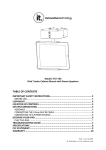
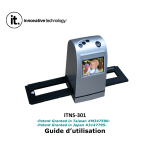
Film and Slide Converter ITNS-401 User Manual Index I. Unpack ITNS-401……........................................................2 II. Install film into the film holder........................................3 III. Quick Start.......................................................................6 IV. Operation Guide............................................................11 V. Specifications................................................................31 -1- I. Unpacking the ITNS-401 ITNS-401 Negative/Slide Film Holder User Manual(EN) ITNS-401 Guide d’utilisation Note AC Adaptor USB/Video Cable Cleaning Brush User Manual(FR) We strongly suggest using a clean, dry, non-alcohol cotton swab to clean the glass surface periodically to produce a clear image during operation. Clean dust from Film Scanner back light with the cleaning brush. Dust or dirt on negatives, slide films or cover trays may affect the scanned image quality. Please make sure all materials are cleaned before inserting into the scanner. To avoid damage to your original negatives or slides, clean only with a recommended, professional purger from your photo store. -2- II. Install film into the film holder ● Placing a slide into the slide holder 1. Open the slide holder as illustrated 2. Put slide into positive slide slot ● 3. Close the film holder Placing negative film into the film holder 1. Open the film holder as illustrated 2. Install film into negative film slot -3- 3. Close the film holder Note To avoid creating a mirror image, make sure the serial numbers on top of the film read correctly (from left to right) when placed into the holder [fig. 1]. Figure 1 If the image is upside down [see fig. 2], you can correct it with the Flip function. Press the Flip function hard key on the device before image capture, or from the playback edit menu after capture [see fig. 3.1]. Figure 2 -4- Down/Flip button (Flip hard key) Flip ● Press hard key on top of device in live view Figure 3 ● Playback mode menu Figure 3.1 -5- III. Quick Start Power status LED Down/Flip button Up/Mirror button OK button Film Slot Power / Standby button SD card Slot USB port TV out jack -6- 1. Put Film onto the film cartridge 2. Insert the film cartridge into the ITNS-401 -7- 3. Connect USB cable to ITNS-401 4. Turn on the unit by pressing the Power / Standby button -8- 5. Press OK button to capture the image 6. Follow the menu on display for scanning -9- 7. Once image capture is complete, take out the SD card where your captured images are stored 8. Or read picture from PC by using MSDC (Mass Storage Device Class) mode -10- IV. Operation Guide Home: Main menu Capture Playback Film Type USB mode ● ● ● ● ● Setting Capture: capture mode (default) Playback: playback mode Film Type: define the film type which is loaded in cartridge USB mode: MSDC (Mass Storage Device Class) mode Setting: TV out and format option 1. Capture Capture After the welcome screen appears, the above menu will remain for 5 seconds. You can press the up/down button for desired menu. If there is no action for 5 seconds, the system will auto enter Capture mode. -11- 1.1 Capture: <Up>/<Mirror> - Down /<Flip> (Hot Key) <OK> Go Back to 1.1Capture button Up/Mirror button Down/Flip button <Mirror> ● Press < Up > button to flip an image left to right <Flip> ● Press < Down > button to flip an image upside down -12- 1.2 Capture mode Live view indicator (flashing at 0.5sec rate) Once in capture mode, there will be a red indicator in the top left corner to indicate you are in live view mode. When the film cartridge is inserted into the scanner slot, the image will always show the positive image according to previously defined Film Type (after power on, the Film Type defaults to negative film). Reconfirm the film position through the display before pressing the OK button. 1.3 Capture: Edit Menu Save Selected image Rotate +90 Rotate -90 Home Cancel ● ● ● ● ● Save: save captured image Rotate +90: rotates the image 90 degrees clockwise Rotate -90: rotates the image 90 degrees counter-clockwise (This is to adjust the image orientation) Cancel: cancel any editing with this image Home: Back to main menu -13- 1.4 Live View -> Capture/Edit Menu Live View Capture/Edit Menu OK OK Press the OK button once in live view and the edit menu will appear. Press the OK button again and the current image will be saved onto SD card. The display will return to live view again. 1.5 Capture: Save Save Once the the OK button on top of the unit is pressed, a preview (live view) image will be selected and shown on the TFT. This will take between 3-4 seconds. Four icons will then appear on the left side of the screen. The save icon will be highlighted. To confirm saving, press the OK button. The display will then return to live view mode (preview). -14- 1.6 Capture: Rotate +/-90 degree OK You can apply the up/down button for further editing (rotate +90/-90). Once the user confirms a +90 degree rotation, they can press the OK button. The image will rotate +90 degrees and the cursor will remain on Save. Press the OK button again and it will save the rotated image to the SD card and the screen will return to live view. To continuously rotate +90 degrees, move cursor to rotate again and press OK. 1.7 Capture: Cancel Playback /captured image Select Cancel and press the OK button to cancel editing on the currently selected image. The ITNS-401 will return to live view mode (nothing will be saved onto the SD card). -15- 1.8 Capture: Home OK To go back to the main menu, select the Home icon and press the OK button. 1.9 Exit from Edit mode back to Capture mode (Live View) Next image in film cartridge Once the OK button is pressed to save or cancel, the display will return to capture mode/live view. You can then move the film cartridge to the next image you would like to capture. -16- 1.10 Memory full OK You will be notified when the internal memory or SD card is full. To continue with image capture, press the OK button and download the images to a PC or replace the SD card. 1.11 SD card locked SD card locked indicator If the SD card is locked when you press the OK button, an SD card locked icon displays on screen. To unlock the SD card, slide the lock switch on the SD card to the off position before inserting it into the device. -17- 1.12 SD card error SD card error indicator If the scanner cannot detect an SD card in working condition, a warning icon with a question mark will be displayed. Please try to format the SD card or replace with a different SD card to continue operation. (Refer to Setting section on page 30.) FULL -18- 2. Playback Playback For Playback mode, select the Playback icon by pressing the Down button in the main menu. The main menu is displayed when the unit is turned on and can be accessed during operation by selecting the Home icon. Press the OK button to confirm your selection. 2.1 Playback: Auto Slide Show Slide show mode In Playback mode (default to slide show), images stored on the SD card will automatically display with a 2 second time interval between images. Press the OK button to stop the slide show. -19- 2.2 Playback: Edit Menu Rotate +90 Exit Delete Save Rotate -90 Mirror Hom Flip ● ● ● ● ● ● ● ● Rotate +90: rotates the image 90 degrees clockwise Rotate -90: rotates the image 90 degrees counter-clockwise Mirror: flips the image from left to right Flip: flips the image upside down Exit: returns to Slide show Delete: deletes the current picture Save: saves the modified image onto SD card Home: returns to main menu 2.3 Playback: Slide mode -> Edit mode You can interrupt (stop) slide show mode and return to stand alone playback mode (single picture playback) by pressing the OK button. (Pause slide show) You can scroll through each picture by pressing the up/down button. Once a picture is selected from the SD card, press the OK button to enter edit mode for modification. -20- 2.4 Slide Show -> Single picture -> Edit mode Pause OK OK Slide show mode Single picture mode Use Up/Down button to scroll picture to be modified Edit mode 2.5 Playback: Rotate/Mirror/Flip/Save OK If you want to rotate an image 90 degrees clockwise press the OK button, the image will be rotated +90 degrees and the cursor will remain on Save. Press the OK button again to save the modified result and the next picture will be shown (N+1). To continuously Rotate +90 degrees, move the cursor back to Rotate again and press OK. (Same for Rotate -90, Mirror, and Flip function.) -21- 2.6 Playback: Exit OK When you select the EXIT function in edit menu, the display will go back to slide show mode starting with the currently selected picture from the internal memory or SD card. Any changes to the current picture will not be saved. 2.7 Playback: Delete OK Delete will delete the presently selected picture and the next picture will be shown (N+1). The cursor will then move to the Exit icon. If you would like to continue deleting pictures, just move the cursor to the delete icon again and press OK to confirm. -22- 2.8 Playback: Home OK Select the Home icon and press the OK button to return to the main menu. 2.9 Playback: No Picture OK If there are no pictures stored on the internal memory or SD card when Playback mode is entered, a no picture symbol will be displayed. -23- 3. Film Type Film Type To change the film type definition select the Film Type icon from the main menu and confirm your selection by pressing the OK button. The main menu is displayed when the unit is turned on and can be accessed during operation by selecting the Home icon. 3.1 Film Type: Select Film Type Color Negative film Slide film B&W Negative ● ● ● Negative film: select when scanning negative film Slide: select when scanning slides B&W film: select when scanning black and white negative film -24- 3.2 Film Type: Example Color Negative film B&W Negative film Loaded Into Cartridge Slide -25- 4. USB Mode USB mode After image capture is complete, you can download the stored images from internal memory or SD card to PC by selecting USB mode. Press the OK button after you connect the USB cable to PC. The ITNS-401 will be recognized as a mass storage device. You can review or edit images once the PC has detected the ITNS-401. You can also remove the SD card from device and insert it into PC to read the images directly. 4.1 USB Mode: Status When the ITNS-401 is successfully connected in USB mode, a USB icon is displayed on the screen. -26- 5. Setting Mode. Setting mode The setting mode is used for TV out and format options. You can connect the device to your TV and finish the operation with TV display. Moreover, the scanned images can be played back on your TV to share with family. If the SD card was formatted by another device, and is not readable by the scanner, you can apply the format function in scanner to change to the correct format. 5.1 Setting Mode Clock (Date/Time) TV out Format Exit ● ● ● TV out: select NTSC or PAL according to required interface Format: format internal memory or SD card Exit: returns to main menu -27- 5.2 Setting: Date/Time Note The tolerance of +/- 1minute if the second is not exactly 00s. Exit the Clock mode screen to start the Date/Time operation. When power is disconnected completely, the date/time will reset back to default. Please set to correct date and time on next power on. The date and time can be set to imprint on the digital file with format of Year (YYYY) – Month (MM) – Day (DD) and Hour (hh):Minute(mm). The picture files in hard disk will show the set date and time. Press the OK button to move to the next date/time item and make a change. Use the up and down buttons to increase or decrease one interval at a time. -28- 5.3 Setting: TV out OK To switch the output on the device from LCD to TV display, connect the device to TV and select PAL or NTSC as required in the TV out menu and press the OK button. The TV display will then show the same option for the scanning operation. You can also directly enter playback mode to play a slide show of captured images on the TV. -29- 5.4 Setting: Format If the internal memory or SD card requires formatting by the scanner, you can enter format mode by selecting the format icon and pressing the OK button. The default setting will be to cancel formatting. Press the OK button to cancel formatting or select the confirm icon to confirm re-formatting the memory. Note If there is no SD card inside the device, the internal memory will be formatted when the format icon is selected. If an SD card is inserted in the device, the SD card will be formatted. Good bye page -30- V. Specifications Image Sensor: Lens: LCD: Internal memory: Focus Range: Exposure Control: Color Balance: Scan Quality: Data Conversion: Scan Method: Light Source: Interface: USB Configuration: Power: Dimensions: Weight: External memory: 5 mega CMOS sensor F no.=6.0, 4 Glass elements, 2.4’’ Color TFT LCD 24MB NAND Flash (for saving images) Fixed focus Automatic Automatic 1,800 dpi 10 bits per color channel Single pass Back light (3 white LEDs) USB 2.0, TV-out (video 3.5mm jack) Mass Storage Device Class/MSDC 5V adapter, or USB power 90x100.2x167.53mm 0.445kg SD/MMC compatible NOTE We strongly suggest using a clean, dry, non-alcohol cotton swab to clean the glass surface periodically to produce a clear image during operation. -31- Innovative Technology Electronics Corp. Limited Warranty: 90 Days Labor, One Year Parts Innovative Technology Electronics Corp. (IT) warrants the product to be free from “Defects” in materials under normal use for a period of “One Year” from the date of the original purchase. The Warranty is “Not” transferable. IT agrees, within the initial “90 Day” period, to repair or replace the product if it is determined to be defective at “No Charge”. It is further agreed that IT will cover the cost to repair or replace damaged “Parts” only for a total period of “One Year” from the date of the original purchase. The warranty does not cover cosmetic damage, antennas, AC cords, cabinets, headbands, earpads, or damage due to line power surges, connection to improper voltage supply or settings, misuse, mishandling, accident, acts of God or attempted repair by an unauthorized service agent. To obtain service, the purchaser MUST present an original sales receipt / proof of purchase. Please contact us at www.ithomeproducts.com to request an RMA (Return Material Authorization) number to return products for service or replacement. Returns without an RMA number on the package will be refused and returned to sender. Upon receipt of the returning item and our full inspection (IT) may issue a replacement to customer for the same item or of one that has equivalent value and features. To return an item, supply full name, return address, phone number, item purchased, receipt of purchase and reason for return to obtain RMA number. All returns must be in the original packaging or reasonable substitute to prevent damage. Customer “Must” include full name, shipping address and telephone number inside of package. No return will be shipped back to a PO Box or APO address. Please include your check or money order in the amount of • USD$5.00 for items $10.00 to $39.99 (Price Paid Per Unit) • USD$10.00 for items $40.00 to $99.99. (Price Paid Per Unit) • USD$16.00, for items $100.00 and up. (Price Paid Per Unit) • Shipping fees are non-refundable to be payable to Innovative Technology Electronics Corp.(for handling and return shipping charges) (IT) will not be responsible for delays or unprocessed claims resulting from a purchaser’s failure to provide any / all of the necessary information. Send all inquiries or RMA request via our website www.ithomeproducts.com/support. Innovative Technology Electronics Corp. 1 Channel Drive Port Washington, NY 11050 Toll free: 1-877-483-2497 Website for support: www.ithomeproducts.com/support There are no express warranties except as listed above. REPAIR OR REPLACEMENT AS PROVIDED UNDER THIS WARRANTY IS THE EXCLUSIVE REMEDY OF THE CUSTOMER, (IT) SHALL NOT BE LIABLE FOR ANY INCIDENTAL OR CONSEQUENTIAL DAMAGES FOR BREACH OF ANY EXPRESS OR IMPLIED WARRANTY ON THIS PRODUCT EXCEPT TO THE EXTENT PROHIBITED BY APPLICABLE LAW. ANY IMPLIED WARRANTY OF MERCHANTABILITY OR FITNESS FOR A PARTICULAR PURPOSE ON THIS PRODUCT IS LIMITED IN DURATION TO THE DURATION OF THIS WARRANTY. Some states do not allow the exclusion or limitation of incidental or consequential damages, or limitations on how long an implied warranty lasts, so the above exclusions or limitations may not apply to you. This warranty gives you specific legal rights and you may also have other rights, which vary from state to state. -32- Instructions shall caution users that modifications not approved by the party responsible for compliance could void user's authority to operate the equipment. The following or equivalent as appropriate: “NOTE: This equipment has been tested and found to comply with the limits for a Class B digital device, pursuant to Part 15 of the FCC Rules. These limits are designed to provide reasonable protection against harmful interference in a residential installation. This equipment generates, uses and can radiate radio frequency energy and, if not installed and used in accordance with the instructions, may cause harmful interference to radio communications. However, there is no guarantee that interference will not occur in a particular installation. If this equipment does cause harmful interference to radio or television reception, which can be determined by turning the equipment off and on, the user is encouraged to try to correct the interference by one or more of the following measures: ● Reorient or relocate the receiving antenna. ● Increase the separation between the equipment and receiver. ●Connect the equipment into an outlet on a circuit different from that to which the receiver is connected. ●Consult the dealer or an experienced radio/TV technician for help.” Statement that the product complies with Part 15 (i.e. “This device complies with Part 15 of the FCC Rules. Operation is subject to the following two conditions: (1) This device may not cause harmful interference, and (2) this device must accept any interference received, including interference that may cause undesired operation.”) CALIFORNIA PROP 65 WARNING WARNING : This product contains chemicals known to the State of California to cause birth defects or other reproductive harm. For more information on these regulations and a list of chemicals, log on the following website address: http://www.oehha.ca.gov/prop65.html -33- Version 1.11 July 2012 -34-