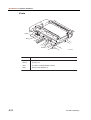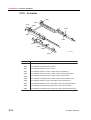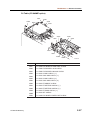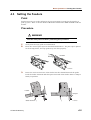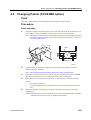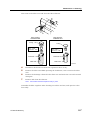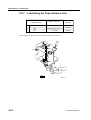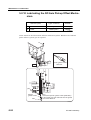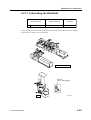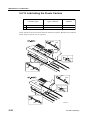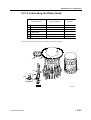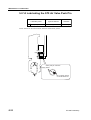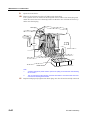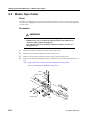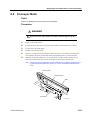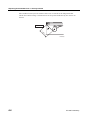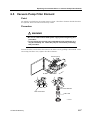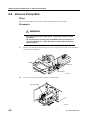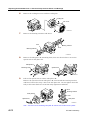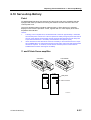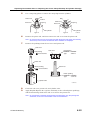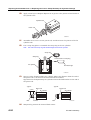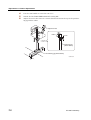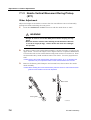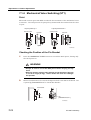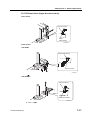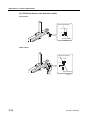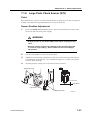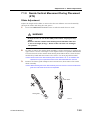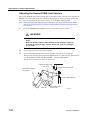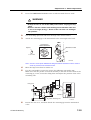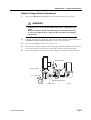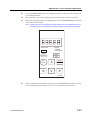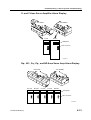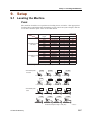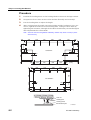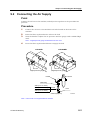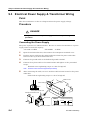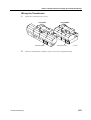
1
High-Speed Chip Placer CP-842E CP-842ME Mechanical Reference Preliminary R Copyrights All rights regarding this manual are reserved by Fuji Machine Manufacturing Co., Ltd. This manual may not, in whole or in part, be reproduced by any means (electronic, mechanical or otherwise), or reused in any way, without the prior written permission of Fuji Machine Manufacturing Co., Ltd. Trademark Rights R is a trademark of Fuji Machine Manufacturing Co., Ltd., and registered in the following countries: Austria, Belgium, Denmark, Finland, France, Germany, Greece, Indonesia, Ireland, Italy, Japan, Korea, Luxembourg, the Netherlands, Portugal, Spain, Sweden, the U.K., and the U.S.A. WindowsNT is a trademark of Microsoft Corporation, USA. UNLHA(32).DLL is a freeware product created by Micco. Warranty and Liability Fuji Machine Manufacturing Co., Ltd. accepts no responsibility for situations that may arise due to any of the following: • The use of third party parts. • The use of non-genuine Fuji parts. • Incorrect settings made by the customer. • Improper use of Fuji equipment. Notice Fuji Machine Manufacturing Co., Ltd. reserves the right to change the content of this manual without notice. Every effort has been made to ensure that this manual is correct in every detail. However, please contact Fuji in the unlikely event that errors or omissions are detected. Fuji Machine Manufacturing Co., Ltd. accepts no responsibility for any situations that may arise as a result of the use of this manual. Table of Contents Table of Contents 1. About This Manual ..........................................................................1-1 1.1 Manual Structure ......................................................................1-1 1.2 Page Layout .............................................................................1-2 1.3 Notation Conventions Used in this Manual...............................1-3 2. Safety ...............................................................................................2-1 2.1 About Symbols .........................................................................2-1 2.2 Safety Rules for All Machine Types..........................................2-2 2.3 Safety Rules for Individual Machine Types...............................2-7 2.3.1 CP-842E/842ME Machines ................................................2-7 2.4 Safety Labels ............................................................................2-8 2.5 The EMERGENCY STOP Buttons .........................................2-11 3. The Machine ....................................................................................3-1 3.1 Machine Components...............................................................3-1 3.1.1 General View ......................................................................3-1 3.1.2 Servo Control Axes.............................................................3-5 3.1.3 Rotary Head........................................................................3-5 3.1.4 Placing Head ......................................................................3-6 3.1.5 PCU (Pallet Change Unit)...................................................3-6 3.2 Functions of Each Part .............................................................3-7 3.2.1 Parts Mounting System.......................................................3-7 3.2.2 Parts Supply System .........................................................3-8 3.2.3 Vision System .....................................................................3-9 3.2.4 Panel Conveyance System.................................................3-9 3.2.5 Electrical Control System....................................................3-9 3.3 Sensor Positions.....................................................................3-11 3.3.1 XY-table ............................................................................3-11 3.3.2 In-conveyor .......................................................................3-13 3.3.3 Out-conveyor ....................................................................3-14 3.3.4 Main Conveyor..................................................................3-15 3.3.5 In-carrier ...........................................................................3-16 3.3.6 Out-carrier.........................................................................3-17 3.3.7 Panel Clamp .....................................................................3-18 3.3.8 Cam Box ...........................................................................3-19 3.3.9 Tape Feeder Unit (ST1, 2)................................................3-20 3.3.10 Tape Cutter (ST1).............................................................3-21 3.3.11 Nozzle Clutch (ST10)........................................................3-22 3.3.12 Nozzle Changer (ST15) ....................................................3-23 3.3.13 Feeder Check ...................................................................3-24 3.3.14 Device Table.....................................................................3-26 CP-842 preliminary i Table of Contents ii 4. Basic Operation...............................................................................4-1 4.1 Changing the Conveyor Width ..................................................4-1 4.2 Changing the Panel Back-up Pin Positions ..............................4-3 4.3 Setting the Feeders...................................................................4-5 4.4 Removal and Installation of Rotary Holders..............................4-7 4.5 Changing Pallets (CP-842ME option) .......................................4-9 5. Maintenance.....................................................................................5-1 5.1 Cleaning....................................................................................5-1 5.1.1 Waste Tape Box and Filter (Every 8 Hours) .......................5-1 5.1.2 Waste Tape Duct (Every 8 Hours) ......................................5-2 5.1.3 Reject Parts Box (Every 8 Hours) .......................................5-3 5.1.4 Nozzle Interior (Weekly)......................................................5-4 5.1.5 Camera Glass (Weekly)......................................................5-5 5.1.6 Filter Regulator (Weekly) ....................................................5-6 5.1.7 Machine Interior (Weekly) ...................................................5-8 5.1.8 Part Height Check Sensor Lens (Weekly) ..........................5-9 5.1.9 Fluorescent Nozzle Stickers (Monthly) .............................5-10 5.1.10 Tapered Clutch on the Nozzle Indexing Shaft (Monthly) ..5-11 5.1.11 Air Filter (Monthly).............................................................5-12 5.1.12 Oil Cooler Air Filter (Monthly)............................................5-13 5.1.13 Carrier Rodless Cylinder (Monthly)...................................5-14 5.1.14 Nozzle Filter (Every 3 Months)..........................................5-15 5.1.15 Cleaning Checklist ............................................................5-16 5.2 Lubrication ..............................................................................5-17 5.2.1 Precautions During Lubrication.........................................5-17 5.2.2 Types of Lubricant ............................................................5-17 5.2.3 Lubrication Instructions .....................................................5-19 5.2.4 Lubricating the XY-table....................................................5-21 5.2.5 Lubricating the Conveyors ................................................5-22 5.2.6 Lubricating the Carriers.....................................................5-23 5.2.7 Lubricating the Tape Advance Link...................................5-24 5.2.8 Lubricating the Cam Box...................................................5-25 5.2.9 Lubricating the Waste Tape Disposal Unit........................5-27 5.2.10 Lubricating the NY-Axis Pickup Offset Mechanism...........5-28 5.2.11 Lubricating the Rod Ends..................................................5-29 5.2.12 Lubricating the D-axis Carriers .........................................5-30 5.2.13 Lubricating the Rotary Head .............................................5-31 5.2.14 Lubricating the ST9 Air Valve Push Pin ............................5-32 5.2.15 Lubricating the Parts Reject Unit ......................................5-33 5.2.16 Lubricating the Pallet Table ..............................................5-34 5.2.17 Lubricating the Nozzle Changer........................................5-35 5.2.18 Lubricating the Rear Cover ...............................................5-36 5.2.19 Lubricating the Index Unit .................................................5-37 5.2.20 Lubricating the Cam Lever Air Cylinder ...........................5-42 5.2.21 Lubrication Checklist.........................................................5-43 CP-842 preliminary Table of Contents 6. Replacing Consumable Parts ........................................................6-1 6.1 Nozzles .....................................................................................6-1 6.2 Fluorescent Nozzle Stickers .....................................................6-2 6.3 Waste Tape Cutter....................................................................6-4 6.4 Conveyor Belts .........................................................................6-5 6.5 Vacuum Pump Filter Element ...................................................6-7 6.6 Vacuum Pump Belt ...................................................................6-8 6.7 Vacuum Pump Internal Vanes and Bearings..........................6-10 6.8 Vacuum Pump Motor ..............................................................6-17 6.9 Vacuum Hoses .......................................................................6-20 6.10Servo Amp Battery .................................................................6-21 6.11Replacing the Carrier Clamp/Unclamp Air Cylinder Packings 6-24 7. Adjustments ....................................................................................7-1 7.1 Station Adjustments..................................................................7-1 7.1.1 Tape Feed Lever (ST1) ......................................................7-1 7.1.2 Waste Tape Cutter (ST1)....................................................7-4 7.1.3 Nozzle Vertical Movement During Pickup (ST1).................7-6 7.1.4 Mechanical Valve Switching (ST1) ...................................7-12 7.1.5 Feeder Height Error Detection (ST1)................................7-15 7.1.6 Large Parts Check Sensor (ST2)......................................7-21 7.1.7 Pre-theta Movement (ST2) ...............................................7-23 7.1.8 Fine-theta Movement (ST8)..............................................7-24 7.1.9 Nozzle Vertical Movement During Placement (ST9) ........7-25 7.1.10 Mechanical Valve Switching (ST9) ...................................7-32 7.1.11 Reverse-theta Mechanism (ST10)....................................7-35 7.1.12 Mechanical Valve Switching (ST13) .................................7-38 7.1.13 Nozzle Change Function (ST14) ......................................7-41 7.1.14 Nozzle Detection Sensor (ST15) ......................................7-44 7.2 Servo Amplifier Adjustments...................................................7-49 7.2.1 Servo amplifier parameters...............................................7-49 7.2.2 Resetting servo errors ......................................................7-52 8. Troubleshooting..............................................................................8-1 8.1 Troubleshooting Table ..............................................................8-1 8.1.1 Poor Placing Accuracy........................................................8-2 8.1.2 Pickup Errors ......................................................................8-3 8.1.3 Vision Processing Errors ....................................................8-5 8.1.4 Panel Conveyance Related Errors .....................................8-6 8.1.5 Missing Parts ....................................................................8-10 8.1.6 Part Height Sensor Errors.................................................8-11 8.2 Servo System Troubleshooting ..............................................8-12 8.2.1 Alarm Code Display ..........................................................8-12 8.2.2 Alarm Codes and Troubleshooting Check List .................8-15 CP-842 preliminary iii Table of Contents 9. Setup ................................................................................................9-1 9.1 Leveling the Machine ................................................................9-1 9.2 Connecting the Air Supply ........................................................9-3 9.3 Electrical Power Supply & Transformer Wiring .........................9-4 9.4 Connecting the Data Transmission Cable ................................9-7 9.5 Moving the Machine..................................................................9-8 9.5.1 Precautions when Moving the Machine ..............................9-8 10. Supplementary Information..........................................................10-1 10.1Noise Levels ...........................................................................10-1 iv CP-842 preliminary About This Manual >> Manual Structure 1. About This Manual This manual contains important machine system information for the user. The manual content is intended for specialized technicians who are familiar with Surface Mount Technology (SMT). Please read this manual carefully in order to ensure safe and efficient machine operation. This manual has been written specifically for the CP842E and CP-842ME. Unless otherwise stated, all explanations apply equally to all machines. 1.1 Manual Structure This manual consists of the following ten parts. 1. About This Manual 2. Safety 3. The Machine 4. Basic Operation 5. Maintenance 6. Replacing Consumable Parts 7. Adjustments 8. Troubleshooting 9. Setup 10.Supplement CP-842 Preliminary 1-1 About This Manual >> Page Layout 1.2 Page Layout In addition to the main body of the manual, each page includes chapter title, section title, page number, and the manual title. Chapter title Chapter title Section title Replacing Consumable Parts >> Nozzles 6. Replacing Consumable Parts 6.1 Nozzles Point Section title A nozzle which becomes bent, deformed, or clogged, can cause part pick-up errors and must be replaced. When replacing a nozzle, use care to avoid losing its internal spring. Procedure WARNING Be sure to turn the main power off before performing this procedure. 1 Remove the nozzle and spring as shown in the figure below. Body Nozzle Press and turn Spring Remove slowly C746M4001 Caution 2 1. When removing the nozzle, take care not to lose the internal spring. Also check that the spring is not left within the nozzle holder. 2. To avoid nozzle bend, do not hold the nozzle at the tip during removal. Reverse the removal procedure to attach a new nozzle. CP-842E Mechanical Reference 1.0E Manual title 6-1 Page number C842M1000 Body: Text and illustrations are used to explain procedures. Chapter Title: The chapter number and title are shown on the header of each page. Section Title: Section number and title. A chapter consists of multiple sections, and the section is also shown on the header. Manual Title: This identifies the machine and type of manual. Page Number: This numbers consists of the chapter number and the page number within that chapter. “1-1” indicates chapter 1, page 1. Note: The reference numbers at the bottom right of the illustrations are for administrative purposes only, and are in no way connected to the content of the manual. 1-2 CP-842 Preliminary About This Manual >> Notation Conventions Used in this Manual 1.3 Notation Conventions Used in this Manual The names of operation buttons, touch screen titles and commands, and keyboard keys are enclosed in brackets [ ]. CP-842 Preliminary 1-3 About This Manual >> Notation Conventions Used in this Manual MEMO: 1-4 CP-842 Preliminary Safety >> About Symbols 2. Safety Fuji machines are designed and produced with safety as one of our main considerations. However, even a perfectly designed machine can be damaged, or someone can still be injured if the user does not follow the safety rules. It is the responsibility of the user to make sure all safety rules are followed during operation and maintenance. Be sure to read these safety rules before operating the machine. Keep this manual close at hand when operating the machine. 2.1 About Symbols This section provides an explanation of the relevant safety precautions to be adhered to by both operators and those responsible for maintaining the machine. An explanation of the warning labels attached to the machine is also provided. This manual employs the use of descriptive symbols and provides details of the level of danger involved in certain operations to accompany the explanations of machine warning labels and safety related items. Be sure you understand the meanings of these symbols before reading the manual. Hazard Definitions Symbol Definition DANGER Failure to observe this hazard warning will lead to severe injury or death. WARNING Failure to observe this hazard warning may lead to severe injury or death. CAUTION Failure to observe this hazard warning may lead to personal injury or damage to the machine. Examples of Symbols Used Symbol Explanation Hazard A triangle is used to draw your attention to a hazard. The symbol inside the triangle indicates the nature of the hazard (in this case, electrical shock). Prohibition A circle with a diagonal line is used to draw your attention to an operation that is prohibited. The symbol inside the circle indicates the nature of the operation (in this case, disassembly). A circle with an exclamation mark is used to draw your attention to to a mandatory action. In other words, you are required to carefully carry out the given instructions. CP-842 Preliminary 2-1 Safety >> Safety Rules for All Machine Types 2.2 Safety Rules for All Machine Types DANGER Do not approach moving parts during automatic or manual operation. z Do not place hands or other body parts inside the machine during automatic operation or positioning. Body parts or clothing may be caught in the machine causing personal injury. WARNING Do not operate the machine with the safety covers or doors open. z Do not leave covers or safety doors open, except during adjustment. z hen adjustments are completed, return the covers and doors to their original (closed) position... z When safety covers or doors are removed, body parts or clothing may be caught in the machine causing personal injury. Always be sure to replace the safety covers or doors. Always verify the position of the EMERGENCY STOP buttons before operating the machine. z Always be aware of the positions of the EMERGENCY STOP buttons so that they can be pressed quickly in case of an emergency. Check the safety functions before starting operation. z Before starting the machine check the operation of the EMERGENCY STOP button, the safety switches on the acrylic covers, the safety switch on the rear fence gate, the optical sensors on the rear fence and all other machine safety features. z Contact a Fuji serviceman immediately if any of the safety functions fails. 2-2 CP-842 Preliminary Safety >> Safety Rules for All Machine Types WARNING Do not remove safety switches. z Do not remove safety switches or disarm the safety functions. z Disarming the safety switches may result in injury when others unknowingly press the START button. z Fuji does not take any responsibility when a machine is disassembled without Fuji's permission, even if this results in accidents or trouble. Check that there is nobody inside the machine when working on the machine with two persons or more. z Verify that nobody is within or near the machine before operating the machine. Operating the machine may cause injury to the person who is carrying out maintenance. [Example] If one person moves the device table while another person is exchanging a feeder, the latter may be injured. Do not close the fence when someone is inside the fence. z When the fence is opened, it is safe to approach the machine. Closing the fence, however, will put anybody working inside the fence in immediate danger when the RESET or START button is pressed. Be sure to leave the fence open when anyone is inside the fence. Do not approach a machine that has stopped moving. z There are times during automatic operation when the machine may appear to have stopped while it is waiting for a board, waiting for the next machine, reading marks, transmitting data, etc. In such cases, once certain conditions are fulfiled, the machine will begin moving again automatically, so care should be taken. Only approach the machine after the EMERGENCY STOP button has been pressed. When the message "Ready" displays at the machine display, the machine will begin to move once certain conditions are satisfied. z Keep in mind that the machine will begin to move regardless of whether these conditions are satisfied intentionally or inadvertently. Resupply solder paste, glue and parts while the machine is in manual mode. z Never resupply solder, glue or parts during automatic operation unless instructed otherwise. Body parts or clothing may be caught in the machine causing personal injury. CP-842 Preliminary 2-3 Safety >> Safety Rules for All Machine Types WARNING Do not place hands near the main conveyor. z Hands or other body parts may be caught in the machine. Always turn the 200V power supply off when cleaning or lubricating the machine. z When the 200V power supply to the machine is turned on, the servo amps will be activated. In this condition the machine may unexpectedly begin to move. Do not insert or remove connectors while power is being supplied to the machine. z Removing or inserting connectors while power is supplied to the machine may not only cause damage to the machine, but may also cause electrical shock. z Be sure to cut the power to the machine before inserting or removing connectors. Stay clear from the machine when it is being lifted. z Never put hands or feet under the machine when the machine is being raised by means of a jack or other device for leveling or transport. Do not look into the conveyor inlet or outlet and do not open the cover. (Reflow oven) z Do not look into the conveyor inlet or outlet and do not open the cover. [Example] The UV light on the reflow oven may damage eyesight or result in burns. Exchange the halogen lamp only after it has cooled down. z When turned on, halogen lamps will reach high temperatures, resulting in skin burns when touched. To exchange a halogen lamp, turn off the power and allow the lamp to cool off sufficiently. Do not wear gloves made of cloth when operating the machine. z Rubber gloves will tear when caught by the machine and prevent hands from being drawn into the machine. Gloves made of cotton or similarly strong material may cause hands to be drawn into the machine. 2-4 CP-842 Preliminary Safety >> Safety Rules for All Machine Types WARNING Long hair should be tied back. z Long hair may get caught in running machines. z Hair should be kept short or tied back so that it does not get caught in the machine. Turn off the air supply when carrying out maintenance on cylinders, valves, and filters. z Removing cylinders, valves, or filters without turning the air supply off, may cause parts or particles to be propelled into the eyes. z Be sure to turn off the air supply when carrying out maintenance on cylinders, valves, and filters. Be sure to wear protective glasses when removing parts from the machine. z Be sure to wear protective glasses when removing or replacing parts. [Example] CP-6, 7, 8 nozzles use springs which may be propelled during disassembly. Be sure to handle the nozzles carefully to prevent eye injuries. Check the machine monitor and the target axes while manually operating the machine. z When operating the machine, carefully follow the instructions that are displayed at the machine display. z Operating the machine without looking at the machine display may lead to operating errors or result in damage to the machine or products. Do not touch the servo amp power terminal for at least five minutes after turning off the power. z The servo amp retains a high voltage even after the power has been turned off. Always wait at least five minutes, and ensure that the CHARGE lamp is off, before undertaking any work that may result in contact with the servo amp terminal. CP-842 Preliminary 2-5 Safety >> Safety Rules for All Machine Types CAUTION Do not operate the machine after removing or disabling sensors. z Removing or disabling sensors will disarm the interlock, leading to collisions and damage to the machine. Check the machine display to determine whether HELPS compatible machines are in the middle of performing changeover. z During operation in automatic mode on machines equipped with automatic changeover equipment, it may be difficult to actually see automatic changeover taking place from the front of the machine. When a message appears at the machine display, follow the instructions that are given. Ensure to use the handle when opening or closing the safety doors, fences or covers. z Opening or closing the safety doors, fences or covers without using the handle may result in injury to the hand. z Opening or closing the safety doors, fences or covers with force, without using the handle may result in damage to the machine. 2-6 CP-842 Preliminary Safety >> Safety Rules for Individual Machine Types 2.3 Safety Rules for Individual Machine Types 2.3.1 CP-842E/842ME Machines WARNING Do not insert hands or other body parts into the conveyor inlets. z Body parts may get caught in the machine resulting in injury. Do not operate the machine when the front/rear cover has been removed. z Body parts may get caught in the machine resulting in injury. Do not perform cam box maintenance with power to the machine on. z Injury may result from electric shock if maintenance on the cam box is carried out with the power to the machine on. Caution required if cam is not at its origin (0°). z Operators must ensure the cam is at its origin (0°) prior to carrying out any operations on the machine. If the cam is not at its origin, recoil from springs used to drive the placing heads may cause unexpected movement which is potentially dangerous for the operator. If an emergency stop occurs, the machine stops immediately. In this case there is a strong possibility that the cam will not be at its origin. z If the cam is not at its origin when the machine stops, use the cam handle to return it to its origin. Do not stare into the laser beam. (On machine fittied with laser type fiber sensors (class 2)) z Exercise extreme caution when working in areas where there is a risk of eye damage from the laser beams. CP-842 Preliminary 2-7 Safety >> Safety Labels 2.4 Safety Labels To warn the operator of hazards, safety labels are attached to the machine at the positions indicated in the figure below. Familiarize yourself with each label and its message before operating the machine. <CP-842E> Front side 9 4 1 5 9 7 10 1 7 7 6 1 5 1 8 1 2 5 3 11 Rear side 8 1 8 5 1 13 14 13 3 2 1 8 1 8 2-8 8 1 6 5 C7SM0001 CP-842 Preliminary Safety >> Safety Labels <CP-842ME> Front side 9 5 4 1 9 7 10 1 7 7 6 1 5 1 8 1 2 5 3 11 Rear side 8 1 8 5 1 13 14 3 2 13 1 8 1 5 8 8 1 CP-842 Preliminary 6 C7SM0007 2-9 Safety >> Safety Labels C7SM0002 2-10 CP-842 Preliminary Safety >> The EMERGENCY STOP Buttons 2.5 The EMERGENCY STOP Buttons In the event of an emergency, press any of the red EMERGENCY STOP buttons located on the machine at the positions indicated in the figure below. <CP-842E> Front side Rear side C74M0003 CP-842 Preliminary 2-11 Safety >> The EMERGENCY STOP Buttons <CP-842ME> Front side Rear side C7SM0009 2-12 CP-842 Preliminary The Machine >> Machine Components 3. The Machine 3.1 Machine Components 3.1.1 General View Front Side<CP-842E> Oil cooler box Cam box Breaker Control box 1 Control box 2 Control box 3 Waste tape box Operation box 1 Conveyor width adjusting handle Placing head Index unit mark camera In-conveyor In-carrier XY-table Out-carrier Out-conveyor C76M1001 CP-842 Preliminary 3-1 The Machine >> Machine Components Rear Side<CP-842E> Operation box 2 Servo box 1 Rear cover Servo box 2 (Servo BKT 1) Servo box 3 (Servo BKT 2) Transformer box (Transformer BKT) Waste tape disposal unit Filter Regulator Vacuum pump Device table C746M1002 3-2 CP-842 Preliminary The Machine >> Machine Components Front Side<CP-842ME> Oil cooler box Cam box Breaker Control box 1 Control box 2 Control box 3 Operation box 1 Waste tape box Control width adjusting handle Placing head Index unit Mark camera In-conveyor In-carrier XY-table Out-carrier Out-conveyor C76M1026 CP-842 Preliminary 3-3 The Machine >> Machine Components Rear Side<CP-842ME> Operation box 2 Servo box 1 Rear cover Servo box 2 (Servo BKT 1) Servo box 3 (Servo BKT 2) Transformer box (Transformer BKT) Waste tape disposal unit Filter regulator Vacuum pump Device table 3-4 C746M1027 CP-842 Preliminary The Machine >> Machine Components 3.1.2 Servo Control Axes NZ-axis motor D1-axis motor PQ-axis motor Cam axis motor RQ-axis motor D2-axis motor FQ-axis motor NC-axis motor Z-axis motor NY-axis motor Y-axis motor X-axis motor C746M1003 Note: The above figure shows the CP-842ME, but the position of the servo motors is the same on the CP-842E. 3.1.3 Rotary Head ST1 Feeder advance ST1 Mechanical valve switch ST2 Large parts check ST1 Picking nozzle up/down ST1 Pickup position offset Waste tape disposal ST2 Pre-theta ST15 Nozzle post-change check ST5 Vision processing ST14 Nozzle change ST6 Parts height check, nozzle length check (Option) ST13 Reject dump parts ST11 Head A detection ST10 Nozzle clutch origin position Nozzle clutch engagement check CP-842 Preliminary ST8 Fine theta ST9 Placing nozzle up/down ST9 Mechanical valve switch ST10 Reverse theta C746M1004 3-5 The Machine >> Machine Components 3.1.4 Placing Head Rotary holder Nozzle C746M1005 3.1.5 PCU (Pallet Change Unit) C746M1006 Note: The PCU is optional on the CP-842ME. 3-6 CP-842 Preliminary The Machine >> Functions of Each Part 3.2 Functions of Each Part Part placement system Cam box Index units Placing heads Stations 1-16 Part supply system Feeders Tape cutter Pallet supply device *PCU (Pallet Change Unit) *:CP-842ME Option CP-842E/CP-842ME Vision system Parts camera Mark camera Panel conveyance system Carrier loader Electrical control system Operation panel Pneumatic control system Machine functions Control box Servo box (Servo BKT) UPS (Uninterrupted Power Supply Unit) C746M1007 3.2.1 Parts Mounting System Cam box The cam box system comprises a cam axis motor, index units, cam axes, cam levers, and air cylinders. Index units Two index units are housed in the cam box. One is used to index the nozzle shaft clutch, and the other is used to index the nozzle holder. Placing heads There are a total of 16 placing heads mounted around a single rotary head. The placing heads comprise nozzles, shafts, and holders. Each placing head is fitted with six nozzle types, with the appropriate nozzle being selected in accordance with the size of the part which is to be placed. Placing heads pick up parts from the feeder, hold the parts during vision processing, and then place the parts on a panel. CP-842 Preliminary 3-7 The Machine >> Functions of Each Part Stations 1-16 Stations 1-16 represent the positions of the 16 placing heads. In this manual, “Station” is abbreviated as “ST”. The functions of each of the 16 stations are explained below. ST1: Picks up parts from the feeder, indexes the feeder, and offsets the NYaxis pickup position. ST2: Checks for the presence of large sized parts. Also performs pre-rotation (PQ) operations. The pre-rotation function rotates parts in advance to a position near the placement angle specified in the placement program. Pre-rotation occurs in 90-degree increments. ST5: Two CCD cameras (Wide View and Narrow View) check the presence and pick-up condition of the parts. ST6: Measures the height of parts which the nozzle has picked up (option). Also,measures the length of the nozzles (option). ST8: Performs fine-rotation (FQ) operations. Rotates a part to its final placement angle based on the vision processing results at ST5. ST9: Places parts on the panels being produced. Parts rejected during vision processing at ST5 are not placed. ST10: Performs reverse pre-theta (PQ) and fine-theta (FQ) rotation operations. Also checks the nozzle’s origin position. ST11: Verifies that nozzles lowered for part placement have been raised again, and checks the nozzle “Holder A” position for the production log. ST13: Rejects parts deemed defective by the vision check at ST5. ST14: Rotates the rotary holder to select among the 6 nozzles. ST15: Checks the positions of the 6 nozzles after nozzle changes. 3.2.2 Parts Supply System Feeders The feeders supply taped parts to ST1 where they are picked up. The CP-842E/842ME uses WC feeders for CP machines. When using part reels 13-inches or larger, feeders with CP-7/CP-8 exclusive reel holders are required. Waste tape disposal unit The waste tape disposal unit is located beneath ST1 of the placing head, and consists of upper and lower cutters which cut the waste tape fed from the feeder. The cut waste tape is then carried through a vacuum duct to the waste tape box at the bottom of the machine. Device tables Device tables hold feeders and also are used for transport. The two device tables move on the D-axes as instructed in the production program. 3-8 CP-842 Preliminary The Machine >> Functions of Each Part The CP-842ME has an option for pallet tables that can be used to enable batch setting and removal of feeders. PCU (Pallet Change Unit) The PCU is used as a dolly for setting and removal of pallet tables. 3.2.3 Vision System Parts camera This CCD camera checks the size and shape of picked up parts. Mark camera A mark camera comprises a CCD camera, a light, and a mounting bracket. After the CCD camera reads the fiducial marks on the panels being produced, the coordinates are automatically corrected (offset) in accordance with internal calculations. 3.2.4 Panel Conveyance System Carrier loader The machine’s sequencer loader conveys panels between the in-conveyor, the XY-table, and the out-conveyor, by way of panel clamp units (carriers). The in and out-carriers are both operated by air cylinders in accordance with the placing program. In-conveyor: Conveys the panel into the machine and transfers it to the in-carrier by means of the in-lifter. In-carrier: Transfers the panel from the in-conveyor to the XY-table. XY-table: Clamps the panel in position and moves it to and from the position for placement. Out-carrier: Transfers the panel from the XY-table to the out-conveyor. Out-conveyor: Conveys the panel to the next machine in the line. 3.2.5 Electrical Control System Notes Regarding CP-842E/842ME Machines Operation Absolute encoders are used on all servo motors on the machine. The harness connectors on the servo motors should not be removed. If a harness connector is removed it will be necessary to recalibrate Proper data. Proper data measurement is also required at the following times. •After replacing the motor. •After removing the cable connector from between the motor and servo amp •If the backup battery within the servo amp is dead Zero setting is not required on the machine. CP-842 Preliminary 3-9 The Machine >> Functions of Each Part Operation panel The operation panel comprises switches and a touch screen monitor which are used to operate the machine. Control box The control box contains electrical circuit boards used to control the machine. It is also equipped with a CD ROM drive which is required to install software. Servo box (Servo BKT) The servo box contains the servo BKT to which the servo amplifiers and boards are attached. Users should not interfere with this box, except to perform servo amplifier replacement. UPS (Uninterrupted Power Supply Unit) The UPS unit is positioned in the transformer box at the rear of the machine. Under normal circumstances, the power supply from the UPS is cut automatically when the machine is shut down. However, if the machine is not operating correctly, the power from the UPS unit may not always be cut. As a safety precaution when performing any kind of electrical maintenance work, always set the switch on the UPS unit to off after also cutting the main power supply to the machine. UPS(Uninterrupted Power Supply Unit) Power switch C746M1008 3-10 CP-842 Preliminary The Machine >> Sensor Positions 3.3 Sensor Positions 3.3.1 XY-table X/Y-axis SX011 SX00A SX012 SX009 C746M1009 Sensor No. SIGNAL NAME SX009 X_AXIS_+OT SX00A X_AXIS_-OT SX011 Y_AXIS_+OT SX012 Y_AXIS_-OT C746M1T01 CP-842 Preliminary 3-11 The Machine >> Sensor Positions Z-axis X05E X05C SX019 Sensor No. SX01A C746M1010 SIGNAL NAME SX019 Z_AXIS_+OT SX01A Z_AXIS_-OT X05C XY-TABLE LOADING HEIGHT CHECK X05E MAIN-LIFTER MIDDLE OT C746M1T02 3-12 CP-842 Preliminary The Machine >> Sensor Positions 3.3.2 In-conveyor X0B0 X0AC X0AB X0B5 Sensor No. X0B6 C746M1011 SIGNAL NAME X0AB IN-CONVEYOR 1 SPEED DECELERATION POINT X0AC IN-CONVEYOR 1 PANEL ARRIVAL CHECK X0B0 IN-CONVEYOR PANEL IN CHECK X0B5 IN-LIFTER UPPER LIMIT CHECK X0B6 IN-LIFTER LOWER LIMIT CHECK C746M1T03 CP-842 Preliminary 3-13 The Machine >> Sensor Positions 3.3.3 Out-conveyor X0C7 X0CB X0D0 X0D1 Sensor No. C746M1012 SIGNAL NAME X0C7 OUT-CONVEYOR 1 PANEL ARRIVAL CHECK X0CB OUT-CONVEYOR UNLOADER PANEL ARRIVAL CHECK X0D0 OUT-LIFTER UPPER LIMIT CHECK X0D1 OUT-LIFTER LOWER LIMIT CHECK C746M1T04 3-14 CP-842 Preliminary The Machine >> Sensor Positions 3.3.4 Main Conveyor X0C0 X0DC X0DB C746M1013 Note: The figure above represents a left to right panel flow. Sensor No. SIGNAL NAME X0C0 ADJUSTING RAIL ENGAGEMENT CHECK ( IN ) X0DB ADJUSTING RAIL ENGAGEMENT CHECK ( OUT ) X0DC ADJUSTING RAIL ENGAGEMENT CHECK ( CENTER ) C746M1T05 CP-842 Preliminary 3-15 The Machine >> Sensor Positions 3.3.5 In-carrier X0B8 X0BC X0B4 X0BB X0BA X0B7 X0BE X0B3 X0B9 X0BD C746M1014 X0B1 Sensor No. SIGNAL NAME X0B1 IN-CARRIER FORWARD LIMIT PANEL CHECK X0B3 IN-CARRIER FORWARD LIMIT CHECK X0B4 IN-CARRIER RETRACT LIMIT CHECK X0B7 IN-CARRIER RETRACT LIMIT CLAMP CHECK (FIXED RAIL) X0B8 IN-CARRIER RETRACT LIMIT CLAMP CHECK (ADJUSTABLE RAIL) X0B9 IN-CARRIER FORWARD LIMIT CLAMP CHECK (FIXED RAIL) X0BA IN-CARRIER FORWARD LIMIT CLAMP CHECK (ADJUSTABLE RAIL) X0BB IN-CARRIER RETRACT LIMIT UNCLAMP CHECK (FIXED RAIL) X0BC IN-CARRIER RETRACT LIMIT UNCLAMP CHECK (ADJUSTABLE RAIL) X0BD IN-CARRIER FORWARD LIMIT UNCLAMP CHECK (FIXED RAIL) X0BE IN-CARRIER FORWARD LIMIT UNCLAMP CHECK (ADJUSTABLE RAIL) C746M1T06 3-16 CP-842 Preliminary The Machine >> Sensor Positions 3.3.6 Out-carrier X0D5 X0D9 X0D8 X0D3 X0D6 X0D4 X0D7 X0CC X0D2 X0CE Sensor No. X0CF C746M1015 SIGNAL NAME X0CC OUT-CARRIER FORWARD LIMIT PANEL CHECK X0CE OUT-CARRIER FORWARD LIMIT CHECK X0CF OUT-CARRIER RETRACT LIMIT CHECK X0D2 OUT-CARRIER RETRACT LIMIT CLAMP CHECK (FIXED RAIL) X0D3 OUT-CARRIER RETRACT LIMIT CLAMP CHECK (ADJUSTABLE RAIL) X0D4 OUT-CARRIER FORWARD LIMIT CLAMP CHECK (FIXED RAIL) X0D5 OUT-CARRIER FORWARD LIMIT CLAMP CHECK (ADJUSTABLE RAIL) X0D6 OUT-CARRIER RETRACT LIMIT UNCLAMP CHECK (FIXED RAIL) X0D7 OUT-CARRIER RETRACT LIMIT UNCLAMP CHECK (ADJUSTABLE RAIL) X0D8 OUT-CARRIER FORWARD LIMIT UNCLAMP CHECK (FIXED RAIL) X0D9 OUT-CARRIER FORWARD LIMIT UNCLAMP CHECK (ADJUSTABLE RAIL) C746M1T07 CP-842 Preliminary 3-17 The Machine >> Sensor Positions 3.3.7 Panel Clamp X07B X063 X060 X064 X062 X05F X061 Sensor No. C746M1016 SIGNAL NAME X05F XY-TABLE PANEL CLAMP CHECK (FIXED RAIL, RIGHT) X060 XY-TABLE PANEL CLAMP CHECK (ADJUSTABLE RAIL, RIGHT) X061 XY-TABLE PANEL UNCLAMP CHECK (FIXED RAIL, RIGHT) X062 XY-TABLE PANEL UNCLAMP CHECK (ADJUSTABLE RAIL, RIGHT) X063 XY-TABLE PANEL CLAMP CHECK (FIXED RAIL, LEFT) X064 XY-TABLE PANEL UNCLAMP CHECK (FIXED RAIL, LEFT) X07B BACKUP PIN CHECK C746M1T08 3-18 CP-842 Preliminary The Machine >> Sensor Positions 3.3.8 Cam Box (10LS-31) X030 (10LS-34) X032 X033 (10LS-9) (10LS-12) C746M1017 Sensor No. SIGNAL NAME X030 ST1 NOZZLE UPPER LIMIT CHECK X032 ST9 NOZZLE UPPER LIMIT CHECK X033 ST9 NOZZLE LOWER LIMIT CHECK (10LS-9) ( ST5 IMAGE CHECK ) (10LS-12) ( CAM ANGLE CHECK ) (10LS-31) ( ACQUIRE PARTS HEIGHT COMMAND ) (10LS-34) ( FOREIGN OBJECTS CHECK COMMAND ) C746M1T09 Note: The items in parentheses do not display in the I/O map. CP-842 Preliminary 3-19 The Machine >> Sensor Positions 3.3.9 Tape Feeder Unit (ST1, 2) X03C X03B X036 C746M1018 Sensor No. SIGNAL NAME X036 ST2 LARGE PART CHECK X03B FEEDING FORWARD LIMIT X03C FEEDING RETRACT LIMIT X03D TAPE END CHECK C746M1T10 3-20 CP-842 Preliminary The Machine >> Sensor Positions 3.3.10 Tape Cutter (ST1) X04E X04D C746M1019 Sensor No. SIGNAL NAME X04D TAPE CUTTER UPPER LIMIT X04E TAPE CUTTER LOWER LIMIT C746M1T11 CP-842 Preliminary 3-21 The Machine >> Sensor Positions 3.3.11 Nozzle Clutch (ST10) X04F C746M1020 X03A Sensor No. X039 SIGNAL NAME X039 ST10 NOZZLE CLUTCH ORIGIN POSITION X03A ST10 NOZZLE CLUTCH ENGAGEMENT CHECK X04F ST11 HEAD A CHECK C746M1T12 3-22 CP-842 Preliminary The Machine >> Sensor Positions 3.3.12 Nozzle Changer (ST15) ST16 ST1 ST15 ST14 Nozzle changer ST13 X04A X049 X048 Sensor No. C746M1021 SIGNAL NAME X048 ST15 NOZZLE TYPE CHECK 1 X049 ST15 NOZZLE TYPE CHECK 2 X04A ST15 NOZZLE TYPE CHECK 3 C746M1T13 CP-842 Preliminary 3-23 The Machine >> Sensor Positions 3.3.13 Feeder Check <CP-842E> X043 X044 X054 X042 X055 C746M1029 Sensor No. SIGNAL NAME X042 ST1 FEEDER CHECK X043 D1 FEEDER CHECK UP X044 D1 FEEDER CHECK DOWN X054 D2 FEEDER CHECK UP X055 D2 FEEDER CHECK DOWN C746M1T14 3-24 CP-842 Preliminary The Machine >> Sensor Positions <CP-842ME> X043 X054 X044 X042 X055 Sensor No. C746M1022 SIGNAL NAME X042 ST1 FEEDER CHECK X043 D1 FEEDER CHECK UP X044 D1 FEEDER CHECK DOWN X054 D2 FEEDER CHECK UP X055 D2 FEEDER CHECK DOWN C746M1T14 CP-842 Preliminary 3-25 The Machine >> Sensor Positions 3.3.14 Device Table D Servo Axis *1 SX042 *2 SX042 SX041 *2 SX04A *1 SX04A C746M1023 Note: CP-842ME sensors are indicated by *1, and CP-842E sensors by *2. Sensor No. SIGNAL NAME SX041 D1_AXIS_+OT SX042 D1_AXIS_-OT SX04A D2_AXIS_-OT C746M1T15 3-26 CP-842 Preliminary The Machine >> Sensor Positions D1 Table (CP-842ME option) X081 X08A X088 X080 X086 X087 X08C X085 X084 X07F X083 X082 X08B X08B Sensor No. C746M1024 SIGNAL NAME X07F D1 CAM CYLINDER UPPER LIMIT CHECK X080 D1 TABLE STOPPER LOCK CHECK X081 D1 TABLE STOPPER UNLOCK CHECK X082 D1 PCU CLAMP CHECK ( 1 ) X083 D1 PCU UNCLAMP CHECK ( 1 ) X084 D1 PCU CLAMP CHECK ( 2 ) X085 D1 PCU UNCLAMP CHECK ( 2 ) X086 D1 PALLET ARRIVE CHECK X087 D1 PALLET SETTING CHECK ( 1 ) X088 D1 PALLET SETTING CHECK ( 2 ) X08A D1 PALLET PASS CHECK ( 1 ) X08B D1 PCU SET CHECK X08C D1 CAM CYLINDER LOWER LIMIT CHECK C746M1T16 CP-842 Preliminary 3-27 The Machine >> Sensor Positions D2 Table (CP-842ME option) X098 X095 X099 X0A2 X09D X09C X0A1 X097 X0A1 X09B X09A X096 X09E X0A0 C746M1025 Sensor No. SIGNAL NAME X0CC OUT-CARRIER FORWARD LIMIT PANEL CHECK X0CE OUT-CARRIER FORWARD LIMIT CHECK X0CF OUT-CARRIER RETRACT LIMIT CHECK X0D2 OUT-CARRIER RETRACT LIMIT CLAMP CHECK (FIXED RAIL) X0D3 OUT-CARRIER RETRACT LIMIT CLAMP CHECK (ADJUSTABLE RAIL) X0D4 OUT-CARRIER FORWARD LIMIT CLAMP CHECK (FIXED RAIL) X0D5 OUT-CARRIER FORWARD LIMIT CLAMP CHECK (ADJUSTABLE RAIL) X0D6 OUT-CARRIER RETRACT LIMIT UNCLAMP CHECK (FIXED RAIL) X0D7 OUT-CARRIER RETRACT LIMIT UNCLAMP CHECK (ADJUSTABLE RAIL) X0D8 OUT-CARRIER FORWARD LIMIT UNCLAMP CHECK (FIXED RAIL) X0D9 OUT-CARRIER FORWARD LIMIT UNCLAMP CHECK (ADJUSTABLE RAIL) C746M1T07 3-28 CP-842 Preliminary Basic Operation >> Changing the Conveyor Width 4. Basic Operation 4.1 Changing the Conveyor Width Point Conveyor width adjustments must be performed jointly at the in-conveyor, XY-table, and out-conveyor. The conveyors should be adjusted to a width which permits smooth panel clamping and conveyance through the machine. Procedure CAUTION Before performing conveyor width adjustment, check the back-up pin positions on the XY-table, verifying that there will be no interference between the back-up pins and the adjustable rail. 1 Execute the necessary commands to link the XY-table to the in and out-conveyors. At the touch panel’s main screen, select the following commands: [Conveyor] - [Conveyor Width] - [Change Width], then press the START button. 2 Turn the handle on the out-conveyor to adjust the conveyor width until the panel can be conveyed smoothly. First increase the conveyor width then reduce it to between 0.5~1.0 mm wider than the panel width. Handle C46M2001 W+(0.5~1.0) W (mm) Panel C46M2002 CP-842 Preliminary 4-1 Basic Operation >> Changing the Conveyor Width 4-2 3 Lower the XY-table. 4 Run a test panel through the machine, verifying that it is conveyed smoothly and that panel clamping is correctly performed. CP-842 Preliminary Basic Operation >> Changing the Panel Back-up Pin Positions 4.2 Changing the Panel Back-up Pin Positions When the panel clamped on the XY-table warps down, position back-up pins, rubber blocks, or back-up plates under the bottom surface of the panel. Rubber block Back-up pin Vacuum pad C46M2003 Note: Producing with the panel in a warped position may negatively impact the product. Point The positions and quantity of back-up pins or rubber blocks which are required depends on the panel shape and size, with consideration given to pre-mounted parts on the lower side of the panel. For panels where upward warping is a problem, back-up pins with vacuum pads should be used to keep the panel flat. Procedure 1 Execute the necessary commands to move the XY-table to the loading position. 2 Raise the XY-table. 3 Press the EMERGENCY STOP button. WARNING Turn the main power off before performing this procedure. 4 Change the positions of the back-up pins or rubber blocks as required. <When using back-up pins> Loosen the pin mounting bolts and reconfigure the pins as necessary. Back-up pin C746M2004 CP-842 Preliminary 4-3 Basic Operation >> Changing the Panel Back-up Pin Positions <When using rubber blocks> Snap the blocks into suitable lengths and use double-faced tape to stick them to the panel lifter’s back-up plate. Rubber block C746M2005 4-4 CP-842 Preliminary Basic Operation >> Setting the Feeders 4.3 Setting the Feeders Point Feeders must be set on the pallets in the correct manner in order for the nozzles to pick up parts. Refer to the CP Feeders Mechanical Reference (MEC-CPFDR-x.xE) for details. Procedure WARNING Turn the main power off before performing this procedure. 1 Verify that the tape guide is not deformed. 2 Place the various part tapes in their dedicated feeders. If a part tape is placed in the wrong feeder, the tape guide may not close properly. Correct Incorrect C746M2006 3 Insert the catch on the base of the feeder into the channel beneath the guide. Push the feeder forwards and then press the back of the feeder down to clamp it firmly in position. Feeder Clamper Guide channel CP-842 Preliminary C746M2007 4-5 Basic Operation >> Setting the Feeders 13 and 15 inch parts reels should be positioned using the three rubber stoppers. When setting, ensure that the feeder base and reel itself are positioned in the same slot. Correct parts supply will not be possible if feeders are incorrectly set as shown in the figure below. View of device table from above Reel holder A Rubber brace Rubber brace Rubber brace C746M2008 4 When setting a feeder on a device table, be sure that there is no foreign matter (waste tape, etc) between the feeder and the device table. Remove any foreign matter which has adhered to the device table grooves or to the bottom of the feeder. Feeder Waste tape Device table 4-6 C746M2009 CP-842 Preliminary Basic Operation >> Removal and Installation of Rotary Holders 4.4 Removal and Installation of Rotary Holders Point Remove rotary holders from the placing heads as necessary when performing maintenance such as cleaning and lubrication. Note: The rotary holder is exclusive to the CP-842E/842ME. Do not attempt to use on any other machines. Likewise, do not use rotary holders from other machines on the CP-842E/842ME. In particular, rotary holders from CP-7-series machines will interfere with other mechanisms around the turret and damage the machine. Rotary holders can be identified as follows. CP-842E/842ME: No coloring CP-6, CP-7 machines: Colored body (anodized) Procedure Complete the following 3 items before removal of the rotary holder.. 1 Move the rotary holder to station 9. 2 Move the XY-table towards the front of the machine to improve access. 3 Turn the machine power OFF. WARNING • Turn the main power off before performing this procedure. • Exercise extreme caution when working on the machine if the cam is not at its origin (0 deg.). Recoil of the cam axis can endanger the operator. Removal 1 Loosen the rotary holder mounting bolts with an L-Allen wrench. 2 Pull the rotary holder down. L-Allen wrench Rotary holder C746M2011 CP-842 Preliminary 4-7 Basic Operation >> Removal and Installation of Rotary Holders Installation Fasten the rotary holder with the mounting bolts. Confirm that the letter on the aluminum drum matches the letter on the rotary holder. Letter Letter E Rotary holder C746M2012 4-8 CP-842 Preliminary Basic Operation >> Changing Pallets (CP-842ME option) 4.5 Changing Pallets (CP-842ME option) Point The PCU (Pallet Change Unit) enables batch changes of feeder pallets. Procedure Pallet unloading 1 Align the height of the PCU forks (at the end of the PCU) with the fork slots on the machine. Turn the handle and raise the upper section of the PCU. Note: Use the guide seal at the side of the handle as a reference when adjusting the height of the forks. Adjust so that the lower surface of the plate falls within plus or minus 10 mm of the standard value. Forks Plate Handle Guide seal C746M2010 2 Push the PCU to insert the forks into the machine, then clamp it with the [Stage1 Clamp] command. Note: The following explanation describes the D1-axis (stage 1) pallet change. 3 Close the rear door and select the [Stage1 Start] command, then press START. The D-axis pallet moves to the change position and is unclamped. 4 Open the rear door and pull the pallet out of the machine and onto the PCU. Caution: 5 1. Remove the pallet slowly. 2. To avoid damage to the door stoppers, the door should be opened and closed with care. Select the [Stage1 Unclamp] touch-panel command, then slowly retract the loaded PCU. Caution:Exercise extreme care when using the PCU to move a fully loaded pallet. A dropped pallet may result in serious injury or damage to the machine. CP-842 Preliminary 4-9 Basic Operation >> Changing Pallets (CP-842ME option) Pallet Loading 1 Push the fork of the PCU (containing the replacement pallet) into the machine and clamp it using the [Stage1 Clamp] command. Caution:Exercise extreme care when using the PCU to move a fully loaded pallet. A dropped pallet may result in serious injury or damage to the machine. 2 Push a pallet onto the machine’s D-axis. 3 Close the rear door and clamp the pallet at the D-axis. Caution: 4-10 1. To avoid damage to the door stoppers, the door should be opened and closed with care. 2. If the rear door is closed as the pallet is being changed, the clamp will be activated even though the pallet is not present. 4 Select the [Stage1 Set] command. 5 Select the [Stage1 Unclamp] command, then slowly retract the PCU. This completes the pallet change. CP-842 Preliminary Maintenance >> Cleaning 5. Maintenance 5.1 Cleaning 5.1.1 Waste Tape Box and Filter (Every 8 Hours) Point Waste tape which has been cut by the cutter is carried through a duct to the waste tape box. This box should be emptied after every 8 hours of operation. Procedure Open the door, remove the waste tape box and empty the contents. When emptying the waste tape box, also check the filter immediately above it. If the filter is soiled, clean it with a vacuum cleaner. Filter Waste tape box C746M3001 Note: When cleaning is complete, ensure that the waste tape box and filter are inserted all the way back to their original positions. Furthermore, ensure that the door is properly closed. CP-842 Preliminary 5-1 Maintenance >> Cleaning 5.1.2 Waste Tape Duct (Every 8 Hours) Point After being cut by the cutter, waste tape is carried through a duct along the route shown in the figure below. Should the duct become clogged, the clogged waste tape may interfere with tape being fed from the feeder, resulting in tape feed problems and part pick-up errors. If a tape feed problem occurs during automatic operation, inspect and clean the duct. Duct Feeder C746M3002 Procedure WARNING Be sure to turn the main power off before performing this procedure. The duct should be cleaned using a vacuum cleaner (do not use an air blower). 5-2 CP-842 Preliminary Maintenance >> Cleaning 5.1.3 Reject Parts Box (Every 8 Hours) Point Parts which have been rejected during vision processing are discarded to a reject parts box. After every 8 hours of operation, this box should be removed from the machine and emptied. Procedure WARNING Be sure to turn the main power off before performing this procedure. While pulling the lever to the left, slide the reject parts box out towards the front of the machine. Reject parts box Lever Cushion seat C746M3003 When returning the reject parts box to its position, make sure that the cushion sheet exists at the bottom of the box. CP-842 Preliminary 5-3 Maintenance >> Cleaning 5.1.4 Nozzle Interior (Weekly) Point Because the part is held by vacuum through the nozzle, minute dust or glue particles, etc., can build up inside the nozzle tube, causing clogging. Such clogging can reduce the nozzle suction and cause problems when picking up parts. The nozzle tube should be cleaned out weekly, or when clogging occurs. Procedure Use an appropriately sized drill bit to remove foreign matter from inside the nozzle tube. When cleaning is complete, check the drill bit to ensure that dirt from the nozzle has not adhered to the tip. JIG No. AWPJ8100 Nozzle Drill bit Fluorescent nozzle sticker C746M3004 Note: Jig AWPJ810* cannot be used for ø0.4 nozzles. Caution: 5-4 1. Take care to avoid bending the nozzle. 2. Take care to avoid dirtying the surface of the fluorescent sticker. CP-842 Preliminary Maintenance >> Cleaning 5.1.5 Camera Glass (Weekly) Point The camera glass should be cleaned once a week to ensure that a clear image is being acquired. This also contributes to stable vision processing and part pick-up operations. Procedure WARNING Be sure to turn the main power off before performing this procedure. Use a soft brush (such as those used to clean camera lenses) to clean the camera glass. If the glass is badly soiled, use a commercially available glass cleaner. CAUTION • Take care not to bend the nozzle by touching it at the tip. • Because the camera glass is thin and easy to break, do not push hard when wiping it clean. Camera glass C746M3005 CP-842 Preliminary 5-5 Maintenance >> Cleaning 5.1.6 Filter Regulator (Weekly) Point The air that flows through the system’s air lines must always be clean. A soiled filter regulator makes it impossible to supply clean air, and can cause equipment failure. Procedure CAUTION Be sure to turn the main power off before performing this procedure. Be sure to turn the air supply off and to release the air pressure in advance. 1 Close the air inlet valve lever and cut the external air-supply. Valve lever Close C746M3006 2 Reduce the pressure in the air hose. After disconnecting the air hose, return the valve lever slowly to the position indicated in the illustration below to expel the air from the air inlet.Reduce the pressure in the air hose. Air hose Valve lever Air C746M3007 3 5-6 Close the valve lever again when the air has been fully expelled. CP-842 Preliminary Maintenance >> Cleaning Next remove the filter case and clean the filter element. A B Filter regulator AW3000-02-BD A Mist separator AFM3000-02-D B O-ring O-ring Filter element Model : 111585 Manufacturer : SMC Lock knob Filter case Element assemby Model : 630617 Manufacturer : SMC Lock knob Filter case C746M3008 4 Disconnect the drain hose from the regulator if there is any. 5 Remove the filter case.While pressing the lock down, turn to remove the filter case. 6 Remove the drainage collected in the filter case and wash the case with neutral detergent. 7 Remove and clean the element. Note: The element should be replaced every 2 years. Assemble the filter regulator after cleaning, attach the air-hose, and open the valve lever fully. CP-842 Preliminary 5-7 Maintenance >> Cleaning 5.1.7 Machine Interior (Weekly) Point Chip parts and other foreign objects will accumulate in the machine during the course of operation. Such objects should be removed from the machine periodically to keep the machine in good working order. Procedure WARNING Be sure to turn the main power off before performing this procedure. 1 Use a vacuum cleaner to remove the foreign objects from the machine interior. 2 Use a dry cloth to wipe grease off of all areas not specified as lubrication points. Caution:Do not use an air gun within the machine as dust or other small fragments may be blown into other areas of the machine. 5-8 CP-842 Preliminary Maintenance >> Cleaning 5.1.8 Part Height Check Sensor Lens (Weekly) Point The lenses should be cleaned periodically to ensure accuracy during part height and nozzle length measurement. Procedure WARNING Be sure to turn the main power off before performing this procedure. Use a soft brush (such as those used to clean camera lenses) to clean the sensor lens. If the lens is badly soiled, use a commercially available lens cleaner. Sensor lens C746M3011 CP-842 Preliminary 5-9 Maintenance >> Cleaning 5.1.9 Fluorescent Nozzle Stickers (Monthly) Point Dust and other particles adhere to the nozzle fluorescent sticker, reducing the amount of light reflected to the ST5 parts camera. A reduced reflection can prevent the part image from being acquired properly, resulting in vision errors. Procedure If repeated vision errors are occurring for a particular nozzle, use a soft brush (such as those used to clean camera lenses) to wipe the dust from the sticker. Note: Do not rub the fluorescent seal with a cloth, as this will cause dust to adhere to it. If the dust cannot be removed, replace the fluorescent seal. 5-10 CP-842 Preliminary Maintenance >> Cleaning 5.1.10 Tapered Clutch on the Nozzle Indexing Shaft (Monthly) Point After extended periods of operation, grease may adhere to the tapered clutch area of the nozzle indexing shaft, causing the clutch to slip. This slippage makes it difficult to rotate the nozzle to its placing angle, and affects the positioning. Use the degreasing agent (ThreeBond 2706) supplied with the machine to clean the tapered clutch on a monthly basis. Procedure WARNING • Turn the 200V power off before performing this procedure. • Rotation may occur (caused by spring action) if the cam axis is not at its origin position (0-degrees). Use special care when working inside the machine as this is a dangerous area. While pulling down the outer shaft which covers the nozzle indexing shaft, wipe the tapered clutch (all the way around) with a cloth on which the degreasing agent has been applied. Note: Do not spray the degreasing agent directly onto the tapered clutch, because spraying is inaccurate. (The agent could land on other components, removing the lubricant which they require.) Tapered clutch Outer shaft CP-842 Preliminary C746M3009 5-11 Maintenance >> Cleaning 5.1.11 Air Filter (Monthly) Point Filters are attached to each of the cooling fans on the machine. The air filters should be cleaned periodically to ensure smooth passage of air and thus prevent overheating. Procedure WARNING Be sure to turn the main power off before performing this procedure. Remove the cover and the filter and then use a vacuum cleaner to remove any particles from the filter. Air filter Filter cover 5-12 C746M3010 CP-842 Preliminary Maintenance >> Cleaning 5.1.12 Oil Cooler Air Filter (Monthly) Point A filter is attached to the oil cooler unit. The air filter should be cleaned periodically to prevent damage to the machine as a result of blockage. Procedure WARNING Be sure to turn the main power off before performing this procedure. 1 Remove the acrylic cover from the top of the machine. 2 Hold the tab and lift the filter upwards to remove. 3 Clean the filter with a vacuum cleaner. <CP-842E> Acrylic cover <CP-842ME> Acrylic cover Tab Filter C746M3012 CP-842 Preliminary 5-13 Maintenance >> Cleaning 5.1.13 Carrier Rodless Cylinder (Monthly) Point There is a tendency for scattered parts and fine fibers etc. to adhere to the slide surface of the rodless cylinder used to drive the carrier. As a result, it is necessary to perform periodic cleaning. Procedure WARNING Be sure to turn the main power off before performing this procedure. 1 Lightly wipe the slide surface of the rodless cylinder using a fine cloth. Furthermore, ensure to remove any dirt etc. that has accumulated between the ends of the slider surface and the absorber holder. 2 Apply some grease to a fine cloth and wipe along the slider surface. Note: Ensure to use Daphne Eponex No. 2 by Idemitsu. Carrier cylinder Absorber holder Slide surface Slider Absorber holder C746M3013 5-14 CP-842 Preliminary Maintenance >> Cleaning 5.1.14 Nozzle Filter (Every 3 Months) Point The filter inside the shaft becomes soiled during the course of machine operation, and should be replaced approximately every 3 months. If errors occur frequently for a specific nozzle, it is probable that the flow of air is being impeded by a dirty filter. Procedure WARNING Be sure to turn the main power off before performing this procedure. 1 Squeeze in the levers shown in the figure below, and carefully extract the filter. Filter Assy C746M3015 Caution: 2 1. Do not apply excess force to the nozzle shaft. 2. Ensure that the filter is returned to the nozzle with the levers at the bottom. Remove the pin from the filter Assy, and replace both the filter and the pin. Filter Pin C746M3014 CP-842 Preliminary 5-15 Maintenance >> Cleaning 5.1.15 Cleaning Checklist Cleaning points Schedule 1 Waste Tape Box and Filter Every 8 Hours 2 Waste Tape Duct Every 8 Hours 3 Reject Parts Box Every 8 Hours 4 Nozzle Interior Weekly 5 Camera Glass Weekly 6 Filter Regulator Weekly 7 Machine Interior Weekly 8 Part Height Check Sensor Lens 9 Fluorescent Nozzle Stickers Weekly Monthly 10 Tapered Clutch on the Nozzle Indexing Shaft Monthly 11 Air Filter Monthly 12 Oil Cooler Air Filter Monthly 13 Carrier Rodless Cylinder Monthly 14 Nozzle Filter Every 3 Months Check T015 5-16 CP-842 Preliminary Maintenance >> Lubrication 5.2 Lubrication 5.2.1 Precautions During Lubrication • Prior to beginning any lubrication, turn the main breaker off. • Apply an appropriate amount of lubricant. If too much lubricant is applied, it may splatter and drop on panels inside the machine. Special care should be taken to keep the camera lens clean, as a soiled lens results in poor part inspection results. Use a lens cleaner to keep the lens clean. 5.2.2 Types of Lubricant The lubricants which are used have the following characteristics. Type Daphne Eponex No. 2 Daphne Super Multi Oil 32 Characteristics Lithium grease by Idemitsu suited to mid/low speed parts. High grade synthetic based oil by Idemitsu used as a multi-purpose lubricating oil applicable to a wide range of parts that require lubrication. Multemp LRL3 Lithium grease by Kyodo Oils suited to mid/low speed parts. Multemp SRL Lithium grease by Kyodo Oils suited to high/mid/low speed parts. AFC Grease High grade synthetic oil based on grease by THK suited to high speed parts. SHC 630 Turbine oil + NASKALUBE This MOBIL, PAO based oil is used on gears and axis components. A Fuji special blend containing additives, used for the purpose of enhancing durability. C746M3T02 Note: Do not mix grease types. CP-842 Preliminary 5-17 Maintenance >> Lubrication Grease Gun Kit A grease gun kits with which grease supply for almost all Fuji equipment can be performed is available from Fuji. The grease gun kit comes with all the nozzles required to apply grease to the various grease nipple formats. To obtain the grease gun kit, please contact your Fuji agent. FUJI Grease gun kit contents: No. Name Name: Fuji grease gun kit Code: AWPJ820* Format Quantity Code 1 Box Sheet PJ EA506J 1 2 Sheet WPJ1271 PE light (Sponge) 1 3 Sheet WPJ1281 Polyurethane 1 4 Mushroom Nipple WPJ1261 K1153F 5 Grease Gun S2184A 6 Syringe 1 KH-120 (with HSP-1) 1 SJ-S30S 1 7 Rubber Hose H5456T SPK-3C 1 8 Air Hose T2063H TU0604B-310 mm 2 9 Nozzle N5004A L-type 1 10 Nozzle N5005A N-type 1 11 Nozzle N5006A N-1-type 1 12 Nozzle N5007A P-type 1 13 Nozzle N5008A U-type 1 14 Tube 15 Connector T2061E PTFE tube 2x3-150 mm 1 K5030T PN-1/8-PT1/8-BS 1 16 Connector Nipple S2176B TS6-01 1 17 Sleeve S3084A 40-13 1 GRSKIT01E Included Parts 1 6 12 7 13 2 8 14 3 15 9 4 16 10 5 11 17 GRSKIT02E 5-18 CP-842 Preliminary Maintenance >> Lubrication The CP-842E/842ME series requires the following grease nozzles, which are not included in the standard grease gun kit. Nozzle for NG parts disposal unit and NY-axis LM blocks Nozzle for NZ-axis LM blocks ADGPJ818* DGPJ055* C746M3039 5.2.3 Lubrication Instructions Illustrations and tables are used to indicate important information about keeping the machine properly lubricated. Type and Schedule for Lubrication Within these illustrations, symbols are used to indicate the location, type and schedule for lubrication. The lubrication schedules are based on eight hours of operation per day, five days per week (40 hours) and 20 days per month (160 hours). However, if the machines are being operated in two or three shifts per day, the lubrication schedules should be used as follows. Daily: Eight hours from when the machine is turned on, after every eight hour shift, or after one day's operation. Weekly: After 40 hours of operation, whether the machine is being used in two or three shifts, or after one week's operation. Monthly: After 160 hours of operation, whether the machine is being used in two or three shifts, or after one month's operation. Every 3 months: After 480 hours of operation, whether the machine is being used in two or three shifts, or after three month's operation. Every 6 months: After 960 hours of operation, whether the machine is being used in two or three shifts, or after six month's operation. Annually: CP-842 Preliminary After 1920 hours of operation, whether the machine is being used in two or three shifts, or after a year of operation. 5-19 Maintenance >> Lubrication Locations for Lubrication Locations for lubrication are indicated in the illustrations using arrows and numbers. White arrows are used to indicate surfaces that require greasing or oil. Black arrows indicate grease nipples, and signify that grease should be inserted using a grease pump. (1) LM block LM rail (2) C746M3016 Note: Even LM blocks that do not have a nipple can be lubricated by applying grease between the block and the LM rail (bearing mechanism). The grease that adheres to the ball bearings and rollers will be taken into the LM block and thereby serve to lubricate the LM block. Lubrication Checklist A lubrication checklist is provided at the end of this chapter. This checklist should be used as follows. 5-20 1 Check the lubrication points corresponding to the reference numbers shown in the illustrations. 2 Mark each check box after lubricating each point. CP-842 Preliminary Maintenance >> Lubrication 5.2.4 Lubricating the XY-table Lubrication points Types of lubricant Schedule 1 X-axis LM block Daphne Exponex No. 2 Every 3 months 2 X-axis ball screw Multemp LRL3 Monthly 3 X-axis screw cover 4 Y-axis LM block Daphne Exponex No. 2 Every 3 months 5 Y-axis ball screw Multemp LRL3 Monthly 6 Y-axis screw cover 7 Z-axis ball screw Daphne Super Multi Oil 32 Every 3 months Daphne Super Multi Oil 32 Every 3 months Monthly Multemp SRL C746M3T03 Caution:If the grease on the Y-axis screw cover dries, the cover must be lubricated, even if the cover is not due for periodic lubrication. Apply a thin layer of grease using a brush. Compressing the screw cover by hand may result in injury. Furthermore, incorrect removal or installation of the screw cover may result in damage to the machine. Arrow marks in the illustration indicate lubrication points. Black arrows indicate points where a grease gun is required. Caution:Always lubricate the X-axis/Y-axis ball screws using a grease pump to apply grease to the nipples. Applying grease directly to the ball screws or closing the cover by hand may result in injury. Furthermore, incorrect removal or installation of the screw cover may result in damage to the machine. (7) (5) (4) (1) (6) (3) (4) (2) (1) C746M3017 CP-842 Preliminary 5-21 Maintenance >> Lubrication 5.2.5 Lubricating the Conveyors Lubrication points Types of lubricant Schedule 8 Ball screw Daphne Exponex No. 2 Every 6 months 9 Lifter guide bar Daphne Exponex No. 2 Every 6 months 10 LM block Daphne Exponex No. 2 Every 6 months C746M3T04 Arrow marks in the illustration indicate lubrication points. Black arrows indicate points where a grease gun is required. (10) (8) (8) (9) (10) C746M3018 Note: The out-conveyor should also be lubricated in the same manner as the in-conveyor shown in the figure above. 5-22 CP-842 Preliminary Maintenance >> Lubrication 5.2.6 Lubricating the Carriers Lubrication points Types of lubricant Schedule 11 LM rail Daphne Exponex No. 2 Every 3 months 12 Cam follower Daphne Exponex No. 2 Every 3 months C746M3T05 Arrow marks in the illustration indicate lubrication points. (11) (11) (11) (12) C746M3019 Note: The out-carrier should also be lubricated in the same manner as the in-carrier shown in the figure above. CP-842 Preliminary 5-23 Maintenance >> Lubrication 5.2.7 Lubricating the Tape Advance Link Types of lubricant Lubrication points Schedule AFC grease Monthly Shaft Daphne Exponex No. 2 Monthly Joint AFC grease Monthly 13 Tape feed lever 14 15 C746M3T06 Arrow marks in the illustration indicate lubrication points. (15) (15) (14) (13) (13) (14) (14) ST1 C746M3020 5-24 CP-842 Preliminary Maintenance >> Lubrication 5.2.8 Lubricating the Cam Box Lubrication points Types of lubricant Schedule Daphne Exponex No. 2 Monthly AFC grease Monthly 16 Cam 17 Cam lever pivot (7 points) 18 Cam lever bearing Daphne Exponex No. 2 Monthly 19 NZ-axis ball screw Daphne Exponex No. 2 Monthly 20 NZ-axis LM rail Daphne Exponex No. 2 Every 3 months 21 NZ-axis holder Daphne Exponex No. 2 Every 3 months 22 NZ-axis LM block AFC grease Every 3 months Daphne Exponex No. 2 Monthly 23 -axis connecting pin C746M3T07 Arrow marks in the illustration indicate lubrication points. Black arrows indicate points where a grease gun is required. ST2, 8, 9, 10 rod (20) (23) (19) (17) (21) (18) (16) (16) (22) (16) (16) (16) (16) Shaft (17) (18) Note: Lubrication of (22) requires a special grease nozzle. Refer to the next page for details. CP-842 Preliminary Caution: Do not lubricate the shaft on the air cylinder. C746M3021 5-25 Maintenance >> Lubrication Hose Special grease nozzle NZ-axis LM block Special grease nozzle for the NZ-axis LM block ADGPJ818* Connect the hose to the special grease nozzle and inject grease into the NZ-axis LM block. C746M3040 5-26 CP-842 Preliminary Maintenance >> Lubrication 5.2.9 Lubricating the Waste Tape Disposal Unit Lubrication points Types of lubricant Schedule 24 Movable cutter Daphne Exponex No. 2 Weekly 25 Cam follower Daphne Exponex No. 2 Weekly 26 Thrust bearing AFC grease Monthly C746M3T08 Arrow marks in the illustration indicate lubrication points. (24) (24) (25) (24) (26) (24) ST1 (26) (26) Note: Apply AFC grease to the outside surface of the thrust bearing. Disassembly is not required. C746M3022 CP-842 Preliminary 5-27 Maintenance >> Lubrication 5.2.10 Lubricating the NY-Axis Pickup Offset Mechanism Lubrication points 27 LM block 28 Roller Types of lubricant Schedule AFC grease Monthly Multemp LRL3 Monthly C746M3T21 Arrow marks in the illustration indicate lubrication points. Black arrows indicate points where a grease gun is required. Special grease nozzle DGPJ055* ST1 (27) (28) Special grease nozzle Hose (27) Connect the special grease nozzle (DGPJ055*) to the grease gun hose and insert into the grease port on the LM block. C746M3041 5-28 CP-842 Preliminary Maintenance >> Lubrication 5.2.11 Lubricating the Rod Ends Lubrication points 29 Rod end Types of lubricant Schedule Daphne Exponex No. 2 Every 3 months C746M3T09 Arrow marks in the illustration indicate lubrication points. Black arrows indicate points where a grease gun is required. Inside of the cam box Rod end (with a grease nipple) (29) ST14 CP-842 Preliminary C746M3023 5-29 Maintenance >> Lubrication 5.2.12 Lubricating the D-axis Carriers Lubrication points Types of lubricant Schedule 30 D-axis LM block Daphne Exponex No. 2 Every 3 months 31 D-axis ball screw Multemp LRL3 Monthly C746M3T10 Arrow marks in the illustration indicate lubrication points. Black arrows indicate points where a grease gun is required. (30) (30) (1) (31) (30) (30) (30) (30) (1) (31) (30) (30) 5-30 C746M3024 CP-842 Preliminary Maintenance >> Lubrication 5.2.13 Lubricating the Rotary Head Lubrication points Types of lubricant Schedule 32 Turret groove Daphne Exponex No. 2 Monthly 33 Helical gear Daphne Exponex No. 2 Monthly 34 LM rail AFC grease Monthly 35 Spline shaft AFC grease Monthly 36 Wave washer Daphne Exponex No. 2 Every 3 months 37 Pin AFC grease Monthly C746M3T11 Arrow marks in the illustration indicate lubrication points. (33) (33) (32) (35) (34) (36) (37) ST1 C746M3025 CP-842 Preliminary 5-31 Maintenance >> Lubrication 5.2.14 Lubricating the ST9 Air Valve Push Pin Lubrication points 38 Types of lubricant Schedule AFC grease Monthly Valve push pin C746M3T12 Arrow marks in the illustration indicate lubrication points. (38) (38) Valve push pin overview Apply grease Do not apply grease on the air blow hole. C746M3026 5-32 CP-842 Preliminary Maintenance >> Lubrication 5.2.15 Lubricating the Parts Reject Unit Types of lubricant Lubrication points Schedule 39 Valve push pin AFC grease Monthly 40 Cam follower AFC grease Every 3 months 41 LM rail AFC grease Every 3 months C746M3T13 Arrow marks in the illustration indicate lubrication points. Black arrows indicate points where a grease gun is required. Hose Special grease nozzle (41) Connect the hose to the special grease nozzle (DGPJ055*), and then insert the nozzle tip into the LM guide grease port. (39) Valve push pin overview (40) (40) Do not apply grease on the air blow hole. Apply grease C746M3038 CP-842 Preliminary 5-33 Maintenance >> Lubrication 5.2.16 Lubricating the Pallet Table Lubrication points Types of lubricant Schedule 42 Pallet clamp surface AFC grease Every 3 months 43 Clamp pin AFC grease Every 3 months 44 Cam follower Daphne Eponex No.2 Monthly C746M3T14 Arrow marks in the illustration indicate lubrication points. <CP-842ME> Option (42) (43) (42) (42) (43) (42) (44) (44) (44) (43) (42) (42) (43) (44) (42) (44) C746M3027 5-34 CP-842 Preliminary Maintenance >> Lubrication 5.2.17 Lubricating the Nozzle Changer Lubrication points Types of lubricant Schedule AFC grease Monthly 45 Spline shaft 46 Beveled gear Daphne Exponex No. 2 Monthly 47 Moveable sections on the lever Daphne Exponex No. 2 Every 3 months 48 Clutch engagement surface Daphne Exponex No. 2 Monthly 49 Thrust bearing AFC grease Monthly C746M3T15 Arrow marks in the illustration indicate lubrication points. (49) (49) (49) Note: Apply AFC grease to the outside surface of the thrust bearing and rotate it to work the grease into the bearing. Disassembly is not required. ST14 (45) (48) Lightly remove the applied grease, leaving behind a thin film CP-842 Preliminary (47) (45) (46) C746M3028 5-35 Maintenance >> Lubrication 5.2.18 Lubricating the Rear Cover Types of lubricant Schedule Daphne Exponex No. 2 Every 3 months Lubrication points Slide rail 50 C746M3T16 Arrow marks in the illustration indicate lubrication points. (50) (50) (50) (50) (50) (50) (50) (50) C746M3029 Note: The above drawing represents the CP-842ME. Please conduct lubrication for the CP-842E in the same fashion. 5-36 CP-842 Preliminary Maintenance >> Lubrication 5.2.19 Lubricating the Index Unit Point The lubricant for the index unit in the cam box is contained within the oil cooler on the left side of the box. Replace the oil in the oil cooler once every three years or after 12,000 hours of operation. Lubrication points 51 Oil cooler Types of lubricant Schedule SHC 630 Every 3 years or 12,000 hours C746M3T17 Procedure The oil in the oil cooler can be drained at three locations. Refer to the diagram below for guidelines on how much oil should be removed from each drain plug. Prepare in advance a bucket for collecting the old oil, a plastic sheet with which to cover the machine, and some corrugated cardboard. Oil inlet (51) Oil cooler drain plug (approx. 2,000 ~ 3,000cc) Nozzle index drain plug (approx. 1,000cc) Theta (q) index drain plug (approx. 1,000cc) C746M3030 CP-842 Preliminary 5-37 Maintenance >> Lubrication 1 Remove the acrylic cover from the top of the machine, and remove the cap from the oil cooler. <CP-842E> Clear acrylic cover <CP-842ME> Clear acrylic cover Oil cooler Drain plug Cap C746M3031 2 Open the cover on the rear left of the machine. 3 Remove the old cooler oil using the drain plugs. Protect the area surrounding the drain plugs using a plastic sheet, remove the drain plug and drain the oil into a collecting bucket. Drain plug Plastic sheet C746M3032 Note:1.Cover the machine carefully to prevent oil spilling on the machine when draining the oil cooler. 2.The oil removed from the machine should be discarded in accordance with local ordinances for handling waste matter. 4 5-38 Replace and properly tighten the drain plugs once the oil has been fully removed. CP-842 Preliminary Maintenance >> Lubrication 5 Open the doors at the rear of the machine. 6 Cover the cameras, prism box and surrounding areas with a plastic sheet. Plastic sheet C746M3033 Note: Cover the machine carefully to prevent oil spilling on the machine when draining the oil cooler. 7 Remove the oil from the nozzle index unit drain plug. Cover the corrugated cardboard with a plastic sheet, create a slope and drain the contents of the nozzle index unit into a collecting bucket.7.Remove the oil from the nozzle index unit drain plug. Slope Drain plug C746M3034 Note: The oil removed from the machine should be discarded in accordance with local ordinances from handling waste matter. 8 CP-842 Preliminary Replace and properly tighten the drain plug once the oil has been fully removed. 5-39 Maintenance >> Lubrication 9 Open the front doors. 10 Remove the oil from the theta (q) index unit drain plug. Use a plastic sheet as shown in the diagram below, remove the drain plug and drain the old oil into the collecting bucket.10.Remove the oil from the theta (q) index unit drain plug. Drain plug Plastic sheet C746M3035 Note: 11 5-40 1. Carefully arrange the plastic sheet to prevent oil spilling on the machine when draining the oil cooler. 2. The oil removed from the machine should be discarded in accordance with local ordinances from handling waste matter. Replace and properly tighten the drain plug once the oil has been fully removed. CP-842 Preliminary Maintenance >> Lubrication 12 Slowly pour the new lubricating oil into the inlet on the top of the oil cooler. <CP-842E> <CP-842ME> Oil range Level indicator Gauge glass Oil inlet (51) Cap 13 Oil cooler C746M3036 Ensure that the surface of the oil is in the range specified by the level indicator. Note: Whether the machine is at rest or during operation, the oil level does not normally change. Immediately after replacing the oil after 3 years or 12,000 hours of operation, the oil level will drop when operating the machine. Following operation, add more oil until the level falls within the recommended range. CP-842 Preliminary 5-41 Maintenance >> Lubrication 5.2.20 Lubricating the Cam Lever Air Cylinder Types of lubricant Schedule Turbine oil + NASKALUBE (*) Every 6 months Lubrication points 52 Air cylinder (*) The lubrication used is a Fuji special blend (Turbine oil + NASKALUBE). Contact Fuji when placing an order. C746M3T18 Procedure 1 Open the lid of the lubricator with a Phillips driver. 2 Lower the lubricator cover. 3 Visually check the oil level of the oil tank and slowly pour in the oil to the lubricator. Be sure not to exceed the upper limit while pouring in the oil. Note: The maximum amount of oil that can be supplied to the lubricator is 75 cc. If the oil level does not reach the tip of the pipe inside the case, there will be insufficient oil to lubricate the cylinder. 4 Replace the lubricator cover and attach the oil inlet cap. 5 Check and discard of any accumulated waste oil in the collection bottle. Lubricator Lid A (52) Cam lever air cylinder B A Upper limit B Case Pipe Bottle Lower limit Cover 5-42 C746M3037 CP-842 Preliminary Maintenance >> Lubrication 5.2.21 Lubrication Checklist (1/2) Lubrication points Types of lubricant Schedule X-axis LM block Daphne Exponex No. 2 Every 3 months 2 X-axis ball screw Multemp LRL3 Monthly 3 X-axis screw cover 4 Y-axis LM block Daphne Exponex No. 2 Every 3 months 5 Y-axis ball screw Multemp LRL3 Monthly 6 Y-axis screw cover Daphne Exponex No. 2 Every 3 months 7 Z-axis ball screw Multemp SRL Monthly Ball screw Daphne Exponex No. 2 Every 6 months 9 Lifter guide bar Daphne Exponex No. 2 Every 6 months 10 LM block Daphne Exponex No. 2 Every 6 months 11 Carriers LM rail Daphne Exponex No. 2 Every 3 months 12 Cam follower Daphne Exponex No. 2 Every 3 months AFC grease Monthly Daphne Exponex No. 2 Monthly 1 8 XY-table Conveyors 13 Tape advance Tape feed lever link 14 Shaft Daphne Super Multi Oil 32 Every 3 months 15 Joint AFC grease Monthly 16 Cam box Cam Daphne Exponex No. 2 Monthly 17 Cam lever pivot (7 points) AFC grease Monthly 18 Cam lever bearing Daphne Exponex No. 2 Monthly 19 NZ-axis ball screw Daphne Exponex No. 2 Monthly 20 NZ-axis LM rail Daphne Exponex No. 2 Every 3 months 21 NZ-axis holder Daphne Exponex No. 2 Every 3 months 22 NZ-axis LM block AFC grease Every 3 months Daphne Exponex No. 2 Monthly 23 -axis connecting pin 24 Waste tape disposal 25 Movable cutte Daphne Exponex No. 2 Weekly Cam follower Daphne Exponex No. 2 Weekly 26 Thrust bearing 27 NY-axis pickup LM block offset 28 Rolle Check AFC grease AFC grease Multemp LRL3 Monthly Monthly Monthly C746M3T19 CP-842 Preliminary 5-43 Maintenance >> Lubrication (2/2) Lubrication points 29 Rod ends Rod end 30 D-axis carriers D-axis LM block 31 D-axis ball screw 32 Rotary head Schedule Check Daphne Exponex No. 2 Every 3 months Daphne Exponex No. 2 Every 3 months Multemp LRL3 Monthly Turret groove Daphne Exponex No. 2 Monthly 33 Helical gear Daphne Exponex No. 2 Monthly 34 LM rail AFC grease Monthly 35 Spline shaft AFC grease Monthly 36 Wave washer 37 Pin Daphne Exponex No. 2 Every 3 months AFC grease Monthly 38 ST9 Air valve Valve push pin push pin AFC grease Monthly 39 Parts reject unit 40 Valve push pin AFC grease Monthly Cam follower AFC grease Every 3 months 41 LM rail AFC grease Every 3 months Pallet clamp surface AFC grease Every 3 months 43 Clamp pin AFC grease Every 3 months 44 Cam follower 45 Nozzle changer 46 Spline shaft 47 Moveable sections on the lever Daphne Exponex No. 2 Every 3 months 48 Clutch engagement surface Daphne Exponex No. 2 Monthly 49 Thrust bearing Monthly 50 Rear cove Slide rail 51 Index unit Oil cooler 52 Cam lever Air cylinder 42 Pallet table Beveled gear *: Fuji special blend 5-44 Types of lubricant Daphne Exponex No. 2 Every 3 months AFC grease Monthly Daphne Exponex No. 2 Monthly AFC grease Daphne Exponex No. 2 Every 3 months SHC630 Every 3 yrs or 12,000 hrs Turbine oil + NASKALUBE* Every 6 months C746M3T20 CP-842 Preliminary Replacing Consumable Parts >> Nozzles 6. Replacing Consumable Parts 6.1 Nozzles Point A nozzle which becomes bent, deformed, or clogged, can cause part pick-up errors and must be replaced. When replacing a nozzle, use care to avoid losing its internal spring. Procedure WARNING Be sure to turn the main power off before performing this procedure. 1 Remove the nozzle and spring as shown in the figure below. Nozzle Press and turn Spring Remove slowly C746M4001 Caution 2 CP-842 Preliminary 1. When removing the nozzle, take care not to lose the internal spring. Also check that the spring is not left within the nozzle holder. 2. To avoid nozzle bend, do not hold the nozzle at the tip during removal. Reverse the removal procedure to attach a new nozzle. 6-1 Replacing Consumable Parts >> Fluorescent Nozzle Stickers 6.2 Fluorescent Nozzle Stickers Point Fluorescent nozzle stickers which become soiled and cause vision processing errors must be replaced. Procedure 1 Wash hands before replacing the sticker. 2 Use a cutter to peel (from outer edge) the old sticker off the nozzle disk. 3 Use a cloth to wipe any residual adhesive off the disk. 4 Verify that the new sticker is not soiled or damaged. 5 Peel the backing off the new sticker, and punch the nozzle tip through from the fluorescent side. Note: Punching the nozzle tip through from the adhesive side will destroy the fluorescent coating around the hole. 6 Align the nozzle and sticker centers, and push the sticker into place using the jig. Be sure that there is no gap between the nozzle disk and the sticker. Jig ( DCPJ046* ) Nozzle seal Nozzle seal Jig ( ADCPJ824*) C746M4002 Note: Make sure that the sticker is attached firmly to the nozzle. Attached neatly without lifting. C746M4003 6-2 CP-842 Preliminary Replacing Consumable Parts >> Fluorescent Nozzle Stickers 7 Use a cutter to trim off any of the sticker which protrudes beyond the disk. 8 Remove any of the adhesive which may have adhered to the nozzle tube. Nozzle and fluorescent sticker drawing numbers Nozzle shape Nozzle Size ADCPH751* φ8 DCPH851* φ 0.4 ( R08-004 ) Short ADCPH769* φ8 DCPH851* φ 0.7 ( R08-007 ) ADCPH752* φ8 DCPH852* φ 1.0 ( R08-010 ) ADCPH753* φ8 DCPH853* φ 1.3 ( R08-013 ) ADCPH754* φ8 DCPH854* φ 1.8 ( R16-018 ) ADCPH955* φ 16 DCPH855* φ 2.5 ( R16-025 ) ADCPH956* φ 16 WPH820* φ 3.7 ( R16-037 ) ADCPH957* φ 16 WPH821* φ 5.0 ( R16-050 ) ADCPH958* φ 16 DCPH856* φ 1.3 ( M08-013 ) ADCPH770* φ8 DCPH854* φ 2.5 ( M16-025 ) ADCPH971* φ 16 WPH820* φ 1.8 ( S16-018 ) ADCPH959* 16x16 DCPH857* φ 2.5 ( S16-025 ) ADCPH961* 16x16 DCPH858* φ 3.7 ( S16-037 ) ADCPH963* 16x16 DCPH859* φ 5.0 ( S16-050 ) ADCPH965* 16x16 DCPH860* φ 1.8 ( B16-018 ) ADCPH960* 16x16 DCPH881* φ 2.5 ( B16-025 ) ADCPH962* 16x16 DCPH882* φ 3.7 ( B16-037 ) ADCPH964* 16x16 DCPH883* φ 5.0 ( B16-050 ) ADCPH966* 16x16 DCPH884* φ 5.0 ( B21-050 ) ADCPH968* 21x21 DCPH885* φ 0.4 ( R08-004 ) Round Melf Round Round Nozzle Assy Fluorescent Seal Disk Size Dwg. No. Dwg. No. C746M4T01 CP-842 Preliminary 6-3 Replacing Consumable Parts >> Waste Tape Cutter 6.3 Waste Tape Cutter Point A broken or damaged waste tape cutter will be unable to cut the waste tape properly, causing tape clogging and tape feed problems. The waste tape cutter must be replaced at such times. Procedure WARNING • Turn the main power off before performing this procedure. • Rotation may occur (caused by spring action) if the cam axis is not at its origin position (0-degrees). Use special care when working inside the machine as this is a dangerous area. 1 Remove the plate located above the waste tape cutter. 2 Remove the two bolts which secure the fixed cutter. 3 Remove the two bolts which secure the arm of the moving cutter. 4 Remove the fixed and moving cutters, and mount the new fixed and moving cutters. Note: Apply grease to the contact points before attaching the moving cutter. (See 5.2.9 Lubricating the Waste tape disposal unit) Plate Moving cutter Fixed cutter Arm C746M4004 6-4 CP-842 Preliminary Replacing Consumable Parts >> Conveyor Belts 6.4 Conveyor Belts Point Broken or damaged conveyor belts must be replaced. Procedure WARNING Be sure to turn the main power off before performing this procedure. 1 Remove the panel lifter. 2 Loosen the bolt which secures the tension pulley and weaken the tension. 3 Loosen the belt guide bolts. 4 Replace the conveyor belt. 5 Insert a 0.3 mm clearance gauge between the belt’s top surface and the plate, then tighten the belt guide bolts while maintaining this 0.3 mm clearance. 6 Tighten the belt by applying 1 to 1.5 kg of force to the tension pulley in the direction indicated by the arrow, then tighten the tension pulley bolt. Note: The belt can also be tightened to the prescribed tension by tightening the tension pulley bolt while pushing the tension pulley 1 to 2 mm in the direction indicated by the arrow. Tension pulley Belt guide bolt Plate Panel lifter C746M4005 CP-842 Preliminary 6-5 Replacing Consumable Parts >> Conveyor Belts The standard conveyor belt tension values are as stated in the diagram below. Check the tension using a tension meter at the points indicated by the arrows as shown. 298Hz ± 15 88 .8 71 m m C746M4006 6-6 CP-842 Preliminary Replacing Consumable Parts >> Vacuum Pump Filter Element 6.5 Vacuum Pump Filter Element Point Air which is sucked into the pump must be clean. The filter element should therefore be replaced when it becomes excessively soiled. Procedure WARNING • Be sure to switch off the 200V power supply before beginning this procedure. • Do not touch the vacuum pump immediately after operation as it may be extremely not. Allow the pump to cool before performing this procedure. Loosen the filter case holder, then extract the filter case by pulling it downward. After extracting the filter case, replace the filter element. Vacuum pump Air filter Filter element Flter case holder Filter case C746M4007 CP-842 Preliminary 6-7 Replacing Consumable Parts >> Vacuum Pump Belt 6.6 Vacuum Pump Belt Point The vacuum pump belt should be replaced when broken or damaged. Procedure WARNING • Be sure to switch off the 200V power supply before beginning this procedure. • Do not touch the vacuum pump immediately after operation as it may be extremely not. Allow the pump to cool before performing this procedure. 1 Remove the bracket bolts which secure the vacuum pump table, then disconnect the harness connectors. Table Connectors Bolts Connectors C746M4008 2 Pull out the vacuum pump together with the table. Vacuum pump C746M4009 6-8 CP-842 Preliminary Replacing Consumable Parts >> Vacuum Pump Belt 3 Open the belt cover. Belt cover C746M4010 4 Remove the motor pulley and replace the belt. Belt Motor pulley C746M4011 5 Adjust the tension of the new belt. If the belt tension is outside the prescribed range, move the motor position in 0.1 mm increments to adjust the "L" dimension. Load 1.8 mm Motor pulley Amount of slack Load Tension meter * Vacuum pump pulley L New Belt Belt During Use 1.8 mm 1.8 mm 0.50 ~ 0.60 kg 0.38 ~ 0.46 kg 28 ~ 34 lb 20 ~ 26 lb * : Polyflex tension meter manufactured by Gates Co. CP-842 Preliminary C746M4012 6-9 Replacing Consumable Parts >> Vacuum Pump Internal Vanes and Bearings 6.7 Vacuum Pump Internal Vanes and Bearings Point The vacuum pump blade consists of 6 vanes. Broken vanes can cause abnormal vacuum pump noise, and may reduce the vacuum force. When replacing the vanes, the bearings must also be replaced. Procedure WARNING • Be sure to switch off the 200V power supply before beginning this procedure. • Do not touch the vacuum pump immediately after operation as it may be extremely not. Allow the pump to cool before performing this procedure. Disassembly 1 Pull out the vacuum pump. (For this procedure, refer to section 6.6"Vacuum Pump Belt"). Vacuum pump C746M4013 2 Remove the duct together with the bracket. Duct C746M4014 6-10 CP-842 Preliminary Replacing Consumable Parts >> Vacuum Pump Internal Vanes and Bearings 3 Open the belt cover. Belt cover C746M4015 4 Remove the pulley and the pulley fan, then remove the vacuum pump from the table. Pulley Pulley fan Air filter Vacuum pump C746M4016 Caution: The air filter should not be removed from the vacuum pump for the folllowing reasons. 5 1. There is a possibility of damage to the pump plumbing or air filter bousing. 2. Metal fragments or other dust from the plumbing may get into the pump. Remove the silencer case and the check valve. Silencer case Check valve C746M4017 CP-842 Preliminary 6-11 Replacing Consumable Parts >> Vacuum Pump Internal Vanes and Bearings 6 Remove the cooling fan cover and the cooling fan. Cooling fan Fan cover C746M4018 7 Remove the bearing retainers and liners. Liner Bearing retainer Liner Bearing retainer C746M4019 8 Remove the side plate "B" mounting bolts, then use these bolts to secure the special tool to side plate "B". Side plate B Mounting bolts Special tool C746M4020 9 Pull on the special tool to remove side plate "B". Remove the special tool from side plate "B", then install the bearing retainer and liner (removed at step 7 above) on side plate "B". Do not tighten the bolts fully at this time (back off 1 mm from fully tightened condition). Bolt Bearing retainer Side plate B Liner Special tool Side plate C746M4021 Note: Use care to avoid scratching side plate "B" and the inner surface of the cylinder. 6-12 CP-842 Preliminary Replacing Consumable Parts >> Vacuum Pump Internal Vanes and Bearings 10 Remove the vanes. Vane C746M4022 Note 11 1. Be sure to note the orientation and positions of the vanes, as the new vanes must be installed in the same manner. 2. If a broken vane exists, air blow the pump interior to remove any fragments. Mount the special tool on side plate "A", then push out the rotor. Support the shaft area with your hand to avoid dropping the rotor. After removing the rotor, remove the special tool. Special tool Special tool Rotor C746M4023 Side plate A NoteWhen pushing out the rotor, use care to avoid scratching the rotor shaft and the cylinder. 12 Remove the side plate "A" mounting bolts, and use a plastic hammer to knock the pin off, then remove side plate "A". Bolt Side plate A 13 CP-842 Preliminary Knock-pin C746M4024 After disassembling to this point, clean each component using a soft cloth soaked in an organic solvent (chlorine or fluorine based solvent such as Kurorosen or Daifuron S3). 6-13 Replacing Consumable Parts >> Vacuum Pump Internal Vanes and Bearings Assembly 1 Insert the rotor into side plate "A". Rotor Side plate A C746M4025 2 Place the spacer and bearing in side plate "A", then use a bearing punch and hammer to pound the bearing in. Hammer Bearing Spacer Bearing punch C746M4026 Note: Place a wood block beneath the shaft to prevent it from being scratched. 3 Mount side plate "A" on the cylinder. After using the knock-pin to position side plate "A", secure it with the bolts. Knock-pin Side plate A C746M4027 6-14 CP-842 Preliminary Replacing Consumable Parts >> Vacuum Pump Internal Vanes and Bearings 4 Mount the vanes on the rotor. Be sure the vane positions and orientations are the same as when disassembled. Vane C746M4028 5 Mount side plate "B" on the cylinder. After using the knock-pin to position side plate "B", place the spacer and bearing in position, then use a hammer and bearing punch to pound the bearing in. After the bearing is in, secure the side plate "B" mounting bolts. Knock-pin Spacer Side plate B Bearing 6 CP-842 Preliminary Bearing punch Hammer Mounting bolt C746M4029 Use the bearing punch and hammer again to pound in the bearings at side plates "A" and "B". 6-15 Replacing Consumable Parts >> Vacuum Pump Internal Vanes and Bearings 7 Place the liners and bearing retainers on side plates "A" and "B". Liner Bearing retainer Liner Bearing retainer C746M4019 Note: Even if the number of liners and their combinations are assembled in the same manner as when disassembled, there may be some looseness when the shaft rotates. The number of liners and the liner thickness should therefore be adjusted as necessary to eliminate this looseness. Liner Thickness 0.03 mm 0.05 mm 0.10 mm Color Coded Red Yellow Black 0.20 mm No color C746M4T02 8 Verify that there is no contact between the rotor and the side plates when the rotor is rotated while pushing and pulling the rotor shaft. Side plate A Shaft Side plate B Shaft C746M4030 9 Complete the vacuum pump reassembly by reversing steps 1 to 6 of the disassembly procedure, then reconnect the harness connectors. Conectors Conectors C746M4031 6-16 CP-842 Preliminary Replacing Consumable Parts >> Vacuum Pump Motor 6.8 Vacuum Pump Motor Procedure WARNING • Be sure to switch off the 200V power supply before beginning this procedure. • Do not touch the vacuum pump immediately after operation as it may be extremely not. Allow the pump to cool before performing this procedure. 1 Pull out the vacuum pump. (For this procedure, refer to section 6.6 " Vacuum Pump Belt"). Vacuum pump C746M4013 2 Use calipers to measure the distance between the vacuum pump pulley and the motor pulley, and make a note of this measured value. L Motor pulley Vacuum pump pulley C746M4032 CP-842 Preliminary 6-17 Replacing Consumable Parts >> Vacuum Pump Motor 3 Remove all parts which hinder the motor replacement work. These parts include the vacuum pump, duct, the belt. Duct Belt Vacuum pump C746M4033 4 Remove the motor, then remove the pulley from the motor. Motor Pulley C746M4034 5 Mount the pulley on the new motor, then set the motor and vacuum pump on the base. Bolts which secure the pulley, motor, and vacuum pump should only be partially tightened at this time. Final tightening should be performed after adjusting the pulley deviation and the distance between the vacuum pump pulley and motor pulley (distance noted at step 2). The pulley deviation should be 0.3 mm or less.5.Mount the pulley on the new motor, then set the motor and vacuum pump on the base. Bolts which secure the pulley, motor, and vacuum pump should only be partially tightened at this time. Reference-side pulley 0.3 mm or less 0.3 mm or less 0.3 mm or less C746M4035 6-18 CP-842 Preliminary Replacing Consumable Parts >> Vacuum Pump Motor 6 Adjust the tension of the new belt. If the belt tension is outside the prescribed range, move the motor position in 0.1 mm increments to adjust the "L" dimension. Load 1.8 mm Motor pulley Amount of slack Load Tension meter * Vacuum pump pulley L New Belt Belt During Use 1.8 mm 1.8 mm 0.50 ~ 0.60 kg 0.38 ~ 0.46 kg 28 ~ 34 lb 20 ~ 26 lb * : Polyflex tension meter manufactured by Gates Co. 7 C746M4012 Reassemble the remaining parts in the reverse order of the disassembly procedure, then connect the harness connectors. Conectors Conectors C746M4031 CP-842 Preliminary 6-19 Replacing Consumable Parts >> Vacuum Hoses 6.9 Vacuum Hoses Procedure WARNING • Be sure to switch off the 200V power supply before beginning this procedure. • The spring force may cause the cam axis to rotate if the cam axis is positioned anywhere other than the origin position (0 degrees). Always use extreme care when working inside the machine, as this is a dangerous area. 1 Detach all nozzle holders. 2 Move the placing head where a vacuum hose is to be replaced to ST9, fix the cam angle at 180 degrees, then replace the vacuum hose between the head manifold and the nozzle shaft assembly. 3 Connect the vacuum hose to joint 4 as shown in the figure below. Head manifold Vacuum hoses 180 4 3 Cam angle 180 Push the hose (from the head manifold) all the way to the back of the support axis nipple at theposition shown in the figure at right. 01 2 ST9 Nozzle shaft assembly Vacuum hoses Nozzle holder C746M4036 6-20 CP-842 Preliminary Replacing Consumable Parts >> Servo Amp Battery 6.10 Servo Amp Battery Point CP-842E/842ME machines use absolute encoder motors with servo amplifiers that are equipped with back-up batteries for saving the absolute encoder data even when the control power is off. The servo amplifier battery should be replaced when a "Servo amp error" message displays on the machine operation screen, together with an "A.83" display at the servo amplifier's LED indicator. Caution: 1. Following a servo amplifier error, the absolute data is saved for approximately 1 week after the machine power is turned off. Failure to replace the battery during this period will result in the loss of the absolute encoder data, and will require another absolute encoder setup and Proper data measurement. The battery should therefore be replaced quickly. 2. All the absolute encoder data will be lost If the old battery is removed while the servo amplifier's POWER LED is off, and another absolute encoder setup and Proper data measurement will then be required. To avoid this, ensure that the machine power is ON and that the POWER LED is lit when removing the old battery. Y- and Z-Axis Servo amplifier <CP-842E> Z-axis <CP-842ME> Y-axis LED panel CN3 connector C746M4037 CP-842 Preliminary 6-21 Replacing Consumable Parts >> Servo Amp Battery Rq-, NC-, Fq-, Pq-, and NZ-Axis Servo amplifier <CP-842E> Rq-axis <CP-842ME> NC-axis Fq-axis Pq-axis NZ-axis LED panel CN3 connector C746M4038 D1-, D2-, X-, Cam-, and NY-Axis Servo amplifier <CP-842E> <CP-842ME> (1) (1) (2) (2) (5) (3) (1) D1-axis (5) (3) (4) (2) D2-axis (3) X-axis (4) (4) Cam-axis (5) NY-axis C746M4039 6-22 CP-842 Preliminary Replacing Consumable Parts >> Servo Amp Battery Procedure Replace the servo amplifier battery with the machine power on. 1 Verify that the machine's [SYSTEM ON] lamp is on. 2 Press the machine's [EMERGENCY STOP] button. WARNING Be sure to switch off the 200V power supply before beginning this procedure. 3 Identify the servo amplifier where "A.83" is displayed at LED. 4 Locate the battery in the case located at the upper front of the servo amplifier, and replace it with a new battery. CP-842E/842ME machines use the following 2 battery types in servo amplifiers • Servo amplifier capacity: 30w to 5kw Model: JZSP-BA01 • Servo amplifier capacity: 6kw, 7.5kw Model: JZSP-BA01-01 Battery Battery C746M4040 Caution:All the absolute encoder data will be lost If the old battery is removed while the servo amplifier's POWER LED is off, and another absolute encoder setup and Proper data measurement will then be required. To avoid this, be sure that the POWER LED is on before removing the old battery 5 Turn the machine power off. Reboot the machine, and verify that the "A.83" alarm has cleared. 6 Press the [READY ON] switch to turn on the motor power. If machine operation is normal, the procedure is complete. CP-842 Preliminary 6-23 Replacing Consumable Parts >> Replacing the Carrier Clamp/Unclamp Air Cylinder Packings 6.11 Replacing the Carrier Clamp/Unclamp Air Cylinder Packings Point Replace these packings if a carrier air cylinder is not working properly. Procedure WARNING Press the EMERGENCY STOP button to turn off the servo power before beginning this procedure. 1 Close the air inlet valve lever and remove the air hose. Next, gradually open the valve lever to release the air pressure. 2 Remove the 4 bolts to remove the air cylinder from the in- or out-carrier bracket. In-carrier clamp/unclamp cylinder Out-carrier clamp/unclamp cylinder In-carrier clamp/unclamp cylinder Forward limit sensor Air cylinder Out-carrier clamp/ unclamp cylinder Air hoses 3 Disconnect the air hoses and remove the forward limit sensor. Note 4 6-24 C7SM3117 Make a note of the air hose connections before disconnecting them, in order to prevent reconnecting them in the wrong positions. Loosen the locknut at the end of the piston rod (for type A cylinders), and remove the bolt. CP-842 Preliminary Replacing Consumable Parts >> Replacing the Carrier Clamp/Unclamp Air Cylinder Packings 5 Use a snap-ring pliers to remove the snap-ring from the cylinder. Bolt Piston rod Bolt Locknut Piston rod Snap-ring Rod cover Snap-ring Rod cover Air cylinder Air cylinder Type A 6 C7SM3118 Remove the piston rod, and then remove the rod cover from the piston rod. Note 7 Type B Do not force the rod cover off if it does not slide off the end of the piston rod smoothly. Remove any burrs from the beveled end with a whetstone or sandpaper. Remove the packings from the rod cover and piston rod. Rod cover Rod packing 㧔Cross-section㧕 Rod packing Code No. : H14753 Type : MYR-8 Rod cover Piston rod Piston packing 㧔Cross-section㧕 Piston rod Piston packing Code No. : H14755 Type : COP-16 Cylinder tube C7SM3119 8 Clean the rod cover, piston rod, and cylinder tube. 9 Apply Daphne Eponex No. 2 grease uniformly to the rod and piston packings, and then mounting them in the rod cover and on the piston rod. Note CP-842 Preliminary Do not damage or twist the packings when mounting them. Also, the packings are directional, so be sure to mount them in the correct orientation. 6-25 Replacing Consumable Parts >> Replacing the Carrier Clamp/Unclamp Air Cylinder Packings 10 Apply a thin layer of Daphne Eponex No. 2 grease to the piston rod and inside of the cylinder tube. Cylinder tube Piston rod C7SM3120 11 Assemble the rod cover on the piston rod, and then insert the piston rod in the cylinder tube. 12 Use a snap-ring pliers to assemble the snap-ring in the air cylinder. Note The side of the snap-ring with beveled edges faces the air cylinder. Snap-ring Snap-ring Cross-section of snap ring Air cylinder Beveled edge C7SM3121 13 Type A carrier clamp/unclamp air cylinder: Adjust the distance from the end of the piston rod to the head of the bolt and lock the locknut. Type B carrier clamp/unclamp air cylinder: Fasten the link bracket on the end of the piston rod. Type A Type B 9 mm Bolt 14 6-26 Piston rod Piston rod Locknut Air cylinder Air cylinder Bolt C7SM3122 Temporarily position the forward limit sensor. CP-842 Preliminary Replacing Consumable Parts >> Replacing the Carrier Clamp/Unclamp Air Cylinder Packings 15 Extend the piston rod, and slide the sensor until it turns ON. 16 Advance the sensor an additional 0.5 mm in the ON direction, and tighten the screw to lock the sensor in place. 0.5 mm Forward limit sensor [a] is the position where the sensor will come ON when the piston is extended. C7SM3123 17 Connect the air hoses to the air cylinder. 18 Mount the air cylinder on the carrier bracket. 19 Connect the air hose and open the valve lever fully. CP-842 Preliminary 6-27 Replacing Consumable Parts >> Replacing the Carrier Clamp/Unclamp Air Cylinder Packings MEMO: 6-28 CP-842 Preliminary Adjustments >> Station Adjustments 7. Adjustments Specialized skills and jigs are required to complete machine adjustments. Attempting adjustments without these skills and jigs may result in damage to the machine, so adjustments should only be performed by people who have received the appropriate training. 7.1 Station Adjustments 7.1.1 Tape Feed Lever (ST1) Point The pitch lever is the mechanism that advances the parts tape. The vertical movement of this lever moves the part to the pick-up position. Two sensors are located in order to check if the tape feed lever reaches the advance limit and retract limit. Tape feed lever (on machine) Retract sensor Advance sensor Tape feed lever (on feeder) Feeder C7SM4002a Rod Adjustment 1 Set the positioning jig (ADCPJ8020) in the D1 position. 2 Press [Position] - (Position) [D1-axis] - enter [1] - [OK] and the START button to move the positioning jig to station 1. 3 Press the EMERGENCY STOP button to take the 200V down to 100V. WARNING • Always be sure to cut off the 200V power before carrying out any work. • Exercise extreme caution when working on the machine if the cam is not at its origin (0 deg.). Recoil of the cam axis can endanger the operator. CP-842 Preliminary 7-1 Adjustments >> Station Adjustments 4 Use the cam handle to rotate the cam to 0°. 5 Switch the I/O (TAPE FEED SOL ON) setting ON. 6 Adjust the rod so that there is 0.5 mm clearance between the top of the positioning jig and the roller. Adjustment rod Roller 0.5 mm Positioning jig (ADCPJ8020) Positioning jig (ADCPJ8020) C73M4001b 7-2 CP-842 Preliminary Adjustments >> Station Adjustments Advance Sensor Position Adjustment 1 When the dog is at the lower limit at cam angle 200°, ensure that the sensor is ON. 2 Set a dial gauge to the roller and adjust the sensor to go off 0.5 mm above the lower limit. Dog Upper Limit Dog Dog Lower Limit 0.5 mm Advance sensor C7SM4003a Retract Sensor Position Adjustment 1 When the dog is at the upper limit at cam angle 0°, ensure that the sensor is ON. 2 Set a dial gauge to the roller and adjust the sensor to go off 0.5 mm below the upper limit. Retract sensor 0.5 mm Dog Upper Limit Dog Lower Limit Dog C7SM4004a CP-842 Preliminary 7-3 Adjustments >> Station Adjustments 7.1.2 Waste Tape Cutter (ST1) Point The waste tape cutter cuts waste tape that protrudes from feeder tips. A vacuum takes the cut tape into the waste tape box at the front side of the machine. Rotate the adjustment rod to align the movable blade with the fixed blade. Adjustment rod Fixed cutter Movable cutter Cutter lever C7SM4007a Adjustment Procedure 1 Press the EMERGENCY STOP button. This cuts the 200V servo power and leaves on only the 100V power supply. WARNING • Always be sure to cut off the 200V power before carrying out any work. • Exercise extreme caution when working on the machine if the cam is not at its origin (0 deg.). Recoil of the cam axis can endanger the operator. 2 7-4 Use the cam handle to rotate the cam to 0°. CP-842 Preliminary Adjustments >> Station Adjustments 3 Ensure that there is a gap of 0 ~ 0.5 mm between the movable cutter lower surface and the cutter unit base. Movable cutter 0~0.5 mm Cutter plate C7SM4009b 4 Use the cam handle to rotate the cam to 194°. 5 Adjust the rod so that the movable blade and fixed blade engages by 0.5 to 1.0 mm. Fixed cutter 0.5~1.0 mm Movable cutter C7SM4008a 6 Ensure that the spring length is 38 mm. 38 mm C7SM4010b CP-842 Preliminary 7-5 Adjustments >> Station Adjustments 7.1.3 Nozzle Vertical Movement During Pickup (ST1) Slider Adjustment Adjust the height of the slider to ensure that the cam follower can travel smoothly through the slider and along the cam groove. 1 Press the EMERGENCY STOP button to take the 200V down to 100V. WARNING • Always be sure to cut off the 200V power before carrying out any work. • Exercise extreme caution when working on the machine if the cam is not at its origin (0 deg.). Recoil of the cam axis can endanger the operator. 2 In order to remove the nozzle shaft assembly, it is first necessary to remove the upper clutch. Set the cam angle to zero degrees and use a spanner (DCPJ0450) to loosen the bolt on the nozzle shaft moving from station 9 to station 10. Turn the loosened bolt by hand and then remove the clutch. (see next page illustration) Caution:Remove the nozzle shaft assembly which bears either a “G” or “O” identifier seal. Operations may be complicated if other nozzle shaft assemblies are removed. 3 Remove the linear guide clampers and vacuum hose, then remove the nozzle shaft assembly. Caution:When handling the nozzle shaft assembly exercise caution to ensure that the linear guide and outer shaft do not become separated. Outer shaft Linear guide C7SM4011a 7-6 CP-842 Preliminary Adjustments >> Station Adjustments Bolt Clutch Spring Outer shaft Spanner ( DCPJ0450 ) Clamper Rotate the placing head while holding the bolt with your finger. Nozzle shaft assembly A Clamper Linear guide Vaccum hose B Caution : Washers may jump when the bolt is loosened because of the spring under the clutch. Part Bolt size A B M4 M4 Torque Nm ( Kgf¥cm ) 2 ( 20 ) 2 ( 20 ) C7SM4012a Caution:Do not disassemble the placing head assembly carelessly. Special equipment and skills are required to perform the reassembly of the placing head. Such procedures should be attempted only by users who have attended training at Fuji and are equipped with the necessary tools, or whilst under the direct guidance of a serviceman. CP-842 Preliminary 7-7 Adjustments >> Station Adjustments Rod Bracket Rod Bolt Slider Slider Dial gauge 0~0.02 mm Cam groove C7SM4013b 4 Move the area for the removed placing head to ST1, then turn on the solenoid Y031 ST1 PICKUP SOL ENGAGED. 5 Set the cam angle to 0°, and position the dial gauge as shown in the figure above. 6 Check that the distance between the cam channel on the slider and the fixed cam channel is 0 to 0.02 mm. If this range is exceeded, loosen the bolt on the rod bracket and make the required adjustments to the height of the slider. 7 Tighten the bolt whilst maintaining the height of the slider. 8 Check the distance between the cam channels again. Note: If the distance between the channels still does not fall within the range then it may be necessary to adjust the unit that controls the vertical movement of the nozzle. 9 Reattach the placing head assembly in the original location. Use the clutch alignment jig and reverse the removal procedures to attach the placing head. Caution:The nozzle shaft assembly is exclusive to the CP-842E/842ME, and cannot be used on other machine types, such as CP-733E, CP-743ME, or CP-743E. 7-8 CP-842 Preliminary Adjustments >> Station Adjustments Confirming the Pick-up Height Ensure that the nozzle descends low enough to pick up a part set in the feeder. Confirm that the mechanical valve movement creates a vacuum for part pick-up. 1 Set a W8 x P4 mm feeder (with tape leaf removed) at the D1 position. 2 Move the feeder to ST1 by pressing [Position] - (Position) [D1-axis] - enter [1] [OK] - START. 3 Check that the NZ-axis is stopping at the position specified at the "PICK UP POS. NZ" item in Proper data. 4 Push the EMERGENCY STOP button, which disables the 200V power but leaves the 100V power on. WARNING • Always be sure to cut off the 200V power before carrying out any work. • Exercise extreme caution when working on the machine if the cam is not at its origin (0 deg.). Recoil of the cam axis can endanger the operator. 5 Set the cam angle to 0 degrees, then turn the first nozzle solenoid valve on to work the cam lever. 6 Use the cam handle to rotate the cam to 170°. 7 Use a thickness gauge to ensure a space of 0.65 mm between the tip of the nozzle and the feeder (pick-up height). Nozzle 0.65 mm Feeder C7SM4014 CP-842 Preliminary 7-9 Adjustments >> Station Adjustments Adjusting the Nozzle UP Limit Sensor The sensor which detects the height of the nozzle UP/DOWN rod is mounted inside the cam box. Adjust the sensor’s mounting position so that the sensor switches ON when the nozzle is at its UP limit. 1 Press the EMERGENCY STOP button to take the 200V down to 100V. WARNING • Always be sure to cut off the 200V power before carrying out any work. • Exercise extreme caution when working on the machine if the cam is not at its origin (0 deg.). Recoil of the cam axis can endanger the operator. 2 Set the cam axis at the 0-degree position. 3 Activate the ST1 pick-up solenoid air cylinder (located in the cam box): Nozzle up limit sensor Cam lever 1ST Pick-up solenoid air cylinder Nozzle UP/DOWN rod Cam lever follows the cam axis. Cam axis 7-10 C7SM4015a CP-842 Preliminary Adjustments >> Station Adjustments 4 Place a dial gauge on the top end of the cam lever and set the gauge reading to “0”. In this condition, the cam axis will be at its 0-degree position, and the nozzle UP/DOWN rod will be at its UP limit position. Verify that the nozzle UP limit sensor is ON (X030 ST1 CYLINDER UPPER-LIMIT is ON) at the I/O screen. Nozzle up limit sensor (ON) Dog Set the dial gauge to "0" Nozzle UP/DOWN rod C7SM4016 5 While observing the dial gauge, rotate the cam axis in the forward direction to lower the nozzle UP/DOWN rod. Adjust the sensor’s mounting position so that the sensor switches OFF (X030 ST1 CYLINDER UPPER-LIMIT switches OFF) when the rod has been lowered 0.3 to 0.4 mm. Nozzle up limit sensor (OFF) Dog Nozzle UP/DOWN rod C7SM4017 6 Adjust the sensor’s mounting position by loosening the sensor lock screw and sliding the sensor in the front/back directions. Screw Nozzle up limit sensor Sensor bracket Dog C7SM4018a CP-842 Preliminary 7-11 Adjustments >> Station Adjustments 7.1.4 Mechanical Valve Switching (ST1) Point The nozzle vacuum goes from OFF to ON with the movement of the mechanical valve at station 1. Vacuum pressure for part pick-up forms inside the nozzle when the valve is open. < Spool pushed up > < Spool pushed down > Vaccum OFF Vaccum ON Vaccum Vaccum Spool Spool C7SM4019a Checking the Position of the Pin Bracket 1 Press the EMERGENCY STOP button to turn off the 200V power, leaving only the 100V power on. WARNING • Always be sure to cut off the 200V power before carrying out any work. • Exercise extreme caution when working on the machine if the cam is not at its origin (0 deg.). Recoil of the cam axis can endanger the operator. 2 Ensure that distance A (as seen in the figure below) is 8.9 mm for all heads. Use a special jig (Z9526DCPJ0371) to check this distance. Pin bracket A 8.9 mm Jig ( Z9526DCPJ0371 ) C7SM4054a 7-12 CP-842 Preliminary Adjustments >> Station Adjustments Valve Switching Lever Height Adjustment This adjustment should be performed on the reference head after completing adjustments to the vertical movement of the nozzle. (Refer to 1.4 “Nozzle Vertical Movement During Pickup” for details.) The reference head can be identified by its height. All heads are measured with spools lifted, and the lowest one is referred to as the reference head. Spool C7SM4055 1 Press the EMERGENCY STOP button to take the 200V down to 100V. WARNING • Always be sure to cut off the 200V power before carrying out any work. • Exercise extreme caution when working on the machine if the cam is not at its origin (0 deg.). Recoil of the cam axis can endanger the operator. 2 Adjust the position of the lever bracket so that the distance from the pin bracket is 12 mm. Lever bracket 12 mm Pin bracket C7SM4056 3 CP-842 Preliminary With the Y030 ST1 PICKUP SOL DISENGAGED ON, use the cam handle to rotate the cam to 170°. 7-13 Adjustments >> Station Adjustments 4 Adjust the height of the bracket so that the distance between the lever and the pin is 0.6 mm. Lever bracket 0.6 mm Pin Lever C7SM4020a 5 Return the cam angle to 0 degrees. Switch on the 1st nozzle UP/DOWN solenoid valve in order to work the cam lever. Check the servo counter to verify that the Proper data (PICK UP POS. NZ) is at the pick-up height (approx. 4000 pulse position). 6 Use the cam handle to rotate the cam to 170 degrees. 7 Ensure that the clearance of the pin from the bracket is within the range of 0.5 to 1.0 mm after the pin has been raised by the lever. Pin 0.5~1.0 mm Pin bracket Lever C7SM4021a 7-14 CP-842 Preliminary Adjustments >> Station Adjustments 7.1.5 Feeder Height Error Detection (ST1) Point To detect the positions of the feeders, two sets of sensors are used at each of the retract areas. A further pair of sensors are also used at the pickup position, bringing the total number to five. A dedicated jig is used to position these sensors. The sensitivity of the sensors must also be adjusted. Feeder check sensor (D1 retract area upper direction check) Feeder check sensor (Pickup area upper direction check) Feeder check sensor (D1 retract area lower direction check) C7SM4022a Note: This diagram shows the CP-842ME D1 arrangement, but the D2 arrangement is the same. The jig used to adjust the sensor positions is shown below. Block (DCPJ0040) Block (DCPJ0050) < For CP-842ME > Block (DGPJ5070) < For CP-842E > Block (DCPJ0060) Positioning jig body (ADCPJ8020) CP-842 Preliminary Block (DCPJ0070) C7SM4049b 7-15 Adjustments >> Station Adjustments Feeder Check Sensor Position Adjustment 1 Press the EMERGENCY STOP button to turn off the 200V power, leaving only the 100V power on. WARNING Always be sure to cut off the 200V power before carrying out any work. 2 Set the positioning jig body on a feeder pallet. 3 Use the inching keys to position the feeder pallet and bring the positioning jig body within the vicinity of the sensor in question. 4 Attach a block appropriate for each sensor within the jig and then adjust the sensor position. Pick-up Area Sensor bracket Block (DCPJ0040) C7SM4050a 7-16 CP-842 Preliminary Adjustments >> Station Adjustments D1, D2 Retract Area (Upper direction check) Inner sensor Sensor bracket Block (DCPJ0040) C7SM4050a Outer sensor <CP-842E> Block (DGPJ5070) Sensor bracket C7SM4057a <CP-842ME> Sensor bracket Block (DCPJ0050) C7SM4051a CP-842 Preliminary 7-17 Adjustments >> Station Adjustments D1, D2 Retract Area (Lower direction check) Inner sensor Block (DCPJ0060) Sensor bracket C7SM4052a Outer sensor Block (DCPJ0070) Sensor bracket C7SM4053a 7-18 CP-842 Preliminary Adjustments >> Station Adjustments Sensor Amp Adjustment Open the front cover and follow the procedures below. Feeder sensor amp Open the cover Power mode Timer mode [SET] button OFF 10ms SET 40ms TURBO FINE SUPER SET [MODE] button MODE D ON L ON [ ] button Output dip switch C7SM4023a 1 Check that the output dip switch is set to "L ON". 2 Set the power modes and timer modes as detailed below. 2-1. Press and hold down the MODE button for three seconds or more to change the display to "turb". Use the up and down arrow buttons to set the power mode to "SUPER". 2-2. Press the MODE button to change the display to "dLy". Use the up and down arrow buttons to set the timer mode to OFF. 2-3. 3 Press the MODE button again to return the display to the original state. Press the MODE button to toggle the display from the light value, to the percentage value (value + "P"), and then back to the light value. Ensure that the figures for all the sensors are above the minimum values shown below. • CP-842E Pickup area: 1000 digit (target: 2000 digit) Retract area: 30 digit (target: 100 digit) • CP-842ME Pickup area: 1000 digit (target: 2000 digit) Retract area: 100 digit (target: 300 digit) Note: The sensor should be replaced when the light reading is at approximately 4095. CP-842 Preliminary 7-19 Adjustments >> Station Adjustments Check the following items if the light reading does not reach the minimum required value. a The position of the sensor bracket. b Check that the sensor is correctly attached to the sensor bracket. c The positioning of the fiber and attachment tips. d Check whether the fiber and amp connections are correctly inserted. e Check the condition of the fiber wiring. 4 Change the display to show the percentage value by pressing the mode button to toggle the display as required. 5 Use the up and down arrow buttons to set the value to 200 where no object interrupts the sensor. Note: The arrow buttons cannot be used if the display reads 999P. In this situation, press the SET button twice to revert the display to 100P. 7-20 CP-842 Preliminary Adjustments >> Station Adjustments 7.1.6 Large Parts Check Sensor (ST2) Point The machine has a sensor at station 2 that checks for large parts (1 mm or larger in height). The machine stops immediately if no part is detected. Sensor Position Adjustment 1 Press the EMERGENCY STOP button. This cuts the 200V servo power and leaves on only the 100V power supply. WARNING • Always be sure to cut off the 200V power before carrying out any work. • Exercise extreme caution when working on the machine if the cam is not at its origin (0 deg.). Recoil of the cam axis can endanger the operator. 2 Use the cam handle to rotate the cam to 200°. 3 Adjust the sensor bracket positions so that the sensor beam goes through 0.7 ~ 0.8 mm below the nozzle tip. Use a thickness gauge etc. to ensure the sensor reaction while working. 4 Actually pick up a large part to check the sensor reaction. Adjustment bolts 2st 0.7~0.8 mm Light beam Light beam Adjustment bolts C7SM4024a CP-842 Preliminary 7-21 Adjustments >> Station Adjustments Sensor Amp Adjustment Open the front cover and follow the procedures below. Large parts check sensor amplifier Open the cover Power mode Timer mode [SET] button MODE OFF 10ms SET 40ms TURBO FINE SUPER SET [MODE] button D ON L ON [ ] button Output dip switch C7SM4025a 1 Check that the output dip switch is set to "L ON". 2 Set the power modes and timer modes as detailed below. 2-1. Press and hold down the MODE button for three seconds or more to change the display to "turb". Use the up and down arrow buttons to set the power mode to "SUPER". 2-2. Press the MODE button to change the display to "dLy". Use the up and down arrow buttons to set the timer mode to OFF. 2-3. 3 Press the MODE button again to return the display to the original state. Press the MODE button to toggle the display from the light value, to the percentage value (value + "P"), and then back to the light value. Ensure that the figures for all the sensors are above the minimum values shown below. 200 digit (target: 500 digit) Note: The sensor should be replaced when the light reading is at approximately 4095. Check the following items if the light reading does not reach the minimum required value. a The position of the sensor bracket. b Check that the sensor is correctly attached to the sensor bracket. c The positioning of the fiber and attachment tips. d Check whether the fiber and amp connections are correctly inserted. e Check the condition of the fiber wiring. 4 Change the display to show the percentage value by pressing the mode button to toggle the display as required. 5 Use the up and down arrow buttons to set the value to 200. Note: The arrow buttons cannot be used if the display reads 999P. In this situation, press the SET button twice to revert the display to 100P. 7-22 CP-842 Preliminary Adjustments >> Station Adjustments 7.1.7 Pre-theta Movement (ST2) Point Pre-theta rotates the nozzles with parts picked up at station 1 by 90°, 180° or -90° depending on the settings in the production program. Clutch Meshing Check Perform this check on the low-pressure nozzle. Note: The low-pressure nozzle refers to the placing head (out of the 16) that receives the weakest pushing pressure. Use the low-pressure nozzle for meshing checks at ST2, 8 and 10. Measure the pushing pressure at all nozzles to determine the lowest value. C7SM4058 1 Press the EMERGENCY STOP button to take the 200V down to 100V. WARNING • Always be sure to cut off the 200V power before carrying out any work. • Exercise extreme caution when working on the machine if the cam is not at its origin (0 deg.). Recoil of the cam axis can endanger the operator. 2 Set the dial gauge to the bottom of the nozzle shaft brake. 3 Use the cam handle to rotate the cam to 200°. 4 Ensure that the clutches mesh properly and the placing head assembly deflects the dial gauge by 0.30 ~ 0.35 mm as illustrated below. 2st Rod Measure the amount of push down Clutch 0.30~0.35 mm Nozzle shaft brake CP-842 Preliminary C7SM4027a 7-23 Adjustments >> Station Adjustments 7.1.8 Fine-theta Movement (ST8) Point Station 8 refers to the vision processing data at station 5 and rotates a part the remaining angle for placement. Clutch Meshing Check Perform this check on the low-pressure nozzle. Note: The low-pressure nozzle refers to the placing head (out of the 16) that receives the weakest pushing pressure. Use the low-pressure nozzle for meshing checks at ST2, 8 and 10. Measure the pushing pressure at all nozzles to determine the lowest value. C7SM4058 1 Press the EMERGENCY STOP button to take the 200V down to 100V. WARNING • Always be sure to cut off the 200V power before carrying out any work. • Exercise extreme caution when working on the machine if the cam is not at its origin (0 deg.). Recoil of the cam axis can endanger the operator. 2 Set the dial gauge to the bottom of the nozzle shaft brake. 3 Use the cam handle to rotate the cam to 200°. 4 Ensure that the clutches mesh properly and the placing head assembly deflects the dial gauge by 0.30 ~ 0.35 mm as illustrated below. 8st Rod Measure the amount of push down Clutch 0.30~0.35 mm Nozzle shaft brake C7SM4026a 7-24 CP-842 Preliminary Adjustments >> Station Adjustments 7.1.9 Nozzle Vertical Movement During Placement (ST9) Slider Adjustment Adjust the height of the slider to ensure that the cam follower can travel smoothly through the slider and along the cam groove. 1 Press the EMERGENCY STOP button to take the 200V down to 100V. WARNING • Always be sure to cut off the 200V power before carrying out any work. • Exercise extreme caution when working on the machine if the cam is not at its origin (0 deg.). Recoil of the cam axis can endanger the operator. 2 In order to remove the nozzle shaft assembly, it is first necessary to remove the upper clutch. Set the cam angle to zero degrees and use a spanner (DCPJ0450) to loosen the bolt on the nozzle shaft moving from ST9 to ST10. Turn the loosened bolt by hand and then remove the clutch. (see next page illustration) Caution:Remove the nozzle shaft assembly which bears either a “G” or “O” identifier seal. Operations may be complicated if other nozzle shaft assemblies are removed. 3 Remove the linear guide clampers and vacuum hose, then remove the nozzle shaft assembly. Caution:When handling the nozzle shaft assembly exercise caution to ensure that the linear guide and outer shaft do not become separated. Outer shaft Linear guide C7SM4011a CP-842 Preliminary 7-25 Adjustments >> Station Adjustments Bolt Clutch Spring Outer shaft Spanner ( DCPJ0450 ) Clamper Rotate the placing head while holding the bolt with your finger. Nozzle shaft assembly A Clamper Linear guide Vaccum hose B Caution : Washers may jump when the bolt is loosened because of the spring under the clutch. Part Bolt size A B M4 M4 Torque Nm ( Kgf¥cm ) 2 ( 20 ) 2 ( 20 ) C7SM4012a Caution:Do not disassemble the placing head assembly carelessly. Special equipment and skills are required to perform the reassembly of the placing head. Such procedures should be attempted only by users who have attended training at Fuji and are equipped with the necessary tools, or whilst under the direct guidance of a serviceman. 7-26 4 Move the area for the removed placing head to station 9 (0°), then turn on the solenoid (Y035 ST9 PLACE SOL ENGAGED). 5 Set the cam angle to 0°, and position the dial gauge as shown in the figure below. CP-842 Preliminary Adjustments >> Station Adjustments Adjustment bolt Rod Slider ±0.02 mm Dial gauge Cam groove C7SM4028a 6 Adjust the length of the rod using the bolt to ensure that the distance between the base of the slider and the cut out section in the cylindrical cam is within the range of ±0.02 mm. 7 Reattach the placing head assembly in the original location. Using the clutch alignment jig, reverse the removal procedures to attach the assembly. Caution:The nozzle shaft assembly is exclusive to the CP-842E/842ME, and cannot be used on other machine types, such as CP-733E, CP-743ME, or CP-743E.. CP-842 Preliminary 7-27 Adjustments >> Station Adjustments Adjusting the Nozzle UP Limit Sensors The nozzle UP limit sensor which detects the up limit position of the nozzle UP/ DOWN rod at station 9 is mounted inside the cam box. Adjust the mounting position of this sensor so that it switches ON when the nozzle is at its UP limit position. 1 Press the EMERGENCY STOP button to take the 200V down to 100V. WARNING • Always be sure to cut off the 200V power before carrying out any work. • Exercise extreme caution when working on the machine if the cam is not at its origin (0 deg.). Recoil of the cam axis can endanger the operator. 2 Set the cam axis at the 0-degree position. 3 Activate the ST9 placing solenoid air cylinder (located in the cam box): Execute the following I/O commands: [Maintenance] - [I/O Check] - [Standard I/ O] - [Y035 ST9 PLACE SOL ENGAGED] - [Output Signal ON] The cam lever will then follow the cam axis. Nozzle up limit sensor Cam lever Nozzle down limit sensor 9ST Place solenoid air cylinder Nozzle UP/DOWN rod Cam axis 7-28 Cam lever follows the cam axis. C7SM4029a CP-842 Preliminary Adjustments >> Station Adjustments 4 Place a dial gauge on the top end of the cam lever and set the gauge reading to “0”. In this condition, the cam axis will be at its 0-degree position, and the nozzle UP/DOWN rod will be at its UP limit position. Verify that the nozzle UP limit sensor is ON (X032 ST9 CYLINDER UPPER LIMIT is ON). Nozzle up limit sensor (ON) Dog Set the dial gauge to "0" Nozzle UP/DOWN rod C7SM4030 5 While observing the dial gauge, rotate the cam axis in the forward direction to lower the nozzle UP/DOWN rod. Adjust the sensor’s mounting position so that the sensor switches OFF (X032 ST9 CYLINDER UPPER-LIMIT switches OFF) when the rod has been lowered 0.3 to 0.4 mm. Nozzle up limit sensor (OFF) Dog Rod lowered 0.3 to 0.4 mm Nozzle Up/Down rod C7SM4031 Adjust the sensor’s mounting position by loosening the sensor lock screw and sliding the sensor in the front/back directions. Screw Nozzle up limit sensor Dog C7SM4032 CP-842 Preliminary 7-29 Adjustments >> Station Adjustments Adjusting the Nozzle DOWN Limit Sensors The nozzle DOWN limit sensor which detects the down limit position of the nozzle UP/ DOWN rod is mounted inside the cam box. Adjust the mounting position of this sensor so that it switches ON when the nozzle is at its DOWN limit position. Note: When performing the DOWN limit sensor adjustment after the UP limit sensor adjustment, remove the dial gauge from the machine to avoid interference between the dial gauge and the cam lever. 1 Press the EMERGENCY STOP button to take 200V down to 100V. WARNING • Always be sure to cut off the 200V power before carrying out any work. • Exercise extreme caution when working on the machine if the cam is not at its origin (0 deg.). Recoil of the cam axis can endanger the operator. 2 Set the cam axis at the 0-degree position. 3 Activate the ST9 placing solenoid air cylinder (located in the cam box): Execute the following I/O commands: [Maintenance] - [I/O Check] - [Standard I/ O] - [Y035 ST9 PLACE SOL ENGAGED] - [Output Signal ON] The cam lever will then follow the cam axis. Nozzle up limit sensor Cam lever Nozzle down limit sensor 9ST Place solenoid air cylinder Nozzle UP/DOWN rod Cam axis 7-30 Cam lever follows the cam axis. C7SM4029a CP-842 Preliminary Adjustments >> Station Adjustments 4 Use the cam handle to rotate the cam to 190°. 5 Place a dial gauge on the top end of the cam lever and set the gauge reading to “0”. In this condition, the nozzle UP/DOWN rod will be at its DOWN limit position. Verify that the nozzle DOWN limit sensor is ON (X033 ST9 CYLINDER LOWER-LIMIT is ON) at the I/O screen. Dog Nozzle down limit sensor (ON) Set the dial gauge to "0". Nozzle UP/DOWN rod C7SM4033 6 While observing the dial gauge, rotate the cam axis in the forward direction to raise the nozzle UP/DOWN rod. Adjust the sensor’s mounting position so that the sensor switches OFF (X033 ST9 CYLINDER LOWER-LIMIT switches OFF) when the rod has been raised 0.3 to 0.4 mm. Dog Nozzle down limit sensor (OFF) Rod raised 0.3 to 0.4 mm. Nozzle UP/DOWN rod C7SM4034 Adjust the sensor’s mounting position by loosening the sensor lock screw and sliding the sensor in the front/back directions. Screw Nozzle down limit sensor Dog C7SM4035 CP-842 Preliminary 7-31 Adjustments >> Station Adjustments 7.1.10 Mechanical Valve Switching (ST9) Point The nozzle vacuum goes from ON to OFF with the movement of the mechanical valve at station 9. Vacuum pressure inside the nozzle is released for part placement when the valve closes. Ensure the part is placed on the production board. <Spool pushed down> <Spool pushed up> Vaccum ON Vaccum OFF Vaccum Vaccum Spool Spool C7SM4036a Checking the Position of the Pin Bracket 1 Press the EMERGENCY STOP button to turn off the 200V power, leaving only the 100V power on. WARNING • Always be sure to cut off the 200V power before carrying out any work. • Exercise extreme caution when working on the machine if the cam is not at its origin (0 deg.). Recoil of the cam axis can endanger the operator. 2 Ensure that distance A (as seen in the figure below) is 8.9 mm for all heads. Use a special jig (Z9526DCPJ0371) to check this distance. Pin bracket A 8.9 mm Jig ( Z9526DCPJ0371 ) C7SM4054a 7-32 CP-842 Preliminary Adjustments >> Station Adjustments Valve Switching Lever Height Adjustment This adjustment should be performed on the reference head after completing adjustments to the vertical movement of the nozzle. (Refer to 7.1.9 “Nozzle Vertical Movement During Placement” for details.) The reference head can be identified by its height. All heads are measured with spools lifted, and the lowest one is referred to as the reference head. Spool C7SM4055 1 Press the EMERGENCY STOP button to take the 200V down to 100V. WARNING • Always be sure to cut off the 200V power before carrying out any work. • Exercise extreme caution when working on the machine if the cam is not at its origin (0 deg.). Recoil of the cam axis can endanger the operator. 2 Set the cam angle to 0°, then activate the place solenoid (Y035 ST9 PLACE SOL ENGAGED) at station 9 to work the lever. 3 Use the cam handle to rotate the cam to 190°. CP-842 Preliminary 7-33 Adjustments >> Station Adjustments 4 Loosen the mounting bolts shown in the figure below, then adjust the lever height until there is a 1.9 mm gap (use a thickness gauge) between the bottom of the mechanical valve and the lever. At this stage, the spring pusher is pressed down 0.1 mm. Mounting bolts Mechanical valve 1.9 mm Speed regulator Lever 1.9 mm Pusher 0.1 mm C7SM4037a Note: Do not touch the speed regulator. The blow air pressure is set to 15.0 ± 0.5 kPa (ST13: 7.0 ± 0.5 kPa). The user should not change the setting, as a manometer is required for the adjustment. 7-34 CP-842 Preliminary Adjustments >> Station Adjustments 7.1.11 Reverse-theta Mechanism (ST10) Point This mechanism reverses the nozzle rotation which occurred at the station 9 part placement. The nozzle is returned from that part placement angle by the amount of rotation which occurred at stations 2 and 8. Clutch Meshing Check Perform this check on the low-pressure nozzle. Note: The low-pressure nozzle refers to the placing head (out of the 16) that receives the weakest pushing pressure. Use the low-pressure nozzle for meshing checks at ST2, 8 and 10. Measure the pushing pressure at all nozzles to determine the lowest value. C7SM4058 1 Press the EMERGENCY STOP button to take the 200V down to 100V. WARNING • Always be sure to cut off the 200V power before carrying out any work. • Exercise extreme caution when working on the machine if the cam is not at its origin (0 deg.). Recoil of the cam axis can endanger the operator. 2 Set the cam angle to 0 degrees, then turn the ST10 solenoid valve on to work the cam lever. 3 Set the dial gauge to the bottom of the nozzle shaft brake. 4 Use the cam handle to rotate the cam to 200°. 5 Ensure that the clutches mesh properly and the placing head assembly deflects the dial gauge by 0.30 ~ 0.35 mm as illustrated below. 10st Rod Measure the amount of push down Clutch 0.30~0.35 mm Nozzle shaft brake CP-842 Preliminary C7SM4038a 7-35 Adjustments >> Station Adjustments Clutch Meshing Check Sensor Position Adjustment 1 Press the EMERGENCY STOP button to take the 200V down to 100V. WARNING • Always be sure to cut off the 200V power before carrying out any work. • Exercise extreme caution when working on the machine if the cam is not at its origin (0 deg.). Recoil of the cam axis can endanger the operator. 2 Use the cam handle to rotate the cam to 200°. 3 Execute inching to align the RQ-axis with the RQ-data position. 4 Make sure the clutches engage properly. Adjust the height of Bracket A so that Gap C in the figure is 0.2 mm. 5 At this position, adjust the position of Bracket B so that the sensor beam hits the hole on the dog. Clutch 0.2 mm C Bracket B Dog Bracket A 7-36 C7SM4039a CP-842 Preliminary Adjustments >> Station Adjustments Clutch Meshing Check Sensor Amp Adjustment Adjust the sensor amp so that it goes off when the clutches mesh properly and it goes on when the clutches do not mesh properly and the dog is pushed down. Remove the cover of the amp and follow the procedures below. Note: Be careful not to drop the cover inside the machine. 1 Set the setting switch to “D ON”. 2 Set the mode selector switch to “SET”. The digital display will then indicate “1”. 3 With the clutch engagement sensor on (sensor is detecting the hole in the dog), press the [TUNING] button. The digital display will then indicate “2”. 4 With the clutch engagement sensor off (sensor is not detecting the hole in the dog), press the [TUNING] button. The digital display will then indicate “9”. 5 Set the mode selector switch to “RUN”. 6 After completing the amplifier setting procedure, verify that the digital display indicates 0 ~ 1 when the sensor is on, and 8 ~ 9 at all other times. (1) (2) (3) (4) (5) S O S O S O S O S O DELAY DELAY DELAY DELAY DELAY TUNING TUNING TUNING TUNING TUNING SET D ON SET D ON SET D ON SET D ON SET D ON RUN L ON RUN L ON RUN L ON RUN L ON RUN L ON Sensor ON Sensor OFF C7SM4040 CP-842 Preliminary 7-37 Adjustments >> Station Adjustments 7.1.12 Mechanical Valve Switching (ST13) Point The station 13 mechanical valve is used to switch the vacuum off inside the nozzle. This releases the negative pressure in the nozzle, and the nozzle can no longer hold a part. Verify that parts which fail vision processing are discarded at station 13. C7SM4041a Valve Switching Unit Position Adjustment This adjustment should be performed on the high valve head after completing adjustments to the vertical movement of the nozzle during the placement (Refer to 7.1.9 “Nozzle Vertical Movement During Placement” for details). The high valve head can be identified by its height. The heights of the spool lower surface are measured for all placing heads with spools lifted, and the highest one is referred to as the high valve head. Spool C7SM4055 7-38 CP-842 Preliminary Adjustments >> Station Adjustments 1 Press the EMERGENCY STOP button to take the 200V down to 100V. WARNING • Always be sure to cut off the 200V power before carrying out any work. • Exercise extreme caution when working on the machine if the cam is not at its origin (0 deg.). Recoil of the cam axis can endanger the operator. 2 Use an inching operation and move the high valve head to ST12. 3 Attach the centering jig to the mechanical valve of the high valve head. Centering jig Z9627DGPJ0110 Spacer Mechanical valve Bolt t = 0.2 mm C7SM4066 Note: Put the 0.2 mm spacer between the fixing bolt and the mechanical valve in order to avoid any scratch to the mechanical valve. 4 Move the high valve head to station 13. 5 Use the cam handle to rotate the cam to the following cam angles:190° Make sure that the pusher is inserted smoothly to the hole at the bottom of the centering jig. If not, loosen the fixing bolts and adjust the position of the valve switching unit. Fixing bolt Centering jig Pusher Valve switching unit 6 CP-842 Preliminary C7SM4067 Return the cam to 0°, and then detach the centering jig from the mechanical valve. 7-39 Adjustments >> Station Adjustments 7 Use the cam handle to rotate the cam to the following cam angles:190° Loosen the fixing bolts, then adjust the height of the valve switching unit by turning the height adjustment bolt so that the gap between the bottom of the mechanical valve and the top surface of the pusher bracket becomes 1.7 mm Speed regulator Mechanical valve Pusher bracket Fixing bolt 1.7 mm Adjustment bolt C7SM4042b Note: Do not touch the speed regulator. The blow air pressure is set to 7.0 ± 0.5 kPa (ST9: 15.0 ± 0.5 kPa). The user should not change the setting, as a manometer is required for the adjustment. 7-40 CP-842 Preliminary Adjustments >> Station Adjustments 7.1.13 Nozzle Change Function (ST14) Point The station 14 nozzle changer selects from among nozzle numbers 1-6, based on the part data. Nozzle Change Clutch Position Adjustment 1 Press the EMERGENCY STOP button to take the 200V down to 100V. WARNING • Always be sure to cut off the 200V power before carrying out any work. • Exercise extreme caution when working on the machine if the cam is not at its origin (0 deg.). Recoil of the cam axis can endanger the operator. 2 Detach the rod end from the nozzle changer. Rod end C7SM4064 3 Remove the nozzle holders of the reference head and the neighboring heads. 4 Use an inching operation and move the reference head to ST14. 5 Use the cam handle to rotate the cam to 200°. CP-842 Preliminary 7-41 Adjustments >> Station Adjustments 6 Attach the adjustment jig to the placing heads at ST14 and 15. ST14 ST15 Adjustment jig ADCPJ8040 C7SM4063 Note: Do not turn the cam with the jig attached to the placing heads; otherwise the heads might be damaged. 7 Loosen the fixing bolts and adjust the clutch position so that it can be smoothly inserted to the cavity of the jig block. Fixing bolt Bracket Bracket Fixing bolt Clutch Adjustment jig C7SM4065 7-42 CP-842 Preliminary Adjustments >> Station Adjustments Nozzle Change Stroke Adjustment 1 Press the EMERGENCY STOP button to take the 200V down to 100V. WARNING • Always be sure to cut off the 200V power before carrying out any work. • Exercise extreme caution when working on the machine if the cam is not at its origin (0 deg.). Recoil of the cam axis can endanger the operator. 2 Position the cam at an angle of 0° and turn the ST14 solenoid to ON (Y037 ST14 NOZZLE CHANGE SOL ENGAGED) to activate the cam lever. 3 Use the cam handle to rotate the cam to 141°. 4 Verify that the nozzle change clutch is engaged with the holder clutch, and that the rotary holder is pushed 0.01 to 0.05 mm as shown in the figure below. 5 If the push amount is outside this range, adjust by turning the adjusting rod. ST14 Adjustment rod Rotary holder 0.01~0.05 mm Nozzle change clutch Holder clutch CP-842 Preliminary C7SM4048 7-43 Adjustments >> Station Adjustments 7.1.14 Nozzle Detection Sensor (ST15) Point Station 15 uses three nozzle detection sensors to detect which of the six nozzles (No. 1 ~ 6) is pointing straight down. The following illustration shows the location of each sensor. Sensor 1 Sensor 2 Sensor 3 Dog Sensor C7SM4043b Sensor Position Adjustment 1 Press the EMERGENCY STOP button to take the 200V down to 100V. WARNING • Always be sure to cut off the 200V power before carrying out any work. • Exercise extreme caution when working on the machine if the cam is not at its origin (0 deg.). Recoil of the cam axis can endanger the operator. 2 Remove the nozzle holders of the reference head and the neighboring heads. 3 Use an inching operation and move the reference head to ST13. 4 Use the cam handle to rotate the cam to 200°. 5 Detach the reject parts brush. Reject parts brush C7SM4059a 7-44 CP-842 Preliminary Adjustments >> Station Adjustments 6 Attach the adjustment jig (for ST15) to the placing heads at ST15 and 16. ST15 ST16 Adjustment jig ADGPJ8050 For ST15 (For ST13) C7SM4062 Note: Do not turn the cam with the jig attached to the placing heads; otherwise the heads might be damaged. 7 Adjust the sensor bracket position so that it can be smoothly inserted to the cavity of the jig block. Jig block Sensor bracket Jig block C7SM4061 CP-842 Preliminary 7-45 Adjustments >> Station Adjustments Checking the Sensor Reaction 1 Press the EMERGENCY STOP button to take the 200V down to 100V. WARNING • Always be sure to cut off the 200V power before carrying out any work. • Exercise extreme caution when working on the machine if the cam is not at its origin (0 deg.). Recoil of the cam axis can endanger the operator. 2 Manually rotate the rotary holder to select nozzle No. 6. At this time, the sensor reactions should be the same as shown below. Rotary holder Digital display 0, 1 = Sensor OFF 8, 9 = Sensor ON 3 2 4 Sensor 3 ON 1 5 13ST 6 Sensor 1 ON Nozzle 3 Sensor 2 OFF 1 2 Sensor No. 3 Amp front view C7SM4044a Rotate the rotary holder to select nozzle No. 2. At this time, the sensor reactions should be the same as shown below. Rotary holder Digital display 0, 1 = Sensor OFF 8, 9 = Sensor ON 5 4 6 Sensor 3 OFF 3 1 13ST 2 Nozzle 7-46 Sensor 1 OFF Sensor 2 ON 1 2 3 Amp front view Sensor No. C7SM4045a CP-842 Preliminary Adjustments >> Station Adjustments 4 CP-842 Preliminary Ensure that the sensors display for the other nozzles as shown below. Sensor 1 Sensor 2 Sensor 3 Nozzle 1 ON OFF OFF Nozzle 2 OFF ON OFF Nozzle 3 OFF OFF ON Nozzle 4 ON ON OFF Nozzle 5 OFF ON ON Nozzle 6 ON OFF ON Digital display 0,1 = Sensor OFF 8,9 = Sensor ON T001 7-47 Adjustments >> Station Adjustments Sensor Sensitivity Adjustment Red LED Green LED S O DELAY TUNING Mode changing switch SET D-ON Digital display Tuner L-ON/D-ON switch RUN L-ON HPY-T1 C7SM4046 Remove the cover of the amp and follow the procedures below to adjust the sensor amp. Note: Be careful not to drop the cover inside the machine. Set the L-ON/D-ON switch to L-ON for the nozzle detection sensor. SET RUN (1) (2) (3) (4) C7SM4047a 1 Move the amplifier's mode change switch to the "SET" position. 2 Rotate the nozzle holder until the sensor light beam is adjacent to a dark part of the dog and press "TUNING". 3 Rotate the nozzle holder until the sensor light beam is adjacent to a metal part of the dog and press "TUNING". 4 Return the amplifier's mode changing switch to the "RUN" position. At this time the sensitivity of the sensor can be checked on the digital display. Digital display : 0 ~ 1: Stable interruption range 8 ~ 9: Stable light input range If the display is within the stable range, setting is complete. 5 If the display is not within the stable range, check the items below and make the necessary adjustments. • Check the connections between the amplifier and the fiber optic cable. • Check the position of the sensor. 7-48 CP-842 Preliminary Adjustments >> Servo Amplifier Adjustments 7.2 Servo Amplifier Adjustments Required Tools Required Tools:1 Digital Operator 7.2.1 Servo amplifier parameters 1 Connect the Digital Operator cable to the servo amplifier to be adjusted (CN-3 connector). Z-axis <CP-842E> Y-axis CP-8 LED panel 42E Connector (CN3) LED panel Rθ-axis NC-axis Fθ-axis Pθ-axis NZ-axis (1) (2) (3) (4) Connector (CN3) D1-axis LED panel (1) Connector (CN3) CP-842 Preliminary D2-axis (2) X-axis (3) Cam-axis (4) C7SM4071 7-49 Adjustments >> Servo Amplifier Adjustments Z-axis <CP-842ME> Y-axis LED panel CP-8 42M E Connector (CN3) Rθ-axis LED panel NC-axis Fθ-axis Pθ-axis NZ-axis (1) (2) (3) Connector (CN3) (4) D1-axis LED panel (1) Connector (CN3) 7-50 D2-axis (2) X-axis (3) Cam-axis (4) C7SM4070 CP-842 Preliminary Adjustments >> Servo Amplifier Adjustments 2 Press the [DSPL/SET] button on the Digital Operator until “PN-00” is displayed by the LED indicator. 3 The parameter type can be changed by pressing the Up or Down arrow key. 4 When the desired parameter is displayed, press the [DATA/ENTER] button and check the current setting. Note: Contact Fuji if any of the displayed parameters differ from those indicated in the servo parameter sheet. Do not change the parameter settings unless otherwise instructed. Servo Pack Reset Alarm Reset JOG SVON Digital Operator Jusp-0p02A DSPL SET DATA ENTER Yaskawa QP3M4008Ea 5 CP-842 Preliminary After confirming the parameter setting, press the [DSPL/SET] button to return to the “PN-XX” display. Repeat steps 3 to 5 to check all the parameters. 7-51 Adjustments >> Servo Amplifier Adjustments 7.2.2 Resetting servo errors Servo errors that cannot be reset using commands at the machine can be reset by connecting the digital operator to the applicable servo amplifier and pressing the [Alarm Reset] button. Servo alarm codes When a servo amplifier error occurs, you can view the alarm code by connecting the digital operator to the applicable amplifier. For further details regarding alarm codes, see Chapter 2 “2.2. Alarm Codes and Troubleshooting Check List.” Servo alarm code history It is possible to view previous alarm codes, either by using the digital operator or by using the indicator panel on the servo amplifier, as follows. Using the digital operator 1 Connect the Digital Operator cable to the applicable servo amplifier (CN-3 connector). 2 Press [DSPL/SET]- [DATA ENTER] to display the alarm code at the LED indicator. Alarm sequence number Alarm code The alarm sequence number is displayed in ascending order, starting with the most recent alarm code 3 QP3M4022E It is possible to scroll through the alarm sequences by pressing the Up or Down arrow key. Using the indicator panel on the servo amplifier 7-52 1 Press the [MODE/SET] button, and then press and hold the [DATA/SHIFT] button for at least one second to display previous alarm codes. 2 It is possible to scroll through the alarm sequences by pressing the Up or Down arrow key. (The alarm sequence number (at the left side of the code) is displayed in ascending order, starting with the most recent alarm code.) CP-842 Preliminary Troubleshooting >> Troubleshooting Table 8. Troubleshooting 8.1 Troubleshooting Table Point This chapter describes troubleshooting measures for problems which may occur during production. Separate troubleshooting tables are provided for each type of problem. When a problem occurs, begin by identifying the appropriate table for the problem in question, then refer to the "Cause" column of that table to find the problem cause. After locating the cause, refer to the "Remedy" and "Remarks" columns to the right of that item for details regarding appropriate corrective actions. The "Ref. Page" column at the far right of the table indicates reference material (manuals, etc.) chapter numbers where information is given regarding the procedure in question. The following alphabetic codes are used in the "Ref. Page" column to indicate the various reference materials: CP-842 Preliminary M: CP-842E/842ME Mechanical Reference (MEC-CP842-Preliminary) S: CP-842E/842ME System Reference (SYS-CP842-Preliminary) T: FujiCam Tutorial Manual (EKEN301*) U: F4G User's Manual (ELEN013*) FM: CP Feeders Mechanical Reference (MEC-CPFDR-*.*E) FJ: CP Tape Feeder Jig Instruction Manual (INS-CPFJG-*.*E) SG: Feeder Setup Guide (GDE-FEEDER-*.*E) PG: WC Feeder Pickup Position Adjustment Guide (GDE-PKUPT-*.*E) 8-1 Troubleshooting >> Troubleshooting Table 8.1.1 Poor Placing Accuracy No. 1-1 Cause Setting error in Part data. Remedy Remarks Ref. Page Specify the appropriate nozzle size and Unsuitable nozzle size, part weight, and cam speed, etc., settings can result in an cam speed settings using the Tech insufficient holding force when handling Report issued by Fuji as a reference. parts, causing nozzle and part slippage. The Fuji Tech Report is meant for reference purposes only. The recommended cam speed may be different even if the part shap is the same. If accuracy deviations or defects are An unsuitable XY table speed can apply a occurring for a specific part, decrease force which exceeds the holding capacity of the XY table speed setting in the Part the part's solder, resulting in position data where the problem is occurring. deviations. Solder adhesion decreases when it dries. Therefore, the sooner placement occurs after printing, the better. "Missing parts" conditions may occur if there Check for errors in the part height is an error in the part height information, or information. in the table reference height Proper data. Fuji recommends actually measuring the part height, and entering the measured value in Part data. T: Part 3, Lesson 2 "2.1.3" U: Part 2 Chapt 4 "Nozzle" "Speed" T: Part 3 Lesson 2 "2.1.3" U: Part 2 Chapt 4 "Speed" T: Part 3 Lesson 2 "2.1.1" U: Part 2 Chapt 4 "Appearance" (1) Use the nozzle check command to A bent or stuck nozzle will make it impossible M: Sect 6.1 check for bent nozzles. to place parts properly. (2) Verify that the nozzle spring-back motion is smooth. 1-2 Defective nozzle (3) Verify that the nozzle is not clogged. If a problem is found with any of the above, replace the nozzle. 1-3 1-4 1-5 Improper placement height Vacuum break problem Check the backup pin heights, quantity, A misalignment between the ST9 nozzle M: Sect 4.1 down limit and the panel height can prevent and configuration, and verify that the the part from being pressed onto the board panel is flat. properly, and it may become impossible to maintain accuracy. Note: Machine adjustments can be performed Check for a problem with the Proper only by those with a Level 3 training. data Z0 (0.3 mm push in). Check for the reference and followup rails' flatness problem. Note: Machine adjustments can be performed only by those with a Level 3 training. Replace mechanical valves where the spool motion is not smooth. Adjust the vacuum break lever position and the speed controller. A malfunctioning vacuum break may affect placing accuracy. Verify that the machine base is level (if not, level it). Failure to level the machine base after the M:Sect 9.1 machine has been moved, etc., can affect the XY-table flatness, making the current Prope data settings unsuitable. Problem after machine status Measure the X0/Y0 and camera change. resolution. M:Sect 7.1.4 Note: Machine adjustments can be performed only by those with a Level 3 training. Perform a calibration using a PAM part. 1-6 Printing conditions problems. 1-7 Reflow conditions problems. Check the solder condition after printing. The solder printing condition or dryness can cause part deviations during board conveyance, or can affect the self-alignment at reflow operations. Solder adhesion weakens when the solder dries. Therefore, the sooner placement occurs after printing, the better. Improper reflow conditions can cause selfCheck the reflow temperature profile. alignments and tombstoning. Provide a profile in which the temperature is increased evenly over the entire board. If the solder's melting speed differs from point to point, parts will be pulled toward the solder which melts first. C746M5TO1 8-2 CP-842 Preliminary Troubleshooting >> Troubleshooting Table 8.1.2 Pickup Errors No. Cause Remedy Set the top film correctly. Remarks Take-up will be abnormal if the top film is not set correctly. Ref. Page FM: Part 2 Chapt 1 FM: Supplement (Point) The top-film is not being peeled off at FM: Part 2 The top-film is not being peeled off at the pickup point. Peel off the top-film Chapt 1 the pickup point. Peel off the top-film and verify that the take-up roller and and verify that the reel are set take-up roller and reel are set correctly. correctly. Clean the tape leaf slit. Feeder top-film Clean the inside of the take-up roller. 2-1 does is not taken up correctly. If the take-up spring is deformed, replace it. A clogged tape leaf slit can back up the top- FM: Part 3 film and prevent proper take-up. Chapt 2 "2.2" Take-up resistance increases if the take-up roller fails to rotate smoothly. FM: Part 3 Chapt 2 "2.4" A deformed take-up spring reduces the take- FM: Supplement "Replacement" up force. Check the take-up reel's reversedirection torque. If clearly low, replace the take-up reel. An excessively low reverse-direction torque will reduce the take-up force. FM: Part 3 Chapt 4 "4.8" If the take-up reel or aluminum bracket is deformed, replace it. Damage may occur or take-up may not be correct if the take-up reel or aluminum bracket is bent. This may also interfere with surrounding feeders. FM: Part 3 Chapt 5 "5.5", "5.7" 1. Check the tape and feeder feed pitches, and set the tape on the correct feeder. 2. Use a tape leaf which is suitable for the nozzle. 1.An incorrect tape and feeder width or feed FM: Part 2 pitch will prevent parts from being fed to Chapt 2 the proper position. 2.A tape leaf which is unsuitable for the nozzle size will cause parts to spring off the tape. Set the tape leaf lock securely. An incorrectly set tape leaf lock will cause FM: Part 2 the tape leaf to lift, resulting in part Chapt 5 "5.2" tombstoning and parts springing off the tape. Clean away parts and dust, etc., which have adhered to the tape leaf. Parts and dust, etc., adhering to the inside of the tape leaf will prevent the tape from being pressed properly. Air-blow the tape leaf before setting a tape. 2-2 Feeder set improperly FM: Part 3 Chapt 2 "2.2" Replace the tape leaf if it is deformed or A deformed tape leaf will cause part FM: Part 3 tombstoning and parts springing off the tape. if it is not flat. Chapt 5 "5.1" Set the tape correctly. Tape feed resistance increases if the tape is FM: Part 2 not set properly in the feeder. Chapt 1 Clean away parts which are embedded in the sprocket and stopper. Parts which are embedded in the sprocket and stopper can prevent tape feed. FM: Part 3 Chapt 2 "2.1" An incorrect feed lever height will prevent a proper tapefeed stroke, and may disable tape feed. FM: Part 3 Chapt 4 "4.9" Chapt 5 "5.3" 2-3 Improper feeder 1) Check the feed lever height and the tape feed. feed movement. 2) When link assembly is deformed replace any deformed parts. Replace the reel holder if it is bent. The parts reel will not rotate correctly if the reel holder is bent. C746M5TO2 CP-842 Preliminary 8-3 Troubleshooting >> Troubleshooting Table No. Cause Remedy Check the pickup offset (X,Z) setting in Part data. Clean away parts and dust, etc., which have adhered to the device table and feeder tape leaf. Clean away parts and dust, etc., which have adhered to the ratchet. Deviation between the Use a grinder to flatten the gouges in 2-4 feeder and the feeder's L-guide. machine pickup position. Adjust the pickup position. Remarks Ref. Page T: Part 3 Lesson 2 "2.1.3" U: Part 2 Chapt 4 "Carrying" The presence of parts or foreign matter, etc., FM: Part 3 on the device table or on the feeder's L-guide Chapt 2 "2.3" can prevent the feeder from being set in the correct position. Parts which have adhered to the ratchet can FM: Part 3 Chapt 2 "2.1" cause pickup position deviations at regular intervals. Air-blow the ratchet area before etting the tape. Gouges in the feeder's L-guide can prevent the feeder from being set in the correct position. FM: Part 3 Chapt 7 Pickup position deviations may occur after prolonged feeder use. Check the pickup posiiton periodically. Lubricate the ratchet area. Failure to lubricate can result in ratchet and stopper wear which will cause pickup position deviations. DT-651(E) Digitizer with Image Processing Instruction Manual FM: Part 3 Chapt 4 "4.9" FM: Part 3 Chapt 4 "4.11" M:Sect7.1.3 Adjust the ST1 pickup height. Measure the part height sensor's nozzle An unsuitable reference value will result in an automatic offset of the pickup height. height reference value. Note: Machine adjustments can be performed only by those with a Level 3 training. 1) Use the nozzle check command to check for bent nozzles. 2) Verify that the nozzle spring-back motion is smooth. 2-5 Defective nozzle. 3) Verify that the nozzle is not clogged. If a problem is found with any of the above, replace the nozzle. · A bent nozzle will cause pickup position M:Sect 6.1 deviations, and may prevent pickup from occurring properly. · A stuck nozzle cannot reach the part, making pickup impossible. · A clogged nozzle will have a lower vacuum force, and may prevent pickup from occurring properly. A low vacuum force may prevent parts from Ensure that the pressure value on the vacuum pump displays at most -40kPa. being pick up properly. Replace the pump parts if the value fails to reach the prescribed range. M:Sect 6.7 Replace mechanical valves where the spool motion is not smooth. Poor spool motion can prevent parts from being picked up properly. M:Sect 7.1.4 Cracks in hoses can prevent parts from being picked up properly. M:Sect 6.9 2-6 Vacuum force is Check the connection of the hose too low. between the vacuum pump and the index unit. Check the hose between the vacuum pump and the index unit. The ST1 feeder's Reset the ST1 feeder's feed lever. 2-7 feed lever has been tripped. C746M5TO3 8-4 CP-842 Preliminary Troubleshooting >> Troubleshooting Table 8.1.3 Vision Processing Errors No. Cause Remedy Replace the error part with the correct part type. Part size is 3-1 different from Part Data setting value. Enter the correct (error part's) part size, part height, lead pitch, etc., settings in Part data. Remarks This error occurs because the part information set in Part data is different from the part on the machine. Ref. Page T: Part 3 Lesson 2 "2.1.1", "2.1.2" U: Part 2 Chapt 4 "Appearance", "[Element] window" Check production information to see if a If the problem is being caused by a soiled M:Sect 5.1.4 nozzle, the vision processing error will occur :Sect 6.1 specific nozzle is causing the vision Nozzle is soiled. :Sect 6.2 processing errors. If so, clean/replace only when that soiled nozzle is used. that nozzle, or replace its reflective seal. Check for dust, etc., around the If the prism box surface is soiled, vision displayed image of the part causing the processing errors will occur for almost all Prism box vision processing error, the wipe the parts. surface is soiled. prism box surface clean with a dry cloth or cotton swab. 3-2 3-3 Measure the size of the part where The part size is frequent errors are occurring, then enter slightly different this correct size in Part data. from the Part data setting. M:Sect 5.1.5 Frequent vision processing errors may be T: Part 3 caused by slight differences between the Lesson 2 "2.1.1" actual part dimensions and the dimension settings. In such cases, measure the actual U: Part 2 Chapt 4 part, and enter those dimensions as the "Appearance" settings. Parts are not Refer to item 2 (Pickup Errors). being picked up. C746M5T03 CP-842 Preliminary 8-5 Troubleshooting >> Troubleshooting Table 8.1.4 Panel Conveyance Related Errors · Most panel conveyance errors are caused by sensor problems. As a rule, these errors occur due to one of the following 6 causes. After checking the machine's error display content, check the following items at the sensor in question. (1) Panel detection problem. (2) Sensor beam emitter is aimed at a notched area of the panel. (3) Sensor beam emitter is soiled (foreign matter is present). (4) Sensor has failed. (5) Disconnected/severed cable, etc. (6) I/O board and I/O terminal board malfunction. · As a malfunctioning actuator may be responsible for problems with sensors which detect the cylinder actuator stroke end, etc., item (7) shown below should also be checked. (7) Sensor detection problem caused by malfunctioning cylinder, etc. No. Cause Remedy Remarks (1) Check whether the panel is being clamped correctly. In-carrier panel (2) Check the following sensors for problems (1) - (6) (described above). 4-1 conveyance error In-carrier advance limit panel check (1) XOB1 (1) Check the following sensor for problems (3) - (6) (see above). In-carrier advance limit check In-carrier 4-2 advance limit error XOB3 (2) Check the in-carrier conveyance cylinder for problem (7) (see above). Ref. Page M:Sect 3.3 XOB1 or XOB2 panel sensor fails to switch on at carrier advance limit even though a panel has been loaded from the in-lifter. Or, panel has been conveyed from the in-carrier to the XY-table, but the X0B1 or XOB2 panel sensor fails to switch off. In-carrier was advanced, but the incarrier advance limit sensor failed to switch on. M:Sect 3.3 In-carrier may not be moving all the way to its motion limit position. S:Sect 3.1 In-carrier was conveyed, but the incarrier advance limit or retract limit sensor failed to switch on. An in-carrier cycle error occurs if the advance limit or retract limit sensor fails to switch on within 8 seconds. M:Sect 3.3 In-carrier may not be moving all the way to its motion limit position. S:Sect 3.1 Execute the following commands to see if the carrier can be moved to its motion limit position: [Panel Loader]-[Loader Maintenance]-[In-side][Carrier Extend/Carrier Retract]-[START]. (1) Check the following sensor for problems (3) - (6) (see above). In-carrier advance limit check In-carrier retract limit check XOB3 XOB4 4-3 In-carrier cycle (2) Check the in-carrier conveyance cylinder for error problem (7) (see above). Execute the following commands to see if the carrier can be moved to its motion limit position: [Panel Loader]-[Loader Maintenance]-[In-side][Carrier Extend/Carrier Retract]-[START]. (1) Check the following sensor for problems (3) - (6) (see above). In-carrier retract limit panel clamp check (fixed-rail side) In-carrier retract limit panel clamp check (adjustable-rail side) In-carrier advance limit panel clamp check (fixed-rail side) In-carrier advance limit panel clamp check (adjustable-rail side) In-carrier retract limit panel unclamp check (fixed-rail side) In-carrier retract limit panel unclamp check (adjustable rail side) In-carrier 4-4 In-carrier advance limit panel unclamp check (fixed-rail side) clamping error In-carrier advance limit panel unclamp check (adjustable-rail side) (2) Check the in-carrier clamping/unclamping cylinder for problem (7) (see above.) X0B7 X0B8 X0B9 X0BA X0BB X0BC X0BD X0BA · In-carrier clamper was M:Sect 3.3 closed but the clamp sensor failed to switch on. · In-carrier clamper was opened but the unclamp sensor failed to switch on. The clamper may not be closing/ S:Sect 3.1 opening all the way to its limit position. Execute the following commands to see if the carrier can be moved to its motion limit position: [Panel Loader]-[Loader Maintenance]-[In-side][Carrier Extend/Carrier Retract]-[START]. * The "X???" and "Y???" values which appear in the remedy column correspond to the I/O map assignment numbers. C746M5T05 8-6 CP-842 Preliminary Troubleshooting >> Troubleshooting Table No. Cause Out-conveyor 4-5 panel conveyance error Remedy Remarks (1) Verify that the carrier has properly clamped the panel. (2) Check the following sensors for problems (1) - (6) (described above). Out-carrier advance limit panel check (1) X0CC Out-conveyor 1 panel arrival check X0C7 Panel sensor or panel arrival sensor fails to switch on even though a panel has been received from the XY-table. Ref. Page M:Sect 3.3 (1) Check the following sensor for problems Out-carrier advance limit sensor failed M:Sect 3.3 (3) - (6) (see above). to switch on even though the outOut-carrier advance limit check X0CE carrier was advanced. Out-carrier 4-6 advance limit error (2) Check the in-carrier conveyance cylinder for Carrier may not be moving all the way S:Sect 3.1 problem (7) (see above). to its motion limit position. Execute the following commands to see if the carrier can be moved to its motion limit position: [Panel Loader]-[Loader Maintenance]-[Out-side] -[Carrier Extend/Carrier Retract]-[START]. (1) Check the following sensors for problems (3) - (6) (see above). Out-carrier advance limit check X0CE Out-carrier retract limit check X0CF Out-carrier 4-7 cycle error Out-carrier 4-8 clamp error (2) Check the carrier conveyance cylinder for problem (7) (see above). Execute the following commands to see if the carrier can be moved to its motion limit position: [Panel Loader]-[Loader Maintenance]-[Out-side][Carrier Extend/Carrier Retract]-[START]. · Out-carrier was conveyed, but the M:Sect 3.3 out-carrier advance limit or retract limit sensor failed to switch on. · An Out-carrier cycle error occurs if the advance limit or retract limit sensor fails to switch on within 8 seconds. Carrier may not be moving all the way S:Sect 3.1 to its motion limit position. (1) Check the following sensors for problems (3) - (6) (see above). Out-carrier retract limit panel clamp check (fixed-rail side) Out-carrier retract limit panel clamp check (adjustable-rail side) Out-carrier advance limit pnale clamp check (fixed-rail side) Out-carrier advance limit panel clamp check (adjustable-rail side) Out-carrier retract limit panel unclamp check (fixed-rail side) Out-carrier retract limit panel unclamp che X0D2 X0D3 X0D4 X0D5 X0D6 · Out-carrier clamper was M:Sect 3.3 closed, but the clamp sensor failed to switch on. · Out-carrier clamper was opened, but the unclamp sensor failed to switch on. (2) Check the out-carrier's panel clamping/ Clamper may not be moving all the unclamping cylinder for problem (7) (see way to its motion limit position. above). Execute the following commands to see if the carrier can be moved to its motion limit position: [Panel Loader]-[Loader Maintenance]-[Out-side][Carrier Extend/Carrier Retract]-[START]. (1) Check the following sensor for problems (1) - (6) (described above). In-conveyor panel loading check X0B0 Panel request occurred, but the panel loading sensor failed to switch on. S:Sect 3.1 M: :Sect 3.3 (2) Check the following sensors for problems (1) - (6) (described above). In-conveyor panel 4-9 conveyance error In-conveyor panel deceleration sensor failed to switch on even though the panel passed the in-conveyor panel In-conveyor 1 panel deceleration start point X0AB loading sensor position. (3) Check the following sensors for problems (1) - (6) (described above). In-conveyor 1 panel arrival check X0AC (4) Check the in-conveyor motor for problem (7) (see above). In-conveyor motor ON Y029 (5) If the panel is caught at some point along the conveyor, change the conveyor width. In-conveyor panel sensor failed to switch on even though the panel passed the in-conveyor panel deceleration sensor. The in-conveyor motor may not be operating S:Sect 3.1 M:Sect 4.1 * The "X???" and "Y???" values which appear in the remedy column correspond to the I/O map assignment numbers. C746M5TO6 CP-842 Preliminary 8-7 Troubleshooting >> Troubleshooting Table No. 4-10 Cause In-lifter cycle error In-lifter panel 4-11 conveyance error Remedy Remarks (1) Check the following sensors for problems (3) - (6) (see above). In-lifter UP limit check X0B5 In-lifter DOWN limit check X0B6 In-lifter UP/DOWN limit sensor fails to switch on and off. (2) Check the in-lifter UP/DOWN cylinder for problem (7) (see above). Execute the following commands to see if the lifter can be moved to its motion limit position: [Panel Loader]-[Loader Maintenance]-[In-side][Lifter Up/Lifter Down]-[START]. Lifter may not be moving all the way to S:Sect 3.1 its motion limit position. (1) Check the following sensors for problems (1) - (6) (described above). Panel loading from the in-lifter to the in- M:Sect 3.3 carrier began, but the panel arrival sensor switched off before the in-carrier was advanced. In-conveyor 1 panel arrival check X0AC (1) Check the following sensor for problems (1) - (6) (described above). Out-conveyor unloader panel arrival check X0CB 4-12 Ref. Page Panel unloading (2) Check the out-conveyor motor for problem error (7) (see above). Out-conveyor motor ON Y02D A panel which should have been unloaded has not been conveyed to the X0CB sensor position. Look for a failed ensor, a stuck panel, or a missing panel. (3) If the panel is caught at some point along the conveyor, change the conveyor width. (1) Check the following sensors for problems (3) - (6) (see above). Out-lifter UP limit check X0D0 Out-lifter DOWN limit check X0D1 4-13 Out-lifter cycle error Out-conveyor 1 panel arrival check X0C7 Out-lifter panel (2) Check the following sensor for problems 4-14 conveyance error (1) - (6) (described above). Out-conveyors 1 & 2 panel spacing check Adjustable-rail error M:Sect 3.3 S:Sect 4.1 M:Sect 3.3 Out-lifter UP/DOWN limit sensors fail to switch off and on. M:Sect 3.3 (2) Check the out-lifter UP/DOWN cylinder for Lifter may not be moving all the way to S:Sect 3.1 problem (7) its motion limit position. (see above). Execute the following commands to see if the lifter can be moved to its motion limit position: [PanelLoader]-[Loader Maintenance]-[Out-side][Carrier Extend/Carrier Retract]-[START]. (1) Check the following sensors for problems (3) - (6) (see above). 4-15 engagement M:Sect 3.3 X0CA (1) Check the following sensors for problems (3) - (6) (see above). Adustable-rail engagement check (IN) X0C0 Adjustable-rail engagement check (OUT) X0DB Adjustable rail engagement check (CENTER) X0DC Out-conveyor panel arrival sensor fails M:Sect 3.3 to switch on even though the panel has been loaded from the out-carrier to the out-lifter. The panel spacing sensor between outconveyors 1 & 2 is off (it should be on). Either the spacing sensor has failed, or the sensor detection position is improper. Adjustable-rail engagement sensor M:Sect 3.3 fails to switch on. Verify that the conveyor width and the XY-table panel conveyence width are properly aligned. (2) Disconnect the machine's air supply and return the adjustable rail to the correct position. * The "X???" and "Y???" values which appear in the remedy column correspond to the I/O map assignment numbers. C746M5TO7 8-8 CP-842 Preliminary Troubleshooting >> Troubleshooting Table No. Cause Remedy Remarks Ref. Page M:Sect 3.3 · Panel was clamped, but the clamp sensor failed to switch on, and the unclamp sensor failed to switch off. (2) Check the following sensors for problems · Panel was unclamped, but the (3) - (6) (see above). unclamp sensor failed to switch on, XY-table panel clamp check (fixed-rail side, right) X05F and the clamp sensor failed to switch XY-table panel clamp check (adjustable-rail, right) X060 off. XY-table panel unclamp check (fixed-rail, righ X061 4-16 XY-table clamp XY-table panel unclamp check (adjustable-rail, right) X062 error XY-table panel clamp check (fixed-rail, left) X063 XY-table panel unclamp check (fixed-rail, left) X064 (1) Verify that the XY-table is clamping panels properly. The clamping cylinder may not be (3) Check the panel clamping/unclamping moving all the way to its motion limit cylinder for problem (7) (see above). position. Execute the following commands to see if the cylinder can be moved to its motion limit position: [Panel Loader]-[Clamp/Unclamp]-[START]. S:Sect 3.1 * The "X???" and "Y???" values which appear in the remedy column correspond to the I/O map assignment numbers. C746M5T08 CP-842 Preliminary 8-9 Troubleshooting >> Troubleshooting Table 8.1.5 Missing Parts No. Cause Remedy Remarks Ref. Page Specify the appropriate nozzle size and Unsuitable nozzle size, part weight, and cam T: Part 3, speed, etc., settings can result in an cam speed settings using the Tech Lesson 2 insufficient holding force when handling Report issued by Fuji as a reference. "2.1.3" parts, causing nozzle and part slippage. U: Part 2 The Fuji Tech Report is meant for reference Chapt 4 purposes only. "Nozzle" The recommended cam speed may be "Speed" different even if the part shape is the same. 5-1 5-2 Incorrect Part data setting. Defective nozzle. An unsuitable XY table speed can apply a force which exceeds the holding capacity of the part's solder, resulting in position deviations. Solder adhesion decreases when it dries. Therefore, the sooner placement occurs after printing, the better. Check for errors in the part height information. Errors in the part height information or in the T: Part 3 table reference height Proper data Lesson 2 information can cause missing parts. "2.1.1" Fuji recommends that the actual part be U: Part 2 measured, with the measured value being Chapt 4 entered as the part height setting in Part data. "Appearance" (1) Press the reflective disk to verify that the nozzle spring-back motion is smooth. (2) Check to see if the nozzle is clogged. (3) Check to see if foreign matter has adhered to the nozzle tip. Replace the nozzle if any of the above problems are found. A stuck nozzle will prevent the parts from being pushed in far enough when being mounted, and may result in the parts being returned. Placement height problem. Check to see if the XY-table is level. M:Sect 5.1 M:Sect 6.1 Parts may be returned if solder, etc., is adhering to the nozzle tip. Check the backup pin height, quantity, A misalignment between the ST9 nozzle and configuration, and check the board's DOWN limit and the board height can prevent parts from being pushed in far flatness. enough when being placed, and may affect placing accuracy. 5-3 T: Part 3 Lesson 2 "2.1.3" U: Part 2 Chapt 4 "Speed" If accuracy deviations or missing parts are occurring for a specific part, decrease the XY table speed setting in the Part data where the problem is occurring. M:Sect 4.2 Note: If a problem is found, contact your Fuji agent. Replace the cylinder unit if abnormal Improper ST9 cylinder operation may noise is emitted from the cam box prevent parts from being placed correctly. uring automatic operation, or if the Note: If a problem is found, contact your Fuji nozzle DOWN limit position is incorrect. agent. Vacuum break 5-4 problem Printing 5-5 conditions problem. Check for a problem with the Proper data Z0 (0.3mm push in). Note: Machine adjustments can be performed only by those with a Level 3 training. Replace mechanical valves where the spool motion is not smooth. Vacuum break problems can result in parts being returned. Adjust the vacuum break lever position and the speed controller. Check the solder condition after printing. The solder printing condition or dryness can cause part deviations during board conveyance, or can affect the self-alignment at reflow operations. Solder adhesion weakens when the solder dries. Therefore, the sooner placement occurs after printing, the better. Check the reflow temperature profile. Reflow 5-6 conditions problems. M:Sect 7.1.4 Improper reflow conditions can cause selfalignments and tombstoning. Provide a profile in which the temperature is increased evenly over the entire board. If the solder's melting speed differs from point to point, parts will be pulled toward the solder that melts first. C746M5T09 8-10 CP-842 Preliminary Troubleshooting >> Troubleshooting Table 8.1.6 Part Height Sensor Errors No. Cause Nozzle length 6-1 warning displays Dust alarm (dust detected 6-2 on part height sensor) Remedy Remarks Ref. Page Replace the nozzle where this warning occurs, then easure the nozzle length again. If the measured nozzle length exceeds the permissible value, a warning displays onscreen. Clean the glass surface of the part height sensor. This error occurs when dust has adhered to M:Sect 5.1.5 the part height sensor's camera lens. Automatic operation continues unless the quantity of dust is such that it hinders the measurements. Note: Clean away the dust using cotton swab, etc. Check the height of the part where the error occurred, and enter the correct setting value. Error occurs because the Part data setting T: Part 3 differs from the height of the part which was Lesson 2 "2.1.1" picked up. U: Part 2 Chapt 4 "Appearance" Error occurs because an unsuitable part T: Part 3 Check the part height tolerance value Lesson 2 (%) for the part where the error ocurred, height tolerance value is specified in Part data. The tolerance value varies according "2.1.1" and enter the correct setting value. to the part type. Verify that the tolerance value is appropriate for the part in question. (Refer to the tolerance values recommended by Fuji.) Part 6-3 tombstoning detection error Use the nozzle check command to perform a nozzle length measurement. Replace the nozzle if its length is outside the tolerance range. A part may be picked up in a tombstoned M:Sect 5.1.4 posture if the nozzle length measurement M:Sect 6.1 result differs from the actual nozzle length When using part height information, measure the nozzle length before production begins. (1) Use the nozzle check command to check for a bent nozzle. (2) Press the reflective disk with your finger to verify that the nozzle springback motion is smooth. (3) Check for a clogged nozzle. A bent nozzle will cause a deviation in the part pickup position, and may result in the part being picked up in a tombstoned posture. Replace the nozzle if any of the above problems are found. The 7-segment display always 6-4 shows the same value, or shows the wrong value. Turn the cam handle and check the LED lamp status on the sensor (for acquisition timing) inside the cam box. If there is a problem with the sensor, replace it. A stuck nozzle cannot adequately reach the part, and may result in the part being picked up in a tombstoned posture. A clogged nozzle will have less vacuum force, and may result in the part being picked up in a tombstoned posture. A malfunctioning "acquisition timing" sensor can cause the 7-segment display to always show the same value, or to show the wrong value. Note: If sensor replacement is required, contact your Fuji agent for assistance. C746M5T10 CP-842 Preliminary 8-11 Troubleshooting >> Servo System Troubleshooting 8.2 Servo System Troubleshooting An AC servo system controls all servo axes in the machine. If there is a problem with the servo system, the machine displays an alarm code to notify the operator. This section describes alarm codes and inspection methods, and should be used as a reference for troubleshooting and resolving problems. 8.2.1 Alarm Code Display Each servo amp has an LED panel to display alarm codes. The following illustrations show the location of each servo amplifier’s LED panel. warning The servo amplifier power terminal is high voltage. Absolutely do not touch the servo amplifier power terminal. Servo amplifier LED panel Connector (CN3) C746M6001 Note: To display the alarm code on the digital operator, connect the digital operator cable to the servo amplifier (CN3 connector). 8-12 CP-842 Preliminary Troubleshooting >> Servo System Troubleshooting X- and Y-Axes Servo Amplifier Alarm Display <CP-842E> <CP-842ME> Y-axis Z-axis LED panel CN3 connector C746M5002 Rq-, NC-, Fq-, Pq-, and NZ-Axes Servo Amp Alarm Display <CP-842E> Rθ-axis NC-axis <CP-842ME> Fθ-axis Pθ-axis NZ-axis LED panel CN3 connector C746M5003 CP-842 Preliminary 8-13 Troubleshooting >> Servo System Troubleshooting X-, D1-, D2-, Cam-, and NY-Axes Servo Amp Alarm Display <CP-842E> <CP-842ME> (1) (1) (2) (2) (5) (5) (3) (4) (1) D1-axis (2) D2-axis (3) (4) (3) X-axis CN3 connector (5) NY-axis (4) Cam-axis LED panel LED panel CN3 connector C746M5004 8-14 CP-842 Preliminary Troubleshooting >> Servo System Troubleshooting 8.2.2 Alarm Codes and Troubleshooting Check List Alarm status, cause, and remedy are listed in the following table to facilitate troubleshooting of alarm codes. Note: Some of the repairs, such as replacement of a servo motor or servo pack, require special training and expertise. Contact a Fuji agent before attempting to perform any of these procedures. Please have the “Check List for Troubleshooting” available for reference when contacting a Fuji agent for assistance. CP-842 Preliminary 8-15 8-16 • Shortcircuit in load: Load shortcircuit in main circuit in Servopack. • Shortcircuit in load: Load shortcircuit in motor or motor cable • Grounding: Grounding in motor or motor cable wiring. • Overcurrent occurs at main power ON or during motor operation. Overcurrent A.10 • Servopack defective. • Servopack capacity does not match motor capacity. • Servopack defective. • Servopack detects overcurrent by mistake. • Failure in electronic overload thermal relay forced reset for overload alarm Combination Error • Occurs at power ON. A.05 • Servopack defective. • SERCOS IF defective. • Servopack power supply malfunctions. • Servopack defective. Check List for Troubleshooting Cause • Servopack power supply malfunctions. • Servopack defective. • Occurs at control power ON. Parameter Setting • Occurs at power ON or Error during operation. A.04 • Occurs at power ON or during operation Main Circuit Detector Error AC Servopack Alarm Name Status Parameter Break- • Occurs at power ON. down A.03 Alarm A.02 • DB circuit or regenerative circuit resistor or wiring grounding. • Improper connection between phases U, V and W and ground, shortcircuit between phases or incorrect ground wiring. • Use a tester to check between phases U, V and W. • Check the combination of Servopack capacity and motor capacity. • Servopack defective. • Does AC power supply sometimes provide 30V to 60V? Check Item • Does AC power supply sometimes provide 30V to 60V? C746M5T13 • Replace the motor or manually correct the motor cable to eliminate grounding. • Replace the Servopack. • Replace the motor or manually correct the motor cable to eliminate grounding. • Replace the Servopack. • Replace the Servopack. • Replace the motor. • Match the Servopack capacity to the motor capacity. • Replace the Servopack. • Replace the SERCOS IF. • Replace the Servopack. • Restore the AC power supply. • Replace the Servopack. Remedy • Restore the AC power supply. Troubleshooting >> Servo System Troubleshooting CP-842 Preliminary CP-842 Preliminary Regenerative overload Overvoltage Undervoltage A.40 A.41 AC Servopack Alarm Name Regenerative Error Detected A.32 Alarm A.30 · Check the wiring to regenerative resistor. · Servopack defective. · Check that wiring to the regenerative resistor is proper. · Check the regenerative resistance value. Check Item · Servopack defective. · Power supply variation is large and power supply is reduced. C746M5T14 · Replace the Servopack. · Set the AC power supply voltage to a value in the normal setting range. · Replace the Servopack. · Check the AC power supply voltage. (Pay attention to different power supply applied.) · Servopack defective. · Check that a momentary power failure has not occurred. · Servopack defective. · Occurs at control power ON. · Power supply voltage is · Occurs at main power ON excessively small. or when motor is in operation. · Replace the Servopack. · Replace the Servopack. · Set parameter Pn600 correctly. Remedy · Replace the Servopack. · Check the regenerative value and correct the wiring. · Replace the Servopack. · Manually correct the wiring of the external regenerative resistor. · Replace the external regenerative resistor. · Replace the Servopack. · Set the AC power supply voltage to a value in the normal setting range. · Replace the Servopack. · Servopack defective. · Check that parameter Pn600 set · Parameter Pn600 set value is not correct when a regenerative value is correct. resistor is mounted externally. · Servopack defective. · Servopack defective. Check List for Troubleshooting Cause · Servopack defective. · Wiring to regenerative resistor defective. · Servopack defective. · Incorrect regenerative resistor wiring. · Regenerative resistor disconnected. · Servopack defective. · Occurs at control power ON. · Excessive power supply voltage. · Check the AC power supply · Occurs at main power ON voltage. (Is there excessive or when motor is in operation. voltage variation?) · Servopack defective. · Servopack defective. · Occurs at control power ON. · Occurs at normal operation. Status · Occurs at control power ON. · Occurs at main power ON. Troubleshooting >> Servo System Troubleshooting 8-17 8-18 Dynamic Brake Overload Overload of in-rush Current Limit Resistor Heat Sink Overheated A.73 A.74 A.7A A.72 Overload for Instantaneous Maximum Load Overload for Continuous Minimum Load AC Servopack Alarm Name Overspeed A.71 Alarm A.51 • Occurs at main power ON or when motor is in operation. • Ambient temperature of the Servopack exceeds 35 °C. C746M5T15 • Set the ambient temperature of the Servopack to 35 °C or less. • Check for excessive load on components driven by the servo. • Replace the Servopack. • Check that the Servopack fan is operating. • Check that the fan for the control board is operating. • Check the ambient temperature of the Servopack exceeds 35 °C. • Excessive load on servo. • Servopack defective. • Replace the Servopack. • Reduce the main circuit power supply ON/OFF frequency to 5 times/min. • Replace the Servopack. • Manually correct the encoder wiring. • Replace the Servopack. • Check for excessive load on components driven by the servo. • Replace the Servopack. • Manually correct the motor wiring. • Manually correct the encoder wiring. • Replace the Servopack. Remedy • Replace the Servopack. • Manually correct the motor wiring. • Replace the Servopack. • Check that the allowable frequency of in-rush current limit resistor (5 times/min) is not exceeded. • Servopack defective. • Excessive load on servo. • Check that the connnection is correct and that the motor wiring does not have an open phase. • Servopack defective. • Check that the motor rotating direction is correct (phases U, V and W wiring). Check Item • Servopack defective. • Occurs at control power ON. • Servopack defective. • Occurs at main circuit • The allowable frequency of power supply ON/OFF. in-rush current limit resistor at power ON/OFF is exceeded. • Servopack defective. • Occurs at control power ON. • Servopack defective. • Incorrect motor wiring. • Occurs at main power ON (imperfect wiring or connection) or when motor is in operation. • Incorrect encoder wiring. (imperfect wiring or connection) • Servopack defective. • Servopack defective. Check List for Troubleshooting Status Cause • Occurs at control power ON. • Servopack defective. • Incorrect motor wiring. • Occurs at main power ON or when motor is in operation. • Incorrect encoder wiring. Troubleshooting >> Servo System Troubleshooting CP-842 Preliminary CP-842 Preliminary A.84 Encoder Data Error · Occurs at power ON or when motor is in operation. · Occurs at power ON. (Pn002.2=1) Absolute Encoder · Occurs at power ON. (Pn002.2=0) Battery Error When used as absolute encoder. A.83 · Occurs at power ON or when motor is in operation. Encoder Checksum Error · Occurs at power ON. (Pn002.2=1) AC Servopack Alarm Name Status Absolute Encoder · Occurs at power ON. Backup Error (Pn002.2 = 0) When used as absolute encoder. A.82 Alarm A.81 · Servopack defective. · Encoder malfunctions. C746M5T16 · Turn ON the encoder power supply again. Replace the motor if the alarm occurs frequently. · Correct the wiring processing around the encoder. · Replace the motor if the alarm occurs frequently. · Replace the Servopack. · Sensor in the encoder reads the data improperly. · Replace the battery and turn ON the encoder power supply again. · Replace the Servopack. · Connect the battery properly. · Replace the Servopack. · Check that the battery is connected correctly. · Check that the battery voltage is not reduced to 2.7 V or less. · Servopack defective if nothing is wrong in the above check. · Servopack defective when used as incremental encoder. · Servopack defective. · Imperfect connection or disconnection of battery. · Battery voltage is reduced to the specified value (2.7 V) or less. · Servopack defective. · Set up the encoder. Replace the motor if the alarm occurs frequently. · Replace the Servopack. · Encoder defective. · Replace the Servopack. · Replace the Servopack. · Encoder defective at alarm occurrence even by setting up the absolute encoder again. · Servopack defective if nothing is wrong in the above check. · Set up the encoder after restoring the power supply to the encoder (by replacing the battery, etc.). · Replace the encoder. Remedy · Set up the encoder. · Servopack defective when used as incremental encoder. · Servopack defective. · Absolute encoder defective. Check List for Troubleshooting Cause Check Item · Turn ON the power supply to the · Check that the absolute encoder has been set up. absolute encoder for the first time. · Check that the power is supplied · Both PG power supply (+5V) to the encoder side. from the Servopack and the battery power supply are failed. Troubleshooting >> Servo System Troubleshooting 8-19 8-20 Servo Overrun A.C1 Phase Error System Alarm A.bF A.C2 Reference Torque • Occurs at power ON or • Servopack defective. Input Read Error when motor is in operation. A.b2 • Encoder defective. • Servopack defective. • Incorrect encoder wiring. • Incorrect motor wiring. • Incorrect encoder wiring. • Occurs at power ON or • Servopack defective. when motor is in operation. • Encoder defective. • Occurs at power ON. • Occurs at power ON or • Servopack defective. when motor is in operation. • Occurs at power ON or • Servopack defective. when motor is in operation. Reference Speed Input Read Error A.b1 • Occurs at power ON or • Encoder defective. when motor is in operation. • Servopack defective. • Encoder temperature exceeds the specified value. AC Servopack Status Cause • Occurs at power ON or • Servopack defective. when motor is in operation. Encoder Overheated AC Servopack Alarm Name Encoder Overspeed A.86 Alarm A.85 • Encoder defective (Initialization polarity sensor data error) • Check the encoder wiring and the connector inserted status at the encoder side. • Check the motor wiring or connector inserted status at the motor side. • Check the encoder wiring and the connector inserted status at the encoder side. • Encoder defective. • Check the encoder and motor wiring to motors A and B, if it is a multiaxis amp. • Check the ambient temperature for the motor exceeds 35 C? Check Item C746M5T17 • Manually correct the encoder wiring. • Replace the motor. • Replace the Servopack. • Replace the motor. • Replace the Servopack. • Manually correct the encoder wiring. • Manually correct the motor wiring. • Replace the Servopack. • Replace the Servopack. • Replace the Servopack. • Replace the motor. • Replace the Servopack. • Reduce the ambient temperature of the motor to 35 C or less. Remedy • Replace the Servopack. Troubleshooting >> Servo System Troubleshooting CP-842 Preliminary CP-842 Preliminary Encoder Communi- · Occurs at power ON or cations Error during operation. Encoder Parameter · Occurs at power ON. Error · Occurs during operation. A.C9 A.CA · Occurs at encoder alarm reset. · Occurs at power ON. Absolute Encoder Clear Error and Multiturn Limit Setting Error A.C7 A.C8 · Occurs at power ON or when motor is in operation. Status PA-, PB-phase connection error C-phase connection error AC Servopack Alarm Name Magnetic Polarity Detection Error A.C6 Alarm A.C5 · Encoder defective. · Servopack defective. · Encoder defective. · Servopack defective. · Encoder defective. · Servopack defective. · Check the encoder wiring or connector insertion at the encoder side. · Encoder defective. · Servopack defective. · Replace the motor. · Replace the Servopack. · Replace the motor. · Replace the Servopack. · Replace the motor. · Replace the Servopack. C746M5T18 · Manually correct the encoder wiring. · Replace the Servopack. · Servopack defective. · Encoder wiring incorrect or poor connection. · Replace the motor. · Replace the Servopack. · Replace the motor. · Servopack defective. · Replace the Servopack. · Manually correct the encoder wiring. · Replace the motor. · Replace the Servopack. · Servopack defective. · Check the encoder wiring. Remedy · Check connections around the power supply to the main circuit. · Replace the motor. Check Item · Check the power supply to the main circuit. · Check the encoder wiring. · Encoder defective. · Servopack defective. · Encoder defective. · Encoder defective. · Servopack defective. · Incorrect encoder wiring. Check List for Troubleshooting Cause · Power supply to the main circuit is turned off. · Incorrect encoder wiring. · Encoder defective. · Servopack defective. Troubleshooting >> Servo System Troubleshooting 8-21 8-22 Multiturn Limit Disagreement Position Error Pulse Overflow Power Line Open Phase A.d0 A.F1 • Occurs at control power ON. • Occurs at main power ON or when motor is in operation. • Imperfect motor wiring. • Occurs during operation. • Servopack defective. • 3-phase power supply is not connected. • 3-phase power supply is imbalanced. • Servopack defective. • Servopack defective. • Load capacity is too large. • Imperfect encoder wiring. • Servopack defective. • Parameter Pn505 value is 0. • Servopack defective. • Check the power supply voltage. • Servopack defective. • Check the power supply voltage. • Excessive load on servo. • Check that the motor U, V and W wiring is correct. • Check the parameter (overflow: Pn505). • A.CC occurs even if the Pn205 setting is correct. • The multiturn limit has not been set in the encoder. • Servopack defective. • Check parameter Pn205. Check Item • Check the encoder wiring or connector insertion at the encoder side. • Encoder defective. • Servopack defective. • Servopack parameter is wrong. • Encoder defective. • Servopack defective. Check List for Troubleshooting Cause • Encoder wiring incorrect or poor connection . • Occurs at control power ON. • Occurs during operation. • Occurs at power ON. AC Servopack Alarm Name Status Encoder Echoback • Occurs at power ON or Error during operation. A.CC Alarm A.Cb C746M5T19 • Replace the Servopack. • Manually correct the power supply wiring. • Correct the power supply imbalance. • Replace the Servopack. • Replace the Servopack. • Correct the Pn505 setting (Refer to the parameter list supplied with the machine). • Manually correct the motor wiring. • Manually correct the encoder wiring. • Replace the Servopack. • Check for excessive load on components driven by the servo. • Correct the Pn205 setting (Refer to the parameter list supplied with the machine). • Execute the multiturn limit setting change Fn013 when the alarm occurs. • Replace the Servopack. • Replace the motor. • Replace the Servopack. Remedy • Manually correct the encoder wiring. Troubleshooting >> Servo System Troubleshooting CP-842 Preliminary CP-842 Preliminary WDC Error MST Loss A.E3 AC Servopack Alarm Name SERCOS IF Unset A.E2 Alarm A.E0 • Reattach the connector between the SGDH and the SERCOS IF. • Reattach the connector between the base board and the SERCOS IF. • Replace the base board. (SGDZ) • Replace the SERCOS IF. • Check that the connector between the SGDH and the SERCOS IF, or the base board and the SERCOS IF (SGDZ) are connected properly. • Base board defective. (SGDZ) • Check for alarms such as cuts in servo board communications. • SERCOS IF is defective. • Servo board is defective. • Occurs after the initialization of the SERCOS communications. • SERCOS IF is defective. • SERCOS IF is defective. • Servo board is defective. • Replace the SERCOS IF. • Replace the Servopack. • Replace the SERCOS IF. • Replace the Servopack. C746M5T20 • Improve the power source. • Manually readjust the power and power wiring. • Manually readjust the fiber optics cabling. • SERCOS IF defective. (DPRAM (SGDH), CPU defective) • Servopack defective. • Replace the Servopack. (When using SGDZ, DPRAM defective) Remedy • Set the switches 1 to 3 on the servo amp according to the electrical schematic. Check Item • Check if the fiber optics connector is detached or if the connection is cut. • Check if “bb” is flashing (SGDH) at one of the servo amps within the loop, or if its power is off. • Check for power alarms such as sudden stoppage. • Check for alarms such as cuts in servo board communications. • SERCOS IF is defective. • Servopack defective. • SERCOS IF defective. • Base board defective. (SGDZ) Check List for Troubleshooting Cause • SERCOS IF CPU is set to nonoperation (SERCOS IF status (S or ST) LED (green) does not come on). • SERCOS IF does repeater operation only. • Problem with the SERCOS IF connection. • Fiber optics are cut. • Occurs after the initialization of the SERCOS communications. • Power is off at one of the other servo amps in the SERCOS communications loop. • Occurs at (10 sec. after) control power on. Status Troubleshooting >> Servo System Troubleshooting 8-23 8-24 SERCOS IF Error AC Servopack Alarm Name MDT Loss • Occurs at power ON. • Occurs after the initialization of the SERCOS communications. Status CPF00 Digital Operator • Occurs at power ON when Transmission Error 1 the digital operator is connected or when the digital operator is CPF01 Transmission Error 2 connected after power ON. (Whether transmission is established is determined by checking the data code of the signal that is sent every approx. 100 msec from the Servopack. If the data code is normal, transmission is established.) A.E7 Alarm A.E4 • Replace the SERCOS IF. • Replace the Servopack. Remedy • Manually readjust the fiber optics cabling. • Incorrect cable or connection between the digital operator and Servopack. • Digital operator control defective. • Servopack defective. • Servopack defective. C746M5T21 • Replace the Servopack. • Replace the digital operator. • Insert the connector again or replace the cable. • Reattach the connector. • Check that the connector between the SGDH and the SERCOS IF is connected properly. • Replace the SERCOS IF. • SERCOS IF is defective. (DPRAM is defective). Check Item • Check if the fiber optics connector is detached or if the connection is cut. • Check for alarms such as cuts in servo board communications. • SERCOS IF is defective. • Imperfect connection between the digital operator and Servopack. • Digital operator defective. • SERCOS IF is not connected correctly. • SERCOS IF is defective. • SERCOS IF is defective. • Servo board is defective. Check List for Troubleshooting Cause • Fiber optics are cut. Troubleshooting >> Servo System Troubleshooting CP-842 Preliminary CP-842 Preliminary A.92 • Servopack defective. • Ambient temperature of the Servopack exceeds 35 C. • Servopack defective. • Check the ambient temperature of the Servopack exceeds 35 C. • Servopack defective. • Excessive load on servo. • Servopack defective. • Servopack defective. • Check that the motor wiring does not have open-phase or the connection is correct. • Check that the motor wiring does not have open-phase or the connection is correct. Check Items Regenerative • Occurs at control power ON. • Servopack defective. Overload Warning • Occurs at normal operation. • Parameter Pn600 set value is • Check that parameter Pn600 set not correct when a regenerative value is correct. resistor is mounted externally. • Servopack defective. • Servopack defective. • Occurs at normal operation. AC Servopack Check List for Troubleshooting Warning Warning Name Status Cause A.91 Overload Warning • Occurs at control power ON. • Servopack defective. • Incorrect motor wiring. • Occurs at servo ON. (imperfect wiring or connection) • Incorrect encoder wiring. (imperfect wiring or connection) • Servopack defective. • Occurs with reference input • Incorrect motor wiring. (imperfect wiring or connection) without motor rotation. • Incorrect encoder wiring. (imperfect wiring or connection) • Load exceeds rated load. C746M5T22 • Replace the Servopack. • Set parameter Pn600 correctly. (Refer to the parameter list supplied with the machine). • Replace the Servopack. Remedy • Replace the Servopack. • Manually correct the motor wiring. • Manually correct the encoder wiring. • Replace the Servopack. • Manually correct the motor wiring. • Manually correct the encoder wiring. • Check for excessive load on components driven by the servo. • Replace the Servopack. • Set the ambient temperature of the Servopack to 35 C or less. • Replace the Servopack. Troubleshooting >> Servo System Troubleshooting 8-25 Troubleshooting >> Servo System Troubleshooting MEMO: 8-26 CP-842 Preliminary Setup >> Leveling the Machine 9. Setup 9.1 Leveling the Machine Point The machine should be set in position on leveling sheets or blocks. The appropriate leveling sheets and blocks differ depending on the panel conveyance height, and the use of anti-vibration pads. Refer to the table below. Units (mm) Board conveyance height Leveling sheet / block Drawing No. Name DCAB0370 Leveling sheet DCAB0380 Leveling sheet BB43880 Leveling sheet GGA8060 Leveling sheet GGA8060 Leveling sheet GGA8030 Leveling sheet 900 912 920 930 Anti-vibration pads 935 not used. 950 962 965 GGA8040 980 BB42950 900 912 DCAB0390 920 GXA2071 930 DCAB0400 Anti-vibration pads 935 WAB0601 used. 950 GXA2121 962 DCAB0410 965 DCAB0410 980 DCAB0420 * : Includes height of anti-vibration pads (12mm). 75 90 Leveling sheet Leveling sheet Leveling block Leveling block Leveling block Leveling block Leveling block Leveling block 24 * 28 * 40 * 44 * 60 * 71 * 71 * 87 * C746M6T01 40 H=980 H=935 12 H=980 12 75 12 H=965 12 59 12 H=962 12 59 H=950 12 48 12 32 H=930 90 H=965 H: Board conveyance height Units (mm) CP-842 Preliminary H=930 30 H=920 28 60 H=920 16 H=912 12 Leveling sheet Leveling sheet 75 H=950 40 H=935 Anti-vibration pads used. H=912 22 H=900 12 Anti-vibration pads not used. Height 12 22 30 40 40 60 C746M6001 9-1 Setup >> Leveling the Machine Procedure 1 Position the leveling sheets or the leveling blocks as shown in the figure below. 2 Set spirit levels on a base surface of the machine (laterally and vertically). 3 Use the leveling bolts to adjust the height. 4 After verifying that the panel conveyance height and the leveling accuracy are correct, tighten the lock nuts on the leveling bolts. Changes can be made by tightening the lock nuts, although the levelness should always be checked again after adjustments have been made. Note: If the lock nuts are not tightened sufficiently, vibration may result in a drop in placement accuracy. 730 518 778 696 538 730 125 455 125 <CP-842E> 150 510 125 125 518 518 778 778 696 696 538 125 538 125 (mm) 965 921 100 125 100 100 549 593 150 100 466 455 100 125 <CP-842ME> 125 518 778 696 538 549 150 125 100 100 593 150 (mm) Lock nut Leveling bolt Leveling sheet Anti-vibration pad C746M6002 9-2 CP-842 Preliminary Setup >> Connecting the Air Supply 9.2 Connecting the Air Supply Point Connect the air hose to the machine, and adjust the regulator to the prescribed air pressure. Procedure 1 Connect the air hose to the machine’s air inlet located on the front of the machine. 2 Raise the filter regulator knob to release the lock. 3 Turn the handle to adjust the air pressure until the gauge reads 0.5 MPa (5kgf/ cm2). Note: A digital pressure gauge is attached to the rear cover. 4 Press the filter regulator knob down to engage the lock. <CP-842E> <CP-842ME> Air inlet Air inlet Digital pressure gauge Digital pressure gauge Knob Handle 20PM Plug 20SH ( for 1/4" hose) 30SH ( for 3/8" hose) Socket Hose 40SH ( for 1/2" hose) 0.5MPa (5kgf/cm2) C746M6003 Note: The air hose is not supplied with the machine. CP-842 Preliminary 9-3 Setup >> Electrical Power Supply & Transformer Wiring 9.3 Electrical Power Supply & Transformer Wiring Point Wire the transformer so that its voltage matches the power supply voltage. Procedure DANGER Verify that the external power supply is off before performing this procedure. Connecting the Power Supply The power capacities are indicated below. Be sure to connect the machine to a power supply which exceeds this capacity. •CP-842E :9.5KVA •CP-842ME :9.0KVA 1 Open the main breaker box, then remove the transparent terminal cover. 2 Feed the power cable into the main breaker box from the power cable inlet located at the top of the main breaker box. 3 Connect the ground cable to the dedicated ground terminal. 4 Connect the 3-phase cable to the main breaker and tighten to the prescribed torque. Terminal screw tightening torque: 5.8 N⋅m (58 kgf⋅cm) Note: Terminal screws should be tightened periodically. 5 After connecting the cable, secure it with the cable lock nut located at the power cable inlet. Cable lock nut tightening torque: 7.5 N⋅m (75 kgf⋅cm) Cable lock nut Power cable 20 mm Three-phase electric wire Transparent terminal cover Ground wire Terminal screw Recommended driver 8.0mm Main breaker 9-4 1.0mm C746M6004 CP-842 Preliminary Setup >> Electrical Power Supply & Transformer Wiring Wiring the Transformer 1 Open the transformer box cover. <CP-842E> Transformer box 2 CP-842 Preliminary <CP-842ME> Transformer box C746M6005 Wire the transformer’s primary taps to match the supplied voltage. 9-5 Setup >> Electrical Power Supply & Transformer Wiring Checking the Three-phase Connections Perform the following procedure to verify that the three-phases are properly connected. 1 Turn the 200V power on. 2 Log in the machine. 3 Press the [AUTO] button (but do not press START). Note: Do not press the START button. The vacuum pump begins operating when [AUTO] is pressed, so disconnect the hose to verify that suction exists. If there is suction, this indicates that the wiring is correct and the motor is rotating in the correct direction. If the air flow is reversed (air is blowing out instead of in), then turn the main power off and reverse the three-phase power cable’s U-phase and V-phase connections, then try again. <CP-842E> <CP-842ME> Hose band Hose air C746M6006 Caution:To avoid leaks, the hose should be pushed firmly into position, and then secured in position with the hose band. 9-6 CP-842 Preliminary Setup >> Connecting the Data Transmission Cable 9.4 Connecting the Data Transmission Cable Point The machine is connected to the host computer by means of an Ethernet twisted-pair communication cable (class 5) which permits program transmissions and production log compilation. Procedure 1 Register the CP-842E/842ME in the line descriptor file at the host. Note: Refer to the host computer manual for details regarding the registration procedure. 2 Connect one end of the transmission cable to the Ethernet connector at the host, and connect the other end to the connector on the machine. <CP-842E> <CP-842ME> C746M6007 CP-842 Preliminary 9-7 Setup >> Moving the Machine 9.5 Moving the Machine 9.5.1 Precautions when Moving the Machine When moving a machine, be sure to observe the safety measures described below in order to avoid accidents. • Be sure that the workers who are moving the machine are wearing safety shoes and helmets. • Prepare the transport path in advance, and be sure that those who are not assisting in the machine transport are kept out of the area. • The machine should be moved only by qualified personnel. • Before moving the machine, attach the machine brackets (red) which were attached when the machine was delivered. (Attach the brackets in the prescribed positions.) • Use a forklift (load capacity of 10 t or higher) which is suitable for the weight of the machine in question. Machine weights: CP-842E Approx. 5,850 kg CP-842ME Approx. 4,880 kg • Be sure to insert the forklift forks at the prescribed position. • Use care to avoid bending the leveling bolts. • If the balance of a lifted machine is unstable, lower the machine immediately. • Raise and lower the machine slowly to avoid subjecting the machine to shocks. Transport Procedure 1 Remove all tape feeders, air hoses, and electrical wiring from the machine. 2 Use the machine brackets (red) to secure the XY-table, the in- and out-carriers, and the D-axes. Note: If there are no machine brackets available, use rope, etc., to secure the various parts of the machine to avoid damaging them. Y-axis bracket X-axis bracket Carrier brackets C746M6008 9-8 CP-842 Preliminary Setup >> Moving the Machine D-axis bracket C746M6009 3 Insert the forklift so that its left and right forks are the same distance from the machine center. Moreover, the space between the left and right forks should be set as wide as possible. DANGER Do not attempt to perform any tasks beneath the lifted machine. Note: The forklift should be operated in accordance with the manual provided by the forklift manufacturer. <CP-842E> <CP-842ME> C746M6010 4 Using the forklift, lift the machine to a height of 30 cm. 5 Transport the machine by forklift to its new location, then lower the machine slowly onto the leveling sheets or leveling blocks. For details concerning leveling sheet or leveling block configurations, refer to 9.1 "Leveling The Machine". CP-842 Preliminary 9-9 Setup >> Moving the Machine MEMO: 9-10 CP-842 Preliminary Supplementary Information >> Noise Levels 10. Supplementary Information 10.1 Noise Levels The following table shows the measured noise levels for CP-842E during operation. WARNING Operators should wear ear plugs in operating environments where noise levels are high enough (80 dBA or more) to cause hearing damage. Machine Model CP-842E Max. Noise Level (dBA) Measurement points (m) Remarks Background Rear side 1 ......................76 Height from floor: 1.2 noise Front side 2 ......................74 Distance from machine sides: 1.0 63 dB 1 2 Front side C746MX001 Note: The noise level of both the CP-842ME is lower than that of the CP-842E. CP746 Preliminary 10-1 Supplementary Information >> Noise Levels MEMO: 10-2 CP746 Preliminary FUJI Internet Fuji Internet aims at providing up-to-date information to our customers in the most efficient manner. This site makes a range of services available, from manual updates and virtual training, to online technical reports. Fuji hopes that this site will be used as a source of information in addition to the services provided by your agent. Fuji Internet is located at http://www.fuji.co.jp/ Fuji Internet membership is required to access the Technical Information section of the site. Please contact your agent for membership details. Any comments or opinions regarding this document can be sent to [email protected] CP-842E/CP-842ME Mechanical Reference Edition No. Date of Issue Preliminary March 26, 2004 Note Fuji Machine Manufacturing Co.Ltd. SMT Equipment 19 Chausuyama. Yamamachi Chiryu, Aichi Prefecture, 472-8686 Japan Copyright 2004 by Fuji Machine Manufacturing Co., Ltd. Printed in Japan Fuji Machine Manufacturing Co., Ltd. serves its customers from the following locations: Fuji Machine Manufacturing Co., Ltd. 19 Chausuyama Yamamachi, Chiryu, Aichi, 472-8686 Japan Tel: (0566) 81 - 2111 Fax: (0566) 83 - 1140 Fuji America Corporation 171 Corporate Woods Parkway, Vernon Hills, IL. 60061 USA Tel: (847) 913-0162 Fax: (847) 913-0186 Fuji Machine Mfg (Europe) GmbH Peter-Sander-Str. 43, D-55252 Mainz-Kastel Germany Tel: 06134-202120 Fax: 06134-202200 Fuji do Brasil Maquinas Industriais Ltda. Rua Joao Cachoeira, 128 Itaim Bibi, Sao Paulo, SP 04535-000 Brazil Tel: 11-3064-7650 Fax: 11-852-6833 Fuji Machine Philippines, Inc. Warehouse 888 Don Mariano Lim Industrial Complex (La Fuerza Compound) Alabang, Zapote Rd., Almanza Uno Las Pinas City, Philippines Tel: (02) 809-4565 Fax: (02) 807-2767 Fuji Machine Mfg (Singapore) Pte Ltd. Blk 2/51, Ubi Avenue 1, #01-24, Paya Ubi Industrial Park, Singapore 408933 Tel: 65-67464966 Fax: 65-68412326 Fuji Malaysia Office C/O Mecomb Malaysia Sdn Bhd 2487, Jalan Sultan Azlan Shah, 11700 Penang, Malaysia Tel: (04) 656-4002 Fax: (04) 656-2941 Fuji Taiwan Office C/O Ascentex Industry Corp. 3 Fl, No. 396, Sec. 1, Nei Hu Rd., Taipei, Taiwan R.O.C. Tel: (02) 8797-8716 Fax: (02) 8797-8717 Fuji Machine Mfg. Co., Ltd. China Representative Office Room A, 26F, Zhaofeng World Trade Building, No. 369, Jiangsu Road, Shanghai, China Tel: (21) 5240-0730 Fax: (21) 5240-0728