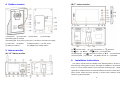
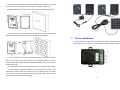
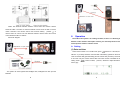
1
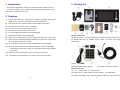
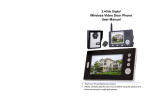
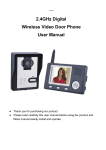
2.4GHz Digital
Wireless Video Door Phone
User Manual
Contents
1.
2.
3.
4.
5.
6.
7.
8.
9.
10.
11.
12.
●
●
Introduction ...................................................................... 2
Features ............................................................................ 2
Packing list ........................................................................ 3
Outdoor camera ................................................................. 4
Indoor monitor .................................................................. 4
Installation instructions ....................................................... 5
E-lock installation................................................................ 7
Operation........................................................................... 9
Working environment .........................................................14
Notices ...........................................................................14
Specifications ..................................................................14
Failure diagnosis ..............................................................15
Thank you for purchasing our product.
Please carefully read this user manual before using the product and
follow the manual to install and operate.
1
1. Introduction
3. Packing list
The product is applicable in office, house, apartment, hotel, building and so on.
The outdoor camera is easy to install. Indoor monitor is portable. It can be hung
on the wall, or be placed on the desk.
2. Features
(1)
2.4GHz digital frequency hopping and encryption technology, transmission
distance up to 400 meters in free field, robust anti-interference
(2) Clear night vision can capture image in low-illumination environment
(3) Rain shield for the outdoor camera is available
(4) 3.5 or 7 inch TFT color panel for indoor monitor
(5) Surveillance, unlock, hands-free call and talk
(6) 16 chord melodies and melody volume is adjustable
(7) Brightness and talk volume are adjustable
Outdoor camera part
(8) Date (only one camera with one monitor system) and time shown on the screen
(1) Outdoor camera (2) Power adapter Input: 100-240V 50/60Hz Output: 5V/1A
(9) Indoor monitor could take pictures automatically or by instruction. It could store
(3) double-sided tape (4) Wireless unlock control (5) Screws and stoppers
up to 100 pictures with date and time
(6) DC cable
(10) BL-5J battery of camera and monitor is replaceable and rechargeable
(11) Outdoor camera works about 30 days if with battery. It works all the while if
connected with the 2w solar module. Or it works all the while if power adapter
is connected.
(12) Wireless unlock control supports power on and power off unlock
(13) One outdoor camera supports up to 4 indoor monitors and vice versa
(7) Remote control (optional)
(8) BL-5J battery (optional)
(9) Solar module charger (optional)
(10) 6meters or 10meters antenna
Indoor monitor part
(11) 3.5” indoor monitor or 7” indoor monitor
(12) Fixed iron for 7” indoor monitor (13) BL-5J battery (14) USB Cable
(15 ) USB power adapter; Input: 100-240V 50/60Hz Output: 5V/1A (16) User manual
2
3
4. Outdoor camera
(1) Microphone
(2) Camera lens
(B) 7” indoor monitor
(3) Rain shield
(4) Infrared light
(5) Indicating light for recharge
(6) Indicating light, show green if press ‘pair’ or ‘call’ button, show red if low voltage
(7) ‘Call’ button
(8) Speaker
(11) Battery lid of BL-5J
(9) Adapter interface (10) ‘Pair’ button
(12) Obligate area welding antenna
(1) Speaker
(2) TFT screen
5. Indoor monitor
(5)
‘Monitor’ button
(8)
Left
(A) 3.5” indoor monitor
(12) Working light (13)
(9) ▼Down
(6)
’Unlock’ button (7)
(10)
’Talk’ button
Right (11) charging light
‘Take picture ’ button (14) ▲Up
(16) Power switch (17) Fixed slot
6.
(3) Antenna (4) Microphone
(15) USB interface
(18) Battery lid of BL-5J (19) Bracket
Installation instructions
The outdoor camera should be installed at the shielded position to be free from
direct shinning of strong light or raining. The height for installation is recommended
to be 1.5~1.7m for outdoor camera to focus on the best monitoring range. Wireless
signal will be weakened if there are obstacles between the outdoor camera and the
indoor monitor. Please check the best sign of monitor when install the outdoor
camera to get the best position.
4
5
If wiring needs to go through wall, the plug should be firstly wrapped with tape so
as to avoid the sand or dirt going into the plug thus resulting in malfunction.
Use double-sided tape fix camera on the wall or door as the following diagram.
Take off the screw on the bottom, remove the back box fit on the wall, embed the
camera to the back box and use screws to fix as the following diagram.
7.
E-lock installation
E-lock and power of e-lock are not included in this product. Wireless unlock
control connects e-lock, shares 12V power adapter with e-lock when it works.
If it is inconvenient for the user to install power adapter near outdoor camera,
user can also select solar panel module and rechargeable battery for outdoor
camera. But the solar panel module and rechargeable battery are not included in the
product package list.
The Vmp and Imp of the 2w solar panel module are 5v and 400mA respectively.
The wire between solar panel module and camera length is 6 meters. You’d
better put the solar module on the place the sun can directly shine. The battery
costs 3~4hours to be fully charged by strongly directly shinning. Outdoor camera
can work about 30 days each full recharge.
6
7
Notes: The distances between wireless unlock control and outdoor camera
should be within 10 meters so that the wireless unlock control is able to receive
unlock command. The remote control uses 27A/12V battery.
presses
of
remote control to unlock. The work distance between remote control and unlock
8.
control should be within 15 meters.
Schematic diagram
Operation
Note: When the system is in working condition, if there is no blocking wall
between indoor monitor and outdoor camera, you must keep them at least 6
meters apart to avoid the ‘whistle’ sound.
A Setting
(1) Date and time
When indoor monitor is in non-talk mode, press
button for 3 seconds, there
will be a "T" (for time) character on the left side of the battery symbols on the screen.
User can set the date (year/month/day) and the current time (hour/min). Time format
is 24 hours. Only one outdoor camera with one indoor monitor is available for date
setting. Press
,
button to select,
press ▲, ▼ button to adjust the date and
time in grey.
The system can work together with intelligent lock, Intelligent lock uses 4pcs AA
batteries.
8
9
(2) Talk, unlock
(2) Melody and volume
When indoor monitor is in non-talk mode, press
chord melodies as the sound of the bell. Press
button to select one of the 16
choose to the volume of
melody
The visitor presses the “call” button of the outdoor camera. All indoor monitors will
sound melody.
A. Press
(adjust level: 1-2).
button of one indoor monitor to speak to visitor before unlock.
Other indoor monitors can see the image but can not hear sound of the visitor.
16 chord melodies are Ding-dong, To Alice, Westminster bell, Butterfly lovers, The
cygnet, Red river valley, My heart will go on, Turkey’s march, Small dance,
If you want to let other indoor monitor to talk, press
Congratulations you, William's prelude, Love romance hudson, Memory, The Little
current dialogue, then another indoor monitor could press
Mermaid, Green sleeves, Romeo and Juliet.
speak to visitor.
When in talk mode, press
(3) Talk volume
In the talk mode, press
to adjust the talk volume. Adjust level: 0-7.
button to
button to unlock the door lock, the unlock signal
shows on the screen. When press
,
button to end the
button again, the unlock signal will
disappear.
Press
button to turn off the screen and enter standby mode, or it will turn into
standby mode automatically after 30 seconds.
(4) Brightness
In the talk mode, when indoor monitor has dynamic image from outdoor camera,
press ▲, ▼ to adjust brightness. Adjust level: 0-7.
B.
If do not want to let the visitor go in after seeing the video, no operation or
press the
button to turn off the screen and then enter into standby mode.
Indoor monitor enters into the standby mode after 30 seconds if no any operation.
Note: if you use multiple indoor monitors, please keep distance among indoor
B
Operation
monitors to avoid affecting talk effect.
(1) Indoor monitor turn on/off
Turn on:
Turn the power switch to “ON”, working light display red and rings the
melody.
Turn off:
Turn the power switch to “OFF”, working light off。
Maximum Com-sign is level 6. Maximum battery bar is level 4.
(3)
Monitor
For one outdoor camera or more outdoor cameras with one indoor monitor, if
there is no calling from the outdoor camera, the indoor monitors are in standby
mode. User can press the
button once to wake up the indoor monitor; press
button again to enter monitor mode and monitor the outdoor as long as you like,
monitor signal will display on the screen. Press
button again to quit and turn off
the screen.
For several outdoor cameras with one indoor monitor, in monitor mode,
press
button to show the image from the CAM1, CAM2, CAM3, CAM4 (if the system
has) in sequence. At the last outdoor camera, press
turn off the screen.
10
11
button again to quit and
(4) Charge
indoor monitor.
For the first time, the battery should be charged for more than 5 hours to activate
the lithium battery. After that charge 3 hours every time, Charging led is red when
(2) One outdoor camera and up to 4 indoor monitors system is 1VN system
Firstly, press ‘pair’ button of outdoor camera, indicating light flash, press
charging, it turns green when the battery is filled, the color of battery bar will change
and
from green to red when the battery is in low power.
pairing”. If pairing succeeds, the video from outdoor camera will be shown in the
C
button of indoor monitor at the same time, the screen will show “... 1v4
screen of indoor monitor.
Picture
Secondly, repeat the above operation for each indoor monitor.
(1) Take pictures
(3) Up to 4 outdoor cameras and one indoor monitor system is NV1 system
When there is video from outdoor camera, presses
button to take a picture,
one press captures one picture.
Note: To pair this system is more complex than to do the above two systems.
After turn on outdoor camera and indoor monitor, press button ASAP so not
When the Call button of outdoor camera is pressed, if the user isn't in or no
operation, all indoor monitors automatically save the image from camera after 10
let any part enter into standby mode.
Firstly, press the ‘pair’ button of outdoor camera, indicating light flash, press
seconds. The new picture will replace the first picture if no memory is available.
and
(2) Browse pictures
pairing”, if pairing succeeds, the video will be shown in the screen of indoor monitor.
In the non-talk mode, press
press
,
button to browse the stored pictures, then
button of indoor monitor at the same time, the screen will show “... 4v1
Secondly, repeat the above operation as soon as possible until finish all pairing.
Thirdly, check whether pairing is successful, let system power on again, and then
button or after 10 seconds to quit browse mode.
press ‘monitor’ button continuously to monitor each outdoor camera. If each outdoor
(3) Delete pictures
camera works, it means that system pairs successfully. Otherwise repeat the first
Firstly turn off the indoor monitor, then press
about 5seconds, then turn on the indoor monitor,
and
button together
text: ’Delete all photo, please wait’ ‘no photo , Please Power off’. After that all
pictures have been deleted. Please turn off the indoor monitor.
D
step.
until the screen displays
2 Pair unlock control with door phone system
Unlock control is connected to 12V power adapter. Outdoor camera uses the
battery, or is connected to the power adapter. Firstly press the pair button of unlock
Pair
control, the pair light will flash once. Press the
under talk mode, pair light will continuously flash.
pair ok before use get the product.
Once again press the pair button of unlock control, pair light stops flashing.
1 Pair outdoor camera with indoor monitor
Note: The system only support 3 models as below. User can’t mix them when
purchase. For one-to-one system, adding more outdoor camera or more
indoor monitor can’t become one-to-multiple system.
and
button of indoor monitor at the same time, the screen will show “... 1v1 pairing”. If
pairing succeeds, the video from outdoor camera will be shown in the screen of
12
Finally press the
button of the indoor monitor under talk mode, the pair light
will flash 3 seconds, it means that pairing is successful.
3 Pair remote control with unlock control
(1) One outdoor camera and one indoor monitor system is 1V1 system
Press ‘pair’ button of outdoor camera, indicating light flash, press
button of the indoor monitor
Unlock control is connected to 12V power adapter. Firstly press the pair button of
unlock control, pair light will flash once. Press the
button of remote control, pair
light will continuously flash.
Once again press the pair button of unlock control, pair light will stop flashing.
13
Finally press the
button of remote control, the pair light will flash 3 seconds,
it means that pairing is successful.
9.
Failure diagnosis
Malfunction
Working environment
Fail to start the
(1) Working temperature: -15℃—+55℃
10.
12.
(2)
Working humidity: ≤85%
product
If the power adapter correctly
Re-insert the plug to make
get through the 100-240V AC
power adapter get AC
electricity?
electricity.
No voice in talk
If the talk volume is adjusted to
To adjust the talk volume to
mode
be the least?
be suitable.
Fail to charge
flashing or
noisy
Camera
Light
Source
Indoor monitor
USB
6 LED lights
Power
microwave oven which has
magnetic wave?
Output:DC 5V/1A
If the outdoor camera is far
3.5”TFT 320×240
Battery
Power
Solar moudle, battery or
Power
Battery or 5V 1A power
supply
5V 1A power adapter
supply
adapter
7”TFT 800×480
BL-5J 1250mAh
No signal for
indoor monitor
away from the indoor monitor?
If there is other strong
magnetic space bother?
3.5” 141×87×20 mm
7” 236×130×18 mm
Standby
tape
or
screw fix
35 days
Installa
tion
Standby
Place on the desk etc.
Or wall mounting type
3.5” 20 days
7” 4 days
14
magnetic wave.
the outdoor camera
BL-5J 1250mAh(option)
Double-sided
from these things which has
connect the power?
Battery
Installatio
n
Keep indoor monitor far away
50/60Hz
Screen
Size
induction cooker and
To connect power adapter to
CMOS 300K pixels
126×93×42 mm
If the indoor monitor is close to
If the outdoor camera doesn't
Input:AC 100-240V
Camera
Size
Charge the Li-on battery
with power adapter
The image is
Specifications
If the power of Li-on battery is
correctly?
model (same standard voltage and current).
11.
Turn the switch to the ON
Re-connect indoor monitor
(2) Please always use the specified power adapter, or that with the same
covers may expose you to dangerous voltage or other hazards.
If turn the switch to the "ON"?
If the plug of power adapter
working mode.
(3) Do not attempt to service this product yourself as opening or removing
Debug
not enough?
Notices
(1) Please don’t cover anything on the Microphone or speaker when it is in
Checking
15
Keep the distance in 60
meters within (stopped by
multi-wall)
Keep indoor monitor far away
from the strong magnetic
space