1
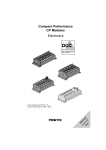
SmartPad
Installation & User Manual
200209 rev 3
Copyright
Code: 200209 rev 3
Date: 14 May 2007
Document code: D500208 rev 3
Copyright © 05/2007 by PaloDEx Group Oy.
All rights reserved.
Documentation, trademark and the software are copyrighted with all
rights reserved. Under the copyright laws the documentation may not
be copied, photocopied, reproduced, translated, or reduced to any
electronic medium or machine readable form in whole or part, without
the prior written permission of Instrumentarium Dental.
The original language of this manual is English.
Instrumentarium Dental reserves the right to make changes in
specification and features shown herein, or discontinue the product
described at any time without notice or obligation. Contact your
Instrumentarium Dental representative for the most current
information.
Manufactured by
Instrumentarium Dental
Nahkelantie 160 (P.O. Box 20)
FI-04300 Tuusula
FINLAND
Tel. +358 45 7882 2000
Fax. +358 9 851 4048
For service, contact your local distributor.
Table of Contents
1
Introduction .............................................................................................. 1
1.1
1.2
1.3
1.4
1.5
1.6
1.7
1.8
2
SmartPad main parts ............................................................................... 9
2.1
2.2
2.3
2.4
2.5
2.6
2.7
3
Embedded medical computer (SPC200)............................................................. 10
SPC200 FrontPanel ............................................................................................ 11
SPC200 RearPanel............................................................................................. 12
SPC200 Cabling.................................................................................................. 12
Wiring diagram .................................................................................................... 14
SmartPad Medical Power (SPM200) .................................................................. 15
SPM200 wiring diagram ...................................................................................... 16
SmartPad installation ............................................................................ 17
3.1
3.2
3.3
3.4
3.5
3.6
3.7
3.8
3.9
3.10
3.11
3.12
3.13
4
Introduction ........................................................................................................... 1
Markings, graphics symbols and abbreviations .................................................... 2
Main Label............................................................................................................. 4
Accessories and preventive maintenance............................................................. 6
Manufacturer’s liability........................................................................................... 7
Disposal ................................................................................................................ 8
Manual .................................................................................................................. 8
General instructions .............................................................................................. 8
General ............................................................................................................... 17
Preparations........................................................................................................ 18
Installing the fastening holders............................................................................ 18
Installation of SmartPadTM display bracket .......................................................... 20
Installation of embedded medical computer........................................................ 21
Cabling of the embedded medical computer....................................................... 22
Finalizing the installation ..................................................................................... 24
Wall mounting ..................................................................................................... 25
SmartPad Medical Power (SPM200) installation ................................................ 26
Changing the line voltage connection ................................................................ 29
SmartNav installation .......................................................................................... 31
Repairing SmartNav installation.......................................................................... 35
Removing SmartNav ........................................................................................... 36
Equipment care ...................................................................................... 39
4.1 Care Instructions ................................................................................................. 39
4.2 Cleaning recommendations ................................................................................ 39
4.2.1
5
Cleaning ..............................................................................................................39
Operating instructions........................................................................... 41
5.1
5.2
5.3
5.4
5.5
5.6
5.7
5.8
5.9
SmartNav Main Window...................................................................................... 41
Imaging program section..................................................................................... 41
Info section.......................................................................................................... 44
Other sections ..................................................................................................... 45
Real Time Status of the unit................................................................................ 45
Help Buttons........................................................................................................ 46
Starting SmartNav............................................................................................... 48
Capturing images ................................................................................................ 48
Patient positioning animation .............................................................................. 49
200209 rev 3
Instrumentarium Dental
i
5.10
5.11
5.12
5.13
5.14
5.15
5.16
6
Taking panoramic exposures .............................................................................. 50
Taking cephalometric exposures ........................................................................ 51
Taking VT exposures .......................................................................................... 52
User programs .................................................................................................... 54
General manuals................................................................................................. 57
Messages............................................................................................................ 57
Multiple monitor support...................................................................................... 59
Troubleshooting..................................................................................... 61
6.1 Diagnosing image quality problems .................................................................... 61
6.2 Diagnosing equipment specific problems............................................................ 62
7
8
Technical specifications........................................................................ 65
Maintenance ........................................................................................... 75
8.1
8.2
8.3
8.4
ii
Maintenance Schedule........................................................................................ 75
Monthly Inspection by User................................................................................. 75
Preventive maintenance program ....................................................................... 75
Touch screen calibration and OSD ..................................................................... 76
Instrumentarium Dental
200209 rev 3
1 Introduction
1 Introduction
1.1
INTRODUCTION
Instrumentarium Dental Orthopantomograph® OP200 D and
Orthoceph® OC200 D are software controlled diagnostic dental X-ray
equipment for producing high quality digital images of dentition, TMjoints and the skull. An embedded medical computer with SmartPad
touch screen display is connected to the OP200 D/OC200 D unit for
image capturing. No additional computer is needed in this setup.
When a user wants to replace the embedded computer with an own
non-medical computer, it will be connected via SmartPad Medical
Power supply (SPM200) to SmartPad system to provide electrical
safety of the system. This power module performs medical grade
isolation for the SmartPad display and the user's PC. A desktop LCD
display can also be powered through the module, if the PC supports
the connection of multiple monitors. With this setup SmartNav can be
run on the SmartPad display and the other LCD display can be used
for running a practice management software (PMS).
SmartPad is a full color high resolution LCD display with touch screen
interface. The SmartPad produces a menu easy to read and follow
with simple and intuitive navigation through the operations.
SmartPad can only be used with Orthopantomograph® OP200 D and
Orthoceph® OC200 D digital units. SmartPad can be installed either in
the OP200 D / OC200 D unit or to a wall.
SmartNav software provides easy selection of imaging programs, arch
sections, lateral scanning start position, and more. SmartNav is used
together with the OP200 D control panel. The exposure button can be
found on the OP200 D control panel. The following operations can be
performed with SmartNav, assuming that all the other equipment are
ready for use:
•
•
•
•
•
•
•
•
•
•
Selection of imaging programs
Selection of arch sections
Selection of lateral scanning start position
Selection of user programs
Setting of user parameters
Selection of the patient positioning animation to be shown on
SmartPad touch screen to support correct clinical use of
OP200 D/OC200 D
Selection of exposure values
Preview of exposed X-ray images
Instant Dynamic help for imaging program purposes
Complete User Manuals in pdf-format
This user & installation manual covers the usage and installation of
SmartPad. Refer to your SmartPad manuals before installing or using
the SmartPad and SmartNav software. See your Windows manuals
for further information about the Windows environment.
SmartNav works with Windows® XP Professional operating system.
200209 rev 3
Instrumentarium Dental
1
1 Introduction
NOTE!
SmartPad must be installed according to the SmartPad installation
manual by a qualified technician. Only trained personnel should be
allowed to operate SmartPad.
1.2
MARKINGS, GRAPHICS SYMBOLS AND
ABBREVIATIONS
The following markings are used in this manual:
NOTE!
Contains useful information for the reader about the unit and its use.
CAUTION!
Contains important instructions. If these instructions are not observed,
malfunction of the unit or damage to the unit or other property may
occur.
WARNING!
Contains warnings and instructions about the safety of the unit. If
these warnings are not respected, serious risks and injury may be
caused to the patient and operator.
The following symbols are used in OP200 D and SmartPad:
Radiographic control
Protective earth (ground)
~
AC, Alternating current
Attention, consult accompanying documents.
Instructions and warnings in OP200 D and SmartPad
manuals must be followed.
If the unit has CE-marking it is CE-marked according to
the Medical Device Directive 93/42/EEC.
2
Instrumentarium Dental
200209 rev 3
1 Introduction
If the unit has UL-marking, it is UL-marked according to
UL60601-1 and CAN/CSA C22.2 No.601.1
This symbol indicates that the waste of electrical and
electronic equipment must not be disposed as unsorted
municipal waste and must be collected separately.
Please contact an authorized representative of the
manufacturer for information concerning the
decommissioning of your equipment.
200209 rev 3
PC
Personal computer
HDD
Hard disk drive
Hz
Hertz; cycles per second
MHz
Millions of hertz
CPU
Central processing unit (computer)
RAM
Random access memory
MB
Mega bytes
GB
Giga bytes
CD-R
Compact disc (read)
CD-RW
Compact disc (read and write)
DVD-RW
Digital Versatile Disc (read and write)
PCI
Peripheral Component Interconnect
LAN
Local Area Network
Instrumentarium Dental
3
1 Introduction
1.3
MAIN LABEL
The type and version of the SmartPad is defined in the main label of
the unit located on the bottom of the embedded medical computer
next to the power cord socket. The unit is class I and with IP-20
protection.
The type designation label of the SmartPad display is located on the
bottom part of the display.
Fig 1.1.
Location of main label and CE mark
M O D E L :
S e r.N o :
D a te o f m a n u fa c tu re :
4 A /1 0 0 -2 4 0 V ~
5 0 /6 0 H z
IE C 6 0 6 0 1 -1
IP -2 0
!
0537
T h is p r o d u c t c o m p lie s w ith D H H S
r e g u la tio n s 2 1 C F R S u b c h a p te r J
a t th e d a te o f m a n u fa c tu re .
M a n u
In s tru
N a h k
F I-0 4
E Q
O E
E C
C C
-1 ,
N O
U IP
L E C
H A N
O R D
C A N
.6 0 1
3 2 Z X
fa c tu re d b y
m e n ta r iu m D e n ta l
e la n tie 1 6 0
3 0 0 T U U S U L A , F in la n d
Fig 1.2.
4
IC A L
C T T
D M
IN A
0 6 0 1
M E
T R
IC A
A N
/C S
.1
N T W
IC S H
L H A
C E W
A C 2
IT H
O C K ,
Z A R D S
IT H
2 .2
2 0 0 1 6 6
M E D
R E S P E
F IR E A N
O N L Y
U L 6
Main label
Instrumentarium Dental
200209 rev 3
1 Introduction
Fig 1.3.
Location of the SmartPad display's type designation label.
SmartPad main label is located on the SPM200 power module in the
option when user's own PC is used. The unit is class I and with IP-20
protection. Because the unit can be changed from 230V line voltage
connection to 115V line voltage, there is separate main labels for both
line voltages.
Fig 1.4.
Location of the main label on the SmartPad Medical Power (SPM200).
Main label for 230V line voltage
200209 rev 3
Instrumentarium Dental
Main label for 115V line voltage
5
1 Introduction
1.4
ACCESSORIES AND PREVENTIVE
MAINTENANCE
If SmartPad is installed to a wall, an optional 10 m optical cable (part
no. 69061) is necessay. For ethernet connections, use an unshielded
CAT5/CAT6 LAN cable. These accessories are suitable for use with in
the patient environment.
WARNING!
The LAN cable shall be unshielded CAT5/CAT6, so that multiple
chassis must not be connected! The Ethernet HUB to which the
medical grade computer is connected to, should be approved
appropriately (e.g. EN 60950, IEC 60950, UL 60950). After installation
check that the IEC 60601-1 leakage current levels are not exceeded.
NOTE!
In order to maintain safe and correct functioning of OP200 D and
SmartPad, only the approved accessories may be used.
During normal operation, any other detachable accessories (mouse,
keyboard, USB memory stick etc.) may not be connected to the
embedded medical computer in the patient environment. During
maintenance, the PS/2 mouse, PS/2 keyboard and all USB
accessories approved by Microsoft, are allowed. Driver installation is
not allowed.
WARNING!
Both SmartPad and OP200 D/OC200 D comply with IEC601-1-1
medical safety standards, but in order to use other standardscompliant equipment in the system, the equipment EITHER has to be
of medical grade or it has to be located at least 2 meters away from
the OP200 D/OC200 D unit. The installer and the user of the system
must confirm that at least one of the above requirements is fulfilled.
The equipment is medical grade if it complies with IEC 601-1
standards referred to in the accompanying documents.
WARNING!
SmartPad Medical Power (SPM200) complies with IEC60601-1
medical safety standards and therefore is suitable for use also with in
the patient environment. The system complies with medical safety
standards, if the external computer connected to OP200 D, the
SmartPad display and a possible external LCD display are powered
through the SPM200 power module. The external, non-medical grade
PC and display should comply with relevant IEC standards. It is not
allowed to connect other non-medical grade equipment (printer,
scanner etc.) to the external PC system than the external LCD display
that is powered through SPM200.
6
Instrumentarium Dental
200209 rev 3
1 Introduction
WARNING!
The user shall not touch parts of non-medical electrical equipment and
the patient simultaneously.
1.5
MANUFACTURER’S LIABILITY
As a manufacturer we can only assume liability for safe and reliable
operation of this unit when:
•
•
•
•
•
SmartPad installation was performed according to the SmartPad
Installation Manual and
SmartPad is used according to the SmartPad User Manual
Maintenance and repairs are performed by a qualified
Orthopantomograph® Dealer and
Original or authorized spare parts are used
SmartNav software is installed and used according to the User
Manual.
Safe and reliable usage of the product requires that the user has read
and followed the instructions and observed the restrictions given in the
manual. We recommend that qualified serviceman check that the unit
is
in its original condition regarding electrical, radiation and
mechanical safety according to our maintenance program and
described in more details in the Maintenance chapter. For more
information please contact your local dealer.
If service on the unit is performed, a work order describing the type
and extent of repair must be provided by the service technician. This
must contain information of changes of nominal data or work range
performed. The work order must furthermore indicate the date of
repair, the name of the company concerned and a valid signature. The
user should keep this work order for future reference.
NOTE!
For computer systems: Instrumentarium Dental can guarantee OP200
D PCI board and CliniView software compatibility with other computer
hardware and software only if that configuration has been tested by
Instrumentarium. Any later changes to the hardware or software may
void this test.
WARNING!
The openings on the enclosures are for air convection. Protect the
equipment from overheating. Do not cover the openings!
WARNING!
Never insert anything metallic into the openings. Doing so may create
a danger of electric shock.
200209 rev 3
Instrumentarium Dental
7
1 Introduction
1.6
DISPOSAL
Follow all local regulations on disposal of waste parts. At least
SmartPad electronic circuits should be regarded as toxic waste
products.
1.7
MANUAL
All SmartNav functions can be selected with the graphical symbols in
the windows and dialogs. This manual describes the procedure by
using graphical symbols. The graphical symbols used are shown
beside the text.
NOTE!
Touching the screen means pressing the screen once with the
forefinger. Clicking means pressing the left mouse button once.
1.8
GENERAL INSTRUCTIONS
In order to obtain full advantage of SmartNav, you should be familiar
with the functionality of the operating system.
It is important to use the SmartPad full color high resolution touch
screen. SmartPad should be operated in subdued light and away from
strong direct light.
If the equipment is not used for a long time, disconnect it from the
mains to avoid damage by transient overvoltage.
8
Instrumentarium Dental
200209 rev 3
2 SmartPad main parts
2 SmartPad main parts
2
3
1
1
SmartPad (SPC200) embedded medical computer
2
Monitor supporting arm
3
SmartPad, touch screen monitor (STP200)
NOTE!
When user's PC is used, the embedded medical grade computer is
replaced with SmartPad Medical Power (SPM200).
200209 rev 3
Instrumentarium Dental
9
2 SmartPad main parts
2.1
EMBEDDED MEDICAL COMPUTER (SPC200)
4
5
6
8
7
6
4
Top cover
5
Cover plate
6
Base plate
7
Inner case
8
ON/OFF-indicator
10
Instrumentarium Dental
200209 rev 3
2 SmartPad main parts
2.2
SPC200 FRONTPANEL
9
19
10
11
9
13
14
15
16
12
24
25
26
20
9
21 17
18
22
23
Front panel
10 Earth ground connector
11 Monitor power connector
12 Optical cable connectors (RX and TX)
13 Link OK LED
14 EEPROM failure LED
15 Supply voltages OK LED
16 Local reset LED
17 VGA connector
18 Two USB connectors
19 1GB Ethernet connector
20 COM1 connector
21 LPT connector
22 Keyboard connector
23 Mouse connector
24 Audio in
25 Audio out
26 Microphone
200209 rev 3
Instrumentarium Dental
11
2 SmartPad main parts
2.3
SPC200 REARPANEL
27
29
30
28
31
27 Rear panel
28 RESET-switch
29 Microsoft® Windows XP authenticity label
30 AC inlet
31 Main label
2.4
SPC200 CABLING
32
12
33
35
34
36
Instrumentarium Dental
200209 rev 3
2 SmartPad main parts
37
38
32 STP200 USB cable
33 STP200 VGA cable
34 Unshielded CAT5/CAT6 Ethernet Cable for LAN connection
35 STP200 Power cable
36 Optical cable to OP200 D
37 Mains cable
200209 rev 3
Instrumentarium Dental
13
2 SmartPad main parts
2.5
14
WIRING DIAGRAM
Instrumentarium Dental
200209 rev 3
2 SmartPad main parts
2.6
SMARTPAD MEDICAL POWER (SPM200)
When a user wants to replace the embedded computer with an own
non-medical computer, it will be connected via SmartPad Medical
Power supply (SPM200) to SmartPad system to provide electrical
safety of the system.
SPM200 includes a medical grade power supply for the SmartPad
display (STP200) and a medical grade isolation transformer for
powering the external PC. An external LCD display can also be
powered through the transformer, if the PC supports the connection of
multiple monitors. SmartNav software runs on the external PC and the
GUI is shown on the SmartPad display. The external display can be
used for viewing other programs (e.g. practice management
softwares) that are run on the PC.
38 Mains switch
39 AC input
40 AC output (A)
41 AC output (B)
42 SmartPad display power supply +12VDC
43 Protective ground connector
44 Main label (reversible for 230V/115V)
45 Fuses
NOTE!
Combined load on outputs A+B must not exceed 700VA.
200209 rev 3
Instrumentarium Dental
15
2 SmartPad main parts
2.7
16
SPM200 WIRING DIAGRAM
Instrumentarium Dental
200209 rev 3
3 SmartPad installation
3 SmartPad installation
3.1
GENERAL
WARNING!
SERVICING AND INSTALLING THIS UNIT WITHOUT ADEQUATE
EXPERTISE IS EXTREMELY DANGEROUS. Instrumentarium Dental
recommends that all service operations are performed by authorized
Instrumentarium Dental service personnel!
WARNING!
Prevent unauthorized access to the unit during the installation
process. Some internal parts of the unit have dangerous voltage
levels, which may be exposed during installation when the unit covers
have been removed.
This chapter covers the installation of SmartPad with the embedded
medical computer system and with the SmartPad Medical Power
(SPM200). As the manufacturer, we strongly recommend that you
read this manual before installation. For information about how to use
the SmartPad, OP200 D unit, and CliniView software please refer to
the appropriate manuals.
These manuals and future updates will be available on request from
Instrumentarium Dental.
As the manufacturer, we strongly recommend that you read,
understand, and follow the SmartPad and OP200 D manuals before
using this system.
Use only approved cables, plugs and fuses.
Mains connector types:
– NEMA 5-15P or similar Hospital grade (US/110 V)
Power supply cord:
– For UL-countries: SJT, 3 x AWG 16/18
– H05VV-F 10-16A 250V (CE)
Fuses for SPM200:
– 230V line voltage: Littelfuse 326 series 4A (slow blow) /
Bussmann MDA series 4A (time delay)
– 115V line voltage: Littelfuse 326-series 8A (slow blow) /
Bussmann MDA series 8A (time delay)
200209 rev 3
Instrumentarium Dental
17
3 SmartPad installation
3.2
PREPARATIONS
Switch the power off and remove the column back plate
1
Switch the OP200 D power off.
2
Remove the counter weight servicing plate behind the column by
opening four allen key screws.
3.3
INSTALLING THE FASTENING HOLDERS
Install the fastening holders for the display and the SPC200
embedded computer, and measure and mark the installation height of
940mm.
NOTE!
Do not drop the fastening holders or other parts into the OP200
column!
1
Insert the fastening holders (2 pcs) into OP200 unit column slots.
Do not harm the Z-movement (up and down movement) motor
cable while placing the holders to the column slots.
Embedded computer holder pin
SmartPad mounting points / stopper screws
(left or right sided installation)
Grounding point
18
Instrumentarium Dental
200209 rev 3
3 SmartPad installation
Slot for the Z-movement motor power cable
2
Place the holders in the column slots so that the embedded
computer holder pin faces upwards. Temporarily loosen the
stopper screws to allow the fastening holders to be placed to the
column slots. To prevent the Z-motor cable from being damaged,
the cable should be located in the dedicated cable slot while
installing and tightening the display bracket!
Column slot stopper screw
Z-motor power cable
3
200209 rev 3
Measure and mark 940mm from the base of the OP200 D
column.
Instrumentarium Dental
19
3 SmartPad installation
3.4
INSTALLATION OF SMARTPAD
TM
DISPLAY
BRACKET
Install the display bracket and SmartPad.
1
Decide onto which side of the OP200 D unit you wish to install
SmartPad.
2
Install the SmartPadTM display bracket to the fastening holders (2
pcs of M6x20 mm hexagon socket head cap (DIN912) screws
with washers). Match the display bracket's upper edge with the
940 mm mark. Use a spirit level to ensure that the display bracket
is horizontal. Install the grounding cable to the display bracket
grounding point while fastening the bracket. Do not overtighten!
Grounding cable terminal can also be installed to the grounding
point on OP column at this point.
3
Install the SmartPad display to the bracket so that the display
cables run below the supporting arm. Place two sliding ring plates
to the cleft between the bracket and the supporting arm. One
piece per slot.
20
Instrumentarium Dental
200209 rev 3
3 SmartPad installation
3.5
INSTALLATION OF EMBEDDED MEDICAL
COMPUTER
NOTE!
Do not drop washers into the computer while fastening!
Attach the SPC200 embedded medical grade computer.
1
The embedded computer cover plate can be removed (if needed)
by releasing two screws holding the cover.
2
Install the counter weight servicing plate on the rear side of the
column prior to installing the embedded computer.
3
Lift and place the embedded computer hanging to the holder pins.
Pass the SmartPad display cables through the opening on the
SPC200 computer. Install and tighten the washers and nuts
holding the computer.
NOTE!
Do not damage the grounding cable or white colored Z-motor cable
while installing and fastening the embedded computer.
200209 rev 3
Instrumentarium Dental
21
3 SmartPad installation
3.6
CABLING OF THE EMBEDDED MEDICAL
COMPUTER
Attach the cables to the SPC200. The OP200 column, the SPC200,
and the supporting arm must be interconnected by a grounding wire.
1
Connect the other end of the grounding cable to the OP200
column with a M4 x 4 screw (N.B. maximum length!), and to the
ground connector on the computer front panel (see chapter front
panel of the SPC200).
2
Connect the SmartPad power cable, VGA cable, USB cable and
the grounding cable to the computer connectors.
3
Bring in the optical cables through the larger opening on the
SPC200, from the side that the optical connectors are located on.
4
Connect the optical cables and secure them through the catch
that is located on the side of the SPC200 just below the opening.
5
If an Ethernet connection is needed, plug the LAN cable into the
computer socket before putting the cover plate on, so the LAN
cable can run inside the cover.
WARNING!
The LAN cable shall be unshielded CAT5/CAT6, so that multiple
chassis must not be connected! The Ethernet HUB to which the
medical grade computer is connected to, should be approved
appropriately (e.g. EN 60950, IEC 60950, UL 60950). After installation
check that the IEC 60601-1 leakage current levels are not exceeded.
6
22
Place the cover plate on and secure it with the nuts.
Instrumentarium Dental
200209 rev 3
3 SmartPad installation
NOTE!
Connect also the SmartPad
display grounding cable to the
embedded computer
grounding point.
WARNING!
Never use LCD if the power cord has been damaged.
WARNING!
The OP200 column, the SPC200, and the supporting arm MUST be
interconnected by a grounding wire.
200209 rev 3
Instrumentarium Dental
23
3 SmartPad installation
3.7
FINALIZING THE INSTALLATION
Switch the power on and attach the optical cables to the OP200 D.
1
Attach the power cord to the mains connector located on the
bottom of the SPC200.
2
Switch the SmartPad on by pressing the button located next to
the mains connector on the bottom of the SPC200.
3
Now the SmartPad should be on: the SmartPad starts and a
green LED should be lit on the side of the SPC200.
4
Switch on the OP200 D.
5
Check the optical cable jacks and optical cable connectors behind
the OP200 D unit. There should be a dim red light on one of the
connectors on the OP200 D and on one of the optical cable jacks.
6
Connect the optical cable with the red light to the lightless
connector and the lightless cable to the connector with the red
light on the OP200 D.
7
The second green LED (L) should light up on the PCI card in the
SmartPad.
8
Replace the SPC200 top cover.
9
The SmartPad hardware is now installed.
NOTE!
Optical cable is very sensitive for mechanical damages. Route the
optics cable properly so that all possible damage is avoided. Ensure
that enough free cable is left for up and down movement of the unit.
24
Instrumentarium Dental
200209 rev 3
3 SmartPad installation
3.8
WALL MOUNTING
SmartPad with embedded medical computer can also be mounted on
a wall. Prior to mounting, locate the supporting material of the wall or a
mounting surface, and choose the mounting system according to the
following examples. Mount the unit so that the upper edge of the
supporting arm’s bracket is approximately 40 inches (1000 mm) from
the floor.
200209 rev 3
1
Wall: The wall and mounting hardware must sustain a force of
350 lbs./1500N on each wall bracket bolt.
2
Specify the sight of the unit and drill suitable holes according to
mounting hardware. Insert plugs if necessary.
3
Fasten the mounting bracket loosely to the wall. Level and tighten
the wall mounting bracket.
4
Repeat the previous steps when installing the SPC200.
5
The SPC200 and the SmartPad display must be connected with a
grounding wire.
Instrumentarium Dental
25
3 SmartPad installation
WARNING!
Connect the grounding wire between the earth ground connector on
the computer front panel and the SmartPad display (see chapter
SPC200 FrontPanel).
NOTE!
We recommend that when mounting the SPC200 to a wall, the
SPC200 is installed so that the ON/OFF indicator is visible.
3.9
SMARTPAD MEDICAL POWER (SPM200)
INSTALLATION
Connecting the SPM200 power module to SmartPad and an external
PC system.
26
Instrumentarium Dental
200209 rev 3
3 SmartPad installation
1
Place the SPM200 module on a table or use the bottom plate for
fixing the module to a wall or to another suitable surface. Please
note that it is not allowed to place the SPM200 on the floor. Mount
the unit in such a way that ingress of liquids and possibility of
mechanical damage is prevented during normal use.
2
Prior to mounting, locate the supporting material of the wall or a
mounting surface, and choose the mounting system according to
examples in the following table. Mount the base frame so that the
four holes at the bottom. Insert M4x12 screws to the lowest holes
of the frame to support the module when slided to the frame.
SPM200 and the external PC shall be located near each other for
easier cabling.
Wall type
200209 rev 3
Anchor
Thread
Screw
Washer
1
K25
Concrete
wall
HSA expansion
anchor
M6
M6 x 50
2
K30
Concrete
wall
HKD-S flush
anchor
M6
DIN 912
M6 x 30
DIN 125B 6,4
3
Wood
frame wall
Hex head
wood screw
M6
DIN 571
6 x 45
DIN 125B 6,4
4
Steel
frame
Installing
directly to steel
framing is not
allowed.
Instrumentarium Dental
27
3 SmartPad installation
3
Install the SmartPad display power cable to the +12VDC
connector (42). Connect the VGA and the USB cables to the PC
and the display grounding cable to the protective grounding point
(43) on SPM200. Use IEC320 extension cables to connect the
AC supply from outputs A and B (40 & 41) to the PC and a
possible external LCD display.
4
Connect the power cord to AC input (39) and switch the power on
from the mains switch (38).
5
The external, non-medical grade PC and LCD display used as
part of the system are intended to be supplied via SPM200, they
shall not be connected directly to the wall outlet, otherwise
patient's or user's safety might be threatened.
WARNING!
Combined load on outputs A+B must not exceed 700VA.
WARNING!
SmartPad Medical Power (SPM200) shall not be placed on the floor to
prevent the ingress of liquids and to prevent mechanical damage.
WARNING!
Additional multiple portable socket outlets shall not be connected to
SPM200 system.
28
Instrumentarium Dental
200209 rev 3
3 SmartPad installation
WARNING!
SPM200 shall be used only for supplying power to equipment which is
intended to form part of the system. Otherwise patient's or user's
safety might be threatened.
NOTE!
SmartPad Medical Power (SPM200) includes a high power isolation
transformer so it is not advisable to switch on the module repeatedly,
because a fuse will be blown. If you switch of the module, please wait
for 1-2 minutes before switching the module on again.
3.10 CHANGING THE LINE VOLTAGE CONNECTION
The power modules are delivered from factory with 230V line voltage
settings. If you have to change to 115V line voltage, read this chapter
for instructions.
WARNING!
Only authorised technician is allowed to perform the change between
230V and 115V line configurations.
WARNING!
Do not connect the mains power until instructed to do so.
200209 rev 3
1
Make sure that the power line meets the requirements set by the
manufacturer for the SPM200. For more details see chapter
Technical Specifications.
2
Make sure that the mains power is switched off and the AC input
power cord is disconnected.
3
Remove the cover of SMP200 by opening the ten allen key
screws.
4
Locate the terminal block of SMP200. Remove the line voltage
cable connected to the transformer primary from 230V position
and connect it to the 115V position on the primary side. Remove
the line voltage cable connected to the transformer secondary
from 230V position and connect it to the 115V position on the
secondary side
5
Close the cover with the ten allen key screws.
6
Turn the main label around from 230V position to 115V position.
7
Change the fuses to type 8A slow blow (Littelfuse 326 series 8A /
Bussmann MDA series 8A)
8
Connect the power cord and switch on the power module.
Instrumentarium Dental
29
3 SmartPad installation
30
Instrumentarium Dental
200209 rev 3
3 SmartPad installation
3.11 SMARTNAV INSTALLATION
NOTE!
Each required driver shall be installed to the SPC200 before starting
the installation of SmartNav. The driver installation guide is found from
the drivers\readme.htm file on the SmartNav installation CD.
Start installation by inserting SmartNav installation CD into the CDROM drive (use external CD-ROM drive with USB connection for
SmartPad). The installation starts automatically. Installation can also
be started by executing setup.exe on root of installation media.
200209 rev 3
Instrumentarium Dental
31
3 SmartPad installation
The setup main screen is shown at the beginning. Select Install
SmartNav for installation.
Setup shows a welcome screen at the beginning. The screen displays
the SmartNav version to be installed. Select Next.
License agreement must be accepted before SmartNav can be
installed. After reading the license agreement please select the Accept
option and press Next.
32
Instrumentarium Dental
200209 rev 3
3 SmartPad installation
Customer information is required before the installation process can
continue. Enter customer information and select Next
Select destination folder where SmartNav software will be installed. By
default, SmartNav will be installed in the <program files>\SmartNav
folder. Installation requires 200 Mb of free space on the hard drive.
Select Change if another destination is required other than default.
After the destination folder is chosen, select Next.
Setup is ready to install SmartNav. Select Install to start the
installation.
200209 rev 3
Instrumentarium Dental
33
3 SmartPad installation
Setup shows installation progress.
After installation, the system must be rebooted. Select Finish and the
system will reboot automatically..
34
Instrumentarium Dental
200209 rev 3
3 SmartPad installation
3.12 REPAIRING SMARTNAV INSTALLATION
Reinstalling SmartNav will launch the SmartNav maintenance
program shield instead of the setup shield. If there have been any
problems with the workstation, it is possible to try and repair the
installation.
Select Repair from the maintenance screen. Select Next.
If there are SmartNav-related processes running on the system, setup
shows a list of them. Setup terminates the processes if Next is
selected.
200209 rev 3
Instrumentarium Dental
35
3 SmartPad installation
Setup reinstalls software components. When the maintenance
operations have ended, select Finish.
3.13 REMOVING SMARTNAV
Maintenance screen also offers a software removal option. Selecting
Remove and Next starts the uninstallation.
Confirmation of removal must be accepted. Select Yes.
36
Instrumentarium Dental
200209 rev 3
3 SmartPad installation
A list of running SmartNav related processes is displayed before
starting the uninstallation. Select Next.
Setup uninstalls SmartNav. After uninstallation, the system must be
rebooted. Select Finish to exit the maintenance program, the system
will reboot automatically.
200209 rev 3
Instrumentarium Dental
37
3 SmartPad installation
38
Instrumentarium Dental
200209 rev 3
4 Equipment care
4 Equipment care
4.1
CARE INSTRUCTIONS
X-ray imaging systems are sophisticated electronic products that
include advanced technologies. As such, they have to be handled with
a high degree of care. This document gives the care instructions
applicable to the SmartPad.
NOTE!
It is strictly mandatory to follow these Care Instructions in order to not
void the warranty of the product.
CAUTION!
As a standard recommendation, clean the unit regularly using nonagressive, mild, and commercially available cleaning agents.
4.2
CLEANING RECOMMENDATIONS
Items and surfaces can be cleaned with a soft cloth moistured with
disinfective after every usage.
WARNING!
Always disconnect SmartPad and OP200 D from the mains prior to
cleaning or disinfecting the unit.
CAUTION!
Do not allow water or other cleaning liquids to enter the unit, as these
may cause short-circuits or corrosion.
4.2.1
Cleaning
The purpose of cleaning and rinsing is to remove all adherent visible
impurities (eg. blood, protein substances and other debris), to reduce
the number of particulate and micro-organisms, and to reduce the
amount of pyrogenic and antigenic material.
Use a cloth moistened in cool-to-lukewarm, soapy water for cleaning
the unit and preventing coagulation, and thus faciliate the removal of
protein substances. Then wipe with a cloth moistened in clean water.
Mild detergent solution can be used. Use cleaners or solvents, listed
as permissible cleaning agents below. If you are uncertain of the
nature of the cleaning agent, do not use it.
200209 rev 3
Instrumentarium Dental
39
4 Equipment care
Examples of cleaning agents that are permissible or prohibited when
cleaning the unit panels:
Permissible: methanol (metyl alcohol), soap, Isopropyl alcohol,
distilled water.
Prohibited: bentzene, chlorine bentzene, acetone, acetic ether, agents
containing phenol, paracetic acid, peroxide, and other oxygencleaving agents, sodium hypochlorite and iodine-dissolving agents.
Never use corrosive or solvent disinfectants. All items and surfaces
should be dried before further usage.
WARNING!
Do not use any cleaning sprays as the vapor could ignite and cause
injury.
40
Instrumentarium Dental
200209 rev 3
5 Operating instructions
5 Operating instructions
5.1
SMARTNAV MAIN WINDOW
Imaging program
section
Info-section
Settings
Help-section
Real time status
of the unit
5.2
IMAGING PROGRAM SECTION
In panoramic imaging programs, the dental arch and image model are
program specific.
200209 rev 3
Instrumentarium Dental
41
5 Operating instructions
Fig 5.1.
Model heads for imaging programs P9 and P10
In cephalometric imaging programs, the model head and setting
buttons are program specific.
IMAGING PROGRAMS
Standard Panoramic (P1)
Pediatric Panoramic (P2)
Ortho Zone enhanced Panoramic
(P3)
Orthogonal Panoramic (P4)
Wide arch Panoramic (P5)
TMJ lateral projection (P6) or
Ortho TMJ, axial corrected lateral
projection (optional) (P6)
TMJ, posterior-anterior projection
(P7)
Maxillary Sinus View (P8)
42
Instrumentarium Dental
200209 rev 3
5 Operating instructions
Cephalo lateral projection (P9)
Cephalo PA projection (P10)
Volumetric Tomography mandible
(P11)
Volumetric Tomography maxilla
(P12)
Volumetric Tomography
Panoramic (P13)
DENTAL ARCH
Enabled arch sections in P1. Two sections disabled.
IMAGE MODEL
X-ray image model shows the enabled and disabled arch sections
from the result point of view.
Disabling sections of the dental arch is shown as limited image model.
200209 rev 3
Instrumentarium Dental
43
5 Operating instructions
5.3
INFO SECTION
AEC-mode
Manual-mode
EXPOSURE INDICATORS
Exposure Indicator symbol
Pediatric adapter symbol
EXPOSURE VALUES
kV value field in AEC mode
mA value field in AEC mode
kV and mA setting button in
Manual mode
time value field
dose value field
Automatic exposure control
Test mode
Manual exposure control
44
Instrumentarium Dental
200209 rev 3
5 Operating instructions
5.4
OTHER SECTIONS
GENERAL SETTING
User programs and pdf-format manuals are available under the
general setting button.
DENSITY SETTING
Nine dose control steps. Default setting is shown in the figure. The
dose is decreased when a lighter button is selected. The dose is
increased when a darker button is selected.
ICONS FOR PRE-PROGRAMMED TECHNIQUE FACTORS
Child
-
Juvenile - Small adult - Adult - Large adult
The dose is decreased when a smaller sized icon is selected. The
dose is increased when a larger sized icon is selected.
5.5
REAL TIME STATUS OF THE UNIT
Status field shows when the unit is ready for capturing or any trouble
occurs. Green, yellow and blue colour indicate the status in question.
See chapter General settings for more detailed information.
200209 rev 3
Instrumentarium Dental
45
5 Operating instructions
5.6
HELP BUTTONS
Instant dynamic help button
Patient positioning animation
button
INSTANT DYNAMIC HELP
Press the dynamic help button once and then press the imaging
program button. The dynamic help dialog is shown on the screen for
the selected imaging program.
46
Instrumentarium Dental
200209 rev 3
5 Operating instructions
PATIENT POSITIONING ANIMATION WINDOW
Imaging
program
buttons
Animation
controls
Animation
display
Progress
bar
Scene
buttons
The selected imaging program can be changed in the patient
positioning animation window. Each patient positioning procedure for
each imaging program is composed of several scenes. One patient
positioning step can be played by pressing one scene button.
Progress bar shows which animation scene is displayed on the
screen.
200209 rev 3
Instrumentarium Dental
47
5 Operating instructions
ANIMATION CONTROLS
Half speed button
Full speed button
Start imaging program animation
Start animation scene /
One step back for one animation
scene
Scene button. Pressing the button
during playing pauses the
animation scene. Re-pressing the
button continues the scene.
Button for patient positioning
animation of imaging programs
P1-P5
5.7
STARTING SMARTNAV
To start the SmartNav Software, click the “ i ” logo in the floating
SmartNav dialog or the SmartNav icon on the desktop, or open the
software from Start menu Programs ⇒ SmartNav.
The SmartNav dialog can be dragged to different corners on the
screen.
The keyboard button opens the floating keyboard on the screen.
5.8
CAPTURING IMAGES
CAUTION!
Do not run other programs while taking X-ray images. The imaging
system uses all the resources of the workstation.
1
Launch or activate CliniView or other DICC image capturing
software. The SmartNav software minimizes itself automatically.
2
Select patient from CliniView.
3
Press the Start image capturing button (e.g. in CliniView) or
otherwise enable the image capturing .
4
SmartNav maximizes itself automatically on the top of the screen.
Select the necessary imaging program and other settings (e.g.
exposure values, modes and density or patient size).
5
Position the patient. Use the SmartNav patient positioning
animation guide if needed.
48
Instrumentarium Dental
200209 rev 3
5 Operating instructions
6
Unit real time status field at the bottom of the screen indicates if
the system is warming up and when the system is ready for
image acquisition. Message “Ready for capture...” is displayed
when the system is ready.
WARNING!
Turning off the X-ray unit or the workstation during the exposure may
cause the image to be lost.
7
Press the exposure button when the system is in a Ready state.
The exposure must be made within the time-out (1...10 min.);
otherwise, the image capture time expires. The exposure
indicator is lit when exposing. SmartNav status displays “X-ray
unit is radiating...”
8
SmartNav shows the image preview when exposing and after 2-3
seconds CliniView maximizes itself on the top of the screen
showing the final image.
5.9
200209 rev 3
PATIENT POSITIONING ANIMATION
1
Select the necessary imaging program.
2
Press the patient positioning animation button.
3
The first animation frame of the selected imaging program is the
default starting point.
4
In the patient positioning animation dialog, it is possible to select
another imaging program. The first animation frame of the
selected imaging program is the default starting point.
Instrumentarium Dental
49
5 Operating instructions
5.10 TAKING PANORAMIC EXPOSURES
Enabled arch sections in P1. Two sections disabled.
Every imaging program, requires at least one section to be selected.
In P8 no sections can be disabled.
Imaging program P6 can be changed from TMJ lateral projection to
Ortho TMJ, axial corrected lateral projection (and vice-versa) through
the service program settings in the control panel.
Auto mode (A) is selected in the imaging programs P1-P5.
Manual mode (M) is selected in the imaging programs P6-P10 and the
exposure values can be changed manually.
50
Instrumentarium Dental
200209 rev 3
5 Operating instructions
5.11 TAKING CEPHALOMETRIC EXPOSURES
Fig 5.2.
Yellow area is the exposure area, which can be adjusted with the arrow
buttons.
1
The exposure area in cephalometric lateral projection can be
limited with the two large arrow button under the head figure. The
exposure area is adjusted 10 mm by pressing the arrow button
once. The effect of pressuring takes approx. three seconds from
SmartNav to the OP200 unit. After a few seconds, the the arrow
buttons return to enable state.
2
Minimum area is 170 mm measured from 10 mm behind the ear
rod to the back of the head.
Maximum area 270 mm
200209 rev 3
Instrumentarium Dental
Minimum area 170 mm
51
5 Operating instructions
5.12 TAKING VT EXPOSURES
NOTE!
See more detailed instructions in Volumetric Tomography User
Manual and CliniView 7 User Manual.
Fig 5.3.
VT panoramic (P13)
When the patient positioning device for VT panoramic exposure is
installed to OP200 D unit, the unit selects automatically the VT
panoramic exposure mode (program 13). Correct collimator (PAN) has
to be selected.
Fig 5.4.
52
VT projection for maxilla (P12)
Instrumentarium Dental
200209 rev 3
5 Operating instructions
Fig 5.5.
VT projection for mandible (P11)
Install the patient positioning device for projection procedures and
select correct collimator (VT). Select correct VT program; program 11
for mandible or program 12 for maxilla imaging. SmartNav shows the
exposure area (incisor, canine, molar) that has been selected from the
patient positioning device. VT projection parameters can be changed
by opening the parameter window. You can change the aperture angle
and the number of projection images for VT procedure.
Fig 5.6.
Projection parameters
SmartNav goes automatically to VT exposure mode when VT
calibration tool is connected. VT panoramic procedure (program 13)
and VT projection procedure (program 11 / 12) can be selected from
SmartNav in order to go through the calibration procedure.
200209 rev 3
Instrumentarium Dental
53
5 Operating instructions
5.13 USER PROGRAMS
NOTE!
The user program setting takes effect as soon as the user program
settings dialog is closed.
POWER UP SETTINGS
Select the imaging program and the exposure mode, which are on
when the OP200 D is turned on.
54
Instrumentarium Dental
200209 rev 3
5 Operating instructions
CONSTANT CONTRAST / SPINE COMPENSATION
The general dose reference default value for all imaging programs is
5.0. Select the Default kV and Offset mode in every imaging program if
needed. Spine compensation can be set to P1 - P5 (OFF, LO, HI,
ASC).
“OFF” disables spine compensation. It can be selected for pediatric
patients. When disabled, the same kV value is used during the
exposure cycle.
“LO” compensates the spine shadow by one mA-step (Lo = 1).
It is a general selection for most patients.
“HI” compensates the spine shadow by two mA-steps (Hi = 2).
It can be selected for large patients.
Select “ASC“ for Automatic Spine Compensation (0 < ASC < 2).
MA compensation will be determined automatically.
200209 rev 3
Instrumentarium Dental
55
5 Operating instructions
PREVENTIVE SERVICE MESSAGE
The preventative maintenance reminder can be set ON or OFF as
necessary. To reset current counter value to 0, select “Reset
maintenance”.
LAST FAILURE CODE
The last failure code can be seen in this dialog. Reset takes effect as
soon as the Last failure code dialog is closed.
56
Instrumentarium Dental
200209 rev 3
5 Operating instructions
5.14 GENERAL MANUALS
The manual button opens the general manuals dialog, where it is
possible to select one of the user manuals provided. The selected
manual is opened by the Adobe Acrobat program, which can be
downloaded from the Adobe www-site. When using SmartNav, the
pdf-manual remains on the screen behind the SmartNav software,
unless the Adobe Acrobat is not closed separately.
5.15 MESSAGES
INFO (GREEN MESSAGES)
•
•
•
“Ready for capture...”
“Rotating unit is moving...”
“X-ray unit is in sequence...”
RADIATING (YELLOW MESSAGES)
•
“X-ray unit is radiating...”
CHECKS (BLUE MESSAGES)
•
•
•
•
•
•
200209 rev 3
“Panorama camera not connected or imaging capture not
enabled."
"Cephalostat camera not connected or imaging capture not
enabled."
"Please select correct collimator."
"Mains line voltage is out of range."
"Please press patient positioning button before taking exposure."
"Maintenance recommended."
Instrumentarium Dental
57
5 Operating instructions
•
•
•
•
•
•
•
"Exposure allowed only from remote exposure button."
"Communicaton to the workstation failed."
"Please check ceph earholder position."
"Exposure values out of range."
"Calculation of dose not possible. Dose will not be displayed."
"Please check biteplate orientation or remove biteplate."
"Please wait ## seconds before next exposure."
WARNINGS (ORANGE MESSAGES)
NOTE!
Message can be closed by clicking CLOSE-button.
•
•
•
•
•
•
•
•
•
•
•
•
•
•
•
•
•
•
"Tubehead too hot. Cooling time at least 1 hour."
"Tubehead or generator error during the exposure cycle."
"Try again. If same problem reappears, call service."
"Exposure button was released before the end of exposure."
"Inverter error during exposure."
"Filament error during exposure."
"AEC signal missing."
"EEPROM write failed."
"Rotating movement error."
"Please check that X-ray unit parts do not touch the patient. If
same error reappears call service."
"Linear movement error"
"Carriage up/down movement error."
"If same error reappears call service."
"Cephalostat movement error."
"Cephalostat beam alignment error."
"Call service to check beam alignment."
"Please check camera connection."
"If same error reappears call service."
ERRORS (LIGHT ORANGE MESSAGES)
NOTE!
Message cannot be closed, but it can be minimized.
•
•
58
"CPU processing error. Call service."
"CPU RAM check error. Call service."
Instrumentarium Dental
200209 rev 3
5 Operating instructions
•
•
•
•
•
•
•
•
"CPU ROM check error. Call service."
"Line voltage error. Call service."
"Filament board or connection error. Call service."
"Input error. Please make sure no buttons are pressed during
startup. If same error reappears call service."
"Lease or test exposure limit has been reached. Call service."
"Could not establish connection to x-ray unit."
"Check the connection and that you have not pressed the
emergency power switch."
"Could not execute OP -server process. Restart system."
5.16 MULTIPLE MONITOR SUPPORT
SmartNav and the USB touch screen driver of SmartPad support the
use of multiple monitors. In order to be able to use this feature, the
display adapter of the external PC has to have at least to VGA/DVI
outputs, up to date display adapter driver has to be installed and
Windows extended desktop has to be enabled and configured.
SmartPad should be used as a secondary display with 800x600
resolution and the external LCD display should be used as primary.
When SmartPad has been defined as secondary monitor and is the
only monitor with 800x600 resolution, SmartNav should automatically
configure itself to SmartPad display during bootup. By using the
multiple monitor manager of the USB touch screen driver, the touch
screen can be linked to SmartPad (usually as a secondary display). If
the USB touch screen driver hasn't been installed, it can be found from
the SmartNav installation CD. Please make sure that the multiple
monitor support feature is selected to be installed.
200209 rev 3
Instrumentarium Dental
59
5 Operating instructions
60
Instrumentarium Dental
200209 rev 3
6 Troubleshooting
6 Troubleshooting
6.1
DIAGNOSING IMAGE QUALITY PROBLEMS
PROBLEM
Images are too
light
Images are too
dark
Lack of image
contrast
Images are
blurred
POSSIBLE CAUSE
REMEDY
1 Exposure factors
used are too low.
1 Increase exposure
factors
2 Image
adjustments have
not been
performed.
2 Adjust the image
brightness,
contrast and
gamma using
CliniView software
1 Exposure factors
used are too high.
1 Decrease
exposure factors.
2 Image
adjustments have
not been
performed.
2 Adjust the image
brightness,
contrast and
gamma using
CliniView
software.
1
kV used is too
high.
1 Lower the kV
value (if possible).
2
Image
adjustments have
not been
performed.
2 Adjust the image
contrast using
CliniView
software.
1 The patient moved
2 The X-ray source
moved
3 Incorrect
integration time
1 Prevent patient
movement.
2 Prevent X-ray unit
movement or have
the unit serviced.
3 Set the integration
time in CliniView to
be longer than the
exposure time.
Images are
bloomed/ burned
out
200209 rev 3
1 Excessive
exposure time
Instrumentarium Dental
1 Set shorter
exposure time
2 Change to a long
cone on the X-ray
unit.
61
6 Troubleshooting
6.2
DIAGNOSING EQUIPMENT SPECIFIC
PROBLEMS
PROBLEM
POSSIBLE CAUSE
REMEDY
OP200 D goes
down
1
Power failure
1
Turn the OP200
D unit on
SmartNav goes
down
1
Power failure
1
Re-start
SmartNav
Power failure
1
Emergency stop
switch is used
1
Release
the
emergency stop
switch and turn
the unit back on
Image capturing
not enabled
1
DICC client
(CliniView) is not
started
1
Start DICC client
and
enable
image capturing
Unit does not
react when
buttons are
pressed
1 SmartNav is in
undefined state
1
Re-start
SmartNav
2
Re-start
the
OP200 D
computer and
SmartNav
Could not
establish
connection to
X-ray unit
1 Emergency stop
switch is used
1
Release
the
emergency stop
switch and turn
the unit back on
2
Turn the OP200
D unit on
3
Re-start
OP200 D
computer
1
Capture new
image
2
Re-start
SmartNav
1
Re-start DICC
client (CliniView)
1
Capture new
image
2
Re-start
SmartNav
1
Re-start DICC
client (CliniView)
2 OP200 D power
off
3 SmartNav has lost
the OP200 D
connection
Preview image
does not appear
on the screen
Image capturing is
not enabled
62
1 DICC and
SmartNav
communication
failure
1 DICC and
SmartNav
communication
failure
Instrumentarium Dental
the
the
the
the
the
200209 rev 3
6 Troubleshooting
PROBLEM
User program
settings are not
updated
Different function
is selected than
the user pressed
on the screen
POSSIBLE CAUSE
REMEDY
1 OP200 D and
SmartNav
communication
problem failure
1
Attempt to reset
the user program
settings
2
Use the OP200
D control panel
to reset the user
program settings
1 Display calibration
incorrect
1
Calibrate
the
touch screen by
using the USBHID Calibration
Tool.
2
Use a stylus for
the
most
accurate
calibration.
PCI board LED:s
L:
Link OK
F:
EEPROM failure (red)
3:
Supply voltages OK
R:
Local reset (red)
Fig 6.1.
200209 rev 3
PCI board LED:s
Instrumentarium Dental
63
6 Troubleshooting
64
Instrumentarium Dental
200209 rev 3
7 Technical specifications
7 Technical specifications
Manufacturer:
Instrumentarium Dental
Nahkelantie 160 (P.O. Box 20),
FIN-04300 Tuusula, FINLAND
Quality system:
In accordance with ISO9001 standard
Environmental
management system:
In accordance with ISO14001 standard
Electrical & mechanical
safety:
According to IEC 60601-1, UL and CUL (File E301913) CE models marked
according to the Medical Device
Directive 93/42/EEC
Product name:
SmartPad
Model:
SPC200
Product type:
SmartPad Option for OP200 D/OC200
D
Unit data:
Class:
I
Protection:
IP-20
Operation:
Continuous operation
Power supply:
Mains plug connection
First software version:
Release 1.0 dated 1.6.2006 by
Instrumentarium Dental
Applied part:
N/A
Standards this unit
complies with:
IEC 60601-1
UL 60601-1
MDD (93/42/EEC) (if the unit contains
CE mark)
UL/CSA (file Exxxxxx, if the unit
contains UL/CSA mark)
Electrical connections
200209 rev 3
Nominal mains voltage:
100-240 VAC full range
Input power frequency:
50 / 60 Hz
Instrumentarium Dental
65
7 Technical specifications
Electrical connections
Nominal current:
2A @ 230 VAC, 4A @ 110 VAC
Fuses:
Inside the power supply
Maximum impedance of
main:
1,0 Ω
User interface
Program and technique
factors selection:
SmartNav
Connection to OP200 D:
Optical link
Connection cable
(OP200 D - computer):
Optical fibre 1.7 m
SmartPad physical measures:
Installation:
OP200 D column or wall mount
Height x Width x Depth
(mm):
computer: 466 x 204 x 111 mm
Monitor with supporting arm:
234 x 750 x 126 mm
Weight:
computer: 5 kg
Monitor with supporting arm: 4 kg
SmartPad Medical Power (SPM200) data:
Model
SPM200
Class
I
Protection
IP-20
Applied part
N/A
Mains Voltage
230 Vac (+/- 10%) / 115 Vac (+/- 10%)
Input power frequency
50/60 Hz
Fuses
4 A slow blow @ 230Vac, 8 A slow
blow @ 115Vac
66
Instrumentarium Dental
200209 rev 3
7 Technical specifications
Outputs (AC)
Two 230 / 115 Vac (total max 700 VA)
Outputs (DC)
+12 VDC (max 2,5 A)
Height x width x depth
(mm)
284 x 196 x 131
Weight
9 kg
Environmental Requirements:
Operation Temperature
range:
+10°...+40°C
Transportation and
storage temperature
range:
-10°…+50°C
Operating humidity:
Max. 95% RH, non-condensing
Transportation and
storage humidity:
Max. 95% RH, non-condensing
embedded medical computer system:
200209 rev 3
Platform:
Intel Pentium-M / Intel Celeron-M,
Mini-ITX
Processor:
Celeron-M 1.3GHz
Chipset:
Intel 855GME and Intel 6300ESB
Embedded Chipset
Hard disk:
40GB HDD minimum
CD-ROM:
N/A, use CD-ROM with USB
connection
Operating system:
Windows ® XP
Main memory (RAM):
512 MB
PCI board connection:
PCI slot
Power Supply:
FSP180-50MP, medical ATX
Ethernet:
10/100/1000 Mbps, Realtek
Instrumentarium Dental
67
7 Technical specifications
Touch screen monitor:
Screen size:
12.1”
Technology:
active matrix TFT LCD
& resistive touch screen
Resolution:
800 x 600
Electrical inspection
specification:
Line defect
Can't be seen
Bright dots
2 dots (note 1)
Green bright dots
1 dot
Dark dots
3 dots
Total dot defects
3 dots (note 2)
Note 1) For dot defect, one sub pixel is
defined as one dot
Note 2) Distance between defective
dots
15 mm
Minimum requirements for SmartNav:
Processor:
Pentium 1.3GHz
Hard disk:
20GB HDD
CD-ROM:
Yes
Keyboard:
Yes
Mouse:
Yes
Network card:
10/100 Mbps
Operating system:
Windows ® XP
Main memory (RAM):
512 MB
PCI board connection:
PCI slot
68
Instrumentarium Dental
200209 rev 3
7 Technical specifications
Orthopantomograph® OP200 D with SmartPad accessory is suitable for use in the specified
electromagnetic environment. The purchaser or user should assure that it is used in an
electromagnetic environment as described below:
Emissions Test
Compliance
Electromagnetic Environment
Radio-Frequency
Emissions
CISPR11
Group 1
Orthopantomograph® OP200 D with SmartPad
accessory uses RF energy only for its internal function.
Therefore, the RF emission is very low and not likely to
cause any interference in nearby electronic equipment.
Radio-Frequency
Emissions
CISPR11
Class B
Orthopantomograph® OP200 D with SmartPad
accessory is suitable for use in all establishments,
including domestic establishments and those directly
connected to the public low-voltage power supply
network that supplies buildings used for domestic
purposes.
Harmonic
emissions
IEC 61000-3-2
Class D
Orthopantomograph® OP200 D with SmartPad
accessory is suitable for use in all establishments,
including domestic establishments and those directly
connected to the public low-voltage power supply
network that supplies buildings used for domestic
purposes.
Complies
Orthopantomograph® OP200 D with SmartPad
accessory is suitable for use in all establishments,
including domestic establishments and those directly
connected to the public low-voltage power supply
network that supplies buildings used for domestic
purposes.
IEC 61000-3-2
Voltage
fluctuations/
flicker emissions
IEC 61000-3-3
Table 7.1 Electromagnetic emissions IEC 60601-1-2 Ed2
Orthopantomograph® OP200 D with SmartPad accessory is suitable for use in the specified
electromagnetic environment. The purchaser or user should assure that it is used in an
electromagnetic environment as described below:
Immunity Test
IEC 60601-1-2
Test Level
Compliance
Level
Electromagnetic Environment
Electrostatic
discharge (ESD)
IEC 61000-4-2
± 2, 4, 6 kV for
contact discharge
± 2, 4, 8 kV for air
discharge
± 2, 4, 6 kV for
contact discharge
± 2, 4, 8 kV for
air discharge
Floors are wood, concrete, or
ceramic tile, or floors are covered
with synthetic material and the
relative humidity is at least 30
percent.
Electrical fast
transient/burst
IEC 61000-4-4
± 2 kV for power
supply lines
± 2 kV for power
supply lines
Mains power quality is that of a
typical commercial and/or hospital
environment
± 1 kV for
input/output
lines
± 1 kV for
input/output
lines
Table 7.2 Electromagnetic immunity IEC 60601-1-2 Ed2
200209 rev 3
Instrumentarium Dental
69
7 Technical specifications
Orthopantomograph® OP200 D with SmartPad accessory is suitable for use in the specified
electromagnetic environment. The purchaser or user should assure that it is used in an
electromagnetic environment as described below:
Immunity Test
IEC 60601-1-2
Test Level
Compliance
Level
Electromagnetic Environment
Surge
IEC 61000-4-5
± 1 kV differential
mode
± 2 kV common
mode
± 1 kV differential
mode
± 2 kV common
mode
Mains power quality is that of a
typical commercial and/or hospital
environment.
Voltage dips,
short
interruptions
and voltage
variations on
power supply
input lines
IEC 61000-4-11
< 5 % UT
(> 95 % dip in UT)
for 0,5 cycle
40 % UT
(60 % dip in UT)
for 5 cycles
70 % UT
(30 % dip in UT)
for 25 cycles
< 5 % UT
(> 95 % dip in UT)
< 5 % UT
(> 95 % dip in UT)
for 0,5 cycle
40 % UT
(60 % dip in UT)
for 5 cycles
70 % UT
(30 % dip in UT)
for 25 cycles
< 5 % UT
(> 95 % dip in UT)
Mains power quality is that of a
typical commercial and/or hospital
environment. If the user of
Orthopantomograph® OP200 D
requires continued operation during
power mains interruptions, it is
recommended that
Orthopantomograph® OP200 D
with SmartPad accessory is
powered from an uninterruptible
power supply or a battery.
Power
frequency
(50/60 Hz)
magnetic field
IEC 61000-4-8
3 A/m
3 A/m
Power frequency magnetic fields
are at levels characteristic of a
typical location in a typical
commercial and/or hospital
environment.
NOTE: UT is the a.c. mains voltage prior to application of the test level.
Table 7.2 Electromagnetic immunity IEC 60601-1-2 Ed2
70
Instrumentarium Dental
200209 rev 3
7 Technical specifications
Orthopantomograph® OP200 D with SmartPad accessory is suitable for use in the specified
electromagnetic environment. The purchaser or user of the Orthopantomograph® OP200 D with
SmartPad accessory should assure that it is used in an electromagnetic environment as
described below:
Immunity
Test
IEC
60601-1-2
Test Level
Compliance
Level
Electromagnetic
Environment
Portable and mobile RF communications equipment
are used no closer to any part of
Orthopantomograph® OP200 D with SmartPad
accessory, including cables, than the recommended
separation distance calculated from the equation
appropriate for the frequency of the transmitter.
Conducted
RF IEC
61000-4-6
3 V150 kHz
to80 MHz
Radiated
RFIEC
61000-4-3
3 V/m80
MHz to2,5
GHz
[ V1 ] 3 V
Recommended Separation Distance:
d =[
3,5
] P
V1
[ E1 ] 3 V/m
d =[
3,5
] P
E1
d =[
7
80 MHz to 800 MHz
] P
E1
800 MHz to 2,5 GHz
Where P is the maximum output power rating of the
transmitter in watts (W) according to the transmitter
manufacturer and d is the recommended separation
distance in meters (m).Field strengths from fixed RF
transmitters, as determined by an electromagnetic
site survey,* are less than the compliance level in
each frequency range.** Interference may occur in
the vicinity of equipment marked with the following
symbol:
*Field strengths from fixed transmitters, such as base stations for cellular telephones and land
mobile radios, amateur radio, AM and FM radio broadcast, and TV broadcast cannot be
estimated accurately. To assess the electromagnetic environment due to fixed RF transmitters,
an electromagnetic site survey should be performed. If the measured field strength exceeds the
RF compliance level above, observe Orthopantomograph® OP200 D with SmartPad accessory
to verify normal operation in each use location. If abnormal performance is observed, additional
measures may be necessary, such as re-orienting or relocating of the system.
**Over the frequency range 150 kHz to 80 MHz, field strengths are less than [V1] V/m.
The Recommended Separation Distances are listed in the next table.
Note: These guidelines may not apply in all situations. Electromagnetic propagation is affected
by absorption and reflection from structures, objects, and people.
Table 7.3 RF immunity of non-life-support equipment or system IEC 60601-1-2
200209 rev 3
Instrumentarium Dental
71
7 Technical specifications
NOTE!
This equipment generates, uses and can radiate radio frequency
energy. If not installed and used in accordance with this manual, it
may cause harmful interference to radio communications. Portable
and mobile RF communications equipment can also affect the
performance of OP200 D and SmartPad.
Recommended Separation Distances
for Portable and Mobile RF Communications Equipment
IEC 60601-1-2
Frequency of
Transmitter
Equation
150KHz to
80 MHz
d =[
3,5
] P
80 MHz to
800 MHz
d =[
3,5
] P
800 MHz to
2,5 GHz
d =[
7
] P
V1
E1
E1
Rated
Maximum
Output
Power of
Transmitter
(watts)
Separation
Distance
(meters)
Separation
Distance
(meters)
Separation
Distance
(meters)
0,01
0,12
0,12
0,23
0,1
0,37
0,37
0,74
1
1,17
1,17
2,34
10
3,69
3,69
7,38
100
11,67
11,67
23,34
Fig 7.1.
Table 4
USE LIMITATION:
External components
The use of accessories, transducers, and cables other than those
specified
may
result
in
degraded
ELECTROMAGNETIC
COMPATIBILITY of the EQUIPMENT and/or SYSTEM
INSTALLATIONS REQUIREMENTS & ENVIRONMENT CONTROL :
In order to minimize interference risks, the following requirements
shall apply.
Cables shielding & grounding
72
Instrumentarium Dental
200209 rev 3
7 Technical specifications
All interconnect cables to peripheral devices must be shielded and
properly grounded. Use of cables not properly shielded and grounded
may result in the equipment causing radio frequency interference.
Stacked components & equipment
The Orthopantomograph® OP200 D with SmartPad accessory should
not be used adjacent to or stacked with other equipment; if adjacent or
stacked use is necessary, the Orthopantomograph® OP200 D with
SmartPad accessory should be observed to verify normal operation in
the configuration in which it will be used.
Electrostatic discharges environment & recommendations
In order to reduce electrostatic discharge interference, the floor
material should be made of dissipative material, versus the
electrostatic charge stacking. Relative humidity should be at least 30
percent. The dissipative material should be connected to the system
ground reference.
200209 rev 3
Instrumentarium Dental
73
7 Technical specifications
74
Instrumentarium Dental
200209 rev 3
8 Maintenance
8 Maintenance
Orthopantomograph® OP200 D with SmartPad accessory is designed
to provide reliable performance and many years of customer
satisfaction. In order to assure safe performance of this X-ray system,
a preventative maintenance program must be established. It is the
owner's responsibility to supply or arrange for this service. Consult
your Orthopantomograph® dealer to arrange for this service.
8.1
MAINTENANCE SCHEDULE
Maintenance service for SmartPad is suggested at installation and
together with OP200 D maintenance. This periodic maintenance is
outlined in OP200 D Maintenance Manual.
These maintenance procedures require the services of a qualified
technician. In addition to periodic maintenance, any deviation from
normal performance should be immediately reported to your dealer
and the equipment should be unplugged. These include:
•
•
•
•
•
•
•
The power cord or plug is damaged
The equipment has been exposed to moisture
Liquid has penetrated into the system
The equipment doesn't work correctly
The equipment has been dropped
The equipment has signs of breakage
If there are any unusual sounds or smells coming from the
equipment
WARNING!
SERVICING THIS SYSTEM WITHOUT ADEQUATE EXPERTISE IS
EXTREMELY DANGEROUS. Instrumentarium Dental recommends
that all service operations are performed by Instrumentarium Dental
authorized service personnel!
8.2
MONTHLY INSPECTION BY USER
The user must perform monthly the following inspections:
– Visually check that all visible labels are intact and legible
– Visually check that the exposure indicator is lit for the duration
of exposure
– Check that exposure terminates and an error code is displayed
on screen when prematurely releasing the exposure button
– Check all the functions of the SmartNav
8.3
PREVENTIVE MAINTENANCE PROGRAM
– Open the computer chassis and clean off all dust
– Check that both the power supply fan and the CPU cooler fan
are working properly
– Check that all screws are tightened and all cables are visually
in order
– Check that the unit is well fixed to the column / wall
200209 rev 3
Instrumentarium Dental
75
8 Maintenance
– Check the grounding from the LCD panel to the computer
mains inlet and the OP200 D chassis. Resistance must be less
than 0.2 Ohms
– Verify that the OP vertical carriage is not able to hit the display
supporting arm
– Check that appropriate operating system update is installed
and virus definitions are up to date
– Do a complete system backup
– Calibrate the touch screen with a stylus by using the HID
Calibration Tool
8.4
TOUCH SCREEN CALIBRATION AND OSD
Run the program; Figure 10.1. shows the first menu. Click the
calibrate button to start the screen coordinates configuration.
Attention: the data is
absent if the touch
screen is not
connected correctly.
Fig 8.1.
Initial menu
The calibration procedure starts by pressing with a finger or a stylus
on the green point on the screen. If the pressing is correct, the point
becomes red.
76
Instrumentarium Dental
200209 rev 3
8 Maintenance
Fig 8.2.
Step 1
Press on the second point and proceed as in the first step, as shown in
the fig. 10.3. Repeat the same procedure for position three.
200209 rev 3
Fig 8.3.
OK
Fig 8.4.
Step 2
Instrumentarium Dental
77
8 Maintenance
Fig 8.5.
Step 3
At this point, the following window will appear on the screen if the
calibration has gone well. During the calibration phase if something
goes wrong, the program returns to the main window. Choose “Yes” to
verify the accuracy of the touch screen; “No” to exit.
Fig 8.6.
Step 4
Once the calibration is acceptable press ESC to exit the program.
78
Instrumentarium Dental
200209 rev 3
8 Maintenance
Fig 8.7.
Step 5
Press “Yes” on the last menu in order to terminate the program. At this
point the touch screen is calibrated and the monitor can be fully used.
Fig 8.8.
Step 6
OSD:
This chapter describes the On Screen Display (OSD) program used to
make the logical adjustments on the monitor (contrast, brightness,
position of picture, clarity of picture and colour temperature of picture).
The OSD program can be accessed whenever the computer is on;
when it is off or in energy saving mode, the OSD program is not
accessible.
200209 rev 3
Instrumentarium Dental
79
8 Maintenance
OSD provides a quick and easy way to make the logical adjustments
on the monitor. To access the OSD main menu, press the “F” button at
the rear panel of the monitor. To scroll through the menu items and to
increase or decrease the value displayed, use the other buttons on the
rear of the monitor; to activate a menu item, after selected it, press the
“F” button again. For more information read the “keyboard” section.
Keyboard:
In the back of the monitor there is a keyboard. For every type of
monitor the keyboard is placed in different position, but the sequence
and the function of the keys is the same. In this paragraph there is the
description of the keys functionalities (the image in this page is only an
example of the keyboard to help the user).
Key “F” - To display the principal menu and the other sub-menu.
To select the interested regulation and, after, save it.
Key “-” - To scroll down the menu and to adjust the level of the
control.
Key “+” - To scroll up the menu and to adjust the level of the control.
After having optimized the regulations, the formulas are memorized
automatically. You can exit the OSD menu after 10 seconds of
inactivity (it is possible to set the OSD timeout), or to exit the menu
with EXIT.
The items of the main menu and submenus are listed together with the
description of the function in the following table:
80
Instrumentarium Dental
200209 rev 3
8 Maintenance
OSD STRUCTURE
FUNCTION DESCRIPTION
Setup functions
Provides access to the setup submenu
Setup video
Adjust the setup video
Setup geometry
Adjust the setup geometry
Autosetup options
Access to the Auto setup options submenu
Autosetup on mode set
Provides access to the setup submenu
Enable autoclock
Allows to turn-on or turn-off the autoclock
Exit
Exit from the auto setup options
Brightness
Regulates the overall brightness of the picture
Contrast
Regulates the contrast of the picture
Image Adjust
Provides access to the image adjust submenu
Geometry
Access to the geometry submenu
Horizontal position
Allows to adjust the horizontal position of the image
Vertical position
Allows to adjust the vertical position of the image
Scale/center
Full screen
Select the picture size
Maintain aspect ratio
Center
Advanced
Phase adjust
Provides access to the corresponding submenu
Clock adjust
Exit
Exit
Exit from the advanced submenu
Exit from the advanced submenu
Video
Access to the video submenu
Image enhancement
Context sensible
Access to the submenu to select the picture clarity
Text (sharp)
Video (smooth)
Color
Provides access to the color submenu
RGB adjust
Adjusts the intensity of primary colours (R, G, B)
Color temp
Selects three colour temperatures for the picture
Black level adjust
Used to adjust the black level of the picture
Exit
OSD setting
Exit from the color submenu
Access to the OSD setting submenu
OSD position
Horizontal position
Adjusts the vert. and hor. position of the OSD menu
Vertical position
OSD size
Normal
Used to adjust the size of the OSD menu
Double
OSD trasparency
Used to adjust the trasparency of the OSD menu
OSD timeout
Sets the duration of the OSD menu
Languages
Used to select the language of the OSD menu
Information
Used to view the version of the monitor firmware
Exit
Exit from the OSD setting submenu
Restore factory presets
Used to restore the setting made by the manufacturer
Exit
Exit from the image adjust submenu
Exit
200209 rev 3
Exit from the OSD menu
Instrumentarium Dental
81
8 Maintenance
82
Instrumentarium Dental
200209 rev 3
Instrumentarium Dental reserves the right to make changes in specification and features shown herein, or discontinue the product described at any time without notice or obligation. Contact your
Instrumentarium Dental representative for the most current information.
Copyright © 05/2007 by PaloDEx Group Oy. All rights reserved.
Instrumentarium Dental
P.O.Box 20, FI-04301 Tuusula, Finland
Tel. +358 45 7882 2000
Fax +358 9 851 4048
Americas:
Instrumentarium Dental Inc.
Milwaukee, Wisconsin, U.S.A.
Tel. 800 558 6120
Fax 414 481 8665
SmartPad
Installation & User Manual, English
200209 rev 3 Printed in Finland 05/2007