1
Ghost User Manual
1
GHOST Manual
INTRODUCTION
3
OVERVIEW
4
INSTALLATION
5
FROM HTTP://WWW.GHOSTSOFT.COM
5
FROM DISKETTE
5
USING GHOST
6
SELECTING CONNECTION TYPE
6
PEER TO PEER CONNECTIONS.
7
SELECTING TRANSFER OPTION
9
CLONE DISK TO DISK…
11
DUMP DISK TO IMAGE FILE…
14
LOAD DISK FROM IMAGE FILE…
16
SPANNING AN IMAGE ACROSS MULTIPLE VOLUMES
19
LOADING FROM A SPANNED IMAGE
22
CHECK DISK INTEGRITY…
23
CHECK IMAGE FILE INTEGRITY…
25
CLONE PARTITION TO PARTITION…
27
DUMP PARTITION(S) TO IMAGE FILE…
30
LOAD PARTITION FROM IMAGE FILE…
33
CONNECTING A WORKSTATION TO A SERVER UNDER DOS.
CONNECTING TO AN NT SERVER
Copyright @ 1997 Binary Research
36
36
2
Ghost User Manual
CONNECTING TO OS/2
CLONING WINDOWS NT
AVOIDING PROBLEMS WITH THE SID (SECURITY IDENTIFIER)
36
38
38
CLONING MULTIPLE WORKSTATIONS
39
USING GHOST IN BATCH FILES
40
USING GHOST INSIDE OF WINDOWS95 FROM A DOS WINDOW
41
USING GHOST INSIDE OF WINDOWS NT FROM A DOS WINDOW
41
GHOST AND CDROMS
41
SWITCHES
42
GLOSSARY OF TERMS
47
FAQ
48
ORDERING
51
APPLYING THE KEY TO GHOST
52
GHOST TECHNICAL SUPPORT
53
GHOST PROBLEM REPORT SHEET
53
Ghost User Manual
3
Introduction
GHOST is designed to minimize the installation times for operating systems
such as Win95, WinNT and OS/2. This is particularly useful to organizations
which have a large number of similarly configured workstations to install. For
example, GHOST reduces the time to install a typical 300 megabyte Win95
system from an hour with substantial operator input to about 5 minutes with no
operator input required. With multi access packages, multiple workstations may
be installed at the same time which further improves efficiency.
When cloning complete hard drives, procedures such as FDISK and FORMAT
are a thing of the past - GHOST dynamically partitions and formats the target
disk “on the fly” allowing FAT16, FAT32 and NTFS partitions to be expanded or
contracted to fit the target.
GHOST is designed to be run under DOS and can be run from a DOS boot
diskette. Although DOS-based, it can handle Win95/WinNT long file names,
NTFS partitions, OS/2 extended attributes and even OS/2 boot manager
partitions.
GHOST has two modes of operation - a simple, robust, menu driven user
interface, and, to further aid automating the installation process, a batch mode.
Prior to Win95 there was little need for a utility like GHOST, as systems could be
installed by simply using the DOS XCOPY command. Win95 introduced long file
names, XCOPY could no longer do the job - hence the need for a utility like
GHOST.
Not only is GHOST the fastest way to install Win95, WinNT and OS/2, it has
another handy use - it can make complete backups of disks, even copying “inuse” system files which are missed by other backup utilities. Making GHOST a
perfect choice for disaster recovery operations.
Copyright @ 1997 Binary Research
4
Ghost User Manual
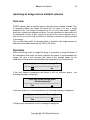
Overview
GHOST is essentially a disk and/or partition copying program. The entire
contents of a disk may be copied from one disk to another, or they may be
copied to a disk image file, and that image file can then be used as a template to
create copies of the original disk. GHOST also allows these operations to be
performed on the partitions of the disk i.e. the contents of a partition can be
copied to another partition, or selected partitions can be copied to an image file
and that image file can be used as a template to create copies of the original
partitions.
Each disk is made up of a Master Boot Record and from 1 to 4 primary
partitions. Primary partitions are physical separate areas of the disk, and are
usually defined by the FDISK utility. Extended partitions may be further
subdivided into logical drives, once again using the FDISK utility. However, it is
not important to understand the exact details of how a disk is subdivided when
using GHOST.
Disk Copying
GHOST copies every partition, regardless of type, from the source (disk or disk image file) to the destination. If the source and destination disks were identical in
size and structure then all that would be needed is a sector by sector copy; but
in practice this is seldom the case. GHOST positions each partition or logical
drive on the target disk using the same rules as FDISK. In addition, if the
partition is a FAT16, FAT32 or NTFS type (which most PC disks are), GHOST
allows the target partition to be expanded or contracted.
Partition Copying
GHOST can be used to make a copy of a single partition or to make an image
file containing a copy of one or more disk partitions. Once an image file has
been created, the contents for the selected partition can be loaded onto a target
partition. The target partition must be large enough to accommodate the
selected partition from the image file. It is important to note that the target
partition must already be defined when using partition options. Partitions are
usually defined by FDISK, but can be already defined on new disks.
Ghost User Manual
5
Installation
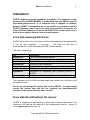
GHOST requires no special installation procedures. It is supplied in a selfextracting file (GHOSTDEM.EXE) if downloaded from the GHOST web site
http://www.ghostsoft.com, or in unzipped form if supplied on diskette.
Because GHOST is designed to be run on any PC (in accordance with the
GHOST licensing rules) it does not need to be installed, but can be run
from a DOS boot diskette. Of course the GHOST files can be copied onto a
hard drive or network drive for improved performance.
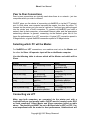
From http://www.ghostsoft.com
GHOST started life as a product that could be downloaded from the Internet with
a free 30 day evaluation.
It still can
- just visit our web site at
www.ghostsoft.com and download the FREE full featured trial.
The files contained are:
File
bugform.txt
ghost.exe
ghost.doc
ghostfaq.txt
license.txt
switches.txt
upgrade.txt
whatsnew.gho
Description
Form for submitting bug reports
This is it, the one that does all the work
The GHOST manual in Word for Windows format
Frequently Asked Questions
Pricing and licensing information
A listing of command line switches
Instructions for upgrading your registered version of
GHOST
Contains list of latest modifications and bug fixes
The evaluation copy is a fully functional single user version, but it will time-out at
the specified date.
Do not try and change the system date to fool GHOST - it independently
checks the system date and will not complete the clone/dump/load
operation if the system date has been set back.
From diskette with/without the manual
GHOST is supplied in a packaged form, either with or without the manual. The
contents of the disk are the same as in the downloadable version - except, of
course ghost.exe has no time-out.
Copyright @ 1997 Binary Research
6
Ghost User Manual
Using GHOST
GHOST should be used in interactive mode initially. Once the interactive
procedure has been finalized, the process can be automated by using batch
mode.
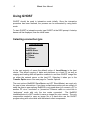
To start GHOST in interactive mode, type GHOST at the DOS prompt. A startup
banner will be displayed, then the initial menu.
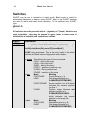
Selecting connection type
Connection type
Local/Server
NetBIOS Slave
NetBIOS Master
LPT Slave
LPT Master
Exit
In the vast majority of cases the default option of Local/Server is the best
choice. This allows copying of disks and partitions on a local PC as well as
copying and loading disk and partition contents to and from GHOST image files
on either the network server or the local PC. Selecting it takes you to the
Transfer Option menu. See next page for Transfer Options.
The next options (NetBIOS Slave/Master and LPT Slave/Master) are used only
for peer to peer connections. If you have a client/server setup you are unlikely to
need the peer-to-peer options. NetBIOS is only used when you connect a PC to
another PC via a “converted” or “pinned-out” Ethernet cable or a mini-Hub in
“workgroup” mode with only the two nodes connected.
The NetBIOS
interface/protocol is NOT needed to save an image file onto a server. The only
components needed to save an image file of a hard drive are the GHOST
program along with a boot disk with the network client components.
Ghost User Manual
7
Peer to Peer Connections
Peer to peer connections are typically used when there is no network - just two
computers which you wish to connect.
GHOST gives you the choice of connecting via NetBIOS or via the LPT (printer)
port. In both cases one computer becomes the master, the other the slave. To
connect via the printer port you need a LapLink or FastLynx type cable plugged
into the printer port of both computers. To connect via NetBIOS you need a
network card in each computer, a converted Ethernet cable, and the appropriate
networking software. In general, connecting via the Network gives two to five
times the performance of an LPT connection. A typical LPT connection speed is
5 Megs/minute, a typical NetBIOS connection speed is 20 Megs/minute.
Selecting which PC will be Master.
For NetBIOS and LPT connections, one machine must act as the Master and
the other the Slave. All operator input will be on the Master computer.
Use the following table to choose which will be Master and which will be
Slave.
Action
Disk to disk copy
Disk to file copy
File to disk copy
Partition to partition
copy
Partition to file copy
File to partition copy
Master
PC containing source
disk
PC containing source
disk
PC containing
destination disk
PC containing source
partition
PC containing source
partition
PC containing
destination partition
Slave
PC containing
destination disk
PC receiving destination
image file
PC containing source
image file
PC containing
destination partition
PC receiving destination
image file
PC containing source
image file
Connecting via LPT
Make sure both computers are connected via the printer port with a
LapLink/FastLynx type parallel cable. GHOST must be running under DOS
on both computers. Select Master and Slave computers based on table
above. The parallel port MUST be set to Bi-Directional or EPP or ECP. You
must experiment with the mode for best performance, Unidirectional will
Copyright @ 1997 Binary Research
8
Ghost User Manual
not work.
Start the Slave first - it will not time-out while waiting for a signal from the
Master. The Master will time-out after 30 seconds if a connection has not been
made.
Once a connection has been made, the data transfer speed will be displayed
and the Transfer Option menu will be displayed. See Selecting Transfer
Option.
Connecting via NetBIOS(Peer to Peer)
Make sure both computers are connected via a converted Ethernet network
cable. Both computers must be running the minimum network software for a
NetBIOS connection. See below for details. Select Master and Slave computers
as per the decision table on previous page. GHOST will automatically connect
the two computers generally in about 30 seconds.
It may be useful to have a special boot diskette which loads just the network
software needed by GHOST for the NetBIOS connect.
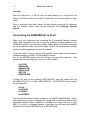
E.g. for an NE2000 network card the following files would be required. Your
drivers and protocols might vary, this is only an example….
LSL.COM
NE2000.INS
NE2000.COM
IPXODI.COM
NET.CFG
NETBIOS.EXE
A batch file such as the following NETLOAD.BAT could be called from the
AUTOEXEC.BAT file (i.e. CALL NETLOAD.BAT). NETLOAD.BAT could contain
the following files
LH LSL
LH NE2000
LH IPXODI
LH NETBIOS
This will load the network drivers needed for the GHOST NetBIOS calls. Again,
both machines will need a Network card, along with an Ethernet cable and the
necessary network drivers. NetBIOS is available from www.novell.com or local
BBS. If you are on a Netware network, most likely you will have the NetBIOS
interface on the server (NETBIOS.com or NETBIOS.exe).
Ghost User Manual
9
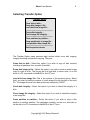
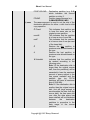
Selecting Transfer Option
Transfer Option
Clone disk to disk...
Dump disk image to file...
Load disk from image file...
Check disk integrity…
Check image file integrity…
Clone partition to partition…
Dump partition(s) to image file…
Load partition from image file…
Back to previous menu
The Transfer Option menu presents eight choices which cover disk copying,
integrity checking and partition copying. They are:
Clone disk to disk... Select this option if you wish to copy all disk contents
including all partitions from one disk to another.
Dump disk image to file... Select this option if you wish to save an exact image
copy of a disk in a file. The file can be on a local disk, a server drive, or on the
drive of a PC connected via NetBIOS or the LPT port.
Load disk from image file...This is the reverse of the previous option. Select
this if you wish to load the contents of a disk image file onto the disk of the local
PC. The image file must have been previously created by GHOST.
Check disk integrity... Select this option if you wish to check the integrity of a
disk.
Check image file integrity... Select this option if you wish to check the integrity
of an image file.
Clone partition to partition... Select this option if you wish to copy a disk
partition to another partition. The destination partition can be on a local disk or
on the disk of a PC connected via NetBIOS or the LPT port.
Copyright @ 1997 Binary Research
10
Ghost User Manual
Dump partition(s) to image file.... Select this option if you wish to save an
exact image copy of one or more disk partitions in a file. The file can be on a
local disk, a server drive, or on the drive of a PC connected via NetBIOS or the
LPT port.
Load partition from image file...This is the reverse of the previous option.
Select this if you wish to load the contents of a partition image file onto a
partition of the local PC. Note that although the file can contain an image of
more than one partition, only one partition can be selected for loading from the
file The file can be on a local disk, a server drive, or on the drive of a PC
connected via NetBIOS or the LPT port. The image file must have been
previously created by GHOST.
Ghost User Manual
11
Clone disk to disk…
This consists of four steps as follows:
1.
Select source drive.
2.
Select destination drive.
3.
Confirm destination drive details.
4.
Proceed with disk clone.
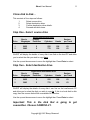
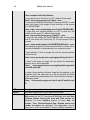
Step One - Select source drive
Drive
1
2
Size in
Megabytes
2055
3063
Select local source drive
Primary
Partitions
Cylinders
2
2
522
778
Heads
128
128
Sectors
per Track
63
63
GHOST will display the details of every disk it can find on the local PC and allow
you to select the disk you wish to copy from.
Use the up and down arrows to move the highlight bar. Press Enter to select.
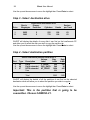
Step Two - Select destination drive
Drive
1
2
Select local destination drive
Size in
Primary
Megabytes Partitions
Cylinders
Heads
2055
3063
2
2
522
778
128
128
Sectors
per Track
63
63
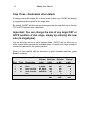
GHOST will display the details of every disk it can find on the local/remote PC
and allow you to select the disk you wish to copy to. If this is a local disk to disk
copy, then the source disk will be unavailable for selection.
Use the up and down arrows to move the highlight bar. Press Enter to select.
Important: This is the disk that is going to get
overwritten. Choose CAREFULLY.
Copyright @ 1997 Binary Research
12
Ghost User Manual
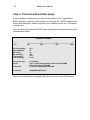
Step Three - Destination drive details
If loading from a disk image file, or doing a disk to disk copy, GHOST will display
a suggested partition layout for the target disk.
By default, GHOST will allocate any extra space that the new disk has to the first
FAT or NTFS partition that it discovers.
Important: You can change the size of any target FAT or
NTFS partition at this stage, simply by entering the new
size (in megabytes).
Use up and down arrow to move between fields. GHOST will not allow you to
enter a value which exceeds the available space, or which is not large enough to
contain the data held in the source partition.
When you are satisfied with the allocation of space between partitions, press
Enter to continue.
Part
Type
1
2
3
4
06
04
07
07
Destination drive details
Volume New size
Description
Label
in Mb
Fat16
Fat16 extended
NTFS extended
HPFS extended
Free
C_DRIVE
MY_DATA
NT_DRIVE
OS2DRIVE
Old size
in Mb
Change
in Mb
1800
200
650
400
0
800
200
650
400
0
1000
0
0
0
0
3063
2055
1000
Ghost User Manual
13
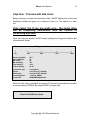
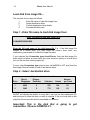
Step Four - Proceed with disk clone
Before starting to overwrite the destination disk, GHOST displays the source and
destination details and gives you a chance to back out. The default is to back
out.
Only select Yes if you are really sure - the target drive
will be completely overwritten, with NO chance of
recovering any data.
Once the copy has started, GHOST keeps updating the Progress Indicator with
information as shown.
Progress Indicator
|
|_____________|_______________|_______________|
0%
25%
50%
Percent complete
Speed (Mb/min)
Mb copied
Mb remaining
Time elapsed
Time remaining
20%
25
50
250
2:00
10:00
Connection type
Source
Destination
Current partition
Current file
Local/Server
Local drive [1], 2055 Mb
Local drive [2], 3063 Mb
1 Fat16 C_DRIVE
\WINDOWS\DIALER.INI
75%
100%
When the disk copy is complete, the target PC will need to be rebooted (as after
a change made by FDISK). By default GHOST prompts with:
Press Ctrl-Alt-Del to reboot.
Copyright @ 1997 Binary Research
14
Ghost User Manual
Dump disk to image file…
This consists of three steps as follows:
1.
Select source drive.
2.
Enter file name to dump disk image to.
3.
Proceed with disk copy.
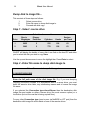
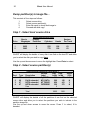
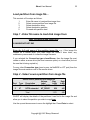
Step 1 - Select source drive
Drive
1
2
Size in
Megabytes
2055
3063
Select local source drive
Primary
Partitions
Cylinders
2
2
522
778
Heads
Sectors
per Track
128
128
63
63
GHOST will display the details of every disk it can find on the local PC and allow
you to select the disk you wish to copy from.
Use the up and down arrows to move the highlight bar. Press Enter to select.
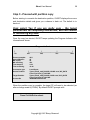
Step 2 - Enter file name to dump disk image to
Enter file name to dump disk image to
G:\IMAGES\WIN95.IMG
Enter the full path name of the disk image file. E.g. if you are dumping
(copying) the entire contents of a workstation disk to a server drive, you must
enter the server’s drive letter, any subdirectory names and of course the image
file name.
If you selected the Connection type->Local/Server then the destination disk
image file must reside on either a server drive (the most common option) or a
local drive (but not the one that is being copied from).
For any other Connection type (peer to peer via NetBIOS or LPT port) then the
destination disk image file must reside on one of the remote drives.
Ghost User Manual
15
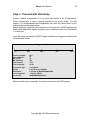
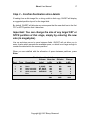
Step 3 - Proceed with disk dump
Confirm whether compression is to be used (the default is No Compression).
When compression is used, copying operations are much slower. For this
reason, it is recommended that compression be used only when there is very
limited space on the target device.
Before starting to dump the disk contents to the image file, GHOST displays the
source and destination details and gives you a chance to back out. The default
is to back out.
Once the copy has started, GHOST keeps updating the Progress Indicator with
information as shown.
Progress Indicator
|
0%
|_____________|_______________|_______________|
25%
50%
Percent complete
Speed (Mb/min)
Mb copied
Mb remaining
Time elapsed
Time remaining
20%
25
50
250
2:00
10:00
Connection type
Source
Destination
Current partition
Current file
Local/Server
Local drive [1], 2055 Mb
Local file, G:\IMAGES\WIN95.IMG
1 Fat16 C_DRIVE
\WINDOWS\DIALER.INI
75%
100%
When the disk copy is complete, the user is returned to the DOS prompt.
Copyright @ 1997 Binary Research
16
Ghost User Manual
Load disk from image file…
This consists of four steps as follows:
1.
Enter file name to load disk image from.
2.
Select destination drive.
3.
Confirm destination drive details.
4.
Proceed with disk load.
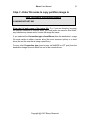
Step 1 - Enter file name to load disk image from
Enter file name to load disk image from
G:\IMAGES\WIN95.IMG
Enter the full path name of the disk image file. E.g., if the disk image file
resides on a server drive, you must enter the server’s drive letter, any
subdirectory names and of course the image file name.
If you selected the Connection type->Local/Server, then the disk image file
must reside on either a server drive (the most common option) or a local drive
(but not the one that is being copied to).
For any other Connection type (peer to peer via NetBIOS or LPT port) then the
disk image file must reside on one of the remote drives.
Step 2 - Select destination drive
Drive
1
2
Select local destination drive
Size in
Primary
Megabytes Partitions
Cylinders
Heads
2055
3063
2
2
522
778
128
128
Sectors
per Track
63
63
GHOST will display the details of every disk it can find on the local/remote PC
and allow you to select the disk you wish to copy to. If this is a local disk to disk
copy then the source disk will be unavailable for selection.
Important: This is the disk that is going to get
overwritten. Choose CAREFULLY.
Ghost User Manual
17
Step 3 – Confirm Destination drive details
If loading from a disk image file, or doing a disk to disk copy, GHOST will display
a suggested partition layout for the target disk.
By default, GHOST will allocate any extra space that the new disk has to the first
FAT or NTFS partition that it discovers.
Important: You can change the size of any target FAT or
NTFS partition at this stage, simply by entering the new
size (in megabytes).
Use up and down arrow to move between fields. GHOST will not allow you to
enter a value which exceeds the available space, or which is not large enough to
contain the data held in the source partition.
When you are satisfied with the allocation of space between partitions, press
Enter
Part
Type
1
2
3
4
06
04
07
07
Destination drive details
Volume New size
Description
Label
in Mb
Fat16
Fat16 extended
NTFS extended
HPFS extended
Free
C_DRIVE
MY_DATA
NT_DRIVE
OS2DRIVE
Old size
in Mb
Change
in Mb
1800
200
650
400
0
800
200
650
400
0
1000
0
0
0
0
3063
2055
1000
Copyright @ 1997 Binary Research
18
Ghost User Manual
Step 4 - Proceed with disk load
Before starting to overwrite the destination disk, GHOST displays the source and
destination details and gives you a chance to back out. The default is to back
out.
Only select Yes if you are really sure - the target drive
will be completely overwritten, with NO chance of
recovering any data.
Once the copy has started, GHOST keeps updating the Progress with
information as shown.
Progress Indicator
|
|_____________|_______________|_______________|
0%
25%
50%
Percent complete
Speed (Mb/min)
Mb copied
Mb remaining
Time elapsed
Time remaining
20%
25
50
250
2:00
10:00
Connection type
Source
Destination
Current partition
Current file
Local/Server
G:\IMAGES\WIN95.IMG
Local drive [2], 3063 Mb
1 Fat16 C_DRIVE
\WINDOWS\DIALER.INI
75%
100%
When the disk image load is complete, the target PC will need to be rebooted
(as after a change made by FDISK). By default GHOST prompts with:
Press Ctrl-Alt-Del to reboot.
Ghost User Manual
19
Spanning an Image across multiple volumes
Overview
GHOST allows a disk or partition image to be split across multiple volumes. This
is necessary where the image file would be too large to fit into a single
destination file. The image is composed of two or more files (called “spans”),
which are copied onto separate volumes. The only constraint on the selection of
the destination volume is that it must not be part of the source selection e.g. it
can not be on a source disk or partition if that disk or partition is being included
in the image.
This is particularly useful for dumping disks or partitions with large amounts of
data onto removable media such as JAZ or ZIP drives.
Operation
When performing a disk to image file dump or a partition to image file dump, If
the destination drive does not have sufficient free space to accommodate the
image, the user is first informed that there is not enough space on the
destination volume and is asked whether the image file is to be compressed.
Not enough space – compress image file
Yes
No
If the user selects compression and there is still not sufficient space , the
following message is displayed :
There may not be enough space
– Enable Spanning?
Yes
No
If the user chose not to use compression, the following message is displayed:
Do you wish to enable Spanning?
Yes
No
If Spanning is not enabled, an error message is displayed:
Copyright @ 1997 Binary Research
20
Ghost User Manual
Error
Not enough space: 100 Mb available,
1727 Mb needed.
OK
Before starting to dump the disk contents to the image file, GHOST displays the
source and destination details and gives you a chance to back out. The default
is to back out.
Once started, the dump continues until the destination volume is filled up. The
user is then prompted to either select ENTER to continue, or specify where the
next “span” of the image file is to be located.
Press Enter or select Filename
Span Volume x Done
Insert Next media and press
Enter to Continue…
OK
Filename?
Either select OK to continue on the same form of Media. Example, if you started
spanning onto a JAZ Drive and wish to span a 3.0 Gigabyte drive onto just JAZ
disks, just hit enter to continue in JAZ disks.
If you wish to span across different forms of media, selecting “Filename?” Gives
you the option to span onto a different location.
Caution, record where you save your segments of the “span”. Also record what
file name each “span” segment is. GHOST will not record where and what file
name you have selected.
If you have a single partition on a drive or if you are “Imaging” a single partition,
GHOST will end on the last spanned volume with not user intervention.
However, if you are “imaging” a hard drive with multiple partitions, GHOST
needs to record boundary information onto the first span of the image file. This
boundary information is recorded to track location of partition amongst the
spanned set. The user is prompted to confirm that the first span is ready to be
updated.
Ghost User Manual
An example of how GHOST will prompt you for span set disk one.
Re-insert 1ST portion of spanned image
G:\D1P1IMG.IMG
When the partition dump is complete, the user is returned to the DOS prompt.
Copyright @ 1997 Binary Research
21
22
Ghost User Manual
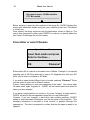
Loading from a spanned image
When loading a disk or partition from an image file, the process is the same as
loading from an un-spanned image file. The loading procedure is the reverse of
the dumping procedure. The user is prompted to provide details of the each
portion of the spanned image:
Span Volume x Done
Insert Next media and press
Enter to Continue…
OK
Filename?
Either select OK to continue on the same form of Media. Example, if you
originally spanning onto a JAZ Drive and wish to restore a 3.0 Gigabyte drive
from just JAZ disks, just hit enter to continue in JAZ disks.
If you wish to restore from different forms of media, selecting “Filename?” Gives
you the option to restore from a different location.
Caution, you need to know where you saved your segments of the “span”. Also
you must know each file name each “span” segment is.
When the disk image load is complete, the target PC will need to be rebooted
(as after a change made by FDISK). By default GHOST prompts with
Press Ctrl-Alt-Del to reboot.
Ghost User Manual
23
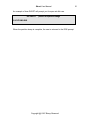
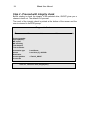
Check disk integrity…
This consists of two steps as follows:
1.
Select local source drive.
2.
Proceed with integrity check.
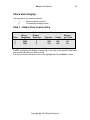
Step 1 - Select local source drive
Drive
1
2
Size in
Megabytes
2055
3063
Select local source drive
Primary
Partitions
Cylinders
2
2
522
778
Heads
128
128
Sectors
per Track
63
63
GHOST will display the details of every disk it can find on the local PC and allow
you to select the disk you wish to check.
Use the up and down arrows to move the highlight bar. Press Enter to select.
Copyright @ 1997 Binary Research
24
Ghost User Manual
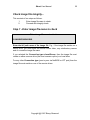
Step 2 - Proceed with integrity check
Before starting to check the integrity of the selected drive, GHOST gives you a
chance to back out. The default is to proceed.
The result of the integrity check is printed at the bottom of the screen and the
user is returned to the DOS prompt.
Progress Indicator
|
0%
25%
50%
Percent complete
Speed (Mb/min)
Mb copied`
Mb remaining
Time elapsed
Time remaining
Connection type
Source
Destination
Current partition
Current file
Local/Server
Local drive [1], 2055 Mb
1 Fat16 C_DRIVE
Disk OK, Data size 806 (Megabytes)
75%
100%
Ghost User Manual
25
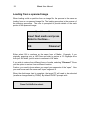
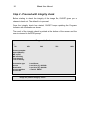
Check image file integrity…
This consists of two steps as follows:
1.
Enter image file name to check.
2.
Proceed with integrity check.
Step 1 - Enter image file name to check
Enter image file name to check
G:\IMAGES\WIN95.IMG
Enter the full path name of the image file. E.g., if the image file resides on a
server drive, you must enter the server’s drive letter, any subdirectory names
and of course the image file name.
If you selected the Connection type->Local/Server, then the image file must
reside on either a server drive (the most common option) or a local drive.
For any other Connection type (peer to peer via NetBIOS or LPT port) then the
image file must reside on one of the remote drives.
Copyright @ 1997 Binary Research
26
Ghost User Manual
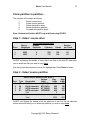
Step 2 - Proceed with integrity check
Before starting to check the integrity of the image file, GHOST gives you a
chance to back out. The default is to proceed.
Once the integrity check has started, GHOST keeps updating the Progress
Indicator with information as shown.
The result of the integrity check is printed at the bottom of the screen and the
user is returned to the DOS prompt.
Progress Indicator
|
0%
25%
50%
Percent complete
Speed (Mb/min)
Mb copied`
Mb remaining
Time elapsed
Time remaining
Connection type
Source
Destination
Current partition
Current file
Local/Server
Local drive [1], 2055 Mb
Local drive [2], 3063 Mb
1 Fat16 C_DRIVE
Image file passed integrity check
75%
100%
Ghost User Manual
27
Clone partition to partition…
This consists of five steps as follows:
1.
Select source drive.
2.
Select source partition.
3.
Select destination drive.
4.
Select destination partition.
5.
Proceed with partition clone.
Note: Destination Partition MUST be pre-defined using FDISK!!
Step 1 - Select source drive
Drive
1
2
Size in
Megabytes
2055
3063
Select local source drive
Primary
Partitions
Cylinders
2
2
522
778
Heads
Sectors
per Track
128
128
63
63
GHOST will display the details of every disk it can find on the local PC and allow
you to select the disk you wish to copy from.
Use the up and down arrows to move the highlight bar. Press Enter to select.
Step 2 - Select source partition
Part
1
2
3
4
Select source partition from drive: 1
Volume
Size
Type Description
Label
in Mb
06
Fat16
C_DRIVE
800
06
Fat16 extended MY_DATA
200
07
NTFS extended NT_DRIVE
650
07
HPFS extended OS2DRIVE
400
Free
0
Total
2055
Data
in Mb
356
162
413
273
1204
GHOST will display the details of all the partitions it can find on the selected
source drive and allow you to select the partition you wish to copy from.
Copyright @ 1997 Binary Research
28
Ghost User Manual
Use the up and down arrows to move the highlight bar. Press Enter to select.
Step 3 - Select destination drive
Drive
1
2
Size in
Megabytes
2055
3063
Select local destination drive
Primary
Partitions
Cylinders
Heads
2
2
522
778
Sectors
per Track
128
128
63
63
GHOST will display the details of every disk it can find on the local/remote PC
and allow you to select the disk you wish to copy the partition to.
Use the up and down arrows to move the highlight bar. Press Enter to select.
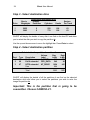
Step 4 - Select destination partition
Part
1
2
3
Select destination partition from drive: 2
Volume
Size
Type Description
Label
in Mb
06
Fat16
C_DRIVE
500
06
Fat16 extended OLD_DATA
540
07
NTFS extended NT_DRIVE
1024
Free
994
Total
3063
Data
in Mb
230
24
415
1208
GHOST will display the details of all the partitions it can find on the selected
destination drive and allow you to select the partition you wish to copy to.
Use the up and down arrows to move the highlight bar. Press Enter to select.
Important: This is the partition that is going to be
overwritten. Choose CAREFULLY.
Ghost User Manual
29
Step 5 - Proceed with partition copy
Before starting to overwrite the destination partition, GHOST displays the source
and destination details and gives you a chance to back out. The default is to
back out.
Only select Yes if you are really sure - the target
partition will be completely overwritten, with NO chance
of recovering any data.
Once the copy has started, GHOST keeps updating the Progress Indicator with
information as shown.
Progress Indicator
|
|_____________|_______________|_______________|
0%
25%
50%
75%
Percent complete
Speed (Mb/min)
Mb copied
Mb remaining
Time elapsed
Time remaining
20%
25
50
250
2:00
10:00
Connection type
Source Partition
Local/Server
Type:6 [Fat16_extd], 800 Mb, 356 Mb used, MY_DATA
from Local drive [1], 2055 Mb
Type:6 [Fat16_extd], 540 Mb, 24 Mb used, OLD_DATA
from Local drive [2], 3063 Mb
\WINDOWS\DIALER.INI
Target Partition
Current file
100%
When the partition copy is complete, the target PC will need to be rebooted (as
after a change made by FDISK). By default GHOST prompts with
Press Ctrl-Alt-Del to reboot.
Copyright @ 1997 Binary Research
30
Ghost User Manual
Dump partition(s) to image file…
This consists of four steps as follows:
1.
Select source drive.
2.
Select source partition(s).
3.
Enter file name to dump disk image to.
4.
Proceed with disk copy.
Step 1 - Select local source drive
Drive
1
2
Size in
Megabytes
2055
3063
Select local source drive
Primary
Partitions
Cylinders
2
2
522
778
Heads
Sectors
Per Track
128
128
63
63
GHOST will display the details of every disk it can find on the local PC and allow
you to select the disk you wish to copy from.
Use the up and down arrows to move the highlight bar. Press Enter to select.
Step 2 - Select source partition(s)
Part
1
2
3
4
Type
06
06
07
07
Select source partition(s) from drive: 1
Volume
Size Data
Description
Label
in Mb in Mb
Fat16
C_DRIVE
800
356
Fat16 extended MY_DATA
200
162
NTFS extended NT_DRIVE
650
413
HPFS extended OS2DRIVE
350
273
Free
0
Total
2055
Select
(Y/N)
N
N
Y
N
1204
GHOST will display the details of all the partitions it can find on the selected
source drive and allow you to select the partitions you wish to include in the
partition image file.
Use the up and down arrows to move the cursor. Press Y to select, N to
deselect.
Ghost User Manual
31
Step 3 - Enter file name to copy partition image to
Enter file name to copy partition image to
G:\IMAGES\NTPART.IMG
Enter the full path name of the image file. E.g. if you are dumping (copying)
the partition contents to a server drive, you must enter the server’s drive letter,
any subdirectory names and of course the image file name.
If you selected the Connection type->Local/Server then the destination image
file must reside on either a server drive (the most common option) or a local
drive (but not the one that is being copied from).
For any other Connection type (peer to peer via NetBIOS or LPT port) then the
destination image file must reside on one of the remote drives.
Copyright @ 1997 Binary Research
32
Ghost User Manual
Step 4 - Proceed with partition dump
Confirm whether compression is to be used (the default is No Compression).
Before starting to dump the disk contents to the image file, GHOST displays the
source and destination details and gives you a chance to back out. The default
is to back out.
Once the dump has started GHOST keeps updating the Progress Indicator with
information as shown.
Progress Indicator
|
0%
|_____________|_______________|_______________|
25%
50%
75%
Percent complete
Speed (Mb/min)
Mb copied
Mb remaining
Time elapsed
Time remaining
20%
25
50
250
2:00
10:00
Connection type
Source
Destination
Local/Server
Type: 7 [NTFS extd], 650 Mb, 413 Mb used, NO NAME
from Local drive [1], 2055 Mb
Local file G:\IMAGES\NTPART.IMG
Current file
\WINDOWS\DIALER.INI
100%
When the partition dump is complete, the user is returned to the DOS prompt.
Ghost User Manual
33
Load partition from image file…
This consists of five steps as follows:
1.
Enter file name to load partition image from.
2.
Select source partition from image file.
3.
Select destination drive.
4.
Select destination partition.
5.
Proceed with partition load.
Step 1 - Enter file name to load disk image from
Enter file name to load image from
G:\IMAGES\NTPART.IMG
Enter the full path name of the partition image file. e.g., if the image file
resides on a server drive, you must enter the server’s drive letter, any
subdirectory names and of course the image file name.
If you selected the Connection type->Local/Server, then the image file must
reside on either a server drive (the most common option) or a local drive (but not
the one that is being copied to).
For any other Connection type (peer to peer via NetBIOS or LPT port) then the
image file must reside on one of the remote drives.
Step 2 - Select source partition from image file
Part
1
2
Select source partition from image file
Volume
Size
Type Description
Label
in Mb
06
Fat16 extended OLD_DATA
520
07
NTFS extended NT_DRIVE
650
Total
1170
Data
In Mb
24
415
439
GHOST will display the details of the partitions it can find in the image file and
allow you to select the partition you wish to copy from.
Use the up and down arrows to move the highlight bar. Press Enter to select.
Copyright @ 1997 Binary Research
34
Ghost User Manual
Step 3 - Select destination drive
Drive
1
2
Size in
Megabytes
2055
3063
Select local destination drive
Primary
Partitions
Cylinders
Heads
2
2
522
778
Sectors
Per Track
128
128
63
63
GHOST will display the details of every disk it can find on the local PC and allow
you to select the disk you wish to copy the partition to.
Use the up and down arrows to move the highlight bar. Press Enter to select.
Step 4 - Select destination partition
Part
1
2
3
Select destination partition from drive: 2
Volume
Size
Type Description
Label
in Mb
06
Fat16
C_DRIVE
500
06
Fat16 extended OLD_DATA
540
07
NTFS extended NT_DRIVE
1024
Free
994
Total
3063
Data
in Mb
230
24
415
1208
GHOST will display the details of all the partitions it can find on the selected
destination drive and allow you to select the partitions you wish to write the
image file partition to.
Important: This is the partition that is going to be
overwritten. Choose CAREFULLY.
Ghost User Manual
35
Step 5 - Proceed with partition load
Before starting to overwrite the destination partition, GHOST displays the source
and destination details and gives you a chance to back out. The default is to
back out.
Only select Yes if you are really sure - the target
partition will be completely overwritten, with NO chance
of recovering any data.
Once the load has started GHOST keeps updating the Progress Indicator with
information as shown.
Progress Indicator
|
|_____________|_______________|_______________|
0%
25%
50%
75%
Percent complete
Speed (Mb/min)
Mb copied
Mb remaining
Time elapsed
Time remaining
20%
25
50
250
2:00
10:00
Connection type
Source Partition
Local/Server
Type:7 [NTFS_extd], 650 Mb, 415 Mb used, NT_DRIVE
From Local file G:\IMAGES\NTPART.IMG
Type:7 [NTFS_extd], 1024 Mb, 415 Mb used, NT_DRIVE
From Local drive [2], 3063 Mb
\WINDOWS\DIALER.INI
Target Partition
Current file
100%
When the partition load is complete, the target PC will need to be rebooted (as
after a change made by FDISK). By default GHOST prompts with:
Press Ctrl-Alt-Del to reboot.
Copyright @ 1997 Binary Research
36
Ghost User Manual
Connecting a Workstation to a Server under
DOS.
In order to facilitate dumping of images to a server and subsequent loading of
images from a server, the server drive(s) must be visible to the GHOST
application i.e. they must be visible to DOS.
The most convenient way to allow GHOST to copy images to the server and load
images from the server is to create a network boot disk with the appropriate
drivers and settings.
In general you need to understand the basics required to create a network
accessible boot disk. Individual situations vary, therefore it is impossible to
provide exacting procedures to assist you in creating and network client boot
diskette.
Connecting to an NT Server
In the past, Microsoft provided a Workgroup Add-on for MS-DOS which could be
used to create a network boot disk. Microsoft no longer supports this product.
Servers running NT 4.X can create a “Network Client” for MS-DOS installation
disks which can be used to attach and “login” to a Windows NT network. To
create a boot disk that is network attachable, search the help section on the NT
4.X server. NT 4.X server comes with a wizard to create DOS Network boot
disks. The files on the client PC (autoexec.bat, config.sys and network drivers)
can then be copied onto a boot floppy disk and used as a network boot disk.
Connecting to OS/2
Use IBM’s DOS LAN Services product to generate and install the network drivers
and configuration files needed.
If you have the OS/2 Warp Server CD then you can generate the diskettes
needed from this. Once installed a boot diskette can be made with just the
drivers and files needed.
Ghost User Manual
37
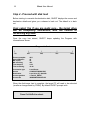
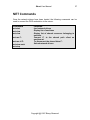
NET Commands
Once the network drivers have been loaded, the following commands can be
used to connect the DOS workstation to the server:
Command
Function
net start
net view
net view
load network drivers
Display list of machines
Display list of shared resources belonging to
machine.
Connect F: to the shared path client on
machine rat
To disconnect the shared drive F:
Unload network drivers
net use F:
net use /d F:
net stop work
net stop
Copyright @ 1997 Binary Research
38
Ghost User Manual
Cloning Windows NT
GHOST supports NTFS and allows NTFS partitions to be expanded and
contracted the same approach GHOST does with FAT partitions. NTFS image
files are also supported, and no longer contain superfluous data.
Note: Unlike Win95 where GHOST can run in a DOS window on the source
workstation, under WinNT the source PC must be booted under DOS.
Avoiding problems with the SID (Security Identifier)
Cloning WinNT is similar to cloning Window’s 95 but there is a problem with the
WinNT network Security Identifier or SID. Cloning a WinNT workstation disk can
produce another workstation with a duplicate SID - something the NT Server will
object to. Happily there is a way to get around this problem.
The solution relies on the way the WinNT workstation and the WinNT server
assign the workstation a SID. It is not until the workstation first connects to the
NT Server that the SID is assigned. Up to that point it is in a “waiting to be
assigned” state. Therefore, the source NT workstation must be cloned (copied to
a disk image file or to a destination disk) before the NT workstation makes its
first official NT connection to the NT Server.
The sequence of actions is:
• Install the WinNT operating system from the NT installation CDROM.
• Before the NT workstation connects to the NT Server, boot it under DOS, and
connect to the server (See Connecting a workstation to a Server under
DOS).
• Make a disk image file of the source/template NT Workstation.
• Boot the target workstations under DOS, connect to the Server.
• Load the disk image file on to the target (see Cloning Multiple Workstations if
you wish to do more than one at a time).
• When the disk load has finished, reboot the workstation under WinNT and
when it first connects to the NT Server it’s SID will be created.
Ghost User Manual
39
Cloning Multiple Workstations
To clone multiple workstations as the same time, you must have
a multi-user version of GHOST. The evaluation copy which is
downloadable from http://www.ghostsoft.com and the single user version
will not allow cloning multiple workstations.
See Ordering if you need to upgrade to the multi-user version.
To clone multiple workstations at the same time:
• Make a disk image file of the system you wish to clone and save on a server
drive.
• Boot the target workstations under DOS and connect to the server (See
Connecting a workstation to a Server under DOS).
• Use the Local/Server->Load disk from image file... option to load all target
PC’s from the same image file.
• To further automate the process, see the following section on Using GHOST
in batch files.
Note that, in practice, the number of workstations that can
simultaneously download an image from a server depends on the speed
of the Network and the speed of the Server. A medium speed
network/server can generally handle five-ten concurrent GHOST loads, a
high speed network/server can handle 10-20.
Copyright @ 1997 Binary Research
40
Ghost User Manual
Using GHOST in Batch files
GHOST has two modes of operation: Interactive (the default) and Batch. Batch
is useful in repetitive situations - especially when a large number of workstations
need to be loaded. Most of the GHOST switches are to allow GHOST to run in
batch mode. They specify such parameters as the source (disk, partition or
image file), the target (disk, partition or image file), the type of connection
(Local/Server, NetBIOS or LPT port) and whether to wait for user confirmation
before starting.
See Switches for a detailed explanation of batch switches.
Some common examples of using GHOST in batch mode:
To load the disk image file SAVEDSK.IMG held on the server
drive E: onto drive one of the local PC. Do not prompt if OK to
proceed.
ghost -clone,mode=load,src=E:\SAVEDSK.IMG,dst=1 -sure
This example is typical of those that would be in a batch file to
automate installation of workstations from a network server.
To copy drive one to drive two on a PC, without final prompt
ghost -clone,mode=copy,src=1,dst=2 -sure
To connect via NetBIOS to another PC running GHOST in
slave mode, and dump a disk image of local drive two to the
remote file C:\DRIVE2.IMG
ghost -nbm -clone,mode=dump,src=2,dst=C:\DRIVE2.IMG
Ghost User Manual
41
Using GHOST inside of Windows95 from a DOS Window
GHOST can be run from a DOS window under Windows95. Note, however, that
it should not be used to load disk or partition images when run inside a
Windows95 DOS window. This is because Windows95 may write to the hard
disk during the loading of the image, and corrupt the disk.
Using GHOST inside of Windows NT from a DOS
Window
GHOST can not currently be run inside a DOS window under Windows NT. This
is because NT traps the low level write operations that GHOST uses.
GHOST and CDROMs
GHOST can be used to install a complete Windows’95 system (or WinNT) from
a single disk image file held on a CDROM. This technique is being exploited by
several Universities who are issuing students with a CDROM containing a
GHOST disk image file and GHOST. Students can re-load their Notebook
computers from the CDROM at any stage, just by clicking on the GHOST icon.
No further user-input is required.
“Burning” a GHOST disk image file onto a CDROM is a useful technique for any
organization which distributes updates via CDROMS.
There is a special version of GHOST available, which will only read an image
from a CDROM drive. Ask your GHOST reseller for more details.
Copyright @ 1997 Binary Research
42
Ghost User Manual
Switches
GHOST may be run in interactive or batch mode. Batch mode is useful for
automating installation or backup using GHOST. Most of the GHOST switches
are used to assist with batch mode operation. To list switches from GHOST,
type:
ghost -h
All switches must be preceded with a - (hyphen) or / (slash). Switches are
case insensitive - they may be entered in upper, lower or mixed case. A
detailed list of switches with explanations follows.
Switch
Explanation
-AFILE
-CLONE
Overrides default abort log file with specified path.
,mode={COPY|LOAD|DUMP|PCOPY|PLOAD|PDUMP},src={d
rive|file},dst={drive|file},szen={F|V|nnnnM|nnP}
CLONE using arguments. This is the most useful of the batch
switches and has a series of arguments which define:
(a) mode
(b) src
(c) dst
This defines the type of clone command :
COPY – disk to disk copy
LOAD – file to disk load
DUMP – disk to file dump
PCOPY – partition to partition copy
PLOAD – file to partition load
PDUMP – partition to file dump
Mode
Meaning
COPY/DUMP
Source drive (e.g. 1)
LOAD
Disk image filename (e.g.
G:\IMAGES\SYSTEM2.IMG )
PCOPY/PDUMP Source partition (e.g. 1:2) which
indicates the second partition
on drive 1.
PLOAD
Partition image filename and
partition number (e.g.
G:\IMAGES\DISK1.IMG:2
)
which indicates the second
partition in the image file.
Mode
Meaning
COPY/LOAD
Destination drive (e.g. 2)
DUMP
Disk image filename (e.g.
G:\IMAGES\SYSTEM2.IMG )
Ghost User Manual
PCOPY/PLOAD
(d) szen
Destination partition (e.g. 2:2)
which indicates the second
partition on drive 2.
PDUMP
Partition image filename (e.g.
G:\IMAGES\DISK1.IMG).
The szen argument is used to set the size of the
destination partitions for either a disk load or disk
copy operation.
F (Fixed)
This indicates that partition are
to have the same size as the
original source partition.
nnnnM
This indicates that the partition
is to have a size of nnnn Mb
mmP
This indicates that the partition
is to have a size of mm per cent
of the target disk.
F
Resizes the first partition to
maximum size allowed based on
file type.
L
Resizes the last partition to
maximum size allowed based on
file type.
V (Variable)
Indicates that the partition will
be resized according to the
following rules :
Rule 1:If the destination disk is
larger than the original source
disk, then the partition(s) will be
expanded to have the maximum
amount of space subject to the
free space available and the
partition type (eg
FAT16
partitions will have a maximum
size of 2048 Mb).
Rule 2: If the destination disk is
smaller than the original source
disk, (but still large enough to
accommodate the data from the
source disk), the free space left
over after the data space has
been satisfied will be distributed
between
the
destination
partitions in proportion to the
data usage in the source
partitions.
Copyright @ 1997 Binary Research
43
44
Ghost User Manual
A few examples will help illustrate:
To copy drive one to drive two on a PC, without final prompt
Ghost –clone,mode=copy,src=1,dst=2 –sure
To connect via NetBIOS to another PC running GHOST in slave
mode, and dump a disk image of local drive two to the remote
file C:\DRIVE2.IMG
Ghost –nbm –clone,mode=dump,src=2,dst=C:\DRIVE2.IMG
To copy drive one, second partition on a PC to drive two, first
partition on the same PC, without final prompt
ghost –clone,mode=pcopy,src=1:2,dst=2:1 –sure
To load the disk image file SAVEDSK.IMG held on the server
drive E: onto drive one of the local PC. Do not prompt if OK to
proceed.
ghost –clone,mode=load,src=E:\SAVEDSK.IMG,dst=1 –sure
This example is typical of those that would be in a batch file to
automate installation of workstations from a network server.
To load partition 2 from an image file onto the second partition
of the local disk
Ghost –clone,mode=pload,src=g:\imgs\part2.img:2,dst=1:2
To load a disk from an image file and resize the destination
partitions into a 60:40 allocation
Ghost
-clone,mode=load,src=g:\imgs\2prtdisk.img,dst=2,
sze1=60P,sze2=40P
To clone a three partition disk and keep the first partition on the
destination drive the same size as on the source disk, but divide
up the remaining space between the other partitions leaving no
unallocated space
Ghost -clone,mode=copy,src=1,dst=2,sze1=F,sze2=V,sze3
=V
-DD
-DFILE
-DI
This option dumps disk metrics to the dump log file.
Overrides default dump log file with specified path.
Diagnostics. This is useful for debugging purposes. For each
disk present on the PC, the physical attributes such as Drive,
Cylinders, Heads, Sectors per track and Total sectors are
displayed. For each partition present on each disk, the
Number, Type, Physical/Logical flag, Starting sector and
number of sectors are displayed. The diagnostics may be
redirected to a file and emailed or faxed to Binary Research to
Ghost User Manual
assist with problem solving. E.g.
ghost –di >diag.ls
-F64
-FNX
-FX
-IA
-LPM
-LPS
-NBM
-NBS
will output disk diagnostics to the file diag.ls
Allows 64K clustersize when loading from old image files.
Disables Extended INT13 Support.
Flag Exit. Normally when GHOST has finished copying a new
system to a disk it prompts the user to reboot with a Press CtrlAlt-Del to Reboot window. However if GHOST is being run as
part of a batch file it is sometimes useful to have it just exit back
to the DOS prompt after completion so that further batch
commands may be processed. -FX enables this. See -RB for
another option on completing a clone.
Image All. When copying a partition from a disk to an image file
or another disk, GHOST examines the source partition and
decides whether to copy just the files and directory structure, or
to do an image (sector by sector) copy. If it understands the
internal format of the partition it defaults to copying the files and
directory structure. Generally this is the best option, but
occasionally if a disk has been set up with special hidden
security files which are in specific positions on the partition, the
only way to reproduce them accurately on the target partition is
via an image or sector by sector copy. The Image All switch
forces GHOST to do a sector by sector copy of all partitions.
LPT Master mode. This switch causes GHOST to
automatically go into LPT master mode, and is the equivalent of
selecting the LPT Master option from the Connection type
menu. See Peer to Peer Connections, Connecting via LPT
for more information.
LPT Slave mode. This switch causes GHOST to automatically
go into LPT slave mode, and is the equivalent of selecting the
LPT Slave option from the Connection type menu. See Peer
to Peer Connections, Connecting via LPT for more
information.
NetBIOS Master mode. This switch causes GHOST to
automatically go into NetBIOS master mode, and is the
equivalent of selecting the NetBIOS Master option from the
Connection type menu. See Peer to Peer Connections,
Connecting via NetBIOS for more information.
NetBIOS Slave mode. This switch causes GHOST to
automatically go into NetBIOS slave mode, and is the
equivalent of selecting the NetBIOS Slave option from the
Connection type menu. See Peer to Peer Connections,
Connecting via NetBIOS for more information.
Copyright @ 1997 Binary Research
45
46
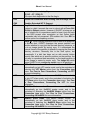
-NTD
-NTC
-NTN
-NTIC
-NTIL
-OR
-QUIET
-RB
-SPAN
-SPLIT=x
-SURE
-XINT13ON
-Z
Ghost User Manual
Enable NTFS Internal diagnostic checking.
Enable NTFS contiguous cluster run allocation.
Inhibit CHKDSK on NTFS Volume boot.
Ignore the NTFS volume CHKDSK bit.
Ignore non-empty NTFS Log File Check (Inconsistent volume).
OVERRIDE, allows the user to override GHOST internal space
and integrity checks.
Disables status updates and user intervention.
ReBoot after finishing a load or copy. After completing a load
or copy operation, the target PC must be rebooted so that the
operating system can load the new disk / partition information.
Normally GHOST prompts the user to Press Ctrl-Alt-Del to
reboot, in a similar way to FDISK. -RB tells GHOST to
automatically reboot after completing the clone, and is useful
when automating GHOST in a batch command file. See the –FX
switch for another option on completion of a clone.
Enables Spanning across volumes.
Use this to create a “forced” size volume set. For example, if
you would like to force smaller image files from a 1024
Megabyte drive, you could specify 200 megabyte segments.
For example, GHOST –SPLIT=200 will divide the image into
200 Megabyte segments.
Use the –SURE switch in conjunction with –CLONE to avoid
being prompted with the final Proceed with disk clone destination drive will be overwritten? Question. This
command is useful in batch mode.
This forces the use of BIOS Extended Int13 system calls if
present.
Forces compression to be used when dumping a disk or
partition to an image file. Note that using this option will cause
the operation to be much slower and is only recommended if
there is insufficient space on the destination device to store the
image without compression.
Ghost User Manual
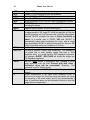
Glossary of Terms
Term
Meaning
Cylinders
A parameter which along with heads and sectors/track
defines the size of a disk.
A hardware device to store data, typically made up of a
Master Boot Record and a number of partitions.
Another name for a partition. Each drive is accessed by a
drive letter. E.g. C:
File allocation table. Used by DOS, Win95 and
sometimes OS/2 to allocate space to files and directories.
Each disk has a fixed number of heads. A head will read
from a single platter of a disk.
High Performance File System - an alternative to a FAT
file system which is used by OS/2
A high level Network programming interface which is
supported by lower level Network protocols such as
IPX/SPX and TCP/IP.
New Technology File System. An alternative to FAT and
HPFS file systems used by WinNT
A contiguous area on a disk, defined in the Master Boot
Record and which has a specific file system such as FAT,
HPFS or NTFS
A 512 byte area on a disk. The smallest addressable unit.
A group of sectors which make up one ring on a disk
platter.
Disk
Drive
FAT
Head
HPFS
NetBIOS
NTFS
Partition
Sector
Track
Copyright @ 1997 Binary Research
47
48
Ghost User Manual
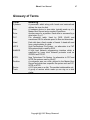
FAQ
Can GHOST for DOS handle long file names for Windows’95, Window’s NT
and OS/2?
Yes.
Will it work with mixed SCSI and IDE drives?
This depends on the operating system. It will do the copy successfully, but if you
try and reboot then the correct disk drivers may not be present, Win95 tends to
be more forgiving than OS/2 and WinNT.
Can the disk image be compressed?
The disk images for FAT (Win 3.x), VFAT (Win95) and NTFS( WinNT) only
include the data for directories and files. For other partition types the partition is
treated like a “black box” and all sectors are copied.
Will it work on systems with multiple Operating Systems loaded.
Yes - subject to any limitations on the operating systems. E.g. for Linux and SCO
UNIX the target disk must be identical to the source disk.
Does GHOST support the beta Win9x with its FAT32 tables?
Yes.
Does it work over TCP/IP? What network protocols do work?
For general usage, all that is required by GHOST in Local/Server mode is that
the server drive(s) are visible. E.g. if the server drive was G: then the
workstation would need to connect to the server with the appropriate network
software so that the workstation could access the G: drive. In this way, GHOST
is independent of the underlying network protocol. In the less common peer-topeer connection situation via NetBIOS, then NetBIOS must be supported by the
network protocol. Most protocols do support NetBIOS e.g. TCP/IP, IPX/SPX.
Ghost User Manual
49
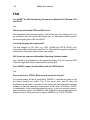
Does GHOST work with NTFS? How about HPFS?
As of revision 3.0 GHOST works fully with NTFS, i.e. partitions are copied on a
data basis and can be resized in the same way as FAT partitions.
GHOST will currently work with HPFS but it is clumsy. GHOST currently does
not understand the internal format of HPFS, so it resorts to a sector by sector
copy. This is slower than just copying the data and does not allow expanding or
contracting the partitions.
Can GHOST work with WinNT? What about SIDS (Security Identifiers)?
Yes, GHOST will work with WinNT. Care must be taken when cloning WinNT
workstations to avoid SID problems. See Cloning WinNT for more information.
Does GHOST work with Netware (by Novell) servers?
GHOST can dump and restore workstation disk images to and from a Netware
server, however it has not been tested duplicating a Netware server. It is unlikely
to work.
Can GHOST Clone Novell Netware volumes?
GHOST can clone Netware partitions. However, no re-sizing is available, and
the configuration must be the same or Netware might have difficulties binding to
dissimilar hardware configurations.
Can GHOST do a push install to a client running just TCP/IP?
No.
Why is it the only backup that doesn’t clobber long file names in Win95?
Because GHOST gets underneath the usual file system interface and deals
directly with the low level file structure.
Can a WinNT system be replicated to a different size disk?
Yes.
Copyright @ 1997 Binary Research
50
Ghost User Manual
When I do a dir /a /s on the original hard drive from the root I get 4,295
files, but on the target drive I get 4,294 files. Why?
Some temporary files are not included when copying a FAT partition. These are:
SWAPPER.DAT,
WIN386.SWP,
SPART.PAR,
PAGEFILE.SYS
and
386SPART.PAR
Excluding these files speeds the copy and reduces the size of the disk image
files.
Does GHOST transfer data from one computer to another like Laplink or
Fastlynx?
Yes, GHOST is capable of data transfer via the printer ports. Typical data
transfer speed is 5-6 megabytes/minute.
How does GHOST load an image back to the hard drive without first
formatting the hard drive?
To save time, GHOST formats “on the fly”.
When I copy an image from a 200 Megabyte hard drive to a 1 gigabyte hard
drive what about the rest of the 800 megabyte free space?
It gets formatted and is made part of the partition. The free space is available for
use immediately.
How fast does GHOST work?
This depends on what GHOST is doing and the speed of the system. For a diskto-disk copy speeds range from 20 megs/minute to 100 megs/minute. For a
Network copy speeds range from 10 megs/minute to 70 megs/min.
Ghost User Manual
51
Ordering
U.S.A and Canada
INNOVATIVE SOFTWARE
5225 North Ironwood Road
Milwaukee, WI 53217-4909
Phone: 414-964-2200
Toll free: 1 (800) 817 5119 (U.S.A)
Fax: 414-964-2201
Email: [email protected]
WWW: http://www.ghostsoft.com
Great Britain
INGRAM-MICRO
Phone: 0181-905-6969
Fax: 0181-951-1012
Email: [email protected]
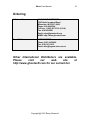
Other International Distributors are available.
Please
visit
our
web
site
at
http://www.ghostsoft.com for our current list.
Copyright @ 1997 Binary Research
52
Ghost User Manual
Applying the key to GHOST
If the name of your GHOST environment file is (for Example) bm512.env,
customize using the following command line:
ghost -#e=bm512.env
GHOST must be at least revision 1.4.5 for this to work. If your version is earlier
then download the latest version from http://www.ghostsoft.com
It may pay to make a backup of your GHOST environment file in case it is
accidentally deleted.
Ghost User Manual
53
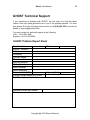
GHOST Technical Support
If you experience a problem with GHOST, the first step is to load the latest
version from http://www.ghostsoft.com to see if the problem persists. If it does
then please fill out the following sheet and fax to +1 (414) 964 2201 or email the
details to [email protected]
You may contact our technical support at the following:
USA – 1-414-964-4099
England – 44-181-905-6969
GHOST Problem Report Sheet
Bug Number
GHOST Version
Author
Company
Contact Name
Phone number
Internet address
State, Country
Abort Number
Abort Message
Reproducible (Y/N)
Parallel,Serial,NetBIOS or Local
Brief Description of problem
Date
Urgency (1-5)
Hardware Make and Model
Notes
Copyright @ 1997 Binary Research
54
Ghost User Manual
Licensing of GHOST
GHOST is licensed and sold on a “per-seat” basis. For every workstation and or
Hard Drive that you create using GHOST requires a unique license. For
example if you wish to use GHOST to prepare and rollout 400 workstations to
Windows 95, you need to purchase a 400 machine license pack. Or, in another
example, if you use GHOST to take a single Hard Drive and clone it to other
Hard Drives, each Hard Drive requires a license.
A 25 workstation license grant entitles you to use GHOST on total of 25 Unique
Workstations, and no more. A 200 machine license grant, entitles you to use
GHOST on total of 200 Unique Workstations, and no more.
Once a workstation is legally licensed, you may use GHOST on that workstation
repetitively, as often as you wish.
Contact Innovative Software for complete licensing and terms.
1-800-817-5119 or 1-414-964-2200
55
Ghost User Manual
H
A
Head, 47
HPFS, 4, 47
-AFILE, 42
allocation of space, 12, 19
I
B
-IA, 45
IBM’s DOS LAN Services, 36
Installation, 5
Interactive mode, 6
backup, 3
Batch files, 42
batch mode, 40,42
boot diskette, 3, 5, 8, 36
K
C
Keynum, 52
CDROMs, 41
-CLONE, 42
Clone disk to disk, 9, 11
Connecting a Workstation, 36
Connecting to NT, 36
Connecting to OS/2, 36
Connecting via LPT, 7
Cylinders, 47
L
D
-DD, 44
destination drive, 11, 16, 28
Destination drive details, 12, 17
-DFILE, 44
-DI, 44
Disk, 47
Download, 5
Drive, 47
dst, 42
Dump disk, 9
dump disk image, 14
E
evaluation copy, 5
F
-F64, 44
FAQ, 48
FastLynx, 7
FAT, 47
FDISK, 3, 4
FORMAT, 3
-FX, 45
G
GHOST.ZIP, 5
Glossary, 47
LapLink, 7
License, 54
Load disk, 10, 16
load disk image, 16, 22, 33
Local/Server, 6
long file names, 3
-LPM, 45
-LPS, 45
LPT, 7
M
Master, 7
mode, 42
Multiple Workstations, 39
N
-NBM, 45
-NBS, 45
NetBios, 7, 47
NetBios connect, 8
Network files and drivers, 36
-NTC, 45
-NTD, 45
NTFS, 47
-NTIL, 45
-NTN, 45
O
-OR, 46
Ordering, 51
OS/2 boot manager, 3
OS/2 extended attributes, 3
P
Partition, 47
Peer to peer, 7
Problem Report Sheet, 53
Copyright @ 1997 Binary Research
Ghost User Manual
Progress indicator, 13
T
Q
-QUIET, 46
Technical Support, 53
Track, 47
Transfer Option menu, 9
R
U
-RB, 46
Using Ghost, 6
S
W
Sector, 47
SID (Security Identifier), 38
Slave, 7
source drive, 11, 14, 23, 27, 30, 33
Spanning across multiple volumes, 19
-SPLIT=x, 46
src, 42
-SURE, 46
Switches, 42
szen, 43
Windows NT, 38
X
XCOPY, 3
-XINT13ON, 46
Z
-Z, 46
56