1
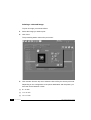
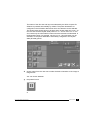
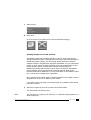
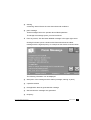
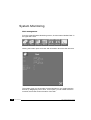
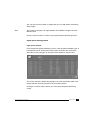
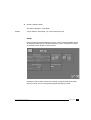
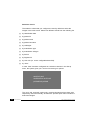
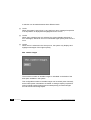
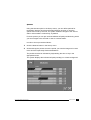
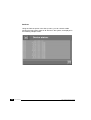
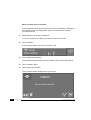
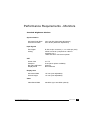
ADC COMPACT
AUTOPROCESSING
SOFTWARE
USER MANUAL
TABLE OF CONTENTS
SWITCHING THE PROCESSING STATION ON AND
GETTING THE SYSTEM MAIN SCREEN
Switching the processing station on
1
Switching the processing station off
3
THE SYSTEM MAIN SCREEN
Selecting and de-selecting images
6
Selecting by criteria
6
Sorting images
7
Printing a selected image
ADC Compact Autoprocessing Software
8
Sending images to review stations
11
Archiving images
13
Monitoring the status of the processing station
14
Managing messages
14
Locking Screen
17
2202A GB 199801
i
SYSTEM MONITORING
Disk management
18
Input queue management
19
Output queue management
21
Setup
23
Queues
27
Devices
28
TROUBLESHOOTING
ii
2202A GB 199801
Automatic anticipation
29
General procedures in case of malfunctions
29
PERFORMANCE REQUIREMENTS OF THE PROCESSING STATION
33
PERFORMANCE REQUIREMENTS - MONITORS
35
ADC Compact Autoprocessing Software
Switching the processing station on and
getting the system main screen
Normally, the processing station may be left on day and night. The
processing station is equipped with a screen saver to prevent the screen from
burning in when it is not used for a long period of time. However, if you need
to move the processing station to a different location or if it has to be
disconnected from the mains, proceed as follows when switching the
processing station on or off.
Switching the processing station on
Proceed as follows to switch the processing station on.
1
Put the main switch in the ON position. The main switch is located on the
back of the processing station close to the power supply cable.
The processing station performs its initialization procedure and asks your
login name.
Welcome to Host Name
Please enter your user name
MIMOSA
OK
ADC Compact Autoprocessing Software
Start Over
Options
Help
2202A GB 199801
1
2
Type your user name and press [ENTER] or click the OK button.
The processing station asks your password.
Welcome MIMOSA
Common Desktop Environment
Please enter your password
OK
3
Start Over
Options
Help
Type your password and press [ENTER] or click the OK button.
The processing station automatically loads the application software and
displays the system main screen.
2
2202A GB 199801
ADC Compact Autoprocessing Software
Switching the processing station off
Caution
Never switch the processing station off while the application is running.
If you want to switch off the processing station, always proceed as follows:
1
Click ‘Controller’ in the system main screen.
ADC Compact Autoprocessing Software
2202A GB 199801
3
2
Click ‘Stop user interface’.
The processing station displays the Log-out menu.
3
Click the Power Off button for a complete shut-down of the processing
station.
If you click the Log-out button, the system returns to the Log-in prompt.
4
4
2202A GB 199801
Click the OK button to proceed.
ADC Compact Autoprocessing Software
The System Main screen
The ADC Compact Autoprocessing Software performs a multitude of tasks,
like the automatic processing of the incoming raw ADC Compact images,
collimation border detection, automatic Window/Level setting, sensitometry
mapping and numerous background and system control operations. For a
more detailed description we refer to the ADC Compact System Overview
manual, Application aspects, page 14 and following.
In addition to an alphanumeric list of images, the system main screen
provides more general information about the processing station, which can be
accessed through the buttons on the topmost toolbar. This information relates
to Disk management, Waste bin management, Input and Output Queue
management, Setup, User Menu management, Queues and Devices.
ADC Compact Autoprocessing Software
2202A GB 199801
5
The images displayed on the alphanumeric image list are selected by default
in accordance with the selection criteria that have been configured in the
Setup module of the system main screen. In the example screen above, the
preconfigured selection criteria are ‘Patient name’, ‘Identification date’,
‘Examination’ and the ‘Sent’ feature.
Selecting and de-selecting images
To perform an operation on an image such as printing, sending or archiving
an image, you first have to select it.
You can select an image by just clicking on it. A selected image appears on a
white background.
You can deselect an image by clicking it again, or you can click ‘Deselect’ to
de-select the currently selected image.
Selecting by criteria
You can also use selection criteria. The following criteria are available:
■
by identification date
■
by patient ID
■
by patient name
■
by patient last name
■
by radiologist
■
by examination type
■
by examination subtype
■
by RIS ID
■
by Digitizer ID
■
by User Info (i.e. four user configurable data fields).
You can configure four criteria from this list. For an explanation on how to
configure the selection criteria, we refer to the section ‘Setup’ on page 23.
Each of the selected criteria has a matching button in the upper left corner of
the screen.
6
2202A GB 199801
ADC Compact Autoprocessing Software
When no selection is entered, all images appear on the screen (on several
successive pages).
Example: If you click ‘Patient name’ then select a given patient from the
menu, the screen will display images of this patient only. You can also
combine selection criteria: e.g. you may want to select the images of one
examination type from a given date. The images that appear on the screen all
fulfil those four conditions. If a button is marked with an asterisk ‘*’ it means
that this selection criterion is inactive.
Sorting images
The default sort algorithm puts the most recently identified images at the
head of the list. However, you can change this order by clicking the ‘Sort on:’
button.
You have 8 possibilities to sort on:
■
identification date
■
patient name
■
radiologist
■
examination
■
patient ID
■
RIS ID
■
Digitizer ID
■
User Info (i.e. four user configurable data fields).
You can also use the ‘Sort on:’ button in combination with the selection
criteria mentioned in the previous sub-section.
ADC Compact Autoprocessing Software
2202A GB 199801
7
Printing a selected image
To print an image, proceed as follows:
1
Select the image you want to print.
2
Click ‘Print’.
The processing station returns the print menu:
3
Click a button from the top row to select the size of film you want to print onto.
Depending on the configuration of the printer destination and the printer, you
have the choice between 3 sizes:
8
■
8 x 10 inch
■
11 x 14 inch
■
14 x 17 inch
2202A GB 199801
ADC Compact Autoprocessing Software
The button of the film size and layout as selected by the ADC Compact ID
Software is pressed automatically by default. The printer destination as
configured in the ID Station determines which size buttons can be selected.
The Scopix laser printers print on all three sizes, Drystar 2000 only on 8 x 10
inch film size and the Drystar 3000 printer on 11 x 14 inch and 14 x 17 inch.
As a result only the size selection buttons that are relevant are selectable. In
the illustration below, for example, only the 8 x 10 “ film size button can be
activated, as the printer destination was initially configured to the Drystar
2000 (Di 2000) printer.
4
Click a button from the next row to select the basic orientation of the image or
image boxes.
You can choose between:
■
the portrait format
or
ADC Compact Autoprocessing Software
2202A GB 199801
9
■
the landscape format
5
The next set of buttons determines which part of the actual film surface is
used when a 1 on 1 reproduction needs to be printed.
You can choose either of the following two options:
■
Full size, i.e. the full film surface is printed on (while preserving the aspect
ratio)
or
10
■
True size, i.e. any cassette size is printed “true size” (=100%) on all film sizes
(See standard film division table on pages 22 and following of the ADC
Compact System Overview Manual). In a number of cases, for example,
when a 35 x 45 cm cassette size is printed on a 8 x 10 inch film size, parts of
the image will be clipped at all sides of the image.
6
In case you wish to assign the image to be printed the highest priority in the
printing queue, click the Emergency button.
2202A GB 199801
ADC Compact Autoprocessing Software
7
Select Printer
8
Click ‘Print’.
Or click ‘Cancel’ if you decide not to print the selected image(s).
Sending images to review stations
The IMPAX product line provides gateways, transmit, archive and review
stations (DICOM STORE = optional) and hard copy printing (DICOM PRINT =
standard)for digital imaging. The processing station features an interface
software module to integrate ADC Compact and IMPAX. You can interactively
send 8 or 12-bit images to IMPAX modules using the DICOM protocol. 8-bit
images already have a Look-up Table, whereas 12-bit images are
MUSICA-processed with separate Look-up Table. To allow for fully-fledged
CR functionality also private elements have been defined. Refer to the
DICOM Conformance Statement. For more information on the IMPAX product
line, consult your local Agfa sales organisation.
Only images that have been given a default destination on the ADC Compact
ID Station can be sent to an IMPAX review station.
If you want to send (re-send) a processed image to an IMPAX review station,
proceed as follows:
1
Select the image that you want to send to the review station.
The ‘Send’ button becomes active.
Note
You can select an image by just clicking on it. A selected image appears on a
white background.
ADC Compact Autoprocessing Software
2202A GB 199801
11
The following picture shows the system main screen with one image
selected.
Note
You can deselect an image by clicking on it again, or you can click ‘Deselect’
to deselect the currently selected image.
2
12
2202A GB 199801
Click ‘Send’.
ADC Compact Autoprocessing Software
Archiving images
Only images that have been assigned a default destination on the ADC
Compact ID Station can be archived to an Impax archive station.
If you want to archive a processed image, proceed as follows:
1
Select the image that you want to archive. In case the selected image was
previously assigned a default archiving station destination, the ‘Archive’
button becomes active.
You can select an image by just clicking on it. A selected image appears on a
white background.
Note
The following picture shows the system main screen with one image
selected.
You can deselect an image by clicking on it again, or you can click ‘Deselect’
to deselect the currently selected image.
Note
2
Click ‘Archive’.
ADC Compact Autoprocessing Software
2202A GB 199801
13
Monitoring the status of the processing station
With the dynamic bar graph in the upper right corner of the browser screen
you can monitor the status of the processing station.
■
D: indicates the degree of occupation of the hard disk
■
I: indicates the current input rate
■
O: indicates the current output rate
These three meters indicate the activity of the processor and of the incoming
and outgoing images. The input rate and output rate indicators show between
zero and four jobs. If there are more than four jobs, the meter turns white.
The activity of the background module is indicated as well:
■
X: indicates that the background is not running
■
\ alternating with /: indicates that the background is running
Managing messages
If the application wants to inform you on certain events, conditions or
problems, it generates a message. A window pops up displaying the
message. After you have read the message and clicked ‘OK’, the message is
put in the message queue.
Messages can have different priorities: this is reflected in the status of the
message. The status of a message can be one of the following:
■
14
2202A GB 199801
message
A message with a ‘message’ status is intended to notify the user of certain
events.
ADC Compact Autoprocessing Software
■
warning
A ‘Warning’ status informs the user about abnormal conditions.
■
panic message
These messages inform the operator about failed operations.
To manage the message queue, proceed as follows:
1
From any screen, click the button labelled ‘message’ in the upper right corner.
Clicking this button opens a window with information about the oldest
message with the highest priority. An example of this window is shown below:
The following information can be displayed:
■
description of the message and the status (message, warning or panic)
■
a possible solution
■
the application that has generated the message
■
date and time the message was generated
■
frequency
ADC Compact Autoprocessing Software
2202A GB 199801
15
■
message ID-number
■
the number of messages as well as the position of the currently selected
message in the queue are also displayed (e.g. 2/2 means that this message
is the second out of two).
If the problem persists and you contact your Agfa service engineer, be sure
that you have this information at hand.
16
2
You have the following options:
■
Click ‘Previous’ to view the message that comes before the currently selected
message in the queue.
■
Click ‘Next’ to view the message that comes after the currently selected
message in the queue.
■
Click ‘View’ to pop up a window that lists all messages in the queue. This
window looks similar to the following one:
3
Click the ‘Cancel’ button.
2202A GB 199801
ADC Compact Autoprocessing Software
4
If you have solved the problem and you want to delete the currently selected
message from the queue, click the ‘Delete’ button.
As long as a panic message is not deleted, it continues to pop up.
5
Click the ‘Cancel’ button.
Locking Screen
In order to forestall accidental erasure of data whenever the operator
temporarily leaves the processing station, the screen will turn blank and be
locked automatically after a (re-configurable) lapse of time.
The screen can also be locked interactively. In order to lock the screen,
proceed as follows:
1
Click the Controller menu.
2
Click Lock Screen.
The processing station returns the following message:
In order to unlock the screen, enter your password.
ADC Compact Autoprocessing Software
2202A GB 199801
17
System Monitoring
Disk management
From the general System Monitoring screen, click the button labelled ‘Disk’ in
the upper left corner.
Clicking this button opens a window with information about the disk structure.
The system gives you the number of stored images on your system and the
amount (in Megabytes) used. Since, as an option, you can install more than
one disk, the window shows the name of the disk.
18
2202A GB 199801
ADC Compact Autoprocessing Software
You can also see the number of images that you can add without overwriting
older images.
Note
The number of images is an approximation since different images can have
different sizes.
Click the ‘Cancel’ button to return to the general System Monitoring screen.
Input queue management
Input queue window
From the general System Monitoring screen, click the button labelled ‘Input’ in
the upper left corner. Clicking this button opens a window with information
about the incoming images. An example of this window is shown below:
The screen shows the patient demographics and the examination data of the
images that are currently queued for the processing station.
Clicking the ‘Cancel’ button returns you to the general System Monitoring
screen.
ADC Compact Autoprocessing Software
2202A GB 199801
19
Changing the job priority
Normally, every job has a priority of 5. The processing station reads jobs
according to the first-in-first-out rule. However, you can change the sequence.
If you want a job to jump the queue, proceed as follows:
1
From the general System Monitoring screen, select the button labelled ‘Input’.
The Input window pops up.
2
Select the job that you want to give a higher priority.
The selected job is highlighted.
3
Click the ‘Emergency’ button
The job moves to the first place in the queue and its priority changes from 5
to 0.
4
Click ‘Cancel’ to return to the general System Monitoring screen.
Holding jobs
The normal status of a job is ‘queued’. If the processing station is actually
reading the image, the job status changes into ‘active’.
If you select a job and click the ‘Hold’ button, the job status becomes ‘hold’.
The processing station will not read the image unless you select it again and
click the ‘Unhold’ button.
Cancel jobs
If you want to cancel a job, proceed as follows:
1
From the general System Monitoring screen, select the button labelled ‘Input’.
The Input window pops up.
2
20
2202A GB 199801
Select the job that you want to remove from the queue.
ADC Compact Autoprocessing Software
The background of the job becomes white.
3
Click the ‘Delete’ button.
The status changes in ‘Cancelled’.
If a job status is ‘Cancelled’, you can, by no means, retrieve the job.
Caution
4
Click ‘Cancel’ to return to the general System Monitoring screen.
Output queue management
Output queue window
From the general System Monitoring screen, click the button labelled ‘Output’
in the upper left corner. Clicking this button opens a window with information
about the images in the output queue. An example of this window is shown
below:
The screen shows the patient demographics of the images that are currently
queued for the different output devices such as printers, archive stations and
review stations.
Clicking the ‘Cancel’ button returns you to the general System Monitoring
screen.
ADC Compact Autoprocessing Software
2202A GB 199801
21
Changing the job priority
Normally, every job has a priority of 5. Consider, as an example, a Laser
Imager. Jobs are printed according to fthe irst-in-first-out rule. However, you
can change the sequence.
If you want a job to jump the queue, proceed as follows:
1
From the general System Monitoring screen, select the button labelled
‘Output’.
The Imager window pops up.
2
Select the job that you want to give a higher priority.
The background of the job becomes white.
3
Click the ‘Emergency’ button.
The job moves to the first place in the queue and its priority changes from 5
to 0.
Holding jobs
The normal status of a job is ‘queued’. If an output device is actually
processing the image, the job status changes into ‘active’.
If you select a job and click the ‘Hold’ button, the job status becomes ‘hold’.
The output device will not process the image unless you select it again and
click the ‘Unhold’ button.
Cancel jobs
If you want to cancel a job, proceed as follows:
1
Select the job that you want to remove from the queue.
The background of the job becomes white.
22
2202A GB 199801
ADC Compact Autoprocessing Software
2
Click the ‘Delete’ button.
The status changes in ‘Cancelled’.
Caution
If a job status is ‘Cancelled’, you cannot retrieve the job.
Setup
From the general System Monitoring screen, click the button labelled ‘Setup’.
Clicking this button opens a window that allows you to configure the system.
An example of this window is shown below:
Clicking the ‘Save’ button stores the currently configured settings whereas
clicking ‘Cancel’ returns to the general System Monitoring screen.
ADC Compact Autoprocessing Software
2202A GB 199801
23
Selection criteria
The selection criteria that you configure are used by default to select the
images in the main screen. Select four different criteria from the following list:
■
by identification date
■
by patient ID
■
by patient name
■
by patient last name
■
by radiologist
■
by examination type
■
by examination subtype
■
by RIS ID
■
by Digitizer ID
■
by User Info (i.e. a user configurable data field).
■
by “Sent”
In case “Sent” has been configured as a selection criterium in the Set-up
menu, the system gives you a choice from among six options:
sent/not sent
archived/not archived
printed/not printed
The “sent” and “archived” options only comprise images that have been sent
respectively archived manually, whereas the “printed” option also includes the
autorouted images.
24
2202A GB 199801
ADC Compact Autoprocessing Software
Wait-message Icons
You are offered a choice between ‘Simple’ and ‘Fancy’ wait-message icons.
By default the wait-message icon assumes the shape of an egg-timer. By
clicking the ‘Fancy’ button in the Set-up menu, you can turn the icon into a
more fanciful shape, like the ones displayed below:
Panic message level
The panic message levels can be set by clicking the ‘More’ respectively
‘Fewer’ buttons in the Panic message level field of the Set-up menu, as
shown in the screen below.
ADC Compact Autoprocessing Software
2202A GB 199801
25
A selection can be made between three different levels:
■
Level 1
When the system is set to level 1, any warning or error message irrespective
of its importance is displayed and highlighted on the screen.
■
Level 2
When panic message level 2 is selected, the system displays warnings or
error messages, whenever errors of a somewhat higher priority than in level 1
occur.
■
Level 3
When level 3 is selected in the Set-up menu, the system only displays and
highlights messages of the highest priority.
Max. number images
The maximum number of storable images is calculated on the basis of the
disk space available in the system.
This configurable number of storable images can be raised (never lowered),
as the initial system calculations are based on storage capacity required for
storing original exposed images and as subsequently processed images
account for far less storage space.
26
2202A GB 199801
ADC Compact Autoprocessing Software
Queues
Using the Queues option in the Set-up menu, you can define periods for
transmitting both the Archive and Review/Softcopy queues. In case the
queues are not set by the user, the system sends the images to the archive
and/or review stations continuously, by default.
For both queues you can pre-set three different off-peak periods during which
you want images to be archived or sent to a review station.
In order to do so proceed as follows:
1
Click the Queues button in the Set-up menu.
2
Click and drag the pointer across the period you want the images to be sent
to the Archive respectively Review destinations.
The period can also be indicated by keyboarding the time of day in the
appropriate boxes.
The system displays the indicated off-peak period(s) on a black background.
ADC Compact Autoprocessing Software
2202A GB 199801
27
Devices
Using the Devices option in the Set-up menu, you can consult a table
showing the last known status of all devices in the system, as displayed in
the following sample screen.
28
2202A GB 199801
ADC Compact Autoprocessing Software
Troubleshooting
Automatic anticipation
The processing station is programmed to anticipate problems. The actions
taken are fully automatic and most of them are transparent to the operator of
the processing station. The automatic actions are explained below:
■
Every night, the processing station automatically makes a consistency check
between the Oracle database of the images and the files of the images to
anticipate database errors.
■
If an internal software problem occurs during operation, the processing
station automatically restarts the MIMOSA software.
General procedures in case of malfunctions
Although the processing station is programmed to anticipate problems and to
correct malfunctions automatically, a user intervention is sometimes required.
If you face a problem that is not automatically solved you can take one of the
following actions:
■
Reset the user interface
■
Reset the background
■
Reboot the system.
Always try to reset the user interface first. If this does not solve the problem,
reset the background. Rebooting the system is the ultimate action you can
undertake. If this does not solve the problem, contact a service engineer.
ADC Compact Autoprocessing Software
2202A GB 199801
29
Reset and stop the user interface
If the software performs slower than normal or faces a deadlock, resetting the
user interface is the most appropriate action. To reset the user interface,
proceed as follows:
1
Make sure the main screen is displayed.
If not, click ‘Select’ in the upper right corner of the current screen.
2
Click ‘Controller’.
The processing station returns the controller menu.
3
Select ‘Reset User interface’
If the previous actions did not solve the problem, then continue with step 4.
4
Click ‘Controller’ again.
5
Select ‘Stop User Interface’.
The processing station displays the Log-out menu.
30
2202A GB 199801
ADC Compact Autoprocessing Software
6
Click either the Log-out button or Power Off button.
If you click the Log-out button and then the OK-button, the system
asks you for confirmation and then returns to the Log-in prompt.
If you click the Power Off button and then the OK-button, the
system returns the following screen:
OK to Power off Workstation
[ yes, no, ?, q ]
7
Type “yes” and press [ENTER].
The system informs you that the Shut-down procedure has started and then
returns the OK prompt. Switch off the computer, or type “boot” to start up the
system again.
Reset the background
This action solves typical background problems. To reset the background,
proceed as follows:
1
Make sure the main screen is displayed.
If not, click ‘Select’ in the upper right corner of the current screen.
2
Click ‘Controller’ in the right corner of the screen and select ‘Reset
Background’ to reset the software.
ADC Compact Autoprocessing Software
2202A GB 199801
31
Check System
This function clears the system of corrupt data, if any. To check the system,
proceed as follows:
1
Make sure the main screen is displayed.
If not, click ‘Select’ in the upper right corner of the current screen.
2
Click ‘Controller’ in the right corner of the screen and select ‘Check System’.
Software Version
When selecting ‘Software Version’ in the ‘Controller’ roll-down menu, the
system displays the software version and the operating system.
32
2202A GB 199801
ADC Compact Autoprocessing Software
Performance Requirements of the
processing station
Hardware
■
SUN ULTRA 1 model 170
■
128 MB RAM
■
1 internal disk 2.1 GB
■
5 GB DAT tape drive (optional)
■
1 internal CD ROM drive
■
1 floppy drive 3.5 inch
■
1 keyboard (Country specific)
■
1 mouse + mousepad
Software
■
Operating system Unix (Sun Solaris 2.5)
■
Graphic User interface: Xwindows
■
Relational data base: Oracle 7.2.2
■
Motif
■
Agfa ADC Compact Autoprocessing software
■
Agfa Musica image processing software
ADC Compact Autoprocessing Software
2202A GB 199801
33
Application software
■
Chest
■
Abdomen
■
Skeleton
Optional application software
■
Uro / Tomo
■
Dental (in development)
■
Paediatrics (in development)
■
Full Leg / Full Spine (in development)
The following applications are not yet supported by the ADC
Compact System:
34
■
Angiography
■
Mammography
2202A GB 199801
ADC Compact Autoprocessing Software
Performance Requirements - Monitors
Standard Brightness Monitor
Synchronization
Horizontal Scan Rate
Vertical Scan Rate
48 to 108 kHz (automatic adjustment)
60 to 80 Hz (automatic adjustment)
Input Signals
ECL Digital
Analog
D-Sub 25 pin connector (1, 2 or 4 bits per pixel)
3 BNC connector (composite on video or
separate sync.)
13W3 and other connectors optional
CRT
Screen Size
Phosphor
Non-glare AR Panel
Display Mode
21” FS
P104 (other options available)
Optional
Non-interlaced
Display Area
Horizontal Width
Vertical Height
16” max (user adjustable)
12” max (user adjustable)
Video
Video Band Width
ADC Compact Autoprocessing Software
200 MHz (up to 300 MHz optional)
2202A GB 199801
35
Resolution
Horizontal
Vertical
Brightness
1024 to 2048
768 to 1536
65 Footlamberts nominal
HRMSTM allows the monitor to adjust
automatically to a range of horizontal and vertical
scan frequencies, providing compatibility with
many hi-res display controllers for PCs, PS/2s,
MACs, Sun, Apollo, DEC, Silicon Graphics and
other workstations.
User Controls
Side
Rear
Power, Brightness and Contrast Controls
Height, Vertical Position, Width, Horizontal
Position
Dimensions
Height
Width
Depth
Weight
16.5” (19” with tilt-swivel base)
19.5”
19”
48 lbs. (55 lbs. with tilt-swivel base)
Power Supply
Power Consumption
Input Voltage
Input Frequency
36
2202A GB 199801
100 Watts
90 to 130 VAC, 220 to 250 VAC
47 to 63 Hz
ADC Compact Autoprocessing Software
High Brightness Monitor
Greyscale Monitor
SMM 2183 L
Power requirements
Input Voltage
Power
Power
Power
Power
Frequency
Consumption
factor control
saving
90 - 264 V
wide range power supply
47 - 65 Hz
Max 150 Watts
according to IEC 1000
according to VESA DPMS
CRT specifications
Size
Deflection Angle
Light Transmission
Phosphor Type
Surface
Gun System
Focusing
21” Flat Square
90°
30%
P45, cadmium free
Multicoated conductive panel (AR/AS)
Dispenser Cathode (long life)
static and dynamic
General performance
Horizontal Frequency
Vertical Frequency
Formats
30 to 83 kHz
50 to 120 Hz
19 Max, self recognizing and autoscaling
Display performance
Display Area (WxH)
Non-Linearity
Raster stability
Maximum Brightness
High Voltage Regulation
ADC Compact Autoprocessing Software
400 mm x 300 mm
≤ 2%
0.05 mm Max swim&jitter
≥ 175 ftL @ 1 Vp-p Input Signal
0,2% Max size change
2202A GB 199801
37
Video amplifier, inputs
Bandwidth
Rise & Fall times
Connectors
Impedance
Video Level
Sync Level
140 MHz @ 80 V Modulation
3 ns
BNC Type
75 ohms
0.75 to 1.2 Vp-p
0.1 to 0.6 Vp-p
Front panel controls
Controls
Geometry
Ambient light sensor
Power on/off, Contrast/Brightness
H/V-phase, H/V-amplitude,
pin & barrel, raster rotation
for automatic contrast control
Operating conditions
Temperature
- Operating
- Storage
+ 10 °C...+ 35 °C
- 25 °C...+ 70 °C
Humidity
- Operating
- Storage
20% - 80% rel. humidity
20% - 80% rel. humidity
Mechanical specifications
Dimensions (WxDxH)
Weight
499 x 520 x 476 mm
approx. 30.5 kg
Approvals
Safety
EMC
Radiation
Others
38
2202A GB 199801
UL 1950, CSA, IEC 950, EN 60 950, DHHS
IEC 601-1-2
MPR II
CE mark
TÜV-Ergo (optional)
ISO 9001 certified plant
ADC Compact Autoprocessing Software
Printed in Belgium
Published by Agfa-Gevaert N.V., B-2640 Mortsel-Belgium
2202A GB 199801