1
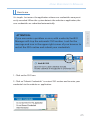
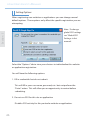
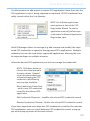
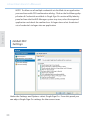
Verifi
WATERPROOF
ENTERPRISE
PROFESSIONAL
User Manual
Windows XP
Fast User Switching
Compatible
Next Generation FingerPrint Security
QAS 098 022505 PG1 RB
USER MANUAL
A Guide to Installing and Using Your
Verifi Fingerprint Reader and Verifi
Identity Manager Software.
Zvetco Biometrics
6820 Hanging Moss Rd
Orlando, FL 32807
©2005 Zvetco LLC. All rights reserved.
Features and specifications are subject to change without
notice. Zvetco, and the Verifi logo are trademarks of Zvetco LLC.
Microsoft, Windows and Internet Explorer are registered trademarks of Microsoft Corporation.
This product may have possibility (of less than 0.1% according
to our measurements) of granting access to persons other than
those who have registered their fingerprints. In no event shall
Zvetco or our representatives be liable for any incidental, consequential, or special loss arising from granting an access to persons
from other than those who have registered their fingerprints. In
no event shall our corporation or our representatives be liable for
any incidental, consequential or special loss arising from any use,
defect, malfunction, or fault of this product.
When sending the fingerprint data via communication line or
storing such data in a computer, sufficient security control is
required to avoid abuse of the data.
TABLE OF CONTENTS
1. Introduction
2. Product Overview
What is an Identity?
Product Features
3. Knowing your Fingertouch Security
Package Contents
System Requirements
About the Fingerprint Reader
4. Installation
Install Software/Hardware
Setup Verifi Identity Manager
Fingerprint Enrollment
5. Using Verifi Identity Manager
Using the System
Verifi ID Dialog Box
Windows Logon
Password Manager (SSO)
e-Wallet
Data Encryption (With Secure Disk)
Application Protection
Backing Up your Identity
6. Advanced User Features
Advanced Multifactor Authentication
Manual Application Registration (SSO)
Advanced Secure Disk Options
Installing External Devices
7. Frequently Asked Questions
8. Troubleshooting
9. Information
..........4
..........6
..........8
. . . . . . . . . . 14
. . . . . . . . . . 17
. . . . . . . . . . 53
. . . . . . . . . . 66
. . . . . . . . . . 78
. . . . . . . . . . 71
Section 1
INTRODUCTION
Thank you for purchasing the Verifi Fingertouch Security system.
Following are two short sections - the first discusses the benefits of a
fingerprint security system, and the other outlines best practices that
maximize your new fingertouch security and convenience. Please be
sure to read through this User Manual completely, and pay special
attention to the section entitled “About the Fingerprint Reader”. By
following our simple setup instructions you will be able to use your
Verifi Fingertouch Security to:
Use a single fingertouch to log on to any Windows Account.
Store and use passwords to your favorite Websites and Applications.
Create a secure portion of your PC that only YOU can access.
Here are some of the advantages of setting up a Verifi
Fingertouch Security system:
Identity Theft - Take a bite out of Identity Theft by limiting the usage
of passwords. Fingerprints can not be guessed and since you do
not have to remember passwords anymore the ones you do use can
be made more complex. Solid passwords significantly reduces your
chances of Unauthorized Access and Identity Theft.
4
INTRODUCTION
Forget your Passwords - By using the password manager (SSO) you
can really forget all your passwords. Let Verifi ID Manager do the work
for you by storing and encrypting all your passwords.
Section 1
Keep your Files Private - With Secure Disk you can store all your
personal files to an encrypted section of your hard drive. Simple and
easy-to-use, the Secure Disk is available only to you. Your privacy is
now a reality.
Maximize your Fingertouch Security and Convenience.
We recommend to use more than one method of logon for the Administrator account for your PC. This allows backup access in the unlikely event of a failed fingerprint reader. For all other user accounts
fingerprint logon only is recommended to increase security.
For security conscious users we do not recommend using the Windows XP Fast User Switching logon method, available on Windows XP
PC’s.
5
PRODUCT OVERVIEW
Section 2
What is an Identity?
Verifi ID Manager is designed to provide a secure and convenient computing
environment. A user can consolidate all passwords and logon accounts into a
single data unit called User Identity. Security and privacy are strictly enforced
with Verifi ID Manager, so all private data is available only to its owner. User
identity is always encrypted and can be protected with Multifactor Authentication.
When you install Verifi ID Manager a User Identity will be automatically created.
This Identity will now be used for PC Logon and all other Verifi Identity Manager
services.
Product Features
Windows Logon
Verifi ID Manager supports logon to a domain as well as local Windows
logon. If authentication of your Identity is successful, Windows logon occurs; a user who fails to be authenticated will be prevented from logging
on to Windows.
Password Manager (SSO)
Enhance user convenience and productivity with Single Sign On (SSO) functionality. SSO can store user names and passwords for an unlimited number
of applications and automatically submits them when required. With SSO
the user no longer needs to remember the growing number of passwords for
Internet and Windows applications.
6
PRODUCT OVERVIEW
e-Wallet
Section 2
Store your personal information along with Credit Card information in
an easy-to-use and secure format. Repetitive typing is no longer needed
when shopping online, simply open your e-Wallet and select to “Fill-in” your
information.
Data Encryption
Create a secure “partition” to your PC’s hard drive that is only available to you.
When logged into your Identity Account your files are accessible through all
your applications including Windows Explorer. However, when you’ve logged
off your entire Secure Disk area is not available even for viewing.
Application Protection
Prevent unauthorized access to any application. Whether its your checkbook,
organizer, or web browser, Application Protection gives you individualized
control for groups of users.
7
KNOWING YOUR FINGERTOUCH
Package Contents
Verifi Fingerprint Reader (P3400, P4000, or P4000WP) with USB Cable
Verifi ID Manager Software
Section 3
Quick Start Guide
Users Manual
System Requirements
Operating System
Windows 2000 Professional
Windows XP Tablet PC Edition
Windows XP Home Edition
Windows XP Professional
Microsoft Internet Explorer 6 or higher
Available USB Port
42MB of available hard disk space.
4X or faster CD-ROM
VGA or higher resolution.
8
KNOWING YOUR FINGERTOUCH
The installation of Verifi ID Manager consists of software and hardware installation steps. The hardware drivers for the Verifi Fingerprint Reader will be
installed during the software installation of Verifi Identity Manager. Drivers for
any additional hardware devices that are supported by Verifi ID Manager must
be installed separately.
Section 3
Refer to “Installing External Devices” for further details.
About the Fingerprint Reader
Proper Use of the
Fingerprint Reader
ATTENTION:
Fingerprint verification is dependent upon how well you
enroll your fingerprint.
The fingerprint enrollment process consists of multiple placements of the
finger to acquire several images for fingerprint template creation. Placing
the core of your fingerprint in the active sensor area increases the quality of
the enrollment template.
9
KNOWING YOUR FINGERTOUCH
Section 3
FINGERPRINT
CORE
Center of finger
swirl patterns
placed in sensor
area.
FINGERPRINT
CORE
No core found
from extreme
placement of
finger.
10
GOOD
IMAGE
BAD
IMAGE
KNOWING YOUR FINGERTOUCH
Fingerprint Placement
PROPER FINGER PLACEMENT
Finger is flat to surface and centered in
fingered guide.
IMPROPER FINGER PLACEMENT
Finger is not flat to surface and not
placed in fingered guide.
Slight variations in the placement of the core are acceptable and beneficial to
the creation of a Composite template.
However, placement of the extreme tip of the finger results in poor template
creation.
11
Section 3
(FOR P3400 Fingerprint Readers ONLY)
KNOWING YOUR FINGERTOUCH
Fingerprint Placement
Section 3
(FOR P4000 & P4000WP Fingerprint Readers ONLY)
PROPER FINGER PLACEMENT
Finger is flat to surface and centered in
fingered guide.
IMPROPER FINGER PLACEMENT
Finger is not flat to surface and not
placed in fingered guide.
Slight variations in the placement of the core are acceptable BUT NOT BENEFICIAL to the creation of a Composite template.
Consistent placement of your fingerprint core in the center of the sensor will
give maximum performance.
12
KNOWING YOUR FINGERTOUCH
Regular cleaning and maintenance is not required for your fingerprint reader.
However, for proper operation the finger sensor must stay free from excessive
debris. If your fingerprint sensor needs cleaning gently wipe the sensor with
a dry soft cloth.
! Warning
To protect against risk of damage to the fingerprint reader:
Do not pour glass cleaner directly on the fingerprint reader window.
Never submerge the reader in liquid (except for the P4000WP waterproof edition)
Never rub the fingerprint reader sensor with an abrasive material,
including paper.
Do not poke the sensor with your fingernail or any other item, such
as a pen.
13
Section 3
Cleaning the Fingerprint
Reader
INSTALLATION
Install Software / Hardware
1. Logon to a Windows Account with Administrator Privileges. Administrative privileges are required to install all security features.
Section 4
2. Shut down any programs that are running on your computer.
NOTE: Do not connect the Fingerprint reader at this time.
3. Insert the Verifi Identity Manager Software CD. The Easy Install Wizard
screen will automatically appear on your screen.
4. You will see the Install Wizard’s welcome screen. Click “Next”.
5. Read and follow installation instructions.
6. Restart your PC.
Setup for Verifi Identity Manager
1. Logon with User Name and Password for your Personal Windows Account.
(This account does not need Administrator Privileges.)
2. If the Registration Wizard welcome screen automatically starts proceed to
step 3. For all others, Click on Verifi ID “icon” or “bubble” to initiate creating
your Verifi Identity. Log on with the same User Name and Password as in step
1. This has now synchronized your Windows Account and Verifi Identity and
you will not be required to submit User Name and Password to a Windows
logon screen during future logons.
14
INSTALLATION
4. Upon the Registration Wizard’s welcome screen. PLEASE INSTALL THE
FINGERPRINT READER INTO AN AVAILABLE USB PORT AT THIS TIME. Windows
should automatically recognize your new hardware. If it does not, follow the
Windows hardware installation Wizard for manual hardware setup.
5. Upon successful hardware recognition Click “Next” on the Verifi ID Registration Wizard to continue.
Fingerprint Enrollment
1. Your password has automatically been registered as a Verifi ID logon method. To register your fingerprint select the fingerprint icon and Click “Next”.
2. The right index finger has been selected by default, now PLACE AND
HOLD this right index finger on the fingerprint sensor.
3. Your fingerprint image will appear on the screen. Once the task bar indicates a successful image capture, lift your finger from the fingerprint sensor.
4. Repeat this process of placing your finger and lifting until the task bar
reaches 100%.
15
Section 4
NOTE: If manual Windows hardware installation is required, the drivers for
the Reader are located on the Verifi Identity Manager CD.
INSTALLATION
5. A second finger will now be prompted for enrollment. PLACE AND HOLD
your left index finger on the fingerprint sensor.
NOTE: The enrollment wizard will be by default the right index and
left index fingers. However, all fingers are available for enrollment.
Section 4
6. Repeat place and hold until task bar reaches 100%.
7. Click “Finish”
Congratulations! You have finished installing the Verifi Fingertouch
Security system.
To test, log off and then back on to your Windows account using your
fingerprint.
ATTENTION:
When using Windows XP Fast User Switching an additional
password box will be encountered during the first fingerprint
logon attempt. Providing this password synchronizes your
Windows Account with your new Identity and will not appear
during subsequent logons.
Now you can enjoy logging on to Windows, Web sites, and programs with
just a touch of your finger.
16
USING VERIFI IDENTITY MANAGER
Using the System
First, to get access to all product features, the user must log on to Verifi ID Manager. By default the user is logged on/off Verifi ID Manager when logging on/off
your Windows Operating System. To learn how to modify this default reference
see the Advanced Features section.
Verifi ID Manager provides services and applications (including Microsoft Network Logon, Single Sign On, e-Wallet, Data Encryption, Application Protection,
Smart Cards and Tokens Service) to meet many needs. Based on the privileges
of the user’s profile, authentication provides access to all the resources to which
the user is authorized.
17
Section 5
Understanding some of the fundamental skills needed when using Verifi ID
Manager helps the user quickly accomplish tasks and improve overall efficiency.
This section briefly describes the major operations provided by Verifi ID Manager.
USING VERIFI IDENTITY MANAGER
Section 5
Verifi ID Dialog Box
The Verifi ID
dialog box is
the major user
interface. Many
services and
configuration settings are available
from the Verifi ID
Manager
dialog box. When
the user is logged
on to Verifi ID
Manager, the
user has access
to these services
as well as to user
identity, Windows
logon, and SSO to
register and manage passwords for
applications, settings, and so on.
Access the
Verifi ID Dialog Box
Right-click the Verifi ID Manager icon in the taskbar notification area. From
the Verifi ID Manager, select “My Identity” item in the navigation panel.
18
USING VERIFI IDENTITY MANAGER
ATTENTION:
After installation, Verifi ID Manager will now perform logon to
your PC Windows Account.
By default, logon to your PC will be through Verifi Identity Manager. This unique
approach means that, upon successful logon to your identity, Verifi Identity
Manager will automatically logon to Windows for you.
Multifactor
Authentication
Now that Verifi Identity Manager is controlling access to your PC, you can
enjoy multiple methods of secure identification and logon (Settings and
Options >Authentication and Credentials). Verifi Identity Manager can use
passwords, fingerprints, smart cards, tokens, and virtual tokens in any AND/
OR combination. For example, if you configure Verifi Identity Manager logon
for password OR fingerprint, then either one will log you onto your identity
(which then logs you onto Windows).
19
Section 5
Windows Logon
USING VERIFI IDENTITY MANAGER
Section 5
If you were to configure Verifi Identity Manager for password AND fingerprint, then you would need to provide BOTH for successful logon to your
identity. Because Verifi Identity Manager controls access to your Windows
logon, you have, in effect, made your logon to Windows require a password
AND fingerprint.
Register
Credentials
In order to use multifactor authentication, the user should register (establish)
credentials in addition to the password. The user can register fingerprints,
smart cards, or any other credentials for supported authentication methods
using the “I Want To” section of the Verifi Identity Manager dialog box. After
credentials are registered, the user can use them during the next logon.
20
Section 5
USING VERIFI IDENTITY MANAGER
Adding Windows Accounts
to your Identity
Verifi Identity Manager has the ability to hold credentials for logging onto
multiple different Windows accounts. From the Verifi Identity Manager
dialog box, select Microsoft Network Logon > Add a Network Account. In the
User credentials dialog box, type user name, domain name (local PC name for
local account) and password.
21
USING VERIFI IDENTITY MANAGER
You can select this new account as the default Widows account (this will
automatically be used when you log onto your identity) by selecting “Use
these credentials by default. If no default account is selected, you will have a
choice during Verifi Identity Manager logon of all registered accounts.
Section 5
Pass Through
Logon
If Pass-Through Logon is enabled (Settings and Options >Advanced Settings
>Microsoft Network Logon), a user will be able to log on to the system
without logging into Verifi ID Manager. Choose a local computer or a domain
name instead of Verifi ID Manager during logon to bypass logging onto your
identity.
Note: If Pass-Through logon is allowed, the users will be able to
logon to the PC with their windows password. However, they will
not have access to their Verifi Identity Manager services.
Locking the
Computer
To secure a computer when the user is away from the desk, the Lock Workstation feature may be employed. This prevents an unauthorized user from
gaining access to the computer. Only the authorized user and members of
the administrator’s group on the computer can unlock it.
To lock your computer:
In Verifi ID Manager, select “Lock Workstation” in the Left Panel to lock your
computer immediately.
Also, the traditional Windows Ctrl+Alt+Del method still works.
22
USING VERIFI IDENTITY MANAGER
Password
Manager (SSO)
Single Sign On enhances user computing experience by reducing number of
passwords that the user must remember. Single Sign On is based on adaptive
logon and records of usernames and passwords as the user enters them.
Security and privacy is an important feature of Verifi ID Manager Single Sign On.
All credentials are encrypted and are available only after successful logon to
Verifi ID Manager.
Verifi ID Manager also includes an additional convenience feature - rapid application launch. All registered SSO applications can be launched directly from the
Verifi ID Manager icon or management console. Advanced users can customize
all steps of application logon by modifying logon scripts and tuning logon configuration parameters. (See Advanced Features - Manual SSO Registration)
You can access Single Sign On functionality after logon to Verifi ID Manager
using one of several methods.
1. Single Sign On is automatically activated when it detects an application
screen requesting user logon.
2. Use My Identity panel, Single Sign On section to access Single Sign On
management components and rapid application launch functionality.
3. Right click the Verifi ID Manager system tray icon to access Single Sign
On management components and rapid application launch functionality.
23
Section 5
learning technology that automatically detects applications requesting user
USING VERIFI IDENTITY MANAGER
Section 5
Automatic SSO
Setup
How to register
Single Sign On prompts the user automatically for memorizing the
username and password associated with an application once a password
dialog is detected. A notification icon appears automatically on the top
right corner of the application indicating that Single Sign On is ready to
record the user’s credentials.
In addition, a hint
periodically pops
up informing for
readiness to record the account
credentials for logon screen. Submit
the required user
credentials to the
website or application. To complete the registration process hit “Enter”,
“Logon”, or “OK”. A dialog box appears confirming the recording of the credentials and allowing the user to change the name for the credential set.
Single Sign On stores the credentials in a separate list so applications with
the same username and password can share the same credentials set.
24
USING VERIFI IDENTITY MANAGER
How to use
ATTENTION:
If you encounter a problem or error, with a website, Verifi ID
Manager will stop the automatic SSO routine. Look for the
message and icon in the upper right corner of your browser to
restart the SSO routine and submit your credentials.
1. Click on the SSO Icon.
2. Click on “Submit Credentials” to restart SSO routine and to enter your
credentials to the website or application.
25
Section 5
It’s simple. Just access the application where user credentials were previously recorded. When the system detects the website or application, the
user credentials are submitted automatically.
USING VERIFI IDENTITY MANAGER
Setting Options
When registering new websites or applications you can change several
default options. These options only affect the specific registration you are
attempting.
Section 5
Note: To change
global SSO settings
see “Global SSO
Settings in this
manual.
Select the “Options” tab to view your choices to individualize this website
or application registration.
You will have the following options:
1. Fill in credentials but do not submit
This will fill in your user name, password, etc.. but not perform the
“Enter” action. This will allow you an opportunity to review before
submitting.
2. Do not use SSO for this site or application
Disables SSO activity for this particular website or application.
26
USING VERIFI IDENTITY MANAGER
3. Prompt to select account for this application
Allows you to choose from multiple accounts for the same website or
application.
Section 5
4. Authenticate user before submitting credentials
Requires additional authentication (fingerprint, password, etc.. ) before
proceeding to submit your credentials.
Using Multiple Website Accounts
When you register two or more accounts at the same website or application Verifi ID will give you the option of choosing which account to submit
before proceeding. Your default account will be appear in the account
field; to select a different account select the drop down arrow and choose
the appropriate account.
To change the default account see “Manage SSO Applications”.
27
USING VERIFI IDENTITY MANAGER
Manage SSO
Applications
Section 5
Verifi ID Manager allows management
(e.g. add, remove
and modify) of the
registered SSO
applications as well
as to manage the
account credentials
assigned to SSO
applications.
To modify or remove a previously registered web site or application, select
the desired record in the list.
Use Remove button to delete the selected application from the list. In this
case, the user will not be able to use SSO functionality for the deleted application unless they register the application again.
To modify settings of the previously registered web site or application, click
Properties button. The application Properties dialog pops up.
General tab contains several settings describing the behavior of the system,
when user accesses the application. Script tab allows user to modify the
application’s script either manually (e.g. right in script editor window) or by
using the “finger” icon as described in Manual Application Registration topic.
(See Advanced User Features)
28
USING VERIFI IDENTITY MANAGER
NOTE: Use Add new application
menu option to launch the SSO
Registration Wizard. To add an
application manually, follow steps
as described in Manual Application
Registration topic.
Verifi ID Manager allows to manage (e.g. add, remove and modify) the registered SSO credentials assigned to the registered SSO applications. Multiple
credential sets can be used with a registered applications allowing the user
to automate logon to multiple accounts.
Select the desired SSO application you wish to manage the credentials.
NOTE: Click More button or
click on the value located in
Account column. Depending on the place where you
started managing the SSO
credentials, the following
menu option available:
New Credentials/Create New
- adds a new SSO credentials
record for the selected SSO
application.
Edit Credentials/Properties - modifies the selected SSO credentials record.
Remove Credentials/ Remove - Deletes the selected SSO credentials record.
If you have registered more than one SSO credentials record for the selected
SSO application, you can switch between SSO credentials records using upper area of pop-up menu at Account column.
29
Section 5
Use More button to add, export or import SSO application. Note, that only the
SSO application script is being exported or imported. All SSO credentials are
safely stored within the User Identity.
USING VERIFI IDENTITY MANAGER
Section 5
NOTE: To allow use of multiple credential sets for Web site or application
you need to enable SSO confirmation dialog. Click on the link Manage Application & Credentials available in Single Sign On section of My Identity
panel or from the Verifi ID Manager system tray icon, select the required
application and check the confirm box. At logon time select the desired
set of credentials to logon into an application
Global SSO
Settings
Under the Settings and Options select Single Sign On. From this panel you
can adjust Single Sign On settings for the current user.
30
USING VERIFI IDENTITY MANAGER
e-Wallet
Your personal information including Credit Card info is ONLY AVAILABLE to your
Verifi ID Account. All others who are logged into your PC under their own Account will not have access to your personal information.
Manage
e-Wallet
Set up begins by selecting “Manage e-Wallet”
under the e-Wallet
category of your Verifi
ID Dialog Box. Under
the “Personal Information” tab type in your
Name and other general
information.
Under the “Address” tab
select “Home” and then
click on properties to
begin entering address, phone number, and email address. You can enter
multiple address information such as your business address by selecting
new and following the wizard screens.
31
Section 5
e-Wallet functions as a form filler to aid in online shopping and other applications where typing your personal information is required.
Section 5
USING VERIFI IDENTITY MANAGER
Manage your
Credit Cards
To utilize your credit cards
for online purchases. Open
“Manage e-Wallet” under
the e-Wallet category in
your Verifi ID Dialog Box.
Under the “Credit Cards”
tab select “New” to enter
a new Credit Card for your
personal use.
You can add multiple credit
cards for your convenience.
They will all be accessible when using e-Wallet. To modify a current Credit
Card entry select “Properties” and update the appropriate field.
To remove an entry, highlight the appropriate Credit Card entry and select
“Remove”.
32
USING VERIFI IDENTITY MANAGER
Using
e-Wallet
Section 5
To open e-Wallet select your Verifi ID e-Wallet icon located in your toolbar of
your Internet Explorer browser.
You can also, Right-Click your Verifi ID Manager Icon in the System Tray. Then
select “Open e-Wallet”.
33
USING VERIFI IDENTITY MANAGER
Section 5
When browsing a web page
that requires your personal
information select “Fill In”
located in your e-Wallet
dialog box.
With e-Wallet you can
choose different combinations of your addresses,
email, phone and credit
card by using the pop-down
arrows.
NOTE: The “Fill In” is
only active when Verifi
ID recognizes a page
requiring your e-Wallet
information.
If Credit Card information
will be used, choose the
appropriate card using the
drop down arrow before
selecting to “Fill In” your information.
e-Wallet never selects an “ENTER” button or action on your browser. You will
always have the opportunity to review your information for accuracy before
choosing to submit to an online third party.
34
USING VERIFI IDENTITY MANAGER
Section 5
As an alternative to “Fill In”
which automatically places
all your information you
can selectively “drag & drop”
individual fields.
To place a field drag your
mouse over the e-Wallet
field (such as your email)
when the field is highlighted Right-Click and Hold.
Drag your mouse pointer to
the appropriate field in your
web browser and Release.
Your information will appear
only for that field.
NOTE: At some websites, the automatic “Fill In” feature may not work for
every field. You can still insert any necessary fields using your mouse as
described above.
35
USING VERIFI IDENTITY MANAGER
Data Encryption
(With Secure Disk)
Section 5
CAUTION:
Unencrypt all data PRIOR to uninstalling Verifi ID
or data may be lost.
Data Encryption
Overview
For the ultimate in privacy, security, and convenience Verifi ID offers powerful
encryption tools. Use Secure Disk to create an encrypted portion of your
hard drive that is available only to you. The Secure Disk even becomes a
mountable drive! (Like your C: drive, Secure Disk is accessible through Windows Explorer and all other applications.)
When using Windows Explorer you can use Direct File Encryption for protecting any file even those not in your Secure Disk.
You will also enjoy Program File Encryption the latest and state of the art
tool that enables an encrypted save that is integrated into programs such as
Microsoft Word and Excel.
36
USING VERIFI IDENTITY MANAGER
Secure Disk is an Encrypted program that looks like and acts like a partitioned portion of your hard drive. This service allows you to work with your
data files with the utmost convenience while receiving the security benefits
and privacy of the latest in encryption technology. All data files stored within
Secure Disk are non-accessible and non-viewable to other users.
Create a Secure Disk
To start a new Secure Disk, click on “Create a New Secure Disk” under the
Document Manager category of your Verifi ID Dialog Box. The Encryption
Keys Wizard will appear to step you through creating a new Secure Disk.
You can choose the Display name, Location, and Size of your new Secure
Disk.
Note: Your are not limited to (1) Secure Disk. You can create several
new Secure Disks to suite your needs.
37
Section 5
Secure
Disk
USING VERIFI IDENTITY MANAGER
Section 5
A default location will be chosen that ensured the Secure Disk is always
available to you. It is not necessary to change this location unless you
prefer a different location.
Note: For reference on how to configure advanced Secure Disk options
- see “Advanced Secure Disk Options” in the Advanced Features section
of this guide.
Using Secure Disk
With a new Secure Disk created you can enjoy this encrypted portion of
your hard drive as you would any other mounted drive on your PC.
Through Windows Explorer you can setup any combination of personal
files and folders that you may have previously structured in your “My Documents” folder or any other personal files and folders.
You can Add files, Delete Files, Modify Files just the same as before with
your Non-Secure Disks.
38
Section 5
USING VERIFI IDENTITY MANAGER
Work with Secure Disk through all your favorite programs.
All your files and folders are only available to you OR to others which you
have chosen to share.
39
USING VERIFI IDENTITY MANAGER
Section 5
Manage Secure Disk
To manage your Secure Disks select “Manage Secure Disks” in the Document Manager category of your Verifi ID Dialog Box.
The Secure Disk Manager will view all existing Secure Disks and display
their access, Drive letter, Automount feature, and Status. Through the
manager, you can create New drives, Remove drives, and also Add existing
Secure Disks to your Verifi ID Account using the “More” tab.
40
USING VERIFI IDENTITY MANAGER
Direct
File Encrypt
While Secure Disk offers protective services (even from viewing file names)
when data files are stored within its’ partition. Direct File Encrypt does
not move the location of your data file. Instead it encrypts the file in its
original location. Once the file is encrypted only your Verifi Identity will
have access to open the file.
Using Direct File Encrypt
To use Direct File Encrypt, select a targeted data file within your Windows
Explorer. Right-Click on the file and select “Encrypt”. This file is now
encrypted and only
accessible to your
Verifi Identity.
To Open an encrypted
file, double-left-click
on the file within
Windows Explorer.
This action will
unencrypt the file and
launch the associated
program application
to open the file.
41
Section 5
Direct File Encrypt is a service of Verifi ID that can encrypt individual files
for security and privacy. This service is separate from Secure Disk.
USING VERIFI IDENTITY MANAGER
Section 5
Making a Package
Use a package to send your files to a friend, college, or employer with
encrypted security.
A Package is a group of data files encrypted together in one file to aid in
the secure delivery to a third party. The data files can be of different types
and sizes and will be combined together in one encrypted package file.
To create a Package, select the targeted files within Windows Explorer.
Right-Click on the selected files and choose Document Manager >Make
Package.
A “Make Encrypted Package Wizard” will appear to step through creating
the package. Type in a passphrase when prompted, this will be used by
you and your receiving party for access in opening the package.
42
Section 5
USING VERIFI IDENTITY MANAGER
Once, the package is created you can send by email or any other electronic
means you prefer while enjoying full encryption protection.
All the receiving party needs is the passphrase to open the package and
start working with the data files.
43
USING VERIFI IDENTITY MANAGER
Program
File Encrypt
Program File Encrypt is a service of Verifi ID that can encrypt individual files
for security and privacy. This service uses the same Verifi ID service as Direct
File Encrypt but its interface is integrated into program applications.
Section 5
Program File Encrypt gives you access to powerful encryption tools while
working directly within Microsoft Word and Microsoft Excel.
44
USING VERIFI IDENTITY MANAGER
Save as Encrypted
To use save a file as encrypted:
1. Open a file with Microsoft Word or Excel.
3. Browse, to locate the appropriate location to save on your PC and then
select “Save”.
Open Encrypted
To open an encrypted Microsoft Word or Excel data file.
1. Open the corresponding Word or Excel program.
2. Select File >Document Manager >Open Encrypted
3. Browse your PC to locate the encrypted file.
4. Select and highlight the encrypted data file.
5. Click “Open” to unencrypt and open the file.
45
Section 5
2. Select File >Document Manager >Save as Encrypted.
USING VERIFI IDENTITY MANAGER
Section 5
Application
Protection
Application Protection allows a you to protect sensitive applications from
non-authorized access. This service can restrict any application on your PC
from operation. You can restrict by completely disabling the program or restrict
by the time or day of week. You can also require authentication to launch any
program installed on your PC.
This Verifi ID service can be applied to two set of user groups Administrators - All users with administrative privileges
Everyone - All users, including administrators
Managing Application
Protection
To manage Application Protection, go to Verifi ID Dialog Box- select Manage
Protected Applications under the Application Protection Service.
STOP: Before proceeding with opening the Application Protection
you must select the proper category Administrator or Everyone.
46
USING VERIFI IDENTITY MANAGER
Section 5
Note: Select the targeted
group with the drop down
box of “Select category”
After, selecting category Double-click on “Application Protection to launch
this service.
The Application Protection Service screen will appear. This will show the
status of all applications. By default, all Applications are Enabled.
47
USING VERIFI IDENTITY MANAGER
There are three access states for an application:
Enable - Full access to all users of this group
Restricted - Conditionally accessible to this group
Section 5
Disabled - Non accessible to this group at all times
ATTENTION: We recommend to leave the <All Applications> selection
“Enabled” and NOT to change to Restricted or Disabled.
48
USING VERIFI IDENTITY MANAGER
Adding an
Application
Section 5
To add an application to the Protection Service, select the tab “Add” on the
Application Protection Service screen. An Add a Program pop-up will appear
for you to choose a targeted application. After selecting (highlighting) the
appropriate selection, click “OK” to proceed.
From the General tab you will confirm you have selected the appropriate
application and then select one of the three access states: Enable, Restricted,
or Disabled.
49
USING VERIFI IDENTITY MANAGER
Section 5
For restricted applications, you can disable
access based on time
of the day and day of
the week. You can also
restrict access based on
a date range.
For restricted and
sensitive applications you have the
option of detecting
user inactivity
setting both a time
limit and requiring
user authentication
to reactivate.
50
USING VERIFI IDENTITY MANAGER
User Identity consolidates and protects all private user information that may
include network and local Microsoft Windows accounts, passwords for SSO
applications, remote connection credentials, certificates, and encryption keys.
The user has
complete
control over
user identity
through User
Identity operations. The
user can back
up the User
Identity after
modifications.
When a backup has been
created, the
User Identity
can be used on another computer or restored in case of system failure.
To Back Up an
Identity
1. Log on to Verifi ID Manager.
2. In Verifi ID Manager, select I Want To ... > Backup Identity.
3. Backup Identity Wizard is displayed.
51
Section 5
Backing Up your Identity
USING VERIFI IDENTITY MANAGER
4. On the Identity Elements screen, check the identity elements that you wish
to back up, and then select Next.
5. On the Device Type screen, select a device type you would like to use.
6. Follow the directions on the screen to specify the required information,
and then select Next until you reach the last step.
Section 5
7. Select Finish to complete the last step of the wizard.
Note: Keep the backup file in a safe place. The backup will be needed in
case identity information is lost.
Restore an
Identity
1. Log on to Verifi ID Manager.
2. In Verifi ID Manager, select “I Want To ...”
3. In the popup menu, select Restore Identity. Restore Identity Wizard is
displayed.
Note: You may restore the user identity when you are logged off the Verifi
ID Manager. In this case the restore identity operation is available from
Verifi ID Manager icon menu in the taskbar notification area.
4. On the Device Type screen, the type of device on which the user identity
was backed up, and then select Next. If the user identity was stored in
secure file, specify the file location and pass phrase, and then select Finish to
complete the operation.
5. If the user identity was stored on a smart card or token, connect the smart
card or token, specify the User PIN, and select Finish to complete the operation.
52
ADVANCED FEATURES
Advanced Multifactor Authentication
Verifi ID Manager fully supports multifactor user authentication, including any
combination of user passwords, trusted platform modules, smart cards, USB
tokens, virtual tokens, and biometrics. The robust feature set also employs alternative authentication methods, providing the possibility for multiple user access
privileges for the same application or service.
To log on to Verifi ID Manager from any of the registered credentials collected
on a particular workstation, two conditions must be met:
The user must have administrator-granted permissions to register the
selected type of credentials.
The workstation should be equipped with the hardware and supporting
software in order to register the selected credentials. For example, to
register smart card credentials, the workstation should have a smart card
reader connected, as well as drivers installed for the particular type of
smart card being used by the user.
The following topic sections provide additional information about all authentication methods supported by Verifi ID Manager:
53
Section 6
Authentication is crucial to secure communication. The user must be able to
provide a verified identity to others and must be able to verify the identity of
others in order to prevent an unethical person from intercepting messages or
impersonating another person or entity.
ADVANCED FEATURES
Password
Authentication
A password is a code created to restrict entry into a system. Passwords add
a level of security to the computer. When a computer is shared, a password-protected logon account secures the customized settings, computer
programs, and system resources of each user.
Section 6
Using Passwords
The password authentication method validates the user’s identity, adding
a level of security to the computer. System resources are more secure when
the user logs on with a password or user account name. The user can log
on to the system through the Verifi ID Manager interface from the following places:
Verifi ID Manager Logon dialog box (if selected during installation)
Verifi ID Manager icon in the taskbar notification area
My Identity dialog box
Usually only the Windows password is available for very first logon to Verifi
ID Manager. As soon as the user enters the Windows password into the
Verifi ID Manager dialog, the user can register other types of credentials for
any supported authentication methods.
How to Logon with Passwords
1. Launch the Verifi ID Manager Logon Wizard.
2. On the Introduce Yourself dialog box, type the user name, and then
select Next.
3. On the Logon Policy dialog box, select the Password as authentication
method to log on to the system, and then select Next.
Note: Only credentials that already registered for this account can be
seen on the Logon Policy dialog box.
4. On the Enter Password dialog box, type the password and then select
Finish.
54
ADVANCED FEATURES
Biometrics
Authentication
The system captures a sample of the biometric characteristic during the
enrollment process. Unique features are extracted and converted into a
mathematical code. Fingerprint templates created during the enrollment
process are stored as an attribute of a user account.
During the logon process, a live fingerprint capture is authenticated
against the user’s stored fingerprint templates, and then access to the Verifi
ID Manager is either granted or denied depending on the result of this
authentication process.
The user can log on to Verifi ID Manager from the following places in the
system:
Verifi ID Manager Logon dialog box (if selected during installation)
Verifi ID Manager icon in the taskbar notification area
My Identity dialog box
How to Logon with Fingerprints
1. On the Introduce Yourself dialog box, type your user name, and then
select Next.
2. On the Logon Policy dialog box, select Fingerprints as the authenti
cation method to log on to the system, and then select Next.
Note: On the Logon Policy dialog box, only credentials that are already
registered for this account can be seen.
3. On the Present your fingerprints dialog box, place the previously
registered finger on the fingerprint reader until the matching operation is
complete.
55
Section 6
Using Fingerprints
ADVANCED FEATURES
TPM
Authentication
The trusted platform module (TPM) provides the ability to run the system or
applications more securely and makes communications more trustworthy.
The TPM provides for authenticity validation, platform integrity metrics
checking, user confidentiality, and privacy. The TPM also provides protection
of information and authentication for individual platforms.
Section 6
Using TPM
The user can log on to Verifi ID Manager from the following places in the
system:
Verifi ID Manager Logon dialog box (if selected during installation)
Verifi ID Manager icon in the taskbar notification area
My Identity dialog box
How to Logon with TPM
1. On the Introduce Yourself dialog box, type your user name, and then
select Next.
2. On the Logon Policy dialog box, select TPM Password as the authentication method to log on to the system, and then select Next.
Note: On the Logon Policy dialog box, only credentials that are already
registered for this account can be seen.
3. On the Enter TPM Password dialog box, type your Basic User Key password for the TPM, and then select Finish.
56
ADVANCED FEATURES
Smart Card
Authentication
Section 6
A smart card is a plastic card about the size of a credit card with an embedded microchip that can be used for storing sign-in passwords, public and
private keys, and other personal information. Smart cards provide tamperresistant and portable security solutions for tasks such as securing e-mail and
logging on to a domain. Support for smart cards is a feature of the public key
infrastructure (PKI).
Using Smart Cards
The user can log on to Verifi ID Manager from the following places in the
system:
Verifi ID Manager Logon dialog box (if selected during installation)
Verifi ID Manager icon in the taskbar notification area
My Identity dialog box
How to Logon with Smart Cards
1. Insert your smart card into smart card reader.
2. On the Introduce Yourself dialog box, type your user name, and then
select Next.
3. On the Logon Policy dialog box, select Smart Card as the authentication
method to log on to the system, and then select Next.
Note: On the Logon Policy dialog box, only credentials that are already
registered for this account can be seen.
4. On the Select a Smart Card dialog box, type the personal identification
number (PIN) for the smart card, and then select Finish.
Note: If the user PIN is entered correctly, the system completes the logon
process. If the PIN is entered incorrectly several times in sequence, logon
will be denied using that smart card. The number of allowable invalid
logon attempts that may be entered before lockout occurs varies with
the smart card manufacturer. Contact the administrator for assistance
in case of locked out User PIN.
Supported models, USB token support is compatible with PKCS#11 and
CAPI complaint devices.
57
ADVANCED FEATURES
USB Token
Authentication
Section 6
A USB token is simply a smart card in a different form factor. Rather than deploying the smart chip on a plastic credit platform, the smart chip is inserted
into a plastic token, also known as a key. The major difference between
a smart card and a USB token is in the access interface. A card requires a
reader, while the USB token plugs directly into any USB port. There is no difference in the core functionality of storing and providing credentials.
Using USB Tokens
The user can log on to Verifi ID Manager from the following places in the
system:
Verifi ID Manager Logon dialog box (if selected during installation)
Verifi ID Manager icon in the taskbar notification area
My Identity dialog box
How to Logon with Passwords
1. Insert your USB token into any available computer USB port.
2. On the Introduce Yourself dialog box, type your user name, and then
select Next.
3. On the Logon Policy dialog box, select USB Token as the authentication
method to log on to the system, and then select Next.
Note: On the Logon Policy dialog box, only credentials that are already
registered for this account can be seen.
4. On the Select a USB Token dialog box, type the personal identification
number (PIN) for the USB token, and then select Finish.
Note: If the user PIN is entered correctly, the system completes the logon
process. If the PIN is entered incorrectly several times in sequence, logon
will be denied using that USB token. The number of allowable invalid
logon attempts that may be entered before lockout occurs varies with
the token manufacturer. Contact the administrator for assistance in
case of locked out User PIN.
Note: Supported models, USB token support is compatible with PKCS#11
and CAPI complaint devices.
58
ADVANCED FEATURES
Virtual Token
Authentication
A virtual token represents the software emulation of a cryptographic hardware token such as a smart card or USB token. The software token can be
stored either in the Windows registry database or in a file and includes the
token’s location on a hard drive, diskette, USB drive, and so on.
Verifi ID Manager Logon dialog box (if selected during installation)
Verifi ID Manager icon in the taskbar notification area
My Identity dialog box
How to Logon with Virtual Tokens
1. On the Introduce Yourself dialog box, type your user name, and then
select Next.
2. On the Logon Policy dialog box, select Virtual Token as the authentication method to log on to the system, and then select Next.
Note: On the Logon Policy dialog box, only credentials that are already
registered for this account can be seen.
3. On the Select a Virtual Token dialog box, select the desired token from
the list, type the personal identification number (PIN) for the virtual token,
and then select Finish.
Note: If the user PIN is entered correctly, the system completes the logon
process. If the PIN is entered incorrectly several times in sequence, logon
will be denied using that virtual token. The number of allowable invalid
logon attempts that may be entered before lockout occurs varies with
predefined system value. Contact the administrator for assistance in
case of locked out User PIN.
Note: Supported models, USB token support is compatible with PKCS#11
and CAPI complaint devices.
59
Section 6
Using Virtual Tokens
The user can log on to Verifi ID Manager from the following places in the
system:
ADVANCED FEATURES
Manual Application
Registration (SSO)
To register an application for Single Sign On usage, perform the following steps:
Section 6
In My Identity panel, click Register New
Application link located in Single Sign
On section. SSO Registration Wizard is
displayed.
Using drop-down list, select what type
of activity you want to automate. In the
most cases, Logon dialog selection is
appropriate.
To register new SSO application, run the desired desktop or Web application and
navigate to its dialog or page with protected (password) field. Then switch back
to SSO Registration Wizard.
Click and drag the icon with finger over the desired application window. Release
the mouse when the window (or part of window) you want to automate is
highlighted.
When mouse is released, the SSO Registration Wizard pops up again requesting
the general application information. Type the desired information and click Finish to complete the registration.
When registration wizard is closed, the system brings you back to the logon
screen being automated. Type the desired credentials in logon fields (username
and password for example), then click the button that submits the typed
credentials.
The system asks you to confirm the typed credentials to be stored for the future
use. Confirm or modify the credentials name, then click Yes to complete the
credentials registration.
60
ADVANCED FEATURES
Advanced Secure Disk
Options
Section 6
To select advanced disk options when creating select the “Configure advanced
secure disk options” check box when at the General Disk Information before
proceeding with “Next”.
Cryptopgraphy
Settings
You can choose
the following
settings for your
Secure Disk:
Provider
Enhanced Crytographic
Providers
Cipher
RSA
Triple DES
Key Length
Up to 128bit
61
ADVANCED FEATURES
Disk Mounting
Options
Choose Disk Mounting Options:
1. Drive letter
Section 6
2. Yes/No simulate
fixed disk.
3. Yes/No automatically mount this disk
at boot up.
Disk File
System
Chose Disk File
System Options:
1. Files system type
Fat32
NTFS
2. Type Disk Label
Name (Default is
labeled ‘Secure
Disk’)
62
ADVANCED FEATURES
To support various authentication methods, you may need to install various
devices with supporting drivers and software tools. Verifi ID Manager supports
various biometric devices, smart cards, and USB tokens from several manufacturers, but Verifi ID Manager installation does not install the drivers or other
software, except the software for AuthenTec fingerprint readers. After Verifi ID
Manager installation is complete, the user must install the desired devices and
verify that they work as expected.
Installing
Biometric Devices
Biometric authentication is supported by the multifactor authentication
functionality provided in Verifi ID Manager. To collect unique biometrics
data, fingerprint readers and corresponding drivers must be installed. To
support fingerprint matching, fingerprint recognition software should be
installed as well.
Supported models
By default, Verifi ID Manager installs drivers and recognition software that
supports fingerprint readers produced by Verifi and Authentec. The application also supports some other biometrics vendors but does not install thirdparty biometric software. The user must install the appropriate biometrics
drivers and fingerprint recognition software. The following vendors are
supported:
Verifi Fingerprint Readers (P3400, P4000, and P4000WP)
AuthenTec
Installing a fingerprint reader
Ensure that the fingerprint reader is working properly prior to installing Verifi
ID Manager.
Install fingerprint reader drivers if required
Connect the reader to USB port
63
Section 6
Installing External Devices
ADVANCED FEATURES
Installing
Trusted Platform Module
Verifi ID Manager supports trusted platform modules (TPM) as authentication devices and as encryption devices for user data. TPM authentication is
supported by the multifactor authentication functionality provided by the
system.
Section 6
Note: Verifi ID Manager installation does not install any software packages for TPM. Prior to the using any TPM with Verifi ID Manager, the user
must install the appropriate package and initialize the trusted platform.
Features and functionality enabled by TPM require that the following components to be installed.
Infineon TPM SLD 9630 TT 1.1b with TPM firmware v.1.05 or higher
HP Embedded Security Manager for ProtectTools
Installing
USB Token Support
Verifi ID Manager supports USB tokens as authentication devices and as
secure storage for user identity. USB token authentication is supported by
the multifactor authentication functionality provided by the system.
Supported models
USB token support is compatible with PKCS#11 and CAPI complaint devices.
Note: Verifi ID Manager installation does not install low-level USB token
drivers. The user must install the appropriate drivers and ensure that the
USB token is working prior to Verifi ID Manager installation.
Verifi ID Manager currently supports the following USB token manufacturers
and formats:
64
Rainbow:
Rainbow iKey 2000
Datakey M 330
Aladdin:
eTokenHS
eTokenOS4 (T1 32k)
Feitian:
FTSafe ePass1000
FTSafe ePass2000
ADVANCED FEATURES
Installing
Smart Card Support
Verifi ID Manager supports smart cards as authentication devices and as
secure storage for user identity. Smart card authentication is supported by
the multifactor authentication functionality provided by the system.
Note: Verifi ID Manager installation does not install any low-level smart
card drivers. The user must install the appropriate drivers and ensure that
the smart card is working prior to Verifi ID Manager installation. If Verifi ID
Manager does not recognize a supported Smart card device try to reinstall
Verifi ID Manager after the Smart card drivers are installed.
Verifi ID Manager currently supports the following card manufacturers and
card formats:
Gemplus:
GemSAFE 16K
GemSAFE 4K
GemSAFE 8K
ProtectTools
Schlumberger:
Cryptoflex 16K
Cyberflex Access 16K
Cyberflex Access Developer 32K
Cryptoflex 8K
Cyberflex Access 32K
65
Section 6
Supported models
Smart card support is compatible with PKCS#11 and CAPI complaint devices.
FREQUENTLY ASKED QUESTIONS
How does the Fingertouch unit read my fingerprint?
Using a unique, patented imaging technology from AuthenTec, a small
signal is generated between the IC and the finger’s live layer. More than
9,000 elements work as an antenna array creating a digital pattern that
mimics the fingerprint’s underlying structure.
Section 7
Are my fingerprints stored in the Fingertouch unit?
No, your TEMPLATE is stored on your personal PC. A complete fingerprint image is never stored anywhere. All authentication occurs on your
personal computer and your fingerprint image is never transmitted
over the internet or to other programs.
Do I need to clean the device?
No, the Fingertouch unit does not require regular cleaning. However, if
you notice debris (dust, etc.) collecting in the corners of the sensor area,
you can clean the sensor with a dry tissue or cloth.
Can I choose between AND/OR settings of my password and fingerprint?
Yes, after setting up your new Verifi Identity and enrolling your fingerprint you can modify your authentication method.
Open the Verifi ID Manager Console and select Settings and Options.
Then select Authentication and Credentials in the left panel. Here you
can select which method of authentication for your account.
66
FREQUENTLY ASKED QUESTIONS
How secure is my personal information?
Your identity is encrypted using RSA 168 bit three key triple DES Cipher.
This ensures extremely secure storage of your information.
No, each User can only access their own Verifi Identity. However, under
certain instances such as Secure Disk you can enable others to share
access with your encrypted files. By default, all sharing is disabled in
your Identity.
Where is my personal information stored?
Your Identity information is stored securely and encrypted in the same
security location your Windows system uses to store Usernames and
Passwords.
67
Section 7
Can another Verifi ID User see my information?
TROUBLESHOOTING
Problem:
When do I plug in my Fingertouch unit during installation?
Section 8
You need to plug the device in when instructed by the “Quick Installation Guide” during the Fingertouch Security software installation
process.
Problem:
I plugged the Fingertouch in before the installation, but Windows
could not find the drivers. What do I do?
Open Windows Device Manager and check whether [Fingertouch] is
showing as an (Unidentified Device). If so, delete [Fingertouch], press
[Renew] (or right-click in the window and select [Scan for hardware
changes]) and follow the instructions on the screen. The Fingertouch
unit’s device driver will be installed. Keep the Verifi ID Manager Software CD-ROM ready. (For more information about Windows Device
Manager, see Windows Help.)
Problem:
Installation CD does not automatically start.
If the CD-ROM does not start the Easy Install Wizard automatically, it
could be that the computer is running other applications that are interfering with the CD drive.
If the Easy Install Wizard does not appear within 15-20 seconds, open
up your CD-ROM drive by double-clicking on the “My Computer” icon
located on your desktop.
Next, double-click on the CD-ROM drive that the Easy Installation CD
has been placed in to start the installation. The Easy Install Wizard
should start within a few seconds. If, instead, a window appears showing the files on the CD, double-click on the icon labeled “Setup.exe”
68
TROUBLESHOOTING
Problem:
Check that the:
Fingerprint reader’s cable is firmly plugged into the PC’s USB port.
Mini USB connector is plugged firmly into the Fingerprint Reader
(P4000 & P4000WP units only.)
Hardware Manager recognizes a USB device is plugged into your
PC. If so, use drivers on your Verifi ID Manager CD to manually
install the fingerprint reader.
Problem:
Why is the Fingertouch not recognizing my fingerprint when I try
to enroll or use the device?
Be sure…
the Fingertouch unit’s cable is firmly plugged into the PC’s USB
port and that your fingerprint is correctly placed on the device (see
Section 2).
if your finger is very dry, moistening your finger will help the sensor
to correctly read the ridges and valleys of your fingerprint.
if your finger is very moist, dry your finger and then place your
finger on the unit.
69
Section 8
The Wizard cannot find my fingerprint reader.
TROUBLESHOOTING
Problem:
I get an error when I verify my fingerprints after enrollment.
Section 8
One or more of the prints do not match. How can I prevent this from happening?
Place your finger consistently on the unit. During enrollment be sure to place
your finger in a similar fashion per instructions in “About the Fingerprint Reader”.
You can re-enroll the same fingers to improve your enrollment.
Problem:
I can’t register a website, or I have successfully registered my username and
password for a website with Password Provider, but when I come back to the
website, it’s not prompting me to use my fingerprint. What’s wrong?
Sometimes, depending on the website, automatic recognition of the website or
dialog box may fail. You can press the “submit manually” tab located in the upper
right corner of your browser. If you continue to have problems, please email
[email protected] or call our technical support center.
Problem:
I uninstalled and reinstalled the Fingertouch Security software, and now I
can’t read the files I previously encrypted with Document Manager. Why?
Unless you recover the user for whom the files were encrypted using a Backup
File, the file will be lost. Be sure to create a Backup File for your user account and
keep it in a secure location.
70
INFORMATION
Customer Support
Section 9
If you have any problems with your Fingertouch Fingerprint Reader or
Software, need more information on other Zvetco products, or have
specific questions relating to your installation, please contact Zvetco via
the information below.
• Technical Support
email:
[email protected]
or call
407-681-0112
• Zvetco Sales
email:
[email protected]
or call
407-681-0042
71
INFORMATION
Product Information and Software Updates
For general product information and software updates, go to the Zvetco
Biometrics website at:
Section 9
www.everifi.com
Regulatory Information
Tested to comply with FCC Standards. For home or office use. Not intended for
use in machinery, medical or industrial applications. Any changes or modifications
not expressly approved by Zvetco could void the user’s authority to operate this
device.
This product is for use with NRTL Listed (UL, CSA, ETL, etc.) and/or IEC/EN 60950
compliant, (CE marked) Information Technology equipment. No serviceable parts
included.
This device is rated as a commercial product for operation at +41F (+5C) to +95F
(+35C).
72
INFORMATION
Limited Warranty Statement
Zvetco LLC. (“Zvetco”) warrants this computer hardware product (“Product”)
against defects in materials or workmanship for the time periods and subject
to the terms and conditions set forth below. In the event of a defect, these are
your exclusive remedies.
Parts: For a period of twelve (12) calendar months from the original date of
purchase from a Zvetco authorized dealer, Zvetco will supply, at no charge,
new or rebuilt, at Zvetco’s option, replacement parts in exchange for parts. Any
replacement parts will be warranted for the remainder of the original warranty
period or ninety (90) calendar days from installation by Zvetco’s authorized personal computer service facility, whichever is longer. All parts replaced under
this Limited Warranty will become the property of Zvetco.
THIS PRODUCT MAY HAVE POSSIBILITY (OF LESS THAN 0.1% ACCORDING TO OUR MEASUREMENTS) OF GRANTING ACCESS TO PERSONS
OTHER THAN THOSE WHO HAVE REGISTERED THEIR FINGERPRINTS. IN
NO EVENT SHALL ZVETCO OR OUR REPRESENTATIVES BE LIABLE FOR
ANY INCIDENTAL, CONSEQUENTIAL, OR SPECIAL LOSS ARISING FROM
GRANTING AN ACCESS TO PERSONS FROM OTHER THAN THOSE WHO
HAVE REGISTERED THEIR FINGERPRINTS. IN NO EVENT SHALL OUR
CORPORATION OR OUR REPRESENTATIVES BE LIABLE FOR ANY INCIDENTAL, CONSEQUENTIAL OR SPECIAL LOSS ARISING FROM ANY USE,
DEFECT, MALFUNCTION, OR FAULT OF THIS PRODUCT.
WHEN SENDING THE FINGERPRINT DATA VIA COMMUNICATION LINE OR
STORING SUCH DATA IN A COMPUTER, SUFFICIENT SECURITY CONTROL
IS REQUIRED TO AVOID ABUSE OF THE DATA.
This Limited Warranty covers only the hardware components packaged with the
Product. It does not cover technical assistance for hardware or software usage
and it does not cover any software products whether or not contained in the
Product; any such software is provided “AS IS” unless expressly provided for
in any enclosed software Limited Warranty. Please refer to End User License
Agreements included with the Product for your rights and obligations with
respect to the software.
There may be a parts exchange program for this product. Proof of purchase in
the form of a bill of sale (which is evidence that the Product is within the warranty period) may be required to obtain warranty service.
73
Section 9
Labor: For a period of twelve (12) calendar months from the original date of
purchase, Zvetco will repair defects in the Product at no charge. After the applicable period you must pay for all labor charges.
INFORMATION
Section 9
In addition, if replacement parts are required and you wish to receive the most
expedient service available, you will be required to provide Zvetco with a credit
card authorization to bill your credit card in the event that you fail to return the
original parts to the address we provide. The credit card will only be charged
for Zvetco’s list price for the part if the part has not been returned within thirty
days.
This Limited Warranty does not cover any consumable items supplied with this
Product; cosmetic damages; damage or loss of any software programs, data or
removable storage media or damage due to (1) acts of God, accident, misuse,
abuse, negligence, commercial use or modifications of this Product; (2) improper
operation or maintenance of this product; (3) connection to improper voltage
supply; (4) attempted repair by any party other than a Zvetco authorized personal
computer service facility; (5) tampering with internal components; or (6) direct
damage to the fingerprint sensor. This Limited Warranty is valid only in country of
purchase, either the United States of America or Canada.
This Limited Warranty is invalid if the factory applied serial number has been
altered or removed from the product.
Repair or replacement of parts or hardware as provided under this Limited Warranty is the exclusive remedy of the consumer. ZVETCO SHALL NOT BE LIABLE
FOR ANY INCIDENTAL OR CONSEQUENTIAL DAMAGES FOR BREACH
OF CONTRACT, NEGLIGENCE, STRICT LIABILITY OR ANY OTHER LEGAL
THEORY RELATED TO THIS PRODUCT. SUCH DAMAGES INCLUDE BUT ARE
NOT LIMITED TO, LOSS OF PROFITS, LOSS OF REVENUE, LOSS OF DATA,
LOSS OF USE OF THE PRODUCT OR ANY ASSOCIATED EQUIPMENT, DOWN
TIME AND PURCHASER’S TIME. EXCEPT TO THE EXTENT PROHIBITED BY
APPLICABLE LAW, ANY IMPLIED WARRANTY OF MERCHANTABILITY OR
FITNESS FOR A PARTICULAR PURPOSE ON THIS PRODUCT IS LIMITED IN
DURATION TO THE DURATION OF THIS WARRANTY.
Some states do not allow the exclusion or limitation of incidental or consequential
damages, or allow limitations on how long an implied warranty lasts, so the above
limitations or exclusions may not apply to you. This Limited Warranty gives you
specific legal rights, and you may have other rights which vary from state to state.
Technical Support: For a limited time technical support may be provided free of
charge under this Limited Warranty, Zvetco has established a telephone number
for technical support. Prior to placing your call, please have available the model
and serial number of your Product, date of purchase, a list of all options installed in
your Product and a detailed description of the problem. For Product information,
service assistance, resolution of a service problem, or technical assistance, call:
(407) 681-0112.
74
Section 9
INFORMATION
Information in this document , including URL and other Internet Web site references, is subject to change without notice. Unless otherwise stated, the example
companies, organizations, products, domain names, e-mail addresses, logos,
people, places, and events depicted herein are fictitious, and no association with
any real company, organization, product, domain name, e-mail address, logo,
person, place, or event is intended or should be inferred. Complying with all
applicable copyright laws is the responsibility of the user. Without limiting the
rights under copyright, no part of this document may be reproduced, stored in or
introduced into a retrieval system, or transmitted in any form or be any means, or
for any purpose, without the express written consent of Zvetco LLC.
Zvetco may have patents, patent applications, trademarks, copyrights, or other
intellectual property rights covering subject matter in this document. Except as
expressly provided in any written license agreement from Zvetco, the furnishing
of this document does not five you any license to the patents, trademarks, copyrights, or other intellectual property.
©2005 Zvetco LLC. All rights reserved.
Zvetco LLC grants the purchaser of this product the rights to reproduce (1) copy
of the enclosed “User Manual” and Quick Start Guide” for your records.
75
Verifi
www.everifi.com
ZVETCO Tech Support
ZVETCO Sales
For technical support and
questions please email or call:
For further Sales information
please email or call:
[email protected]
407-681-0112
[email protected]
407-681-0042
Zvetco Biometrics
6820 Hanging Moss Rd
Orlando, FL 32807
407-681-0111
2005 Zvetco Biometrics. All rights reserved. All trademark names are registered trademarks of
respective manufacturers listed.
QAS 098
5205-006192