1
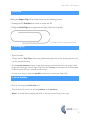
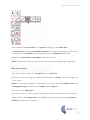
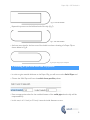
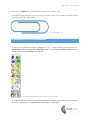
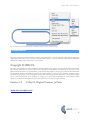
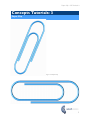
Paper Clip - CSi Tutorials 3
Concepts Tutorials: 3
Paper Clip
Figs 1 & 2 Paper Clip
1
Paper Clip - CSi Tutorials 3
About this tutorial
Application: Concepts 3D / Concepts Unlimited
Description: In this tutorial we learn to make connected lines with the multi line tool,
how to use the select chain and how to apply the pipe tool.
Level: Beginner. Requires reading the ‘Getting Started’ section of the User Manual
Tools:
Fig 2. Connected Line, Fillet Three Curves, Solid Pipe Tools
Further Information: Please refer to the product User Manual. Additionally, the
Concepts User Forum provides discussion and assistance:
www.csi-concepts/conceptsunlimited
2
Paper Clip - CSi Tutorials 3
Overview
Making the Paper Clip can be broken down into the following process:
1. Drawing the 2D Profiles from which to create the 3D.
2. Using the Solid Pipe tool to generate the Paper Clip from it’s profile
Fig 3. Profile A shown is ‘lathed’ around axis B
1. Setting Up
• Open Concepts
• Change view to Top View (View>top). [Alternately, right-click on the drawing window and
use the contextual menu]
• Set the zoom extents of your screen by drawing a horizontal line from the origin a little
longer than the length of your Paper Clip. Press the ‘e’ key on the keyboard to comfortably
fit that line (and thus your model) to your screen.
• You are now ready to draw the profiles necessary to create your Paper Clip
2. Draw Profiles
• Start by choosing the multi line tool.
• The connected line tool is in the line palette of the tool bar.
• Note: To reveal the line palette, left-click on the line tool and drag to the right
3
Paper Clip - CSi Tutorials 3
• Once selected, the tool name in the top bar changes to read multi line
• The multi line tool allows multiple segments of straight (and arced) line to be drawn
consecutively. The endpoint of one segment being the startpoint of the next.
• Beneath the tool name are prompts relative to that tool.
• Note: Always keep an eye on the prompt: it will assist you through any given operation.
• Click on the origin to place the 1st point of your multi line
• Move your cursor to the right an arbitrary distance from the origin .. to near the right side
of the screen.
• Note: To assist you in drawing a horizontal line, you will see the dotted helper line of the
intelligent snaps and a point at the origin marked align x.
• Click to place the 2nd point
• From here, move your cursor up the screen, about a third as far as the first part of the line.
• Again, watch for the helper line of the intelligent snaps to ensure that you are perpendicular to the first part of the line.
4
Paper Clip - CSi Tutorials 3
• Click to place the 3rd point.
• Next, move your cursor to the left again. Keep horizontal by ensuring you can see a horizontal
helper-line and the segment start point marked perpendicular.
• Pass the origin point by a short distance and place the 4th point
• Continue this process until you have a multi line that looks like Fig 4 below
Fig 4. Seven Segment Multi Line
• When you have placed the 8th point (ie: seven segments) as shown, press the ESC key on
the keyboard to exit the tool
3. Now use the Fillet Three Lines tool to round the ends of the Clip
• You are now ready to round the ends of the Paper Clip
• Choose the Fillet Three Lines tool from the fillet palette
• Click the 3 lines approximately as marked in fig 5 below
Fig 5. Click these points to create a 3 Line Fillet
• You should now have a rounded ended paper clip (Fig 6)
5
Paper Clip - CSi Tutorials 3
Fig 6. First end rounded
• Repeat this process on the left-hand end of the clip (Fig 7)
Fig 7. Two ends rounded
• And one more time for the last curve.You should now have a drawing of a Paper Clip as
shown below in Fig 8.
Fig 8. Paper Clip profile complete
4. Creating a Pipe Solid from the Clip profile
• In order to give material thickness to the Paper Clip, you will now use the Solid Pipe tool
• Choose the Solid Pipe tool from the solids from profiles palette
• Enter an appropriate value for the outside diameter of the solid pipe that the clip will be
respresented by.
• In this case, it is 0.1 inch (or 2.5 mm). Leave the inside diameter as zero.
6
Paper Clip - CSi Tutorials 3
• Now draw a fence (a box) around the entirety of your Paper Clip
• Provided the pipe diameter is not too large, the Paper Clip should now be seen with material
thickness stated. See Fig 9 below.
Fig 9. Finished Paper Clip
6. Additional Notes and Comments
• If you are not seeing the clip as it appears in Fig 7, it may be that you are viewing in
wireframe mode as opposed to shaded mode. Try clicking the shade mode buttons
at the bottom of the toolbar. See Fig 10
Fig 10. The Shade Mode buttons are at the bottom of the Tool Bar
• Try experimenting using the right-click contextual menu on your paper clip to change
the color, resolution or transparency of the object. See Fig 11
7
Paper Clip - CSi Tutorials 3
Fig 11. Right Click on any object to see a contextual menu of object related settings
License Notes
All terms mentioned in this book that are known to be trademarks or service marks have been appropriately capitalized. CSi cannot attest to the accuracy of this information. Use of a term in this book should not be regarded as
affecting the validity of any trade mark or service mark.
Copyright © 2005 CSi
All rights reserved. No part of this publication may be reproduced or used in any form by any means without the
prior written permission of CSi. The information contained in this publication is believed to be accurate and reliable. However, CSi makes no representation or warrantees with respect to the program material described within
and specifically disclaims any implied warranties of merchantability or fitness for any particular purpose. Further,
CSi reserves the right to revise the program material and make changes therein from time to time without obligation to notify the purchaser of the revisions or changes. In no event shall CSi be liable for any incidental, indirect
special or consequential damages arising out of the purchaser’s use of the program material.
Revision 1.0
8 May 05, Original Creation, Jol Yates
www.csi-concepts.com
8