
1
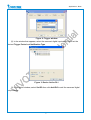
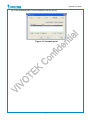
Application Note
ST7501
Using Event Management
www.vivotek.com
Application Note
© 2010 VIVOTEK Inc. All Right Reserved
VIVOTEK may make changes to specifications and product descriptions at any time, without notice.
The following is trademarks of VIVOTEK Inc., and may be used to identify VIVOTEK products only: VIVOTEK.
Other product and company names contained herein may be trademarks of their respective owners.
No part of this publication may be reproduced or utilized in any form or by any means, electronic or mechanical,
including photocopying and microfilm, without permission in writing from VIVOTEK Inc.
Revision History
Version
Issue date
Author
Comment
0.1
2010/08/26
Polly Yang
First draft
1.0
2010/08/30
Polly Yang
First release
2
Application Note
Table of contents
Introduction............................................................................................... 4
1. Usage scenarios ................................................................................... 5
1.1 Digital input triggering digital output.................................................................... 5
1.2 Receiving a GSM message when cameras stop recording ........................................ 8
1.3 Receiving an e-mail when storage has been exhausted ......................................... 11
2.
How to set up event management ........................................................... 14
3
Application Note
Introduction
In addition to monitoring and recording, the ST7501 provides the ability to manage
various types of events. Some typical applications include:
(1) Using one camera’s digital input device to trigger another camera’s digital output
device.
(2) Receiving a GSM message when the cameras stop recording.
(3) Receiving an e-mail when storage has been exhausted.
4
Application Note
1. Usage scenarios
The following three scenarios illustrate the use of the ST7501’s event
management features.
1.1 Digital input triggering digital output
Figure 1: Scenario (I)
If the FD7131’s PIR or siren is triggered, the ST7501 will activate the PZ7131’s
alarm to notify the user. If the ST7501 is not used, only PIR can be used to trigger the
FD7131’s alarm.
To set up an event, follow the steps below:
(1) In the Trigger window, make the selections shown in Figure 2, then click OK.
5
Application Note
Figure 2: Trigger window
(2) In the window that appears, select the cameras’ digital input device, then set the
desired Trigger Period and Notification Type.
Figure 3: Device list for DI-1
(3) In the Action window, select Set DO then click Add DO to add the cameras’ digital
output device.
6
Application Note
Figure 4: Action window
(4) In the Schedule panel, the event schedule can be set up.
Figure 5: Schedule panel
7
Application Note
1.2 Receiving a GSM message when cameras stop recording
Figure 6: Scenario (II)
A GSM message can be sent to a user’s mobile phone when recording has been
interrupted. Such messages can keep the user informed of system status, even when
not in the control room or in front of a computer.
To set up an event, follow the steps below:
(1) In the Trigger window, make the selections shown in Figure 7, then click OK.
Figure 7: Trigger window
8
Application Note
(2) In the window that appears, select the cameras you wish to respond to the trigger,
then set the desired Trigger Period and Notification Type.
Figure 8: The List of Recording Status
(3) In the Action window, select GSM short message, then click GSM Settings to perform
configuration.
Figure 9: GSM Settings
Note: The computer must be connected to a GSM modem to configure the settings.
9
Application Note
(4) In the Schedule panel, event schedules can be set up.
Figure 10: Schedule panel
10
Application Note
1.3 Receiving an e-mail when storage has been exhausted
Figure 11: Scenario (III)
An e-mail can be sent when there is insufficient storage remaining to continue
recording. The user can stay informed of current storage status, so that storage can be
expanded or other actions taken.
To set up an event, follow the steps below:
(1) In the Trigger window, make the selections shown in Figure 12, then click OK.
Figure 12: Trigger window
11
Application Note
(2) Select the desired server and set the desired Trigger Period and Notification Type.
Figure 13: List of devices for which storage capacity status is available
(3) In the Action window, select Email, then click SMTP Settings to perform configuration.
The Insert Macro feature can be used to specify the content of the notification e-mail.
Figure 14: SMTP Settings
*SMTP Settings: If using Gmail’s SMTP server, set the port to 25 or 587.
*Insert Marco: This feature can be used to decide the particular content that will be
sent, and can include event time, trigger type, and device name.
12
Application Note
(4) In the Schedule panel, the event schedule can be set up.
Figure 15: Schedule panel
13
Application Note
2. How to set up event management
Please refer to How to Set up Event Management in the ST7501 LiveClient
Configuration section in the ST7501 user manual.
14


![Cover [FD7131] Outline](http://vs1.manualzilla.com/store/data/006153350_1-7c92864b367e6483a8a42a379e46e580-150x150.png)

![Cover [PZ7131]](http://vs1.manualzilla.com/store/data/006293861_1-8873fad7fe5138ed7551f9d779b6f18c-150x150.png)
