1
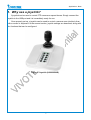
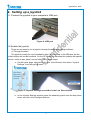
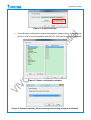
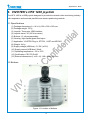
Application Note
Using a joystick
www.vivotek.com
Application Note
© 2010 VIVOTEK Inc. All Right Reserved
VIVOTEK may make changes to specifications and product descriptions at any time, without notice.
The following is trademarks of VIVOTEK Inc., and may be used to identify VIVOTEK products only: VIVOTEK.
Other product and company names contained herein may be trademarks of their respective owners.
No part of this publication may be reproduced or utilized in any form or by any means, electronic or mechanical,
including photocopying and microfilm, without permission in writing from VIVOTEK Inc.
Revision History
Version
Issue date
Author
Comment
0.1
2010/09/23
Polly Yang
First draft
1.0
2010/09/27
Polly Yang
First release
2
Application Note
Table of contents
Introduction .............................................................................................. 4
1. Why use a joystick?............................................................................... 5
2. Setting up a joystick .............................................................................. 6
2.1 Connect the joystick to your computer’s USB port ................................................. 6
2.2 Enable the joystick ..................................................................................... 6
3.
VIVOTEK’s HFX 1400 joystick ................................................................ 10
3.1 Specifications ......................................................................................... 10
3.2 Buttons……………………………………………………………………………………………………………….…..10
3
Application Note
Introduction
This document describes the setup of a joystick for camera control, using VIVOTEK’s
HFX 1400 joystick as a specific example where necessary. It is divided into the following three
sections:
1.
2.
3.
Why use a joystick?
Setting up a joystick
VIVOTEK’s HFX 1400 joystick
4
Application Note
1. Why use a joystick?
A joystick can be used to control PTZ cameras or speed domes. Simply connect the
joystick to the USB port and it is immediately ready for use.
Once properly set up, a joystick can be used to control a camera more intuitively than
with a mouse or keyboard. In the second section, joystick settings are described, along with
the functions that can be configured.
Figure 1: Joystick (900002500G)
5
Application Note
2. Setting up a joystick
2.1 Connect the joystick to your computer’s USB port
Figure 2: USB port
2.2 Enable the joystick
There are two ways to use a joystick: through firmware, and through software
(1) Through firmware:
The joystick is ready for use immediately after it is connected to the USB port, but the
hotkey buttons will not be functional. On the HFX 1400, to associate the hotkeys with specific
actions—such as pan, patrol, and so forth—follow these steps:
a. On the Home page, right-click in the Live View Window, then select “Joystick
Settings” from the pop-up menu.
Figure 3: Joystick Settings accessible in the Live View window
b. In the Joystick Settings window, select the attached joystick from the drop-down
menu, and then click Configure Buttons.
6
Application Note
Figure 4: Joystick Settings
c. In the Buttons configuration window that appears, assign actions to the desired
buttons. A list of actions available with the HFX 1400 can be viewed in Figure 5.
Figure 5: Button configuration window
Figure 6: Example showing Stop streaming action being assigned to Button2
7
Application Note
(2) Through software (using the ST7501 as an example):
a. Select Configuration > Client Settings > Joystick Settings from the menu bar.
When the Joystick Settings window appears, the attached joystick should be
listed in the drop-down menu.
Figure 7: Selecting Joystick Settings
b. Choose the joystick you wish to configure. Select the Enable Joystick checkbox,
and then click Configure Buttons to open the Button Configuration window.
Figure 8: The Joystick Settings window
8
Application Note
c. For the HFX 1400, the actions shown Figure 9 can be associated with the
joystick’s twelve buttons.
Figure 9: Button Configuration window
Figure 10: Example showing Home being assigned to Button8
Note: The HFX 1400 supports the PZ7111/PZ7121, PZ7112/PZ7122, PZ7131/PZ7132,
PZ7151/PZ7152, SD7151, SD7313/SD7323, and SD8111/SD8121, as well as all e-PTZ
models. In addition, all future VIVOTEK PTZ and speed domes will support joystick
controls. To view a list of supported device, please use the following link:
http://www.vivotek.com/products/accessories.php?type=joystick
9
Application Note
3. VIVOTEK’s HFX 1400 joystick
The HFX 1400 is a USB joystick designed to provide the network video monitoring industry
with responsive and accurate pan/tilt/zoom camera positioning controls.
3.1 Specifications
(1) Package dimensions (L x W x H): 300 x 300 x 350 mm
(2) Package weight: 797 g
(3) Joystick: Three-axis, USB interface
(4) Joystick travel: 36° (18° from center)
(5) Buttons: 12, all programmable
(6) Housing: High-impact glass-filled nylon
(7) Application: VIVOTEK Plug-in, ST7501, VAST and NR7401
(8) Weight: 441 g
(9) Supply voltage (USB bus): 5 V DC (±0.5V)
(10) Supply current (USB bus): 32mA
(11) Operating temperature: –25 to 70°C
(12) Certification: CE FCC RoHS
(13) External dimensions (L x W x H): 169 x 156 x 126 mm
3.2 Buttons
Figure 11: Location of buttons
10


![Cover [PZ7131]](http://vs1.manualzilla.com/store/data/006293861_1-8873fad7fe5138ed7551f9d779b6f18c-150x150.png)
![Cover [NR7401]_o](http://vs1.manualzilla.com/store/data/006290720_1-4f23ff4bcdfa148ab77552381ec65ce5-150x150.png)