1
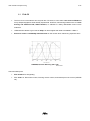
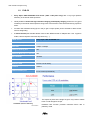
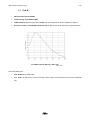
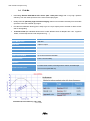
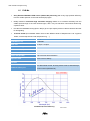
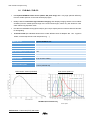
PLxCam Series User guide PLxCapture software © I-Nova Version 2.1f I-Nova www.inova-ccd.com 33, rue des gros grès - 92700 Colombes – France - Tél. : +33-(0)1 47 84 70 27 – Fax : +33-(0)9 50 53 50 80 Contents 1 2 3 4 5 6 7 8 Introduction ....................................................................................................................................................... 3 1.1 PLA-C2 ........................................................................................................................................................ 5 1.2 PLB-C2 ........................................................................................................................................................ 6 1.3 PLA-M ........................................................................................................................................................ 7 1.4 PLA-Mx ....................................................................................................................................................... 8 1.5 PLB-Mx ....................................................................................................................................................... 9 1.6 PLB-Mx2 / PLB-C2 .................................................................................................................................... 10 1.7 Getting started ......................................................................................................................................... 12 PLxCapture presentation .................................................................................................................................. 14 PLxCapture commands..................................................................................................................................... 15 3.1 Capture .................................................................................................................................................... 15 3.1.1 Planetary............................................................................................................................................. 15 3.1.2 Deepsky .............................................................................................................................................. 17 3.1.3 Preview ............................................................................................................................................... 18 3.1.4 About .................................................................................................................................................. 18 3.2 Files .......................................................................................................................................................... 19 3.3 Focus ........................................................................................................................................................ 21 3.4 Mount ...................................................................................................................................................... 22 3.5 Filterwheel ............................................................................................................................................... 22 3.6 User.......................................................................................................................................................... 22 3.7 Settings .................................................................................................................................................... 24 PLxCapture Mesures ........................................................................................................................................ 25 4.1 Stats image............................................................................................................................................... 25 4.2 Distance measurement ............................................................................................................................ 25 4.3 Diameter .................................................................................................................................................. 25 4.4 ADU .......................................................................................................................................................... 25 4.5 Pause preview/Start preview ................................................................................................................... 25 4.6 ROI definition ........................................................................................................................................... 25 Using PLxCapture ............................................................................................................................................. 26 5.1 Planetary .................................................................................................................................................. 26 5.2 Deep sky................................................................................................................................................... 27 5.3 Autoguiding.............................................................................................................................................. 28 5.3.1 Example with PHDGuiding V1.12 ........................................................................................................ 28 Batch processing .............................................................................................................................................. 31 6.1 Generalities .............................................................................................................................................. 31 6.2 Conversion SER to FIT (IRIS compatible numbering) ................................................................................ 32 Technical support ............................................................................................................................................. 33 7.1 Support by phone and Email .................................................................................................................... 33 Annex ............................................................................................................................................................... 34 8.1 Default file................................................................................................................................................ 34 I-Nova User manual PLxCapture 2.0g 3 / 34 1 Introduction I-Nova cameras – PLxCam Series are ideally designed for specific usage in Astronomy; optimization of the electronics makes them suitable for applications such as acquisition with very low light. The PLxCapture software was specially developed to fully exploit the potential of our cameras. An integrated circuit including specific IC (FPGA) allows significant reduction of electronic noise. 3 speeds of reading of the CCD / Cmos matrix: - High speed for planetary/lunar/solar imaging (8 and 12bit); - Half maximum speed to reduce readout noise (12bit); - 1/4 maximum speed for deepsky imaging and enhanced visual mode (2bit) with a minimal readout noise. During a long exposure (deepsky or enhanced visual mode), the non-essential components will go into energy-saving mode which reduces the heating of these components and helps to reduce thermal noise as well. Cameras are equipped with a TTL Serial communication port which allows communication with other devices such as a GPS module or a cooling system kit for temperature regulation. The possibility to connect several i-Nova cameras on the same PC and to control every camera by one PLxCapture instance each and/or to add a PHDGuiding instance (autoguiding software) to the running system. The PLxCapture software works in client-server mode. Several configurations are possible: - PLxCapture in server mode and the Sequencer module in client mode, - Several i-Nova cameras connected on several PCs can be controlled by a third-party module (via an Internet browser for example). The SDK is available on request for programming (Microsoft C# or C++). I-Nova User manual PLxCapture 2.0g 4 / 34 How to read PlxCam Series nomenclature? PLx-tsn x = sensor size n = version A = 1/4” B = 1/3” C = 1/2” t = sensor type s = sensitivity M = Monochrome x = High sensitivity C = Color I-Nova User manual PLxCapture 2.0g 1.1 5 / 34 PLA-C2 The PLA-C2 is not a webcam as it may look like. Of course, it is the same color sensor ICX098 that many astrophotographers have already experienced. However, mentionning features such as: 12-bit binning and hardware ROI, USB2 interface, is sufficient to clearly differentiate PLA-C2 from webcams. USB2 interface allows to get a rate of 60fps, ten times higher than what is available in USB1.1! Electronic noise is remarkably maintained low on this sensor which allows long exposure times. ICX098BQ Quantum Efficiency (QE = 0,45) Source SONY Communication ports: ST4 interface for autoguiding, TTL serial: for filter wheel control, focusing motors control, and telescope mount control (ASCOM V6). I-Nova User manual PLxCapture 2.0g 1.2 6 / 34 PLB-C2 Sony Super HAD ICX204AK CCD sensor (1024 x 768 pixel array) with a very high quantum efficiency in the whole visible spectrum. Ideally suited for lunar/solar high resolution imaging, and deepsky imaging, thanks to a very good sensitivity in the whole visible spectrum range, with a low electronic noise which allows long exposure times. Provides 2x2 hardware binning (512 x 384) to get a 9.3µm square pixel to be able to detect a faint star for autoguiding. C-mount thread (this standard allows users to take different kinds of adapters like 1.25” eyepiece holder, camera objective lens with step down ring, …). CMOS Sensor Sony Super HAD ICX204AK 1/3" CCD Matrix (L*H) 1024*768 Pixel size 4.65µm x 4.65µm Hardware binning 2x2 Yes Hardware ROI (region of interest) Yes A/D converter 10/12bit Frame rate (8/12bit) Up to 24 FPS at full resolution Exposure time From 0.1ms to infinity Interface USB2.0 For filter wheel control, focusing motors control, and telescope Communication port mount control (ASCOM V6) The surplus of pixels in the image we get is very useful to realize lunar or solar images at 24 fps. ICX204AK Quantum Efficiency Source SONY Hardware ROI function provides maximum frame rate in planetary mode. I-Nova User manual PLxCapture 2.0g 1.3 7 / 34 PLA-M Monochrome sensor ICX098 12-bit binning and hardware ROI USB2 interface allows to get a rate of 60fps, ten times higher than what is available in USB1.1! Electronic noise is remarkably maintained low on this sensor which allows long exposure times. ICX 098BL Quantum Efficiency (QE = 0,45) Source SONY Communication ports: ST4 interface for autoguiding, TTL serial: for filter wheel control, focusing motors control, and telescope mount control (ASCOM V6). I-Nova User manual PLxCapture 2.0g 1.4 8 / 34 PLA-Mx New Sony Exview ICX618ALA CCD sensor (640 x 480 pixel array) with a very high quantum efficiency from the visible spectrum to the near infrared (IR) region. Ideally suited for planetary high resolution imaging, thanks to an excellent sensitivity from the visible spectrum to the near infrared (IR) region. Provides 2x2 hardware binning (640 x 480) to get a 11.2µm square pixel to be able to detect a faint star for autoguiding. C-mount thread (this standard allows users to take different kinds of adapters like 1.25” eyepiece holder, camera objective lens with step down ring, …). CMOS Sensor Sony Exview ICX618ALA 1/4" CCD Matrix (L*H) 640*480 Pixel size 5.6µm x 5.6µm Hardware binning 2x2 Yes Hardware ROI (region of interest) Yes A/D converter 10/12bit Frame rate (8/12bit) Up to 63 FPS at full resolution Exposure time From 0.1ms to infinity Interface USB2.0 For filter wheel control, focusing motors control, and telescope Communication port mount control (ASCOM V6) ICX618ALA Quantum Efficiency (QE = 0,60) Source SONY I-Nova User manual PLxCapture 2.0g 1.5 9 / 34 PLB-Mx Sony Exview ICX445ALA CCD sensor (1280 x 960 pixel array) with a very high quantum efficiency from the visible spectrum to the near infrared (IR) region. Ideally suited for lunar/solar high resolution imaging, thanks to an excellent sensitivity from the visible spectral range to the near infrared region, with a very low electronic noise which allows long exposure times. Provides 2x2 hardware binning (640 x 480) to get a 7.5µm square pixel to be able to detect a faint star for autoguiding. C-mount thread (this standard allows users to take different kinds of adapters like 1.25” eyepiece holder, camera objective lens with step down ring, …). CMOS Sensor Sony Exview ICX445ALA 1/4" CCD Matrix (L*H) 1280*960 Pixel size 3.75µm x 3.75µm Hardware binning 2x2 Yes Hardware ROI (region of interest) Yes A/D converter 10/12bit Frame rate (8/12bit) Up to 23 FPS at full resolution Exposure time from 0.1ms to infinity Interface USB2.0 For filter wheel control, focusing motors control, and telescope Communication port mount control (ASCOM V6) ICX445ALA Quantum Efficiency Source SONY I-Nova User manual PLxCapture 2.0g 1.6 10 / 34 PLB-Mx2 / PLB-C2 New Aptina MT9M034 Cmos sensor (1280 x 960 pixel array) with a very high quantum efficiency from the visible spectrum to the near infrared (IR) region. Ideally suited for lunar/solar high resolution imaging, and deepsky imaging, thanks to an excellent sensitivity from the visible spectral range to the near infrared region, with a very low electronic noise which allows long exposure times. Provides 2x2 hardware binning (640 x 480) to get a 7.5µm square pixel to be able to detect a faint star for autoguiding. C-mount thread (this standard allows users to take different kinds of adapters like 1.25” eyepiece holder, camera objective lens with step down ring, …). CMOS Sensor Aptina MT9M034 1/3" CCD Matrix (L*H) 1280*960 Pixel size 3.75µm x 3.75µm Hardware binning 2x2 Yes Hardware ROI (region of interest) Yes A/D converter 10/12bit Frame rate (8/12bit) Up to 30 FPS at full resolution Exposure time from 0.1ms to infinity Interface USB2.0 Communication port For filter wheel control, focusing motors control, and telescope mount control (ASCOM V6) Monochrome sensor (PLB-Mx2) Color sensor (PLB-Cx) MT9M034 Quantum Efficiency Source Aptina Performance - Frame rate (FPS), 8bit mode: I-Nova User manual PLxCapture 2.0g 11 / 34 Resolution Frame rate 1280*960 34 FPS 1280*480 68 FPS 1024*768 43 FPS 800*600 82 FPS 640*480 104 FPS 400*400 119 FPS 320*240 200 FPS I-Nova User manual PLxCapture 2.0g 1.7 12 / 34 Getting started NOTICE: The PLx cameras are only compliant with PC running under one of the following operating systems: Windows XP SP3, Vista or Win 7 / 8 / 8.1 x86 / x64. Insert the disk into a drive to start the installation program. At this stage of the installation, do not connect the camera to the USB 2.0 port of your PC. If you do not have an autorun feature or have it disabled, you may launch the installation program named autorun.exe (in the root of the CD-ROM). The installation window below appears to select programs to install on the computer: 1. Third party components installation Windows XP Vista: PLxCapture software requires the installation of the following prerequisites: .Net Framework 3.5, .Net Framework 4, Ascom V6 and VC Redist 2010. Windows 7, 8 and 8.1 x64: Only Ascom V6 needs to be installed. 2. For all applications, it is necessary to install software drivers: Click on "Windows Drivers" and select the camera model to be installed. 3. For planetary imaging / long exposure and Visual enhancement, install PLxCapture application. I-Nova User manual PLxCapture 2.0g 13 / 34 4. For Polar pointing, PE analysis and autoguiding, install EQAlign application. 5. To use the camera with other third party software, it is necessary to install PLx ASCOM driver. 6. Connect the camera to the PC and confirm the choice of Windows during the procedure "Add peripheral Wizard". 7. For a complete documentation of the software package, click on "Documentation". We recommend to check frequently our FTP site and download the latest software package version from this link: http://www.inova-ccd.fr/download/ I-Nova User manual PLxCapture 2.0g 14 / 34 2 PLxCapture presentation Once the PLX capture software is installed, you can use your PLA-Mx camera to make your first capture. The main window will look like the following image (without lens on the camera) ; The window can be split in two parts: On the left: the preview window which displays the camera image; On the right: exposure, image control and major functions. All these functions are presented in the following chapter 3. Windows used in PLxCapture are sized to be compatible with “netbook platforms”. I-Nova User manual PLxCapture 2.0g 15 / 34 3 PLxCapture commands Current chapter will enumerate all available software funtionnalities. We select a functionnality by clicking on the navigation tabs on the left side of the window. Upper tabs are generally considered as sub-functions. 3.1 Capture In this window, 4 tabs are available to configure the camera in order to capture: “Planetary”, “Deepsky”, “Preview”, “About”. Color cameras use an additional tab to manage color balance. 3.1.1 Planetary In planetary mode, it is possible to adjust exposure time from one up to 1000ms with one millisecond accuracy. The 1000ms is an arbitrary limit used to distinguish planetary and deepsky modes. Gain is adjustable from 1 to 1023 (0% to 100%). The window preview reproduces changes immediately, even if the histogram is enabled. Be careful higher gain values produces noise on images. Capture can be made in 8bit or 12bit mode. In 12bit mode, frame rate may be reduced by a factor of 2. Then, the capture itself can be configured either in frames or in time in seconds. The histogram can be displayed in linear or logarithmic and shows the pixel saturation: if the curve reaches the right hand side of the windows, it means the image is “over-exposed”. The camera can also operate in 2x2 binning mode, and, in this mode, each block of 2x2 pixels is seen as a single pixel. The camera sensitivity is increased in a ratio of 4 but its resolution is reduced in the same ratio. For example, 4 pixels of intensity 7, 8, 9 and 11, the resulting pixel will be seen as a single pixel with an intensity of 35: 87 8 9 7 11 35 9 11 I-Nova User manual PLxCapture 2.0g 16 / 34 This greatly enhances sensor sensitivity by quadrupling the collecting area of a "pixel" and thus also quadrupling its "sensitivity" for a monochrome sensor (tripling for a color sensor). Its use is uncommon in planetary mode as it is usually more efficient to work with a focal length reduced by half when possible. But, for autoguiding, this is useful to catch faint stars. ROI (Region of Interest) function allows to process a part of the total image again to optimize the bandwidth of the USB port. By default, several image sizes are predefined according to ROI. A "Custom" size can be defined manually (see ROI definition in Chapter 4.6). Finally, the Start button starts capture process following configured settings. The button is deactivated when backup is impossible (e.g. if path does not exist). I-Nova User manual PLxCapture 2.0g 3.1.2 17 / 34 Deepsky In deepsky mode, maximum exposure of 1000ms is removed and there is virtually no limit for exposure time. However, spending a few tens of seconds, an electronic noise will appear but this non-statistical noise which depends only on temperature and exposure can be manually removed by a dark frame, performed without flow (putting a cap on the objective lens of the camera) in the same temperature and gain exposure conditions. We have then the possibility to capture Deep Sky Objects or planets in special conditions (e.g. Jupiter with a CH4 filter, or distant outer planets with at high F/D) when seeing condition is correct. Again, gain value is adjustable from 1 to 1023. Exposure time is now in second, and capture duration is given in frames. A progress bar informs you about the status of the current acquisition. Other commands (ROI, binning, histogram) are similar to those found in paragraph 3.1.1. The START button shall activate the capture sequence and is deactivated when backup is impossible (e.g. if path does not exist). During capture, a countdown of images is displayed. Nota: in deepsky mode, capture is automatically done in 12bit mode in a "slow readout" which improves the CCD readout noise. I-Nova User manual PLxCapture 2.0g 3.1.3 18 / 34 Preview This window contains options to configure image display. Configuration is ONLY for image display and does not affect the image recording. It is possible to reduce the dynamic image viewing by raising the black level (default zero) and reducing the white level (default 255). Commands allow images to reverse horizontal and/or vertical axes. For less powerful machines, it is possible to display only one picture every N recorded. For an accurate calibration, dark level can be adjusted manually. A zoom function allows to simplify focus operation by enlarging the image in a ratio of 2 to 4. It can also reduce the image size in a ratio of 1:2 to 1:4. A crosshair is available and can be rotated degree by degree. Of course, this crosshair is not registered with the stream from the camera. 3.1.4 About The tab “About” displays information: PLxCapture software version and information about the used camera. I-Nova User manual PLxCapture 2.0g 3.2 19 / 34 Files This command configures the folder for storing captured images (or videos). The file name to be used in the series of files must be specified. In our example, the file will be named "Capture". The selected file name can include operators preceded by the symbol "%" as follows: %o: OBSERVER field. See Chapter 3.6: for definition. %t: TELESCOPE field. See Chapter 3.6: for definition. %s: current number of the sequence. This code will be replaced by an index (1st value defined) that is incremented with each capture. %d: local date. Will be replaced by "YYYYMoDD_HHMiSSmmm" with YYYY: year, Mo: month, DD: day, HH: hour, Mi: minute, SS: seconds and mmm: milliseconds. %u: UTC date. Same format as %d but taking into account time zone and winter / summer time. %f: filter number. %n: filter name. For example, to conform with the notation of planetary observations, one can use the notation S%uTU_%o for Saturn capture images. The recording format can be set to one of the following: Image format 8 bit FITS Film format 1 2 8 bit AVI1 SER2 16 bit 16 bit AVI format is stored in RGB (DIB format) and limited to 2Gb. SER format manages 8bit and 12/16bit images that are compatible with Registax 5/6, as well as Avistack 1.8 or 2.0 (all platforms). I-Nova User manual PLxCapture 2.0g 20 / 34 It is possible to produce a "PLX" file associated to each capture. This file, in text format, contains a number of specific data related to the achieved capture3. An example for a SER file: DateStart=2011-03-09T20:31:49.234 DateEnd=2011-03-09T21:12:02.531 ExposureDuration=30sec Gain=104 Mode=16,Low Images=80 FileFormat=SER This acts as a notepad to record captures with all configured settings. It is possible to use buffer RAM to increase acquisition speed – Number of acquisitions will depend on resolution (8/12bit): It is also possible to produce compatible SER files with LUCAM Recorder. In mode "Compatible Lucam Recorder", header of the SER file contains "LUCAM RECORDER", in order to make the capture compatible with third-party programs that require such label. Otherwise, the name "PlxCapture" is included in the header of the SER file. See example below of an extract of a SER file: Highlighted fields are: acquisition software, the two configured user fields (user and device) – see Section 3.6, Field "i-Nova PLA-MX" indicates camera model. "000000000 4C 55 43 41 4D 2D 52 45-43 4F 52 44 45 52 00 00 |LUCAM-RECORDER "000000010 00 00 00 00 00 00 01 00-00 00 80 02 00 00 E0 01 | "000000020 00 00 10 00 00 00 65 00-00 00 4D 50 61 20 20 20 | "000000030 20 20 20 20 20 20 20 20-20 20 20 20 20 20 20 20 | |" "000000040 20 20 20 20 20 20 20 20-20 20 20 20 20 20 20 20 | |" "000000050 20 20 69 2D 4E 6F 76 61-20 50 4C 41 2D 4D 78 20 | i-Nova PLA-Mx |" "000000060 20 20 20 20 20 20 20 20-20 20 20 20 20 20 20 20 | |" "000000070 20 20 20 20 20 20 20 20-20 20 43 31 31 20 20 20 | "000000080 74 20 20 20 20 20 20 20-20 20 20 20 20 20 20 20 | € e MPa C11 |" à |" |" |" |" A summary of the capture can be displayed in a window on demand. This avoids having to go and open the PLX file when it is created. 3 contents may change in future versions I-Nova User manual PLxCapture 2.0g 3.3 21 / 34 Focus This command helps to focus from PLxCapture software and allows to control a focus motor working under ASCOM V6 protocol. To do so: 1. Select a star (a green box will appear around your target). The frame size can be modified (20 to 40 pixels) to best fit the targeted star: 2. A cross-section of the star is displayed with a FWHM computation in real time. Warning, this measure is given in pixels, not in arcseconds. 3. The navigation buttons can be used to control a motorized device via ASCOM protocol. I-Nova User manual PLxCapture 2.0g 3.4 22 / 34 Mount This command controls telescope’s mount using ST4 interface (available on I Nova cameras) or using an ASCOM interface. Pressing buttons generates pulses on the required axis. Pulse duration parameter can be adjusted (default value is 100ms). 3.5 Filterwheel This command allows to specify the name of filters used. The user will fill in the name of each filter for each wheel position, and this information will be automatically available from communication with the filter wheel I-Nova. This information is integrated into the FIT format, and in all cases in the PLX file backup settings (see chapter 3.2 - Files for more information). If no filterwheel, filter selection is deactivated. In manual mode, functionality is available. “On Camera” modes and Ascom use respectively I-Nova and Ascom interfaces to select the automatized filterwheel. 3.6 User Under this menu, the user will configure PLxCapture for his personal settings. It is possible to name files (see Chapter 3.2 : Files) or provide digital elements for PLxCapture computation. I-Nova User manual PLxCapture 2.0g 23 / 34 Observer and Telescope: this information will be used to populate the fields OBSERVER and TELESCOP in FIT files (fields OBSERVER and TELESCOPE in SER files). Field "Focal Length" will be used for some computations (see Chapter 4 - PLxCapture Mesures). Field "location": defined \Mydocuments\Capture. Field INSTRUMEN (FIT file): contains the camera model. PROGRAM field is “I-Nova PlxCapture”. Here is a header FIT file with some parameters: SIMPLE = T BITPIX = 8 NAXIS = 2 NAXIS1 = 640 NAXIS2 = 480 OBSERVER= INSTRUME= MPA i-Nova PLA-Mx TELESCOP= C11 DATE-OBS= 2011-04-20T14:52:54.751 EXPTIME = 0.016 XBINNING= 1 YBINNING= 1 PROGRAM = I-Nova PlxCapture END I-Nova by default as User manual PLxCapture 2.0g 3.7 24 / 34 Settings In this window you can set: Language used for PLxCapture interface and a color mode: default is english. We can also activate tooltips (same language as interface). Refresh rate information (histogram, FPS displays, internal buffer display and star refresh to focus) is adjustable to 1, 2, 5 (default) or 10Hz. This helps not to overburden CPU load for lowest configurations. Expert setting: - “black level” to precisely tune resulting gamma; - visualization of filling and emptying of PLxCapture internal buffer. This buffer shows the software's ability to maintain the best possible speed from the camera and to absorb a temporary disk latency. When buffer is full, PLxCapture has to wait until free space is available. If this occurs often, try to activate the buffering files SER (chapitre 3.2 : Files). - PLxCapture generates 16bit files (or 2 bytes), but only 12 data bits are used. Generally, data is stored in the lower bits representing values from 0 to 4095. The higher bits (4096 to 65535) are forced to zero. AviStack software reads these data but only the higher byte for display; to make PLxCapture compliant with this mode, option “Avistack compatible data” has to be enabled. I-Nova User manual PLxCapture 2.0g 25 / 34 4 PLxCapture Mesures In this section, are described all operations that can be achieved on the preview window. Right clicking on the preview window, we get the following list: 4.1 Stats image In dynamic mode, this functionality is deactivated. It allows to get statistics on the image. It provides minimum, maximum and average ADU and also standard deviation (σ). 4.2 Distance measurement This operation involves linking two points on the window (eg. 2 stars) and, using focal value (see section 3.6), the result gives the distance between the 2 selected points in arcsecond. When focal length is not given, result is given in pixels. 4.3 Diameter This operation involves selecting three points of the window (eg. 3 points over a moon crater) and, using focal value (see section 3.6), the result gives the object diameter in arcsecond. When focal is not given, result is given in pixels. 4.4 ADU ADU stands for Analog/Digital Unit and gives the level of the selected pixel. Of course, preview needs to be in pause mode to get the result. 4.5 Pause preview/Start preview This operation freezes or restart display as well as communications with the camera 4.6 ROI definition This functionality defines a rectangular area that will be read from the sensor. This optimizes the USB bandwidth while reducing the size of the generated files. See Chapter 3.1.1: Planetary mode for more information on ROI. To do so, start in a corner of the area to define and, while holding the left mouse button pressed, draw a rectangle to the opposite corner. ROI is the minimum size of 320x240 and its size must be a multiple of 8. PLxCapture will correct automatically invalid values. I-Nova User manual PLxCapture 2.0g 26 / 34 5 Using PLxCapture 5.1 Planetary The best way to use PLxCapture software to capture planets (or moon) is to run the planetary camera in 8bit or 12bit mode as appropriate. 12bit mode requires twice the bandwidth vs 8bit mode on the USB 2.0 link, thus, maximum frame rates decreases from about 55 fps in 8bit mode to around 25 fps in 12bit mode (12bit mode contains more information than 8bit mode). In planetary mode, capture is realized with a global compromise between exposure time (often dependent on turbulence) and gain (brightness of the sky object). With a monochrome camera, capture has to be performed several times to compose a color image: in this case, we talk about capturing RGB (Red, Green, Blue). To do so, the best way is to deal with a filtering device (it is strongly not recommended to disassemble the camera to change the color filter). It is also possible to add an additional layer to RGB capture that contains all details: L-RGB with an additional filter L which lets the entire visible spectrum, or IR-RGB with a filter allowing only the infra-red. Throughout this document, is used the generic term L-RGB but everything applies with IR-RGB in the same way. 1. Having captured 3 or 4 shots, processing has to be done on each one independently (considering that each one is a single black and white image). To do so, Registax v6.1, AviStack 2.0 or Autostakkert!2 are among the best tools currently available (included in PLxCapture CDROM). All of them are able to handle the flow of 8bit or 12bit images from the camera, in TIFF, FIT or SER format (see Section 3.2 for recording formats available). Unprocessed composite images (still in black and white at this stage) are usually backed up in FITS 16 or 32bit format. 2. To build a RGB (or L-RGB) image, all images have to have the same dimensions (for example 640x480 maximum size for PLA-Mx) as Registax v6.1 is not able to process images with various sizes. Select 3 (or 4) FIT images and check RGB composite image (LRGB for 4 pictures). 3. Press R, G or B on each image of the "frame list" to indicate which image corresponds to which color (respectively Red, Green and Blue) plane (this step is not necessary if names of image files end with _R, _G _B (_L for the luminance) before the extension FIT). 4. Registration (picture alignment) will be done as usual. In case one image is deleted from the list, it is necessary to lower the quality threshold. Compositing process provides a color picture directly. 5. At this stage, it is possible to refine plan alignement (“align RGB”), edit proportion of Red, Green and Blue in the image (“RGB scale”). In case of a RGB image, wavelet filtering is applied to all three planes simultaneously, or to an "internally" built image using the "Colour Mixing" functionality.: I-Nova User manual PLxCapture 2.0g 27 / 34 This very important "Colour Mixing" button will allow you to play with coefficients , , of luminance following equation: Luminance = *Red + *Green + *Blue Wavelet filtering applies on this Luminance plane - R, G and B planes only gives a color overlay. You can also choose not to apply color (Create B/W image), or to use a real luminance image separately (Use Luminance (file)). 5.2 Deep sky To use long time exposure, it is possible to use either PLxCapture or third-party software via the ASCOM plugin. Signal Flat Dark Offset PLxCapture software can achieve pre-processing of images such as: - OFFSET/BIAS images This image type contains the readout noise of the camera. - DARK images Contain “hot pixels” of the CCD as well as the thermal noise for a given exposure time. - FLAT Field images This type of image allows to remove vignetting and dust on the sensor from deepsky images. Images produced by PLxCapture can be processed by third-party softwares such as DeepSkyStacker (Freeware), IRIS (Freeware), Prism, AstroArt, MaximDL, Photoshop, … I-Nova User manual PLxCapture 2.0g 5.3 28 / 34 Autoguiding ASCOM V6 and plugin ASCOM I-Nova PLx camera are required to use the camera for autoguiding. Various softwares can be used: PHDGuiding (freeware), Prism, AstroArt, MaximDL, etc. 5.3.1 Example with PHDGuiding V1.12 1. Install pre-requisites as follows (included in the installation CDRom): a. .Net Framework 3.5 b. .Net Framework 4 c. Ascom V6 d. Redist 2010 e. Plugin Ascom PLxCam 2. Launch PHDGuiding application, clicking on the icon 3. Select "ASCOM V6 Camera", then “iNova camera” in the ASCOM window. Select the binning 2*2 option to autoguide using a faint star. I-Nova User manual PLxCapture 2.0g 29 / 34 Notice : - For a color camera: in binning 2*2, sensitivity is twice or three times sensitivity at full resolution. - For a monochrome camera, this ratio increases to four times. 4. Click on "Mount" and verify that interface "On-camera" is selected: 5. Click on the icon to activate the ST4 interface. 6. Select the exposure time (default value is 1 second). 7. Click on the icon to activate the camera display. I-Nova User manual PLxCapture 2.0g 8. Click on the icon 30 / 34 to start the calibration process (allows the software to measure and configure the correction pulses applied to the mount for a high quality autoguiding process). 9. When calibration is complete, the software starts to autoguide. 10. To change the autoguiding configuration of PHDGuiding, simply click on the icon 11. To stop autoguiding or exit the application, it is necessary to click on the STOP icon, before any other action. I-Nova User manual PLxCapture 2.0g 31 / 34 6 Batch processing 6.1 Generalities This command allows to convert files from one format to another one. If an image processing software can not read the format of a captured video, the “batch processing” functionality can convert a video file into multiple single images. 1. The conversion begins with selection of the file to convert (AVI or SER). Then, a summary is provided and the first frame is displayed. 2. Top right, specify the output image format (FIT in the following example), and the output directory / output file name. 3. Output file index can be configured as needed. 4. Click on "Begin Conversion" to start conversion; a progress bar displays while the file is being converted. I-Nova User manual PLxCapture 2.0g 6.2 32 / 34 Conversion SER to FIT (IRIS compatible numbering) 1. Select the file to convert. 2. Specify the output folder (generally the working directory of IRIS). 3. Fulfill a generic name (e.g. Sat for "Saturn") 4. Indicate “FIT” as output format and run "Begin Conversion". As a result, files are created and can be directly used (including numbering) with the Iris software that allows to launch operations, Iris operating on sets (e.g. PREGISTER, ADD_NORM ...). I-Nova User manual PLxCapture 2.0g 33 / 34 7 Technical support 7.1 Support by phone and Email I-Nova provides technical support and regular updates. You can contact us by email to [email protected] or by phone +33 (0)1 47 84 70 27. For an effective technical support, tell us as much information as possible about your setup (type of instrument, frame, accessories, computer, operating system, etc..) and if possible a screen shot with the error message. In case of major problem (software crash), PLxCapture will automatically create a data file and a screen shot to be sent to the support team. There is no personal information other than defining the working environment when the "bug" occurs. Attached is a default file example. I-Nova User manual PLxCapture 2.0g 34 / 34 8 Annex 8.1 Default file Hereafter is a typical file sent to support team: PlxCapture 2.0.0.43 Un élément avec la même clé a déjà été ajouté. à System.ThrowHelper.ThrowArgumentException(ExceptionResource resource) à System.Collections.Generic.Dictionary`2.Insert(TKey key, TValue value, Boolean add) à PlxCapture.Main.InitLangues() à PlxCapture.Main.Main_Load(Object sender, EventArgs e) à System.Windows.Forms.Form.OnLoad(EventArgs e) à DevExpress.XtraEditors.XtraForm.OnLoad(EventArgs e) à System.Windows.Forms.Form.OnCreateControl() à System.Windows.Forms.Control.CreateControl(Boolean fIgnoreVisible) à System.Windows.Forms.Control.CreateControl() à System.Windows.Forms.Control.WmShowWindow(Message& m) à System.Windows.Forms.Control.WndProc(Message& m) à System.Windows.Forms.ScrollableControl.WndProc(Message& m) à System.Windows.Forms.Form.WmShowWindow(Message& m) à System.Windows.Forms.Form.WndProc(Message& m) à DevExpress.XtraEditors.XtraForm.WndProc(Message& msg) à System.Windows.Forms.Control.ControlNativeWindow.OnMessage(Message& m) à System.Windows.Forms.Control.ControlNativeWindow.WndProc(Message& m) à System.Windows.Forms.NativeWindow.Callback(IntPtr hWnd, Int32 msg, IntPtr wparam, IntPtr lparam) DataWidth : 64 Name : Intel(R) Core(TM) i7 CPU 920 @ 2.67GHz Caption : Microsoft® Windows Vista™ Édition Familiale Premium ServicePackMajorVersion : 2 TotalVisibleMemorySize : 6281392 CurrentBitsPerPixel : 32 CurrentHorizontalResolution : 1280 CurrentVerticalResolution : 1024 Description : ATI Radeon HD 4600 Series I-Nova