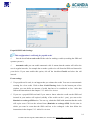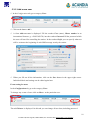
1
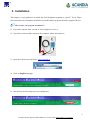
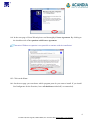
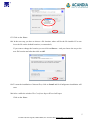
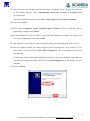
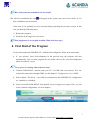
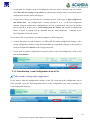
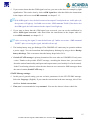
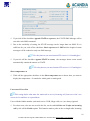
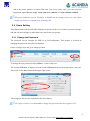
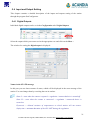
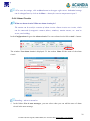
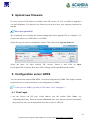
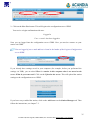
User Manual For SeaConfigurator ACANDIA AB, Vintervägen 2B, 13540 TYRESÖ, Tel: +46-8-52 22 40 30, [email protected], www.acandia.se 1. USED SYMBOLS ...............................................................................................................................................1 2. ABOUT SEACONFIGURATOR ......................................................................................................................1 3. INSTALLATION ...............................................................................................................................................2 4. FIRST START OF THE PROGRAM ..............................................................................................................7 5. CONFIGURATION ...........................................................................................................................................9 5.1 THE BASICS FOR CONFIGURATION ....................................................................................................................9 5.1.1 Change of Station configuration ............................................................................................................9 5.1.2 Data Backup, Load Configuration from a File ....................................................................................10 5.1.3 Add a New Action, Edit and Delete Action ...........................................................................................11 5.2 GENERAL CONFIGURATIONS...........................................................................................................................13 5.3 USER SETTINGS ..............................................................................................................................................17 5.3.1 Change the Password ...........................................................................................................................17 5.3.2 Add new user ........................................................................................................................................18 5.3.3 Creation the User Group ......................................................................................................................20 5.4 INPUT AND OUTPUT SETTINGS ........................................................................................................................21 5.4.1 Digital Outputs .....................................................................................................................................21 5.4.2 Digital Inputs .......................................................................................................................................24 5.4.3 Temperature Inputs ..............................................................................................................................26 5.4.4 Alarm Circuits ......................................................................................................................................29 6. MONITORING.................................................................................................................................................31 7. STATION SELECTION ..................................................................................................................................32 7.1 STATION MANAGER ........................................................................................................................................32 7.2 ADD THE STATION ..........................................................................................................................................33 8. UPLOAD NEW FIRMWARE .........................................................................................................................34 9. CONFIGURATION SERVER GPRS .............................................................................................................34 9.1 FIRST LOGIN ...................................................................................................................................................34 9.2 LOGIN AND CONNECTION TO GPRS SERVER ..................................................................................................38 9.3 CONFIGURATION AND MONITORING VIA GPRS SERVER ................................................................................39 ACANDIA AB, Vintervägen 2B, 13540 TYRESÖ, Tel: +46-8-52 22 40 30, [email protected], www.acandia.se 1. Used Symbols Questions Examples Information 2. About SeaConfigurator SeaConfigurator is a program created by SEA Ltd. which is used for configuration of products series GSM RELAY 3 from PC via USB cable or via GPRS. USB cable is contained in a package of all GSM products series GSM RELAY 3. The Program SeaConfigurator you can download on web sites www.seapraha.cz for FREE and without any limitation. Thanks this program you can change many parameters of GSM RELAY. Examples and FAQ you can find on web sites www.seapraha.cz in the category GSM Products GSM application for home Examples and FAQ Connection via GPRS is possible only for stations with FW 1.0.12 and higher!!! 1 ACANDIA AB, Vintervägen 2B, 13540 TYRESÖ, Tel: +46-8-52 22 40 30, [email protected], www.acandia.se 3. Installation This chapter is your guide how to install the SeaConfigurator program to your PC. If you follow the instructions, the installation should be successful and the program should be prepared for use. How to start the program installation? 1. If you have opened older version of SeaConfigurator, close it. 2. If you have connected the station to the computer, please disconnect it. 3. Open the web browser and write www.seapraha.cz. 4. Click on English language. 5. Into the box for browsing write text configurator. 2 ACANDIA AB, Vintervägen 2B, 13540 TYRESÖ, Tel: +46-8-52 22 40 30, [email protected], www.acandia.se 6. Start the search by clicking on the Search button on the right side of the browser box. 7. Click on GSM-CONFIGURATOR. 8. The homepage of the program SeaConfigurator is displayed. For downloading the installation file into your computer click on here on this page. 9. In the menu which will displayed the web browser window, click on here. Downloading of the file can take time, depends on internet connection speed. 10. Installation of the program SeaConfigurator will start. 11. At first choose the language. If you want the program in English, check if you choose English in the list box. If not, please click to the list box and select the English. 12. Click on OK to accept the language selection. 13. In the next step you will see SeaConfigurator Setup Wizard. Click on the Next>. 3 ACANDIA AB, Vintervägen 2B, 13540 TYRESÖ, Tel: +46-8-52 22 40 30, [email protected], www.acandia.se 14. In the next page of Scan Wizard please read thoroughly License Agreement. By clicking to the checkbox tick off Acceptation with License Agreement. Attention! Without acceptation is not possible to continue with the installation! 15. Click on the Next>. 16. On the next page you can choose which program parts do you want to install. If you install SeaConfigurator for the first time, leave all checkboxes ticked off (recommended). 4 ACANDIA AB, Vintervägen 2B, 13540 TYRESÖ, Tel: +46-8-52 22 40 30, [email protected], www.acandia.se 17. Click on the Next>. 18. In the next step you have to choose a file location, where will be the file installed. You can leave the file on the default location (recommended). If you want to change the location you can click on Browse… and you choose the way to the new file location and after that click on OK. 19. To start the installation of chosen files, click on Install and SeaConfigurator installation will start. 20. After a while the window The Certificate Import Wizard will open. Click on the Next>. 5 ACANDIA AB, Vintervägen 2B, 13540 TYRESÖ, Tel: +46-8-52 22 40 30, [email protected], www.acandia.se 21. In the next step you can choose the location of the certificate. If you can save the certificate to the default location, select Automatically choose the location of certificate file (recommended). If you want a different location of file choose All certificates save to the next location. 22. Click on the Next>. 23. The window Completion of the Certificate Import Wizard will open. Certificate will be imported by clicking on the Finish. 24. If the installation of the certificate is successful, the information window The import was successful is displayed. Please click on OK. 25. The second Certificate Import Wizard will start. Repeat all following steps from 19 to 24. 26. The last window informs you about Completing the SeaConfgurator Setup Wizard. If you leave ticked off the check box Run SEA Configurator, the SeaConfigurator will start automatically. If you do not want to open SeaConfigurator just now, click to the checkbox, after that you can open the program by double click to the icon SeaConfigurator on the desktop of your computer. 27. Click on Finish. 6 ACANDIA AB, Vintervägen 2B, 13540 TYRESÖ, Tel: +46-8-52 22 40 30, [email protected], www.acandia.se How I know that the installation was successful? 28. After the installation the icon will appear in the system tray (next to the clock). If it is blue, installation was successful. If the icon is red, probably an error occurred during removing the previous version. In this case, perform the following steps: 1) Restart the computer. 2) Install the SeaConfigurator ones more. SeaConfigurator is successfully installed. What is the next step? 4. First Start of the Program For the interconnection GSM RELAY 3 with the SeaConfigurator follow next instructions. 1. If you selected Start SeaConfigurator in the previous step, the program will start automatically. You can start program also by double click on the icon SeaConfigurator which is on the PC screen. The program is running, what is the next step? 2. Connect GSM RELAY (station) with your PC via USB cable (accessories). You can connect the station also through GPRS, see the chapter 9. Configuration server GPRS. 3. Wait a minute. The driver ( not valid for reconnection) and GSM RELAY configuration are installed (or reloaded). 4. After successfull GSM RELAY data upload, screen Configuration opens. Here you can create a station configuration, see next chapters. 7 ACANDIA AB, Vintervägen 2B, 13540 TYRESÖ, Tel: +46-8-52 22 40 30, [email protected], www.acandia.se How to close the program correctly? 5. The program will be closed by click on x ( cross) in the upper right corner of the window SeaConfigurator. Attention! If you created configuration, don´t forget to Save it (see chapter 5.Configuration)! 6. After Exit, the program disconnects the GSM RELAY from the computer. How to run the program again? For re-run the program and load the data from/into GSM RELAY, follow steps 1. – 4. of this chapter. 8 ACANDIA AB, Vintervägen 2B, 13540 TYRESÖ, Tel: +46-8-52 22 40 30, [email protected], www.acandia.se 5. Configuration This chapter describes all possibilities of station´s configuration e.g. how to change a password, how to add users, how to set inputs and outputs, how to set alarm circuits etc. Some functions are in the factory configuration. Any saved configuration can be changed. On the website www.seapraha.cz in the category GSM products GSM applications for home Examples and FAQ you can find answers to frequently asked questions and examples for the most common used methods of GSM RELAY. 5.1 The Basics for Configuration This part of the chapter Configuration describes the basics for the configuration of station through the SeaConfigurator, especially how to upload new configuration into the station, how to backup, how to upload configuration from a file and add, edit and delete actions during the process. 5.1.1 Change Station configuration How to upload a new configuration to the station? If you want to make changes in your station configuration, you have two options. The first way is to make the desired configuration in your PC and then you connect the station to the computer. The second way is to make changes when the station is connected to the computer via USB cable or GPRS. If you choose first option, you can upload changes by following way: Make the desired changes in the configuration by SeaConfigurator. Save the configuration using the button Save. Connect the station to your computer via USB cable or GPRS (chapter 9. Configuration server GPRS). When configuration in the station and the SeaConfigurator are different, following message is displayed: The station settings are different from the last time. What do you want to do? You have three options: Save the new configuration to the station, Ignore differences and decide later, Load settings from the station. 9 ACANDIA AB, Vintervägen 2B, 13540 TYRESÖ, Tel: +46-8-52 22 40 30, [email protected], www.acandia.se If you made the changes in the SeaConfigurator and you want to upload it into the station, select Save the new settings to the station. An information window about successfully stored configuration into the station will appear. In other cases, choose one from the two remaining options. In the case of Ignore differences and decide later, the configuration of station remains as it is , in the SeaConfigurator remains changed configuration (configurations are not synchronized) and you can decided later to upload it. In the case of Load settings from the station, the original configurations which is stored in station will be uploaded into the SeaConfigurator (changes in the SeaCofigurator will not be saved). If you choose the second option, you upload changes by following steps: Connect the station to your computer via USB cable and make configuration changes. After saving configuration changes using the button Save, you upload the changes to the station by click on the button To Station in the Configuration tab. If you want to upload configuration from the station to the SeaConfigurator, click on the button From Station. 5.1.2 Data Backup, Load Configuration from a File How to make a backup of the configuration? If you want to load the configuration (backup) to the file, from which the configuration can be later uploaded, open the SeaConfigurator where is the configuration you want to backup (or create appropriate changes). 10 ACANDIA AB, Vintervägen 2B, 13540 TYRESÖ, Tel: +46-8-52 22 40 30, [email protected], www.acandia.se On the Configuration tab, click on the top bar Settings overview on the button Files… click on To file. Now is displayed the window Save configuration. Choose the path where the file should be saved (recommended to leave it as it is). Into the box File Name fill the name of the selected file and click on the button Save. The window Saving Configuration will be closed. The file is saved into the chosen place and can be loaded later. It is recommended to backup your configuration for the possibility to return to the previous configuration. All configuration parameters can be uploaded to a file. How to upload the configuration from a file? If you have a file, which contains the desired configuration (e.g. for reset an older configuration), you can upload whole configuration into the station in one step. Click on the button Files... in the Configurations tab. Click on From file. Use the wizard to select the file from which you can upload the configuration and click on the button Open. This will upload the configuration from a file into the SeaConfigurator. 5.1.3 Add a New Action, Edit and Delete Action You can add, edit and delete the action for every individual inputs and outputs of the station. This is an action, which will be performed, if the specific state occurs. What is an action? An action can be a SMS message, a tone call or a SMS Command which will be performed, if the specific state occurs. Add a New Action Click on the button Add and you can add a new action. The Adding Action window will appear. You can choose SMS Message (sending a SMS message to selected users), Tone Call (defined a tone call to selected users) or Command (the station make a SMS command). Click on the desired action (see following points). If you want to send a SMS message after the specific state occurs, click on the SMS Message. Type your text into the textbox Text of SMS message, which you want to send 11 ACANDIA AB, Vintervägen 2B, 13540 TYRESÖ, Tel: +46-8-52 22 40 30, [email protected], www.acandia.se after the specific state occurs. In the List of users select which users have to obtain this SMS message. You can add a new user when you click on the button New user (after that follow the instructions in chapter 5.3.2). Click on Save. If you want a tone call to the telephone number, click on the button Tone call. Choose sounds to be played back and write them to the textbox Tones played. Allowed symbols are 0, 1, 2, 3, 4, 5, 6, 7, 8, 9, A, B, C, D, *, #, p. In the List of users check which users have to be called in this occasion. You can add new user when you click on the button New user (after that follow the instructions in chapter 5.3.2). If you tick off Users must accept the call, the station will call this user repeatedly as long as the user accept the call. Click on the Save button. If the station has to do SMS command automatically, click on button Command. Write any command to the textbox SMS command and after that click on Save. All commands are explained in the user manual you obtained with your GSM-RELAY. Editing action In the list of actions, click on the action that should be edited and after that click on Edit. You will see the window Editing action. To edit the action, you can rewrite the text, a SMS message or a command in the action textbox. After the editing, click on Save. 12 ACANDIA AB, Vintervägen 2B, 13540 TYRESÖ, Tel: +46-8-52 22 40 30, [email protected], www.acandia.se Deleting action In the list of actions, click on the action that you want to delete. Click on the button Delete. You will be asked Do you really want to delete the selected action? If yes, click on Yes. If you tick off the check box Disable action list, you will block all the actions temporary. The advantage is, that it isn´t necessary delete all actions, but you can use them later by uncheck the same checkbox. 5.2 General Configurations On the Configurations tab go to the General. To change the configuration click on the More… button. The window General configurations will be displayed. View and change basic station parameters In this part you can do settings of a phone number, a PIN code and SMS limits. Station´s phone number will be loaded when you connect your station to your computer. It can be changed by rewriting the textbox Station´s phone number. In the textbox PIN Code of the SIM Card you can set the PIN code for the SIM card, which is inserted into the station. The new PIN code will be used after re-inserting the SIM card (after ejecting and inserting from/to the station). SMS Limit is used for limit the number of sending messages by the station. Choose the limiting number of SMS messages which is allowed to send, including a time interval. If the number of SMS messages during a set time is exceeded, no more messages will be send. Resend SMS is used for resending SMS messages which are obtained the inserted SIM card phone number. By tick off the correct check box, you can select under what circumstances you want to resend the message. 13 ACANDIA AB, Vintervägen 2B, 13540 TYRESÖ, Tel: +46-8-52 22 40 30, [email protected], www.acandia.se Prepaid SIM Cards Settings This configuration is valid only for prepaid cards! Into the box Code to read credit fill the code for reading a credit (according the SIM card operator you use). Automatic calls you can enable automatic calls. It means that the station will call to the user in regular intervals, for example due to make a paid voice call from the SIM card inserted in your device. If you want enable this option, tick off the checkbox Enable and select the call interval. Event settings If a prepaid card is used, it can happen that you exhaust the credit. You can set an automatic warning for a low credit. Click on Low Credit Warning choice. In the bottom part of the window you can define an amount of credit that has to be considered as low. After that follow the instructions in the chapter 5.1.3 Add a New Action. If you use a prepaid SIM card and if you want to know when the credit on the SIM card inserted in your station will expired (validity of the credit can be 1 year), you can set the Reminder to recharge SIM action. You can e.g. obtain the SMS with attention that the credit will expire soon. Click on the selected item (Reminder to recharge SIM). Set the time in which you want be warn that the SIM card has to be recharged. After that follow the instructions in the chapter 5.1.3 Add a New Action. 14 ACANDIA AB, Vintervägen 2B, 13540 TYRESÖ, Tel: +46-8-52 22 40 30, [email protected], www.acandia.se If you want to know that the GSM signal was lost, you can set the alert for example by light signalization. This can be done by choice GSM signal lost. After that follow the instructions in the chapter Add new action SMS command, see chapter 5.1.3. If the GSM signal is lost, the bulb connected on output Y4 and placed in a visible place for the operator will light up. I will add a new action - SMS command Y4 ON. If the device lost the GSM signal, the bulb connected to the output Y4 will light up. If you want to know that the GSM signal was recovered, you can set the notification by choice GSM signal recovered. After that follow the instructions in the chapter Add new action SMS command, see chapter 5.1.3. After recovering the signal, I want the bulb turn off. I add a new action - SMS command Y4 OFF. After recovering the signal, the bulb will turn off. The backup battery may get discharged. The GSM RELAY cannot stay in operation without a power supply. You can learn about the backup battery discharge by using a choice Backup battery discharge. This event starts when the battery drops below 20 %. Periodic STATE message is primary determined for users who use GSM RELAY only once a time. Thanks to the periodic STATE message, according the chosen time, you can know about the station functionality and inputs and outputs states (used mainly for a back control). In the Event Setting selection select the time between two consecutive SMS messages about the state of station (Send STATE every :). STATE Message settings: In this part of general setting you can set basic parameters for the STATE SMS message. Select the language (English). If you want the current time in the state message, tick off the checkbox Include current time. Time zone is recommended to keep automatic. You can also choose it from a check list. 15 ACANDIA AB, Vintervägen 2B, 13540 TYRESÖ, Tel: +46-8-52 22 40 30, [email protected], www.acandia.se If you tick off the checkbox Append STATE to responses, the STATE SMS Message will be sent after each SMS command. Due to the variability of setting, the STATE message can be longer than one SMS. If it is sufficient for you, tick off the checkbox Limit responses to 1 SMS and the length of status messages will be reduced to only one SMS message. For this function you need station FW version 1.0.16 and higher! If you tick off the checkbox Append STATE to events, the messages about events would automatically contain the answer to STATE. For this function you need station FW version 1.0.15 and higher! Show temperature as Thick off the appropriate checkbox in the Show temperature as to choose how you want to display the temperature - if rounded to whole grade or tenth grade. Users out of Users List This setting define what must the station do in case of incoming call from users who´s are not on the list and how to respond them. Users with the hidden number (activated service CLIR, Skype calls, etc.) are always ignored. For other users, who are not saved in the list, can be enabled Pulse on Y4 after an incoming call by tick off the Enable option. This function make a pulse in the set length after incoming 16 ACANDIA AB, Vintervägen 2B, 13540 TYRESÖ, Tel: +46-8-52 22 40 30, [email protected], www.acandia.se call to the phone number of station SIM card. Just as for other users, you can select the appropriate option Do not verify, Verify with voice callback or Verify with data callback. The pulse needn't be only on Y4 output, it depends on the settings in the user card, which output you choose to respond to the incoming call. 5.3 Users Setting This chapter deals with an individual adjustment options for the user, such as a password change, add and edit user settings for individual users and create user groups. 5.3.1 Change the Password The password can be changed by SMS or by SeaConfigurator. This chapter is focused on changing the password using SeaConfigurator. On the Configuration tab, go to category Users. To change the user password click on More... in line of the user. The window Edit user is displayed. In the textbox Password rewrite the password to a new one. Then click on the Save button in the upper right corner. All settings for the user are explained in the next chapter. For safety reasons is recommended to change the password from the original 1234. 17 ACANDIA AB, Vintervägen 2B, 13540 TYRESÖ, Tel: +46-8-52 22 40 30, [email protected], www.acandia.se 5.3.2 Add a new user In the Configuration tab, go to category Users. Click on the button Add… A form Add new user is displayed. Fill the textbox User (name), Phone number in an international format e.g. +420123456789, into the textbox Password fill the password which the user will used for controlling the station. In the textbox Prefix you can specify what text will be written at the beginning of each SMS message sent by the station. When you fill out all the information, click on the Save button in the upper right corner. Individual labels and settings can be edited again later. Event setting for users In the Configuration tab, go to the category Users. To change any events of users click on More... at the particular user. The tab Edit user is displayed. On this tab you can change all user data, including password. 18 ACANDIA AB, Vintervägen 2B, 13540 TYRESÖ, Tel: +46-8-52 22 40 30, [email protected], www.acandia.se What does it mean each settings options in the right side of window? If you tick off the checkbox Disable, the user telephone number will be prohibited for all events. It is useful when you need temporarily disabled sending events to this user (e.g. when the user is on holidays). If you tick off the checkbox Automatic calls, the user will be called in regular intervals (e.g. due to make a voice call from SIM card). The interval can be set in the menu General Automatic calls. If you tick off the checkbox Send a copy of all messages, copies of all SMS responses from the station will be sent to this user. In the selection Pulse after incoming call you can define whether and how to verify back the pulse execution as a reaction to the incoming call. There are three options what to do after incoming call: do not verify, verify with voice callback, verify with data callback. Tick off the wanted option. The reaction on the incoming call can be done only for one selected output. The output you can select in the listbox. 19 ACANDIA AB, Vintervägen 2B, 13540 TYRESÖ, Tel: +46-8-52 22 40 30, [email protected], www.acandia.se !!!For saving the setting, click on the Save button in the upper right corner. Individual settings can be edited later, see the beginning of this chapter!!! 5.3.3 Creation the User Group This setting is only for a Czech version of stations called “Svolávač”. In the Configuration tab go to the User Groups. For creating a new user group, click on Add... A card Add user group is displayed. Into the textbox Name fill the name of the group. From the List of users using the checkboxes select the members of the group. You can also add a new user through the button New User (after that follow the chapter 5.3.2 Add New User). !!!For saving the settings, click on the Save button in the upper right corner. Individual settings can be edited later by click on the button More…!!! User groups can be used for example in multi-shift operations or different competencies for different servicing. 20 ACANDIA AB, Vintervägen 2B, 13540 TYRESÖ, Tel: +46-8-52 22 40 30, [email protected], www.acandia.se 5.4 Input and Output Setting This chapter contains a detailed description of the inputs and outputs setting of the station through the program SeaConfigurator. 5.4.1 Digital Outputs Individual digital outputs can be set in the Configuration tab of Digital Outputs. Select the output which you want to set in the appropriate row and click on the More ... The window for setting the Digital output is displayed. Names in the STATE message In this part you can choose names of states, which will be displayed in the state message of the station. You can change them by rewriting the text in textbox. State L = state when the contact is opened = regulation / connected device is turned off. State H = state when the contact is connected = regulation / connected device is turned on. Hysteresis = allowed variance of temperatures at which station will not answer. Safety time = minimum duration of the ON / OFF during the regulation. 21 ACANDIA AB, Vintervägen 2B, 13540 TYRESÖ, Tel: +46-8-52 22 40 30, [email protected], www.acandia.se Output settings Use the check boxes to select whether you want the SMS information about the selected output. If yes, tick off the List state L in messages/ List state H in messages, or both. If you tick off Negate, you will do a negation of the states. The state H (ON) - contact is disconnected, state L (OFF) – contact is connected. If you tick off the checkbox Do not use, this output will be prohibited to use. Then this output does not respond to SMS commands (ON / OFF), or button. Regulation If you use the output for regulation, you can set the parameters of regulation in this section. In selection Regulate temperature at choose by selecting from the list, according which temperature input will be the regulation implemented. In the selection Mode, select from the list the mode: heating/cooling. In the selection Required temp. select what temperature is required for heating/cooling. In the selection Hysteresis select tolerates for temperature fluctuation. In the selection Temperature guard select the desired temperature (the temperature below which may not fall, and if so, it starts heating). The regulation to the temperature guard you switch by tick off the check box Enable. I am in the heating mode and I set up the temperature guard to 5 ° C and a hysteresis of 1 ° C. If the temperature falls below 5 ° C, the heating will be swith on and will run as long as the temperature does not rise to 6 ° C. Then the heating will turn off and starts again when the temperature drops below 5 ° C. Damage protection In the selection Damage protection you can set the minimum duration of ON state and OFF state for the output during the control. This will avoid the constant switching on and off state. This setting does not affect ON and OFF commands via SMS, button control, nor switching by alarmed functions. Turn output HIGH on sensor error If you tick off the checkbox Turn output HIGH on sensor error, you ensure that if a sensor is faulty, it means a sensor will not transmit station status information (e.g. the measured temperature), the output will be closed (e.g. turn on an alarm signalization). Set also the delay 22 ACANDIA AB, Vintervägen 2B, 13540 TYRESÖ, Tel: +46-8-52 22 40 30, [email protected], www.acandia.se before recognizing sensor error. It means how long after the sensor does not specify a value, is recognized as a faulty sensor. Pulse/Reset Set only if the output is used for the pulse (e.g. for opening doors) or reset. If you don´t use it, you can leave factory settings. In the selection Duration select the desired duration of the pulse / reset, it means the delay between opening/closing (off/on) contact output. I use this output for opening the gate. I set the length of the pulse duration to 4 seconds. After calling the station phone number, it makes 4 sec. pulse, which can command the doors control mechanism and the gate starts to open. !!! To save the settings, click on Save in the upper right corner. Individual settings can be changed later by click on the More… button for the concrete output!!! 23 ACANDIA AB, Vintervägen 2B, 13540 TYRESÖ, Tel: +46-8-52 22 40 30, [email protected], www.acandia.se 5.4.2 Digital Inputs Individual digital inputs can be set in the Configuration tab of Digital Inputs. Select which input you want to set and click on More… in the appropriate row. You will see the window for setting the Digital input. Names in STATE message In this part you can choose the names of states, which will be displayed in the STATE message of the station. You can change them by rewriting the text in the textbox. State L = the device is off - the contact is open. State H = the device is on - the contact is connected. Input settings By tick off the checkbox, you will choose if you want information about selected input in the STATE message. If yes, tick off the checkbox List state L in messages / List state H in messages, or both. 24 ACANDIA AB, Vintervägen 2B, 13540 TYRESÖ, Tel: +46-8-52 22 40 30, [email protected], www.acandia.se If you tick off Negate, you will do a negation of the states. The state H (ON) - contact is disconnected, state L (OFF) – contact is connected. If you tick off the checkbox Do not use, this output will be prohibited to use. Then this output does not respond to SMS commands (ON / OFF), or button. Change reports In the selection Delay - time to recognize a change set the time interval in which the change will be ignored. After exceeding this time the changes will be recognized. You can set any time interval for the Transition from state L to H and for the Transition from state H to L. For the transition from L to H, as well as the transition from H to L, you can set how the events will be announced, who should obtain information about this event and how the user or station has to respond. The required settings can be done through the Add, Edit and Delete. Click to Add to add new action. Follow the instructions Add new action, see Chapter 5.1.3. A special type of digital input is a power supply. Because GSM RELE 3 has a built-in backup battery, it is possible to learn about the power outage and the station will stay in operation for a time of backup battery lifespan. All settings can be done the same way as any other digital input. They differ only by checkbox Do not send changes during the power outage. If this checkbox is tick off and a power outage occurs, the input does not generate any events. !!!For save the settings, click on the Save button in the upper right corner. Individual settings can be changed later by click on More… button for the concrete input!!! 25 ACANDIA AB, Vintervägen 2B, 13540 TYRESÖ, Tel: +46-8-52 22 40 30, [email protected], www.acandia.se 5.4.3 Temperature Inputs Individual temperature inputs can be set in the Configuration tab of the Temperature Inputs. Select which input you want to set and click on More… in the appropriate row. The window Temperature input configuration is displayed. Names in STATE message In this part you can change the names of individual data, which will be displayed in the sent STATE message. To change this, overwrite the original text in textboxes. Change will be made after click on the Save button. Shorted – temperature input is shorted. Disconnected – no temperature sensor is connected. 26 ACANDIA AB, Vintervägen 2B, 13540 TYRESÖ, Tel: +46-8-52 22 40 30, [email protected], www.acandia.se Input settings If you tick off the checkbox List state in messages, the current state of the temperature input will be written in the STATE message. If you tick off the checkbox Do not use, input will not generate any events and will not presented in the STATE message. Adjustment It may happen that the sensor measures a different temperature value than it is in reality (not calibrated correctly or has a long wire). For the setting use the Adjustment. Here you can set the value which be added to the reported value to match reality. Sensor indicates a temperature of 23 °C, the etalon in the same place indicates the temperature of 22 °C. Set -1 °C (23-1 = 22) in the calibration. Then the sensor will also indicate 22°C. Change reports In this part you can set the required reports of the temperature changes. The change can be reported during the transitions from the set zones. Click on the Add button (for setting the desired transition zone) and you can add a new action. Follow the instructions Add new action, see the Chapter 5.1.3. For each zone transitions can be set the delay. It means the time to recognize the change. Setting you can do in their listboxes Delay for each transition zone. If the temperature exceeds 30 °C, I would like to receive SMS with the text "The temperature rose above 30 degrees." If the temperature drops below 5 °C, I wish output Y3 will be switched on and I will receive SMS "The temperature dropped below 5 degrees”. To the textbox for the transition from the green to the red zone in Change reports I write temperature of 30 °C. After that I click on the Add button, then choose the SMS message, to Text of SMS message I write: „The temperature rose above 30 degrees“. In the List of users, I select the users to whom I wish send the message and click on Save. To The textbox for the transition from the green to the blue zone in Change reports I write the temperature of 5 °C. After that I click on the Add button, then choose the SMS message, to Text of SMS message I write: “The temperature dropped below 5 degrees”. In the List of users, I select the users to whom I wish send the message and click on Save. 27 ACANDIA AB, Vintervägen 2B, 13540 TYRESÖ, Tel: +46-8-52 22 40 30, [email protected], www.acandia.se Click on the Add button and then choose the Command. To the textbox SMS command I will write Y3 ON and click on Save. Now it is needed to set when again the message should be sent. During the day, the temperature fluctuates and it could happen that the message would be sent several times per day. Therefore, I have to set when I want to obtain the message again. For example, when the temperature fluctuates between 22-30 °C, this change is "uninteresting" for me and therefore I don´t need to report it. I want to obtain the message when the temperature is below 22 °C and then when will grow above 30 °C. Similarly during the winter months, I decide that "uninteresting" change is in the range of 5-8 °C. To the textbox for the transition temperature from the red to the green zone I set the temperature of 22 °C, to the textbox for the transition temperature from the blue to the green zone I set the temperature of 8 °C. (If you want to receive a message at the beginning of winter, set up in the box for transition temperature from the blue to the green zone temperature of 20 °C and you get the message when the temperature rises above 20 °C and subsequently drops below 5 °C.) See the settings on following picture. To save the settings click on Save in the upper right corner. 28 ACANDIA AB, Vintervägen 2B, 13540 TYRESÖ, Tel: +46-8-52 22 40 30, [email protected], www.acandia.se !!!For save the settings, click on Save button in the upper right corner. Individual settings can be changed later by click on the More… button for concrete temperature input!!! 5.4.4 Alarm Circuits What are alarm circuits? What are alarm circuits for? The station can be used for creation of alarm circuits. Alarm circuits are circuits, which can be connected by magnetic contacts (doors, windows), motion sensors, etc. used to secure your building. In the Configuration tab go to the Alarm circuits. For a new alarm circuit click on Add… button. The window New alarm circuit is displayed. To the textbox Name fill the name of the alarm circuit. Guarding = alarm is turned on. In the listbox List in state messages, you can select when you can add the state of alarm circuit in the state message. 29 ACANDIA AB, Vintervägen 2B, 13540 TYRESÖ, Tel: +46-8-52 22 40 30, [email protected], www.acandia.se Use the checkboxes to select the input to which is connected the alarm circuit. NO / NC according to graphics choose when alarm starts. If you want to start the alarm when input is activated, select select . If you want to start the alarm starts when input is deactivated, . Com. = common/shared area. Alarm is activated only if are guarded all the circuits that contain a specific input. Activate Guarding by Input = activation of guarding by pressing the button or by switching position to on/off. Tick off the checkbox Enable and select the input, on which is connected button/switch. Select whether it is a button or a switch. Indicate Guarding of the Circuit – guarding (alarm turn on) can be indicated using one output. Tick off the checkbox Enable and select the output to indicate guarding. Indicate Alarm of the Circuit - If you select Enable, choose the appropriate output, which is connected to the alarm indication (e.g. siren). When the alarm starts, the alarm indication is turned on. Actions when the alert starts – here you can set the action, which be executed in case of an alarm indication. For adding a new action click on the Add button. Follow the instructions Add new action, see Chapter 5.1.3. On the right part of a window you can set the time periods, during which the station will ignore the change on inputs (Time for Entry, Time for Leave). It is the time during which the change on inputs does not starts the alert (will not call anywhere, send messages, start alert). Duration of Alert Indication - through this selection you can set for how long the alert indication will be activated. Alert again after – you can set the time between two consecutive action, that are caused by alarm activation (e.g. the time between two consecutive SMS in the event of an alarm, the time between two consecutive alert indications). !!! For save the selected settings, click on Save button in the upper right corner. Individual settings can be changed later by clicking on the More… button for the concrete alarm circuit!! 30 ACANDIA AB, Vintervägen 2B, 13540 TYRESÖ, Tel: +46-8-52 22 40 30, [email protected], www.acandia.se 6. Monitoring On the Monitoring tab, you can monitor the states of inputs and outputs or change them. There are also included all information about the station and the SIM card and battery charge status and battery capacity. How do I know what version of firmware I have? Click the button More... button to find the firmware version number of your station. I want to find out what version of station FW I have. I connect the station via USB cable. Click on the Monitoring tab, then in this tab click on the More ... Current version of station FW is 1.0.16. Monitoring can be done only if the station is connected via USB cable or GPRS. Run the program SeaConfigurator. Connect the station via USB cable to the computer or via GPRS, see Chapter 9. On the Monitoring tab you can test the function of your station and follow changes on inputs and outputs. The change in the Monitoring tab is identical to using SMS command. Click on the Monitoring tab. The values, that are in parentheses, are actual values at the connectors (e.g. (26 ° C)). The values, that are displayed in bold, are values filtered by setting (e.g. Off, On). 31 ACANDIA AB, Vintervägen 2B, 13540 TYRESÖ, Tel: +46-8-52 22 40 30, [email protected], www.acandia.se The current state of the inputs and outputs of the station are displayed. You can change states for the concrete input / output by selecting from the listbox menu. I want to switch on the output Y0. I am connected via GPRS. Click on the Monitoring tab. Click in the listbox and choose Output Y0 option ON. This action will cause switching ON output Y0 (the same can be done by sending SMS: <password> Y0 ON). 7. Station selection On the Station tab, there is a part to login to the server GPRS and Station Manager. 7.1 Station manager Here you can see a list of all stations that have been installed. In the Station Manager tab are displayed basic information about the stations, including the most recent monitoring data and settings. 32 ACANDIA AB, Vintervägen 2B, 13540 TYRESÖ, Tel: +46-8-52 22 40 30, [email protected], www.acandia.se To edit the settings of a station, click on the Change button. Follow the Chapter 5. (Configuration). To delete all the data of station in the computer and also on the server SEA click on the red cross of the selected station. If there is text USB next to the Edit button, it means that the station is currently connected to the computer via USB. 7.2 Add the station Connect the station via USB cable to the computer. Wait for a while. The station is automatically added to the list in Device Manager and automatically loads the settings that are stored in it. If you don´t connect the station via USB, it is possible to add it manually: In Station tab on Device manager, click on the Add button. It is displayed the menu with all the types of stations. Select your type of station; enter its serial number (SN :) into the textbox. Then click on the Select button. At this moment you add a new station. If you have backed up the configuration in a file, you can download it from the file. In Device Manager, click on Add. At the bottom of the window, click on the Load from File. Select a file with a saved configuration and then click on the Open button. Wait for a while. This will load the configuration from a file. 33 ACANDIA AB, Vintervägen 2B, 13540 TYRESÖ, Tel: +46-8-52 22 40 30, [email protected], www.acandia.se 8. Upload new firmware If a new version of FW station is available, from FW version 1.0.14 it is possible to upgrade it via SeaConfigurator. For upload a new firmware you need to have your computer connected to internet. How can I upload FW? We recommend you to backup the station configuration before upgrade FW, see Chapter 5.1.2. Connect the station via a USB cable or via GPRS. On the Settings tab, click on the Service... button. Then click on the Upgrade firmware... Select the latest (or other desired) FW version, choose it and click on Open. It will upload FW of station. Wait for a while. Settings will be uploaded into the station. 9. Configuration server GPRS You can connect the station GSM RELE 3 with SeaConfigurator by GPRS. This chapter contains instructions how to connect and how to do configuration via GPRS. Connection via GPRS is possible for FW station 1.0.12 and higher!!! 9.1 First Login 1. On the Station tab fill your e-mail address into the textbox User Name (e.g. [email protected]). Intoo the textbox Password, enter your chosen password. Remember this password! Later can be determined only after a call to a SEA Ltd. 34 ACANDIA AB, Vintervägen 2B, 13540 TYRESÖ, Tel: +46-8-52 22 40 30, [email protected], www.acandia.se 2. Click on the New User button. This will login to the configuration server GPRS. You receive a login confirmation with text: Logged in User <e-mail> has been logged in. Now you are logged into the configuration server GPRS. Now you need to connect to your station via GPRS. You are logged if your e-mail address is listed in the header of the Login to Configuration server GPRS. If you already have settings saved in your computer (for example, before you performed the settings via USB), you are asked There´s a station in this computer that is not stored at the server. What do you want to do? Click on the Upload to the server. This will upload the station settings to the configuration server GPRS. If you have not yet added the station, click on the Add button on the Station Manager tab. Then follow the instructions, see chapter 7.2. 35 ACANDIA AB, Vintervägen 2B, 13540 TYRESÖ, Tel: +46-8-52 22 40 30, [email protected], www.acandia.se Make sure that you filled the station´s phone number! Without it, it is not possible to connect the station via GPRS! The phone number you can add by writing into the textbox for concrete station. Fill the phone number in an international format e.g. +420 123 456 789. 3. Now if you added the station in your computer, move your mouse on the icon of the lock (it means the station is locked for this user, for unlock it is necessary to register first). Now the information window with a text of registration SMS message is displayed. 4. From your phone number, send an SMS message to the phone number of station in the form <password> REGISTER <code>. The code is in the information window. You will receive an SMS message on your mobile phone. Request received. If you are logged in to the Configuration Server GPRS, log out and wait 1 minute before logging back in. 5. Click on the Logout button. After about 1 minute, click on the Login button. The login confirmation is displayed again. If the registration is OK, the lock icon at the station disappears. The registration SMS message must be sent by each user. In case of changing phone number of station (change SIM cards) you must register again. Each station can be registered by several users. Each user can register several stations. 6. Click on the Change button for the station in Station manager. 36 ACANDIA AB, Vintervägen 2B, 13540 TYRESÖ, Tel: +46-8-52 22 40 30, [email protected], www.acandia.se 7. It is displayed the Settings tab. Click on Connect GPRS, which is located at the top of the window. 8. The information screen about the connection is displayed. Wait for a while. 9. After the connection, it will automatically load the configuration from the station. The information window about loading configuration from the station will be displayed. 10. Now you are connected via GPRS configuration server. If you are connected, you can check on the Station tab, where in the last column at the station will be text GPRS. Where was originally GPRS Connect button will now appear the GPRS Disconnect button. 37 ACANDIA AB, Vintervägen 2B, 13540 TYRESÖ, Tel: +46-8-52 22 40 30, [email protected], www.acandia.se 11. If you are connected, you can make changes in Configuration and Monitoring station via GPRS configuration server. 12. To be disconnected, click on the Disconnect button which is located in the upper right corner of the Configuration tab and Monitoring. 13. For logout, click on the Logout on tab Station. You will be completly logout from the server. 9.2 Repeated Login and Connection to GPRS Server 1. On the Tab Station Manager, fill Username and Password to textbox Login to Configuration server GPRS that you entered when you first logged into the server, see Chapter 9.1. 2. Click on the Login button. You will receive a login confirmation with text: Logged in User<e-mail>has been logged in 3. Click on the Change button for the selected station, the Settings tab will be displayed. 4. Click on the Connect GPRS button, which is located at the top of the window. Now you can do Configuration and Monitoring the station via GPRS configuration server. 5. To disconnect, click on the Disconnect button, which is located in the upper right corner of the Configuration and Monitoring tab. 6. For log out, click on the Logout on the tab Station. You will be completly logout from the server. 38 ACANDIA AB, Vintervägen 2B, 13540 TYRESÖ, Tel: +46-8-52 22 40 30, [email protected], www.acandia.se 9.3 Configuration and Monitoring via GPRS Server All setting changes you can do not only via USB cable, but also via the configuration server GPRS. To connect via GPRS, follow instruction in Chapter 9.1. Loading of any setting changes is similar to connection via USB cable, see Chapter 5. The station Monitoring, the changes of states of individual inputs and outputs are similar as you are connected via USB cable, see Chapter 6. and 7. 10. Upload SeaConfigurator Program SeaConfigurator is still improved. After updates you will obtain new versions of Firmware. How to make an update? You must be connected to internet for checking updates. Click on Check for updates in the left corner. If any update is available, the window Update available is displayed. Click on button Download now. Download of a new version of SeaConfigurator will start. 39 ACANDIA AB, Vintervägen 2B, 13540 TYRESÖ, Tel: +46-8-52 22 40 30, [email protected], www.acandia.se The number of your actual version of program is in the left side beside Check for updates. After downloading the update will be installed. Click on the button Install now. Update installation will start. After update installation, a new version of SeaConfigurator will starts automatically. 40 ACANDIA AB, Vintervägen 2B, 13540 TYRESÖ, Tel: +46-8-52 22 40 30, [email protected], www.acandia.se