Transcript
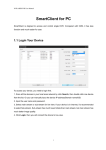
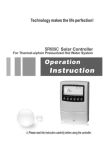
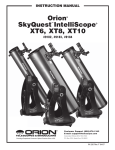
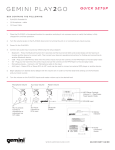
KLARUS Charging Cradle provides a convenient way to store and charge your RS11
flashlight, or to store other KLARUS flashlights. The cradle is fixed onto a wall or flat
surface – in a vehicle for example – and works with the RS11 magnetic charging
cable. You just simply push the RS11 into the cradle and the magnetic connection on
the charging cable automatically self locates onto the charging point on the RS11.
It's ideal for using in a vehicle, at home or in the office. Rapid response
professionals, such as fire officers and law enforcement personnel will find the
charging cradle extremely useful.
Features
• Uses 90% black PU to make it soft, durable and drop/ scratch resistant
• The RS11 magnetic charging cable self-locates to make the connection when you
need to charge your flashlight – making it extremely effective for rapid response
professionals
• Can be installed on any flat surface, using screws, glue or fixing paste
• Uses an international standard, quick to use wire wrapping slot, which make it easy
install and disassemble
Specification
• Material: 90% black PU
• Lifespan: 10,000 times
• Deigned for :RS11 and future rechargeable lights from KLARUS
Also compatible as a holder for the XT11 and XT10
• Application places: Vehicle, home, office, garage, etc
• Working temperature: -20°C ~ 70°C
• Maximum stress:500g
• Color: black
• Dimensions: 138mm (Length) x 38.2mm (Width) x43mm (Thickness)
• Weight: 62.6g (including all the material)
• Included accessories: two screws, two rubber plugs, one double-sided tape, two
screw sleeves
Installation method
Step 1: Drill two holes (5mm diameter and 40mm depth) into the wall, ensuring that
they are vertically aligned and about 12mm apart
Step 2: Insert raw plugs into the holes
Step 3: Using a screw-driver and the screws, fix the cradle into place
2.2. Installation with self-adhesive strip
(Only for the smooth surface)
Peel the paper from the adhesive strip, and
place cradle onto a smooth and clean surface,
such as glass, table, door, refrigerator, and
other surface not suitable to punch.
Remark: The stickiness is much stronger after
sticking on the wall without any load for 24 hours.
For long-term using, the user is suggested to fix
the cradle with screws.
3. Installation with self-adhesive strip and screws
(Recommended way)
This method is a combination of the methods above.
Use the self-adhesive strip and two screw holes to
fix the cradle to the wall.
4. Place the light for charging
Put the RS11 in the cradle. The charging cable
will self-locate and charging will commence.
Charging status indicating light can be seen
through the mirror at the bottom of the
charging cradle.
You can use it as a holder when you don’t need to
charge the light.
.
Due to the magnetic affect, the charging cable will connect to the light’s tail-end
automatically when you insert the light in a particular way.
Installation warnings
1. Installing the charging cord to the slot
1. The self-adhesive fixing method requires a smooth and clean surface and affective
adhesion.
2. You may need to use a higher strength adhesive when reinstalling the cradle to a
surface
30mm
Warranty Service
Step 1: Install the charging
Step 2: Install the charging cable’s
cord to the slot
magnetic connection to the
bottom of the cradle
When install the magnetic connection side of charging cord, it will be better only extend
about 30mm, make the cord same as the button reflector’s center point
2.1. Installation with screws (Recommended way)
KLARUS Charging Cradle User Manual
RC11
12mm
Klarus guarantees the product against defects in material and workmanship.
Defective products can be exchanged for replacement through a local distributor/
dealer within the 15 days of purchase. This warranty does not cover damage caused
by accident, unreasonable use or product alteration. Failure to follow the general
maintenance directions could result in damage to your products that may not be
covered by the Klarus warranty