1
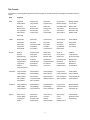
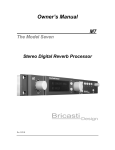
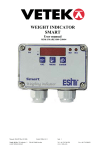
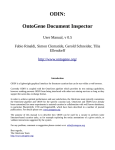
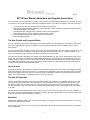
7/23/10
M7 V2 User Manual Addendum and Upgrade Instructions
The V2 release brings new functionality to your M7 reverb processor while maintaining the simplicity of control and use of the
V1 operations. Your new M7 has these new features installed and ready to use. Here is an overview of the new V2 package:
•
•
•
•
•
•
A new “larger than life” V2 reverb algorithm with associated new presets.
New delay and delay modulation parameters that are available in both the original V1 algorithm and presets and the
new V2 based algorithm and presets.
Expanded selection of Early Reverbs, available on both V1 and V2 algorithms.
New presets for both V1 and V2 algorithms, plus Non Linear presets
Enhanced Midi functionality with selective system exclusive dumps.
Mute and Bypass functions
The New Presets and Programs Banks
All of the original V1 presets remain unchanged from the original release. We have added some new presets to these banks
that use the original algorithm and some in addition use the new delay parameters that are available on both V1 and V2
based presets.
For the V2 based presets, we added a second tier of banks. They are labeled Halls 2, Rooms 2, Plates 2, and Spaces 2. All
these presets use the new V2 algorithm, which have all the same types of parameters as in V1, including the delay. If you
want to start with the new stuff, start here by loading a preset from one of these banks.
There is a third algorithm called Non Linear, based on the classic AMS RMX 16. This is a very simple algorithm and only the
Rolloff, Size, Early Select, Early Balance and Early Rolloff parameters are used. Increasing the size will spread the taps out,
making it longer or shorter. You can roll off the high end with the low pass Rolloff parameters, for a darker or brighter sound.
The smaller size settings, like preset 1 and 2, are great for gated drum sounds. Larger settings, like the #4 preset, create a
nice large ambient space for acoustic instruments.
Saving Presets
When saving presets to User Registers or Favorites, V2 has added a new label in the lower section of the display to indicate
which preset bank the original sound came from. For example if you started with a preset from the Plates 2 bank, and saved
that to a user register, there will be a P2 now in the lower section of the display indicating the program started as a Plates 2
preset, an H1 would indicate a V1 Halls preset, R1 is V1 Rooms, and so on.
The New V2 Algorithm
The new V2 algorithm is based on some of the same building blocks of the original V1, so it maintains the same clarity and
sense of space, and natural density, and overall operation. The Early Reverb, with its new selections, and the VLF or very
low frequency reverb, are the same as in the V1. What has changed is the late reverb. It is a very different kind of sound,
with more coloration, being more effect like than natural sounding, but keeping the kind of clear density found in the original
V1 sounds.
The edit parameters and overall operation are the same for the new V2, so there is no need to learn new user paradigms. In
some cases, since the underlying algorithm is different, parameters will have a different affect on the sound than before. Here
are the key parameters that have changed in character.
Modulation
Besides being a different algorithm than the V1 based modulation, it is higher in level and more profound than in V1. The V2
modulation is designed to be noticed.
At low settings, from Low to 3, it is a more of a sine wave like effect, with smooth left to right movement, deep and consistent,
and not randomized.
1
When the modulation parameter is set to higher settings, say 6 to High, it uses a randomized pattern, with the delay taps
moving randomly.
Settings in the mid, (4 or 5), region will blend between the types.
There are many presets made with different settings. Try one of the large spaces from the V2 bank, like the churches that
have a long RT and experiment to hear the affect.
Reverb Rolloff Filter
This filter is gentler than the V1 and allows a different balance of high frequency content to pass. This is one factor that gives
the V2 presets a brighter sound.
Diffusion
High diffusion settings will yield a very colored high frequency characteristic, with a bright sizzle to the highs. For example, a
preset like the Rich Plate in the Plates 2 bank is made to have a bit of exaggerated sizzle.
Use a lower setting of diffusion to get a more clear and open sound.
Density
The V2 late reverb algorithm is of a different construction. It is designed for more flexibility in creating a wide range of reverb
tails. From very fast tails that “pop”, to late blooming tails that build more slowly.
The affect of the Density parameter has changed. In addition to increasing/decreasing echo density, it also changes the rate
of reverb build up over the entire length of the reverb tail.
Higher Density settings will have high values of echo density and very fast build up of the reverb. Low settings will have lower
echo density and slower reverb build up for a late bloom. This is another factor that gives the V2 presets a different character
than the V1.
New settings for both V1 and V2 presets
Early Reverb selections
The V2 uses the same early reverb as the V1, but we have added some larger sized ones to the original 20. The new ones
(20-31) are spread out more, and can be used to achieve a slower early reverb build up. You will find some of the Halls and
Spaces using larger settings for a softer wider and less dense early sound. These are available on all presets, V1 or V2
based and some new V1 based presets use these larger settings as well.
The New Delay Parameters
There are 3 new parameters added to all presets, Delay Time, Delay Level and Delay Modulation.
The delay sound being controlled is the original input signal, delayed, diffused and band limited by the Rolloff setting. This is
injected into the start of the late reverb, (but not the early reverb.) You can control the level, from -20db to -6db and adjust
the delay time, from 100ms to 1sec.
Even though it is controlled as a single delay, it is actually a diffused set of 8 voices spread in time. It will add coloration and
a late swell to the late reverb.
The modulation parameter functions in a similar way as the reverb modulation parameters. Low settings are slower and more
shallow, and the higher settings are more random and deeper. However in this case only the delay is modulated, not there
reverb. There are new presets that have these parameters turned on and since it is available on all presets you can add it to
any one of your favorites.
At first it might seem that this is only useful for big sounds, but try the Marble Room preset in the Rooms 2 bank. This is a
smaller sound with this delay added. Vocal Plate 2 in the V1 plates bank is a new preset that has this delay added at a
higher level to add a bright diffused swell to the later reverb, creating a shimmering effect that is very different than typical
reverb modulation.
2
MIDI Enhancements
This release brings many new Midi features, including program changes and selective system exclusive data dumps.
System Menu MIDI Settings
You will find there are 2 new midi related pages in the system menu. These need to be set correctly for the M7 communicate
with another midi device:
Midi Channel:
This selects the midi channel the M7 will communicate on, 1-15 or Omni.
This is only needed for Program Change Messages. Sysex messages do not use MIDI channel
information.
Midi Bank:
This selects the default bank that MIDI Program Changes will be mapped to. At the factory this is set to
Registers.
This is the default bank used every time the M7 is powered up. The M7 does respond to MIDI Bank
change messages (see below). When a MIDI Bank Change message is received it will change the
current Bank, (but not the default bank specified in the System Page.)
Midi Program Changes
Midi Program Changes can be mapped to the Preset Programs by bank, User Registers, and Favorites. On the Midi Bank
page, select between Preset Banks, User Registers or Favorites.
Mapping to the User Registers
1.
2.
3.
In the system page Midi Bank select, set the M7 to Regs. This will map the program change to the user registers.
The program changes are mapped one to one with the user registers, so you will need to store the presets you want
to use in the correct corresponding user registers. For example Midi program change 0 = M7 Register Bank 0
program 0 in the M7 and so on.
Start the sequencer or application that generates the changes and the M7 will follow and load the programs from the
user registers.
Mapping to the Preset Programs and Banks
1.
In the system page Midi Bank select, set the M7 to one of the listed preset banks, for example Halls 1. This will
map the bank and following program change to the selected M7 Bank, in this case Halls 1. These program changes
are mapped one to one with the programs in the selected M7 bank.
Mapping to the Four Favorites
1.
In the system page Midi Bank select, set the M7 to Favs. This will map the bank and following program changes to
the 4 front panel favorites.
Midi Bank and Program Changes
Press and hold momentarily ENTER and the current Bank and Program will be sent to your receiving device. When this is
sent back to the M7, the saved Bank and Program will be selected. If an attempt is made to select an unused Register or
Favorite, the Bank and Program Change is ignored.
The M7 uses the following values for bank selects:
0
1
2
3
4
5
Halls
Plates
Rooms
Chambers
Ambience
Spaces
6
Halls 2
8
Rooms 2
Plates 2
7
9
Spaces 2
10
NonLin
118 Edit
119 Favorites
120 Registers
3
Sending Midi Sysex data from the M7 to another device.
You can select and send out different aspects of the M7 to be saved with your session for later recall, here is how to do it.
Sysex dumps from the M7 do not include MIDI channel information. If more than one M7 is in use, a MIDI patch bay
is recommended.
Program Dump:
This will send out the current running program, any edited parameters and the state of the user interface. The running
program can be a loaded preset, register or favorite, along with any edits. If a register or favorite is the basis of the running
program, an unedited version of it will be saved as well.
This can be used as a comprehensive session recall when all aspects of the M7 program must be saved. More generally, this
can be used to save User Registers and Favorites.
Press and hold momentarily PROG and the current running program will be sent to your receiving device. The TAP
light LED will flash when the data is transmitted.
System Parameters Dump:
This will send out the complete system set up of the M7, and is useful for resetting the M7 to a desired I/O configuration for
your session.
Press and momentarily hold SYSTEM and the system data will be sent to your receiving device. The TAP light LED
will flash when the data is transmitted.
Edit Buffer Dump:
This will send out the current state of all the edit parameters of the M7, and will allow for snapshot automation of any
parameter changes in the M7.
Press and momentarily hold EDIT and the system data will be sent to your receiving device. The TAP light LED will
flash when the data is transmitted.
Receiving Midi Data from an external device
When the M7 receives the specific data packet, regardless of the state the M7 is in, it will set itself to that saved state. This
will allow you to recall session data or automate the M7 using stored Program or Edit Data files from your midi sequencing
device.
Receiving Program Data:
When the Program Data file is sent back to the M7, it will load the program, edited parameters and the state of the
user interface.
If a User Register or Favorite was the basis of the stored program, the User Register or Favorite will be restored as
well. If an attempt is made to restore a User Register that is in a write protected User Register Bank, the
entire Program Data file is ignored.
The Tap LED will flash when a valid data pack is received. When the Tap LED lights, you can be assured that the
data has been restored as requested.
Receiving System Data:
When the System Data file is sent back to the M7, it will set the system parameter settings in the M7 to the saved
data. The MIDI address is not overwritten.
The Tap LED will flash when a valid data pack is received. When the Tap LED lights, you can be assured that the
data has been restored as requested.
4
Receiving Edit Buffer Data:
When the Edit Data file is sent back to the M7, it will create a new preset bank called Edit. This bank consists of a
single preset that contains all the saved parameter settings.
This preset bank can be used just like any factory preset bank. It can be overwritten by a subsequent Edit Data
file, and it is erased when the M7 is powered off.
The Tap LED will flash when a valid data pack is received. When the Tap LED lights, you can be assured that the
data has been restored as requested.
Copying and Transferring Settings and User Registers from one M7 to Another:
With two M7s connected with Midi send and receive cables, you can transfer System settings, User Registers, Favorites, and
Edit buffer data from one M7 to another. This works just like the above examples only now the receiving M7 will immediately
get the new settings and set itself accordingly.
This can be used to quickly copy User Registers between two M7s. Use Program Data to move User Registers to the same
location in the second M7. Use Edit Data to first move a User Register into the Edit preset of the second M7, then store the
Edit preset to any location in the second M7 if registers are to be moved to different locations.
Mute and Bypass Functions
The tap key will now function as a mute or bypass. Pressing the tap key quickly will set the M7 to mute and mute all outputs.
This kills both the dry and wet signal paths. A long press on the tap key will set the M7 to bypass on all outputs. This mutes
the reverberant or processed signal and passes through the dry unprocessed signal. The Tap LED will illuminate when the
M7 is in mute or bypass mode.
5
The Presets
The revised V1 reverb algorithm preset list with all the original V1 release presets and including the new additions for this
release:
Bank
Programs
Halls
Large Hall
Medium Hall
Small Hall
Large & Near
Small & Near
Large & Dark
Large & Deep
Medium & Deep
Concert Hall
Gold Hall
Clear Hall
Brass Hall
Amsterdam Hall
Berliner Hall
Boston Hall A
Boston Hall B
Chicago Hall
Vienna Hall
Worcester Hall
The ArchDuke
Sandors Hall
Troy Hall
Saint Sylvan
Mechanics Hall
Saint Gerold
Pepes Hall A
Pepes Hall B
Refect Hall A
Reflect Hall B
Bright Plate
Dark Plate
London Plate
Snare Plate A
Snare Plate B
Vocal Plate
Old Plate
Rich Plate
Gold Plate
Dense Plate
Silver Plate
Percussion Plate
Echo Plate
CD Plate A
CD Plate B
Large Plate
Sun Plate B
Small Plate
Sun Plate C
Fat Plate
Vocal Plate B
Crystal Plate
Repro Plate
Sun Plate A
Studio A
Studio B Close
Studio B far
Studio C
Studio D
Studio E
Deep Stone
Music Room
Heavy Room
Large Wooden
Small Wooden
Large Tiled
Medium Tiled
Small Tiled
Drum & Chamber
Medium & Near
Piano Hall
Plates
Rooms
Chambers
Ambience
Spaces
Diagnose Room
Small Vox
Glass Room
Percussion Rm
Marble Foyer
Large Q Room
Small Q Room
Large Red Room
Red Room
Blue Room
Large Room
Small Room
Front Room
Center Room
Back Room
Studio K
Long Wood Room
Waits Room
Corn Room
Oakland Room
SF Perf Room
Large Chamber
Med Chamber
Small Chamber
Large & Dark
Small & Dark
Large & Bright
Small & Bright
Kick Chamber
Smare Chamber
Vocal Chamber
A&M Chamber
CD Chamber
Deep Chamber
Amb Chamber A
Amb Chamber B
Old Chamber
Sunset Chamber
A&M Chamber B
Stone Chamber
Tiled Chamber
Fat Chamber
Echo Chamber
Large Ambience
Med Ambience
Small Ambience
Large & Dark
Medium & Dark
Small & Dark
Large & Bright
Med & Bright
Small & Bright
Deep Ambience
Long Ambience
Clear Ambience
Heavy Ambience
Bass XXL
Percussion Air
North Church
East Church
South Church
West Church
Cinema Room
Scoring Stage
Bath House
Car Park
Arena
Redwood Forest
Tanglewood
Academy Yard
Hillside
Cavern
Stone Quarry
Europa
Gated Space
Reflect Chapel
Reflect Church
6
The New V2 reverb algorithm preset listing:
Bank
Halls 2
Plates 2
Rooms 2
Spaces 2
Non
Linear
Programs
Large Hall
Large & Stage
Medium Hall
Medium & Stage
Small Hall
Small & Stage
Large Church
Small Church
Jazz Hall
West Hall
Concert A
Concert B
Live Hall
Koncert Piano
Berliner Hall
Plate A
Small Plate
Snare Plate
Dark Plate
Rich Plate A
Rich Plate B
Thin Plate
Vocal Plate A
Vocal Plate B
Drum Plate
Large Plate
Fat Plate
Alpha Plate
Vocal Shimmer
Music Club
Large Room
Med Room
Small Room
Lg Wood Room
Sm Wood Room
Large Chamber
Small Chamber
Bright Chamber
Tiled Room
Fat Chamber
Studio 1
Studio 2
Studio 3
Studio 4
Guitar Room
Marble Room
Deep Chamber
Dark Chamber
Vocal Chamber
Wide Room
Lush Room
Open Space
Med Space
Small Space
VOX Ambience
Big Bottom
Cathedral
Grand Stage
Lush Church
Grand Church
Concert Wave
Oak Ballroom
Long Vox Space
Dark Warm Room
Live Room
Shimmering Sky
Ice House
Ice Beads
Music Forest
Waving Bloom
Nonlin A
Nonlin B
Nonlin C
Nonlin D
7
M7 Software Upgrade Installation Instructions
If you received this new V2 as an upgrade for your M7, installation is quite simple and only requires a few simple tools to
install.
What you will need:
•
•
•
#1 Phillips head screw driver
Optional Ground Strap ( available at most any electronics supply like Radio Shack, RS etc)
PLCC 32 memory removal tool, as pictured below (available at most any electronics supply like Radio Shack, RS
etc) or (as provided with the upgrade kit), a small hex key pictured below.
or
or
Performing the upgrade:
1. Power on the M7 and press program and load a preset from one of the standard presets, and leave the unit in program
not edit. There are some new edit parameters and this will correct for any display errors that can occur if the unit is left in
EDIT. If you forget to do this just load a new preset after installing the new software before editing.
2. Power off, and disconnect all audio and AC mains! As you will be opening the M7 you must remove the AC power to
protect against accidental shock and or component damage.
3. Remove the top cover by removing the fasteners with the #1 Phillips screw driver. There are 12 screws, 3 on the top
front, 2 on the right side, 3 on the left side, and 4 across the back side.
4. Ground yourself! You must take care, when removing / installing the flash parts of static discharge.
If you have a ground strap attach it to your wrist and to the M7 chassis. If you do not have one, be sure to have one
hand on the chassis, while handling the parts, so that you are grounded. This will prevent static discharge of the parts.
5. Remove the existing parts using the removal tool. There are 2 PLCC-32 Flash Memory chips installed on the main
digital PC board. They are labeled U120 and U125 as pictured below. The tool will grip under the opposite corners of
the chip, and then carefully pull them out; using a slight rocking motion will help.
Note: If you can not find a tool as shown above, or one is not provided in your upgrade kit, a very small screw driver or
pointed object can be used to pry them out. Care must be taken when using this technique and you must carefully pry up
under each corner, a bit at a time, moving from one side to the other until it comes free, and then remove it.
8
6. Install the new software. Ground yourself by touching/holding the M7 chassis during this operation as you do not want to
damage the parts by static discharge!
In the package there are two new PLCC-32 Flash Memory chips. They are labeled U120 and U125 and will go in the
empty sockets on the board, and note on the PC board you will see U120 and U125 printed on the board. Remove
them from the package and press them into the correct locations on the PC board, using even pressure on the chip.
They can only go in one way, and they should snap into position and be held firmly in place.
7. Double check things: Take a close look and be sure that the parts are in the correct location, and the U120, U125 parts
are in the U120, U125 sockets on the board.
8. Power on test. Before attaching the top cover you should carefully test the M7 and see that it does power up correctly,
so in the event there is a problem you don’t have to remove the top again.
•
Check to be sure the front panel power switch is in the OFF position.
•
Connect the AC mains to the AC inlet.
•
Switch on the power from the front panel keeping clear of any AC power inside the unit.
•
You will hear the analog relays clicking on, note the rows of LEDs on the main bd by each DSP chip will
sequence as they boot, and when complete, the front panel display will settle on the last program/preset or
setting the M7 was left in.
•
Turn the Adjust Knob on the front panel to test that it is working and the display changes and shows a different
program, and pressing enter will load it.
9. If all boots up correctly and you have verified basic operation, replace the top cover and test the audio.
You have now successfully upgraded the M7.
What if it does not boot after installing the new software? It is quite rare to have anything go wrong, and the only problems
could be is from a bit of dust on one of the contacts, or putting the chips in the wrong socket. If they are put in wrong, it will
not harm the parts, just remove and reinsert them to the correct positions. Providing you ground yourself, you should have
no problems and cause no damage to the parts or the M7.
Here are a few things to try:
•
Check to be sure the parts are installed correctly; this is the most common mistake.
•
Remove them, inspect the socket and part for any dust or corrosion, bent pins, and clean with a swab and
alcohol and re-install as they may have some dirt on one of the contacts.
•
Re-install the old version. If this works, then you may have damaged, or the parts may have been damaged by
static in transit. If this is the case, they will need to be replaced or re-programmed.
Enjoy the new sounds of the M7!
Bricasti Design
9