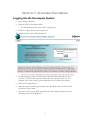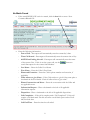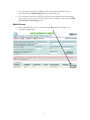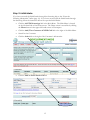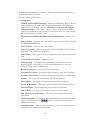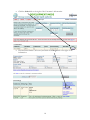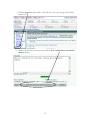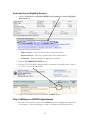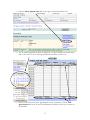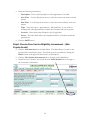
1
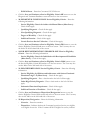
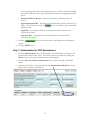
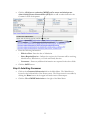
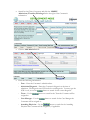
Monroe Encompass User Manual
Access Staff
Created By: PCE Systems
28530 Orchard Lake Road, Suite 101
Farmington Hills, MI 48334
248.932.4888
Table of Contents
Section 1: Accessing Encompass.......................................................................................................3
Logging Into the Encompass System.........................................................................................3
Logging Out of the Encompass System ....................................................................................4
Section 2: Navigation Buttons............................................................................................................6
Navigation Buttons .......................................................................................................................6
Section 3: Intake Process ....................................................................................................................7
Step 1: Phone Call or Walk In ..............................................................................................7
No Match Found .............................................................................................................8
Match Found....................................................................................................................9
Step 2: Screening...................................................................................................................10
Step 3: Initial Intake .............................................................................................................13
Step 4: Authorization for Intake Services .........................................................................17
Authorize Service Eligibility Services .........................................................................20
Step 5: Making an ACCESS Appointment .......................................................................20
Step6: Face-to-Face Service Eligibility Assessment – (Bio-Psycho Social)..................22
Step 7: Authorization for PCP Development ..................................................................32
Step 8: Admitting Consumer ..............................................................................................33
Step 9: Finalizing and Signing Intake Assessment (Bio-Psycho-Social) .......................35
Section 4: Keyboard Shortcuts.........................................................................................................38
SECTION 1: ACCESSING ENCOMPASS
Logging Into the Encompass System
•
Open Internet Explorer
•
Enter the URL in the address field.
o
•
For the Production Site: www.ewcho/org/monroe
Click Go or press Enter on your keyboard.
The following login screen will be displayed:
•
On the login page, enter your User Name and Password (passwords are case
sensitive). The User ID is the first initial and the last name of the User. For
example, if the User’s name is James Smith then the User ID will be jsmith.
•
Click on the Login Button.
•
After three unsuccessful login attempts in the Production Site, the User will be
locked out of the system.
•
Once the User has successfully entered his/her User Name and password, the
following screen will be displayed.
3
•
Read the above Attention Statement. If the User agrees to the terms outlined in the
statement, click the I have read and accept these terms. Take me to the
Encompass system button. If the User DOES NOT agree to the terms outlined in
the statement, click I do not accept these terms. Please log me out button. The
User will be logged out of the Encompass system.
Logging Out of the Encompass System
When the User is finished using the Encompass system he/she must log of out of the
system. Logging out protects the data in the database from unauthorized Users.
•
Click the Logout button located in the upper left hand corner of the database
screen.
•
The following screen will appear, informing the User that he/she has logged out of
the Encompass system.
4
•
To quickly access the log in screen from this page, click the here link.
5
SECTION 2: NAVIGATION BUTTONS
Navigation Buttons
When you are in the Encompass System, DO NOT use your browser’s back or forward
buttons. Only click on the buttons and links on the actual System Screens, that is, those
below the red line and above the footer that contains the current date, time and the User’s
Name.
Click on the Back Button to go to the previous page. Do not use your
Browser’s Back Button.
Click on the Logout Button to logout of the system.
From any section on the website, the Home Button will take you to the
Home Screen.
Click on the Help Button to access the Lenawee Encompass User Manuals.
This Button will blink when you have messages waiting. Click on the Button
to retrieve your messages. A new window will open to display the message.
6
SECTION 3: INTAKE PROCESS
This User Manual is specifically designed to walk ACCESS Staff and Intake Staff through
the Encompass System as it pertains to Screenings, Intake Assessments, Authorizations, and
Service Activity Logs. Other options in the database will be covered in the Clinician User
Manual. The following instructions assume the User is logged into the Monroe Encompass
System.
Step 1: Phone Call or Walk In
•
Click the ACCESS Screenings link in the Main Menu. The Main Menu is located
on the left-hand side of the Home screen. The Home screen is accessible by clicking
the Home button in the upper left-hand corner of the Encompass System.
•
Click the Add/View Consumer ACCESS Calls link to the right of the Main Menu.
•
Enter the Caller’s Last Name and First Name. If the Caller is willing to give a birth
date and/or social security number be sure to include this information in your search
as well. This will help to ensure the Caller is not already in the Encompass system.
7
No Match Found
•
If the search DOES NOT result in a match, click the here link to enter a NonConsumer Related Call.
•
Enter the following information:
o
Date of Call – Encompass will automatically enter the current day’s date.
o
Time Call Started – Encompass will automatically enter the current time of day.
o
ACCESS staff taking this call – Encompass will automatically enter the name
of the current User. If this is not the correct call, use the
button to
search Encompass for the correct Staff Member.
o
Last Name – Enter the Caller’s Last Name
o
First Name – Enter the Caller’s First Name
o
Phone and Extension – Enter the Caller’s phone number and extension, if
applicable.
o
Caller refuses to give Name – If the Caller refuses to give his/her name place a
checkmark in the box labeled “Check if caller refuses to give name”
o
Phone Conversation and Notes – Enter the conversation with the Caller and
any applicable notes.
o
Information Request – Place a checkmark to the left of all applicable
information requests.
o
Disposition – Place a checkmark to the left of all applicable dispositions.
o
Call Completion – If the call is complete mark “Call Completed”. If this call
requires a call-back mark “Put this record in our call-back queue and we’ll call
him/her back later.
o
Call End Time – Enter the time the call ended.
8
•
If it is determined that this call WILL NOT result in Mental Health Services
screening click the SAVE and Exit button and end the call.
•
If it is determine that this call WILL result in a Mental Health Services screening
place a checkmark in the box labeled “Add Client to database” and click the SAVE
and Continue to Screening button.
Match Found
•
If the search DOES result in a match click the Select link to the right of the
Consumer’s information.
9
•
Click the Add a Screening Call link.
Step 2: Screening
Depending on whether the Caller was found in the system will determine how the User
reaches this step. The same information will be entered into the Screening page regardless
of how the User got to the screening. For further information regarding accessing the
Screening application, please see the instructions in Step1 – Phone Call or Walk-In.
•
Enter the following information:
o
Caller Last Name – Encompass will enter the Caller’s Last Name if this
screening resulted from a Non-Consumer call. Encompass will enter the
Consumer’s Last Name if this screening is a result of a call from an existing
Consumer.
o
Caller First Name – Encompass will enter the Caller’s First Name if this
screening resulted from a Non-Consumer call. Encompass will enter the
Consumer’s First Name if this screening is a result of a call from an existing
Consumer.
o
Caller Phone Number and Extension – Encompass will enter the Caller’s
phone number if this screening resulted from a Non-Consumer call. Encompass
will enter the Consumer’s phone number if this screening is a result of a call
from an existing Consumer.
o
If Consumer Does Not Exist in Encompass – If the Consumer does not
already exist in the Encompass system place a checkmark in the box labeled
“Check here, if the Consumer entered below does not currently exist in the
database.
10
o
Consumer Last Name – Encompass will automatically enter the Consumer’s
Last Name or the Caller’s Last Name.
o
Consumer First Name – Encompass will automatically enter the Consumer’s
First Name or the Caller’s First Name.
o
Gender – Indicate male or female. Encompass will automatically enter this
information if known.
o
Phone – Encompass will automatically enter the Consumer’s phone or the
Caller’s phone.
o
Address – Enter the Consumer’s address including City and State. Encompass
will automatically enter this information if known. Verify the information if
automatically entered by Encompass.
o
County – Use the drop down menu to enter the County. Encompass will
automatically enter this information if known. Verify the information if
automatically enter by Encompass.
o
Recipient ID # - Use the
button to search for the Consumer’s
Medicaid Recipient ID #. Enter the Consumer’s Social Security Number, Last
Name, and Birth Date and click the SEARCH button. If a match is found click
the Select link to the right of the information. Encompass will automatically
enter this information if known.
o
Social Security Number – Enter the Consumer’s Social Security Number.
Encompass will automatically enter this information if known.
o
Birth Date – Enter the Consumer’s birth date. Encompass will automatically
enter this information if known.
o
Veteran – Indicate yes or no.
o
Has Veteran Benefits – Indicate yes or no.
o
SSN Verified – Place a checkmark in the box labeled “SSN Verified” once the
SSN has been verified.
o
Birth Date Verified – Place a checkmark in the box labeled “Birth Date
Verified” once the birth date has been verified.
o
Address Verified – Place a checkmark in the box labeled “Address Verified”
once the address has been verified.
o
Insurance Information – Place a checkmark to the right of all applicable
insurance information. If the User checks “Commercial Insurance” or “Other
Payment Source” enter the specific information in the applicable text field.
o
Caller’s Relationship to Consumer – Indicate the Caller’s relationship to the
Consumer.
o
Referral Source – Use the drop down menu to select the appropriate referral
source, if applicable. If “Other” is selected specify the source in the available
field.
o
Consumer Population – Indicate Adult or Child.
11
o
Emergency Contact – Enter the Primary and Secondary Emergency Contact
including name, contact numbers (home, work, cell, pager) and relationship to
Consumer.
o
Phone Conversation and Notes – If this screening is a result of a nonconsumer call that narrative entered will carry over. Enter the conversation or
additional notes.
o
Information Request – If this screening is a result of a non-consumer call the
checkmarks will carry over. Place a checkmark to the left of all information
requests.
o
Disposition – Place a checkmark to the left to all applicable dispositions.
o
Services Needed – Place a checkmark to the left of all applicable services.
o
ACCESS Staff taking this call – Encompass will automatically enter the name
of the current User. If this is incorrect click the
button to search
Encompass for the correct Staff Member.
o
Time Call Started – Encompass will automatically enter the time the call began
o
Time Call Ended – Enter the time the call ended.
o
Call Completion – If the call is complete mark “Call Completed”. If this call
requires a call-back mark “Put this record in our call-back queue and we’ll call
him/her back later.
•
If after the Screening it is determined the Caller/Consumer IS NOT eligible for
services, click the SAVE button.
•
If after the Screening it is determined the Caller/Consumer IS eligible for a face-toface Intake Assessment (Bio-Psycho-Social Assessment), click the SAVE and
Continue to Initial Intake button. Click the Add an Initial Intake Call link.
12
Step 3: Initial Intake
If you have accessed the Initial Intake through the Screening skip to the “Enter the
following information” bullet (page 14). If you have not accessed the Initial Intake through
the Screening follow the instruction below the open the Initial Intake.
•
Click the ACCESS Screenings link in the Main Menu. The Main Menu is located
on the left-hand side of the Home screen. The Home screen is accessible by clicking
the Home button in the upper left-hand corner of Encompass.
•
Click the Add/View Consumer ACCESS Calls link to the right of the Main Menu.
•
Search for the Consumer.
•
Click the Select link to the right of the Consumer’s information.
•
Click the Add an Initial Intake Call link
13
•
The Initial Intake is split into six sections. The User may use the index located on
the left-hand side of the screen.
•
Enter the following information:
•
1 - Demographic
o
CMHSP Staff Standard Statement – Discuss Confidentiality, Right to Second
Opinion Request, HIV Risks/STD/Pregnancy Information, and Recipient
Rights with the Consumer. Click the Click here to view the Caller’s Right
Telephone Script to view a script. Once you have reviewed the Consumer’s
rights place checkmark in the box labeled “Check here if the above information
has been discussed/provided to caller”.
o
Permission to Call Back/Send Reminder of Appointment – Indicate yes or
no.
o
Date of Intake – Enter the date of the Intake, to use the current day’s date click
the Use Current Date link.
o
Time of Intake – Enter the time of the Intake.
o
Caller is Consumer – Place a checkmark in the box labeled “Check if Caller is
Consumer” if the Caller is the Consumer.
o
Caller Name – If the Caller is not the Consumer enter the Caller’s name in this
field.
o
Is this Intake face-to-face – Indicate yes or no.
o
Call Regarding – Encompass will automatically enter the narrative of the
Screening phone conversation, you may edit the information as necessary
including adding additional information.
o
Reason for Request – Enter the reason for the request.
o
Consumer Last Name – Encompass will automatically enter this information.
o
Consumer First Name – Encompass will automatically enter this information.
o
Address – Encompass will automatically enter this information.
o
Home Phone – Encompass will automatically enter this information.
o
County of Residence – Encompass will automatically enter this information.
o
Alternate Phone – Enter an alternate phone number, if applicable.
o
Date of Birth – Encompass will automatically enter this information.
o
SSN (Social Security Number) – Encompass will automatically enter this
information.
o
Medicaid Identifier – Encompass will automatically enter this information, if
known. If unknown click the
button to search for the Consumer’s
Medicaid information.
o
AKA Information – Enter any “also known as” or other information that may
be helpful when searching for a Consumer.
14
o
Gender – Indicate Male or Female. Encompass will automatically enter this
information if known.
o
Marital Status – Select the correct Marital Status. Encompass will automatically
enter this information if known.
o
Race – Select the correct race, or “refused” if the Consumer does not disclose
the information. Encompass will automatically enter this information if known.
o
Ethnicity – Select the correct Ethnicity. Encompass will automatically enter the
information if known.
o
Primary Language Spoken – Select the Consumer’s primary spoken language.
Encompass will automatically enter this information if known.
o
Religion – Select the Consumer’s religion, if applicable. Encompass will
automatically enter this information if known.
o
Primary and Secondary Emergency Contact – Enter the name, home phone,
work phone, cell phone, pager and relationship to Consumer for both types of
Contacts. Encompass will automatically enter this information if known.
o
Referral Source – Select the referral source, if applicable. Encompass will
automatically enter this information if known.
o
Additional Information – Enter any other applicable information regarding
demographics, and referral source.
•
Click the Save and Continue to Medical Information to save the Demographics
and continue to Medical Information. You may also click on the Medical
Information link in the Index.
•
2 – Medical Information
o
Consumer has Primary Physician – Indicate yes or no.
o
If yes, Physician Name – If the Consumer has a Primary Physician enter the
Physician’s Name.
o
Physician Phone – Enter the Primary Physician’s phone number.
o
Last Seen – Enter the Month and Year the Consumer last saw his/her Primary
Physician.
o
Are you Pregnant – Indicate yes or no.
o
If Yes, was interim service offered? – Indicate yes or no.
o
If Yes, explain – Enter an explanation regarding the interim service offered.
o
Current Medical Problems – Enter a narrative regarding the Consumer’s
medical problems.
o
CMHSP Prescribed Medications – Encompass will automatically enter this
information if known.
o
Other Medications – Enter any other medications the Consumer is currently
taking; including prescriptions form Doctors outside of CMHSP, vitamins and
over the counter medications.
15
o
HELPS Brain Injury Screening Tool – Ask all of the questions in the Brain
Injury Screening Tool and enter the Consumer’s answers in the applicable fields.
•
Click the Save and Continue to Financial Information button to save the Medical
Information and continue to Financial Information. You may also click the
Financial Information link in the Index.
•
3 – Financial Information
o
Recipient ID # - Encompass will automatically enter this information if known.
If unknown click the
button to search for the Consumer’s Medicaid ID,
if applicable.
o
MI Child ID # - Encompass will automatically enter this information if known.
If unknown click the
button to search for the Consumer’s MI Child ID,
if applicable.
•
Click the Save and Continue to Guardian/Parent button to save the Financial
Information. You may also click the Financial Information link in the Index.
•
4 – Guardian/Parent
o
Guardian/Custody Status: Answer the following information for Guardian,
Custody, Payee, and Foster Parent.
o
o
o
o
o
Issue – Indicate yes or no
Explanation – If there is an issue enter an explanation
Contact Name – Enter a Contact Name
Phone – Enter a Phone number
Family Information: Enter the following information for each child. If the
Consumer has no children place a checkmark in the box labeled “Consumer has
no children”.
Child’s Name – Enter the Child’s Name, first name and last initial only.
Age – Enter the age of the Child.
Child’s Gender – Indicate Male or Female.
Child lives with – Enter whom the Child lives with, enter names and the
relationship to the child.
o Biological Child – Indicate whether this is the Consumer’s biological child.
o Biological Parent – Enter the Name of the biological parent, first name and
last initial only.
o
o
o
o
o
Additional Family Information – Enter any other applicable information.
•
Click the Save and Continue to Residential, Education & Employment button
to save the Guardian/Parent information and continue to Residential, Education and
Employment. You may also click the Residential, Education & Employment in
the Index.
•
5 – Residential, Education & Employment
16
o
Residential Living Arrangement – Select the appropriate description of the
Consumer’s living arrangement.
o
Highest Level Attended – Select the highest level of education the Consumer
received.
o
School Name and Location – Enter the name and location of the last school
attended.
o
Number of Years of Education – Enter the number of years the Consumer
has, i.e. primary, secondary and four years of college will equal 16.
o
Currently in Training/Education – Indicate yes or no. If yes select the
appropriate type of training or education.
o
Employment Status – Select the appropriate description of the Consumer’s
employment status.
•
Click the Save and Continue to Legal button to save the residential, education and
employment information and continue to the Legal section. You may also click the
Legal link in the Index.
•
6 – Legal
•
o
Legal Status – Select the appropriate description of the Consumer’s legal status.
o
Type of Involvement – Describe the type of involvement, PO, court date and
offense, if applicable.
o
Drug court Client – Indicate yes or no.
o
Arrest History – Enter the number of total arrests, arrest for possession/sales
and arrests for DUI/DWI in the past 6 months and 5 years, if applicable.
o
Narrative – Enter the Intake Narrative.
Click the Save and Continue to Authorize Services button to authorize the
Consumer to receive a face-to-face Intake.
Step 4: Authorization for Intake Services
In order to authorize the Consumer to receive a Service Eligibility Assessment, you must
access the Authorization screen through the Initial Intake Call. If you saved the Intake Call
screen before authorizing services DON”T PANIC, continue to read for instructions. If
you have accessed the Authorization screen through the Initial Intake Call screen, skip to
“Authorize Service Eligibility Assessment” on page 20.
•
Click the ACCESS Screenings link in the Main Menu. The Main Menu is located
on the left-hand side of the Home screen. The Home screen is accessible by clicking
the Home button in the upper left-hand corner of Encompass.
•
Click the Add/View Consumer ACCESS Calls link to the right of the Main Menu.
•
Search for the Consumer.
17
•
Click the Select link to the right of the Consumer’s information.
•
Find the Initial Intake Call record, and click the Change link to the right of the
information.
18
•
Click the Legal link in the Index. This will take you to the last page of the Initial
Intake Call.
•
Scroll to the bottom of the screen and click the Save and Continue to Authorize
Services button.
19
Authorize Service Eligibility Services
• Click the Click here to authorize CMHSP staff to perform a Service Eligibility
Assessment link.
•
Enter the following information:
o
Effective Date – Enter the effective date of the authorization
o
Expiration Date – Enter the expiration date of the authorization.
o
Comments – Enter any additional, applicable comments.
•
Click the AUTHORIZE UNITS button
•
Find the CPT Code H0031 (Mental Health Assessment, by non-Physician). Enter a
“1” in the “Units Authorized” field.
•
Scroll to the bottom of the screen and click the SAVE button.
Step 5: Making an ACCESS Appointment
•
From the Authorization screen, click the Back button in the upper left-hand corner
of Encompass. This should bring you back to the Intake and Screening call list.
20
•
Click the Make Appointment link to the right of the Initial Intake Call.
•
The ACCESS Appointment Book is displayed. Use the Calendar on the left-hand
side of the screen to move through the Months and Days of the Year.
•
Once you have found an open appointment for the Consumer, click the Add
Appointment link in the correct Staff Member’s schedule at the top or bottom of
the schedule.
21
•
•
Enter the following information:
o
Description – Enter a brief description of the appointment, if needed.
o
Start Time – Use the drop down menu to select the correct start time, hour and
minute.
o
End Time – Use the drop down menu to select the correct end time, hour and
minute.
o
Type – Leave the type as “Appointment”, “Blocked Time” is only used for
meetings and other appointments at which the Consumer will not be present.
o
Location – Select from either Hospital or Jail, if applicable.
o
Status – The Status field will not be completed until the Consumer attends the
appointment.
Click the SAVE button.
Step6: Face-to-Face Service Eligibility Assessment – (BioPsycho Social)
•
Click the Assessments link in the Main Menu. The Main Menu is located on the
left-hand side of the Home screen. The Home screen is accessible by clicking the
Home button in the upper left-hand corner of Encompass.
•
Click the View Intake/Assessments link to the right of the Main Menu.
•
Search for the Consumer, once found click the Initial Intakes link to the right of
the Consumer’s information.
22
•
Click the Add Initial Intake link
•
Enter the following information:
•
1 – Demographic
o
Date of Intake – Enter the date of the Intake. Click the Use Current Date link
to automatically enter the current day’s date.
o
Time of Intake – Enter the time of the Intake.
o
Encompass will automatically enter the remaining Demographic information
based on the Consumer’s Initial Intake Call record.
•
Click the
•
Click the Save and Continue to Medical Information button to save
Demographics and continue to Medical Information. You may also use the Index to
navigate the Intake Assessment.
•
2 – Medical Information
o
button to run spell check on the Demographics section.
Encompass will automatically enter the Medical Information data based on the
Consumer’s Initial Intake Call record.
•
Click the
section.
•
Click the Save and Continue to Financial Information button to save Medical
Information and continue to Financial Information. You may also use the Index to
navigate the Intake Assessment.
•
3 – Financial Information
o
button to run spell check on the Medical Information
Encompass will automatically enter the Financial Information date based on the
Consumer’s Initial Intake Call record.
•
Click the Save and Continue to Guardian/Parent button to save the Financial
Information and continue to Guardian/Parent. You may also use the Index to
navigate the Intake Assessment.
•
4 – Guardian/Parent
23
o
Guardian/Custody Status: Answer the following information for Guardian,
Custody, Payee, and Foster Parent.
o
o
o
o
o
Issue – Indicate yes or no
Explanation – If there is an issue enter an explanation
Contact Name – Enter a Contact Name
Phone – Enter a Phone number
Family Information: Enter the following information for each child. If the
Consumer has no children place a checkmark in the box labeled “Consumer has
no children”.
Child’s Name – Enter the Child’s Name, first name and last initial only.
Age – Enter the age of the Child.
Child’s Gender – Indicate Male or Female.
Child lives with – Enter whom the Child lives with, enter names and the
relationship to the child.
o Biological Child – Indicate whether this is the Consumer’s biological child.
o Biological Parent – Enter the Name of the biological parent, first name and
last initial only.
o
o
o
o
o
Additional Family Information – Enter any other applicable information.
•
Click the
•
Click the Save and Continue to Residential, Education & Employment button
to save the Guardian/Parent information and continue to Residential, Education and
Employment. You may also use the Index to navigate the Intake Assessment.
•
5 – Residential, Education & Employment
•
button to run spell check on the Guardian/Parent section.
o
Residential Living Arrangement – Select the appropriate description of the
Consumer’s living arrangement.
o
Highest Level Attended – Select the highest level of education the Consumer
received.
o
School Name and Location – Enter the name and location of the last school
attended.
o
Number of Years of Education – Enter the number of years the Consumer
has, i.e. primary, secondary and four years of college will equal 16.
o
Currently in Training/Education – Indicate yes or no. If yes select the
appropriate type of training or education.
o
Employment Status – Select the appropriate description of the Consumer’s
employment status.
Click the
Employment section.
button to run spell check on the Residential, Education &
24
•
Click the Save and Continue to Legal button to save the residential, education and
employment information and continue to the Legal section. You may also use the
Index to navigate the Intake Assessment.
•
6 – Legal
o
Encompass will automatically enter the Legal information based on the
Consumer’s Initial Intake Call record.
o
Narrative – Enter the Intake Narrative.
•
Click the
button to run spell check on the Legal section.
•
Click the Save and Continue to Presenting Problems button to save Legal
information and continue to Presenting Problems. You may also use the Index to
navigate the Intake Assessment.
•
7-Presenting Problems – Enter the following information:
o
Presenting Problem(s)/Disability – Enter the Consumer’s presenting
problems and/or disability.
o
History of Presenting Problem(s)/Disability – Enter the Consumer’s history
of presenting problems and or disability.
•
Click the
screen.
button to run the spell check on the Presenting Problems
•
8-Bio-Psycho-Social Development & History – Enter the narrative including
developmental milestones, family of origin, educational background, past and current
significant events, relationships, and supports, and current living situation.
•
Click the Save and Continue to Risk Assessment button to save the Bio-PsychoSocial Development & History screen and move to the next screen. The User may
also use the Index located on the left-hand side of the screen.
•
9-Risk Assessment – Enter the following information:
o
Danger to Self – Indicate past danger, current danger and provide an
explanation.
o
Danger to Others – Indicate past danger, current danger and provide an
explanation.
o
Danger to Property – Indicate past danger, current danger and provide an
explanation.
o
Other Safety Issues – Enter narrative including vulnerability to
abuse/neglect/exploitation, knowledge of health and safety issues, medication
compliance, use of other’s medication and risk of practicing unsafe sex.
•
Click the
button to run spell check on the Risk Assessment section.
•
Click the Save and Continue to Needs Assessment button to save the Risk
Assessment screen and move onto the next. The User may also use the Index
located on the left-hand side of the screen.
•
10-Needs Assessment – Enter the following information:
25
o
Personal/Self Care – Indicate whether the Consumer receives or needs
assistance; enter a description in the applicable field.
o
Medication Management – Indicate whether the Consumer receives or needs
assistance; enter a description in the applicable field.
o
Transportation – Indicate whether the Consumer receives or needs assistance;
enter a description in the applicable field.
o
Independent Living Skills – Indicate whether the Consumer receives or needs
assistance; enter a description in the applicable field.
o
Access to Health Care /Medical Issues – Indicate whether the Consumer
receives or needs assistance; enter a description in the applicable field.
o
Financial/Money Management – Indicate whether the Consumer receives or
needs assistance; enter a description in the applicable field.
o
Education/Vocational/Specific Learning Needs – Indicate whether the
Consumer receives or needs assistance; enter a description in the applicable field.
o
Hobbies, Interests, Recreation, Play, Likes/Dislikes – Indicate whether the
Consumer receives or needs assistance; enter a description in the applicable field.
o
Social Support/Other Community Providers – Indicate whether the
Consumer receives or needs assistance; enter a description in the applicable field.
•
Click the
button to run spell check on the Needs Assessment section.
•
Click the Save and Continue to Cultural Considerations button to save the
Needs Assessment screen and move to the next screen. The User may also use the
Index located on the left-hand side of the screen.
•
11-Cultural Considerations – Enter the following information:
o
Identify Components of Consumer’s Cultural Identify – Enter a narrative
regarding the Consumer’s race, ethnicity, socio-economic group, language issues,
family traditions, age group, educational background, employment-vocationavocation, homelessness, sexual orientation, literacy, physical disability, mental
illness, developmental disability, etc.
o
Impact – Enter a narrative regarding how the Consumer’s cultural identity may
affect the Consumer’s expectations regarding being the victim of discrimination,
comfort in pursing mental health services in general, amenability to specific types
of programs/services/modalities. Willingness/ability to work with specific types
of workers, interest in particular types of outcomes, comfort with various kinds
or natural supports, etc.
•
Click the
section.
button to run spell check on the Cultural Considerations
•
Click the Save and Continue to Developmental Disabilities button to save
Cultural Considerations and move onto to the next screen. The User may also use
the Index located on the left-hand side of the screen.
•
12-Developmental Disabilities – Enter the following information:
26
o
Nature of Support System – Indicate the nature of the Consumer’s support
system.
o
Status of Existing Support System – Indicate the status of the Consumer’s
current support system.
o
Predominant Communication Style – Indicate the Consumer’s
communication style.
o
Assistance for Independence Needed – Indicate if the Consumer is in need of
assistance for each of the following; Mobility, Medication Administration,
Personal, Household, or Community.
o
Health Status – Indicate the level of assistance, if any, needed by the Consumer
in the following; Vision (beyond glasses), hearing (beyond hearing aid), Other
physical/mental characteristics.
o
Assistance for Accommodating Challenging Behaviors – Indicate to what
level the Consumer needs assistance, if any.
•
Click the Save and to Continue Strengths button to save the Developmental
Disabilities and move to the next screen. The User may also use the Index located
on the left-hand side of the screen.
•
13-Strengths – Enter a narrative regarding the Consumer’s strengths.
•
Click the
•
Click the Save and Continue to Barriers to Service button to save Strengths and
move onto the next screen. The User may also use the Index located on the lefthand side of the screen.
•
14-Barriers to Service - Enter a narrative regarding the Consumer’s barriers to
service.
•
Click the
•
Click the Save and Continue to Mental Status button to save the Barriers of
Service and move onto the next screen. The User may also use the Index located on
the left-hand side of the screen.
•
15-Mental Status – Enter the following information:
button to run spell check on the Strengths section.
button to run spell check on the Barriers to Service section.
o
General Behavior – Check all that apply.
o
Speech – Check all that apply.
o
Perceptions – Check all that apply.
o
Thought Process – Check all that apply.
o
Mood – Indicate the Consumer’s mood.
o
Judgement – Indicate the Consumer’s judgement. If judgement is deemed
“Poor” provide an explanation in the field provided.
o
Impulse Control – Indicate the Consumer’s impulse control. If impulse control
is deemed “Poor” provide an explanation in the field provided.
27
o
Insight – Indicate the Consumer’s insight, if applicable.
o
Sleep – Indicate whether there has been an increase or decrease in the
Consumer’s sleep, or if there has been no change.
o
Appetite – Indicate whether there has been an increase or decrease in the
Consumer’s appetite, or if there has been no change.
•
Click the
button to run spell check on the Mental Status section.
•
Click the Save and Continue to Psychiatric and Substance Abuse History
button to save the Mental Status and move to the next screen. The User may also
use the Index located on the left-hand side of the screen.
•
16-Psychiatric and Substance Abuse History – Enter the following information:
o
MH Treatment History – Enter the Consumer’s mental health treatment
history. If the Consumer denies receiving previous treatment, place a checkmark
in the check box labeled “ Consumer denies MH Treatment”.
o
SA Treatment History – Enter the Consumer’s substance abuse treatment
history. If the Consumer denies receiving previous treatment, place a checkmark
in the check box labeled “Consumer denies SA Treatment”.
o
Family History of Mental Illness and Substance Abuse – If the Consumer
has family members with a history of Mental Illness and/or Substance Abuse
enter the Family Member, whether it is MI or SA or Both, and the Diagnosis. If
no family history exists, place a checkmark in the box labeled “No Family
History”.
o
Abuse History – Enter the Consumer’s physical and sexual abuse history in
regards to ongoing, past, PS involvement, current, and past PS involvement.
Indicate if the abuse was ever reported. If the Consumer denies abuse, place a
checkmark in the box labeled “No Abuse History”.
o
UNCOPE – Ask the Consumer the questions in the UNCOPE screening
instrument; indicate the Consumer’s answers to the right of each question. Click
the CALCULATE button, Encompass will tabulate the results and enter then
into the Intake.
o
Narrative – Enter the narrative.
•
Click the
button to run spell check on the Psychiatric and Substance
Abuse History section.
•
17-Substance Abuse Chart – Enter the following information for each drug of
choice indicated by the Consumer.
o
Type of Drug and Name
o
Drug of Choice – Enter “1” for first choice thru “10” for last choice.
o
Age at Use – Enter the Consumer’s age at first use and the Consumer’s age at
problematic use.
o
Initially a Prescription – Indicate whether the drug was initially a prescribed
medication where applicable.
28
o
Heaviest Amount Consumed and When – Enter the largest amount of the
drug consumption and when it occurred.
o
Current Consumption – Enter how much the drug is currently used by the
Consumer.
o
Date of Last Use – Enter the date the Consumer last used the drug.
o
Number of days drug used in the last 30 days – Enter “0” for not used, “1”“29” for exact number of days and “30” for daily consumption.
o
Method of Current Dosing – Enter “1” for oral, “2” for smoking, “3” for
snorting, “4” for intravenous, and “5” for other.
•
Click the Save and Continue to Mood Altering Questions button to save the
Psychiatric and Substance Abuse History and move to the next screen. The User
may also use the Index located on the left-hand side of the screen.
•
18-SUBSTANCE ABUSE ONLY Mood Altering Questions – Enter the
following information
o
Other Factors – Place a checkmark to the left of any other factors, if there are
no other factors place a checkmark in the checkbox labeled “No Other Factors”
o
What are the mood altering chemicals you use? – Enter the Consumer’s
response.
o
What is your current living environment? – Enter the Consumer’s response.
o
Any history of Overdose? – Enter the Consumer’s response. If there is no
history of overdose, place a check mark in the box labeled “No History”
o
Any history of blackouts? – Enter the Consumer’s response. If there is no
history of blackouts, place a check mark in the box labeled “No History”
o
What are past recovery attempts? – Enter the Consumer’s response.
o
Longest period of recovery? How was this achieved? What triggered
relapse? What will be different in treatment this time? Any use of
Antabuse, Methadone, Naltraxone, or Revia? – Enter the Consumer’s
response.
o
What are the supports experienced in the past? AA/NA meetings,
sponsor, support groups, therapy support, group or church? – Enter the
Consumer’s response.
o
Do you hold a current driver’s license? – Enter the Consumer’s response.
o
Do you have transportation? – Enter the Consumer’s response.
o
What areas of functioning have you experienced consequences? – Enter
the Consumer’s response.
o
Any history of seizures, DT’s, Hallucinations? – Enter the Consumer’s
response. If there is no history of seizures, DT’s and hallucinations, place check
mark in the check box labeled “No History”
29
o
CHILD ONLY Have you attended raves or similar parties? – Enter the
Consumer’s response.
o
CHILD ONLY Have you engaged in high risk sexual behavior (number
of sexual partners, use of barriers or condoms)? If yes, when did you first
become sexually active? – Enter the Consumer’s response.
o
CHILD ONLY Are you more sexually active when using mood-altering
chemicals? – Enter the Consumer’s response.
o
CHILD ONLY Have you engaged in other types of risk taking activities?
– Enter the Consumer’s response.
o
CHILD ONLY Have you ever run away from home? – Enter the
Consumer’s response.
o
CHILD ONLY Any history of truancy from school? – Enter the Consumer’s
response.
o
CHILD ONLY Do you have any history or current legal problems? If yes,
what are the charges? If yes, do you have a P.O. or court date? – Enter the
Consumer’s response.
o
CHILD ONLY Do either of your parents use mood altering chemicals? –
Enter the Consumer’s response.
o
CHILD ONLY Why do you want treatment at this time? – Enter the
Consumer’s response.
•
Click the
section.
button to run spell check on the Mood Altering Questions
•
Click the Save and Continue to Diagnosis and Treatment Readiness button to
save the Mood Altering Questions and move to the next screen. The User may also
use the Index located on the left-hand side of the screen.
•
19-Diagnosis and Treatment Readiness – Enter the following information:
o
Minkoff Quadrants – Indicate the appropriate quadrant.
o
Stages of Change – Indicate the Consumer’s stage of change
o
Complete ASAM Worksheet – Complete the ASAM Worksheet by clicking the
Complete ASAM Worksheet link. If the Client does not meet any level of
ASAM Criteria, place a checkmark in the box labeled “Client does not meet any
level of ASAM criteria”
o
Client Requires psychological evaluation – Indicate yes, no or not at this
time. If the Consumer is not in need of treatment at this time, place a
checkmark in the check box labeled “No need for treatment at this time”.
o
Client Requires psychiatric evaluation – Indicate yes, no or not at this time.
o
Diagnosis – Enter the Consumer’s diagnosis. Click the
search for the appropriate diagnosis code.
o
CAFAS Score – Enter the Consumer’s CAFAS score.
30
button to
o
PCAFAS Score – Enter the Consumer’s PCAFAS score.
•
Click the Save and Continue to Service Eligibility Criteria MI button to save the
Diagnosis and Treatment Readiness screen and move to the next screen.
•
20-FOR MENTAL ILLNESS ONLY Service Eligibility Criteria – Enter the
following information:
o
Service Eligibility Criteria for Adults with Mental Illness (Must Serve) –
Check all that apply
o
Qualifying Diagnosis – Check all that apply
o
Non-Qualifying Diagnosis – Check all that apply
o
Degree of Disability – Check all that apply.
o
Sufficient Duration – Check all that apply.
o
Certain Previous Service Utilization – Check all that apply.
•
Click the Save and Continue to Service Eligibility Criteria DD button to save the
Service Eligibility Criteria MI and move to the next screen. The User may also use
the Index on the left-hand side of the screen.
•
21-FOR DEVELOPEMENTALLY DISABLED ONLY Service Eligibility
Criteria – Enter the following information.
o
Service Eligibility Criteria for Individuals with Developmental Disabilities
(Must Serve) – Check all that apply.
•
Click the Save and Continue to Service Eligibility Criteria Child button to save
the Service Eligibility Criteria DD and move to the next screen. The User may also
use the Index on the left-hand side of the screen.
•
22-FOR CHILDREN ONLY Service Eligibility Criteria – Enter the following
information.
o
Service Eligibility for Children and Adolescents with Serious Emotional
Disturbance-Age 7-17 (Must Serve) – Check all that apply.
o
Qualifying Diagnosis – Place a check mark to the left of all that apply.
o
Other High Priority Diagnosis – Place a check mark to the left of all that
apply.
o
Substantial Functional Impairment – Check all that apply.
o
Sufficient Duration of Condition – Check all that apply.
•
Click the Save and Continue to Disposition/Designation button to save the
Service Eligibility Criteria Child section and move to the next screen. The User may
also use the Index on the left-hand side of the screen.
•
23-Disposition/Designation – Enter the following information
o
Narrative – Enter the narrative.
o
Disposition – Indicate whether the Consumer has refused service, not eligible,
or is eligible for service. If the Consumer IS NOT eligible for service, indicate
31
why by placing checkmarks in the appropriate boxes. If the Consumer IS eligible
for services, indicate service type by placing checkmarks in the appropriate check
boxes.
o
Preliminary Plan of Service – Enter the Consumer’s preliminary plan of
service.
o
Signature Required By – Encompass will automatically enter the current User’s
name. If this is incorrect, click the
button to search for the correct Staff
Member name.
o
Signed By – Encompass will enter the information in this field once the
assessment is signed.
o
Signature Date – Encompass will automatically enter the date that the
assessment was signed.
•
Click the
section.
•
Click the SAVE button.
button to run spell check on the Disposition/Designation
Step 7: Authorization for PCP Development
•
Click the Authorization link in the Main Menu. The Main Menu is located on the
left-hand side of the Home screen. The Home screen is accessible by clicking the
Home button in the upper-left hand corner of Encompass.
•
Click the View Consumer Authorizations link located to the right of the Main
Menu.
•
Search for the Client, if necessary and click the Authorization Records link to the
right of the Consumer’s information.
32
•
Click the Click here to authorize CMHSP staff to assess and develop new
client’s Initial Person-Centered Plan (PCP) link to add an authorization for the
Consumer’s PCP development.
•
Enter the following information:
•
o
Effective Date- Enter the date of Admission
o
Select Required Service – Indicate the services the Consumer will be receiving;
Adult Services, DD Services, or Youth and Family Services.
o
Comments – Enter any additional information not captured in the above fields.
Click the SAVE button.
Step 8: Admitting Consumer
•
Click on the Consumer Information link in the Main Menu. The Main Menu is
located on the left-hand side of the Home screen. The Home screen is accessible by
clicking the Home button in the upper left-hand corner of Encompass.
•
Click the View CMHSP Admissions to the right of the Main Menu.
33
•
Search for the Client, if necessary and click the CMHSP
Admissions/Transfers/Discharge link to the right of the Consumer’s
information.
•
Click the Add Admission link
•
Enter the following information:
o
Date – Enter the Consumer’s admission date.
o
Admission Diagnosis – Enter the Consumer’s diagnosis at the time of
admission. The diagnosis uses ICD codes for each diagnosis. You may type the
ICD 9 code, or use the
button to search for the correct diagnosis.
o
Team – Use the
assigned to.
o
Case Manager – Use the
Consumer will be assigned to.
o
Attending Physician – Use the
button to search for the Attending
Physician the Consumer will be assigned to, if applicable.
button to search for the Team the Consumer will be
button to search for the Case Manager the
34
•
o
Psychologist – Use the
button to search for the Psychologist the
Consumer will be assigned to, if applicable.
o
Nurse – Use the
button to search for the Nurse the Consumer will be
assigned to, if applicable.
o
Disability Designation – Indicate correct disability designation. This is a
required field; you will not be able to save the admission record without this
information.
o
Service Designation – Indicate the correct service designation. This is a
required field; you will not be able to save the admission record without this
information.
o
Diagnostic Category – Indicate the correct diagnostic category.
o
Notes – Enter any other information applicable to the admission that is not
captured in the above fields.
Click the SAVE button
Step 9: Finalizing and Signing Intake Assessment (Bio-PsychoSocial)
•
Click the Assessment link in the Main Menu. The Main Menu is located on the lefthand side of the Home screen. The Home screen is accessible by clicking on the
Home button in the upper left-hand corner of Encompass.
•
Click the View Intakes/Assessments link located to the right of the Main Menu.
•
Search for the Consumer who’s Intake Assessment you will be finalizing and signing.
Once found, click the Initial Intakes link to the right of the Consumer’s
information.
35
•
Locate the Initial Assessment in the Consumer’s Intake list and click the Change
link.
•
Review each page of the Assessment; correct any typos, misspelled words and
grammar.
•
On the last page of the Assessment (Disposition/Designation), click the SUBMIT
FOR SIGNATURE button.
•
Click the Home button located in the left-hand corner of Encompass
•
Click the Assessments link in the Main Menu, if necessary.
•
Click the Sign Intake/Assessments link located to the right if the Main Menu. All
Intake Assessments pending signatures will be listed.
•
Click the View and Sign Assessment link to the right of the Assessment you wish
to sign.
•
The Assessment will be displayed in a “Read Only” format. At this time if you find
any errors/typos you must go back to the changes link and make you adjustments
there.
36
•
On the last page of the Assessment (Disposition/Designation), enter you
Encompass password in the field provided, and click the Sign button.
•
You will be automatically taken to the Service Activity Log. Encompass will
automatically enter the Staff Member, Consumer, CPT Code, Service Date, Service
Begin time and Team. Verify this information to ensure it is correct and enter the
following information:
•
o
End Time
o
Location – Indicate office, community, hospital, or jail
o
Face to Face – Indicate yes or no
o
Staff Type – Indicate Primary or Secondary
Click the SAVE button.
37
SECTION 4: KEYBOARD SHORTCUTS
Below you will find a list of keyboard shortcuts that may assist you in your navigation of the
Encompass system.
Tab – The Tab key is located on the left-hand side of your keyboard above the Caps Lock
key. Pressing the Tab key will move your cursor forward from field to field.
Shift + Tab – The Shift keys are located on the left and right hand side of your keyboard.
The Tab key is located on the left-hand side of your keyboard above the Caps-Lock key.
Pressing the Tab key while holding the Shift key will move your cursor backwards from field
to field.
Space Bar (Check boxes) – The Spacebar is used to mark check boxes. A dotted rectangle
will appear around the checkbox, hit the spacebar and you will see a checkmark appear.
Space Bar (Radio Buttons) – The Spacebar is used to mark radio buttons. A dotted circle
will appear around the radio button, hit the spacebar and a mark will appear in the radio
button. Use your arrow keys (usually located to the left of the number pad) to move the
mark to a different radio button.
CTRL + C – The CTRL keys are located to the left and right of the space bar. CTRL + C is
used to copy text, pictures, etc from a document or the Encompass system. Highlight the
text you would like to copy. Once the text is highlighted hold the CTRL button and press
“C”. You have highlighted the text.
CTRL + V – The CTRL keys are located to the left and right of the space bar. CTRL + V
Is used to paste copied text into a document or the Encompass System.. Place your cursor
where you would the copied information to be pasted. Hold the CTRL button and press
“V” the copied text will appear.
Drop Down Menus – To quickly move through drop down menus, use your arrow keys OR
use the first letter of the information you are searching for in the drop down menu, continue
hitting that letter until your selection appears.
38