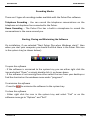
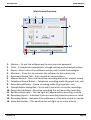
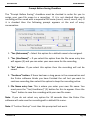
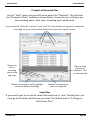
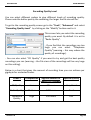
1
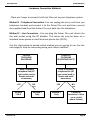
CTI
PULSAR PLUS
Installation and User Guide
Version 2.0
Information in this document is subject to change without notice.
© 2009 Crucible Technologies. All rights reserved.
Crucible Technologies is a trading name of Tele-Products Ltd.
We cannot guarantee that the information in this document is current with the most up to date
information. Please visit our website at http://www.crucible-technologies.co.uk.
Reproduction of any material, software or hardware without prior consent of Crucible Technologies
is strictly forbidden.
Pulsar Plus Software Manual Version 2.0 Rev 2
Steve Davies - June 2009
CTI
PULSAR PLUS
USER MANUAL
Thank you for purchasing the CTI Pulsar Plus Version 2.
The Pulsar Plus records telephone conversations from your telephone straight to your
computer. This process is termed “Computer Telephony Integration” (or CTI).
This manual contains setup and general use instructions. There is also a troubleshooting
guide that will help you with any problems you may face on installation or using the
software.
CTI
Pulsar Plus Features
2 recording types– Automatic and Manual. Automatic recording will record all
conversations on the telephone/line without user intervention. You can leave the
software set to auto record and minimise it to the system tray. Manual recording
means that you have to press “Start” and “Stop” on recording a conversation.
Has 2 recording modes – Telephone and Room. The “telephone” mode will record all
the conversations on a telephone or telephone line. The “room” mode will use the
Pulsar Plus’s built-in microphone to record the conversations in the room around
you.
Can work with analogue, DECT or digital telephones.
Has a selection of recording file options for varying quality and compression.
Can be locked with a password so that the user cannot shut the software down.
Records all conversations in “.wav” format, which can be universally played.
Hardware Guidance
CTI
1.
Pulsar Plus does not have any user-serviceable parts. Under no circumstances
should the user attempt to open the unit. IF OPENED THE WARRANTY WILL BE
INVALIDATED.
2.
CTI
Pulsar Plus is designed for indoor use only.
Version 2.0
Page 3
CTI
PULSAR PLUS
USER MANUAL
CONTENTS
Have I got everything?
5
Installation
7
Hardware Installation
- Hardware connection methods
- Hardware connection setup method 1
- Hardware connection setup method 2
8
10
12
Software Installation
- Step 1 Windows Vista installation
- Step 1 Windows XP (and all others) installation
- Step 2 Installing the Pulsar Plus software
- Step 3 Setting the soundcard for Pulsar Plus
14
16
18
19
Software User Guide
- Recording modes, starting, closing & minimising
- Main screen overview
- Auto recording a conversation
- Recording level settings
- Manual recording a conversation
- Prompt before saving checkbox
- Playback of recorded files
Advanced settings
- Use password (Lock the software)
- Recording quality level
23
24
25
26
26
27
28
29
30
31
32
Troubleshooting Guide
34
After Sales Service & Guarantee
45
Version 2.0
Page 4
CTI
PULSAR PLUS
USER MANUAL
Have I Got Everything?
Please check the package contents and make sure you have all the equipment listed below. If you find
you have something missing please contact us immediately.
Package Contents
I.
II.
III.
IV.
V.
VI.
VII.
VIII.
IX.
1 x Pulsar Plus hardware unit
1 x USB to serial adaptor + USB extension lead
1 x BT socket to RJ10 lead
1 x Serial Lead with audio jack
1 x Coiled (curly) handset cord
1 x BT socket doubler
1 x Pulsar Plus Version 2 install CD
1 x user manual
1 x quick install sheet
I
II
VI
Version 2.0
III
VII
IV
VIII
V
IX
Page 5
CTI
PULSAR PLUS
Version 2.0
USER MANUAL
Page 6
CTI
PULSAR PLUS
USER MANUAL
Installation
Version 2.0
Page 7
CTI
PULSAR PLUS
USER MANUAL
Hardware Connection Methods
There are 2 ways to connect the Pulsar Plus unit to your telephone system.
Method 1 - Telephone Connection- You can unplug the curly cord from you
telephone handset and connect it to the Pulsar Plus unit and then connect
the supplied lead from the Pulsar Plus unit back into the telephone.
Method 2 - Line Connection - You can plug the Pulsar Plus unit direct into
the wall socket using the BT doubler. This setup can only be done on a
standard home phone or small business phone line (POTS).
Use the chart below to decide which method you are going to use. See the
next page for help on connecting using your chosen method.
CORDED
TELEPHONE
RECORDING
CORDLESS
TELEPHONE
RECORDING (DECT)
I have a standard
telephone line (BT
type socket used in
homes and small
businesses)
I have a standard
telephone line (BT
type socket used in
homes and small
businesses)
YES
Method
1 OR 2
Version 2.0
NO
YES
Method 1
Only
YES
Method 2
Only
NO
YES
Cannot be
connected – Must
use a corded
phone instead
Page 8
CTI
PULSAR PLUS
USER MANUAL
Notes on the Different Pulsar Plus Connection Methods
• If you use the line connection (method 2) any conversation on the line
will be recorded if the software is running, e.g. if someone is speaking
on extension telephone upstairs and the Pulsar Plus in connected to
the main telephone wall socket downstairs it will still record this
conversation.
• If you are using a business telephone connected to a business PBX
then you must use the telephone connection method (Method 1).
Version 2.0
Page 9
CTI
PULSAR PLUS
USER MANUAL
Hardware Connection Setup
Method 1 – Telephone Connection
A
B
A
C
D
D
C
E
C
F
C
This picture shows how to connect the “serial lead
with audio jack (IV)” to the “USB to serial adaptor”
(II) and then to your computer’s USB port and
microphone socket.
Version 2.0
Page 10
CTI
PULSAR PLUS
USER MANUAL
Steps to setup your hardware for method 1
Step 1 – Unpack the Pulsar Plus parts and check the package contents with
those on page 5.
Step 2 – Plug the “RS232 lead with audio jack” (IV) into the top left of the
Pulsar Plus unit (C) and connect the “USB to serial adaptor” (II) to the other
end (A).
Step 3 - Unplug the curly handset cord from the back of your telephone
(remember this socket for the next step) and plug this into the bottom of
the Pulsar Plus unit (E).
Step 4 – Plug the “Coiled (curly) handset cord” (V) into the socket in the
back of the telephone where you unplugged the handset cord from (F).
Step 5 – Plug the USB end of the “USB to serial adaptor” (II) into a spare
USB socket on your PC / laptop (A). You can use the supplied USB extension
lead if you cannot fit the adaptor into a socket due to its size.
Step 6 – Plug the 3.5mm microphone jack into your microphone port on
your PC / Laptop (B). This is usually coloured pink or will have a microphone
symbol by it:
Note; you may have a microphone socket on the front and a socket on the
back. You will have to try both after installation of the software to see
which one will work as default.
Unused Parts
BT socket to RJ10 lead (III)
Version 2.0
Page 11
CTI
PULSAR PLUS
USER MANUAL
Hardware Connection Setup
Method 2 – Line Connection
E
D
A
B
A
C
D
D
C
This picture shows how to connect the “serial lead
with audio jack (IV)” to the “USB to serial adaptor”
(II) and then to your computer’s USB port and
microphone socket.
Version 2.0
Page 12
CTI
PULSAR PLUS
USER MANUAL
Steps to setup your hardware for method 2
Step 1 – Unpack the Pulsar Plus parts and check the package contents with
those on page 5.
Step 2 – Plug the “RS232 lead with audio jack” (IV) into the top left of the
Pulsar Plus unit (C) and connect the “USB to serial adaptor” (II) to the other
end (A).
Step 3 - Plug the “BT socket to RJ10 lead” (III) into the top right of the
Pulsar Plus unit (D) and plug the other end into the wall socket - If you are
plugging the Pulsar Plus into the same wall socket as your telephone then
use the “BT socket doubler” (VI) as shown at (E).
Step 4 – Plug the USB end of the “USB to serial adaptor” (II) into a spare
USB socket on your PC / laptop (A). You can use the supplied USB extension
lead if you cannot fit the adaptor into a socket due to its size.
Step 5 – Plug the 3.5mm microphone jack into your microphone port on
your PC / Laptop (B). This is usually coloured pink or will have a microphone
symbol by it:
Note; you may have a microphone socket on the front and a socket on the
back. You will have to try both after installation of the software to see
which one will work as default.
Unused Parts
Coiled (curly) handset cord (V)
Version 2.0
Page 13
CTI
PULSAR PLUS
USER MANUAL
Software Installation Step 1
If your PC is not turned on please do so now.
Windows Vista Installation
(For XP go to page 16)
Step 1 –Plug in the USB to Serial adaptor (if you have not already done so)
and you will get an “Installing device driver software” popup:
OR you may get the following “Found New Hardware” wizard – Select
“Locate and install driver software (recommended):
Setup with an internet connection (if this does not apply please skip)
If you are connected to the internet then the drivers should autoinstall.
Please note that it may take several minutes to find the driver online.
Version 2.0
Page 14
CTI
PULSAR PLUS
USER MANUAL
You should get the following message to say that the driver is
installed:
“Installing device driver software” may appear (this time for the
“USB Serial Port”). The same process of finding the drivers online will
occur. Your drivers are now installed – please go to page 16.
Setup without an internet connection (if this does not apply please skip)
If you are not connected to the internet still select “Locate and install
driver software” but make sure the Pulsar Plus CD (VII) is inserted
and press “Next”.
At the next screen select “Search for best driver in these locations”
and make sure that the “Search Removable Media (floppy, CDROM..) is checked. Press “Next”. It should now search the CD ROM
and install the driver.
It may do this process twice before it is installed fully.
Version 2.0
Page 15
CTI
PULSAR PLUS
USER MANUAL
Software Installation Step 1
If your PC is not turned on please do so now.
Windows XP Installation
(For Vista go to page 14)
Step 1 –Plug in the USB to Serial adaptor (if you have not already done so)
and you will get a “Found New Hardware” icon for a “USB Serial Controller”:
- The “Found New Hardware Wizard” should now appear.
Setup with an internet connection (if this does not apply please skip)
If you are connected to the internet you can select “Yes, this time
only” and press “Next”.
Leave it set to “Install the software automatically (Recommended)” –
and press “Next” - After it has found the driver press “Next” and
“Finish”.
Please note that it may take several minutes to find the driver online.
Version 2.0
Page 16
CTI
PULSAR PLUS
USER MANUAL
Another “Found new hardware” messgae will appear (this time for
the “USB Serial Port”). Follow the same process and then the USB to
Serial adaptor will be installed.
Setup without an internet connection (if this does not apply please skip)
If you are not connected to the internet select “No, not this time”.
Insert the Pulsar Plus CD (VII) and press “Next”.
At the next screen select “Install from a list or specific location
(Recommended). Press “Next”.
At the next screen leave it selected on “Search for the best driver in
these locations” and make sure that the “Search Removable Media
(floppy, CD-ROM..) is checked. Press “Next”.
You may get several options for drivers to be installed. Select the one
relative to your operating system (d:\usb 2.0to rs232
converter\win2000_xp_xp64\ftdibus.inf) and press “Next”.
This should now install the drivers – you may have to do this again for the “USB
Serial Port” – follow the same steps as above and it will be installed.
Version 2.0
Page 17
CTI
PULSAR PLUS
USER MANUAL
Software Installation Step 2
Please make sure the Pulsar Plus CD is inserted - If you have come from the
previous steps then the CD auto-run may already be active.
Installing the Pulsar Plus software
After inserting the Pulsar Plus CD in a CDROM or DVDROM the autorun should appear. If it does not please go to your “My Computer” and
open the Pulsar Plus CD contents from the relevant drive and run
“Setup.exe”.
Follow the on screen instructions to install the software. The default
directory for install is: “C:/Program Files/Pulsar Plus”
You will have an option to install to a different directory.
You will also have 3 checkbox options: 1 for putting a shortcut to the
Pulsar Plus software on your desktop, 1 for a quick launch icon and 1
for starting the Pulsar Plus software when Windows starts - Note. If
you wish to use manual record only we advise you to not have the
Pulsar Software starting when Windows starts.
Once the installation is complete the software will be
minimised to the system tray.
You may have to click the chevron sign to expand the icons. You can
double click the icon OR right click and select “Open” to maximize the
Pulsar Plus software main screen.
Note. For business users connected to a network with a server.
If there are any problems at this stage with error messages relating to
“Permissions” then you may need to contact your IT administrator to
grant you the relevant permissions to install the software. You should be
logged on with administrator privileges for the install.
Version 2.0
Page 18
CTI
PULSAR PLUS
USER MANUAL
Software Installation Step 3
Soundcard Configuration Settings
Windows Vista Soundcard settings
(For XP go to Page 21)
First find the volume control icon on your system tray (where the clock is
displayed) Right click the icon and select “Recording Devices”:
Check that the “Microphone” has a
green tick and says “Working” as
shown below. If not then the mic
jack from the Pulsar Plus may be
plugged into the wrong socket.
Click on the “Microphone” section
to highlight it and then click
“Properties”.
(Note. If you have installed a
separate PCI soundcard then the
settings may be on the “Line-In”
section).
Version 2.0
Page 19
CTI
PULSAR PLUS
USER MANUAL
Select the “Levels” tab and set
the “Microphone” slider at 100
if you are using the Telephone
connection (Method 1) or set
it to 50 if you are using the
Line connection (Method 2).
Make sure that the
“Microphone Boost” is set to
0.0 dB.
Go to the “Advanced” tab and make
sure that the “Allow applications to
take exclusive control of this device”
is unchecked.
Press “Apply” and then “OK” to close
the window. Press “OK” again to exit
the “Recording Control” window.
These settings are now saved and
you can run the Pulsar Plus software.
Version 2.0
Page 20
CTI
PULSAR PLUS
USER MANUAL
Windows XP Sound Card Settings
(For Vista go to Page 19)
First find the volume control icon on your system tray (where the clock is
displayed) Right click the icon and select “Open Volume Control”:
Now the “Volume Control” window should open. Using the left mouse
button open the “Options” menu and select “Properties”:
This should open the “Properties” window. Under
“Mixer Device”, if there is an option that suggests
either input or output then select the input
option (this should set the “Adjust Volume For”
to “Recording”). If the “Mixer Device” has only
one option then change the “Adjust Volume For”
to “Recording”, as shown on the right.
Make sure that the “Microphone” check box is
checked and press “OK”.
Version 2.0
Page 21
CTI
PULSAR PLUS
USER MANUAL
Now the “Recording Control” window should appear. Make sure that the
“Microphone” volume is all the way up for Telephone recording (Method
1) or ½ the way up for Line recording (Method 2) and make sure the
“Select” checkbox is checked.
Now select the “Advanced” button underneath the
“Select” checkbox. (if it is grayed out or not there
then you must go to the “Options” menu and select
“Advanced Controls” – it should then appear):
Now the “Advanced Controls for
Microphone” window should
appear. Make sure that the
“Microphone Boost” option is
unchecked. If there are 2 “Mic
Boost” options then you have 2
sound cards on you computer.
Press “Close” and then press the X
on the top right of the “Recording
Control” window to close the
window. These settings are now
saved and you can run the Pulsar
Plus software.
Version 2.0
Page 22
CTI
PULSAR PLUS
USER MANUAL
Software User
Guide
Version 2.0
Page 23
CTI
PULSAR PLUS
USER MANUAL
Recording Modes
There are 2 types of recording modes available with the Pulsar Plus software.
Telephone Recording - You can record the telephone conversations on the
telephone or telephone line connected to the Pulsar.
Room Recording – The Pulsar Plus has a built-in microphone to record the
conversations in the room around you.
Starting, Closing and Minimising the Software
On installation, if you selected “Start Pulsar Plus when Windows starts”, then
when you start your computer you should find that there is the Pulsar Plus icon
in the system tray (as shown below):
To open the software
- If the software is minimised to the system tray you can either right click the
icon and select “Open” or simply double click it, as shown above.
- If the software is not running then either select the icon from your desktop or
find the shortcut on the windows menu under “programs”.
To minimise the software
- Press the
to minimise the software to the system tray.
To close the software
- Either right click the icon in the system tray and select “Exit” or on the
software menu go to “Options” and “Exit”.
Version 2.0
Page 24
CTI
PULSAR PLUS
USER MANUAL
Main Screen Overview
1
2
3
4
5
6
7
8
10
9
14
11
1.
2.
3.
4.
5.
6.
7.
8.
9.
10.
11.
12.
13.
14.
12
13
Options – To exit the software and to set a non-exit password
Tools – To playback conversations, change settings and advanced options
About – Gives info on the software version and Crucible Technologies
Minimise – Press this to minimise the software to the system tray
Automatic Record Tab – Auto records all conversations
Manual Record – Has a start and stop recording button for manual record
Telephone Record Button – Telephone recording mode (if greyed out= set)
Room Record Button – Room recording mode (if greyed out= set)
Prompt Before Saving Box – Set to ask if you wish to save the recordings
Pause Record Button –On active recording this will pause the recording
Red Recording Light – This red light will appear when recording is active
Recording Source – Indicates if you are recording from the phone or room
Recording Mode – Indicates if the software is set to auto record or manual
Voice Activity Bar – This equaliser bar will light up on voice activity
Version 2.0
Page 25
CTI
PULSAR PLUS
USER MANUAL
Auto Recording a Conversation
Automatically recording a conversation means that the Pulsar Plus software will
record all the conversations on the telephone or line without user intervention.
You can leave the software set to auto record and minimise it to the system
tray.
“Pause Recording” – When a conversation is being recorded you can press this
pause button to stop the auto record from turning off. You can press it again to
continue auto record operation as normal. When the recording is paused you
will get the following icon - you can use this to stop the auto record
saving multiple files if there is a pause in the conversation.
Automatic Recording Level Settings
From the Pulsar Plus main screen go to the “Tools” menu bar and select
“Recording Level Settings”. The default settings are in most cases the correct
ones. Please read the description of each setting before adjusting it.
By default the “Recording
Level Settings” will open on
the “Telephone” settings
tab. If you wish to change
the “Room” recording
settings press the “Room”
tab.
Threshold Level – Recording is triggered when the volume threshold level is
exceeded. If there is a lot of background noise on the line you should increase
this by increasing the number (delete the number and insert a higher one and
press “OK”)
Delay Before Recording Starts- Time delay in seconds before the recording
begins.
Delay Before Recording Stops- Time delay in seconds before the recording
ends. You may want to increase this if you find conversations being saved in
segments.
Activity Level - If you find recording is triggered by the phone ringing rather
than speech activity you can increase this setting.
Version 2.0
Page 26
CTI
PULSAR PLUS
USER MANUAL
Please note that if you have changed the “Recording Level Settings” then you
will need to restart the Pulsar Plus software for them to take effect.
Manually Recording a Conversation
If you wish to occasionally record your conversations then you can use the
“Manual Record” tab.
Note. We suggest that if you wish to manually record then you should not have
the software start when Windows starts. This option must be set on installation
of the software.
- When changing to “Manual Record” mode it will
ask you if you wish to change – press “Yes” to
switch to manual mode.
- There are 2 buttons you must use to
manually record:
“Record” button – Press to start
recording.
“Stop” button – Press to stop recording.
The red recording light will come on
when you have pressed the “Record”
button and should disappear when you
have pressed the “Stop” button.
- After pressing the “Record” button you should see activity on the “Voice
Activity Bar” when you speak or when the caller speaks. If there in no activity
then either your hardware or soundcard settings are incorrect - please see the
troubleshooting section.
Version 2.0
Page 27
CTI
PULSAR PLUS
USER MANUAL
Prompt Before Saving Checkbox
The “Prompt Before Saving” checkbox must be checked in order for you to
assign your own file name to a recording. If it is not checked then each
recording will be saved with a sequential file name (conv1, conv2, conv3, etc). If
it is checked then the following prompt appears at the end of every
conversation-
1
2
3
4
5
1. “Yes (Autoname)” – Select this option for a default name to be assigned.
2. “Yes (UserName)” – If you select this option then the file name entry box
will appear (5) and you can enter your own name for the recording.
3. “No” button– If you select this option then the recording will not be
saved.
4. “Continue” button- If there has been a long pause in the conversation and
the Pulsar software thinks you have finished the call but you want to
continue recording then select this option to keep the recording active.
5. File Name entry box- This is where you enter your own file name. You
must press the “Yes (UserName)” (2) button for this to appear. Press the
“Save” button to save the recording with your own file name.
Note. If you do not select any option for 30 seconds then the Pulsar Plus
software will auto save the recording with a default file name.
Note. If “Lock on Startup” is set then this prompt will not work.
Version 2.0
Page 28
CTI
PULSAR PLUS
USER MANUAL
Playback of Recorded Files
On the “Tools” menu tab you will find an option for “Playback”. This will load
the “Playback of Files” window as shown below. As you can see it will give you
the recording name, date, time, recording type and duration.
You can use the “Order By” and the “From” and “To” search boxes to search for a particular
recording. Once you have selected the criteria press the “Apply” button.
Options to
play a
recording,
pause, stop
and mute
Delete a recording or multi-highlight
and multi-delete recordings
Slider to show
position of
playback – this
can be adjusted
Rename a recording for
ease of recognition
Saved files
If you want to get to the actual saved files (which are in “wav” format) then you
must go to the folder where they are saved. The default path is “C:\Program
Files\Pulsar Plus”.
Version 2.0
Page 29
CTI
PULSAR PLUS
USER MANUAL
Advanced Settings
You will find the “Advanced” menu under the “Tools” menu bar on the main
screen
Maximum Recording Time – Specify the maximum duration of each individual
recording.
Free Disk Space – Can be set to give warnings when disk space is low.
Use Password – To lock the software - See the following page.
Recording Quality Level – To change the codec used for recording – See the
next few pages for details on this section.
Path for Saving Speech Recordings – To change the path that the recorded files
are stored – By default this is set to “C:/Program Files/Pulsar Plus”. You can set
this any location you choose, including a shared network drive, USB drive (if
inserted) or any other portable media.
AutoNumbering – This returns the autonumbering to conv1 and will overwrite
any existing files. Archive any files you wish to keep prior to resetting
numbering.
Version 2.0
Page 30
CTI
PULSAR PLUS
USER MANUAL
Use Password
This setting is for Automatic Record mode only. Setting a password will prevent
the user from shutting down the Pulsar Plus software, playing back files through
the software and changing any of the software settings.
Note. Even though this locks the software and prevents the user from playing
the recordings through the software it does not prevent the user from finding
the files through Windows Explorer.
To set a password
To set a password you can either go to the “Options” menu and select
“Passwords” or alternatively you can go to the “Advanced” menu and modify it
there.
Tick this box and enter your password.
This password will be required to
switch off this setting.
Please keep your password safe.
Crucible Technologies are unable to help
you if you lose this password
Version 2.0
Page 31
CTI
PULSAR PLUS
USER MANUAL
Recording Quality Level
You can select different codecs to give different levels of recording quality.
Please note the better quality the recording, the larger the file size will be.
To get to the recording quality screen go to the “Tools”, “Advanced” and select
“Recording Quality Level” by clicking on the “Modify” button next to it.
This screen lets you select the recording
quality you want. By default it is set to
“Radio Quality”.
- If you find that the recordings are too
large you can select “Telephone
Quality” (warning – this may reduce the
quality of recordings).
- You can also select “CD Quality” if you want to try and get the best quality
recordings you can (warning – the file sizes of the recordings will be very large
on this setting).
Below is a chart that gives the amount of recording time you can achieve per
gigabyte for a selected codec.
Codec’s
Compression
Approx Amount of
Speech Per Gigabyte
Speech Quality
CD Quality
Low
50 hours
Very Good
Radio Quality
Medium
140 hours
Good
Telephone
Quality
High
250 hours
Fair
Version 2.0
Page 32
CTI
PULSAR PLUS
USER MANUAL
Troubleshooting
Guide
Version 2.0
Page 33
CTI
PULSAR PLUS
Version 2.0
USER MANUAL
Page 34
CTI
PULSAR PLUS
USER MANUAL
TROUBLESHOOTING GUIDE
If your question is not answered here and you would like more assistance
please look at our website help page, where we will be frequently updating
any technical issues. You can find this under the Pulsar Plus help section at:
http://www.crucible-technologies.co.uk/support/callrecorder.aspx
If this still does not answer your query please contact us via our website
enquiry page or alternatively email:
[email protected]
TROUBLESHOOTING GUIDE CONTENTS
1 -Installation Problems
1.1 - Software Install error messages
1.2 - Pulsar can’t detect the hardware
1.3 - Re-Installation Problems
2 - Auto Recording Problems
2.1 - Auto-recording does not start automatically
2.2 - Only records 1 side of the conversation
2.3 - Recordings sound very quiet
2.4 - Files recorded in segments
2.5 - Half way through a call it asks me to save the recording
36
36
36
37
37
37-38
38
38
39
39
3 - Manual Recording Problems
3.1 - No sound on playback of recording
3.2 - Only records 1 side of the conversation
3.3 - Recordings sound very quiet
40
40
41
41
4 - Recording Quality Problems
4.1 - Buzzing / crackling noise problems
4.2 - File sizes are too large
42
42
42
5 - Other Troubleshooting Problems
5.1 - Can’t find saved wav files
5.2 - Don’t want the Pulsar software to start when windows starts
5.3 - I can hear my voice coming out of my speakers
5.4 - I have lost my CD or USB/Serial Drivers
5.5 - I need to backup my recorded files
43
43
43
43
44
44
Version 2.0
Page 35
CTI
PULSAR PLUS
USER MANUAL
1 - Installation Problems
1.1 - “Software Install Error Messages”
Permissions error on installation of the Pulsar Plus software
If you get a permissions error on installation of the software then you
need to make sure that you log into your pc on an administrator account
(also if you are on a business network you must be logged in locally), to
make sure that you have full admin permissions for the installation.
1.2 – “Pulsar Can’t Detect the Hardware”
If you get the above message on running the Pulsar Plus software then
either you have not connected the hardware correctly to computer or the
USB to Serial Drivers are not installed. Please see pages 8-13 for info on
the correct hardware installation methods and pages 14-17 for info on
installing the USB to Serial Adaptor driver.
1.3 - “Re-installation Problems”
Permissions error on re-installation of the Pulsar Plus software
If you try and uninstall the Pulsar Plus software whilst it is running it may
not uninstall correctly and therefore on re-installation it may give a
permissions error.
You must “abort” the installation process and take the following steps to
correctly uninstall the rest of the Pulsar Plus software and then reinstall it.
Version 2.0
Page 36
CTI
PULSAR PLUS
USER MANUAL
To close and uninstall the rest of the Pulsar Plus software Go to task manager (Ctrl, Shift, Esc) and under “Processes” find
“PulsarPlus.exe”. - Highlight it and then press “End Task” to shut down the
Pulsar Plus software.
Now you may have to go to the location of the Pulsar Plus folder through
“My Computer” (default C:/Program Files/Pulsar Plus) and delete the
“Pulsar.exe” file.
Now try to install the software again.
2 – Auto Record Problems
2.1 - “Auto-Recording Does Not Start Automatically”
If there is no sound on playback of recordings then please follow these steps.
Please note that if you have changed the “Recording Level Settings” then you
will need to restart the Pulsar Plus software for them to take effect.
Check Your Speakers - Try and play the “Speaker Check.wav” audio file
on the Pulsar Plus CD. If this plays through your speakers then they are
working correctly. If not then make sure your speakers are plugged into
the correct socket on your computer’s soundcard (usually green) and
that the volume is turned up on the speakers themselves and the
volume control icon in the system tray.
Check the Microphone Connection – Make sure that the 3.5mm mic
lead that you have connected to the Pulsar Plus (the same lead splits to
the serial/USB adaptor) is connected to your microphone socket on
your computer. See page 10 or 12 for a diagram on plugging this in.
Do You Have 2 Microphone Sockets (2 Sound Cards)? - You may have a
microphone socket on the front AND back of your computer. If this is
true try plugging the 3.5 mm mic lead into the other microphone socket
and recording a conversation again.
Version 2.0
Page 37
CTI
PULSAR PLUS
USER MANUAL
Try a Manual Record and Check Your Soundcard– Try a manual record
(Page 27) and then playback the recorded file (Page 29). If this works
then make sure you have followed the previous points here. If it does
not work then and you have followed the previous point here then your
soundcard may need to be configured again. See pages 19-22 on
configuring your soundcard.
2.2 - “Only Records 1 Side of the Conversation”
Flip the “1-2” Switch - This is on the side of the Pulsar Plus hardware
box and you may need a pen or paper clip to move it. Once you have
moved the switch to the other position try another recording and see if
this gives both sides of the conversation at the same level on playback.
Turn the Mic Volume Up – The microphone volume on your volume
control may need to be turned up. See Pages 19-22 on how to access
the microphone volume level setting and make sure that it is set at a
high level. Also you could try and turn the mic boost on (or up to ½ way
if using Vista) see if this improves the recordings.
2.3 – “Recordings Sound Very Quiet”
Turn the Mic Volume Up – The microphone volume on your volume
control may need to be turned up. See Pages 19-22 on how to access
the microphone volume level setting and make sure that it is set at a
high level. Also you could try and turn the mic boost on (or up to ½ way
if using Vista) see if this improves the recordings.
Check Your Speaker Volume - Try and play the “Speaker Check.wav”
audio file on the Pulsar Plus CD. If this plays through your speakers at a
loud level then they are working correctly. If not then make sure your
volume is turned up on the speakers themselves and the volume
control icon in the system tray.
Version 2.0
Page 38
CTI
PULSAR PLUS
USER MANUAL
2.4 – “Files Recorded in Segments”
If there has been a long pause in the conversation and the Pulsar software
thinks you have finished the call then it will stop recording and save the file.
Then when you start talking again it will start a new recording.
There are 2 solutions to this problem:
You can increase the “Delay before recording stops (Secs)” in the
Recording Level Settings menu (See Page 26) which will give you more
time before the recording will auto-stop (warning– if you hang up and
start a new conversation within the time you have set then you could have
multiple conversations recorded on 1 file).
You can have the “Prompt before saving” checkbox checked and if this
problem happens you can select “Continue” on the pop up window (See
page 28 for details).
2.5 – “Half-Way through a Call it asks me if I Want to Save the Recording”
This is due to the “Prompt before saving” checkbox being checked and the
“Delay before recording stops (Secs)” being set to short. If you don’t want
to have the “Prompt before saving” to appear then simply un-check the
check box on the main Pulsar screen (See page 25).
If you do want the “Prompt before saving“then you must can click the
“Continue” button to carry on recording on the same file (see page 25) and
increase the “Delay before recording stops (Secs)” in the Recording Level
Settings menu (See Page 26).
Version 2.0
Page 39
CTI
PULSAR PLUS
USER MANUAL
3 – Manual Recording Problems
3.1 – “No Sound on Playback of Recording”
If there is no sound on playback of manual recordings then please follow these
steps:
Check Your Speakers - Try and play the “Speaker Check.wav” audio file
on the Pulsar Plus CD. If this plays through your speakers then they are
working correctly. If not then make sure your speakers are plugged into
the correct socket on your computer’s soundcard (usually green) and
that the volume is turned up on the speakers themselves and the
volume control icon in the system tray.
Check the Microphone Connection – Make sure that the 3.5mm mic
lead that you have connected to the Pulsar Plus (the same lead splits to
the serial/USB adaptor) is connected to your microphone socket on
your computer. See page 10 or 12 for a diagram on plugging this in.
Do You Have 2 Microphone Sockets (2 Sound Cards)? - You may have a
microphone socket on the front AND back of your computer. If this is
true try plugging the 3.5 mm mic lead into the other microphone socket
and recording a conversation again.
Try a Manual Record and Check Your Soundcard– Try a manual record
(Page 27) and then playback the recorded file (Page 29). If it does not
work then (and you have followed these previous points) then your
soundcard may need to be configured again. See pages 19-22 on
configuring your soundcard.
Version 2.0
Page 40
CTI
PULSAR PLUS
USER MANUAL
3.2 - “Only Records 1 Side of the Conversation”
Flip the “1-2” Switch - This is on the side of the Pulsar Plus hardware
box and you may need a pen or paper clip to move it. Once you have
moved the switch to the other position try another recording and see if
this gives both sides of the conversation at the same level on playback.
Turn the Mic Volume Up – The microphone volume on your volume
control may need to be turned up. See Pages 19-22 on how to access
the microphone volume level setting and make sure that it is set at a
high level. Also you could try and turn the mic boost on (or up to ½ way
if using Vista) see if this improves the recordings.
3.3 – “Recordings Sound Very Quiet”
Turn the Mic Volume Up – The microphone volume on your volume
control may need to be turned up. See Pages 19-22 on how to access
the microphone volume level setting and make sure that it is set at a
high level. Also you could try and turn the mic boost on (or up to ½ way
if using Vista) see if this improves the recordings.
Check Your Speaker Volume - Try and play the “Speaker Check.wav”
audio file on the Pulsar Plus CD. If this plays through your speakers at a
loud level then they are working correctly. If not then make sure your
volume is turned up on the speakers themselves and the volume
control icon in the system tray.
Version 2.0
Page 41
CTI
PULSAR PLUS
USER MANUAL
4 - Recording Quality Problems
4.1 – “Buzzing / Crackling Noise Problems”
There can be 3 reasons for bad quality recordings. Please change each of these
in order so that you can get the best quality recording possible:
Cordless Phones Cause Interference – If you have a cordless phone
(wireless) within 2 meters of the Pulsar Plus hardware box then this can
interfere with the unit and give bad static on the recordings. Please make
sure that if you have a cordless telephone that it is positioned at least 1.5
meters away from the Pulsar hardware.
Mic Boost – Do you have the “Mic Boost” on or turned up? This can cause
bad quality recordings as it overloads the microphone. Please see pages
17-20 on how to turn off the mic boost.
Low Quality Codec – If you have used a very high compression codec that
keeps the file sizes small it could reduce the quality of recordings to a
point where they sound distorted. Please see page 32 on how to change
the recording quality level to a higher quality codec.
4.2 – “File Sizes Are Too Large”
High Quality Codec – If you have used a very low compression codec (e.g.
CD Quality) then the file sizes might be very large so as to give the best
quality recordings. Please see page 32 on how to change the recording
quality level to a lower quality codec (we recommend “Radio Quality” but
please try “Telephone Quality” and if you find the quality is acceptable
then use it as it will save on disk space.
Version 2.0
Page 42
CTI
PULSAR PLUS
USER MANUAL
5 - Other Troubleshooting Problems
5.1 – “Can’t Find Actual Saved WAV Files”
The default directory for saving the recorded files (in wav format) is:
“C:/Program File/Pulsar Plus”
If you have changed this then you can find the changed directory under
the “Advanced” menu (See page 30).
You can always do a search using the Windows search feature (“Ctrl + F”
from your desktop) for wav on all drives to see if it can find the recorded
files (if Vista remembering to select “Non-indexed locations”).
5.2 – “Don’t Want the Pulsar Software to Start when Windows Starts”
This is an option that can only be set on installation of the Pulsar Plus
software. (Note. We do not advise editing the system registry to change
the Pulsar entry).
If you want to change it so that the software starts or doesn’t start when
Windows starts then you will have to uninstall the software and re-install
it making sure you select the checkbox option (see page 18).
5.3 – “I Can Hear my Voice Coming out of my Speakers”
The “Playback” Microphone volume needs to be muted. (Note. The
playback volume NOT the recording volume).
Double-click on the Volume Control loudspeaker symbol in the system
tray, which is normally on the bottom right of the screen. On the Volume
Control menu, the Microphone input needs to be muted. Normally, you
just need to click on the Mute box underneath the Microphone input
Version 2.0
Page 43
CTI
PULSAR PLUS
USER MANUAL
option. On some computers, only Select options are presented, in which
case you will need to select everything except the Microphone input.
5.4 – “I Have Lost my CD or USB/Serial Drivers”
You can download any USB/Serial adaptor drivers and the Pulsar Plus
software from our website.
To get an updated version of the Pulsar Plus software, please use our
enquiries page at:
http://www.crucible-technologies.co.uk/AskUsAQuestion.aspx
You must select the option for “Pulsar Plus software update request” and
include the serial number of your Pulsar Plus (you can find this on the base
of your Pulsar unit).
To get the USB to Serial adaptor drivers you can find them on our site:
http://www.crucible-technologies.co.uk
under the “Help” menu tab, “Product Support”, “Pulsar Plus” section.
5.5 – “I Need to Backup My Recorded Files”
1 - First you will need to locate the saved recordings - see page 38.
2 - Once found you have several options to backup up the files. Some
suggestions are listed below:
You could burn the files to CD / DVD.
You could copy the files to a portable hard-drive.
You could copy the files to another computer / laptop.
If on a business network (and if you have the permission of your network
administrator) you could save the files to a shared network drive.
NOTE - Please do not contact Crucible-Technologies on support for how to
burn CD's / DVD's, etc. You must contact your relevant PC support
company. Alternatively you may find info pages at:
http://www.microsoft.com/windows/default.aspx
Version 2.0
Page 44
CTI
PULSAR PLUS
USER MANUAL
AFTER SALES SERVICE
At Crucible Technologies we pride ourselves in providing excellent technical
support. Having supplied CTI products for more than 15 years, we know this
makes us stand out from other suppliers.
Due to the increasing amount of our products in the market and the number of
support issues that relate to people changing and upgrading computers rather
than encountering difficulties with our products, we have the following support
policy:
“We will provide unlimited telephone support for 30 days following purchase of
the product. Following this period, we will provide unlimited e-mail support for
the life of the product. This will allow us to keep the cost of the product
competitive.”
When contacting us for support, please have the following information to hand
(or include in e-mail):
Serial number of unit (usually on base of product)
Software version
Where purchased from? (ie directly from us or a reseller)
Windows Operating System (Windows 98, 2000, ME, XP, Vista, etc)
Your contact details including tel, fax and e-mail address
Description of the problem
GUARANTEE
Your Crucible Technologies product is guaranteed for 1 year from the date of
purchase. Please keep your invoice as proof of purchase. Should a problem
arise with the product, please contact: [email protected] for
technical assistance. If you wish to return your product please contact us via the
details on the back page and instructions for returning the product will be given.
If you send any items back to us without arranging a returns number then we do
not guarantee any repair or refund of the item. This guarantee does not affect
your statutory rights.
Version 2.0
Page 45
Version Change Log
Pulsar Plus Software Version 2.0 – 2.0.40
- New comm port search feature & software load
- System tray minimize function
- Advanced search on playback screen
- Pause feature on playback
- Settings and Advanced buttons moved to Tools menu
- Descriptions of each setting with an “I” icon
- Button selected now grayed out on main screen
- Auto-numbering max level increased
- Settings name changed & now defaults to Telephone tab
- Sliders on settings now defunct
- About menu changed
- Visual styles updated
- Installation method changed. Also new user manual & trouble guide inc on install
Crucible Technologies
11 Glaisdale Road
Northminster Business Park
York
YO26 6QT
United Kingdom
www.crucible-technologies.co.uk
[email protected]