1
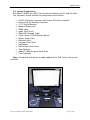
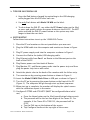
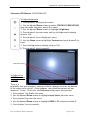
EVA USER’S MANUAL MODEL 10-WIN Manual Revised November 2012 EVA Users Manual - Model 10-WIN.docx Page 1 of 24 Table of Contents CONTENTS 1. SYSTEM DESCRIPTION ............................................................................................................ 3 2. DEFINITIONS AND SYSTEM COMPONENTS.................................................................. 4 3. TIPS FOR SUCCESSFUL USE................................................................................................... 6 4. SYSTEM SETUP............................................................................................................................. 6 5. MONITOR CALIBRATION ........................................................................................................ 9 6. USING THE EVA TESTER ....................................................................................................... 10 7. CONFIGURE STUDIES ............................................................................................................. 11 8. RETRIEVE STUDY DATA ....................................................................................................... 11 9. SHUT DOWN THE EVA TESTER ......................................................................................... 11 10. EVA VISUAL ACUITY TESTING APPLICATIONS..................................................... 12 11. FREQUENTLY ASKED QUESTIONS ............................................................................... 14 12. COMMON ERRORS ............................................................................................................... 16 APPENDIX A......................................................................................................................................... 17 APPENDIX B ......................................................................................................................................... 19 APPENDIX C ......................................................................................................................................... 21 APPENDIX D ........................................................................................................................................ 22 APPENDIX E ......................................................................................................................................... 23 EVA Users Manual - Model 10-WIN.docx Page 2 of 24 System Setup MODEL HIGHLIGHTS Model 10-WIN is a completely new system. Uses a new monitor able to display letters down to 20/6. Windows-based system that uses Wi-Fi for communication. System controlled using an Apple iPod Touch. Sleep option to make monitor dark without turning it off. System is only 8 ½” deep and 18” to top of monitor when stacked (monitor is 21” wide). Test results are stored as encrypted files per HIPAA requirements. 1. SYSTEM DESCRIPTION The Electronic Visual Acuity (EVA) Tester uses an Apple iPod Touch to communicate with a Windows-based computer. Stimuli are high-contrast, black-and-white letters with luminance of 85 to 105 cd/m2 and contrast of 98%. The system can present single letters or lines of letters. Single letters are framed with crowding bars around the letter. For lines of letters, five (5) letters are displayed for sizes smaller than 20/250; a decreasing number of letters is displayed as letter size increases. With a 21.5-inch LCD/LED monitor at 1920 x 1080 pixels, the system is capable of displaying letters from 20/800 (1.6 logMAR) to 20/6 (-0.5 logMAR) at a test distance of 3 meters. Letter size corresponds to the logMAR progression of the ETDRS charts. The iPod, communicating with the PC wirelessly via Wi-Fi, provides instructions to the technician and displays the letter that is being shown on the monitor. For the automated tests (ATS-HOTV, E-ETDRS) the size and sequence of letter presentations is determined from a computer algorithm based on the subject’s responses. EVA Users Manual - Model 10-WIN.docx Page 3 of 24 System Setup 2. EFINITIONS AND SYSTEM COMPONENTS 2.1 Definitions EVA PC The personal computer (PC) sent with the EVA Tester. Also referred to as the “Tower.” EVA Tester All components of the EVA Tester including monitor, PC, iPod, programs on the PC, and communication between the iPod and PC. iPod The Apple iPod Touch that is used as the controller for the EVA Tester. Program Flash Drive Portable memory device used to start the EVA Tester and store encrypted test results. The flash drive must be inserted in a USB port for the tester to start. Retrieve Data Flash Drive Flash drive with EVA program to download test data from EVA hard drive when requested by a study coordinating center. Splash Screen The initial screen when EVA starts up. A white square outlined in black is displayed in the middle of the screen with “EVA” written underneath. Used for monitor calibration. Router A wireless-access point used to manage communication between the EVA PC and the iPod. Tower ID Unique identifier used to configure wireless connection between the iPod and EVA PC. Printed on a label attached to the EVA PC; example “T000001”. Validation Codes Encrypted values for the test result and patient identifier; used during data entry to validate that information is correctly entered. EVA Users Manual - Model 10-WIN.docx Page 4 of 24 System Setup 2.2 System Components EVA Model 10-WIN uses Wi-Fi communication between the PC and the iPod. The shipment should include the components listed below: EVA PC (Desktop Computer) with Tower ID sticker attached Power Cord for Desktop Computer 21.5” Digital Monitor Monitor Power Cord HDMI cable Apple iPod Touch iPod USB Charging Cable Cisco Linksys E1200 Wireless Router Router Power Cord Ethernet Cable Program Flash Drive Light Meter Plastic Ruler with Velcro Tape Measure Model 10-WIN Program Flash Drive Cart (Optional) Note: A keyboard and mouse are not used with the EVA Tester and are not included. EVA Users Manual - Model 10-WIN.docx Page 5 of 24 System Setup 3. TIPS FOR SUCCESSFUL USE Keep the iPod battery charged by reattaching to the USB charging cable plugged into the EVA after each use. Use only flash drives with Model 10-WIN on the label. To shut down the EVA PC, use either the PC Power button on the iPod or press and quickly release the power button on the EVA PC. Do NOT press and hold the EVA PC power button or the system may take longer to boot the next time. 4. SYSTEM SETUP Follow these instructions to set up the 10-WIN EVA Tester. 1. Place the PC and monitor on the cart provided or your own cart. 2. Plug the HDMI cable into the computer and monitor as shown in Figure 1. 3. Plug PC power supply cord into the computer as shown in Figure 1. 4. Connect the iPod to the (white) USB charging cable. 5. Plug Ethernet cable from Port 1 on Router to the Ethernet port on the back of the EVA PC. 6. Plug Router power cord into back of Router. 7. Plug Monitor, PC, and Router power cords into the power strip and then plug the power strip into a wall outlet. 8. Attach the plastic ruler to the back of the monitor with the Velcro strip. 9. Turn monitor on by pressing power button as shown in Figure 2. 10. Insert the Model 10-WIN Flash Drive in USB port as shown in Figure 2. 11. Turn the PC on by pressing the power button on the front of the PC (Figure 2). The computer will go through start up (boot) sequence. 12. When start up is complete, the monitor will display the splash screen with the calibration square in the center. 13. Configure E-ETDRS and ATS-HOTV (MUST be configured before initial use). a. Press the Home button on the iPod (round button below screen). b. The passcode will be the last four digits of the Tower ID. For example, if the Tower ID is T000123, the password will be 0123. c. Tap the EVA icon at the bottom of the screen. d. Tap Configure Studies at the top right of the screen. EVA Users Manual - Model 10-WIN.docx Page 6 of 24 System Setup e. Tap Set E-ETDRS and check boxes for studies in which your site is participating. Select Non-Study if your EVA Tester is also used for non-study patients. f. Tap Done. g. If your site uses ATS-HOTV (for children under age 7), tap Set ATS-HOTV, select your studies (and Non-Study if needed), tap Done. h. Tap the Exit to leave configuration. 14. Confirm testing distance is 3 meters (118 inches) from the patient to the monitor screen. The EVA Tester is ready to use. Refer to Section 6 for patient testing procedures. IMPORTANT A Model 10-WIN flash drive is required for this EVA Tester. Usable flash drives and application cards are labeled “10-WIN”. Do NOT use flash drives intended for other models. EVA Users Manual - Model 10-WIN.docx Page 7 of 24 System Setup Figure 1 View of the back of the EVA PC Use for Program Flash HDMI Use for iPod cable Power Cord Figure 2a View of the back of the Asus monitor Power Cord HDMI Figure 2b View of the back of the Viewsonic monitor Power Cord HDMI EVA Users Manual - Model 10-WIN.docx Page 8 of 24 Monitor Calibration 5. MONITOR CALIBRATION The EVA monitor must be correctly calibrated for valid testing. The calibration square is the image displayed on the EVA splash screen. Two monitor calibration checks are performed at regular intervals: (1) size calibration check to confirm letters are accurately displayed and (2) luminance calibration check to confirm the monitor screen is sufficiently bright for testing. Procedures to check calibration on your monitor are as follows: 5.1 Size Calibration 1. Display the EVA splash screen. The outlined square in the middle of the screen is used for size calibration. Each side of the square should be 114 mm in length. 2. Complete the following steps on the top and left side of square: a. Place a ruler with millimeter scale against side of the square. Confirm the length of the side is 114 mm. IMPORTANT: When viewing, use only one eye and adjust your head as necessary so your eye is directly on line with side. b. If the either side is not 114 mm, contact EVA Support at the Jaeb Center for assistance. 5.2 Luminance Calibration For correct testing, the white area of the calibration square should be at least 95 cd/m2. The corresponding lux values are printed on the light meter label. See Appendix B for instructions and photos. IMPORTANT! 1. Allow monitor to warm up. a. For regular testing, the monitor should be on for at least 10 minutes. b. For Low Contrast testing, the monitor should be on for at least 45 minutes. 2. Turn room lights OFF and follow instructions in Appendix B for your light meter. 3. If needed, adjust brightness setting as described in Appendix A. IMPORTANT The Model 10-WIN EVA Tester has been equipped with a Sleep feature that darkens the screen without turning the monitor off. If you use the Sleep feature, you do NOT need to let the monitor warm up again before use. You should still perform calibration checks before testing. EVA Users Manual - Model 10-WIN.docx Page 9 of 24 Using the EVA Tester 6. USING THE EVA TESTER 6.1 Perform Visual Acuity Testing Follow these instructions to perform visual acuity testing with the EVA Tester. 1. Insert the Model 10-WIN Flash Drive into a USB port. Power on the EVA PC. 2. Perform size and luminance calibration checks on the monitor. 3. Confirm test distance is 3 meters (118 inches) from the monitor screen to center of exam chair. 4. Confirm florescent lighting is not used in the exam room. Dim incandescent lighting is recommended. 5. Turn iPod on. The iPod screen should display test icons (E-ETDRS, ATS-HOTV, etc.). If the icons are not displayed, tap the EVA icon. 6. Tap an icon to start a program. 7. E-ETDRS and ATS-HOTV Testing a. For study patient, select protocol (e.g., DRCRnet, PEDIG, etc.). For non-study patient select Non-Study. Tap Continue. b. Tap New Test. c. Confirm Date and Time are correct. If not, tap Change Time, enter the correct date and time and tap Save. d. Tap Start Test, verify testing distance and calibration, tap Continue. e. If necessary, choose a protocol or select Screening (ID not yet assigned) and tap Continue. (Note: Screening option is not available for DRCRnet and PEDIG.) f. Follow directions on iPod screen to perform test. 6.2 Validation Codes The EVA vision test results include encrypted values for the score and patient ID/test date. These codes are displayed on the iPod with the test result and can be used during data entry to confirm the data is entered correctly. If it is necessary to view the codes for a previous test, select the appropriate icon on the EVA Application screen on the iPod and select the study for which the test was done. Tap View Previous Tests and tap either View by Date or View by Patient ID. Select the patient ID and the test results/codes will be displayed. EVA Users Manual - Model 10-WIN.docx Page 10 of 24 Configure Studies 7. CONFIGURE STUDIES The Configure Studies program selects studies (or non-study) that will use the E-ETDRS and ATS-HOTV vision testing programs. For example, if a site is participating in the DRCRnet and PEDIG studies, Configure Studies is set to display those studies when E-ETDRS is used. You must use the Configure Studies program to set up the E-ETDRS and ATSHOTV programs before initial use. 1. On iPod, tap Configure Studies icon in upper right corner. 2. Tap Set E-ETDRS and check boxes for studies at your site. Select NonStudy if your EVA Tester is also used for non-study patients. 3. Tap Done. 4. If your site uses ATS-HOTV (for children under age 7), tap Set ATS-HOTV and repeat steps 2 and 3. 5. Tap Exit to leave configuration. 8. RETRIEVE STUDY DATA Periodically your coordinating center may want to download stored test data from the PC hard drive. They will send you a Retrieve Data Flash Drive to download the data and return to the coordinating center. 1. Ensure the EVA Tester is at the Calibration Square. 2. Insert Retrieve Data Flash Drive in a USB port. Leave the Program Flash Drive plugged in. 3. The data retrieval will start and you will see a message stating that the EVA PC will shut down when the retrieval is complete. 4. When the EVA PC shuts down, remove the Retrieve Data Flash Drive. 5. Use the same Retrieve Data Flash Drive on each Model 10-WIN EVA Tester at your site, repeating steps 1-4. 6. After retrieving data from all 10-WIN EVA Testers, mail the Retrieve Data Flash Drive to your coordinating center. If the files are emailed, include your Project (DRCR, PEDIG, etc.) and Site Number in the subject line. 9. SHUT DOWN THE EVA TESTER To shutdown the EVA PC, use the PC Power application on the iPod. You can also press and quickly release the power button and the PC will safely shut itself down. (Do NOT press and hold the power button or system will crash and require several minutes to restart.) EVA Users Manual - Model 10-WIN.docx Page 11 of 24 EVA Visual Acuity Testing Applications 10. EVA VISUAL ACUITY TESTING APPLICATIONS 10.1 E-ETDRS Visual Acuity Test The Electronic Early Treatment of Diabetic Retinopathy (E-ETDRS) is a visual acuity testing program for subjects 7 years of age or older. It was developed to provide a visual acuity letter score comparable to the ETDRS chart testing score. The E-ETDRS Visual Acuity Testing protocol consists of an initial screening phase to obtain an approximation of the visual acuity threshold followed by a testing phase to obtain the visual acuity score. Details of the E-ETDRS algorithm and an example are included in Appendix E. The E-ETDRS application displays the test result as a letter score (number of letters correctly identified) and as a Snellen approximation. Also displayed are validation codes for the test result, patient ID, and test date. These codes can be used to validate correct entry when the data are entered into a case report form. The E-ETDRS application includes study versions for use in specified clinical studies. These study versions MUST be used for study patients and patients being screened for the study. Data entry of the patient ID and technician ID is required; results are identified by the patient ID and stored on both the Program Flash Drive and on the hard drive. 10.2 ATS-HOTV Visual Acuity Test The ATS-HOTV is the electronic version of the Amblyopia Treatment Study Visual Acuity Testing protocol that was developed to facilitate the standardization of visual acuity testing in clinical trials of pediatric eye disease involving children in the three to less than 7 years old range. In brief, the ATS-HOTV consists of the presentation of singlesurrounded optotypes (letters H, O, T, and V) in 4 steps: a screening phase, a first threshold determination (Phase I), reinforcement phase, and a second threshold determination (Phase II). Details of the ATSHOTV algorithm are included in Appendix D. The ATS-HOTV application displays the test result as a Snellen value. Also displayed are validation codes for the test result, patient ID, and test date. These codes can be used to validate correct entry when the data are entered into a case report form. EVA Users Manual - Model 10-WIN.docx Page 12 of 24 EVA Visual Acuity Testing Applications The ATS-HOTV application includes study versions for use in specified clinical studies. These study versions MUST be used for study patients and patients being screened for the study. Data entry of the patient ID and technician ID is required; results are identified by the patient ID and stored on both the Program Flash Drive and on the hard drive. 10.3 Chart An application that can be used for manual vision testing. Displays individual letters or lines of letters using either the HOTV or Sloan letter set, or the Lea Symbols. 10.4 PC Power An application to shut down, restart, or “sleep” the EVA PC. A. Shutdown – This option turns the EVA PC off. Use this if you want to power off the system or if you need to unplug it. B. Restart – This option restarts the EVA PC. You may be asked to do this in the course of troubleshooting. C. Sleep – This option displays a black image covering the entire screen. You can use this option when you need to use the room while the EVA Tester is not in use without turning off the EVA PC and/or monitor. IMPORTANT The Model 10-WIN EVA Tester has been equipped with a Sleep feature that darkens the screen without turning the monitor off. If you use the Sleep feature, you do NOT need to let the monitor warm up again before use. You should still perform calibration checks before testing. EVA Users Manual - Model 10-WIN.docx Page 13 of 24 Frequently Asked Questions 11. FREQUENTLY ASKED QUESTIONS System Questions 1. How much space do I need to properly operate the EVA Tester? 2. Why does the testing distance need to be 3 meters? 3. I have an LCD monitor that didn’t come with the EVA Tester; can I use it? 4. Does it matter if the EVA PC and monitor are stacked or separate? 5. Where are the keyboard and mouse? 6. What program version is my EVA Tester running? iPod Questions 1. Can I use the PDA from a previous EVA model? 2. How can I find which program version is installed on my EVA Tester? 3. What do I do if I cannot find the EVA program on my iPod? 4. I need to look up a previous score for a patient. How do I do that? System Questions 1. How much space do I need to properly operate the EVA Tester? The system is calibrated for a 3 meter (118 inches) testing distance from the patient to the front of the monitor screen. Since the base of the monitor has a depth of about 6 inches, you will need approximately 11 feet from the patient to the back of the monitor. 2. Why does the testing distance need to be 3 meters? For standardized testing of visual acuity in a clinical trial it is best to have the same testing distance at all clinical sites since visual acuity can vary with testing distance. It was therefore decided to have a fixed test distance of 3 meters even if this means that the EVA Tester must be wheeled into position when it is used to test a study patient. 3. I have an LCD monitor that didn’t come with the EVA Tester; can I use it? No. EVA Testers are carefully calibrated and validated with specific hardware. Any variation of this hardware could cause the testing to be invalid. EVA Users Manual - Model 10-WIN.docx Page 14 of 24 Frequently Asked Questions 4. Does it matter if the EVA PC and monitor are stacked or separate? The system will work either way. Choose the setup that is easiest and most comfortable for you. Be sure that you adjust the cart as needed for the correct testing height. 5. Where are the keyboard and mouse? The EVA Tester does not require a keyboard or a mouse to operate so this equipment is not included. The only equipment required is the PC, the monitor, and the iPod. 6. What program version is my EVA Tester running? The program version for your EVA Tester is located on the bottom of the splash screen. iPod Questions 1. Can I use the PDA from a previous EVA model? No. The 10-WIN model EVA Tester requires the Apple iPod Touch to access the Wi-Fi signal. PDAs from previous EVA models used Bluetooth to communicate with the PC. 2. How can I find which program version is installed on my EVA Tester? Tap the Configure Studies icon; the version is displayed on the bottom of the iPod screen. 3. What do I do if I cannot find the EVA program on the iPod? If you cannot find the EVA program, scroll once to the left and type Safari in the search bar. Select Safari from the list below. In the address bar, type 192.168.250.1 and tap Go. Tap the middle button ( ) and then tap Add to Home Screen. Name the new icon EVA. 4. I need to look up a previous score for a patient. How do I do that? There are two ways to view previous patient test results; by patient and by date. On the iPod, select the appropriate study for the patient, tap Continue. Tap View Previous Tests. Tap View by Date or View by Patient. Select the appropriate date or Patient ID for previous results. When completed, tap Done three times to exit to the View Previous Tests menu. EVA Users Manual - Model 10-WIN.docx Page 15 of 24 Common Errors 12. COMMON ERRORS 1. Cannot Open EVA. (See Figure 1) Check to make sure all devices are on and EVA is at the Calbration Square. Sometimes the EVA Tester takes a minute to start broadcasting the WiFi signal. 2. Overscan Issue Calibration square does not measure 114 mm and bottom of screen is cut off. See Figure 2. There is a possibility that your monitor’s settings could be changed to cause the bottom of the screen to be cut off. If this happens, the calibration square will not measure 114 mm. To fix this, the Overscan setting must be corrected. Figure 1 Overscan issues Figure 2 1. 2. 3. 4. 5. Press button 1 to display the menu. Use the Up and Down arrows to highlight Input Select from the menu. Press button 2 to enter the menu. Use the Up and Down arrows to highlight HDMI 1 PC and press button 2. Press button 1 to exit menu(s). EVA Users Manual - Model 10-WIN.docx Page 16 of 24 Appendix A – Monitor Adjustment Instructions APPENDIX A Monitor Adjustment Instructions These instructions describe how to adjust the EVA monitor to conform to luminance and size specifications. Refer to the instructions for the monitor model included with your system. NOTE: Size cannot be adjusted on these monitors. If the calibration square is incorrect contact Jaeb Center EVA Support; do not proceed with EVA testing. If the brightness or size do not calibrate correctly contact Jaeb EVA Support for assistance. Asus LCD Monitor (VH226H) To Adjust Brightness 1. Press button 3 to display the menu. 2. Press button 2 to move to the Image menu, then press button 3. 3. Press button 3 to select Brightness, then use button 2 to increase brightness. 4. Press button 1 to exit menu(s). EVA Users Manual - Model 10-WIN.docx Page 17 of 24 Appendix A – Monitor Adjustment Instructions Viewsonic LED Monitor (VX2253MH-LED) To Adjust Brightness 1. Press button 1 to display the menu. 2. Use the Up and Down arrows to select CONTRAST/BRIGHTNESS from the menu and press button 2 to enter. 3. Use the Up and Down arrows to highlight Brightness. 4. Press button 2 to enter menu and use the Up arrow to change value to 100. 5. Press button 1 to exit Brightness menu. 6. Use the Down arrow to highlight Contrast and press button 2 to enter. 7. Press the Up arrow to change value to 100. 8. Press button 1 to exit menu(s). Overscan issues To Adjust Size of EVA Square to 114 mm There is a possibility that your monitor’s settings could be changed to cause the bottom of the screen to be cut off. If this happens, the calibration square will not measure 114 mm. To fix this, the Overscan setting must be corrected. 1. Press button 1 to display the menu. 2. Use the Up and Down arrows to highlight Input Select from the menu. 3. Press button 2 to enter the menu. 4. Use the Up and Down arrows to highlight HDMI 1 PC and press button 2. 5. Press button 1 to exit menu(s). EVA Users Manual - Model 10-WIN.docx Page 18 of 24 Appendix B – Light Meter Instructions APPENDIX B Light Meter Instructions The light meter is used to calibrate the computer monitor that you use for visual acuity determinations. *** CRITICAL NOTE *** Effective May 2012, EVA Testers should only use a digital light meter. See below for photographs and instructions to identify and correctly use your meter. YOU MUST USE THE CORRECT PROCEDURE FOR VALID TEST RESULTS! DIGITAL LIGHT METER Mastech LX1330B Important: Your EVA Tester MUST display the calibration image with a white square inside a black frame as shown at right. If you do not have this image, contact your coordinating center. Do NOT continue with calibration. Allow monitor to warm up for at least 10 minutes. Be sure other lights are off in the room when you take light meter readings. Procedure LCD Screen Photo Sensor ON/OFF Switch Confirm that all other lights are off in the room. 1. Confirm monitor has been warming up for at least 10 minutes. 2. Display the EVA splash screen. 3. Turn the light meter on by pressing the POWER button. If battery icon is displayed on the LCD screen, replace the 9V battery. 4. Confirm the light meter screen displays only the word “Lux” (on bottom right). If other items are displayed turn the meter off then on again to clear the display. EVA Users Manual - Model 10-WIN.docx Calibration Square on Splash Screen Page 19 of 24 Appendix B – Light Meter Instructions 5. Press the Range button once. 6. Remove the sensor protective cover and place the side with the white circle (see image above) on the white area in the center of the EVA calibration square. Do NOT allow the sensor to touch non-white areas. 7. The display will return the lux value of the monitor screen. Confirm that the displayed value falls within the range specified on your light meter label. If the displayed value is below the specified range, increase brightness, leave the monitor on for 10 minutes, and then recheck with the light meter (recommend increasing brightness in 5% increments). 8. When finished with light meter calibration, replace the protective cover to avoid damage when not in use. EVA Users Manual - Model 10-WIN.docx Page 20 of 24 Appendix C. iPod Instructions APPENDIX C iPod Instructions Apple iPod Touch 4G 8GB Sleep/wake Home EVA Users Manual - Model 10-WIN.docx Page 21 of 24 Appendix D. ATS-HOTV© Visual Acuity Test Protocol APPENDIX D ATS-HOTV© Visual Acuity Test Protocol Single letters with surround bars ½ letter width from the letter are presented in four phases: screening, phase I (first threshold determination), reinforcement, and phase II (second threshold determination). In phase I and phase II, up to four single letters are sequentially presented at each logMAR level* that is tested. A level is considered to be ‘passed’ if 3 of 3 or 3 of 4 letters are correct and ‘failed’ if 2 letters at a level are missed. Testing of a level stops as soon as criteria are met for either ‘pass’ or ‘fail’. Screening Phase Starting from either 20/100 or 20/400, single letters, in sequential descending logMAR sizes, are shown until one is missed. 1. Tester selects 20/100 or 20/400 size letter to present as starting point (depending on the expectation of visual acuity level based on previous testing or a pretest). 2. If response is correct, letter at next smallest logMAR level is presented and testing continues sequentially with one letter per logMAR level through 20/20 until there is an incorrect response. 3. If starting point was 20/100 and response is incorrect at either 20/100 or 20/80, screening is restarted at 20/400. 4. If starting point is 20/400 and response is incorrect at either 20/400 or 20/320, screening is restarted at 20/800. If 20/800 is missed, 20/800 becomes the starting level for phase I. Phase I Starting 2 logMAR levels above the missed level in Screening, the smallest logMAR level at which 3 of 3 or 3 of 4 letters are correctly identified is determined. 1. Up to 4 single letters are sequentially presented 2 logMAR levels above the level missed in screening Exception: if 20/20 was correct in Screening, phase I starts at 20/30. Exception: if 20/800 or 20/640 was missed in Screening, phase I starts at 20/800 2. If first tested level is failed, testing continues at sequentially larger logMAR levels until a level is passed. If 20/800 is failed, phase I ends, the Reinforcement phase is omitted, and 20/800 is retested in phase II 3. If first tested level is passed, testing continues at sequentially smaller logMAR levels until a level is failed. Reinforcement Phase In order to get the child whose attention is drifting back on track, 3 letters larger than the phase I threshold are sequentially presented. 1. Starting 3 levels larger than the level missed in phase I, 3 successively smaller single letters are presented. Exception: if the level failed in phase I is 20/500 or 20/640, 3 20/800 letters are shown for reinforcement Note: the reinforcement phase responses do not contribute to the visual acuity score and even if the responses are incorrect, the test proceeds to phase II. Phase II The last level missed in Phase I is retested and if ‘passed’, testing continues until a level is ‘failed’ 1. Up to 4 single letters are sequentially presented at the last level missed in phase I 2. If the level is failed, testing stops. 3. If the level is passed, testing continues at sequentially smaller logMAR levels until a level is failed. Final Visual Acuity Score The visual acuity score is the smallest logMAR level passed in Phase I or Phase II. *logMAR levels (Snellen equivalents): 20/800, 20/640, 20/500, 20/400, 20/320, 20/250, 20/200, 20/160, 20/125, 20/100, 20/80, 20/63, 20/50, 20/40, 20/32, 20/25, 20/20, 20/16, 20/12 EVA Users Manual - Model 10-WIN.docx Page 22 of 24 Appendix E. E-ETDRS© Visual Acuity Test Protocol APPENDIX E E-ETDRS© Test Protocol The EVA runs a visual acuity testing program called E-ETDRS© (Electronic Early Treatment of Diabetic Retinopathy). The program has been developed to provide a visual acuity letter score that is comparable to the ETDRS chart testing score. During development of the E-ETDRS protocol, a study was conducted in which high validity and test-retest reliability were demonstrated (Moke PS, Turpin AH, Beck RW et al. A computerized method of visual acuity testing: adaptation of the amblyopia treatment study visual acuity testing protocol. Am J Ophthalmol 2001; 132:903-14). Overview The E-ETDRS Visual Acuity Testing Protocol consists of an initial screening phase to obtain an approximation of the visual acuity threshold and then a testing phase to obtain the visual acuity score. The protocol is summarized below. The complete algorithm is depicted in the figure that follows. Letters are displayed with surround bars one full letter width from the letter. The E-ETDRS testing protocol: Screening phase: With single letter presentations, determines smallest logMAR level at which a letter is correctly identified. Testing phase: Starts testing letters by intermixing letter sizes of screening phase score and one level smaller. Test progress: If a letter is missed at a level, one level larger is added to the testing mix; if a letter is correct at a level, one level smaller is added to the testing mix. Acuity determination: Tests 5 letters at each level until smallest level with 5/5 correct and the smallest level with 0/5 correct are determined. Example: IN THE FOLLOWING EXAMPLE, C = CORRECT AND M = MISSED Screening: 20/400c, 20/200c, 20/100c, 20/50c, 20/25m, 20/40m Score = 20/50 Test progress 1. Start by intermixing 20/50 and 20/40 letters: 20/50c, 20/40m, 20/50c, 20/40m, 20/50m 2. Because a 20/50 letter was missed, add 20/63 to the letter mix (so now have letters of 20/40, 20/50, and 20/63 intermixed): 20/63c, 20/50c, 20/40c 3. Because 20/40 was correct, add 20/32 to the letter mix (mix is now 20/32, 20/40, 20/50, and 20/63): 20/32m, 20/63c, 20/63c, 20/50m 4. Five letters at 20/50 have been tested, so it drops out of the mix (mix is now 20/32, 20/40, and 20/63): 20/63c, 20/40c, 20/32m, 20/40m 5. Five letters at 20/40 have been tested, so it drops out of the mix (mix is now 20/32 and 20/63): 20/32m, 20/32m, 20/63c 6. Five letters at 20/63 have been tested, so it drops out of the mix (mix is now 20/32 only): 20/32m 7. Five letters at 20/32 have been tested; there are no letters left in the mix so test is over Test summary 20/63 5/5 correct 20/50 3/5 correct 20/40 2/5 correct 20/32 0/5 correct Letter Score: 10 (number of letters correctly identified) + 55 (5 times the number of lines above (larger than) 20/63 and through 20/800) = 65 Snellen Approximation (logMar to Snellen conversion for 65 letters): 20/50 EVA Users Manual - Model 10-WIN.docx Page 23 of 24 Appendix E. E-ETDRS© Visual Acuity Test Protocol Electronic ETDRS (E-ETDRS) Visual Acuity Testing Protocol Algorithm Screening Phase In each step, one letter is shown at each logMAR level. Show 20/400 letter Incorrect Correct Show letters in 3-level steps (e.g. 20/200, 20/100, 20/50, 20/25, 20/12) until either a miss or 20/12 correct 20/12 Correct 20/400 Correct Show letter at each successively smaller level until either a miss or 20/400 correct Correct Show a 20/800 letter Incorrect Letter missed Letter Missed Show letter 2 levels up from missed level (i.e. level smaller than last correct level) Incorrect Correct Show letter at each successive larger level until correct response or 20/800 is shown Show letter at each successively smaller level until a miss or 20/12 correct Screening score is last correct level or 20/800 if last letter shown is 20/800 1. 2. 3. 4. 5. 6. Screening score is 20/800 Threshold Phase To start, the letter pool consists of letters from 2 levels*: the level of the screening phase score and one level smaller. Each letter presentation is randomly selected from the active pool of letters with the stipulation that every third letter must be from the largest level in the active letter pool. A level remains in the active pool until 5 letters are tested at the level. A new level is added to the active letter pool when: a. A letter from the largest level in the pool is missed: one level larger is added to the letter pool† b. A letter from the smallest level in the pool is correct: one level smaller is added to the letter pool‡ Testing continues until an upper logMAR level with 5 of 5 letters correct and a lower logMAR level with 0 of 5 letters correct are determined and 5 letters are tested on all levels in between the upper and lower logMAR levels.§ Visual acuity score is the number of letters correctly identified during threshold testing, plus 5 letters for each logMAR line above the upper logMAR level through 20/800. The screening phase uses the letters V, R, K and D. The threshold phase uses the same 5 letters from the Sloan letter set that appear on the original ETDRS charts for right and left eyes. *Unless screening score was 20/12, in which case letter pool consists of only 20/12 letters. †Unless 20/800 letter is missed. ‡Unless 20/10 is correct. §If 20/10 becomes part of the active letter pool, it will be the lower logMAR level. EVA Users Manual - Model 10-WIN.docx Page 24 of 24