1
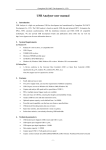
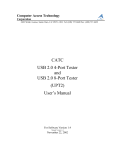
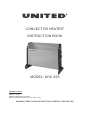
CONVECTOR HEATER”
INSTRUCTION BOOK
MODEL: UHC-825
TECHNICAL DATA
Convector heater
RATED POWER INPUT: 2000W
RATED VOLTAGE RANGE: AC 220-240V - 50Hz
WARNING: READ THESE INSTRUCTIONS CAREFULLY BEFORE USE
USER INSTRUCTIONS FOR CONVECTOR HEATERS
IMPORTANT Read these instructions fully before using the heater. Retain these instructions for future reference.
NOTE: THESE HEATERS ARE INTENDED FOR DOMESTIC USE ONLY. THEY CAN BE USED AS BOTH PORTABLE APPLIANCE AND
WALL MOUNTING APPLIANCE.
SAFETY INSTRUCTIONS (to be read before operating the heater)
1) Do not use the heater unless the feet are correctly attached if the heater is used as portable appliance.
2) Ensure the power supply to the socket into which the heater is plugged is in accordance with the rating label on the heater and that the
socket is earthed.
3) Keep the mains lead away from the hot body of the heater.
4) The heater is not intended for use in bathrooms, laundry areas or similar indoor locations. Never place the heater where it may fall into a
bathtub or other water container.
5) Do not use outdoors.
6) Do not cover or obstruct any of the heat outlet grilles or the air intake openings of the heater.
7) Do not place the heater on carpets having a very deep pile.
8) Always ensure that the heater is placed on a firm level surface. Ensure that the heater is not positioned close to curtains or furniture as this
could create a fire hazard.
9) Do not position the heater in front of, or immediately below, a wall socket.
10) Do not insert any object through the heat outlet or air intake grilles of the heater.
11) Do not use the heater in areas where flammable liquids are stored or where flammable fumes may be present.
12) Particular care should be taken when the heater is situated in areas occupied by children or invalids.
13) Always unplug the heater when moving it from one location to another.
14) Do not use the heater if the power cord is damaged. If the power cord is damaged it must be replaced by a recognised service agent or
other qualified person. If the plug is damaged, see Plug Replacement details below.
15) The products are over-temperature protection, if the equipment works, we must disconnect the plugs, and other products, after cooling, in
order to plug in the power of work
16) This appliance is not intended for use by persons (including children) with reduced physical, sensory or mental capabilities, or lack of
experience and knowledge,unless they have been given supervision or instruction concerning use of the appliance by a person responsible for
their safety. Children should be supervised to ensure that they do not play with the appliance.
ASSEMBLY OF THE HEATER (while use on the floor as portable appliance)
Before using the heater, the feet (supplied separately in the carton), must be fitted to the unit. These are to be attached to the base of the
heater using the 2 self-tapping screws provided, taking care to ensure that they are located correctly in the bottom ends of the heater side
mouldings
OPERATION OF THE HEATER
NOTE:- It is normal when the heaters are turned on for the first time or when they are turned on after having not been used for a long period of
time the heaters may emit some smell and fumes. This will disappear when the heater has been on a short while.
1800W~2000W Convector heater with thermostat
1) Choose a suitable location for the heater, taking into account the safety instructions above.
2) Insert the plug of the heater into a suitable socket.
3) Turn the thermostat knob fully in a clockwise direction to the maximum setting.
Turn on the heating elements by means of the rocker switches on the side panel. When the heating elements are on the switches will
illuminate. For maximum heat output adjustment switch Three (the highest) position
4) When the desired room temperature has been reached, the thermostat knob should be turned slowly anti-clockwise until the thermostat is
heard to click off and the lights on the element switches are seen to go out. After this the heater will keep the air temperature in the room at the
set temperature by switching on and off automatically.
5) In it's minimum (fully anti-clockwise) position, the thermostat provides a frost guard position. In this position (depending on the size of the
room) the heater will maintain the temperature above freezing.
6) Fan Operation:- This is operated by means of the switch with the fan symbol along side it. The fan will only operate with the thermostat in the
“on” position and can be used when the heating elements are “on” to blow warm air into the room. In warm conditions the fan can be used with
the heating elements “off” to blow cool air into the room
WALL MOUNTING (while use the heater as fixed appliance)
The heater is supplied with 4 off each fixing brackets, screws and plastic wall plugs to enable it to be mounted onto a wall if required.
If it is decided to mount the heater on the wall, the feet should not be fitted. The position must be chosen carefully. It must not be in front of or
below a power socket. It must not be below a shelf, curtains or any other obstruction. Also refer to the safety instructions overleaf.
Having decided on the location of the heater it is necessary to drill 2 fixing holes 8mm diameter by 43mm deep at 455mm centres on a
horizontal line at a minimum height of 400mm from the floor. Allowance must be made for any floor coverings, carpet etc and if any skirting
boards are present, the fixing holes must be a minimum of 400mm above the top edge of the skirting board. Using the plastic plugs and fixing
screws provided, attach 2 of the fixing brackets to the wall. The other pair of fixing brackets must be attached to the base of the heater using
the feet retaining screws so that the brackets project out at the rear of the heater and space the bottom edge away from the wall.
If required, these brackets may also be secured to the wall using the remaining fixing screws and plastic wall plugs. If this option is chosen it is
suggested that the heater is hung on the upper brackets and the hole positions for the lower brackets is then marked on the wall, prior to
drilling the holes for attachment purposes. See figures below..
Figures for wall mounting
safety screw
minimum distances
CLEANING THE HEATER
1) Always un-plug the heater from the wall socket and allow it to cool down before cleaning.
2) Clean the outside of the heater by wiping with a damp cloth and buff with a dry cloth. Do not use any detergents or abrasives and do not
allow any water to enter the heater.
STORING THE HEATER
When the heater is not used for long periods of time it should be protected from dust and stored in a clean dry place.
WARRANTY INFORMATION
The manufacturer provides warranty in accordance with the legislation of the customer's own country of residence,
starting from the date on which the appliance is sold to the end user.
The warranty only covers defects in material or workmanship.
The repairs under warranty may only be carried out by an authorized service centre. When making a claim under the warranty, the original bill of
purchase (with purchase date) must be submitted.
The warranty will not apply in cases of:
- Normal wear and tear
- Incorrect use, e.g. overloading of the appliance, use of non-approved accessories
- Use of force, damage caused by external influences
- Damage caused by non-observance of the user manual, e.g. connection to an unsuitable mains supply or non-compliance with the installation
instructions
- Partially or completely dismantled appliances