1
GS-RAM''
and
GS-RAM Plus"
user's Manual
4 Hppueu enclneeplncA DIVISION OF AE RESEABCH CORPORATION
v2.01
Applied Engineering
Telephone Numbers
Technical Support
(2r4) 241-6069
9 AM to 5 PM (CST)
Monday through Friday
Do not return any
Rerum ri#l*iT:ffi#1?#'&?'}13 number
An RMA number can be obtained by calling Technical Support.
Sales
(2t4) 24t-6060
9 AM to 11 PM (CST) 7 days
GS-RAM'*
and
GS-RAM Plus"
User's Manual
Applied Engineering warrants the GS-RAM and GS-RAM PLUS cards and memory chips installed by or purchased
lrom Applied Engineering against defeds in material and workmanship for a period of 5 years from the date of original
retail purchase. Any misuse, abuse, or non-r€ authorized alteration, modilication and/or repair to the Applied
Engineering product will void the warranty. This warranty will also be void if you use the .lE product for any other
purpose than its intended use. lf you discover a defect, Applied Engineering will, at its option, repair or replace only
the Applied Engineering product, provided you return the product during the warranty period, transportation prepaid,
to Applied Engineering with a Return Material Authourization (RMA) number.
Thls warrantv applles to the orlolnal retail ourchaser only. Therefore, please include a copy of the
original invoice or a small service charge may be applied. lf the product is to be sent to Applied Engineering by mail,
the purchaser will insure the package or assume lull responsibility for loss or damage during shipping. Prior to
returning the product for warranty consideration, call Applied Engineering Technical Support for a Return Material
Authorization (RMA) number and shipping instructions.
Even though Applied Engineering has tested the software and reviewed the documentation, Applied Engineering
makes no warranty or representation, either express or implied, with respect to software, its quality, performance,
merchantability, or fitness for a particular purpose. As a result, this software is sold 'as is," and you, the purchaser,
are assuming the entire risk as to its quality and performance.
ln no event will Applied Engineering be liable for loss or damages of any kind caused either directly or indirectly by the
use or possession ol its products, even il advised ol the possibility of such damages. THE APPLIED ENGINEERING
WARRANTY lS FOR THE APPLIED ENGINEERING PRODUCT ITSELF. ln particular, Applied Engineering shall have
no liability lor any other equipment used in conjunction with Applied Engineering products nor for programs or data
stored in or used with Applied Engineering products including the costs of recovering such equipment, programs, or
data.
The warranty and remedies set lorth above are exclusive and in lieu of all others, oral or written, express or implied.
No Applied Engineering dealer, agent, or employee is authorized to make any modification, extension, or addition to
this warranty.
Some states do not allow the exclusion or limitation ol implied warranties or liability for incidental or consequential
damages, so the above limitation or exclusion may not apply to you. This warranty gives you specific legal rights,
and you may also have other rights which may vary from state to state.
This manual and lhe software (computer programs) described herein are copyrighted by Applied Engineering with all
rights reserved. Under the copyright laws, this manual or the progiams may not be copied, in whole or in part, without
the written consent of Applied Engineering, except in the normal use of the software or to make an archival copy.
This exception does not allow copies to be made lor others, whether or not sold, but all of the materials purchased
(with all archive copies) may be sold, loaned, or given to another person. Under the law, copying includes translating
into another language or formal. You may use this software on any computer owned by you but extra copies cannol
be made for this purpose.
Applied Engineering cannot guarantee that you will receive notice of revisions to the software or products described
in this manual. Be sure to check with your dealer or Applied Engineering lor information on possible updates.
However, Applied Engineering reserves the right to make any improvements to Applied Engineering products without
any responsibility loward upgrading previously released produc'ts.
Apple is a registered trademark of Apple Computer, lnc.
AppleWorks, DOS 3.3, and PToDOS are trademarks ol Apple Computer, lnc.
RamWorks is a registered trademark of Applied Engineering.
Applied Engineering, GS-RAM, GS-RAM PLUS, AW
2 Expander, Super Desktop Expander, and CP/AM
trademarks of Applied Engineering.
@
Copyright 1987, Applied Engineering
Applied Engineerlng
P.O. Box 798 Canollton, Texas 75006
Sales: (214) 241-6060 9 AM - 11 PM 7 days
Technical Support: (214\ 241-6069 I AM - 5 PM Monday - Friday
(The Technical Support telephone lines cannot be accessed through the Sales department.)
are
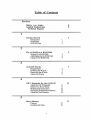
Table of Contents
Preface
Before you begin...
Applied Engineering
tl
ll
Technical Support
I
Getting Started
I
Innoduction
Installation
GS-RAM Test
1
2
2
)
The cs-RAM as a RAM Disk
Disk
Setting Up a RAM
Addressingthe GS-RAMDisk
Using the GS-RAM Disk
3
4
5
3
GS-RAM
{ache
Requiremens
Installing the lache
Removing the laclw
About the{,aclte
7
7
7
9
9
4
AW 2 Expander for the cs-RAM
AbouttheAW2 Expander
Think...
Instructions
Setting the Enhancement Options
About the New Features
Before You Even
Modification
1l
11
1l
12
13
14
5
t7
More Memory
Choices
t7
Installing the chips
18
Provided courtesy of hosf
w,ApplezOnline,com
The ultimate SFREE Apple
ll onlinelibrary!
Scanned by Dr. Kmneth Buchholz
Preface
E&E&EEEEE&E&&&&&&&E&E&E&EEE&E&E&&E1E&EEEEEEEEEEEEEEEEEEEEEEEIE&EE&&?EE&&EE&&&&&EE
About This Manual
The GS-RAM allows you to increase the Random Access Memory (RAM
capacity of your Apple IIGS by a maximum of 1.5 megabytes, in increments of
256K. With the cs-RAM Plus, you can expand the computer's memory as much
as 6 megabytes, in steps of 1024K (1 megabyte). If someday you discover that
you need even more memory, an optional 2 megabyte "piggy-back" expander card
can be installed to boost the total memory expansion for the GS-RAM up to 3.5
megabytes and up to 8 megabytes for the GS-RAM Plus! See Chapter 5, "More
Memory" for more information.
Chapter 1will take you quickly through the installation and testing of your
GS-RAM or GS-RAM Plus card.
Chapter 2 tells you how to use some of the expanded memory as a RAM
disk. This is a great way to increase the access speed to different applications.
Chapter 3 describes the GS-RAM{ache included on your AW 2 Expander
disk. The {ache will greatly increase your access speed to most applications.
With ttre {ache installed, you will notice that the time it takes to load a program
from an Apple Disk 3.5 drive is greatly decreased--even on the initial load!
Chapter 4 steps you through the installation and use of the AW 2 Expander
program. This software will enable you to greatly enhance your AppleWorks
program by using the extended memory that the cs-RAM has given your trcs.
Chapter 5, as mentioned above, helps you to decide what chips you will need
to expand the memory of yourGS-RAM card. It also explains how to install the
chips yourself as well as how to return the card to Applied Engineering for a
memory upgrade with no additional charge for the installation and testing.
&@E@E E
EEE& EE&?E&&&&&&E &E
?E&,
E
&&&E
& E,
Applied Engineering Technical Support
If you have a technical question relating to your GS-RAM card that is not
covered in the manual, please contact the dealer from whom you purchased the
card. Most dealers have the knowledge and the resources to answer your question
readily. In the event that the dealer cannot answer your question, direct it to
Applied Engineering. We have a staff of technicians dedicated to answering
specific technical questions about Applied Engineering products and software.
Technical Support representatives are available betrveen the hours of 9 AM and 5
PM Central time, Monday through Friday. The Technical Support telephone
number is (214)241-6069. Please call only this number for technical support, as
our sales office cannot transfer calls to the support lines.
The support rcpresentatives are experienced in many of the applications of
Applied Engineering products, but in order to provide a quick and effective answer
Preface
to your question, they will need to know as much as possible about the hardware
and soft'ware specifically related to your question. Please provide the technical
support representative with the following inforrnation:
. The specific Applied Engineering product related to your question.
If
the question is related to GS-RAM, please provide the
revision level, original memory configuration, and cturent
memory configuration of the GS-RAM card.
. The configuration
of your computer. (Whatperipherals are attached?)
. If the question
is related to an Applied Engineering expansion card, please
provide the revision level, original memory configuration, and cturent
memory configuration of the card.
. The name, version, and publisher
of the software package related to your
problem.
. The results
of any testing or troubleshooting done by you or your dealer.
Most questions can be answered in one telephone conversation, but some may
require research by the technical support representative. Please be sure to make a
note of the representative's name, just in case you need to call back with any
additional information or follow-up on a previous question.
Applied Engineering
Technical Support
(214) 24t-6069
9 AM to 5 PM (CST)
Monday through Friday
Rememben
When all else fuls, read the manual!
...then call Technical Support.
lll
Getting Started
7:
Chapter
Getting Started
This chapter tells you how to install and test the cs-ItAM and cs-RAM Plus
memory expansion cards. Before you install your memory-expansion card, please
be sure to read Setting Up Your Apple trcs and the Apple fIGS Owner's Guide.
Youll need to be particularly familiar with ttre Control Panel functions as this
manual makes frequent reference to the Contol Panel menu.
eE&&e@E E@E&@@@r,a,r,c,@@A@?E&.8@&&@&&@e.A,&&&e,&aD&EAAIE&&@aE&IE&AE&@@&E@8oAE&E&E&EEEE&EEAA
Installation
Turn off the computer.
Irave
the computerplugged in but
Remove the Appte
IIcs
flip the power switch to the OFF position.
cover.
Locate the two larches on either side of the backplate. Push in on the latches
while pulling up and back on the lid-
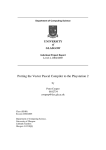
Touch the power supply
case.
The case is shown in the illustation below. This will discharge any static
elecricity that may be on your body. Do not skip this step. Stalic-elecldcily
can ruin chips on the board and in the computer.
Inside Your
IIcs
Power Supply Case
Memory Expansion Slot
Remove the memory-expansion card from its anti-static bag.
Hold the card by the edges, like
the card.
a
photograph. Do not touch the gold fingers of
1
Chapter
o
Getting Started
L
Position the memory expansion card over the Memory Expansion
Slot.
The Memory expansion slot is located in the front right comer of the computer.
Hold the card so that the long end of the card is toward the rear of the computer.
O fnsert the card.
Insert the gold edge-connector into the Memory Expansion Slot until it is
completely seated. You can wiggle the card gently, back to front, to insure a
firm connection.
Replace the Apple
flcs
cover.
Slid the front of the lid in fust, then press on the back edge until it snaps into
place.
Installation is complete!
Check the RAM Disk setting to verify correct installation.
You can verify that the computerrecognizes the additional memory by checking
the RAM Disk option in the Control Panel menu. First, turn on the computer
then select the Classic Desk Accessories menu by pressing C-control-esc. Use
the up and down iurow keys to select the Control Panel menu. Select the RAM
Disk option and press return. The number next to the Largest Selectable listing
tells you the amount of memory that the system now has available.
o
Make a copy of the AW 2 Expander disk.
It is very important to make backup copies of your master disks when possible.
The AW 2 Expander disk is not copy protected. You can copy it using the
IIGS's Desktop. Simply drag the AW 2 icon to the icon of the destination disk.
Or, you can use the "Copy Files" option of your GS utility disk or the "Filer"
progam included on the AW 2 Expander disk. The drag method seems easiest
to many people, but if you prefer, the other methods give you the same end
result.
After you copy the disk, store the master in a safe place.
o
Test the card.
cs-RAM Test program from the main menu of your COPY of the AW
2 Expander disk. The test progftrm will run automatically when selected (See
warning below). To stop the test, turn the computer off.
Use the
WARNING: The cs-RAM
in extended memory.
test program
will
erase anything stored
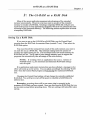
cs-RAM as a RAM Disk
Chapter
2:
The cs-RA
M as a RAM Disk
Many of the newer application programs take advantage of the extended
memory automatically. However, you may want to use part of the extended
memory to emulate a RAM disk. Creating a temporary RAM disk will give you
much faster access to some apptcations (programs which do not automatically take
advantage of the increased memory). The following section explains how to create
a temporary RAM disk.
Setting Up a RAM Disk
If you want to set up the GS-RAM as a RAM Disk, run the Control Panel
program from the trGS Desk Accessories Menu (control-6-esc). Then select the
RAM Disk option.
You must first tell the computer how much of the card's memory you want to
RAM disk. The minimum setting limits the amount of
memory that applications can use. The maximum limits how much memory the
RAM disk can use. You'll want to leave enough memory open to support the
programs that automatically take advantage of the extra memory.
set aside for use as a
NOTE: If
working with an application that uses a version of
l.2,the minimum and maximum RAM disk settings
PToDOS before
must be equal.
If an application needs more memory ttran you have allotted, a message to that
effect will come up on the screen. You can adjust accordingly by selecting "RAM
Disk" from the Control Panel program and decreasing the maximum RAM disk
size.
Changing the Control Panel setting will not change the currently established
RAM disk. You will have to turn off thepower to establish a RAM Disk of a
different size.
Remember, powering down will in tum erase what is currently in the
temporary RAM disk you have created. Save any data from the RAM Disk that you
do not want to erase before powering down. The new settings will take affect upon
startup.
2
GS-RAM as a RAM Disk
Chapter
2
eEEE&&EE@AEEE&&@&&,&IE@E&&@ID@&&EEAE@@EE@@e&A@@&IEAA&E$@@&&&&@E&&AE&&A&&A&EEEEEEE&
Addressing the GS-RAM Disk
Some applications may ask you to identify your RAM disk by slot and
drive number.
SLOT: The GS identifies your'mock RAM disk in slot 5 just
as it recognizes a
3.5" drive as being in slot 5.
DRIVE: The drive number will
depend on what you decide to use as your startup
device. Drive 1 can be eitherthe RAM disk or a 3.5" drive. Choose one or the
other using the "Slots" heading under the Control Panel Program.
-- First, make sure slot 5 is set to "Smart Port."
-- If you want the computer to boot your RAM disk
at startup, select
"RAM Disk" next to the "Starnrp Slot" heading. The GS will
recognize the RAM disk at, S5,D1 and the 3.5" drive will be S5,D2.
-- If you want
the computer to boot your 3.5" drive at startup, enter "5"
(or "Scan") under the "Startup Slot" heading. The GS will recognize
the 3.5" drive at S5,D1 and the RAM disk will be S5,D2.
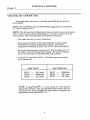
-- A
second 3.5" drive will be S2,D1. The following chartmay help
you to understand:
Boot "Slot 5"
S5,D1
S5,D2
S2,D1
NOTE: If
3.5" drive
RAM disk
3.5" drive
Boot "RAM Disk"
S5,D1
S5,D2
S2,D1
RAM disk
3.5" drive
3.5" drive
using PToDOS@ 1.1.1, your second 3.5" drive (S2,D1)
will not be recognized. This early PToDOS version allows only two
devices per slot. See your authorized Apple dealer to upgnde your
applications which use PToDOS 1.1.1.
cs-RAM as a RAM Disk
Chapter
E&&EE&EEE?E& EE&&&E&ETEEE E
Using the GS-RAM Disk
Now you are ready to use the RAM disk you have created. Think of it as a
regular disk. You can format it then save or copy documents or applications onto
it.
Remember: The RAM disk is only a disk as long as the
power is on. The information it contains is lost when
the power is turned off (unless you have saved that
information to a disk or disks).
FORMATTING
You need to format the RAM disk only if you plan to use it as
your startup device. The disk will be automatically formatted at startup for
saving and copying. So, if you plan only to save to and copy to the disk, you don't
need to worry about formatting. If, however, you plan to use ttre RAM disk as a
startup device, format the disk just as you would a regular disk. Format for either
ProDOS, Pascal or Applied Engineering's CP/AM (5.1.1 or later) depending upon
the operating system of the application(s) you intend to store on the RAM disk.
Here are a few ways to format for the different systems:
. Format for Apple Pascal 1.3 by X-ecuting the "Formatter"
program on yourpascal disk. (Refer to Apple Pacsal
documentation for more information on formating for Pascal.)
. Format for PToDOS using the "Format" option on your [IGS
System disk or trGS System Utilities. Or, you may find it easier
to use the Desktop's "Format Disk" option under the "Special"
menu.
. To format for CP/AM
versions 5.1.1 and following, refer to the
formatting instmctions in the CP/AM manual.
Do not try to format the disk for DOS 3.3. The 3.3 applications were
designed for use with 5.25" disks and will not work with the RAM disk, or 3.5"
drives.
You can give the RAM disk any name that the operating system will allow.
2
Chapter 2
GS-RAM as a RAM Disk
COPYING
You can copy prcgrams to the RAM disk with the "Copy Files" option on your
utility disk. You may prefer to use the Desktop rrenu to make direct copies of
PToDOS applications by dragging the application's icon to your RAM disk's icon.
SAVING
You can save documents onto the RAM disk
But be sure to
You will most likely want
to save to a regular drsk &tring use to keep documents from being lost due to power
surges, power loses and other frustrating occrurences.
6
cs-RAM
fu
Chapter
3
/.)
J.. GS-RAM ECache
{acht"
is and does, read, "About the
Those of you who want to know what the
the end of this chapter. Those of you who want to install it right away, here's how...
eeE&
&E
EEEEA&E
E
A&&8&
&
{ache,"
at
&
Requirements
To use the GS-RAM
o A cs-RAM*
lache,
you must have the following:
card installed in the IIGS's Memory Expansion Slot
o An Apple 3.5 Drive.
NOTE: The cache suppofts only the Apple Disk 3.5* drives
(platinum). It will not cache the Apple II Uni-Diskru 3.5 drives
(white) nor will it cache 5.25 drives or lhard disks.
Important: You must setSlot 5 in the Control Panel menu to the
Smont Por.t setting.
o A COPY of the AW 2 Expander disk,
E &E & E& E E
&E&&E
&
version 2.1 or later.
EE&E.EA&E&EEE
&&8&&&EE
Installing the ECache
It is easy to install ttre GS-RAM
o
o
{aclrc.
You simply:
Boot your COPY of the AW 2 Expander disk (version 2.1 or later),
Select AE Cache from the AW 2 Expander main menu or load the file,
AECACHE.SYSTEM.
While loading, the program will display the 'its startup scr@n accompanied
by the message:
INSTALLING.
...
at the bottom of the screen.
Chapter
GS-RAM -=Cttht
3
If the program does not find a properly installed cs-RAM card it will print
the following message to the monitor:
REQUIRES AN APPLIED ENGINEERING GS-RAM
]N IIGS MEMORY EXPANSION SLOT
NOTE: Booting PToDOS 16 will reinitialize the system.
Therefore, if you want to boot PToDOS 16 and use it with
the cache, you must cold bootProDOS 16 (by pressing
"control-3-reset" or by powering your computer down and
then back up) before installing the cache. Warm booting
PToDOS 16 (e.g. pr#5) with ttre cache installed will cause
unpredictable results.
Once the {aclw is installed, itwill automatically increase your
productivity. All you need to do is decide how large you want the {ache
to be.
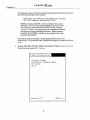
o
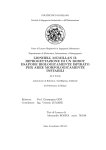
Access the IIGS Classic Desk Accessories Menu (control-6-esc).
Notice the new option-AE Cache.
6 Desk Accessories
Control Panel
Alternate Display
Mode
AE Cache
Quit
select t J
t
Open: J
8
GS.RAM
o
=W
Chapter
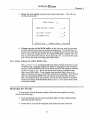
Select the new option using the arrow keys and return. You
will
see
the following screen:
RAM Cache
RAM
V-
Buffer Size:
Current Size:
GS-RAM Size
Sel-ect
o
-K
-K
-K
Cancel:Esc Save:J
t)
Change the size of the RAM buffer to the size you want by pressing
ilrow keys to increase and decrease. You do not have to
powej your computer dow-n *9 bu* up to change
qize;9f the cache like
-th9
you do when you change the size of aregularRAM disk. Simply select the
size you want then press return. If you access the AE CACHE option again,
you will see that your new setting has taken effect.
the right and left
Note About Setting the RAM Buffer Size
The GS-RAM
Size:
heading displays the entire amount of memory on the
cs-RAM card. If another program or utility is using some of the extended
memory, the RAM Buffer will not be able to use all of the memory indicated
by the GS-RAM Size. But it can use the free memory available at that
time for a RAM buffer. If you request more memory than is free at the
time, the {acle will use as much free memory as is available. The {ache
will not automatically fulfrll your size request once the memory becomes
free. If a progmm frees any fiiornorl, you can use that memory as a RAM
buffer by resetting the RAM Buffer Size in the AE Cache option in the Desk
Accessories menu.
EEEEEE.EEEE
Removing the ECache
To remove the lache from the system, cold boot your computer by doing
either of the following:
o
o
Press and hold down the control and open apple
and releasing the reset key.
(6) keys while pressing
Power down--turn off the computer, then power up--turn it back on.
9
3
Chapter
cs-RAM
3
-W
After you cold boot, access the Desk Accessories menu and note that the HE
Coche option is gone.
&&E&.&E&
&
&&8&
E
EE&E&EE&
E.
E &E E & & & & & E E
About t}ne ECache
Part of the reason the cs-RAM {acle is so incredibly fast at retrieving
information is that it reads a whole rack every time il accesses the disk drive instead
of reading individual blocks. This method, called, "track caching," makes even the
initial read much faster--up to twice as fast as a system without a cache. A11
subsequent calls are sped up even more because the system does not have to access
the disk drive every time you request information. In fact, subsequent accesses are
often faster than accesses from a RAM disk!
The {ache installs itself onto the smartport and will operate with
PToDOS 8, PToDOS 16, Apple Pascal 1.3, and,!E's PC program for
CP/AM.
The GS-RAM{ache uses some of the expanded memory for itself plus the
amount of memory you allocate to it.
When the cache program reads a track, it stores the entire track in the track
buffer and stores the block(s) containing the requested information in another
buffer, the cache buffer. You can set the cache buffer to the size you want,
depending upon the memory size of your cs-RAM card and how much of that
memory you have allotted foruse as a RAM disk. When the cache buffer becomes
full, it will make room for the most recently requested data by replacing the blocks
that have been stored in the buffer ttre longest without being accessed.
The track buffer is not variable; it is large enough to hold one track (6K) and
cannot be changed.
When you call for information, the system first looks in the cache buffer. If the
information is there, it reads it with speed comparable to (often even faster than)
reads from RAM disks and internal hard disks. If it doesn't find the information in
the cache buffer, it checks the track buffer. This takes very little more time than
reading from the cache buffer because the system is still not required to read the
disk drive.
If the information is not in the track buffer, the system will then go back out to
the disk drive, find the information and read the entire track to the track buffer.
This new track replaces the track currently held in the track buffer.
While this method actually goes through more steps than a non-cached system
to get information that is not stored in the buffer, the actual time it takes the system
to check the cache buffer and track buffer is insignificant.
Note About Copy Protected Programs
Some copy protected programs have a disk accessing function of their own and
will not use the cache. However, most programs will use the cache with no
problem.
10
E
AW 2
4:
Expander
Chapter
AW 2 Expander Instructions
&EEEE
&E&&
&E&E
TPE.
A&&E&'E
About the AW 2 Expander
The AW 2 Expander is an accessory program designed to compliment Applied
Engineering memory expansion products. It modifies the AppleWorksru program
to recognize and utilize the additional memory provided by these products. Also
contained on the AW 2 Expander disk are several test progmms you can run to
verify the operation of your GS-RAM card.
When used with the GS-RAM or GS-RAM Plus, the AW 2 Expander program
enhance AppleWorks USA version 2.0, German 1.4, and French 1.4. The
AW 2 Expanderprogram is very different from the Super AppleWorks Desktop
Expander program. The Super AppleWorks Desktop Expander will only enhance
AppleWorks versions 1.0 through 1.3 which are not designed to be used with the
IIGS.
will
@iEiE&EE&&&
Before You Even Think of Modifying AppleWorks...
If you are familiar with AppleWorks, you will probably be tempted to use the
AW 2 Expander without reading these instructions. Resist the temptation. Or at
least read the following.
. AW 2 Expander does not support AppleWorks versions
1.0 through 1.3.
. These instructions
The
AW
assume that you already know how to use AppleWorks.
2 Expanderprogram uses the same screen displays and keyboard
input routines ("user interface") as the AppleWorks program. If yog need a
quictreview, read Throughout AppleWorks in your Using AppleWorks
manual.
. There is an AppleWorks Word-Processorfile on the AW 2 Expander disk
entitled "READ.ME." Please do so. This document will contain
information about any recent changes to the software or updates to the
documentation.
. Apply the AW 2 Expander modifications
only to unmodified BACKUP
copies of your AppleWorks startup and program disks. Modifications
required by other programs should be done after executing the AW 2
Exp ander enhancements.
11
4
Chapter
AW 2
Expander
4
ASEEEEE&'EE&&8&8-&a&ca&A&&EIE&8&&E&&EE&AA?EEE&EE@&E1EEEE&EE.1EEEEEEEIE&EEEEE&EEEEEEET,E
AppleWorks Modification Instructions
This is how to use the AW 2 Expander to modify the AppleWorks disks:
1
.
2.
First, make copies of your original AppleWorks disks. "Filer ," provided on
the AW 2 Expander disk, or the copy program on your System Utilities disk
should be used for this purpose.
Boot the AW 2 Expander disk in your startup drive.
3. Select option 1 - "Execute AppleWorks Enhancements."
4. The Applied Engineering AW 2 Expander copyright screen will then appear.
After reading each of the screens, press the space bar to continue.
5.
You will now be prompted to remove the AW 2 Expander disk and insert a
COPY of the AppleWorks STARTUP disk in drive one. Be sure the WRITE
PROTECT tab has been removed from the disk. As prompted at the bottom of
the display screen, press the space bar to continue or the escape key to go back
to the main menu.
The AW 2 Expander program expects to find the AppleWorks STARTUP file,
"APLWORKS.SYSTEM," on the disk in drive one. If, at this point, the
program displays the following message:
Cannot find correct file
Please enter the prefix
of the AppleWorks
program
?
Enter the complete PToDOS prefix of the AppleWorks STARTUP disk. Be
sure to include any (/) slashes for suMirectories. An example PToDOS prefix
of an AppleWorks subdirectory on a Profile hard disk (with a volume directory
name of /PROFILE) mightbe:
/PROFILE/APPT,SWORKS
6.
7
.
will then grve you a list of the modifications that it will make to
your AppleWorks disk(s) and ask you if you want to continue. If you want to
go ahead and make these modifications to your AppleWorks disk(s), hit the "Y"
key. If you do not want to make these modifications, hit the "N" key to return
to the main menu.
The program
After the STARTUP disk has been successfully modified, you may be
prompted to remove it from the disk drive and insert a COPY (write enabled) of
the AppleWorks PROGRAM disk. The volume directory name of this disk
must be the same as the STARTUP disk. Press the space bar to continue.
8. When the modification to the AppleWorks
PROGRAM disk has been
prompt
for a key press to quit. Press the space bar
completed, the program will
and the modified AppleWorks can then be booted in the normal manner.
t2
AW 2
E
iE
Expander
Chapter
EEE&EEEE&E&
EE E E8& &&@E &&E &EEE@'EE'E'EETE
Setting the AppleWorks Enhancement Options
Boot the AppleWorks starfirp disk just like you normally would. (Notice that
the AppleWorks version number near the lower right corner of the startxp screen
now has an "A" tagged onto its end (Ex: 2.0A). If it does not have an "A:
appended to the version number, it has not been modified correctly.
When the stafiup disk has finished loading, remove the startup disk and insert
renrn. Press the ESCape key in1t9@. If you
AppleWorks from a UniDisk 3.5 or a hard disk, press the ESC key
are
when you are prompted with: "Press the Space Bar to continue."
the program disk, but DO NOT press
-booting
Note: It is not
necessary to access the Getting Started options
menu each time you boot AppleWorks. The Getting Started menu is
only used to set the enhanced AppleWorks options.
The current enhancement-options configuration will be read from the parameter
file (SEG.PR) on the AppleV/orks program disk and displayed in the Getting
Started option menu. The configuration shown contains the default settings. These
default settings remain in effect until you change them and save the new
configuration back to the AppleWorks program disk.
Note: Options 1 and 3 apply to RamWorks and Z-RAM only and
are noted with the symbol (RW). Option 4 applies to the GS only
and is marked with a (cs).
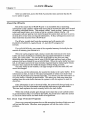
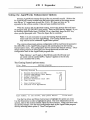
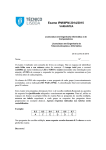
The Getting Started options menu:
File: None
GETTING
4
STARTED
Getting Started
1. Maximum Records/Lines (RW)
2. Preload Appleworks onto Memory
3. Printer Buffer (RW)
4. Buffer Size (GS)
5. Reserved RamFactor Size (RF')
6. Time Display
7 . Save Configurat,ion
8. Continue with AppleWorks
l_2, 000
Type number, or use arrows, then press Return
On
off
OK
OK
off
111-3K
Avail-.
Use the Up Arow and Down Arrow keys to highlight the optionyou want.
Use the Return key to select a highlighted option. For more information on the
options, refer to ttre section entitled About the New Features. Wheg lo-u have made
tlie desired changes, save the new configuration back to the AppleWorks program
disk by selecting menu option 5, "Save Configuration."
t3
Chapter
AW 2
Expander
4
qiqt
Choose option 7 to continue booting the AppleWorks program.- If you
save your new configuration, the new one will be in effect only until you quit the
ApplLWorks program. The next time you boot AppleWorks, the previous (saved)
configuration will be used.
&&E&E
&E&&
TE
&EE
EE&E
E. IE TE&
E&EEE&&
&
About the New Features
The following paragraphs describe the new features of the enhanced
AppleWorks and the initructions for using them. Please read this section very
thoroughlY.
More Word-Processor Lines and Data Base Records
With sufficient memory, the maximum number of Word hocessor lines available
with the unenhanced AppleWorks 2.0 is limited to7,250; the maximum number of
data base records is 6,35^0. The enhanced version expands the maximum number to
just over 22,600 apiece.
With your GS-RAM or GS-RAM Plus, the enhancg4 Ap^pleWorks automatically
the number of lines and records to the maximum (22,60q.
sets
Clipboard Expansion
The standard AppleWorks clipboard'(2.0) is limited to only 250 lines of
information. fta enhanced AppleWorks clipboard expansion increases the
clipboard size for the Word Pr&essor and data base functions to 2,0421ines. Only
ctiiUoara activities within and originating from the Spreadsheet function remain
limited to 250lines.
Printer Buffer Option
The Apple trGS has a built-in print buffer which can be activated to"Lth" ep!l"^^
trCS iontrol-Panel menu. You may select the "On" setting from the Printer Buffer
option but the buffer will be functional only if you have selected it from the Control
P^anel option. If you would like to know more about the internal printer buffer,
please refer to your Apple trcs Owner's Guide.
Buffer Size Option
The Buffer-Size option of the Getting Started option menu affects the size of only
the Apple IIGS'internal printer buffer.
Important: If any amount of memory is allocated to the Buffer Size
option, the printei buffer setting is shown to be "On." However, it
will not actia[y be on if not selected from the Conrol Panel menu.
L4
AW 2 Expander
Chapter
The Buffer-Size option of the enhanced AppleWorks Getting Stated option menu
lets you allocate the amount of Apple trGS memory space (up to 64K) to be used for
the print buffer. With the Apple trGS print buffer ON and the Getting Started
Buffer Size option set to 0 K, the actual buffer size will be determined by the
amount of memory (2K or less) that the Apple IIGS memory manager can allocate.
Time Display/Data Base Time-Stamp Option
This option will read the oulput of the Apple trGS intemal clock and replace the
"Open-Apple-? for Help" message in the bottom line of the AppleWorks screen
with a current date and time display. This option also allows the AppleWorks user
to enter the current date or time into a data base category by typing the @ character
as the only entry in that category. The category name must contain either the word
DATE or the word TIME but should not contain both. For example, you should
not use this feature in a category named, "Date and Time."
NOTE: To use the internal clock of the Apple IIcs, the enhanced
AppleWorks must be run under PToDOS 8 or 16, not PToDOS
1.1.1. (See your Apple dealer for PToDOS upgrades.)
The Getting Started options menu allows 12 hour or 24 hour time and date display.
How the date is displayed on the screen is affected by the time display option
selected.
The 12-hour (USA format) option displays the date as Month/DayYear.
The 24-hour (French, German, and military format) option displays the date as
DayMonth/Year.
Multiple-Disk
Save
Data storage problems arise when the size of a file on the Desktop exceeds the
amount of storage space on the data disk. A standard floppy disk can store only
135K of AppleWorks data. Using the modified AppleWorks, Desktop files larger
than the available disk space will be segmented, or "split" and saved in sections to
two or more disks. The following paragraphs explain how to use this feature to
save and load segmented Deskrop files.
This seems to be a good time to remind you of Murphy's Law:
Whatever can go wrong will go wrong.
Back up your Desktop files! A power failure will wipe out anything currently
on the Desktop! It's always a good idea to have backup copies of your working
data disks, especially if you have large amounts of data stored on them.
15
4
Chapter
AW 2
Expander
4
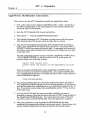
Saving Multiple Files to Disk
When saving a Desktop file which is larger than the data disk space available,
the enhanced AppleWorks will prompt the user with the following message:
Segmented Desktop File...
Please insert NEXT disk with SAME VOLUME NAME
Note: If a previous version of the file already exists on the disk,
AppleWorks will first ask you if you wish to delete the old file.
Remove the data disk from the current disk drive and replace it with the next
disk. All segments of a given segmented Desktop file MUST be saved on data
disks having the same volume (disQ name as the primary (frst) data disk. On
subsequent data disks, each appended file segment (sequential) will be
automatically deleted before saving a new segment.
data
If you discover that you don't have enough formatted blank disks with the same
volume name, don't panic! Press esc then space to continue. Just use the
AppleWorks Disk Formatter utility under the "Other Activities" menu before you
begin to save your file.
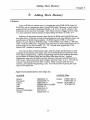
Adding Multiple Disk Files to the Desktop
When adding multiple-disk or segmented files to the Desktop, the file MUST be
loaded from the data disks in the same sequence as it was saved. AppleWorks will
prompt the user to insert the NEXT data disk(s) until the file is completely loaded.
If you list the files on disks that contain segmented files you'll notice that the
first segment has the filename that you gave it. The next segment (on the NEXT
disk) will have a ".2" appended to the end of your filename. The next disk in the
sequence will have a ".3" appended to the filename and so on. In ttris way,
AppleWorks helps the user keep tack of the segmented Desktop file sequence.
You'll probably want to label your data disks in such a way that you too can keep
track of the proper sequence. You may segment up to 9 disks (".9) in this manner.
Print-File
Cache
One small file (SEG.PR) on the AppleWorks program disk contains special
configuration information about such things as your printer information, standard
location of your data disk, and enhancement options. The unmodified version of
AppleWorks leaves this information on the program disk and is not preloaded along
with the program overlays. When AppleWorks needs information from this file it
prompts you to reinsert the ApplelMorks program disk. The enhanced version of
AppleWorks loads this file into memory at startup and eliminates the need for the
program disk (until overlays are bumped from memory). Only when you change
the contents of this file does the enhanced AppleWorks prompt you to insert the
program disk.
I6
Adding More Memory
5.'
Chapter
Adding More Memory
rffij:TJ&e&&E&E&&&EEIE&&EEE&,2E2EE&E&&EEaEE2E.EEE1E&E?ETEE.r,r.rEE&EE&EE&EEEEEEEE&EEE&EEEE
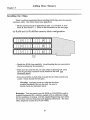
Your GS-RAM can contain up to 1.5 megabytes using 256KRAM chips; GSRAM Plus, up to 6 megabytes using 1 Meg RAM chips. Memory on both cards is
organized into six blocks, designated blocks A, B, C, D, E, and F, shown in the
illustration at the top of the nextpage. Each block consists of eight memory chips.
You must add these chips in groups of eight, frlling the blocks in order, A-F.
Selection of the proper memory chips for the cs-RAM and cs-RAM Plus can
be a little tricky. There are several chip manufacturers and many different types and
specifications of RAM chips available. GS-RAM requires 256Kx 1 Dynamic
Random Access Memory (DRAM) chips. cs-RAM Plus uses 1024K x 1 DRAM
chips. Both the 256K and 1 megabyte chips must have a speed specification of 150
nanbseconds or less (for example, -1.5, -12, -10) and must support the "CAS
before RAS" method of memory refresh.
You may be able to find memory chips with the proper specifications at some
computer or electronics-parts stores. But we recornmend that you purchase them
from Applied Engineering. Applied Engineering receives bulk-quantity discounts
on purchases of memory chips and can often offer them for less. Applied
Engineering uses only the highest-quality memory chips and wiurants them for a
full 5 years. (Most electronics-parts vendors sell their chips "as-is.") We will not
warant chips purchased from other vendors. When you get ready for more
memory, give Applied Engineering a call. You'll be assured of getting the right
chips at the right price.
Approved manufacturers and chips are:
GS-RAM Plus
GS.RAM
Hitachi
Mitsubishi
Fujitsu
OKI
HM50256-15 Hitachi HM511000-15
HM511001-15
M5M4256P-15
MB8125G15 Toshiba TC511000-15
MSM41256A-15AS/RS
Intel
P2t256-t5
Samsung
KM41256-15
MT1259-15
Micron Technologies
Toshiba
T\/nv141,257-15
t7
TC511001-15
5
Adding More Memory
Chapter
5
EE,EEE.&EE&
Installing the Chips
There is nothing complicated about installing RAM chips onto the memory
expansion cards. Just follow these basic guidelines:
.
Fill the memory blocks in alphabetical order (i.e. fill block A, then
block B, then block C...). Refer to the illustration on the next page.
cS-RAM and cs-RAM Plus memory-block configuration:
Handle the RAM chips carefully. Avoid bending the pins excessively.
(Some bending may be necessary.)
Make sure the notch (or dot, on some chips) is pointing UP, away
from the gold edge-conn@tor on the bottom of the card. See
illustration below.
firmly on each chip to ensure that it is fully
socket. Check closely for bent pins.
Press down
seated in its
Warning: Applying power to a chip that has been
installed incorrectly can ruin the chip. Be sure to
double check the orientation notch.
Reminder: You may return your cs-RAM or GS-RAM Plus card to
Applied Engineering for a memory upgrade with no additional charg_e
for the installation or testing. Call the Applied Engineering sales office
for the latest memory-chip prices and shipping instructions. The sales
office telephone number is (21'024L-6060.
18
Notes
m
$FR.EE publieacc€ss llbrary
of softmrc, gam€8, Pho0os,
link3, dodm€ntaton & brums
eldusively tur the APPIo ll
;;
t9
bmllyof compufienl
:. . r:i; ::'r"....
.r'1._i. t'i-::r. . i'
.;.i i .:
iti;:r..i,:3.:
:i:!
'
..r:
:tt,.:l:.,:,.."
: .
f. i'
r_
.1.:
t.
':::''1
;.t.
''.'
", .;
:
il.
.1.'.,1;:...::i',::;.
:-
,]]r',,:i,:';
_:.ij' 1.r._.. t,"::.;:f
iirl
: '1:
a:ir;a,1:.1::,':-+-r :t:q.:
1:'i
.-:'-1..*-,,:
:
.',t:-.,:-
.';
i ..
""'1:.,
..ririi
-'::1'.,.
;'r;'1
'l1,r,:, .
..!
,
'
,'
''
::
''' \...
j:,,: