1
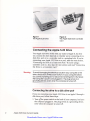
t ll. Apple 5,25Drive Owner's Guide Apple ll, Apple ll Plus, Apple lle, Apple llc, Apple llos LIMITED WARRANTY ON MEDIA AND REPIACEMENT If you discover physical defects in the manuals distributed with an Apple product or in the media on which a software product is distributed, Apple will replace the media or manuals at no charge to you, provided you return the item to be replaced with proof of purchase to Apple or an authorized Apple dealer during the 90-day period after you purchased the software. In addition, Apple will replace damaged software media and manuals for as long as the software product is included in Apple's Media Exchange Program. Vhile not an upgrade or update method, this program offers additional protection for up to two years or more from the date of your original purchase. See your authorized Apple dealer for program coverage and details. In some countries the replacement period may be different; check with your authorized Apple dealer. AIL IMPLIED WARRANTIES ON THE MEDIAAIID MANIJAIS, INCLUDING IMPLIED WARRANTIES OF MERCHANTABILITY AND FITI\ESS FOR A PARTICIJIAR Pt.'RPOSE, ARE LIMITED IN DURATION TO MNETY(9O) DAYS FROMTHE DATE OF THE ORIGINAL RETAIL PURCIIASE OF THIS PRODUCT. Even though Apple has tested the software and reviewed the documentation, APPLE MAKES NO WARRANTY OR REPRESENTATION, EITHER E)PRESS OR IMPLIED, WITII IN NO E\tsNTWILLAPPLE BE LIABLE FOR DIRECT, INDIRECT, SPECIAI" INCIDENTAI, OR CONSEQUENTIAL DAMAGES REST]LTING FROM AIYY DEFECT IN THE SOFTWARE OR ITS DOCUMENTATION, even if advised of the possibility of such damages. In particular, Apple shall have no liabiliry lor any programs or data stored in or used with Apple products, including the costs of recovering such programs or data. THE WARRANTY AND REMEDIES SET FORTH ABOVE ARE EXCLUSIVE AND IN LTEU OF AIL OTHERS, oRAL OR WRITTEN, EXPRESS OR IMPLIED. No Apple dealer, agent, or employee is authorized to make any modification, extension, or addition to this warranty. Some states do not allow the ex- clusion or limitation of implied warranties or liability for incidental or consequential damages, so the above limitation or exclusion may not apply to you. This warranty gives you specific legal rights, and you may also have other rights which vary from state to state. WARNING This equipment has been certilied to comply with the limits for a Class B computing device, pursuant to SubpartJ of Part 15 of FCC Rules. See instructions if interferencc to radio or television reception is suspected. RESPECT TO SOFTWARE, ITS QUALITY, PERFORMANCE, MERCTIANTABILITY, OR FITI\ESS FOR A PARTICUIAR PURPOSE. AS A RESULT, THIS SOFIWARE IS SOLD "AS IS,' AND YOU THE PL]RCIIASER ARE ASSUMING THE ENTIRE RISKASTO ITS QUALITY AND PERFORMANCE. Downloaded from www.Apple2Online.com 3. Apple. II Apple5.25 Drive Owner's Guide u Downloaded from www.Apple2Online.com I lpprn coMpurER, INc. @ Copyright 1985, Apple Computer, Inc., for all nontextual material, graphics, figures, photographs, and all computer program listings or code ii any form, including object and source code. All rights reserved. Apple, the Apple logo, and Disk II are registered trademarks of Apple Computer, Inc. DuoDisk and UniDisk are trademarks of Apple Computer, Inc. AppleCare is a registered service mark of Apple Computer, Inc. Macintosh is a trademark of Mclntosh Laboratories, Inc., and is being used with express permission of its owner. ITC Garamond, ITC Avant Garde Gothic, andITC Zapf Dingbats are registered trademarks of International Typeface Corporation. Microsoft is a registered trademark of Microsoft Corporation. POSTSCRIPT is a trademark of Adobe Systems Incorporated. Printed in Japan. Downloaded from www.Apple2Online.com Conlents Figures lv Rodio ond lelevision lnlerlerence v Apple 5.25 Drlve Owner's Guide I Connecting the Apple 5.25 Drive 2 Connecting the drive to a disk drive port 2 Connecting the drive to a controller card 3 Attaching a second Apple 5.25 Drive 5 Connecting more than two Apple 5.25 Drives 7 Getting better acquainted 7 The disks 8 \7rite protecting a disk 9 Inserting a disk into the drive 10 Removing a disk from the drive 11 Care and handling of disks 12 Caring for your Apple 5.25 Dnve 73 If your Apple 5.25Drive doesn't work 14 Service and support 14 Appendix A: Daisy-chain drive combinations 15 Chaining 15 The scanning order 16 Appendix B: Apple 5.25 Drive specifications 18 Downloaded from www.Apple2Online.com Figures Figure Figure Figure 1 2 I Figure Figure Figure 4 5 5 7 8 9 10 11 12 Figure 13 Figure 14 Figure 15 Figure 15 Figure 17 Figure Figure Figure Figure Figure Figure The Apple 5.25 Drive 2 'Ihe Apple 5.25 Drive controller card 2 Pluggng the Apple 5.25 Drive into a disk drive port 3 Things you'll need 3 Removing the plastic insert from the back paneT 4 Arranging the controller card and hardware for installation 5 Installing the controller card 6 Plugging in the Apple 5.25 Drive 6 Attaching a second Apple 5.25 Drive 6 The front of the Apple 5.25 Dtive 7 A 5.25-inch disk 8 lVrite protecting a disk 9 Releasing the disk insertion latch 10 Inserting a disk into the drive 11 Closing the disk insertion latch 11 Care and handling of disks 12 Possible drive configurations 17 IV Downloaded from www.Apple2Online.com Rqdio ond lelevision interference The equipment described in this manual generates and uses radiofrequency energy. If it is not installed and used properly---that is, in strict accordance with Apple's instructions-it may cause interference with radio and television reception. This equipment has been tested and complies with the limits for a Class B computing device in accordance with the specifrcations in Subpart J, Part L5, of FCC rules. These rules are designed to provide reasonable protection against such interference in a residential installation. However, there is no guarantee that the interference will not occur in a Particular installation, especially if a "rabbit-ear" television antenna is used' (A rabbir ear antenna is the telescoping-rod type usually found on television receivers.) You can determine whether your comPuter is causing interference by tuming it off. If the interference stops, it was probably caused by the computer or its peripheral devices. To further isolate the problem, disconnect the peripheral devices and their input/output (I/O) cables one at a time. If the interference stoPs, it was caused by either the peripheral device or the I,/O cable. These devices usually require shielded I,/O cables. For Apple peripheral devices, you can obtain the ProPer shielded cable from your authorized Apple dealer. For non-Apple peripheral devices, contact the manufacturer or dealer for assistance. A shlelded coble uses o metollic wrop oround the wires to reduce the potentiol effects of rodio-frequency interference. lmporlont ' lhis product wos FCC-certified under test conditlons thot included use of shlelded cobles ond connectors between system components. lt is importont thot you use shlelded cobles ond connectors to reduce the possibillty of cousing interference to rodio, television, ond other electronic devlces. If your computer does cause interference to radio or television reception, you can try to correct the interference by using one or more of the following measures: r r r r r Tum the television or radio antenna until the interference stops. Move the computer to one side or the other of the television or radio. Move the computer farther away from the television or radio. Plug the computer into an outlet that is on a different circuit than the television or radio. (Ihat is, make certain the computer and the radio or television set are on circuits controlled by different circuit breakers or fuses.) Consider installing a rooftop television antenna with a coaxial cable lead-in between the antenna and television. If necessary, consult your authorized Apple dealer or an experienced radioltelevision technician for additional suggestions. Downloaded from www.Apple2Online.com Downloaded from www.Apple2Online.com Apple, ll Apple 5.25 Drive Owner's Guide The Appleo 5.25Drive is a floppy-disk drive that uses removable, single-sided 5.25-inch disks to store and retrieve data. You can use your Apple 5.25Dive with any Apple II in the Apple II family of computers. This guide explains all the features of the Apple 5'25 Drive. It also gives you step-by-step directions for connecting it to your computer, and instructs you in the use, care, and handling of your Apple 5.25 Drtve and its storage media' You'll also find some tips on what to do if you have a problem using your Apple 5.25 Drive with your Apple II system. lmportonl A conltoller cordis q printed circuit boord thot you instoll in o peripherol slot in Your comPuter lo communicote with o disk drive. It is sometimes colled oPeiPlerol card, on interfoce cord, or just o cord. Before reoding this guide or ottempting to use your Apple 5.25 Drive, you should reod the monuols thot come with your computer, Your Apple 5.25 Drive comes in a lightweight, slimJine case. (See Figure 1.) It can be connected to an Apple II either directly through a disk drive port or through a aontnoller card installed in a peripheral slot. If you plan to connect your Apple 5.25 Dtive to your Apple II through a peripheral slot, you'll also need an Apple 5.25 Drive controller card. (See Figure 2.) The Apple 5.25 Drive controller card supports a maximum of two Apple 5.25 Drives. If you plan to use more than two Apple 5.25 Drives, you'll need to install a second Apple 5.25 Drive controller card. Downloaded from www.Apple2Online.com Figure I The Apple 5.25 Drive Figure 2 Ihe Apple 5.25 Drive controller cord Connecting the Apple 5.25 Drive YourApple 5.25Drwe works with any model of Apple II, bur how you connect the drive depends on whether you're connecting it to a disk drive port or to a controller card in a peripheral slot. If you're connecting your Apple 5.25Drive to a port, read the next section, "Connecting the Drive to a Disk Drive Port." If you're using a controller card in a slot, skip the next section and read "Connecting the Drive to a Controller Card." Worning To ovold domoging the electricol circuits ln your computer or the drive, olwoys furn offthe power svltch on your computer before you connect onythlrg to lt or disconnect onything from it, But leove the computer's power cord plugged ln, The plug serves os o grounding devlce, eren when the computer ls furned off. Connecling the drive lo o disk drive port If you are connecting your Apple 5.25 Drive to an Apple II through disk drive port, follow these steps: 1 a . Turn off the pov/er switch on the back of your computer, but leave the computer plugged in. The plug serves as a grounding device, even when the computer is nrrned off. Apple 5,25 Drive Owner's Guide Downloaded from www.Apple2Online.com 2. Touch one of the metal connectors on the back of the Apple II to discharge any static electricity that may be on your clothes or body. Worning lf you don't dischorge stolic electricity, you could permonently domoge the drlve, l. Plug the cable from your Apple 5.25 Drive into the disk drive port on the back panel of your computer and tighten the thumb screws. (See Figure 3.) Apple 5.25 Drive controller cqrd with ribbon-type coble Smoll wrench Figure 3 Plugging the Apple 5.25 Drive into o disk drive port 4. Attach a drive identification label to the recess on the front of your Apple 5.25 Drive. (The recess is next to the "in use" light.) Connecting the drive to o controller cord If you are connecting your Apple 5.25 Drive to an Apple II through an Apple 5.25 Drive controller card, you'll need the items shown in Figore t Figure 4 4. Follow these steps to connect your Apple 5.25 Drive: 1. Tul::, offthe power switch on the back of your computer, but leave the computer plugged in. The plug serves as a grounding device, even when the computer is turned off. 2. Carefully remove the cover from the computer and set it aside. Things you'll need Connecting the Apple 5.25 Drive Downloaded from www.Apple2Online.com 3. Touch the power supply case inside the computer to discharge any static electricity that may be on your clothes or body. (The power supply case is the large metal box on the left as you face the computer.) Worning ll, ll Plus don't dlschorge stotic electricity, you could permonently domoge lhe drlve. lf you lf your computer ls on origlnol Apple ll or on Apple ll Plus, disregord steps 4 through 6. lnsteod, you'll need to get o speciol two-port connector retoinlng clomp (servlce port number 655-8'l '12) fom your outhorized Apple deoler ond use the lnstructions thot come with lt to secure lhe connector to the bock ponel of the computer, 4. Remove the plastic insert from opening 2 on the back panel of your Apple II by reaching inside and pushing down and out on the plastic tab on the top of the insert. (See Figure 5.) Figure 5 Removing the ploslic insert from the bock ponel Apple 5.25 Drive Owner's Guide Downloaded from www.Apple2Online.com lmporlont ln the followlng steps, you wlll hondle the Apple 5.25 Drive controller cord. Hondle lt wlth core. Grosp lt by lhe corners or edges, ond try not to touch the components. Don't grosp the cord by the gold 'fingers' on lts bottom edge-they ore ihe medium through which the computer communicotes with the cord, ond their efficiency decreoses lf they ore dkty or scrotched, 5. Arrange the controller card, its ribbon-type cable, and two jack screws as shown in Figure 5. Two jock screws a Figure 6 Arionglng the controller cord ond hordwore for irstollotion 6. Hold the cable's D-shaped connector against the opening. Then reach behind the computer and feed the two jack screws tfuough the holes above and below the opening and into the threaded holes on the connector. (See Figure 5.) Use the small wrench to tighten the screws. 7 . 8. Locate the row of slots across the rear of your computer's main circuit board. Each slot is identified by a number on the circuit board. Hold your controller card over slot 6, the second slot from the righg so that the side of the card with the componens is facing away from the computer's power supply. (See Figure 7.) Connecting the ApPle 5.25 Drive Downloaded from www.Apple2Online.com 9. Gently but firmly push the gold 'fingers" on the card's edge connector into the slot, rear edge first. Then push the front edge down and gently rock the card back and forth until it is level and firmly seated. 10. Put the computer's cover back into position and press down on the rear corner fasteners until they pop into place. from your Apple 5.25 Drive into the D-shaped connector that you just installed on the back panel of your computer and tighten the thumb screws. (See Figure 8.) 11. Plug the cable 1,2. Attach a drive identification label to the recess on the front of your Apple 5.25 Drive. (The recess is next to the "in use" light.) Figure 7 lnstolling the controller cord Figure 8 Plugging in the Apple 5.25 Drive Attoching o second Apple 5.25 Drive If you want to connect a second Apple 5.25Drive, you attach it to the back of your frst Apple 5.25 Drive. (If you connected your first Apple 5.25 Drive to a controller card, both drives will share the controller card that you installed in slot 5.) Follow these steps to connect your second Apple 5.25 Drive: 1. Attoching o second Apple Plug the cable from your second Apple 5.25 Drive into the connector on the back of the first Apple 5.25 Drive and tighten the thumb screws. (See Figure 9.) Attach a drive identification label to the recess on the front of your second Apple 5.25 Drwe. (The recess is next to the "in 5,25 Drive use" light.) 2. Figure 9 Apple 5,25 Drive Owner's Guide Downloaded from www.Apple2Online.com Connecting more lhon lwo Apple 5.25 Drives If your Apple II system uses only ports to communicate with peripheral devices, you are limited to using two Apple 5.25 Drives connected daisy-chain fashion. You can connect more than two Apple 5.25 Drives to your Apple II system if your computer has slots for peripheral cards. If you plan to use a third and fourth drive, you'll need to install a second controller card in a vacant slot. (Each controller card controls two drives.) If possible, install the second controller card in slot 5. To install a second controller card, follow the instructions in the section "Connecting the Drive to a Controller Card," but this time remove the plastic insert from opening 5 on the back panel of your Apple II and install the card in slot 5. Worning comblnolion of Apple 5,25 ord 3.5 Drives, moke conect controller cord for eoch type of drive' plug on Apple 5.25 Drive lnto on Apple 3'5 Drive You connot controller cord, or on Apple 3.5 Drlve into on Apple 5.25 Drive controller cord. Plugglng your drtve lnto the wong controller cord con permonently domoge the drlve. For more lnformotion obout using o combinolion of S,2$lnch ond 3.S-inch disk drives, see Appendix A,'Dolsy-Choln Drlve Comblnotions.' lf you ore uslng o sure you're uslng the ldentificotion lobel Getting better ocquoinled Now you're ready to use your Apple 5.25 Drive. But before you do, you should read the rest of this guide to leam a litde more about your drive and its disks. The Apple 5.25 Drive has no operating controls, but it does have red "in use" indicator light that comes on whenever the drive is running. (See Figure 10.) Figure l0 The front of the APPIe 5.25 Drive Getting better ocquointed Downloaded from www.Apple2Online.com a You can use your Apple 5.25 Drive with any of the operating systems that are available for the Apple II family of computers. For a complete explanation of the operating system you are using, read your ov/ner's manual or the manual that came with your software. The disks Your Apple 5.25 Drive uses removable, single-sided 5.25-inch disks. Each disk can store approximately 143,0W bytes of formatted data. The circular disk is enclosed in a square jacket. (See Figure 11.) This jacket protects the disk and contains a woven fabric liner that wipes the disk as it spins in the jacket. A lubricant on the surface of the disk keeps the disk spinning freely inside the jacket. Doio surfoce Flgure I I A 5.25lnch disk Apple 5.25 Drive Owner's Guide Downloaded from www.Apple2Online.com Write protecling o disk Most 5.25-inch disks have a rectangular write-enable notch. (See Figure 11.) This notch allows information to be stored on a disk during a write operation. $7hen you don't want the contents of your disks changed by mistake, you can cover the write-enable notch with one of the write-protect tabs that came with your disks. (See Figure 12.) Figure l2 Write protecting o disk \t/ith the notch covered, the computer cannot write any informa[ion onto the disk surface or change information that is already there. If, at a laler time, you want to store information on the disk, you'll need to remove the write-protect tab first. Worning A write-protect tob will not protect o disk from occidentol loss doto due to coreless hondling. of Before inserting a write-protected disk into the disk drive, make sure ttre tab is securely attached to the disk. Tabs that are not securely attached can come off inside the drive. Write protecling o disk Downloaded from www.Apple2Online.com lnserling o disk inlo lhe drive Follow these steps to insert a disk into your Apple 5.25 Drive 1. If the disk insertion latdr is closed, release it by pushing it in shown in Figure 13. as Figure l3 Releoslng the disk lnsertlon lotch 2. Grasp the disk jacket becween your thumb and forefinger, with your thumb on the label. Worning doto strfoce of the disk. This of the disk exposed by tlrc ovol cutout in theJocket. Be coreful not to tor.rch the 3. 4. t0 is the oreo Gently insert the disk into the disk drive, oval cutout end first, label side up. (See Figure 14.) Be careful not to bend or force the disk. If you feel any unusud resistance, pull the disk back out slowly and try aga'in. rVhen the disk is all the way irside, push down on the latdr until it clicks shur (See Figure 15). Apple 5.25 Drive Owner's Guide Downloaded from www.Apple2Online.com Figure 14 lnserling o disk lnto the drive Figure 15 Closing the disk insertion lotch Removing o disk from the drive Follow these steps to remove a disk from your Apple 5.25 Drive: Before you remove the dlsk, moke sure the 'ln we' light ls off. Never remove o disk while thls llght b on. Dolng so moy destroy some of the lnformotion on the dlsk. (lf the llght stop on longer thon 45 seconds, you con refurn controlto the computer by pressing Control-Reset,) Wornlng 1. Push in on the insertion latch to release it and partially eject the disk. 2. & Gently remove the disk from the slot and pur ir in a disk envelope. By the way If you have a disk in your drive bur are not planning to use the drive, leave the insertion latch in the released position. Removlng o dlsk from the Downloaded from www.Apple2Online.com drive II Core qnd hondling of disks Follow these general rules when handling 5.25-inch disks. (See Figure 16.) Nffi An,ffi l_-JutN Flgure l6 NR Core ond hondling of disks r Never let anything touch the data surface of the disk. A scratch, or even a fingerprint, can cause errors. r r r r Do not place disks on dirty or greasy surfaces. Don't let disks collect dust. Handle the disk by the plastic jacket only. Use a felt-tip pen to write on a label already acadred to a disk. Don't use a pencil or bdl-point pen-they may dent the recording zurface. It's better to wdte on the label before you attadr it to ttre disk. 12 Apple 5.25 Drive Owner's Gulde Downloaded from www.Apple2Online.com I Do not use an eraser on the label. Eraser dust is abrasive and can damage the disk, and even the disk drive. r If the disk has a write-protect tab on it, make sure the tab is securely atached to the disk before inserting the disk into the drive. Tabs that are not securely attached can come off inside the drive. r r Do not bend disks or attach paper clips to them. Sbre disks upright in their envelopes and auray from direct sunlight, moisture, or extremes of heat and cold. Keep disks away from magnets or electrical devices. r Coring for your Apple 5.25 Drive Your disk drive is a precision electromecharical, magnetic storage device. It has motors and moving parB; in some ways, it is more delicate than the computer. Your Apple 5.25 Drive was completely aligned and tested before it left the f^ctory so that it would give you trouble-free operation. However, you can cause serious damage to the drive if you accidentally drop it, jar it sharply, or plug it in or unplug it when the computer's power is on. Coring for your Apple 5.25 Downloaded from www.Apple2Online.com Drlve '13 lf your Apple 5.25 Drive doesn't work If your Apple 5.25 Drive doesn't work, check the following: r Have you plugged the cable from the Apple 5.25 Drive into the port or controller card? I If you're using a controller card, is the card in the appropriate slot in your computer? I Have you plugged your computer's power cord into an outlet or power strip? r r Have you turned on your computer? Have you correctly inserted a 5.25-inch disk into your Apple 5.25 Drive? r Is your drive too close to the monitor? Non-Apple monitors may cause the Apple 5.25 Drive to make read/write errors because of the electromagnetic interference (EMI) field emitted by the monitor. Apple monitors are shielded to contain the EMI. If your Apple 5.25 Drive still doesn't work, contact your authorized Apple dealer. Worning Don't remove your Apple 5.25 Drlve's outer cose-removing the cose wlll vold your wononty. Service ond support To help you get the best performance from your system, Apple Computer, Inc. has established a worldwide network of full-support authorized Apple dealers. If you need answers to technical questions or information about product updates, your authorized Apple dealer can help you. Apple's Technical Support organization backs each dealer and international technical support group via Applelink, a state-of-the-art on-line electronic information service, to ensure prompt, reliable assistance. Your dealer has the latest information on new hardware and software products as well as product updates. If you wish to upgrade your system, your dealer can help you select compatible components. 14 Apple 5,25 Drive Owner's Gulde Downloaded from www.Apple2Online.com If your product requires service, your local authorized Apple dealer is trained and ready to support you. Apple provides factory-qualicy parB and the latest available diagnostic equipment to the more than three thousand authorized Apple service centers throughout the world. Apple guarantees par:ts and wafianty labor. @egulations in each country determine the length of warranty. Some restrictions may apply, depending on the country of original purchase.) If for some reason you cannot return to the authorized dealer from whom you purchased your system, go to the nearest service location. For the location nearest you, in the United States, call (800) 53&96%; in Canada, call (800) 268-7796 or (800) 268-7637. For locations in other countries, either call the Apple headquarters in your country or write to Apple Computer, Inc. Attn: Customer Relations 20525 Mariani Avenue Cupertino, CA 95014 USA Apple also offers service options designed to meet your needs. They range from carry-in contracts like the AppleCatP Service Agreement (U.S., Canade, and Australia only), which extends full warranty coverage up to three years, to self-service plans designed to allow large installations to repair their own equipment. \(hether you use your computer at home, in the office, or at school, Apple has a low-cost service plan for you. For details, please visit your authorized Apple dealer. Appendix A: Doisy-choin drive combinolions The Apple IIGS lets you use a combination of 5.25 and 3.5 drives, and the drives can be daisy-chained to the computer in a variety of ways. This appendix provides some possible drive configurations and explains the order in which your Apple IIGS will scan the drives when searching for a starnrp disk. Appendix A: Dolsy-choln drlve Downloaded from www.Apple2Online.com combinotions 15 lmporlonl lt ls possible to dolsy-choin more thon four disk drives on your Apple IIcS, Remember, however, thot the computer supplies oll the power for your drives. lf you try to doisy-choin more thon four drives, there moy be too much droin on the power supply, ond the long coble length moy pick up electricol signol noise thot could offect howyour drlveswork, Choining Figure 17 shows a series of possible drive configurations. Notice that in a chain of up to four drives, you can connect r r r * L or 2 Apple 3.5 Drives UniDisktr 3.5 Drives L or 2 Apple 5.25 Drives (including the UniDisk drive, the DuoDiskffi Drive, and the IIc External Drive) L or 2 Note: The Apple 3.5 Drives should come first in any chain, and all 3.5-inch drives should come before any 5.25-inch drives in the chain. The Apple IIc External Drive or the DuoDisk must be the last in a chain because neither has a daisy-chain port. To daisy-chain a DuoDisk with a serial number bqlow 433754, you must insert the DuoDisk controller card in slot 5. The Disk II@ Drive cannot be daisy-chained because it doesn't have a DB-19 connector. The sconning order The Apple IIGS follows a partianlar scanning order as it searches for a sarnrp disk in the drives connected to it. You can override this scanning order by using the Control Panel. If you do not override the scanning order, the Apple IIGS always looks first in slot 5 for a disk in a 5.25-nch drive, and then in slot 5 for a disk in a 3.5-inch drive. 16 Apple 5,25 Drive Owner's Gulde Downloaded from www.Apple2Online.com Apple 3.5 Drlve Apple 3.5 Drive Apple 3.5 Drive Apple 3.5 Drive uniDisk3.5 Drive Apple 3,5 Drive Apple 3.5 Drive Apple 5,25 Drive Apple 3.5 Drive Apple 3.5 Drive Apple 5.25 Drive Apple 5.25 Drive Apple3.sDdve Apple3.5Drive DuoDi*5.25Drive L,niDisk 3.5 Drive UniDisk 3,5 Drive UniDisk 3.5 Drive uniDisk 3.5 Drive Apple 5.25 Drive UniDisk 3.5 Drive UniDisk 3.5 Drive Apple 5.25 Drive Apple 5.25 Drive Apple 5.25 Drive Apple 5.25 Dnve Flgure l7 Posslble drlve confl gurotions Appendix A: Doisy-choin drive comblnotions Downloaded from www.Apple2Online.com 17 The Apple IIGS tries to start up from a disk in rhe 5.25-inch drive first, even if it is not the first drive in the chain. If the Apple IIGS doesn't find a disk in the 5.25-inch drive, it tries to start up from the first Apple 3.5 Drive connected to the port that coresponds to slot 5, drive 1. If you chain anApple 3.5Drive and a UniDisk 3.5 Drive, the Apple IIcs Eies to start up from the disk in the Apple 3.5 Drive. If the Apple IIGS can't find an Apple 3.5 Drive, it will start up from a UniDisk 3.5 Drive. It will not try to sa$ up from a UniDisk 3.5. Appendix B: Apple 5.25 Drive specificotions The Apple 5.25 Drive is a self-contained, highly reliable data storage system for Apple II computers. It uses a single-sided, lowprofile, 5.25-inch floppy-disk drive. The drive is equipped with its own electronics that process the data signal and control the disk speed, head positioning, and other drive functions. \flhen removed from the shipping container, the drive is ready to be plugged into a disk drive port or an Apple 5.25 Drive controller card and used. It requires no special preparation. Forrnatted data capacity Datasurfaces Datatransf,erralE Diskrotadonal speed Tradssperzurfrce Tradss per Itfu inch(ITf) 'nher of rcadrtrrire heads Qperatogkryeratur€ 143 kilobytes per disk 1 250 kilobits per second D9 rpn 35 48 1 10'C to 40'C ambient to 104'F ambient 50'F t8 neJative humidity 2U/o Lo 80/o (noncondensing) Veight 2.r7 kg(4.78Ib) Case dirnerslons 162vx 72Hx2o7Lmm Apple 5,25 Drive Owner's Gulde Downloaded from www.Apple2Online.com THE APPLE PUBLISHING SYSTEM This Apple manual was written, edited, and composed on a desktop publishing system using the Apple MacintoshrM Plus and Microsoft@ \(ord. Proof and final pages were created on the Apple Laser\TriterrM Plus. the Laserwriter's page-description language, was developed by Adobe Systems Incorporated. PoSTSCRIPTTM, Text type is ITC Garamond@ (a downloadable font distributed by Adobe Systems). Display rype is ITC Avant Garde Gothic@. Bullets are ITC Zapf Dingbats@. Program listings are set in Apple Courier, a monospaced font. Downloaded from www.Apple2Online.com *i f, a F N g gg o- €E$ g o o' er r r.,f' Fe t f ir : : g fi +f f d+ ;$f g $f 3 EI3BE ;Ar o 5 o eo: FFFFI' Ig E 1g i gE g aF E $gliE IEE g a $ +$ Fi$ ['i EeE EUEsriF€:*Fgr E ffFgg +g'esn :e ESg$i,r[s nNiiad+A uTtoi_m*A eF gi FSHTEE*b-or Eg Fag i g gi l;a3.llsqe.1 a ;gi -3: gg S "6 g €g S :h dl \ L tt o L u o s 5 s i*t[Fs[Fai fX g t i["s;3F$i'glEg Erg FEE+sHP [$i''i€i*t$fe[ifggBg Err rtut gee [gFg'E* F:: 'F F +;g i ss F * o ! T rlllf sNO\tco! tr ! EEEE EEEE EE EE EE EE E E E E TT TT 9:^5!N EE EE EE EE EE EE EE EE EE EE ii*E 7, E$ AE T T'ITTITTII-L ,..=l E sl E EEIa E E E E E E Downloaded from www.Apple2Online.com lll!!ll! !ttt!!!! € E EIF!rrr!!l! t E E iH Fl !!EEi!EE E16t!tItIt! Blal!