1
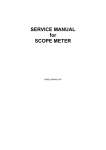
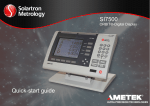
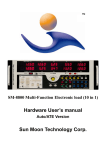
www.tlpsol.com
MODEL TLP50
TRANSMISSION LINE PULSE
TESTER
User’s Manual
v1.5.1
©2007 & 2008, TLP Solutions – all rights reserved
Page 1 of 15
www.tlpsol.com
Contents
1. INTRODUCTION.................................................. 3
2. SPECIFICATIONS ............................................... 3
2.1 Facility Requirement ............................................................................... 3
2.2 System Requirements ............................................................................. 3
2.3 Host PC Control Interfaces ..................................................................... 3
2.3.1 USB Interface .................................................................................... 3
2.3.2 DSO Sampling Terminal .................................................................... 3
3. INSTALLATION & SETUP PROCEDURES ......... 4
3.1 Pre-Installation Procedures ..................................................................... 4
3.1.1 Shipping Carton Inspection ............................................................... 4
3.1.2 Unpacking the Tester ........................................................................ 4
3.1.3 TLP Tester Inspection ....................................................................... 4
3.2 Installation & Setup ................................................................................. 5
3.2.1 PC to Oscilloscope Communication Software Installation ................. 5
3.2.2 Application Software Installation ........................................................ 5
3.2.3 Connecting the PC, Oscilloscope, and Tester ................................... 5
3.2.3.1 Making Measurements from 0 to 100V or less………………………6
3.2.4 Starting a Connected and Configured System................................... 7
4. User Interface – TLP50 Application Software ...... 7
4.1 Hardware Initialization Module ................................................................ 7
4.1.2 Initialization Errors ............................................................................. 8
4.2 Test Module ............................................................................................ 8
4.2.1 Data Entry Zone ................................................................................ 9
4.2.1.1 Advanced tab ............................................................................... 10
4.2.2 Saving Results................................................................................. 10
4.2.3 Zooming and Panning in the Graphical Display ............................... 10
5. Wafer Probing .................................................... 10
6. Calibration .......................................................... 11
7. Troubleshooting ................................................. 13
©2007 & 2008, TLP Solutions – all rights reserved
Page 2 of 15
www.tlpsol.com
1. INTRODUCTION
This document will guide you through the TLP50 tester set up and configuration process. It
also provides a quick start guide to using the TLP50.
2. SPECIFICATIONS
2.1 Facility Requirement
Power: 110VAC @ 50/60 HZ
2.2 System Requirements
To work with the TLP50 tester you’ll need the following items:
A Personal Computer (“host PC”) with:
o a Pentium III processor or higher
o a minimum of 256 MB of RAM
o Windows 2000, Windows XP with Service Pack 2, or Windows Vista
o an 800 x 600 resolution (or higher) video card
Two free USB ports and a Tektronix TDS 1000B or 2000B Series Digital Storage
Oscilloscope (DSO) with a USB communications module
OR one free USB port, one free serial port numbered 1 to 8 and a Tektronix TDS
1000 or 2000 Series Digital Storage Oscilloscope (DSO) with a serial
communications module
2.3 Host PC Control Interfaces
2.3.1 USB Interface
Bus Interface
USB specification
USB bus speed
USB 2.0 full-speed
12 Mb/s
Power Requirements
USB
4.10 to 5.25 VDC
USB suspend
80 mA typical, 500 mA max
300 µA typical, 500 µA max
Note: Your PC must meet USB power requirements, otherwise the tester will not
work properly and the application software may hang up.
2.3.2 DSO Sampling Terminal
Output Impedance
Maximum Voltage
Pulse Width
50 Ohms
500V when terminated with 50 Ohms
100
© 2007 & 2008, TLP Solutions – all rights reserved
Page 3 of 15
www.tlpsol.com
3. INSTALLATION & SETUP PROCEDURES
a. Pre-Installation Procedures
3.1.1 Shipping Carton Inspection
Please check carefully the packaging materials for signs of visible damage when they
are received. If damage is noted, please photograph the damaged cartons immediately
BEFORE OPENING THEM.
3.1.2 Unpacking the Tester
While removing the materials from the cartons, check all components for shipping
damage. Photograph any damage found for use when claims are submitted to the
shipping company. Notify the shipping company and TLP Solutions immediately.
Check all containers against the packing list as soon as they are received. If a shortage
is noted, notify TLP Solutions immediately. We will not be responsible for shortages
unless we are notified within 3 days of the day of receipt. The following documents must
be included in all claim reports:
Instrument Model
Purchase Order Number
List of the Missing Materials
Your TLP tester comes with:
1 Model TLP50 Transmission Line Pulse Tester
1 mini-USB to standard USB connector cable (“USB cable”)
1 BNC to BNC coaxial cable (“DSO cable”)
2 BNC-to-2 mini-clip calibrated Device Under Test (DUT) cables
1 M-F-M BNC “T” connector
1 50 Ohm cable terminator with a BNC connector
1 1:2 BNC 20dB attenuator & splitter
2 12V, 100mA rated Zener test diodes
1 CD containing support software for the host PC and a soft copy of this User’s Manual
(the “support CD”)
1 hardcopy of this User’s Manual
3.1.3 TLP Tester Inspection
All instruments should be inspected as soon as they are received. If the contents are
damaged or the tester does not operate properly, both the carrier and TLP Solutions
must be notified immediately. The following documents are needed to support claims:
Original Freight Bill and Bill of Lading
Original (or photocopy) Invoice
Copy of the Packing List
Photo of damaged equipment and containers
Description of the operational failure, if applicable
©2007 & 2008, TLP Solutions – all rights reserved
Page 4 of 15
www.tlpsol.com
3.2 Installation & Setup
When the components have been removed from their shipping cartons, place the TLP tester
on a suitable rack or lab desktop and plug it in.
3.2.1 PC to Oscilloscope Communication Software
Installation
If you have not already done so, install the communications software that came
with your oscilloscope (or a later version downloaded from Tektronix web site) on
your PC, and verify you have communication between the PC and the oscilloscope.
You must install the TLP application software on your host PC before making any
connections between it and the TLP tester. This is so the host PC can detect the tester
controllers when they are attached.
3.2.2 Application Software Installation
Place the TLP50 support CD in a CD drive on the host PC.
Select Start>>Run.
Enter x:\volume1\setup.exe, being x the letter of the CD drive.
Reboot the computer if the program instructs you to.
The setup program will install the following components and drivers:
National Instruments’ (NI) Virtual Instrument Software Architecture (VISA) v4.0.
This provides communication between the TLP tester and the DSO.
NI DAQ 8.0.1f0 mx driver for the Data Acquisition (DAQ) board.
NI Measurement & Automation Explorer (MAX) Version 4.1
TLP50 Control Application program TLP50_Vx.y (the “TLP50 application
program”). Required to properly operate the TLP50 tester. Vx.y is the release
version of the software.
A shortcut icon on the desktop of the host PC for “TLP50_Vx.y”.
Tlp50.lnk
A shortcut icon on the desktop of the host PC for National Instruments’
Measurement and Automation Explorer
Measurement & Automation.lnk
3.2.3 Connecting the PC, Oscilloscope, and Tester
BEFORE opening the TLP50 application program:
1. Click on the National Instruments’ icon that has been placed on your desktop.
2. Attach the TLP50’s mini-USB port (labelled “PC”) to one of the host PC’s USB
ports with the USB cable provided.
©2007 & 2008, TLP Solutions – all rights reserved
Page 5 of 15
www.tlpsol.com
Note: Blinking of the green light to the left of the “PC” port indicates an active
USB connection to the host PC. This will appear as long as the PC is on and the
tester is plugged in, whether or not the tester is turned on.
3. Connect one end of the DSO cable to the tester output labelled “TEK DSO”.
Connect the other end to one male terminal on the T connector. Attach the 50
Ohm terminator to the other male terminal. Connect the female terminal of the T
connector to Channel 1 of the oscilloscope. The connection must be made to
Channel 1 – the system will not work if it is attached to a different channel.
4. Depending on which version of the TLP50 software you are using, connect the
USB or RS232 serial port on the communications module of the oscilloscope to a
free RS232 port or USB port, respectively on the host PC.
If you are using the RS232 version of the TLP50 software, and your host PC does
not have a free RS232 serial port, you can use an RS232 to USB adaptor to connect
the DSO to your PC. The connection must be made to a USB port numbered 1 to 8.
5. Connect one of the DUT cables to the connector labelled “DUT” on the tester.
Connect the two mini-clips to the pins you wish to test on your DUT, or to a test
diode.
Note: The DUT cables supplied are calibrated to length. Using cables other than
the ones supplied may reduce the accuracy of your system or cause it to be unable to
measure leakage current.
BLOCK DIAGRAM 1
3.2.3.1 Making Measurements from 0 to 100V or Less
For increased accuracy, when making measurements in the range of 0 to 100V the
TLP50 requires a 20dB attenuator on the output of the DUT connector of the tester.
This attentuation must also be applied to the signal going to the Tek DSO.
A combination attenuator and splitter is supplied with the tester for this purpose.
©2007 & 2008, TLP Solutions – all rights reserved
Page 6 of 15
www.tlpsol.com
BLOCK DIAGRAM 2
3.2.4 Starting a Connected and Configured System
Once your system has been connected and configured, or you are starting up a
previously connected and configured system:
1. Turn on the tester and the oscilloscope, and allow the scope to finish its power-up
self tests.
2. THEN start the TLP50 application program. Starting the application program prior
to turning on both units and allowing the scope to finish its self tests will result in
error messages. Close the TLP application program and reopen it after the tester
and scope are on and ready.
You are now ready to use your TLP50 tester.
4. User Interface – TLP50 Application Software
The application program sets the DSO to properly operate with TLP tester; please don’t
change any scope settings after the application has started up.
The application software has two main modules: the Hardware Initialization module (HWI) and
the Test Module (TM).
4.1 Hardware Initialization Module
When you start-up the application, the HWI module tests the connections and communication
between PC & the DSO and between the PC & the TLP50 tester.
The following window will appear:
©2007 & 2008, TLP Solutions – all rights reserved
Page 7 of 15
www.tlpsol.com
4.1.2 Initialization Errors
If any of these tests fail, you’ll get a pop-up window containing an Error Message or
Error Code.
Error/Error Code
Error Writing to the Device
Reset the App
01
10
11
Description
TLP50 software cannot communicate with
the tester
DAQ Initialization failure
DSO Initialization failure
DAQ & DSO Initialization failure
See more information on Troubleshooting in Section 6.
4.2 Test Module
When the system has been successfully initialized, the following User Interface screen will
appear:
©2007 & 2008, TLP Solutions – all rights reserved
Page 8 of 15
www.tlpsol.com
In the graphical output, the voltage measured at the DUT is plotted in yellow, and the
leakage current measured is in blue. Note: the logarithmic scale for the leakage current
plot will not appear at the top of the plot until a test is in progress.
4.2.1 Data Entry Zone
This area provides controls to record device and test information and set test limits.
Data Logging Information
o Device Name: DUT name and/or code
o PIN(+) and PIN (-): the device pin numbers to which the test pulses are being
applied
Safety Limits
o IMAX: The maximum current that will be applied to the DUT, irregardless of
the test settings
The allowed range of IMAX is 0 to 10A
o VMAX: The maximum voltage that will be applied to the DUT, irregardless of
the test settings
The allowed range of VMAX is 0 to 1000V
o Dev Limits: You may choose to apply both currrent and voltage limts, only
the current limt, only the voltage limit, or to turn device limits off.
Pulse Amplitude
o
Initial V: The first & lowest voltage to be applied to the DUT.
The allowed range of Initial V is 0 to 1000V
o
Final V: The last & highest voltage to be applied to the DUT.
The allowed range of Initial V is 0 to 1000V
o
Steps: The number of steps plus 1 equals the number of equally spaced
voltage levels that will be applied to the DUT between and including Initial V
and Final V
The allowed range of Steps is 1 to 100
Attenuator ON/OFF
o For increased accuracy, when making measurements at less than 100V the
TLP50 requires a 20dB attenuator on the DUT output of the DUT tester, and
the TEK DSO output must also be taken from the output of this attenuator.
A 20 dB attenuator & splitter is provided with the tester for this purpose.
See “Making Measurements from 0 to 100V or Less” above. When the
Initial Voltage (see Pulse Amplitude, above) is less than or equal to100V,
the Attenuator setting must be ON. If it is not, the following pop-up message
will appear:
Leakage
o
Chooses between forward and reverse leakage current measurement, or
turn off leakage current measurement.
©2007 & 2008, TLP Solutions – all rights reserved
Page 9 of 15
www.tlpsol.com
4.2.1.1 Advanced tab
Shots
o The number of pulses (“shots”) that will be applied to the DUT at each voltage
level
The allowed range for #Shots is 1 to 5
The duration of each pulse is 100nsec, and the rise time is < 1nsec
TBS
o The time ADDED TO the default value of between shots in seconds
1.
The default time between shots with leakage current testing ON is 6sec
2.
The default time between shots with leakage currentt testing OFF is 4
sec
The allowed range for TBS is 1 to 1000
Leakage Voltage
o Sets the voltage to be applied when making the leakage current
measurement
The allowed range for Leakage Voltage is 0 to 5V
4.2.2 Saving Results
Select File -> Save from the Menu Bar to save test results in tabular form and the
associated test settings. Results can be saved in either text (.txt) or Microsoft Excel
(.xls) format.
4.2.3 Zooming and Panning in the Graphical Display
To zoom in on a point, press the <Ctrl> key and click the left mouse button over the
point. You can release the <Ctrl> key after you press the mouse button. The
resolution in the viewport increases steadily until you release the mouse button. If you
drag the mouse, zooming continues but does so over the new point under the mouse
cursor. The zooming stops when you release the left mouse button or click on the
right mouse button.
To zoom out, click the right mouse button and then press the <Ctrl> key as you do to
zoom in.
To pan, press the <Ctrl-Shift> keys and click the left mouse button over a point on the
viewport. Then drag the mouse to another point. The graph viewport scrolls so that
the original point now appears under the new mouse cursor location. You can drag
the mouse anywhere on the screen, even beyond the viewport.
5. Wafer Probing
The TLP50 samples the DUT in a 2 nsec wide time window. The DUT cables supplied with
the tester are calibrated to length to provide the correct signal delay for this window.
Changes in the delay in the DUT connection to the tester or more than 10% will cause errors.
©2007 & 2008, TLP Solutions – all rights reserved
Page 10 of 15
www.tlpsol.com
When connecting the tester to a wafer prober, the clips on the DUT cable should be attached
as closely as possible to the probe tips of the wafer prober. Attaching just behind the probe
tips or on the springs that suspend the probe tips is typical. If this is not possible, an
adjustment may need to be made in the cable length. The needed adjustment can be
determined from examining the waveforms generated on the DUT cable during a test showing
the outgoing pulse and its reflection back from the DUT. Send your waveform to
[email protected] and we will advise you as to what adjustment needs to be made.
6. Calibration
There are two procedures that must be performed to calibrate the tester – one for high range
measurements (100 to 1000V) call the “Transmission Line” test, and one for the low range (0
to 100V). (See “Making Measurements from 0 and 100V or Less” above.) The latter is called
the “T.Line + Attenuator” test. Both are initiated by commands in the Calibration pull-down
menu in the upper left hand corner of the TLP50 application interface screen.
Step 1: Transmission Line Calibration
1) Make sure the attenuator/splitter is NOT attached to the DUT output of the tester and the
system is connected as in Block Diagram 1, above
2) Select Transmission Line from the Calibration pull-down menu
3) You will be prompted by a pop-up message to remove any load from the DUT for the first,
open circuit test.
The following progress box will also appear in the upper left of the application screen.
©2007 & 2008, TLP Solutions – all rights reserved
Page 11 of 15
www.tlpsol.com
4) When this test is complete, you will prompted by a pop-up message to attach a 50 ohm
resistor as the DUT.
The accuracy of the calibration will be a function of the precision of this resistor, so
the use of the highest precision resistor available is recommended.
5) When this test is complete, the following pop-up message will appear.
The new calibration values are not written into non-volatile memory and put into effect
until the program is closed.
©2007 & 2008, TLP Solutions – all rights reserved
Page 12 of 15
www.tlpsol.com
Step 2: Transmission Line plus Attenuator Calibration
1) Make sure the attenuator/splitter IS attached to the DUT output of the tester and the
system is connected as in Block Diagram 2, above. Attach a 50 Ohm resistor as the DUT.
The accuracy of the calibration will be a function of the precision of this resistor, so
the use of the highest precision resistor available is recommended.
2) Select T.Line + Attenuator from the Calibration pull-down menu
3) You will be prompted by a pop-up message with the instructions in 1) above
The following progress box will also appear in the upper left of the application screen.
4) When this test is complete, the following pop-up message will appear.
The new calibration values are not written into non-volatile memory and put into effect
until the program is closed.
This completes the calibration procedures for the TLP50.
7. Troubleshooting
Error Writing to the Device - Reset the APP
You have opened the TLP50 application software before opening the National Instruments’
program. Communication between the tester and the PC has not been established.
1. Shut down the TLP50 application program. This error may cause TLP50 program to
become non-responsive, requiring a hard shutdown and reboot before you can
proceed.
©2007 & 2008, TLP Solutions – all rights reserved
Page 13 of 15
www.tlpsol.com
2. Open the National Instruments Measurement and Automation program before
opening the TLP50 application software.
Hardware Initialization Error Code 10
This code indicates an error in the serial communication link between the DSO (Digital
Storage Oscillascope) and the host PC.
Case A) The connection between the PC and the DSO is made via a USB cable directly
attached to a USB port on your PC.
Be sure that the USB port of the PC is working. Attach another USB device to it
and try to communicate with that device.
Be sure your DSO is configured to have Carriage Return (CR) as the terminator
character. (The TLP50 Application Software does this automatically, but some
firmware versions in the DSOs do not allow it. In that case you will need to set
it manually. Contact [email protected] if you need assistance.)
Try to communicate with the Tektronix oscilloscope through its USB interface
with Tektronix application sofware. If it does not work, the problem is in the
USB communication module. Contact Tektronix.
Case B) The connection between the PC and DSO is made via a RS232 cable directly
attached to the serial port of your PC (without a USB/RS232 adapter).
Be sure that the serial port of the PC is working. Attach another serial device to
it and try to communicate with that device.
Be sure your DSO is configured to have Carriage Return (CR) as the terminator
character. (The TLP50 Application Software does this automatically, but some
firmware versions in the DSOs do not allow it. In that case you will need to set
it manually. Contact [email protected] if you need assistance.)
Try to communicate with the Tektronix oscilloscope through its serial interface
with Tektronix application sofware. If it does not work, the problem is in the
serial communication module. Contact Tektronix.
Case C) The connection between the PC and the DSO is made via an RS232/USB
adaptor attached to a USB port on your PC.
Verify the PORT Number of the USB port connected to the scope.
The port number must be between 1 and 8.
Be sure that the USB port of the PC is working. Attach another USB device to it
and try to communicate with that device.
Be sure your DSO is configured to have Carriage Return (CR) as the terminator
character. (The TLP50 Application Software does this automatically, but some
firmware versions in the DSOs do not allow it. In that case you will need to set
it manually. Contact [email protected] if you need assistance.)
Try to communicate with the Tektronix oscilloscope through its USB interface
with Tektronix application sofware. If it does not work, the problem is in the
USB communication module. Contact Tektronix.
Hardware Initialization Error Code 01
This code describes an error in the initialization of or the communication to the DAQ module
of the tester.
1) Unplug and re-attach the USB cable from the “PC” connector on the tester.
2) Open the National Instruments application interface by double clicking on the following
Icon on your desktop
Measurement & Automation.lnk
©2007 & 2008, TLP Solutions – all rights reserved
Page 14 of 15
www.tlpsol.com
You should see the following Configuration menu in the upper left hand corner after you
expand the “Devices and Interfaces” and then “NI-DAQmx Devices” items.
Check that the NI USB board is present in your system, it has a serial number, and it is
named “DEV1”. If so, right click on the board to select it and open a pull-down menu of
actions. Left click on the first of these, “Self Test” to run the self-test on the board. If there is
another device listed under NI-DAQmx Devices, it may be necessary to remove it.
If the board fails self-test, contact Tektronix. If the board passes self-test, re-load the TLP
Application software and run the application again. If the board does not pass self test, or if
initialization still generates error code 01, try connecting to a known good USB port on the
host PC.
Hardware Initialization Error Code 11
Both DSO & DAQ initialization procedures have failed. Refer to Error Codes 01 and 10 above.
No pulses are generated
Make sure the ON/OFF switch on the TLP tester is in the ON position (the light to the upper
left of the switch should be on).
Also verify that the DSO has the CR character set as the terminator character. The TLP50
Application software attempts to set this, but in a few frimware versions of the Tektronix
scopes it is not allowed. In those cases the terminator character may be set manually using
Microsoft’s Hyperterminal utility – contact [email protected] for assistance.
There are no curves displayed on the scope.
Be sure the green light next to the PC port on the tester is flashing green (indicating the tester
is in communication with the PC).
If the steps above do not resolve the problem, contact TLP Solutions
Support at [email protected].
©2007 & 2008, TLP Solutions – all rights reserved
Page 15 of 15