1
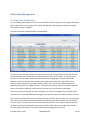
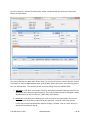
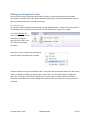
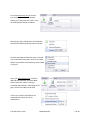
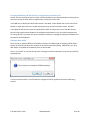
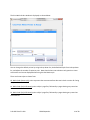
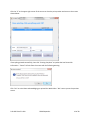
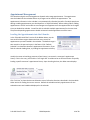
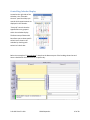
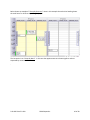
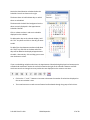
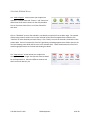
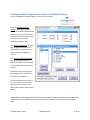
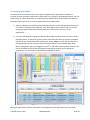
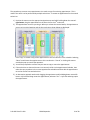
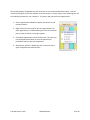
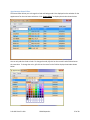
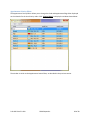
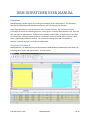
DRM DISPATCHER USER MANUAL Overview: DRM Dispatcher provides support for creating and managing service appointments. This document describes the DRM Dispatcher Dashboard and how to use it to manage your schedule. Work Order information is now saved as part of the customer’s history. The work order contains information to assist with scheduling the work, track progress, and store details about the job. There are two main types of appointments: 1) appointments linked to a Work Order, 2) appointments not linked to a Work Order. All appointments related to a customer’s account should be type 1 linked to a Work Order. Appointments made for vacation, sick time and in-house projects and not related to a customer’s account are type 2 not linked to a Work Order. Dispatcher Dashboard DRM Dispatcher is an additional program launched from DRM Windows Schedule Menu that allows you to manage Work Orders and Appointments. As shown below: 9-10-2012 Rev 5.0.109 DRM Dispatcher 1 of 28 The dashboard is comprised of three main areas. The first area at the top is the Ribbon Menu and appears like this upon entering DRM Dispatcher Dashboard. The menu contains three tabs; Schedule, Grids, and Tools Menus, defaulting to the Schedule Menu. The second area is the Appointment Schedule Calendar with its controls section to the right of the calendar. The yellow highlighted short dashed line controls the height of the Schedule area versus the height of the Grid area The last area located at the bottom of dashboard contains the tabbed Grids which list 3 different perspectives of work orders and appointments: 1. Work Order Grid: Lists all work orders entered for the date range 2. Dispatch Grid: Only lists work orders that have not yet been scheduled. This will likely be your primary workspace. 3. Appointments: Lists all appointments for the date range, and is a combination of work order appointments and time-off/blocked time appointments. 9-10-2012 Rev 5.0.109 DRM Dispatcher 2 of 28 Work Order Management Creating a New Work Order: To start creating a Work Order, first click on the “Add WO” button located by the left edge of the Ribbon Menu. Alternatively, you can right-click on either the WO grid or Dispatch grid, to display the Popup Menu and then select “Add WO”. The Account Selection window appears as shown below: The easiest way to find your customer is to enter the Account #, Customer Name, Site Name, Site City, or Phone Number into the wide text box located to the left of the “Find” button. As you type in this field, the list is automatically filtered and the matched text is highlighted in the grid. Unlike DRMWindows, notice that all fields are searched for the typed phrase. Note that if your search phrase contains a space character, for example “Abbott, Chester” then you need to include quotes at the beginning and end like this “Abbott, Chester”. If the quotes are missing, then the new phrase after the space is searched for separately, and accounts that match any of the phrases are displayed. Select an account from the grid by either, clicking once on its row (the background turns deep blue to indicate that it is selected) followed by clicking the “Pick Account” button, or double-clicking on the row. There are other useful approaches for filtering the Account Selection Grid. One way is to use the Column Filter, which is the edit box located below each Column Name. Note that the column filter is different from the “Find” in several ways; 1) it only filters on that one column, 2) Find does a compare based on the field containing the filtered phrase, whereas the column filter requires the field to start with the phrase 3) spaces are allowed in the column filter without needing quotes around it. 9-10-2012 Rev 5.0.109 DRM Dispatcher 3 of 28 The Column Header itself (where the column name is displayed) provides two useful features for sorting and filtering the column. The column currently being used for sorting contains a grey arrow showing direction of sort in the right hand corner of the column’s header area. To change the sort order of the list, click the appropriate Column Header area anywhere except in the small box located on the rightside, containing the down arrow. Click the same column header again to reverse the direction of the sort. Click on the box with the down-arrow on the right-side of the column header to see a list of specific values to filter on. Check one or more of these choices. For example, limit the list to a specific town or group of cities, as shown below: 9-10-2012 Rev 5.0.109 DRM Dispatcher 4 of 28 Once the customer is selected, the Work Order Viewer is displayed with the customer’s information filled in as shown below: This section describes the Work Order Viewer fields. The top area of the form contains the basic account information as shown in DRM-Windows when entering Work Order information. Upon entering you will be in the Job Code field. Tab and shift-tab will move you through the form’s editable fields. 1. Job Code is a pull down menu used to select the Job Code that best describes the reason for the Work Order and subsequent appointment(s). The list of available selections is managed in DRMWindows from the menu Utilities (F7) / More (F9) / Job Code (F5) . 2. Invoice # is a pull down menu allowing you to link an invoice to the Work Order. Only servicerelated invoices dated after the Work Order are displayed. This field is left blank until the invoice which contains detailed labor and parts charges is created. Click the “View” button to display the Invoice detail pop-up. 9-10-2012 Rev 5.0.109 DRM Dispatcher 5 of 28 3. WO # should generally not be edited when using laser printed work orders, as the next available number will be automatically assigned when the work order is saved. In the case of dot matrix printed work orders, the pre-printed reference number from the work order form should be entered here after the Work Order is printed. 4. Queue gives you the flexibility to organize the work to be dispatched by grouping work orders into categories appropriate for each job. For example, you could have queues to represent a specific day, priority, type of work etc. When the work order is created, assign it to the appropriate queue to make it easier for the dispatcher to locate and schedule. The “Unassigned” queue will be selected by default. If you do not want the work order to appear in the Dispatch queue, then set the Queue value to the first, empty choice. 5. Status allows you reflect the state as the work order moves toward completion. The choices include “Scheduled”, “In Progress”, “Completed”, “On Hold”, “Printed” 6. Priority allows you set the urgency for the work order. 7. Payment lets you indicate how the work order should be billed. Choices include “Invoice”, “Warranty”, “Contract”. For example, you can easily list any completed work orders that have not yet been invoiced. 8. PO Number is for commercial accounts that provide a PO Number. 9. Job Date can be used to help the dispatcher schedule an appointment. It can later be updated to reflect when the work was performed. 10. Description 1 & 2 are used to briefly describe the problem and nature of the work order. Along with the Job Code, these 2 lines print on all the standard Work Order forms. 11. Duration is used to set the length of an appointment created for the work order. It can be updated later to reflect the actual time spent on the job. The first edit box display hours and the second edit box displays minutes. 12. Tech can be used to indicate preference for a specific technician when the workorder is created. It can be updated later to reflect who performed the work. 13. Request Note should be used by the person creating the Work Order to inform the Dispatcher about any conditions such as when the customer is available, how to access the equipment, notification of the customer, etc. 14. Office Note should be used to convey information about the job to properly invoice the work order. 15. Problems Found is used to enter the technician’s list of any issues found during the appointment. 9-10-2012 Rev 5.0.109 DRM Dispatcher 6 of 28 16. Resolution describes the actions taken during Appointment to resolve the Problems Found. 17. Recommended notes any suggestions or observations made to the customer that should be addressed in the future. 18. Equipment Note should contain details about measuremnts and the condition of the equipment and equipment changes. 19. WO Appointment Information lists all the appointments scheduled for this Work Order. 20. WO History shows information about when the Work Order was created, modified and printed. To Save a work order, click the Save button in the lower-right corner. 9-10-2012 Rev 5.0.109 DRM Dispatcher 7 of 28 Editing an existing Work Order: There are several ways to select the Work Order for editing. The WO and Dispatcher Grids provide functionality to edit the Work Order. Before describing how to get into the Work Order editor from the grid, we need to know how to load and use the grids Loading the Grids All 3 grids are loaded using default values when starting DRM Dispatcher. In order to limit the number of records displayed, only information that pertains to the specified date range will be loaded. To load the WO Grid, first make sure the WO Grid Tab is selected by clicking on it. Now select the “Grids” entry on the Dispatcher Ribbon Grid Menu: Alternatively, right-clicking within the WO Grid itself will display the Popup menu as shown: The date used for filtering is the Created On date. Setting the start and end date determines which work orders are loaded according to the Work Order creation date. Click on “Refresh WO” to update the grid’s data. The grid is automatically refreshed when a work order is saved or when the Schedule is refreshed. Other DRM users could be adding work orders but they won’t show up in your grid until it is refreshed. 9-10-2012 Rev 5.0.109 DRM Dispatcher 8 of 28 To load the Dispatcher Grid, first make sure the Dispatcher Tab is selected by clicking on it. Now select the “Grids” entry on the Dispatcher Ribbon Grid Menu: Alternatively, right-clicking within the Dispatcher Grid itself will display the Popup menu as shown: To select the Dispatch Queues to show in this grid click on the down arrow and a check list as shown below is presented to select Queue(s) to be loaded in this grid. Lastly, the Appointments Grid, unlike the WO Grid and Dispatcher that show Work Order information, shows a listing of scheduled Appointments. The loading of the grid is similar to the Work Order Grid. In this case, the Start and End date are compared to the Start time of the Appointment. 9-10-2012 Rev 5.0.109 DRM Dispatcher 9 of 28 Locating and Editing the Work Order or Appointment from the Grid You will use the same interactive Find, Filter, and Sorting features you discovered when searching for an Account to locate the Work Order or Appointment record you want to edit. In the WO Grid, to display the Work Order details in the editor, either double-click on the record to be edited, or single right-click on the record to display the pop-up menu and then choose “Edit WO”. In the Appointment Grid, first open the Appointment editor and then click on the “Edit WO” button. Note that only appointments loaded in the schedule may be edited. If you try to edit an appointment from the grid that is not within the current schedule’s calendar, a message to change the schedule load parameters will be displayed. Editing a Work Order There are only a couple of differences between creating a new Work Order and editing a Work Order. You do not need to first select the customer for the work order when editing. Additionally, the “Print WO” button is available on the bottom center of the window. Click on “Print WO” to start the print process. If changes have been made but not yet saved, you will be prompted with: In most cases the answer is yes otherwise the changes will not be applied to the Work Order being printed. 9-10-2012 Rev 5.0.109 DRM Dispatcher 10 of 28 The Print Work Orders window is displayed, as shown below: You can change the default printer by using its drop-down list, the default WO Style from its drop-down list, and adjust the number of copies to print. Note that the latter two selections only pertain to Laser work orders and are not displayed when using the Dot Matrix style. There are 3 new styles to choose from: 10. Work Order (Notes only) prints any notes that were entered but does not include a section for listing the parts that were used 11. Work Order (Style 1 & Notes) prints a Style 1 page first, followed by a page showing any notes that were entered 12. Work Order (Style 2 & Notes) prints a Style 2 page first, followed by a page showing any notes that were entered. 9-10-2012 Rev 5.0.109 DRM Dispatcher 11 of 28 The following Print Preview Window is displayed: Click the printer icon on the menu to display the printer selection dialog. Change the printer if necessary and click “Print” when ready to print. 9-10-2012 Rev 5.0.109 DRM Dispatcher 12 of 28 Click the “X” in the upper-right corner of the screen to close the print preview and return to the screen shown below: If everything printed successfully, then click “Printing Complete” to update the Last Printed On information. “Cancel” will exit from the screen with the following warning: Click “Yes” to exit without acknowledging you printed the Work Order. “No” returns you to the previous screen. 9-10-2012 Rev 5.0.109 DRM Dispatcher 13 of 28 Appointment Management The calendar and grids are used together to dispatch and manage appointments. The appointment must be loaded into the calendar before any changes can be made to the appointment. The appointment information in the calendar is not automatically refreshed, therefore if multiple people are editing or adding appointments you should perform a “Refresh Schedule” before making edits or adding appointments. You will not be able to save changes to an appointment if that appointment has changed since you loaded the calendar. You will be able to schedule multiple appointments for the same time. The person dispatching appointments should review and resolve appointment conflict issues. Loading the Appointments into the Calendar In the “Schedule Load Filter” section of the Ribbon Menu, use the Start and End Date range to determine how many months of appointments you want loaded in the calendar. The default range is two months in the past and a year in the future. Click “Refresh Schedule” to reload the calendar’s appointment information. If you find the calendar loading slow, try loading less appointment history. Usually the reason to load large amounts of past history is to research a customer’s appointment history. If this is the case, you’ll find the “Use Single Site” checkbox to be an efficient solution for quickly loading a specific customer’s appointment history. Upon checking the box, the ribbon menu displays: Click “Pick Site” to show the Account Selection screen. Follow the directions described in the New Work Order section for finding the correct account. Refresh the schedule and only appointments for the selected account are loaded and displayed in the calendar. 9-10-2012 Rev 5.0.109 DRM Dispatcher 14 of 28 Controlling Calendar Display Located to the right-side of the Calendar is the “Schedule Controls” panel that helps you control which appointments are displayed in the calendar. “Group By” controls how the Appointments are grouped within the calendar display. The Resources pull down edit box allows you to select specific technicians to show in the calendar by checking each technician’s check-box. Below is an example of “Group By Date”. Note that the Resource part of the heading shows the total hours scheduled for this technician for a specific day. 9-10-2012 Rev 5.0.109 DRM Dispatcher 15 of 28 Below shows an example of “Group By Resource”. Note in this example the technician heading shows the total hours for all three days being displayed. The last option is to “Group by None”. In this case the appointments are shown together and not separated by resource. . 9-10-2012 Rev 5.0.109 DRM Dispatcher 16 of 28 Notice the Date Selection calendars below the Schedule Controls as shown on the right The dates shown in bold indicate days on which there are scheduled. The dates with the dark blue background are the dates currently displayed in the Appointment Schedule Calendar. Click on a date to select it and see its schedule displayed on the calendar. To add another day to the calendar display, hold the “Ctrl” key down and click on the day you want to add. To add all the days between two dates hold down the “Shift” key and click on the date and all the days will be added to the displayed appointment schedule. Alternatively, click and drag your mouse over the dates to select. If you are scheduling multiple technicians, the Appointment Calendar being displayed can become quite crowded and condensed. Notice the controls located to the right of the calendar‘s bottom scroll bar. Use these controls to change how many technicians are displayed on the screen at one time. Click on the “+” and “-” buttons to increase or decrease the number of technicians displayed on the current calendar’s view. The arrow buttons are used to move forward and backward through the group of technicians. 9-10-2012 Rev 5.0.109 DRM Dispatcher 17 of 28 Schedule Ribbon Menu The “View Navigator” section allows you to adjust the calendar’s viewable dates and “Zoom In” and “Zoom Out” affects how much detail is shown for the daily schedule. You can choose to show from 1 to 12 lines of detail for each hour. Click on “Backward” to move the calendar’s view back by one block of current date range. The number of days being viewed is shown in the control calendar to the left of the appointment calendar. Click “Forward” to move ahead by one block of days. Click “Today” to move the calendar’s view back to thre present date. Zoom In increases the time line’s granularity spreading appointments further apart in the view and showing more detail and less time in the viewable area. . Zoom Out decreases the time line’s condensing appointments in the view and showing less detail. The “View Selector” section allows you to adjust the viewing format type. Longer view periods show less detail for each appointment. Select the different views to see which ones work best for you. 9-10-2012 Rev 5.0.109 DRM Dispatcher 18 of 28 Printing Scheduled Appointments Reports and Work Orders Click “Print/Appointment/Work Order” to open the Print wizard. Use the “Appointment Start Criteria” to establish the date range. This example would include all appointments on July 23, 2012. Uncheck the “All Day Mode” check box if you want to limit the schedule to specifics hours Use “Filter by Technician” to select whose appointments to print. In this example, only appointments and work orders for Demo are printed. Use “Filter by Appointment Code” to only print appointments for specific job codes. In this example, only “Call Back” appointments are printed. The default sorting is by day and then by technician. Click “Select Sort Fields” to change this. The two check boxes to the left of the “Print” button let you select whether to print either or both Work Orders and the Appointment Report. If Work Orders are being printed, then the “Print Work Orders” window is displayed, as described earlier in this document. The difference in this case is that many work orders may be queued in the grid to print. 9-10-2012 Rev 5.0.109 DRM Dispatcher 19 of 28 Creating Appointments As mentioned in the overview there are two types of appointments. Appointments related to a customer account are either created from a Work Order or by copying an existing appointment. The first appointment for a Work Order must be created using the Appointment Calendar along with either the Dispatcher Grid or WO Grid. To create an appointment from a Work Order: 1. Adjust the Appointment Calendar View so the date and time slot for the appropriate technician are visible in the Appointment Calendar. “Day, Work Week, and Timeline Views” are best for setting new appointments because they allow you to easily set the start time of the appointment 2. Use either the Dispatch or WO grid to find the Work Order record for which you want to create the appointment. The Dispatch grid only shows work orders that have not yet been scheduled. Left-click on the record and without releasing the mouse, drag the record over the calendar to the appropriate time-slot, and then release the mouse button. In this example, Work Order #1157, highlighted in gray, was dragged to July 24th at 3:00 and the mouse button released. You will be prompted to confirm that the appointment should be created. Upon creating the appointment, the work order is removed from the Dispatch Queue. Editing the appointment and the initial values of the Appointment are discussed in the next section. 9-10-2012 Rev 5.0.109 DRM Dispatcher 20 of 28 The second way to create a new appointment is to make a copy of an existing appointment. This is useful if the work is to be performed by multiple technicians. To create an appointment for the second technician: 1) Position the mouse over the appropriate Appointment and while holding down the mouse’s right-button, drag the appointment to the time-slot for the 2nd technician, 2) The appointment moves as you drag it. When you release the mouse button, the appointment returns to its original position and the Pop-up choices shown below are displayed: Click “Copy” to create a copy of the appointment at this new location in the schedule. Selecting “Move” would move the appointment to this new location. “Cancel” or clicking ithe mouse outside the pop-up cancels the operation. 3) You will be prompted to confirm that you want to copy or move the appointment. 4) If the technician or date and time are not currently visible in the Appointment Calendar, then make the copy anywhere in the current appointment schedule and then edit the appointment to set the correct time and technician. 5) An alternative approach works with dragging the appointment while holding down mouse leftbutton. Left-click and drag moves the appointment, whereas “Ctrl” + Left-click and drag copies the appointment. 9-10-2012 Rev 5.0.109 DRM Dispatcher 21 of 28 The second category of Appointments are those that are not associated with work orders. They are used for blocking out time on the calendar and can be used in a variety of ways, from reflecting time-off to scheduling estimates for non-customers. To create a new non-work order appointment: 1. Set the Appointment Schedule to display the technician and relevant timeslot. 2. Right-Click on the start time for this new appointment if no other appointment is scheduled during that start time and the pop-up menu as shown on the right appears. 3. Select New Appointment or New All Day Event. This takes you into the Appointment Editor to enter the appointment parameters and save this new appoitment. 4. Alternatively, perform a double left-click on the time-slot to open the appointment editor directly. 9-10-2012 Rev 5.0.109 DRM Dispatcher 22 of 28 Editing Appointments: For an Appointment to be edited, it must be loaded into the current Appointment Schedule. There are two ways to edit an Appointment. You can set the Appointment Schedule to display the appointment and either double left-click on the appointment to open the editor directly, or right-click on the appointment to display the popup menu as shown. Click “Open” to open the Appointment Editor. You can also edit appointments in similar fashion from the Appointment Grid. However, be aware that there may be occasions when an appointment is displayed in the grid, but not be loaded in the calendar. Such appointments cannot be edited. In such an event, simply change the date range for the calendar to include the appointment you want to access from the grid. 9-10-2012 Rev 5.0.109 DRM Dispatcher 23 of 28 The Appointment Editor When editing the Start or End time or Technician for the appointment, be aware that these values are not checked to see whether the changes conflict with an existing appointment. In other words you are allowed to overlap and double book appointments. When moving an appointment, it best to do so by dragging the appointment directly on the Calendar 1. “Job Code” is initially set to the same value as the associated work order. If it is not linked to a work order, the Job Code must be selected before saving the new appointment. The Job Code is editable for the appointment. Changing the Job Code in the appointment has no effect on the work order’s Job Code value. 2. “WO #” is not editable in the Appointment Editor but is editable in the Work Order Editor. If you change the Work Order Number via “Edit WO”, you must Refresh the Schedule in order for the appointment to pick-up the change. 9-10-2012 Rev 5.0.109 DRM Dispatcher 24 of 28 3. “Start & End Time” establish when the appointment begins and its duration. If you change the Start Time, then the End Time is automatically adjusted to preserve the original duration. To alter the duration, you will need to adjust the End Time. 4. “All Day Event” when checked disables the Start and End time and sets the appointment for the whole day. This is a fast way to block-out time-off for vacation, sick time, and holidays. 5. “Priority” is initially set to the same priority as the associated Work Order. The priority level controls the border color of the Appointment in the schedule calendar. The dispatcher can easily see the priority of the appointments without viewing the appointment editor. There are 10 priority levels that you can edit. The default value are “N/A”, “Low”, “Medium”, “High” 6. “Status” affects the background color of the Appointment displayed on the calendar. When an appointment is added to the Calendar, its initial Status is blank or white. When the appointment is confirmed with the customer, you can mark it as Confirmed. Change it to Started when the tech calls in, and Completed when he leaves. There are 10 status codes you can assign, each with its own color scheme. 7. “Resource” assigns the technician to the appointment. You can schedule multiple appointments for the same work order. 8. “Appointment Comments” is the place to enter any information needed by the technician to execute the appointment that is not in the Work Order. This information is printed on the Appointment Report given to the Technician. 9. “Location” is set to the Site name and Address and is not editable. It is displayed on the calendar to help you see at a glance where the job is. 10. Click “OK” to save any changes to the appointment. 9-10-2012 Rev 5.0.109 DRM Dispatcher 25 of 28 Tools Menu Queue Manager Queues help you organize work to be scheduled. Queues are flexible and can be set-up to accommodate your day-to-day workflow. For example, you can set-up task oriented tasks such as “Cleaning” or “Estimate”, “Installation” Click “Queue Manager” from the Tools Ribbon menu to show: Edit existing records by double-clicking on the record or selecting the record and clicking “Edit Queue”. 9-10-2012 Rev 5.0.109 DRM Dispatcher 26 of 28 Appointment Status Editor The Status Editor allows you to change the Code and Background Color displayed on the calendar for the appointment for the nine Status selections. Click “Status Editor” to display the window shown below. You can only edit the Code or Color. To change the code, left-click on the record’s code field and enter the new value. To change the color, left-click on the record’s color field to display the window shown below. 9-10-2012 Rev 5.0.109 DRM Dispatcher 27 of 28 Appointment Priority Editor The Appointment Priority Editor allows you to change the Code and Appointment Edge Color displayed on the calendar for the nine Priority codes. Click “Priority Editor” to display the window shown below: The window is similar to the Appointment Status Editor, as described in the previous section. 9-10-2012 Rev 5.0.109 DRM Dispatcher 28 of 28