1
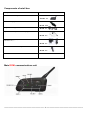
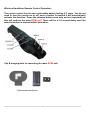
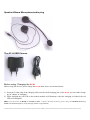
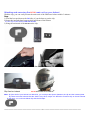
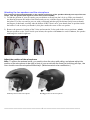
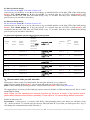
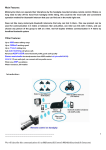
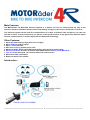
Main Features:
The MOTORader 4R Bluetooth Intercom System is a feature rich tool for motorcyclists by way of our
exclusive wireless handlebar remote control now making using your intercom so much safer and easier.
This intercom system can be used for communication in 4 riders or between rider and pillion, one rider can
link with 3 riders, and can choose any one person of the group to talk to at any given time. Real full duplex
wireless communication in 4 riders by hands free Bluetooth technology.
Other Features:
1. Up to 900 meter talking range (direct line of sight)
2. Up to 120Km/h working speed
3. Up to 7 hours talk time
4. Safe auto-receiving mobile phone calls
5. Advanced A2DP & EDR stereo Bluetooth profile, with excellent audio quality
6. Stereo music/audio function (transmits from A2DP enabled mobile phone/MP3/GPS)
7. Line in 2.5 mm audio jack, can connect with most audio sources
8. Wind noise DSP cancellation
9. Water-resistance, full weather
Introduction :
------------------------------------------------------------------------- 1 ----------------------------------------------------------------------
We will describe this communication kit as the R (Remote) C (Control) M (Multifunctional) I (Intercom)
This RCMI can either be used for rider or for the pillion.
This RCMI is a multifunctional device for motorcyclists, it can be used:
1) As a hand-free Bluetooth headset for mobile phone calls
2) As a two way wireless full duplex interphone in 4 riders or between rider & pillion
Any rider could choose one of 3 riders to talk at a time !
The maximum communication range can reach 900m (based on direct line of sight)
3) As a wireless Bluetooth stereo music receiver and speaker
This RCMI has EDR and A2DP profile, with EDR and A2DP profile it can offer another important function--listening to stereo music from A2DP enabled mobile phone, MP3 or navigation audio instructions from a GPS
(this MP3 or GPS should have a built in audio Bluetooth transmitter)
4) As the speakers of your MP3/GPS
If your MP3 or GPS is not Bluetooth enabled and you do not have a Bluetooth AV dongle, this RCMI also
offers another method to listen to the stereo music/audio info --- the simple wired method. Plug the audio
source directly into the RCMI via the 2.5mm-3.5 mm stereo connection cable.
----------------------------------------------------------------------- 2 -------------------------------------------------------------------
Components of retail box
Component
Parts Number
RCMI headset main part
#RCMI -001
RCMI hand grip wireless remote control
RCMI -002
Clip for mounting the main unit
RCMI -003
Speakers & microphone & audio plug
RCMI -004
AC &USB Charger (AC110V-220V / DC
OUTPUT 5V)
RCMI -005
2.5mm to 3.5mm audio adapter cable
RCMI -006
User manual
RCMI -007
Main RCMI communications unit
--------------------------------------------------------------------------- 3 ---------------------------------------------------------------------
Wireless Handlebar Remote Control Operation:
The remote control has its own replaceable battery lasting 2-3 years. You do not
need to turn the remote on or off, once a button is pushed it will automatically
activate this function. Press the selected button once only and not repeatedly as
this will confuse the main RCMI unit. There will be a 3-5 second delay once the
selected button is pushed before activation.
Clip & hanging-hole for mounting the main RCMI unit
Clip/Inserted plate/Spacer
----------------------------------------------------------------------- 4 ---------------------------------------------------------------------
Speakers/Boom Microphone/audio plug
The AC & USB Charger
Before using: Charging the RCMI
Before using this device, please charge the RCMI main device at least three hours.
1) Insert the 2.5mm plug of the charging cable into the small charging jack of the RCMI, you can either charge
by AC adapter or computer .
2) While charging the red LED on the headset module will illuminate, when the charging is finished, the red
LED will extinguish .
Note: if you do not use the RCMI for a month or more , to protect the Poly-Li battery, please charge the RCMI at least every
month. (the fault damaged by wrong charging will be not guaranteed).
----------------------------------------------------------------------- 5 ---------------------------------------------------------------------
Attaching and removing the RCMI main unit on your helmet
With the clip, you can easily mount the main unit of the BIM on a helmet within 3 minutes.
Step:
1) Find the best position on the left side of your helmet to put the clip
2) Insert the inserted plate between shell and foam of the helmet
Fix the clip on the helmet with the screws
3) Hang the main unit of the RCMI on the clip.
Insert the plate between the shell and the foam of a helmet, fix with screws.
Clip fixed on helmet
RCMI mounted on a helmet
Note: 1) If the shell of your helmet is a little thick, you could put the Spacer between the clip and the inserted plate.
2) There are some helmets that the shell is very thick, maybe it is difficult to fix above clip on these helmets.
In this case, you could use below clip with the 3M tape.
----------------------------------------------------------------------- 6 ---------------------------------------------------------------------
Attaching the two speakers and the microphone
The success of the system depends on the careful positioning of the speakers directly over top of the ear
canals. This will give the best signal of noise of the received audio..
1) To find the position of your ear canals, put your helmet on firmly but don’t do it up. Slide your thumb of
one hand up between the inside of the helmet and your ear, with the fingers of that hand on the exterior of
the helmet. Feel the ear canal in your ear with your thumb and then grip the helmet firmly between thumb
and fingers of that hand, carefully take the helmet off BUT don’t move your thumb from its position inside
the helmet. Look at where your thumb is, this place marks the centre of the ear speaker.
.
2) Remove the protective backing of the Velcro and mount the Velcro pads in the correct positions , attach
the two speakers on the Velcro inside your helmet, the speaker with short wire cord for left ear, the speaker
with long wire cord for right ear.
Adjust the position of the microphone
Note: To reduce the external noise, you need to close the visor while riding, and please adjust the
position of the microphone to be right in front of your mouth with the foam just touching your lips , the
visor should cover the microphone effectively! (Minimizes wind noise contribution )
Correct position of the microphone
Wrong position of the microphone
----------------------------------------------------------------------- 7 ---------------------------------------------------------------------
Operation:
The operation is friendly and very easy.
Pairing with your Bluetooth phone for the first time
Note: You must have a Bluetooth enabled phone to “Pair” with the RCMI.
Before using the 6RMI, please familiarize yourself with Bluetooth function of your mobile phone. Read the
instruction
manual that came with the phone so you can enable its Bluetooth function.
Before you can use this RCMI in combination with your phone , you will need to “pair” it with your cell phone for the
first time. This usually only needs to be performed once with that individual phone however follow the instructions
supplied by the phone manufacturer and save the “pairing” so it will be automatically connect when your phone and
the RCMI come into contact.
A. Please pair the RCIM with the phone only by the buttons of the main unit. Don’t pair them by the
remote control.
1) Enable the Bluetooth function on your mobile phone. Short press(< 1 second) Reset key on the RCMI.
2) You must place the RCMI in “Pairing mode”, this is done by way of holding down the Power/Interphone
key on the headset until the red & blue LED flash alternately.
3) Begin the “searching for Bluetooth device” on your mobile phone according to the phone’s instructions.
4) When the RCMI is discovered, the mobile phone will display MOTOR PHONE, select this and accept the
connection.
5) Your mobile phone will ask you to input a password to enable this connection, when prompted input
password : 0000 (four zeros)
6) Your phone will confirm that pairing has succeeded. Note that the only light showing on the headset is now
blue and it will flash once every 5 seconds.
Turn on
Short press(< 1 second) Reset key on the RCMI.
Press the Power/ RIDER A key for 6 seconds or so,
until the blue light illuminates, promptly release the
Power/Interphone key, then the blue led light will flash
every 2-5 seconds, and you can see that on the
screen of your mobile phone the RCMI will ask your
phone to connect with it , select ”yes” on your phone.
Increase the volume Short press of the V+ key
Reduce the volume Short press of the V- key
----------------------------------------------------------------------- 8 ---------------------------------------------------------------------
Safe mobile phone call function
1) Receive a phone call automatically
With an incoming a phone call, you will hear the ring on the mobile phone and about 3-5 seconds later, the
RCMI will receive the call automatically.
2) Terminate phone call
When you finish talking on the phone, a short press of the Phone/Play Key will terminate the call.
3) Reject a phone call
When you receive an incoming phone call, you will hear the ring, within 1 second, immediately press the
Phone/Play key and it will reject the call.
Set up for bike- to- bike and rider-to-pillion intercom: pairing
Pairing is a one time process that is required for mutual recognition between a RCMI and other RCMI. Once the
two headsets are paired, they will retain paired whenever they are within range.
Please note that you can speak via intercom to one persons headset at a time.
Note:
B. When you are pairing two RCMIs, you must keep other RCMIs in the off status.
C. Please pair the RCIMs only by the buttons on the main unit. Don’t pair them by the remote control.
D. You can pair your RCMI with maximum total of four RCMI’s.
1) Pairing two RCMIs
If you only need to communicate with one person (rider to pillion or bike to bike), you can simply pair
two RCMIs according to the below steps:
Power on RCMI A (the blue LED of RCMI A will flash), power on RCMI B (the blue LED of RCMI B will
flash).
Simultaneously hold the B key on RCMI A and hold the A key on RCMI B until the red & blue LED of the both
pairing RCMI’s flash, short press the B key on RCMI A, and 5-9 seconds later the red LED of both RCMI’ s
will extinguish and the blue LED will then flash briefly every 2-5 seconds, thus they have finished the pairing
process, (now you can talk to each other).
--------------------------------------------------------------------------- 9 ---------------------------------------------------------------------
2) Pairing all RCMI’s
Before pairing, to avoid being confused, please stick respectively, 4 labels of A, B, C, D on 4 main units of the
RCMI’s.
Note: At one time it only allows one RCMI to pair to another RCMI, so when you are pairing two
RCMI’s please confirm the other units are in status of power off.
2.1 Pair unit A with unit B
Power on unit A (the blue LED of unit A will flash), Power on unit B (the blue LED of unit B will flash).
Simultaneously hold the B key on unit A and hold the A key on unit B until the red & blue LED of the both pairing
RCMI’s flash, short press the B key on unit A, 5-9 seconds later the red LED of both RCMI’s will
extinguish and the blue LED will flash briefly every 2-5 seconds, thus they have finished the pairing process
(now you can talk to each other).
2.2 Pair unit A with unit C :
Be sure that unit B and unit D is in status of power off.
Power on unit A (the blue LED of unit A will flash), Power on unit C (the blue LED of unit C will flash).
Simultaneously hold the C key on unit A and hold the A key on unit C until the red & blue LED of the both pairing
RCMI’s flash, short press the C key on unit A, 5-9 seconds later the red LED of both RCMI’s will
extinguish and the blue LED will flash briefly every 2-5 seconds, thus they have finished the pairing process
(now you can talk to each other).
2.3 Pair unit B with unit C :
Be sure that unit A and unit D is in status of power off.
Power on unit B (the blue LED of unit A will flash), Power on unit C (the blue LED of unit C will flash).
Simultaneously hold the C key on unit B and hold the B key on unit C until the red & blue LED of the both pairing
RCMI’s flash, short press the C key on unit B, 5-9 seconds later the red LED of both RCMI’s will
extinguish and the blue LED then will flash briefly every 2-5 seconds, thus they have finished the pairing
process (now you can talk to each other).
Pair unit D with unit A,B,C
2.4 Pair unit D with unit A
Because there is not D key on the RCMI, the way of pairing unit D with unit A,B,C is different.
To be sure that unit B and C is in status of power off,
Simultaneously hold the A key on unit A and hold the A key on unit D until the red & blue LED of the both pairing
RCMI’s flash, short press the A key on unit A, 5-9 seconds later the red LED of both RCMI’s will
extinguish and the blue LED will flash briefly every 2-5 seconds, thus they have finished the pairing process
(now you can talk to each other).
-------------------------------------------------------------------------- 10 ---------------------------------------------------------------------
2.5 Pair unit D with unit B
Be sure that unit A and C is in status of power off ,
Simultaneously hold the B key on unit B and hold the B key on unit D until the red & blue LED of the both pairing
RCMI’s flash, short press the B key on unit B, 5-9 seconds later the red LED of both RCMI’s will
extinguish and the blue LED then will flash briefly every 2-5 seconds, thus they have finished the pairing
process (now you can talk to each other).
2.6 Pair unit D with unit C
Be sure that unit A and B is in status of power off ,
Simultaneously hold the C key on unit C and hold the C key on unit D until the red & blue LED of the both pairing
RCMI’s flash, short press the C key on unit C, 5-9 seconds later the red LED of both RCMI’s will
extinguish and the blue LED then will flash briefly every 2-5 seconds, thus they have finished the pairing
process (now you can talk to each other).
To get all pairing details, please refer to below pairing chart,
STATUS
BEFORE
PAIRING
WHEN RED
AND BLUE
LED FLASH
ON BOTH
UNITS,SHORT
PRESS BELOW
BUTTON ON
LEFT UNIT
<---pair each
other--->
INTERPHO
NE
PAIRI
NG
BUTTO
N
INTERPH
ONE
PAIRIN
G
BUTTON
Unit A
B
powered on
B
<---pair each
other--->
Unit B
Unit A
C
powered on
C
<---pair each
other--->
Unit C
A
powered on
Unit B
C
powered on
C
<---pair each
other--->
Unit C
B
powered on
Unit A
A
powered on
A
Unit D
A
powered on
Unit B
B
powered on
B
Unit D
B
powered on
Unit C
C
powered on
C
Unit D
C
powered on
<---pair each
other--->
<---pair each
other--->
<---pair each
other--->
STATUS
BEFORE
PAIRING
powered on
A
3)Choose which rider you will talk with:
Pairing these riders seems a bit complicated, but using the intercom is very simple ☺
After you have paired all the RCMI’s, you can now talk with one of the riders at a time.
STEP: After finishing the pairing procedure, confirm that all of RCMI’s have been powered on.
We suggest that it is best to use the hand grip remote control to initiate or finish an intercom call, this is a safer
method whilst riding.
Note: When you are operating the intercom functions by the A, B, C button of the remote control,
please don’t press the same button repeatedly. There will be a 3-5 second delay before connection.
Initiate an intercom call…
For example: A short press(< 1 second) of the B Key, then promptly release your hand, you will hear a beep
“di”, then wait about 3-5 seconds and you can now talk with rider B. If you then you short press the C key, it
will change the communication to talk with rider C.
-------------------------------------------------------------------------- 11 ---------------------------------------------------------------------
Tips: Talk with unit D
Because there is not D key on the unit, the way of calling unit D is different :
Short press A key on unit A , and you will connect with unit D. Short press B key on unit B, and you can talk
with unit D.
…Short press C key on unit C , you will talk with D.
Finish an interphone talk:
You only need a short press of same unit of an intercom (A, B, C) key, to terminate communication.
Note: to reduce power consumption, when you do not need to talk, don't keep your RMCI in the intercom
state .
Note: If two RCMI’s were out of range, they may lose connection. When you come within range
again you only need to initiate a intercom call as normal.
Music /Audio function
1) Listen to audio navigation from your GPS with a built in Bluetooth transmitter.
a) Pair GPS with your RCMI
Be sure that you have turned off the Bluetooth function on your mobile phone.
Be sure that the RCMI is in the state of power off.
Refer to your GPS instruction booklet for Bluetooth pairing process. When the GPS is ready for pairing
long press the POWER/Rider A key on the RCMI, until the red & blue LED flash.
Several seconds later, the GPS and the RCMI will have finished the pairing process.
2) Listen to stereo music from your A2DP enabled mobile phone
Read the user manual of your mobile phone carefully, if your mobile phone is A2DP enabled, the RCMI can
receive the stereo music from your mobile phone.
Please note that only A2DP (stereo Bluetooth) enabled mobile phones can offer a Bluetooth music transmitting
service. You can use the Phone/Play key to pause/play the music from A2DP Bluetooth devices.
-------------------------------------------------------------------------- 12 ---------------------------------------------------------------------
3) Listen to music from some mono Bluetooth enabled mobile phones:
Almost all current Bluetooth enabled mobile phones can offer Bluetooth music transmitting service.
We do not promise that the RCMI will support music function for all Bluetooth enabled mobile phones.
Step: Confirm that your RCMI has paired with your mobile phone; play the music on the phone, and then you
can enjoy the music on your RCMI.
Note: For mono Bluetooth mobile phones, you can not use the Phone/Play key to operate the music, you can
only operate the music on your phone.
4) Listen to stereo music from your MP3 by wired method:
2.5-3.5mm audio adapter cable
With the 2.5-3.5mm audio adapter cable attached, it can be used for connecting your RCMI with most MP3
players. Play the MP3, you can listen to the music via the speakers of your RCMI.
NOTE: You only can adjust the music volume on your MP3.
5) Listen to navigation instructions from your GPS by wired method:
The same way of listening to music from a MP3.
6) Listen to stereo music from MP3 via external audio Bluetooth transmitter:
If you have a external audio Bluetooth transmitter insert the plug of the transmitter into the jack of the MP3.
Pair the transmitter with the RCMI according to the instruction manual of the transmitter.
7) Listen to stereo music from MP3 with a built in Bluetooth transmitter:
Please familiarize yourself with the Bluetooth function of your Bluetooth enabled MP3(this MP3 must have
Bluetooth transmitting function). Read the instruction manual that came with the MP3 so you can enable
its Bluetooth function. Pair the MP3 with the RCMI according to the instruction manual of the MP3.
8)Auto switch between different operations:
Whilst talking on the intercom or listening to music, if you receive a phone call, the voice will be switched to
“mobile phone talking” state automatically. After the call has been hung up, the system will auto return to
intercom talking or music playing state.
-------------------------------------------------------------------------- 13 ---------------------------------------------------------------------
While listening to music, short press any intercom key and it will initiate intercom talking. After terminating
the intercom talk, the system will return to the music automatically.
Note: It will take 3-5 seconds to return to “intercom talking” state after the “mobile phone talking” has been
hung up.
Troubleshooting
1. Not working
Could be a flat battery , charge the RCMI for 3 hours.
2. Reset
In some regions of high RF strength i.e, near high power TV transmitters, GSM station or airport radars, these
can overwhelm the CPU in the BIM causing it to latch up.
Short press(< 1 second) Reset key on the RCMI. When you turn on the RCMI, it will work normally again.
3. No sound
Physically check to see the headset cables are ok or the audio plug is properly inserted into the jack? Swap with
the other functioning RCMI to localize the problem. Have you turned the volume too low?
4. Whistling of the speakers:
If the microphone is too close to a speaker, the speaker will make a whistling noise, take the microphone away
from the speaker, reduce the volume by the Volume-key, it will resolve this issue.
5. Lose connection with your mobile phone or music from the mobile phone:
Thankyou for choosing the MOTORader 4R Bluetooth Interphone Communication Headset
-------------------------------------------------------------------------- 13 ---------------------------------------------------------------------