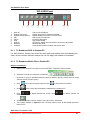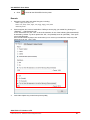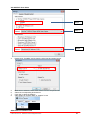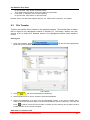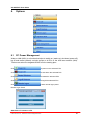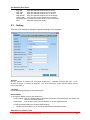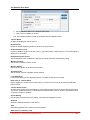
1
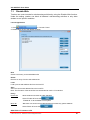
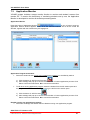
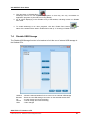
XCLASS EVO User Guide Table of Contents 1. INTRODUCTION .................................................................................................................................. 3 2. STUDENT MANAGEMENT ................................................................................................................. 5 2.1 2.2 3. TEACHING PANEL .............................................................................................................................. 7 3.1 3.2 3.3 3.4 3.5 3.6 3.7 3.8 4. DISABLE WEB.................................................................................................................................. 40 REMOTE START ............................................................................................................................... 41 APPLICATION MONITOR ................................................................................................................... 42 DISABLE USB STORAGE .................................................................................................................. 43 PRINTER MANAGEMENT ................................................................................................................... 44 INSTANT KEYBOARD MONITOR ........................................................................................................ 50 OPTIONS.............................................................................................................................................. 51 8.1 8.2 8.3 8.4 8.5 8.6 9. VIDEO PLAYER - XPLAYER ............................................................................................................ 28 AV LIVE.......................................................................................................................................... 31 FILE TRANSFER................................................................................................................................ 33 QUIZ ............................................................................................................................................... 35 WHITEBOARD .................................................................................................................................. 37 LESSON RECORDER .......................................................................................................................... 37 LESSON REMINDER .......................................................................................................................... 38 CONTROL PANEL .............................................................................................................................. 39 7.1 7.2 7.3 7.4 7.5 7.6 8. GROUPING ....................................................................................................................................... 21 GROUP DISCUSSION ......................................................................................................................... 23 APPLICATION PANEL ...................................................................................................................... 27 6.1 6.2 6.3 6.4 6.5 6.6 6.7 7. BILLBOARD MESSAGE ...................................................................................................................... 16 SWITCH BETWEEN PANEL MODE / FULL SCREEN MODE ..................................................................... 17 SCREEN CAPTURE ............................................................................................................................ 18 SMART PEN ..................................................................................................................................... 18 KEYBOARD AND SCREEN LOCK ........................................................................................................ 19 CALL RESPONSE .............................................................................................................................. 20 CANCEL CALL ................................................................................................................................. 20 DISABLE HAND RAISE ...................................................................................................................... 20 STOP ALL ........................................................................................................................................ 20 GROUP DISCUSS ................................................................................................................................ 21 5.1 5.2 6. TEACHER SHOW................................................................................................................................. 8 STUDENT MONITOR ......................................................................................................................... 11 REMOTE AID ................................................................................................................................... 12 STUDENT SHOW ............................................................................................................................... 14 TEACHER VOICECAST ...................................................................................................................... 14 STUDENT VOICECAST ....................................................................................................................... 14 VOICE MONITOR .............................................................................................................................. 15 INTERCOM ....................................................................................................................................... 15 TEACHER TOOLBAR ........................................................................................................................ 16 4.1 4.2 4.3 4.4 4.5 4.6 4.7 4.8 4.9 5. ADD STUDENT ................................................................................................................................... 5 REMOVE A STUDENT .......................................................................................................................... 6 PC POWER MANAGEMENT ............................................................................................................... 51 ALIGNMENT TOOLS.......................................................................................................................... 52 SETTING .......................................................................................................................................... 53 ACTIVATION .................................................................................................................................... 55 CLASS MANAGEMENT ...................................................................................................................... 55 EXIT SYSTEM ................................................................................................................................... 58 EXTERNAL VIDEO BROADCASTING ............................................................................................ 59 9.1 AV CONTROL PANEL (ALL-IN-ONE REMOTE-CONTROL PANEL)(DEFAULT DISABLED)........................ 59 SUN-TECH I.T. Solutions LTD. © 2012 Sun-Tech I.T. Solutions Limited. All Rights Reserved. 1 XCLASS EVO User Guide 9.2 AV LIVE..........................................................................................................................................60 APPENDIX 1: CHANNEL SETTING ...................................................................................................61 SUN-TECH I.T. Solutions LTD. © 2012 Sun-Tech I.T. Solutions Limited. All Rights Reserved. 2 XCLASS EVO User Guide XCLASS Multimedia Classroom Management System 1. Introduction XCLASS is a Multimedia Classroom Management Software, which integrates classroom controlling and Teacher-Student interaction. By utilizing the teaching panel with Graphical User Interface (GUI), classroom environment can be controlled perfectly. Additionally, teaching experience and learning proficiency could be totally enhanced with the help of advanced management features of XCLASS. Classroom Control Panel Teaching Panel Group Discussion SUN-TECH I.T. Solutions LTD. © 2012 Sun-Tech I.T. Solutions Limited. All Rights Reserved. 3 XCLASS EVO User Guide Application Panel Control Panel Teacher Toolbar SUN-TECH I.T. Solutions LTD. © 2012 Sun-Tech I.T. Solutions Limited. All Rights Reserved. 4 XCLASS EVO User Guide 2. Student Management Each student PC is assigned with a unique Student and Computer Name so that the teacher program can identify and control them. 2.1 Add Student To add student PC(s) to the seating plan from Teacher PC: 1. 2. 3. Press Click “Add Student” button. An Add Student window displays as the follow: 4. The left window shows the available student PC(s) who are ready to add. The right Window shows the selected student PC(s). To select student(s), please highlight the student(s) in All Student list on the left hand side (holding “Ctrl” key + pressing left mouse for multiple selection). 5. 6. 7. 8. 9. button in the Options tab. Then click >> button to add the selected student(s) to the right hand side’s Added Student list or click Add All to select all available student(s) and add to the Added Student list. To cancel selection, highlight the student(s) teacher wants to unselect in Added Student list then click << button or Delete All to remove all selected student(s). After selection, please click OK to confirm the selection. Now student(s) are added to the seating plan accordingly. Access to the seating plan alignment tools to arrange student icons in right position and make sure modification has been saved from the alignment tools menu. Please refer to 8.2 Alignment tools for details. P.S. All teacher and student PCs should be in the same channel (refer to Appendix 1 about the channel setting) SUN-TECH I.T. Solutions LTD. © 2012 Sun-Tech I.T. Solutions Limited. All Rights Reserved. 5 XCLASS EVO User Guide Connection status When the student icon shows as , student PC is connected to teacher PC. When the student icon shows as (with a red cross), student PC is disconnected. When the student icon shows as . 2.2 , student PC is connected but logged off. Remove a Student To remove a student PC from the seating plan: 1. Right click the student icon that needs to be removed from in seating plan. 2. In the popup menu, select “Remove Student” to remove the selected student Icon. 3. To save the seating plan for current class (e.g., English), please click “Yes” in the popup dialog box. Next time when the class (e.g., English) is loaded, previously saved seating plan will be displaying on teacher PC. (For details on class management, please refer to Section 8.5) SUN-TECH I.T. Solutions LTD. © 2012 Sun-Tech I.T. Solutions Limited. All Rights Reserved. 6 XCLASS EVO User Guide 3. Teaching Panel <Teacher Show> <Student Monitor> <Remote Aid> <Student Show> <Teacher Voicecast> <Student Voicecast> <Voice Monitor> <Intercom> Allows teacher to broadcast the teacher’s PC screen and voice to selected students Allows teacher to “stroll’ around the classroom Empowers teacher with the ability to control selected student’s PC remotely, which makes interactive guidance possible Allows teacher to relay the selected student’s PC screen together with his/her voice to other students Allows teacher to have voice broadcasted to selected students Allows teacher to broadcast the selected student’s voice to other students. Allows teacher to listen to the activities that students are engaging in Allows teacher to communicate with any selected student at one time. Teaching Panel function keys SUN-TECH I.T. Solutions LTD. © 2012 Sun-Tech I.T. Solutions Limited. All Rights Reserved. 7 XCLASS EVO User Guide 3.1 Teacher Show Teacher Show is one of the major functions in XCLASS. With this feature, teacher can broadcast the multimedia messages from the teacher PC to a single student, a group of students, or all students in real-time. Once teacher starts the Teacher Show, teacher screen shall be broadcasted to students’ PCs in real-time. 3.1.1 Starting Teacher Show Steps to use Teacher Show: 1. Select some student(s) or groups (for details on groups, please refer to Section 5.1) or all students to receive Teacher’s screen and voice. from the <Teaching> panel. 2. Click 3. The main < Classroom Control Panel > will be minimized by default (teacher can choose to display this panel during teacher show by unchecking the checkbox of “Hide Panel in Teacher Show” from <Setting> button in <Options> panel). 4. Teacher now can convey the screen messages to students. 5. Move the mouse pointer to the top right corner of the screen. The <Teacher Show Panel> Toolbar appears once the mouse pointer stays on it. SUN-TECH I.T. Solutions LTD. © 2012 Sun-Tech I.T. Solutions Limited. All Rights Reserved. 8 XCLASS EVO User Guide 6. Teacher can click in the toolbar to exit <Teacher Show>. 3.1.2 The Teacher Show Panel The <Teacher Show Panel> toolbar consists of useful features that help teacher carry out a smoother lesson. Useful functions in the Teacher Show : Pause / Resume Screen Broadcasting : Windows Mode / Full Screen Projection on Student PC : Exit : Audio setting to switch between PC Sound + Microphone / Microphone and PC Sound : Smart Pen 3.1.3 Pause Screen Broadcasting The Play/Pause function allows presenter to control the flow of the presentation. Click < Play/Pause > Click it again to resume broadcasting. to pause the broadcasting. SUN-TECH I.T. Solutions LTD. © 2012 Sun-Tech I.T. Solutions Limited. All Rights Reserved. 9 XCLASS EVO User Guide 3.1.4 Windows Mode Projection The default screen will be displayed in full window. Click on the <Teacher Show> Toolbar to activate the window mode projection in student’s screen. Students can adjust the size and position of the teacher’s projection window screen and place it on the desktop according to their own desire. Windows Mode Projection (Student’s Screen) 3.1.5 Demonstration with Audio Teacher can choose to demonstrate PC screen together with sounds to Students. The default recording device is microphone; however, teachers can specify different recording device by selecting the relevant recording source: Click <MIC> Click <PC Sound> Click <Mic with PC Sound> microphone and PC’s sound. or to enable or disable broadcasting microphone sound (via headset). or to enable or disable broadcasting PC’s sound. or to enable or disable broadcasting teacher’s SUN-TECH I.T. Solutions LTD. © 2012 Sun-Tech I.T. Solutions Limited. All Rights Reserved. 10 XCLASS EVO User Guide 3.1.6 Demonstration with Smart Pen During the Teacher Show, Teacher can use Smart Pen to deliver information to the students. When teacher wants to activate the function, teacher can select from the <Teacher Show Panel>, and then the broadcast interface will be paused. Now teacher can use different smart pen tools for the demonstration. When exiting the Smart Pen function, the interface will be resumed and desktop broadcasting continues. For details on smart pen, please refer to section 4.4. 3.2 Student Monitor Teacher can simultaneously view student screens in real-time (individual student, a group of students, or all students) through teacher PC in full screen mode or in multiple-window mode. 1. Select icon(s) of student whose screen is to be monitored (individual, group, or all). 2. Press <Student Monitor> from the <Teaching> panel. 3. Teacher screen will display the selected student screen. 4. Click again to close student monitor function. 3.2.1 Monitor Setting The Student Monitor Setting is located at <Options> in <Setting> panel. Teacher can adjust some settings before launching the Student Monitor function. Set the refresh time interval of student screen. Set the size of student window viewed by teacher. SUN-TECH I.T. Solutions LTD. © 2012 Sun-Tech I.T. Solutions Limited. All Rights Reserved. 11 XCLASS EVO User Guide Set the picture quality of monitored screen. 3.2.2 Function panel Student monitor window will be enlarged by double clicking the target student. The <function panel> is displayed on top of each monitored window: Full screen - After selecting the “Full Screen” function, the monitor screen will change from window mode to full screen mode. - If the student interface’s resolution is larger than Teacher interface, then Teacher can use the mouse to point to the side of the windows to move the student’s screen left/right or up/down. - To exit from the full screen mode, move the mouse to the top edge of the screen. Please wait until the <function panel> exists, then click again to return to window mode. Remote Aid - Start or stop mouse and keyboard control of the selected student’s PC remotely Intercom - Start or stop the intercom between teacher and selected student’s PC Sound Monitoring - Start or stop the sound monitoring of selected student - Microphone Monitor - PC Sound Monitor - PC Sound + Microphone Monitor Exit - 3.3 Click to close the “Student Monitor” of the selected student’s PC Remote Aid By using <Remote Aid>, teacher can help any logged-on student in a remote but interactive Talk & Lead manner. Teacher can take control of any student’s computer and work on it in the same way as if working on teacher’s own PC. In some cases, teacher would find students uneasy to disclose their learning problems. Either as the result of being shy or simply uninterested, then teacher may apply this guidance function to help. Under this mode, teacher can communicate with the student via headset and microphone, lead and give feedback while teacher is controlling and let the student practice if necessary. 1. Select a Student that needs assistance. 2. Press <Remote Aid> from the <Teaching Panel>. 3. Teacher screen will display the selected student’s screen (in window mode). SUN-TECH I.T. Solutions LTD. © 2012 Sun-Tech I.T. Solutions Limited. All Rights Reserved. 12 XCLASS EVO User Guide 4. Click from the function panel to close the student monitor function. 3.3.1 Function Panel The function panel is displayed on top of each monitored window for enhancement: Full Screen - After selecting the “Full Screen” function, the monitor screen will change from window mode to full screen mode. - If the student interface’s resolution is larger than Teacher interface, then Teacher can use the mouse to point to the side of the windows to move the student’s screen left/right or up/down. - To exit from the full screen mode, move the mouse to the top edge of the screen. Please wait until the <function panel> exists, then click again to return to window mode. Remote Control - To stop or restart the mouse and keyboard control of the selected student’s PC Intercom - Start or stop the intercom between teacher and the selected student’s PC Sound Monitoring - Start or stop the sound monitoring to the selected student’s PC - Microphone Monitor - PC Sound Monitor - PC Sound + Microphone Monitor Exit SUN-TECH I.T. Solutions LTD. © 2012 Sun-Tech I.T. Solutions Limited. All Rights Reserved. 13 XCLASS EVO User Guide - 3.4 Click to close the “Student Monitor” of the selected student’s PC Student Show Teacher can enable one student to carry out presentation by broadcasting his / her voice and PC screen to the targeted students. 1. Select a student from seating plan to broadcast his/her screen. from the <Teaching Panel>. 2. Choose 3. Select students to receive the presenter’s PC screen and voice. 4. Click “OK” to start Student Show. will appear on the top right corner of the screen. 5. The <Teacher Show> toolbar Teacher can choose different options from the panel (For details please go back to section 3.1.2). 3.5 Teacher Voicecast Teacher can broadcast his/her real-time voice messages to a single student, a group of students, or all students. 3.6 1. Select students (individual, group, or all) from the main screen. 2. Click to start the voice broadcast function. 3. Click to stop the voice broadcast function. Student Voicecast A student can have his / her voice and PC sound broadcasted to selected audience via microphone. 1. Select a student from seating plan to broadcast his/her voice. from the <Teaching> panel. 2. Click 3. Select students to receive the presenter’s voice. SUN-TECH I.T. Solutions LTD. © 2012 Sun-Tech I.T. Solutions Limited. All Rights Reserved. 14 XCLASS EVO User Guide 4. Click “OK” to start the broadcast. 5. Click the <Student Voicecast> again to stop voice broadcasting function. 3.7 Voice Monitor Teacher can listen to the speech of a single student via the headset by choosing <Voice Monitor>. 1. Select a student from seating plan. 2. click <Voice Monitor> to hear the student‘s voice and PC sound. 3. Teacher can change the target student by simply clicking another student’s icon. 4. Click <Voice Monitor> button again to stop the monitoring function. Voice Monitor Intercom During the <Voice Monitor> section, if the teacher want to chat with the monitored student, teacher can click the <Intercom> from the <Teaching Panel> or right click student icon and select <Intercom> for direct chatting. 3.8 Intercom Teacher may have one to one communication with selected student through the network without disturbing other students. 1. Select a student to intercom with teacher from the seating plan. 2. 3. 4. Click <Intercom> to start chatting with the student. Teacher can change the targeted student by clicking another student’s icon. To stop the intercom function, please click <Intercom> button again. SUN-TECH I.T. Solutions LTD. © 2012 Sun-Tech I.T. Solutions Limited. All Rights Reserved. 15 XCLASS EVO User Guide 4. Teacher Toolbar The <Teacher toolbar> consists of useful functions that help teacher to carry out a smooth lesson. 4.1 Billboard Message Teacher can type and send one-way message to student(s) by using the messaging function in the Teacher toolbar. - Select student(s) from the seating plan to receive message. - Type the message in the empty space and click <Send> - Click <History> - Click <close> to deliver the message. to view or save the history record to a file for backup. to close the message box. History Window Save… : To save the sent message to a file Clear : To clear up all sent message on both teacher and student screen Close : Close the windows SUN-TECH I.T. Solutions LTD. © 2012 Sun-Tech I.T. Solutions Limited. All Rights Reserved. 16 XCLASS EVO User Guide 4.2 Switch between Panel Mode / Full Screen Mode Panel button allows teacher to switch between different modes of the user interface in XCLASS. This gives an easy way for the teacher to switch between the Windows Desktop interface and the XCLASS interface. 4.2.1 Full Screen XCLASS Mode Display the full XCLASS interface with seating plan and functions for teacher to use. 4.2.2 Panel Mode After Panel button is clicked, the user interface of XCLASS will change to hidden mode by default as displayed as below (If teacher has unchecked the “Hide Panel in Teacher Show” checkbox in <Setting> located at <Options> Panel, then the user interface will not hide by clicking the Panel button ). The panel interface is hidden on the side of the windows and it will appear on the screen when user moves the cursor over it. SUN-TECH I.T. Solutions LTD. © 2012 Sun-Tech I.T. Solutions Limited. All Rights Reserved. 17 XCLASS EVO User Guide User can click 4.3 button to return to the full interface mode. Screen Capture The screen capture function allows teacher to have a real time screen capture if needed. to take a snap of the current interface, and then a window will Teacher can click pop up for saving the captured image. 4.4 Smart Pen The Smart Pen is a marker tool. It provides tools of drawing, typing, editing, deleting and some useful functions for presentation. 1. 2. 3. 4. Click <Smart Pen> from the <Teacher Toolbar>. The <Smart Pen> tool screen will appear as below. Click any drawing tools from the Annotated Demonstration Tool to start demonstration. Teacher can move the mouse pointer on the Tool to view the hints of its function. SUN-TECH I.T. Solutions LTD. © 2012 Sun-Tech I.T. Solutions Limited. All Rights Reserved. 18 XCLASS EVO User Guide Annotated Demonstration Tool Function List: 4.5 Click to open file. Click to save the drawing outcomes. Click to erase the unwanted drawing outcomes. Click to undo or Click to remove all drawing outcomes on the current screen. Click to change the text font, font size, and font style. Click to type the words or numbers on the screen. Click to get the blackboard on the screen. Click to get the whiteboard on the screen. Tick check box to get the transparent effect for the drawing outcomes. Tick Click redo the last change. check box to blink the next drawing outcome a several times. to exit the Smart Pen Tool. Keyboard and Screen Lock Lock/Black With <Lock/Black>, teacher can lock both student PC’s keyboard and mouse. 1 Highlight the icons of student PC to be locked; it can be one student, groups of students, or the whole class. It is not necessary to highlight any students in the seating plan if teacher wants to lock the whole class. 2 Click the 3. OR Click the mouse locked. button to lock the keyboard and mouse of the students. button to lock the student’s PCs with black screen and keyboard & Unlock 1. Highlight the icons of student PC to be unlocked; it can be one student, groups, or the whole class. It is not necessary to highlight any students in the seating plan if teacher wants to unlock the whole class. 2. Click the button to release the lock of the selected PCs SUN-TECH I.T. Solutions LTD. © 2012 Sun-Tech I.T. Solutions Limited. All Rights Reserved. 19 XCLASS EVO User Guide 4.6 Call Response If students get questions during the lesson, they can press F12 to ask for teacher’s help. A hand will be showing up on student icon. At the same time, “Hand up” icon is colored and students’ names are displaying in the drop down box under the icon To answer the hands-up, simply follow below steps: 1. Select one of the hand-up students at the drop down box (by default, the first one pressed F12 will be displayed on top of the scrollbar.). 2. Click to response to the request by intercom. 3. Click the shading <Intercom> button from the <Teaching Panel> to end the call with current student. 4. To response to other student, teacher can simply choose his/her name from the drop down box and click Call Response directly. 4.7 Cancel Call To clear all question requests, simply click 4.8 Disable Hand Raise Simply click 4.9 to disable student [F12] hand-up function Stop All Click to stop all current commands and running functions SUN-TECH I.T. Solutions LTD. © 2012 Sun-Tech I.T. Solutions Limited. All Rights Reserved. 20 XCLASS EVO User Guide 5. Group Discuss <Pairing> <Random Pairing> <Group Discussion> 5.1 Pair students consecutively and then launch <Group Discussion>. Pair students randomly and then launch <Group Discussion>. Allows students in the same group to exchange their viewpoints on assigned topics. The voice recording function in teacher PC is used for backing up dialogues for various groups. Grouping Grouping is an important step before teacher carries group discussion. Add / Remove Group Add a new group icon below the seating area to add a new group. 1. Click 2. A window is displayed for entering number of new group. 3. Enter group name: SUN-TECH I.T. Solutions LTD. © 2012 Sun-Tech I.T. Solutions Limited. All Rights Reserved. 21 XCLASS EVO User Guide 4. After entering name and press <Finish>, a new group is formed. A group TAB will be added on the top of the seating plan and a new <Group Icon> will be displayed in the seating plan area. 5. Teacher can change the group icon picture by right clicking the tab and choosing “Change icon” .” Remove a group 1. Select group icon. 2. Click icon to remove the selected group. OR just right click the group icon and select “Remove Group”. SUN-TECH I.T. Solutions LTD. © 2012 Sun-Tech I.T. Solutions Limited. All Rights Reserved. 22 XCLASS EVO User Guide Cancel all group(s) to break all group(s). Click cancel group icon (Group(s) will NOT be removed. Only students will be removed from group) Add student in group 1. Access to the “All Student” tab. 2. Select a student or highlight a group of students (To select several students at one time, press <Ctrl> from the keyboard). 3. Use the mouse to drag the selected student(s) to the TAB or the Icon of the group which teacher wants to add in. Remove student from a group 1. Access to the TAB of specified group. 2. Select a student. 3. Right click the student icon and select “Remove Student”. 5.2 Group Discussion XCLASS allows selected students to join in a virtual discussion in forms of voice and text. In this environment, students discuss with group members and other groups will not disturb them. Teacher can seat in as an audience or take part in a group’s discussion randomly. 5.2.1 Pairing Gather students of consecutive numbers in pair. If the total sum of the class is an odd number, then the last group would be in three’s. Discussion will be launched automatically after pairing. The size of pairing can be changed in the drop down box in <Setting> located at <Options>: . If the number is set to “2 students”, then the pairing group size will be 2. 5.2.2 Random Pairing Almost identical to <Pairing>. Gather students randomly other than gather consecutively. Discussion will be launched automatically after pairing. The size of pairing can be changed in the drop down box in <Setting> located at <Options>: . If the number is set to “2 students”, then the pairing group size will be 2. SUN-TECH I.T. Solutions LTD. © 2012 Sun-Tech I.T. Solutions Limited. All Rights Reserved. 23 XCLASS EVO User Guide 5.2.3 Group Discussion There are two ways to launch group discussion: Way 1: Highlight the students and click the <Group Discussion>, all those students will start the discussion in the same group Way 2: Group the students in different groups. Highlight the Group icons and click the <Group Discussion>. It is not necessary to highlight any groups if teacher wants all groups to start group discussion. 5.2.4 How to use Group Discussion Group Discussion Window Teacher can join a particular group by clicking the corresponding group tab one at a time. Once teacher is joined, students in the group could see teacher name on the top right list (section 5). 1. 2. 5. 3. 6. 4. (1) Top tab: (2) Top left: (3) Middle left: (4) Bottom left: Display the group(s) tab for selection Display the dialogue, and it is the area for message typing Send file to a selected student Voice recording section SUN-TECH I.T. Solutions LTD. © 2012 Sun-Tech I.T. Solutions Limited. All Rights Reserved. 24 XCLASS EVO User Guide (5) Top right: (6) Bottom right: List of members within the current group Actions applied for all groups Teacher and student can resize the group discussion window by dragging its right-bottom corner. Exit the Group Discussion - Click on the tab to exit the discussion of current group on the group discussion dialog to cancel all groups’ discussion Click P.S. Student is NOT allowed to exit the Group Discussion function by themselves. Messenger 1. Students can type message in the second half of message box and click “Send” to chat with other group members. 2. Click “Save History” to back up the dialogue in a file. File Transfer Allow teacher and students to send file to a selected group member: 1. First select a group member from the group member list in the right column. 2. Click “Send file”, the sender’s screen will pop up a file browser to select a file from local PC. 3. After selecting a file, click “open” to start the send process. 4. The process bar will show 100% when the file is transferred successfully. Default receiving folder of student is C:\Program Files\Sun-Tech\XClass EVO\Student\Save Default receiving folder of teacher is C:\Program Files\Sun-Tech\XClass EVO\Teacher\Save Voice Recording (Exist only when one has proper recording device) 1. To record the utterance of the discussion group, click <Start> in the voice recording section to start recording the current group or <Record All Groups> to start recording all groups. To stop recording, simply click the <Stop> or <Stop Record All> button. Recorded file will be showing in the rectangle list box on the bottom. If teacher chooses “Enable Student Record” in <Setting> from <Options> panel , then the authority of recording a single group’s discussion is passed to the first student of every group, in which students are arranged alphabetically. Then other students could see his/her name as the Current Leader. SUN-TECH I.T. Solutions LTD. © 2012 Sun-Tech I.T. Solutions Limited. All Rights Reserved. 25 XCLASS EVO User Guide 2. To collect the recording from groups, teacher can click <Collect Recording> or <Collect All Recording>. Then system will collect all recorded audios from current group or all groups. The name of collected file will be displayed in a pop-up message. Teacher can select <Open Folder> to open saved location. 3. To change the default save location, go to main panel: <Options> -- <Setting> -- Advance tab. In the “Mp3 Path” box, click “Browse” to choose your desired save location. (Default storing folder is C:\Users\(current user)\Music) . Other Functions - - Voice to All Teacher can broadcast his/her voice to all groups by pressing <Voice to All> button. Relay Teacher can broadcast current group’s discussion to all other groups by pressing <Relay> button. SUN-TECH I.T. Solutions LTD. © 2012 Sun-Tech I.T. Solutions Limited. All Rights Reserved. 26 XCLASS EVO User Guide 6. Application Panel <Video Player-XPLAYER> allows teacher to play various kinds of multimedia contents to different students simultaneously. <AV Live> allows teacher to broadcast captured media with AV controller <File Transfer> allows teacher to send and receive files/folder from students’ PC. <Quiz> provides a mean of assessment or evaluation of students’ learning progress during the lesson. <Whiteboard> allows teacher to use the smart pen feature <Lesson Recorder> allows teacher to record any progress of screen during lesson <Lesson Reminder> a web-based module of XCLASS Multimedia Classroom Management Software with the intention of organizing your lessons Application Panel function keys: SUN-TECH I.T. Solutions LTD. © 2012 Sun-Tech I.T. Solutions Limited. All Rights Reserved. 27 XCLASS EVO User Guide 6.1 Video Player - XPLAYER 1 ○ 2 ○ 3 ○ 4 ○ 5 ○ 6 ○ 7 ○ 1. 2. 3. 4. 5. 6. 7. 8. 9. 10. 11. Play/Pause Stop Pre Chapter Next Chapter Open File Open DVD/VCD Menu S.Full T.Full Volume Timer 8 ○ 9 ○ 10 ○ 11 ○ Play/Pause video file Stop playing Previous Chapter, it is used for playing DVD only Next Chapter, it is used for playing DVD only Browse video file and choose it to play Play DVD/VCD media directly DVD/VCD menu Student Full Screen mode Teacher Full Screen mode Adjust media volume Display the playing time of video SUN-TECH I.T. Solutions LTD. © 2012 Sun-Tech I.T. Solutions Limited. All Rights Reserved. 28 XCLASS EVO User Guide XPLAYER Panel 1 2 3 4 5 6 7 ○ ○ ○ ○ ○ ○ ○ 1. 2. 3. 4. 5. 6. 7. 8. 9. Mute All Student Full Screen Student Normal Screen Play Pause Stop Arrange Minimize Close all 8 ○ 9 ○ Use to mute all players. Display full screen in student XPLAYER Display student XPLAYER in window mode Start to play or broadcast Pause the XPLAYER Stop all XPLAYER Arrange the display size and position of teacher’s XPLAYER Minimize the panel Close all XPLAYER on student and teacher side 6.1.1 To Broadcast DVD to Student PC For DVD features, teacher can select the audio track and subtitle while broadcasting the video. As the common features, teacher can use it to apply with student for broadcast. 6.1.2 To Broadcast Media File to Student PC Steps to use XPlayer: 1. Select some students or a group from XCLASS Main <Classroom Control Panel>. 2. Select the channel you would like to broadcast . (If teacher is going to broadcast different videos to different groups, please select a unique channel number for each group) 3. Click icon to open and play video file/ Click 4. Click button to play and broadcast the material to the student PCs. 5. Click screen. 6. Click to play DVD from the drive. to display Student full screen. Click to display Teacher full button if teacher wants to mute all sound in XPLAYER. 7. Tick “Always Audible” in Options menu if teacher wants to hear all XPLAYER opened on teacher’s PC SUN-TECH I.T. Solutions LTD. © 2012 Sun-Tech I.T. Solutions Limited. All Rights Reserved. 29 XCLASS EVO User Guide 8. Click to close all the XPLAYER from the panel. Remark: 1. Supporting most video and audio file types, including: Audio: .mp3, .wma, .flac, .aac Video: .avi, .divx, .wmv, .mp4, .vob, .mpg, .mpeg, .m4v, .mkv and many more. 2. Cannot support ALL kinds of media files. If XPlayer cannot play your media file, please go to <Settings> -- <File Playback> tab. In the “Transcode” box, the “Turn on when file extension is one of the following (Recommended)” is selected by default. Try other options like “Off”, “On (Parallel)” and “On (cascade)”. Then open your media file again. If the file still cannot be played, we recommend you to convert your media into commonly used format, such as .avi, .wmv, .mp4. 3. Intel video chipset may cause lower picture quality SUN-TECH I.T. Solutions LTD. © 2012 Sun-Tech I.T. Solutions Limited. All Rights Reserved. 30 XCLASS EVO User Guide 6.2 AV Live Teacher can broadcast captured video to students by this feature. 1 ○ 2 ○ 1. 2. 3. 4. 5. Play Stop S.Full T.Full Volume 3 ○ 4 ○ 5 ○ Start to Capture and Broadcast Video/Audio to Students Stop Screen Cast Student Full Screen mode Teacher Full Screen mode Adjust the Volume of Audio Received Steps to use AV live 1. Connect the capture device to teacher PC 2. Click “setting” in “Options” menu 3. In <Video Devices> box, expand the capture device from which the captured video will be streaming to students. SUN-TECH I.T. Solutions LTD. © 2012 Sun-Tech I.T. Solutions Limited. All Rights Reserved. 31 XCLASS EVO User Guide Step 3 Step 4 Step 5 4. Double click “CrossBar” and choose the right input and output source. 5. 6. 7. 8. Make sure to select the same video device from the drop down list. Select the corresponding audio device. Click “OK” to save the settings. Start capture by clicking “Start” in “Capture” menu SUN-TECH I.T. Solutions LTD. © 2012 Sun-Tech I.T. Solutions Limited. All Rights Reserved. 32 XCLASS EVO User Guide Or just click the “Play” button on the left bottom. Then student side will start to receive the audio and video data. Click “Stop” in “Capture” menu to stop capturing. Or just click the “Stop” button on the left bottom. 9. Remark: AV live can also work together with Pro one. Please refer to section 9.1 for details. 6.3 File Transfer Teacher can transfer files or folders to any selected students. The selected files or folders will be copied to the designated location of Student PC. Conversely, teacher can also receive a file or folder from Students stored in the designated location under teacher’s control. Sending File 1. Click <File Transfer> button panel and the File Transfer window pops up as below: 2. Click from the XCLASS <Application> File Transfer tab to send files/folders to Student(s). 3. Select Student icons to receive Teacher’s particular files/folders. 4. Select the files/folders to be sent from the appropriate location. In the source session pane, Teacher can either input its location in the text box besides the Teacher’s Directory, click <Up one to search it from the current folder or browse from the directory tree to specify another level> location and file on the Teacher computer. SUN-TECH I.T. Solutions LTD. © 2012 Sun-Tech I.T. Solutions Limited. All Rights Reserved. 33 XCLASS EVO User Guide 5. Select or input the location of the file received by students in the text box besides the Students’ to search it from the current Directory under destination session pane. Click <Up one level> folder or browse from the directory tree to specify a new folder for the transmitted file saving in student computers. Remark: Teacher’s and Student’s default selected paths can be predefined under the “FileTrans.ini”. 6. Click to send the file(s)/folder(s) to Students. 7. Click to send the file and launch it remotely with associated program on the selected Student computers. 8. Click to check for any error during the file transferring process. 9. Click or to close the File Transfer window. Note: Select “Don’t prompt with the notification dialogue on Students” option to skip the notification dialogue display on Student(s) after the transferring process. Receiving File 1. Click <File Transfer> button panel. 2. Click from the XCLASS <Application> tab under the File Transfer window. 3. Select student icons to send file/folder to teacher. 4. If files or folders were previously sent to students during this session, the source (Student’s) and destination (Teacher’s) section pane displays records of the distributed files or folders. To collect only recently sent files/folders, make no changes in the source and destination sections. If not, input or browse the file/folder to be collected from Student PC. 5. In the destination section pane, select the file location of the Teacher PC to receive the file/folder from Student. 6. Enable the “Delete file(s) on Student after receive” option to delete file on Student PC remotely after the receiving successfully. 7. Click to collect the selected file/folder and the system will assign different folders for each student’s file under the directory of the designated path for the file storage. 8. Click or to close the File Transfer window. SUN-TECH I.T. Solutions LTD. © 2012 Sun-Tech I.T. Solutions Limited. All Rights Reserved. 34 XCLASS EVO User Guide 6.4 Quiz <Quiz> is an easy-to-use assessment instrument. As you will see, it is enjoyable to use from both teacher’s and students’ point of view. <Quiz> provides real time test for the whole class or a selected group of students. It monitors the test time and marks the questions for the teacher. How to use <Quiz> 1. To start, click to the <Quiz> button in Teacher control panel. 2. Click <New> button from the <Quiz> panel to prepare the quiz or load the pre-set test paper. 3. Input the time, Number of question and number of choice for the quiz. 4. To create a quiz paper, please type in all questions and choices in the page view window. To load pre-set test paper , click “…” button to load from the directory and click <OK> in the monitor panel to confirm. SUN-TECH I.T. Solutions LTD. © 2012 Sun-Tech I.T. Solutions Limited. All Rights Reserved. 35 XCLASS EVO User Guide 5. Now teacher will have the questions loaded in the question plate. Set the answers by clicking the keys in the left. Then click <Start> to begin the quiz. 6. Student now will see the full <Quiz> panel with the questions displayed on the question plate. (Of course, they won’t see the answers as teacher defined!) Once the quiz starts, the timer will begin to monitor. When time is up, students’ work will be submitted automatically. Students who have completed the quiz may click the <Submit> button to send their work to teacher PC. 7. Quiz is over! Now teacher may click <Result> in the monitor panel to evaluate the students’ know-how on a particular question. Percentage bars reveal the student ratio of the corresponding answer options. Click <Details> to identify the students when necessary. Click <Info> to view the score of the students after the quiz. SUN-TECH I.T. Solutions LTD. © 2012 Sun-Tech I.T. Solutions Limited. All Rights Reserved. 36 XCLASS EVO User Guide Hint: Currently, <Quiz> only supports txt. files, in other words, pictures can hardly be shown in the question plate. But teacher may adapt to it by switching to word documents, spread sheets and web resources to take the place of the default question plate. For new Quiz module, please refer to the Quiz User Manual or contact our Sales team for further information. 6.5 WhiteBoard Refer to the section 4.4 smart pen. 6.6 Lesson Recorder Teacher can record his or her PC screen activities during the lesson. By utilizing the <Lesson Recorder> function, teacher can start or stop the recording at any time and benefits from the various uses of the recorded video. 1. Click <Lesson Recorder> button. Then move the mouse to the top edge of the screen until the <Recorder Bar> appears. SUN-TECH I.T. Solutions LTD. © 2012 Sun-Tech I.T. Solutions Limited. All Rights Reserved. 37 XCLASS EVO User Guide 2. Click <Record> to start the lesson recording. A notice will be displayed to inform the start of recording. Click OK to start recording right away. 3. If teacher wants to record the voice at the same time, click <Sound> change it to 4. Click <Pause> the recording. before recording to . to pause the recording temperately. Teacher can click <Record> to continue 5. Click <Stop> to stop the recording. A notice will pop up to inform the video being saved successfully. Teacher may click <Open> to view the recorded video. The default storage path could be found by clicking <Setting> button. Teacher could change the storage path either by inputting the path or click the browse button to specify the destination folder. 6. Click <Exit> 6.7 to exit <Lesson Recorder> function. Lesson Reminder <Lesson Reminder> - Please refer to the Lesson Reminder Manual. SUN-TECH I.T. Solutions LTD. © 2012 Sun-Tech I.T. Solutions Limited. All Rights Reserved. 38 XCLASS EVO User Guide 7. Control Panel <Disable Web> <Remote Start> <Application Monitor> <Disable USB> <Printer Monitor> <Keyboard Monitor> Controls student’s web-browsing activities Allows teacher to remotely open various applications and websites at selected Student PCs Shows all students’ current applications and allow teacher to remotely terminate or disable selected students’ application programs or websites Allows teacher to enable / disable the use of the USB storage on the selected Student PCs Allows teacher to monitor and manage the usage of the print jobs of all students Allows teacher to monitor all the keyboard input on student’s PC Control Panel function keys: SUN-TECH I.T. Solutions LTD. © 2012 Sun-Tech I.T. Solutions Limited. All Rights Reserved. 39 XCLASS EVO User Guide 7.1 Disable Web Teacher can control student’s web-browsing activities by using the Disable Web function. Under the setting, teacher can block all students’ web-browsing activities or only allow student to surf specific websites. Launch Application 1. Click in <Control> Panel. 2. Disable Web window will appear as follow: New Create a new entry to the web address list Delete Remove an entry from the web address list Load Load a pre-set web address list from the local PC Save Save the current web address list to the local PC. Note: The file name of the saved list is recommended to use the .ini extension Policy Enable All Allow students to browse all public websites. Select “Enable All” and click “Enable All” is set as default in the system Block All . “Block All” is a function that forbids students to browse any public websites. Select “Block All” and click . SUN-TECH I.T. Solutions LTD. © 2012 Sun-Tech I.T. Solutions Limited. All Rights Reserved. 40 XCLASS EVO User Guide Enable Some “Enable Some” is a function that partially restricts students to browse public websites. Students can only browse website(s) listed on the left. Disable Some “Disable Some” is a function that partially restricts students to browse public websites. Students are NOT allowed to browse website(s) listed on the left. Block All Https When under Enable Some or Disable Some mode, ”Block All Https” additionally blocks all encrypted websites (which start with https://). Note: To block custom ports for proxy server, go to <Options> --<Settings>--“Disable Web” tab. Then input the port numbers. Please refer to P.55 <Disable Web>for details. Close To exit the Disable Web window 7.2 Remote Start XCLASS allows teacher to send remote command to run programs on student PCs. Remote open Programs 1. Select student(s) (individual, group or all) to receive command. 2. Click <Remote Start> and choose the program from the context menu. 3. Then a ‘’ will appear asides the name of the program and the program will be running in student PCs. 4. To close the program on student PC, click <Remote Start> again and choose the program to be closed. Remote open Websites 1. Select student (individual or group) to receive command. 2. Click <Remote Start> and choose “Remote Internet Explorer” to pop up the “Start Remote IE” window. 3. Enter or search the previous website address teacher would like to open for students. 4. The corresponding website will be automatically opened in students’ PCs. Edit the context menu 1. 2. 3. 4. Click <Remote Start> from <Control> panel. Click “Define Remote Menu” to pop up this diagram. Click “Add” button to add either programs or websites to the context menu. Click “Browse” from the column of “Program Path” to search for the execute command (.exe) of the programs or I.E. 5. Name the corresponding programs or website on the “Menu Name” column. 6. If teacher wants to add a website address, teacher should enter the website address at “File Path”. 7. Click “OK” to finish and the corresponding program or website will be added to the context menu. SUN-TECH I.T. Solutions LTD. © 2012 Sun-Tech I.T. Solutions Limited. All Rights Reserved. 41 XCLASS EVO User Guide 7.3 Application Monitor XCLASS system includes a screen monitor function to monitor each student’s screen from teacher PC. To resolve the inefficiency of monitoring students one by one, the Application Monitor is developed to monitor all students processing tasks. Application Monitor Press the button of Application Monitor on the <Control> panel; an Application Monitor window appears. Then, all of the selected students will be shown inside the Window, together with the activities they are engaged in. Application Program termination Select the student whose current running application program is to be killed by teacher 1) Click the button of <Kill Current Process>. 2) Alert message will pop up to confirm the termination of current application process. Click Yes to confirm the termination, No to cancel the termination. To kill other running application program, select the student from the left session pane and the program that teacher wants to kill from the right <All Process> session pane. 1) Click the button of <Kill Process>. 2) Alert message will pop up to confirm the termination of current application process. Click Yes to confirm the termination, No to cancel the termination. Disable running new application programs 1. Select the student(s) that teacher wants to disable running new application program. SUN-TECH I.T. Solutions LTD. © 2012 Sun-Tech I.T. Solutions Limited. All Rights Reserved. 42 XCLASS EVO User Guide 2. Click the button of <Disable Run>. Student(s) cannot run new application programs so that they can only concentrate on application programs or jobs that are running already. 3. An “N” will be displaying in the <Enable> entry of that student, indicating he/she is in Disable Run mode. 4. To enable student(s) to run other programs, click the< Enable Run> button. The status of the student will be back in Enable Run mode (a “Y” showing in Enable column). 7.4 Disable USB Storage The Disable USB Storage function is for teacher to limit the use of external USB storage in the Student PCs. Unblock Blocked Ok Cancel Undo : : : : : Allow the selected student PCs to connect to an external USB storage Block the new USB storage connection on the selected student PCs Accept change and close the dialog Cancel change and close the dialog Undo changes SUN-TECH I.T. Solutions LTD. © 2012 Sun-Tech I.T. Solutions Limited. All Rights Reserved. 43 XCLASS EVO User Guide 1. 2. The left window shows the available student PC(s) who are ready to add. The right Window shows the selected student PC(s). To select student(s), please highlight the student(s) in Unblock list on the left hand side (holding “Ctrl” key + pressing left mouse for multiple selection). 4. to add the selected student(s) to the right hand side’s Then click >> button Blocked list or click Block All to select all available student(s) and add to the Blocked list. To cancel selection or unblock USB storage usage, highlight the student(s) teacher wants to 5. unselect or unblock in blocked list then click << button selected student(s). After selection, please click OK to confirm the selection. 3. or Delete All to remove all Note: the function CANNOT block the external USB storage which is ALREADY connected to the PC. 7.5 Printer Management XCLASS provides a function for the teacher to monitor and manage the usage of the print jobs for the students. Click <Control> panel <Printer Management> to start the printer monitor panel. After the Printer Monitor is started, the student view will be shown as default. There are 2 views provided for teacher‘s supervision. One is Student View and other is Printer View. SUN-TECH I.T. Solutions LTD. © 2012 Sun-Tech I.T. Solutions Limited. All Rights Reserved. 44 XCLASS EVO User Guide 7.5.1 Student View In Student View, teacher can find and monitor specific student printing activity with ease. Teacher can switch the view to Student View by clicking the tab of “Student”. In the student list of the student view, student is disconnected. mean this student is connected and mean this Once the teacher clicks the student icon in the student list, the printers which are connected with the student will be listed in the printer list. Teacher can select multiple printers in the printer list to view their status concurrently. SUN-TECH I.T. Solutions LTD. © 2012 Sun-Tech I.T. Solutions Limited. All Rights Reserved. 45 XCLASS EVO User Guide There are 4 status icons used to present the status of the printer. All new print jobs will be printed directly All new print jobs will be paused All new print job will be deleted Printer is not available The printer monitor is only able to control the printers which are in normal status. If the printer is in other status, for example paused or disabled by Windows, the “not available” icon will be displayed and we will not be able to control this device via the Printer Management. 7.5.2 Printer View In Printer View, the teacher can find the students who connect with the specific printer. Teacher can switch the view to Printer view by clicking the tab of “Printer”. Once a printer is selected in the printer list, the students will be listed in the student list. Teacher can select multiple students in the student list to view their status concurrently. Once the teacher clicks the printer in the printer list, the connected students will be listed in the student list. There are 4 icons used to present the printer status of the student. SUN-TECH I.T. Solutions LTD. © 2012 Sun-Tech I.T. Solutions Limited. All Rights Reserved. 46 XCLASS EVO User Guide All new print jobs will be printed directly All new print jobs will be paused All new print job will be deleted Printer is not available 7.5.3 Printer Information When the teacher selected the printers in the student view or selected the students in the printer view, the printer information will be displayed. There are 3 types of printer information will be shown. Printer status Current print jobs Completed print jobs Printer Status If the teacher selects one printer only, the single printer status view will be shown. SUN-TECH I.T. Solutions LTD. © 2012 Sun-Tech I.T. Solutions Limited. All Rights Reserved. 47 XCLASS EVO User Guide If the teacher selects several printers in Student View or select several students in Printer View, the multi printer view will be shown. The teacher can control the printer by pressing the buttons. In multi printer view, the button action will only affect the printers which are selected in the table. Button Name Usage Resume button Print jobs are allowed and students can print their new jobs directly. Pause button Disable button Apply page limit button Teacher can set the printer to pause the new jobs. Teacher can set the printer to delete the new jobs directly Teacher can set the page limit to restrict the printing pages per job. Once the pages exceed the limit, the job will be deleted automatically. Current Print Jobs The current print jobs table will display the current outstanding print jobs of the selected printers. The following job information will be shown in the job list: Print date Job status Student who starts the printing Document name Pages of printing Copies of printing Teacher can select multiple jobs in the table and press the buttons under the job list to manage them. Button Name Resume button Pause button Usage Teacher can resume the paused printer job to print out. Teacher can pause the print job SUN-TECH I.T. Solutions LTD. © 2012 Sun-Tech I.T. Solutions Limited. All Rights Reserved. 48 XCLASS EVO User Guide Button Name Remove button Usage Teacher can delete the print job Completed Print Jobs Once the teacher starts the Printer Management, the Print Management will collect the completed job log as reference and display in the Completed Print Job List. Teacher is able to review the print job information of the completed job. The button multiple records and click the button to clear them. is provided to clear the log. Teacher can select 7.5.4 Notification of Printer Status If the teacher changes the printer and print jobs status, update shall be notified on Windows toolbar of student PCs. Thus, student can learn latest status accordingly. SUN-TECH I.T. Solutions LTD. © 2012 Sun-Tech I.T. Solutions Limited. All Rights Reserved. 49 XCLASS EVO User Guide 7.6 Instant Keyboard Monitor XCLASS provides keyboard monitor function to supervise every student’s keyboard input. The application is running on student PC and the keyboard activities will be displayed and logged. 7.6.1 File File menu allows teacher to browse the folder that contains all the log files during current keyboard monitor session. 7.6.2 Function Menu Right click at student’s row, function menu will pop up. And user can select action on selected student. 1. Show log 2. Clear Student’s log will be displayed. Student’s log includes the name of active application and the keyboard activities throughout that window active time. ( This action can also be called by double clicking the student row) Clear the entry under <Text> of selected student. 7.6.3 Save Log On exit the program, user can choose to save the log file at a user-defined location. Click “YES” in the save log dialog and the folder browser will pop up. Click “OK” after desired path is located. SUN-TECH I.T. Solutions LTD. © 2012 Sun-Tech I.T. Solutions Limited. All Rights Reserved. 50 XCLASS EVO User Guide 8. Options 8.1 PC Power Management Wake-on-LAN (WOL) is a function that helps to switch on (wake up), shut down (power off), log off and restart (reboot) a single, groups or all PCs in the local area network (LAN). Teacher can select the targeted student from the seating plan. Click to power on the selected PCs. Click to shut down the selected PCs. Click to restart the selected PCs. Click to logoff the selected PCs. Click to start remote logon panel. Remote Logon Panel SUN-TECH I.T. Solutions LTD. © 2012 Sun-Tech I.T. Solutions Limited. All Rights Reserved. 51 XCLASS EVO User Guide To remotely logon students’ PCs with same logon name and password: 1. Click <Logon All> from the panel and input Logon Name and Password for all students. 2. Click OK to remotely logon students’ PCs. To remotely logon students’ PCs with different logon name and password: 1. Click <Set Logon Data> from the panel 2. Input User Name and Password for EVERY individual student. 3. 4. 8.2 Click OK to save all logon information. Then click <Logon> from the panel to remotely logon students’ PCs. Alignment Tools This tool is for teacher to change the layout of the seating plan. It is located at the following diagram. Simply use these buttons to align the icons in the seating plan. SUN-TECH I.T. Solutions LTD. © 2012 Sun-Tech I.T. Solutions Limited. All Rights Reserved. 52 XCLASS EVO User Guide Align left Align right Align top Align bottom Vertical Split Horizontal Split Save 8.3 Align the selected student icons to the left Align the selected student icons to the right Align the selected student icons on the top Align the selected student icons at the bottom To evenly line-up the student icons vertically To evenly line-up the student icons horizontally Save the seating plan layout Setting This tool is for teacher to change the general settings of the program. Channel Set the channel of teacher and connected student PCs. Available channels are from 1 to 8. Channel 0 means no channel is assigned. (For more information of the channel setting, please refer to Appendix 1) Language Set the displaying language of XCLASS program Student Name To change the display name of the student icon Custom Name: Use the “Student Name” data from the Student Icon (default will use student PC name as the Student Name) Login Name: Use the login name from the Student PC as the displayed name To Edit the Student Name (for Custom Name Setting) 1. Double click the student icon to launch the Edit student information window SUN-TECH I.T. Solutions LTD. © 2012 Sun-Tech I.T. Solutions Limited. All Rights Reserved. 53 XCLASS EVO User Guide 2. Edit the Student Name in the Student Name field 3. Click “Save” to update the record P.S. The Computer Name is used as the default name of Student Name Teacher Name Change the displayed name of teacher Show Gender Enable or disable displaying student’s gender next to their name Enable Student record Enable or disable student to record voice in group discussion. Please refer to “Voice Recording” in Section 5.2.4 for details. Default Group User Count Set the default number of students in a group for pairing discussion and random pairing Monitor Icon Size Set the size of student monitor screen Monitor Quality Set the picture quality of student monitor screen Show Seconds Set the refresh interval of student monitor window Lock Seat Panel Lock/Unlock seating panel (Alignment tools is not usable if sear panel is locked) Hide Panel in Teacher Show Hide or display the <Classroom Control Panel> on teacher’s PC screen when teacher broadcasts teacher show Teacher Show Screen Choose which screen to be broadcasted to student during teacher show if teacher has dual monitors. “All Screen” broadcasts picture on all monitors to students while “Primary Screen” broadcasts picture on primary monitor to students. Sound Setting Sound Setting including side tone setting, microphone and speaker volume Network Select the network interface for teacher PC Quiz Quiz setting (please refer to Quiz manual for details) SUN-TECH I.T. Solutions LTD. © 2012 Sun-Tech I.T. Solutions Limited. All Rights Reserved. 54 XCLASS EVO User Guide External Enable or Disable external features Advance Advance Setting including Background setting, Disable Screen Save, Enable Remote Logon and Mp3 Path (mp3 storing path for Group Discussion function). Disable web Additional settings of Disable Web function in <Control> panel Input the ports of HTTP/HTTPS you want to block and click “Add” to add them in the list To unblock a port, highlight it in the list then click “Remove” 8.4 Activation Please refer to the XCLASS EVO Installation and Configuration Guideline for more details. 8.5 Class Management Class Management is a function that helps teacher to manage the class including create, load, save and delete class. Therefore, teacher can easily recall the class seating plan from the “Class List” before a lesson starts. Please note that “Take Attendance” box will automatically pop up at students PC for them to update their names once the button is clicked. SUN-TECH I.T. Solutions LTD. © 2012 Sun-Tech I.T. Solutions Limited. All Rights Reserved. 55 XCLASS EVO User Guide Add Teacher Class Management allows different teachers to manage different classes. Therefore, the management will be more efficient Delete Teacher Click <Delete Teacher> to delete the record of certain teacher Delete Class Teacher can delete the class by selecting the Class in <Class List>, then click <Delete Class> Create Class A new class can be created under current teacher’s name. Created class will be shown in the “Class List” Load Class Select the Class in Class List, and then click <Load Class>. Previously saved seating plan will be loaded Save Class 1. 2. After editing the seating plan, teacher can save it for further uses. Select the Class in Class List, and then click <Save Class>. Take Attendance 1. When a lesson starts, teacher can record and save the attendance of a class in an excel format. 2. An attendance taking notice will pop up on student screen. SUN-TECH I.T. Solutions LTD. © 2012 Sun-Tech I.T. Solutions Limited. All Rights Reserved. 56 XCLASS EVO User Guide 3. Clicking “Yes” will direct student to the attendance form to input name and gender. Click OK to submit information. 4. After 30 seconds of taking attendance, a save window will pop up automatically for teacher to saving attendance record to a CSV format file. Simply enter the file name and press <Save> button to save . 5. To take the attendance of late student, click “Take Attendance” again. In the pop up window, choose NOT to reset the record. 6. Only student who hasn’t take attendance yet will see the “take attendance” notice. Click “Yes” to fill in the form. 7. Teacher can save the attendance later in a .csv file. For late student(s), the entry of “Attendance” will show as “Late”. SUN-TECH I.T. Solutions LTD. © 2012 Sun-Tech I.T. Solutions Limited. All Rights Reserved. 57 XCLASS EVO User Guide Export Class - Select a class from the class list and click “Export Class”. The class information, including class name, teacher name, student PC name, student’s display name, student’s gender, will be exported to a .csv file. . Import Class - - 8.6 Click “Import Class” Choose the .csv file which contains teacher and student’s information (The class information should be presented in the same form as in the file generated by “Export Class” function ) The class name will appear in the class list under the teacher’s name. Exit System Simply click on the XCLASS system. button on the top right-hand corner of the program interface to exit the SUN-TECH I.T. Solutions LTD. © 2012 Sun-Tech I.T. Solutions Limited. All Rights Reserved. 58 XCLASS EVO User Guide 9. External Video Broadcasting To perform multimedia broadcast and AV devices control like delivering content of DVD or other media to all of students in class simultaneously. An easy-to-use & allin-one AV control panel is essential for each multimedia classroom. 9.1 AV Control Panel (All-in-One Remote-Control Panel)(Default disabled) Teachers may still feel dazzling to master a suite of AV equipments no matter they are doing it manually or with the aid of ‘numerous’ remote control panels. The XCLASS AV Control Panel is specially designed for ease of control. To call for its service, go to XCLASS AV control panel. Tick on External TAB of <Setting> to display AV control Panel Note: The AV control Panel will not be displayed if no COM1 is found on the system How to use AV control 1. Choose <Input> source, either <DVD> / <VHS> / <Cassette> / <Visualizer> / <Teacher PC> / <Notebook PC> 2. Choose the image project to the projector screen, either < Screen Project > or < Video Project >. - The option < Screen Project > projects the teacher PC screen to the projector screen. - The option < Video Project > projects the selected AV signals to the projector screen. Remark: Input/Output Channel menu items can be updated in "AVControl.ini" file. Operate the AV equipments by switching to the AV control panel (as shown below) : For <Power On/Off> the input AV equipment To mute the sound comes out from speaker To turn up the noise level of the amplifier (speakers) To turn down the noise level of the amplifier (speakers) To select stereo or mono signal SUN-TECH I.T. Solutions LTD. © 2012 Sun-Tech I.T. Solutions Limited. All Rights Reserved. 59 XCLASS EVO User Guide To Broadcast AV Media to Projector 1. Choose AV device from the <Input Devices> console for broadcasting. 2. Select <Video Project> icon from the <Output Devices> console. 3. Click <Play> button to play the media. Note: By default, once teacher chooses to broadcast via a projector, audio signals come out simultaneously through the classroom speakers in real time. To Broadcast AV media to student PC by capturing tools When teacher wants to broadcast media like DVD and videocassette, teacher should play the multimedia by the AV equipments in the AV cabinet. Get full control of all AV equipments in the AV cabinet by <AV Control Panel> and broadcast what teacher plays to the student PCs. In this context, teacher needs to operate <AV Control Panel> and < AV Live Player> simultaneously. 9.2 AV Live Operate <AV control> and <AVLive player> to broadcast To choose the right input/output devices at the AV control, switch to <AV Live> to broadcast selected AV signals to student PCs. 1. Choose the input device, either a DVD, VCR or Visualizer by selecting the menu as named. Operate the AV equipments by using the <AV Control Panel>. 2. Pop up the <AV live Player> by clicking <AV Live> in the XCLASS <Application>panel. Start capture 3. Make sure you have selected the right video and audio source in “Settings” (Please refer to section 6.2 for details) 4. Click “Start” to divert the AV signals to the media player, the student PC will automatically receive AV signals once teacher clicks “Start” button. Note: Student PCs will receive AV signals only when the <AV Live> function is activated. Teacher can select the signal projects to the projector screen, either select Screen Project or Video Project. SUN-TECH I.T. Solutions LTD. © 2012 Sun-Tech I.T. Solutions Limited. All Rights Reserved. 60 XCLASS EVO User Guide Appendix 1: Channel Setting Define Your Class (Network) Channel ID The class channel ID is used for avoiding network interference when more than one teachers are using in the same network mask (make sure that each classroom is using different channel ID for their classes). 1. 2. Click Setting in <Option> menu. In General Tab, drop down the box to define Channel ID for your class. 3. Click OK to confirm the setting. Note: - When finishing modifying the channel, all the students connected with XCLASS will change to the assigned Channel ID accordingly. - It is recommended to restart all the PCs (both Teacher and Students) after changing the channel. Change the Class Channel ID for Student Manually To change the Class Channel ID for student manually, please access to the folder of the XCLASS Student in C:\program files\Sun-Tech\XCLASS EVO\Student and launch a program called ChangeChl.exe. SUN-TECH I.T. Solutions LTD. © 2012 Sun-Tech I.T. Solutions Limited. All Rights Reserved. 61 XCLASS EVO User Guide To change the channel, please select a channel ID from the drop down list and click “OK” to confirm. It is necessary to restart the Student PC to activate the changes. SUN-TECH I.T. Solutions LTD. © 2012 Sun-Tech I.T. Solutions Limited. All Rights Reserved. 62 XCLASS EVO User Guide SUN-TECH I.T. Solutions Limited SUN-TECH I.T. Solutions LTD. © 2012 Sun-Tech I.T. Solutions Limited. All Rights Reserved. 63