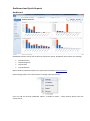
1
User manual of the Work Examiner Contents About this document .................................................................................................................................... 4 Overview ....................................................................................................................................................... 4 What is Work Examiner? ........................................................................................................................... 4 Standard vs Professional Comparison Chart ............................................................................................. 5 FAQ ............................................................................................................................................................ 6 Install ............................................................................................................................................................. 7 WE Standard Edition ................................................................................................................................. 7 WE Professional Edition ............................................................................................................................ 8 Installing WE Clients ................................................................................................................................20 Uninstalling Work Examiner ........................................................................................................................21 Uninstall Work Examiner Clients .............................................................................................................22 Uninstall Work Examiner Console ...........................................................................................................23 Uninstall Work Examiner Server (Pro edition only) ................................................................................23 Welcome to WE Console .............................................................................................................................23 Connecting to Work Examiner Server (Pro edition only) ........................................................................23 Remote installation of Work Examiner Clients .......................................................................................24 Dashboard and Quick Reports ....................................................................................................................28 Dashboard ...............................................................................................................................................28 Report Controls .......................................................................................................................................29 Dates Filter ..........................................................................................................................................29 Users Filter ..........................................................................................................................................30 Activities Filter .....................................................................................................................................30 Extended Filter ....................................................................................................................................31 Search ..................................................................................................................................................37 Export Reports.........................................................................................................................................37 Print Reports ...........................................................................................................................................38 Users and PCs ..........................................................................................................................................39 User Sessions .......................................................................................................................................39 Organization units ...............................................................................................................................41 User Groups.........................................................................................................................................42 Summary Reports ....................................................................................................................................44 Summary by User ................................................................................................................................44 Summary by User Group .....................................................................................................................45 Summary by Computer .......................................................................................................................45 Summary By Hour ...............................................................................................................................46 Summary by Day .................................................................................................................................47 Summary By Weekday ........................................................................................................................48 Activities Reports ....................................................................................................................................48 Activities ..............................................................................................................................................48 Activity by User ...................................................................................................................................50 Activities by User Group ......................................................................................................................52 Activity by Computer...........................................................................................................................53 Categories Reports ..................................................................................................................................55 Categories............................................................................................................................................55 Category by User .................................................................................................................................56 Categories by User Group ...................................................................................................................58 Category by Computer ........................................................................................................................59 Attendance Reports ................................................................................................................................60 Attendance by User .............................................................................................................................60 Attendance by Users – Computers......................................................................................................61 Attendance by Activity Period .............................................................................................................62 Detailed Reports......................................................................................................................................62 Detailed Applications ..........................................................................................................................62 Detailed Application Windows ............................................................................................................63 Detailed Websites ...............................................................................................................................64 Spy Reports .............................................................................................................................................64 Screenshots .........................................................................................................................................64 Keystrokes ...........................................................................................................................................65 Emails ..................................................................................................................................................66 Instant Messages.................................................................................................................................67 Settings and Administration ........................................................................................................................68 Scheduled Reports ..................................................................................................................................68 Categories and Activities .........................................................................................................................72 Security Management (Pro edition only) ................................................................................................73 Client Options ..........................................................................................................................................76 Common ..............................................................................................................................................77 Schedule ..............................................................................................................................................79 Tracking ...............................................................................................................................................80 Other Tracking .....................................................................................................................................81 Spy .......................................................................................................................................................81 Warning ...............................................................................................................................................83 App Filter .............................................................................................................................................84 Web Filter ............................................................................................................................................85 Database Settings ....................................................................................................................................86 SMTP Settings..........................................................................................................................................88 Active Directory Integration (Pro edition only) .......................................................................................91 Filtering .......................................................................................................................................................93 Website Filters ........................................................................................................................................93 Application Filters....................................................................................................................................99 Manage Sets ..........................................................................................................................................106 Url Set ................................................................................................................................................107 Keyword Set ......................................................................................................................................108 Domain Set ........................................................................................................................................109 Program Set .......................................................................................................................................110 Work Examiner Server Manager ...............................................................................................................112 Status.....................................................................................................................................................112 License ...................................................................................................................................................113 Database (Pro edition only)...................................................................................................................114 Options ..................................................................................................................................................115 Content DB ............................................................................................................................................115 Contacts.....................................................................................................................................................116 About this document This help documentation was designed for both Standard and Professional editions of Work Examiner product. Articles applicable for Professional edition only are marked as “(Pro edition only)” in the header. We’ve tried to reflect all important issues about Work Examiner in this documentation. If you have any questions that were not answered by this help document – feel free to contact [email protected] for assistance. Overview What is Work Examiner? About WE Standard One of the main problems of any business is to monitor the efficiency of staff work. Also nowadays it is impossible to imagine the organization that does not use computers. Work Examiner Standard is the comprehensive solution for managing staff work time. Work Examiner Standard enables organizations to quickly and cost-effectively monitor and analyze the activity of its employees in the Internet and in various applications. Work Examiner Standard is designed for the needs of small and medium businesses and is aimed primarily at managers of companies and departments, IT professionals, system administrators. About WE Professional Quite often in big companies the key performance indicators are associated with evaluation of end results of the staff activities, and they do not account for the qualitative component and missed opportunities. Thus formally the employee can write the whole day for one task implementation, actually spending just two hours for that. Work Examiner Professional system is the solution that will help to conduct qualitative analysis of working time usage and to find staff productivity points of growth. With the help of Work Examiner Professional every middle manager will be able to know exactly how working hours of his subordinates are spent. Thus, the system will allow to see the situation of usage of company time resources bottomup at all necessary levels of control (sector-> division-> department). Work Examiner Professional is designed for the needs of medium businesses (from 40-50 employees) and enterprises (10000+ employees) and is aimed primarily at middle managers, HR department and top management. Benefits Work Examiner allows you to: • Increase employees productivity • Reduce non-working time of employees’ computer use • Plan time and human resources consummation more precisely Standard vs Professional Comparison Chart Parameter\WE version Standard Professional Target market Small businesses, Home users Medium businesses, Enterprises DB Engine Firebird MS SQL 2005\2008 Minimum number of clients to purchase 3 20 Range of PCs to monitor 3..40 20..10000+ Remote WE Consoles usage 1, local only Unlimited Real-time monitoring + + Organization Structure Linear Unlimited hierarchy Reports + + Spy features + (if enabled) + (if enabled) Applications Filter + + Websites Filter + + Security Management - + Report Jobs + + Active Directory integration - + Components of Work Examiner system: WE Client - is a client module required to collect data from computer on which it is installed. Does not have a user interface, but can be installed (and removed) both locally and remotely. WE Server - connects clients, customer database and console of system administration. WE Console - provides complete control over all components of Work Examiner Professional system. In Work Examiner Standard edition WE Server and WE Console are combined under WE_Standard.exe setup package. FAQ I. Common Questions Q: What is Work Examiner used for? A: It's a software for employees monitoring, allowing to monitor, analyze and control their activity at the computer. There are 3 most popular use cases of WE: web usage control, work time tracking, surveillance. Q: What is the difference between Work Examiner Standard and the Professional version? A: Standard edition is good for 3..40 PCs, Pro – for 20..10000+. You can find more details in the Standard vs Professional Comparison Chart. Q: What is the price of Work Examiner? A: You can find detailed information about the price of Work Examiner editions on the Purchase page. Q: How does Work Examiner differ from other solutions present on the market today? A: Work Examiner is a complex solution combining functions of monitoring, analysis, reports and blocking applications and Internet sites. Owing to tight integration of all these functions Work Examiner is a very powerful, still flexible tool. Q: Do you provide a demo version of the program before the purchase of Work Examiner? A: Yes. You can download a trial of Work Examiner Standard or request a trial of Professional edition in the Download section. Q: Do you provide free updates of Work Examiner? A: You have a right to update the product free of charge within a year after the purchase. You can also purchase an additional year of support and updates package in the Purchase section. Q: What are the system requirements of Work Examiner? A: Work Examiner Standard components minimum system requirements: - WE Server\Console: Intel\AMD CPU -1Ghz, 512RAM, 200Mb free space, Windows2000\XP\2003\2008\Vista\Win7 32\64bit Work Examiner Professional components minimum system requirements: - WE Server: Intel\AMD CPU -1Ghz, 512RAM, 200Mb free space, Windows2000\XP\2003\2008\Vista\Win7 , MS SQL Server 2005\2008 (2005 Express can be downloaded by WE installer) 32\64bit - WE Console: Intel\AMD CPU -1Ghz, 256RAM, 200Mb free space, Windows2000\XP\2003\2008\Vista\Win7 32\64bit For both Standard and Professional editions: - WE Client: Intel\AMD CPU -1Ghz, 256RAM, 100Mb free space, Windows2000\XP\2003\2008\Vista\Win7 32\64bit Q: Does Work Examiner Professional support MS Windows Vista, Win7? A: Yes, both the client and the server fully support MS Windows Vista and Windows 7, 32bit and 64bit editions. Q: Is your system a spyware one? A: It depends: all spying features are disabled by default, spy options are not visible at all. If you enable spy features (screens\keystrokes\emails\IMs recording) – WE will become a spyware, but anyway, will not be blocked by antiviruses. It’s a business software that is monitoring company’s PCs. II. Technical Issues Q: Will Work Examiner Client work when the server is switched off? A: Yes, it will save the logs in temporary folder and upload as soon as the server will be available. Q: How does WE Client load the computer? A: WE Client makes low system load about 1-3% CPU usage on the average. Q: Can I install WE Client remotely? A: Yes, sure! There is a 'Install Clients...' option in WE Console. Note: you must have admin rights on the remote PC or know admin's login\password. Q: Is WE Client stealth? A: Yes, if installed remotely, it is invisible for user – hidden from Task Manager, no icons on the toolbar, no entries in Start - Programs and Add\Remove Programs. Q: Do I must log in to the WE Server PC to make WE collect data from the clients? A: No, it uses special services that work w\o user’s logon. Install WE Standard Edition Step-1: Installing Work Examiner Console application (with built in WE Server) Run ‘WE_Standard.exe’ from the installation package (http://www.workexaminer.com/download/WE_Standard.zip) and follow the instructions of installer. Note: by default Spy features are disabled during the installation. You may choose to enable them on the Select Components step: Spy features can be enabled to be visible with recording turned off - to prevent all PCs tracking. You may enable recordings later in Client Options. Along with installing WE Console, WE Server will also be installed and taskbar icon WE Server Manager appears. Now you can install WE clients remotely, manage system settings, etc. Now you are ready for installation of clients. WE Professional Edition Prepare to install Work Examiner Server application Work Examiner Server requires Microsoft SQL Server (versions 2005 or higher, SQL Express Edition is also supported). MS SQL Server must work in «mixed mode» of security. WE_Server.exe installer can itself load and deploy MS SQL Server 2005 Express Edition when choosing «Standard» installation mode (installation modes are described further). If the installation is not possible or you wish to install MS SQL Server yourself we recommend you to download free version of MS SQL Server 2005 Express Edition (supports MS Windows Vista\Win7, limited to 1Gb of RAM and limit of database of 4Gb) at the address: http://www.microsoft.com/downloads/details.aspx?FamilyID=220549b5-0b07-4448-8848dcc397514b41&displaylang=en. Now you can start installation of Work Examiner Professional system in three steps described further. Installing Work Examiner Professional Server application Step-1: you need to install Work Examiner Server application first: Run ‘WE_Pro_Server.exe’ and follow installer instructions. Several installation types will be offered Note: by default Spy features are disabled during the installation. You may choose to enable them on the Select Components step: Spy features can be enabled to be visible with recording turned off - to prevent all PCs tracking. You may enable recordings later in Client Options. o o Standard – deployment and configuration of all the necessary components with minimum of requests. Recommended for inexperienced users. Extended – Select an existing MS SQL Server, installing new database and creation of Work Examiner administrator account. It is recommended for advanced users. Standard installation of WE database When you choose a standard installation the installer will download MS SQL Server 2005 Express Edition software from the official site of the manufacturer. SQLEXPR.EXE file will be saved in WE Server installation folder (by default C:\Program Files\Work Examiner Professional Server). In case of problems with downloading a file, it is recommended to delete it so that the program download it again (otherwise the installer will attempt to run the "broken" file), because if SQLEXPR.EXE is present the installer will not download it again, and immediately proceed to install MS SQL Server. Therefore, in the absence of Internet access you can place your SQLEXPR.EXE to WE Server folder downloaded manually from the official site of Microsoft: http://download.microsoft.com/download/e/a/4/ea4b699b-bec44722- 96d3-254580ed7f9e/SQLEXPR.EXE Further downloaded MS SQL Server distribution package will be installed with the following parameters: • Instance name: WORKEXAMINER • Authentication mode: mixed (windows and sql) • SA password: WorkExaminer$123 Other options will be preserved by default. Then database of Work Examiner Professional system will be deployed. After installing the database the user-administrator of System Work Examiner Professional system will be created with login "weadmin" and password "WorkExaminer$123". If such user already exists in the database, the request will appear to change the password: At the end of the installation you'll see important information needed to enter WE Console – administrator WE login and password created automatically. Default system administrator login – "weadmin", password - " WorkExaminer$123". Extended installation of WE database Extended installation of WE Server application presupposes the existence in the network or on the computer deployed and working MS SQL Server 2000/2005 software with the authentication mode «mixed authentication mode (windows and sql)». The user running the setup program should have the administrator rights of the MS SQL Server. First step will require setting the Database server – full path to a copy of your MS SQL Server. Please note that instances of the MS SQL Server other than the standard installed are specified as [server name]\[instance name] Then you must create an account of Work Examiner Professional system administrator, which will be used to log into WE console. If the selected account already exists in MS SQL Server database installation wizard will offer to change the password to new or leave it unchanged. Then Work Examiner Professional database will be deployed with parameters set before (database server, database name, user authentication mode). After installing the database a user-administrator of Work Examiner Professional system is created with login and password that you specified earlier. If such user already exists in the database, the request will appear to change the password: WE Server application installation is complete; you can start installing WE Console application. Installing Work Examiner Professional Console application Step-2: Installing Work Examiner Console Run ‘WE_Pro_Console.exe’ and follow the instructions of installer. Run WE Console, connect to WE Server. While connecting to WE Server enter login and password which you set during installation of WE Server application. Now you can install WE clients remotely, manage other system users (e.g., create managers), group users of your company etc. Now you are ready to install clients. Installing WE Clients Work Examiner Client must be installed on any PC you want to monitor. You can install clients remotely – from WE Console – or locally – from WE_Client.exe distribution package that must be run on all user computers. Remote WE Client installation is described here. Note: for remote installation you will need administrator rights on the user’s PC. If you do not have them for your account, WE Console will ask for username \ password of client PC administrator. Installation from WE_Client.exe will require to fill in WE Server computer’s name (or IP address), other steps are formal. If you install WE Client over the old version, the setup program will ask for update confirmation. If old version is installed in a folder different from c:\Program Files\WE_Client\ - setup will ask for WE Client’s folder path. Uninstalling Work Examiner Uninstall Work Examiner Clients There are several ways to uninstall WE Client applications: • Remotely – from WE Console using the ‘Home -> Uninstall Clients’ menu or “Uninstall….” Button in Users & PCs Note: This action will require administrator rights on the remote PC or currently connected client. • Locally with the installation software – using list Add \ Remove Programs. It works only if the client was installed from the distribution package (WE_Client.exe). • Locally from the command line – run ‘wemon.exe’ with the ‘–u’ parameter (using Start – Run…, in DOS console or via shortcut) if WE Client is stealth. For example: Start – Run - C:\Program Files\WE_Client\wemon.exe –u or “C:\Program Files\WE_Client\wemon.exe” –u Uninstall Work Examiner Console WE Console can be easily uninstalled using list Add \ Remove Programs in Control Panel. Note: Before that close WE Console. Uninstall Work Examiner Server (Pro edition only) WE Server can be easily uninstalled using list Add \ Remove Programs in Control Panel. Note: Before that close WE Server Manager. Note: WE database will not be deleted while uninstalling WE Server. Database can be deleted manually using MS SQL Server resources. (For example using SQL Server Management Studio). Welcome to WE Console Connecting to Work Examiner Server (Pro edition only) To connect to WE Server in main menu of the program select ‘File -> Connect’. Then select connection data which were set during WE Server installation: By default (if standard way of database deployment was selected), credentials are: Login: weadmin Password: WorkExaminer$123. Work Examiner user accounts management is described in details in Security Management section. Remote installation of Work Examiner Clients Remote installation requires administrative rights on those computers, where clients will be installed (to check permission rights on the selected computer, click 'Start' then choose 'Run ...', write \ [Remote_Computer_Name]\admin$, and press Enter). For remote installation of Work Examiner Client application select 'Home -> Install Clients' in main menu of WE Console application. WE Clients installation wizard will appear: Here you may specify the following parameters: Server address of Work Examiner Server computer (the default is server name, to which Work Examiner Console is currently connected); Folder where clients of Work Examiner Professional system will be installed; List of computers that require WE clients installation. You can form the list of computers at this stage in several ways: add computer names manually, use built-in capability of Network Environment explorer, as well as by importing a list of computers from file. File should contain a list of computers (in form of computer name or its IP-address). After selecting a file containing list of computers, the wizard will check access rights to each of them and add them to the list for clients’ setup. After successful completion of remote installation of client the computers with installation should appear in Monitoring section within 30-60 seconds. Dashboard and Quick Reports Dashboard Dashboard presents a brief view of the most important reports. By default, these reports are showing: Top 10 Activities Top 10 Categories Top 10 Users Top 10 Websites When rendered, Dashboard reports use parameters selected in Report Controls. Select Settings item in the context menu to change report parameters: User can add and remove Dashboard reports. To delete a report – select Remove button from the context menu: Select Add Report in the Options menu to create new Dashboard report. If you double click on the report – you’ll be redirected to the full report view. Report Controls Report Controls allow you to set filtering parameters: dates period, users, computers, applications and websites (together called activities) and other items that will be reflected in the current report. Dates Filter Dates Filter allows you to set different report time intervals. You may select following periods: day, week, month, custom. When the “Custom time period” option is selected, you can define a time interval using From and To values or by selecting days in the calendar: Use left and right arrow keys to move back and forth by the duration of the selected period. Users Filter Users Filter allows you to set current report users: select Organization Unit or User Group in the Unit field, then choose a User (or All Unit Members) in the User field. By default, all users are selected. Read on how to unite users with organization units and user groups in the Organization Unit section. Activities Filter Activities Filter allows to build report for Applications only, Websites only or both Apps and Websites. Extended Filter Extended Filter allows to use advanced report data filtering options. Extended Filter preferences include: Schedule Users Time period selection Hours selection (and also Day&Night hours) Weekdays selection Selection of Users to include to the report Selection of Users to exclude from the report Users can be selected directly or from User Groups and Organization Units. To select report users, click on the Add button and special search window will appear: Computers Selection of Computers to include to the report Selection of Computers to exclude from the report Computers can be selected directly or from Organization Units. To select report computers, click on the Add button and special search window will appear: Activities Selection of report’s Activity types: All, Applications, Websites. E.g. Applications will mean that only programs will be showed in the report and you’ll see no any website. For Applications option you may select to include web browsers’ tracking time into the report or not. E.g. if “Include websites time in browsers” is not selected, you’ll see only local files\documents usage in the Internet Explorer, but not websites. Selection of Activities to include to the report. Activities can be added directly ‘as is’ or using a Category object. Seleciton of Activities to exclude from the report. This search window is used to select Activities: Draw Draw options allow to select report rendering parameters: chart type, number of records to show, table columns and others. These options affect on both Quick Reports in the user interface (except the Page group) and report Print Preview. Selection of report table columns Selection of number of levels for tree reports Selection of sorted column Chart type selection … Search Search box allows to filter report data by application names, website URLs, categories, windows titles. In Spy Reports Search box also filters data by keystrokes, e-mail subjects and instant messages. Searching fields (usually columns) depend on the report itself. To reset the Search mode - click Clear Export Reports . Export Reports feature allows to save reports in various file formats: Adobe Acrobat (*.pdf) Microsoft Excel (*.xls) Rich Text Format (*rtf) HTML (*.html) Comma-separated values files (*.cvs) Simple Text (*.txt) XML Files (*.xml) BMP Image (*.bmp) JPEG Image (*.jpg) GIF Image (*.gif) To export the data, click "Export Current Report to popular file formats" and select required file type. If the Extended Filter is on, then advanced rendering options will be applied (from the Draw tab). Print Reports Print Reports allows to preview and print report data. Just click on the "Print Preview" button: Preview window will be opened. You may click on the Print button and set up some printing options like printer device, pages to print out, number of copies and others. If the Extended Filter is on, then advanced rendering options will be applied (from the Draw tab). Users and PCs User Sessions User Sessions shows all captured user sessions on the computers with WE Client program installed and currently connected to WE Server. Here you may see such info as user name, computer name, user activity status (active\away), active application and window title. Status column reflects current user’s activity state and last input time period (time passed form any mouse or keyboard action). Green icon is used for sessions with < 5min activity status. Red icon shows Away users, who is making no actions for more than 5min. If no users are logged into PC – you’ll see a “No users logged in” message. From the user sessions window you can go to the Activities Report for selected user. Just click on this button and Work Examiner will instantly forward you to the Activities Report with current user selected in Report Controls. User sessions can be viewed grouped by organization units. Select an organization unit in the tree and you’ll see it’s sessions (for OU’s user or computer). Organization units tree also shows number of user sessions for each unit. You can move users and computers between organization units with drag and drop from the sessions list or using the Move button. If both session’s computer and user exist in the same organization unit, Work Examiner will offer to select what objects to move: Read more about organization units management in the Organization Units section. If Spy Features are enabled (checked during the WE installation or by editing so.ini from a “C:\ProgramData\WE\Server\” in win7\vista and “C:\Documents and Settings\All Users\Application Data\WE\Server\” in winXP), then the Surveillance button will be visible on the User Sessions toolbar. Surveillance feature allows to receive some information about user session in real-time mode: desktop screenshot, processed launched, websites opened: Screenshots can be recorded and played. See more information on it in Screenshots and Client Options sections. Organization units Organization units allows to group Work Examiner objects, users and computers, using various criteria. Grouped objects can be sued in reports, application and website filtering rule, scheduled reports. For users grouping are used: organization units and user groups. Organization Unit is a container that can include users, computers, user groups, organization units (in the Professional edition, there is a full OU hierarchy mode supported, in the Standard edition – flat, one level OU model only). Organization Units usually are used to reflect the departments structure of the company. OU object can be a member of one Organization Unit only. Organizational structure can be used to divide access rights to Work Examiner objects and to manage client options. See more info on these items in Security Management and Client Options sections. In the left part of the screen you can see Organization units tree. In the right part – OU contents are located. OU contents show Work Examiner objects (user\computer\user group\OU) with many properties reflected in columns: name, connection status, object type, client version, last connect time and last logs upload time. The status, last connect time and last logs upload time are used for users and computers only. The Status column shows whether the user or PC is Online\Offline, depending on the user session visibility. The Client Version column is used by computers only and shows installed WE Client build number on the remote PC. From the organization unit contents you may move to the Activities Report. Just click on this button and Work Examiner will instantly forward you to the Activities Report with current user or computer selected in Report Controls. Install Clients button allows to deploy WE Clients remotely. See more info on the remote clients deployment in the Remote installing client section. To delete a WE Client remotely use the Uninstall button. User Groups User group is a container that can include any number of users, from different organization units. One user can be a member of many groups. So, instead of organization units, user groups can unit users on various criteria rather than OUs. To create a group select the 'New-> User Group' in the toolbar. On the Users tab you should specify group members. In the Professional edition user groups can be synchronized with Active Directory and be used for Security Management needs. See more info in the Active Directory Integration section. Summary Reports Summary by User The Summary by User report shows the total time spent by user(s) in applications and on websites. The report consists of a chart accompanied by a table. By default, the chart displays information about 15 most active users. When the mouse cursor is placed over a user, the program shows a popup window with detailed information about this user: active, idle and total time spent by a user. The table lists all report users sorted by active time. When a user is clicked either on the chart or in the table (double click), the system will redirect you to the Activities report of a selected user. When a user-specific context menu is opened in the table, you can also view a Categories or an Attendance report. The Summary By User report allows you to assess time distribution across users. It can help you quickly get a clear picture of the workload of a group of users or an entire department. To view reports from different points of view, use additional filtering parameters described in the Report Controls section. Summary by User Group The Summary by User report shows the total time spent by user group(s) in applications and on websites. The report consists of a chart accompanied by a table. By default, the chart displays information about 15 most active user groups. When the mouse cursor is placed over a user group, the program shows a popup window with detailed information about this user group: active, idle and total time spent by a user group. The table lists all report user groups sorted by active time. When a user group is clicked either on the chart or in the table (double click), the system will redirect you to the Activities report of a selected user group. When a user group-specific context menu is opened in the table, you can also view a Categories or an Attendance report. The Summary By User Group report allows you to assess time distribution across user groups. It can help you quickly get a clear picture of the user groups workload of the whole company or a department. To view reports from different points of view, use additional filtering parameters described in the Report Controls section. More information on managing user groups can be found in the User Groups section. Summary by Computer The Summary by Computer report shows the total time spent on computers. The report consists of a chart accompanied by a table. By default, the chart displays information about 15 most active computers. When the mouse cursor is placed over a user, the program shows a popup window with detailed information about this computer: active, idle and total time spent on the PC. The table lists all report computers sorted by active time. The Summary by Computer report allows you to assess time distribution across company PCs. It can help you quickly get a clear picture of the computers workload of the whole company or a department. To view reports from different points of view, use additional filtering parameters described in the Report Controls section. Summary By Hour The Summary By Hour report shows the total time spent on computers distributed by hours. The report consists of a chart accompanied by a table. When the mouse cursor is placed over an hour, the program shows a popup window with detailed information about this hour: active, idle and total time spent on it. The table lists all report data sorted by hours. The Summary by Hour report allows you to assess time distribution across different hours. It’s important to understand that if a several days period is selected, the total\active\inactive time for an hour can show more than 60 minutes, so the time is just summarized for several days per hour. Relative comparison of hours usually is more important than absolute. To view reports from different points of view, use additional filtering parameters described in the Report Controls section. Summary by Day The Summary By Day report shows the total time spent on computers distributed by days. The report consists of a chart accompanied by a table. When the mouse cursor is placed over a day, the program shows a popup window with detailed information about this day: active, idle and total time spent on it. The table lists all report data sorted by days. The Summary by Day report allows you to assess time distribution across calendar days. It can help you quickly get a clear picture of calendar days’ workload of the whole company or a department. To view reports from different points of view, use additional filtering parameters described in the Report Controls section. Summary By Weekday The Summary By Weekday report shows the total time spent on computers distributed by weekdays. The report consists of a chart accompanied by a table. When the mouse cursor is placed over a weekday, the program shows a popup window with detailed information about this weekday: active, idle and total time spent on it. The table lists all report data sorted by weekdays. The Summary by Weekday report allows you to assess time distribution across different weekdays. It’s important to understand that if a several weeks period is selected, the total\active\inactive time for a weekday can show more than a 1 day time, so the time is just summarized for many days per weekdays. Relative comparison of weekdays usually is more important than absolute. To view reports from different points of view, use additional filtering parameters described in the Report Controls section. Activities Reports Activities The Activities report shows the total time spent in applications and on websites. The report consists of a chart accompanied by a table. By default, the chart displays information about 15 most popular activities. When the mouse cursor is placed over an activity, the program shows a popup window with detailed information about this activity: active, idle and total time spent on it. The table lists all report activities sorted by active time. Activities can be categorized right in the report using the Category column. By default, the system categorizes applications and websites using its own applications database, keywords found in webautocat.ini (for websites) and the website content database (if accessible by subscription). More information on this feature can be found in the Categories and Activities section. When an activity is clicked either on the chart or in the table (double click), the system will redirect the user to the Detailed Application Windows or Detailed Websites report, depending on the type of activity selected. When an activity-specific context menu is opened in the table, you can also view an Activities By User report or apply a site or application filtering rule, thus quickly blocking access to a program or site. Activity reports have two tiers. In this report type, the second tier displays the windows and web pages involved in each activity. This way, you can see what document was opened, what site sections were visited, what IM contact the user mostly chatted with and so forth. The Activities report allows you to assess time distribution across applications, sites, windows and web pages. It can help you quickly get a clear picture of a user’s activities, activities of a group of users or an entire department. To view reports from different points of view, use additional filtering parameters described in the Report Controls section. Activity by User The Activity by User report shows the total time spent by user in applications and on websites. The report consists of a chart accompanied by a table. By default, the chart displays information about 15 most active users. When the mouse cursor is placed over a user, the program shows a popup window with detailed information about this user: active, idle and total time spent. The table lists all report activities sorted by active time. When a user is clicked either on the chart or in the table (double click), the system will redirect you to the Activities report for the selected user. When a user-specific context menu is opened in the table, you can also view the Categories or Attendance report. Activity by User report has two tiers. In this report type, the second tier (Activity level) displays the applications launched and websites visited by user. Activity level’s context menu can redirect you to the Detailed Application Windows or Detailed Websites report. This way, you can see what document was opened, what site URLs were visited and so forth. Activity level context menu also offers application and website filtering actions. You may easily block selected application or site, add it to existing or create a new filtering rule. More information on app\web filters can be found in the Filtering section. The Activity by User report allows you to assess time distribution across users and their actions. To view reports from different points of view, use additional filtering parameters described in the Report Controls section. Activity by User Group The Activity by User Group report shows the total time spent by user group in applications and on websites. The report consists of a chart accompanied by a table. By default, the chart displays information about 15 most active user groups. When the mouse cursor is placed over a user group, the program shows a popup window with detailed information about this user group: active, idle and total time spent. The table lists all report activities sorted by active time. When a user group is clicked either on the chart or in the table (double click), the system will redirect you to the Activities report for the selected user group. When a user-specific context menu is opened in the table, you can also view the Categories or Attendance report. Activity by User Group report has two tiers. In this report type, the second tier (Activity level) displays the applications launched and websites visited by user group. Activity level’s context menu can redirect you to the Detailed Application Windows or Detailed Websites report. This way, you can see what document was opened, what site URLs were visited and so forth. Activity level context menu also offers application and website filtering actions. You may easily block selected application or site, add it to existing or create a new filtering rule. More information on app\web filters can be found in the Filtering section. The Activity by User Group report allows you to assess time distribution across user groups and their actions. To view reports from different points of view, use additional filtering parameters described in the Report Controls section. More information on managing user groups can be found in the Organization Units section. Activity by Computer The Activity by Computer report shows the total time spent on PC in applications and on websites. The report consists of a chart accompanied by a table. By default, the chart displays information about 15 most active PCs. When the mouse cursor is placed over a computer, the program shows a popup window with detailed information about this PC: active, idle and total time spent. The table lists all report activities sorted by active time. Activity by Computer report has two tiers. In this report type, the second tier (Activity level) displays the applications launched and websites visited on the PC. Activity level’s context menu can redirect you to the Detailed Application Windows or Detailed Websites report. This way, you can see what document was opened, what site URLs were visited and so forth. Activity level context menu also offers application and website filtering actions. You may easily block selected application or site, add it to existing or create a new filtering rule. More information on app\web filters can be found in the Filtering section. The Activity by Computer report allows you to assess time distribution across PCs and their actions. To view reports from different points of view, use additional filtering parameters described in the Report Controls section. Categories Reports Categories The Categories report shows the total time spent in activity categories. The report consists of a chart accompanied by a table. By default, the chart displays information about 15 most popular categories. When the mouse cursor is placed over a category, the program shows a popup window with detailed information about this category: active, idle and total time spent on it. The table lists all report activities sorted by active time. By default, the system categorizes applications and websites using its own applications database, keywords found in webautocat.ini (for websites) and the website content database (if accessible by subscription). More information on this feature can be found in the Categories and Activities section. When a category-specific context menu is opened in the table, you can easily block applications or sites of the selected category: add it to existing or create a new filtering rule. Categories report has two tiers. In this report type, the second tier (Activity level) displays the applications launched and websites visited in the category. Activity level’s context menu can redirect you to the Detailed Application Windows or Detailed Websites report. This way, you can see what document was opened, what site URLs were visited and so forth. Activity level context menu also offers application and website filtering actions. You may easily block selected application or site, add it to existing or create a new filtering rule. More information on app\web filters can be found in the Filtering section. The Categories report allows you to assess time distribution across categories and their contents (applications, websites). To view reports from different points of view, use additional filtering parameters described in the Report Controls section. More information on activities and categories management can be found in the Categories and Activities section. Category by User The Category by User report shows the total time spent by user in activity categories. The report consists of a chart accompanied by a table. By default, the chart displays information about 15 most active users. When the mouse cursor is placed over a user, the program shows a popup window with detailed information about this user: active, idle and total time spent. The table lists all report activities sorted by active time. When a user is clicked either on the chart or in the table (double click), the system will redirect you to the Activities report for the selected user. When a user-specific context menu is opened in the table, you can also view the Categories or Attendance report. Category by User report has two tiers. In this report type, the second tier (Category level) displays the categories based on applications opened and websites visited by user. By default, the system categorizes applications and websites using its own applications database, keywords found in webautocat.ini (for websites) and the website content database (if accessible by subscription). More information on this feature can be found in the Categories and Activities section. When a category-specific context menu is opened in the table, you can easily block applications or sites of the selected category: add it to existing or create a new filtering rule. More information on app\web filters can be found in the Filtering section. The Category by User report allows you to assess time distribution across users and their categories. To view reports from different points of view, use additional filtering parameters described in the Report Controls section. Category by User Group The Category by User Group report shows the total time spent by user group in activity categories. The report consists of a chart accompanied by a table. By default, the chart displays information about 15 most active user groups. When the mouse cursor is placed over a user group, the program shows a popup window with detailed information about this user group: active, idle and total time spent. The table lists all report activities sorted by active time. When a user group is clicked either on the chart or in the table (double click), the system will redirect you to the Activities report for the selected user group. When a user group-specific context menu is opened in the table, you can also view the Categories or Attendance report. Category by User Group report has two tiers. In this report type, the second tier (Category level) displays the categories based on applications opened and websites visited by user group. By default, the system categorizes applications and websites using its own applications database, keywords found in webautocat.ini (for websites) and the website content database (if accessible by subscription). More information on this feature can be found in the Categories and Activities section. When a category-specific context menu is opened in the table, you can easily block applications or sites of the selected category: add it to existing or create a new filtering rule. More information on app\web filters can be found in the Filtering section. The Category by User Group report allows you to assess time distribution across user groups and their categories. To view reports from different points of view, use additional filtering parameters described in the Report Controls section. More information on managing user groups can be found in the Organization Units section. Category by Computer The Category by Computer report shows the total time spent on PC in activity categories. The report consists of a chart accompanied by a table. By default, the chart displays information about 15 most active PCs. When the mouse cursor is placed over a computer, the program shows a popup window with detailed information about this PC: active, idle and total time spent. The table lists all report activities sorted by active time. Category by Computer report has two tiers. In this report type, the second tier (Category level) displays the categories based on applications opened and websites visited on the PC. By default, the system categorizes applications and websites using its own applications database, keywords found in webautocat.ini (for websites) and the website content database (if accessible by subscription). More information on this feature can be found in the Categories and Activities section. When a category-specific context menu is opened in the table, you can easily block applications or sites of the selected category: add it to existing or create a new filtering rule. More information on app\web filters can be found in the Filtering section. The Category by Computer report allows you to assess time distribution across PCs and their categories. To view reports from different points of view, use additional filtering parameters described in the Report Controls section. Attendance Reports Attendance by User The Attendance by User report shows user sessions information: start (logon) time, end (logoff) time, active, inactive, total user session time. The report consists of a single table. The table lists all user sessions sorted by start time. The Attendance by User report allows you to see how much time was spent by user, when he was on and off, was he late or not, what part of his work time was active. To view reports from different points of view, use additional filtering parameters described in the Report Controls section. Attendance by Users – Computers The Attendance by Users – Computers report shows a combined information on the time spent by users on their PCs. The report consists of a single table. The table lists all data sorted by active time. The Attendance by Users – Computers report allows you to quickly see who (user), where (PC) and for how long time was working. To view reports from different points of view, use additional filtering parameters described in the Report Controls section. Attendance by Activity Period The Attendance by Activity Period report shows information on working periods by users and PCs. The report consists of a single table. The Attendance by Activity Period report allows you to see start and end of any period of user activity. To view reports from different points of view, use additional filtering parameters described in the Report Controls section. Detailed Reports Detailed Applications The Detailed Applications report shows information on the program life time: application name, executable file name, launch time, termination time, active, inactive and total usage time. The report consists of a single table. The Detailed Applications report is used to understand what programs was launching a user. With the Search box you can find application usage information by product name and file name. See more details about the Search feature in the Report Controls section. To view reports from different points of view, use additional filtering parameters described in the Report Controls section. Detailed Application Windows The Detailed Application Windows report shows information on the window life time: when it was opened, closed, how much time user spent in it. The report consists of a single table. The Detailed Application Windows report is used to understand what windows, documents, IM contacts were opened by a user. Usually documents and contact info is showed in the title, that’s why this report can be valuable for the needs of employee monitoring. With the Search box you can find window usage information by product name and window title. See more details about the Search feature in the Report Controls section. To view reports from different points of view, use additional filtering parameters described in the Report Controls section. Detailed Websites The Detailed Websites report shows what URLs were visited by a user: website, page URL, start time, end time, page title, active, inactive and total usage time. The report consists of a single table. The Detailed Websites report is used to get a full web usage log on who, when and what URL have visited. With the Search box you can find window usage information by product name and window title. See more details about the Search feature in the Report Controls section. To view reports from different points of view, use additional filtering parameters described in the Report Controls section. Spy Reports Screenshots The Screenshots report shows recorded images captured from monitored user’s desktop. The report consists of an image accompanied by a table. You may play screenshots as a video. Just click on the Play button. You may stretch images and make their size proportional. To save current or all images use the Save.. or Save All buttons. Images will be saved in bmp format. To make a screenshot search by application or window, use the Search box from Report Controls. The Screenshots report is only available when Spy features are enabled (checked during the WE installation or by editing so.ini from a “C:\ProgramData\WE\Server\” in win7\vista and “C:\Documents and Settings\All Users\Application Data\WE\Server\” in winXP). To get screenshots in the real-time mode – use the Surveillance function from Users and PCs - User Sessions See more info about screenshots recording parameters (frequency, color depth) in the Client Options section. Keystrokes The Keystrokes report presents a full log of all keys pressed by selected user(s). The report consists of a text box accompanied by a table. With this report you will know everything a user was typing on the keyboard, in any application – chat, on the Facebook, e-mail, etc. Special keys like Shift, Ctrl and some others are grayed. Using the Search box you may find keystrokes by the text typed, application name and window title. For instance, you may find any mention of boss’s name in any chat message\email typed. See more details about the Search feature in the Report Controls section. Keystrokes report is only available when Spy features are enabled (checked during the WE installation or by editing so.ini from a “C:\ProgramData\WE\Server\” in win7\vista and “C:\Documents and Settings\All Users\Application Data\WE\Server\” in winXP). See more info about keystrokes recording parameters (limit captured applications list, enable\disable recording) in the Client Options section. Emails The Emails report shows sent and received e-mail correspondence by selected user(s). The report consists of a text box accompanied by a table. Report allows to show e-mails in Text and HTML formats. With the Search box you can find e-mails by subject, message text and headers. See more details about the Search feature in the Report Controls section. E-mails report is only available when Spy features are enabled (checked during the WE installation or by editing so.ini from a “C:\ProgramData\WE\Server\” in win7\vista and “C:\Documents and Settings\All Users\Application Data\WE\Server\” in winXP). See more info about e-mails recording parameters (limit captured applications list, enable\disable recording) in the Client Options section. Instant Messages Instant Messages report shows a chat log in the Windows Live IM\MSN, ICQ instant messaging programs of the selected user(s). The report consists of a text box accompanied by a table. With this report you’ll be up on what are users chatting about in ICQ, MSN, Windows live IM programs. Using the Search box you may find chat messages. For instance, you may find any mention of boss’s name in all messages. See more details about the Search feature in the Report Controls section. Instant Messages report is only available when Spy features are enabled (checked during the WE installation or by editing so.ini from a “C:\ProgramData\WE\Server\” in win7\vista and “C:\Documents and Settings\All Users\Application Data\WE\Server\” in winXP). See more info about instant messages recording parameters (limit captured applications list, enable\disable recording) in the Client Options section. Settings and Administration Scheduled Reports Scheduled Reports feature allows to automatically create any report in the specified time. To create a scheduled report, go to Scheduled Reports section and click New…. One scheduled report can include one or many reports. Scheduled Report also has a generation schedule and target options to select where to save the report or either send it via e-mail. Scheduled Reports are generated by WE Server, from weServerMessenger service, in the background. It means, that they are not dependent on WE Console. Scheduled Report includes these groups of parameters: General Content Name and description Enable\disable a scheduled report Scheduled Report contents – report that will be included into it. Content reports are called Report Tasks. When you add a Report Task you get all data filtering options available in the Extended Filter of the Report Controls section. Period of time that reports will reflect. File format to save all reports as. Schedule Target Scheduled time of reports generation. Daily or weekly or monthly periods are available. Target folder selection Target e-mail address selection Target tab manages the publication of reports, e.g. in what folder or to what e-mail they will be sent. It is important to remember that server service weServerMessenger provides publication – and it must have access to the appropriate path or mail server on the Internet. If you use sending reports via e-mail you must specify SMTP settings of e-mail server (e.g. gmail.com, hotmail.com), which will be used by weServerMessenger service. For detailed SMTP setting information see SMTP Settings. By default, built-in yahoo account is used. Any report created with any data filtering options can be scheduled (except Spy reports). See more details on how to schedule reports from the Report Controls section. Categories and Activities The Categories and Activities section allows to group applications and websites (together called activities) into groups called Categories. Categories can be used in reports, app\web filtering rules, scheduled reports. There is a 2-tier system of categories. 1st level categories can include 2nd level categories and no activities. 2nd level categories can include activities only. One activity can be a member of one (2nd level) category only. In the left part of the program window you may see the categories tree. In the right part selected category members are showed. To groups activities into categories and move from one category to another simply use mouse drag-and-drop or a Move button. Usually activities categorization is made under the Activities report where you can sort the most important applications and websites (because most used actions are in the top of the report). Work Examiner system has some predefined categories. They are grouped by business tasks (Business node) and by functional characteristics. But you can make any custom view of the categories tree by creating and deleting categories. The only restriction here is that only empty categories can be deleted. Also, Work Examiner has some techniques of automatic activities categorization. By default, the system categorizes applications and websites using its own applications database, keywords found in webautocat.ini (for websites) and the website content database (if accessible by subscription). Website content database availability depends on your existing support&updates subscription. If it is on, this db of millions of domains categorized by 80+ groups will be constantly updated once a 10 days. See more information in the Database Settings section. Webautocat.ini file is located in WE Server’s folder and is used when site was not found in the website content database. You may edit this file to create your custom patterns of web categorization. Security Management (Pro edition only) There is a security and roles support the Work Examiner Professional edition that allows to manage access rights of WE users to reports, users, computers, user groups and organization users. To enter WE Console you need to pass the authorization dialog: To control the parameters of WE user access rights the section Logins is used. In the Logins section there is a list of system users of Work Examiner Professional. Users in this section can be connected to the server Work Examiner Server – enter their username\password in logon windows and get the appropriate access to the system depending on the settings described below. Among Work Examiner system users the following can be distinguished: Administrator; Manager. Administrator has full access to all users and all the functionalities of the system. The manager has limited rights and can see the statistics for only those users and computers or the units to which his access is allowed. Manager cannot edit\move\delete any data, willnot see Web & App Filters, Scheduled Reports, Logins, Server Options items. Manager’s access rights are limited by users, computers, user groups and organization units. If the “Inherit permissions from parent organization unit” option is on, current OU will inherit permissions from all top-level OUs until there is an OU with disabled inheritance option. User group’s users will also inherit security permissions if they have the Inheritance option enabled. You may add new permissions to the already inherited permissions. In the Security properties of OU\User\Computer\User Group you may see the inheritance of permissions. To get more details on Organization Units management see the Organization units section. To get more details on User Groups management see the User Groups section. To edit manager’s access rights (for users, computers, user groups, organization units) use the Permissions tab in user’s properties. Here you may select a list of objects her has access to. Client Options The Client Options function determines various parameters of WE Client program: tracking options, filtering preferences, spy options and others. Client Options are applied to computers only. You may set up Client Options for a PC directly or for the Organization Unit it belongs to. To get into the Client Options you may use OU’s or PCs properties, or user session popup menu properties (PC properties will be opened then) Client options for the selected organization unit are inherited by computers, if check box "Inherit options from parent organization unit" is enabled. If the inheritance box is disabled it is interrupted and options of this organization unit or computer are available for editing. But ultimately client options apply only to computers, not to users. So, finally client options will apply to any user logged in to the PC and there is no possibility to apply client options for each user separately. Options tab for organization units and computers contains additional tabs: Common Display icon of client module (with the appropriate context menu Start recording user's work, Stop recording user's work, Server Address, Delete) in the Task Panel Set a password for actions Start, Stop and Delete of client module Hide processes of client from list of processes of Task Manager and protect client services from user's access Run wemon.exe under user account (by default runs under the account SYSTEM) to address some compatibility issues Schedule Allows you to set a schedule for all functions of the client (monitoring, filters). It means that no filters or reports will work out of the schedule period. Tracking Enable tracking of applications, select a method of tracking and enter filename masks. E.g. it may track only *msword.exe or track all except *iexplore.exe Enable tracking of Web, select a method of tracking and enter url masks. E.g. it may track only *facebook.com* or track all except *companysite.net* Enable or disable attendance tracking – Attendance by Users (Logons tracking ) and Attendance by Activity Periods reports Other Tracking Setting the interval to send information about active user sessions the client PC to the User Sessions section Setting the interval of loading saved client logs to the server Setting the interval of saving client logs Setting the interval of inactivity sensitivity – if during this period the user did not make mouse movements or keystrokes of keyboard\mouse, this period will be considered inactive and will be recorded in the log as inactive as long as there is no motion made by mouse or pressing the keyboard\mouse Spy Spy options are only available when Spy features are enabled on the WE Server (“Spy…” item checked during the WE Server installation or by turning on the “spy=1” flag in so.ini file from “C:\ProgramData\WE\Server\” in Windows Vista\7 or “C:\Documents and Settings\All Users\Application Data\WE\Server\” in Windows XP). Save screens every XX sec – allows to record screenshots and view them in Spy Reports Screenshots Enable\disable Keystrokes tracking, define a programs list to record keystrokes in Enable\disable E-mails recording Enable\disable instant messaging chat conversations recording (MSN\Windows Live\ICQ supported) Warning Allows you to define the content of user notification working at the computer with installed Work Examiner Professional system client. Notification will be shown when user logs on to Windows and after WE Client installation: App Filter Determines whether you need to use application filter for the selected organization unit or computer. This option will disable any App filtering rules for selected computer(s), but if it is enabled and there are no app filtering rules – it will not filter anything. Web Filter Allows you to enable\disable all filter rules for this organization unit or computer. This option will disable any Web filtering rules for selected computer(s), but if it is enabled and there are no web filtering rules, no TCP ports blocking and no e-mail\IM recording – it will not filter anything and filtering engine will not be used at all. Enable\disable https interception (port 443), which helps to avoid some problems of incompatibility. Choose method of filtering applications – for example you can exclude from filtering (intercept all connections on selected ports) applications which have problems with filter (for example, some exchange clients which use https-protocols). Settings MS ISA Firewall Client detection mode, to which the filter is not compatible (ISA Client first intercepts all connections), and turning off the filter to avoid incompatibility. Setting up a list of HTTP-port if the ports different from the standard are used. Blocking of TCP ports – allows you to completely close the incoming connections on these ports. With this feature you may block any Instant Messaging program communication and other web clients. Database Settings The group of Database settings is a part of WE Server Options. In the Database Settings some databaserelated system parameters are defined. With these parameters you can manage server load, optimize speed, data currency, size. To enter the Database Settings window, select Server Options item from the Main Menu and then go to the Database tab: Here are the Server Options and the Database tab: Database Settings are managed by these parameters: Database cleanup – allows to delete old data from the database. E.g. you can make it delete the data older than 6 months. Deletion process will run on 3 events: instantly after the Database Settings were changed, on WE Server’s weServerMessenger service start, periodically every 20 hours. This feature allows you to considerably adjust the total amount of information in WE database. This affects the size of WE.mdf file (format of MS SQL Server), the speed report generation. Activity logs writing – affects the operation of weServerDBUpdater service, which is responsible for uploading the activity logs to the database. Parameters "Write Activity Logs Every..." affects the frequency of WE logs processing sent by clients. Logs can be processed periodically every X seconds\minutes\hours or every day at the time specified. This option reflects on the server load with weServerDBUpdater process, the frequency of hard disk usage and network load in case MS SQL Server is located on the other hard disk (MS SQL Server is used in Pro edition). Client data writing – determines how often to write the information about the last time a client connected and the last logs upload time to the WE database. Client data writing can be disabled at all, this will not prevent activity logs from recording and uploading to the database, it’s just a load management feature that affects 2 columns (Last Connect time, Last Upload time) from the Organization units section. Web connections – manages updates of some parts of the Work Examiner database from external sources: website icons downloading, website content database usage. Website content database is used by web filtering rules and automatic websites categorization. See more information on automatic categorization in the Categories and Activities section. See more information on Domain Sets usage in the Filter Website section. Also, the Website content database can be loaded to WE manually from the webcat.zip file, see more details on it in the WE Server Manager – Categories section. Website content database includes 2+ millions of domains categorized by 80+ groups. It is updated on the workexaminer.com every ~10 days and downloaded if a new version is released. If you have no Support & Updates subscription, or it is expired – website content database will stop to auto-update. You may check how many days of the Support & Updates subscription are available in the WE Serer Manager – License section. SMTP Settings SMTP (Simple Mail Transfer Protocol) settings are used to send e-mail alerts of app\web filters and scheduled reports to the e-mail. To open the SMTP Settings select the Server Options item in the Main Menu: then go to the SMTP tab: SMTP Settings are also available from Scheduled Reports options, Website Filters and Application Filters rules. SMTP parameters available: SMTP Server – e-mail server address that will send e-mails. Port –SMTP port number. From name – Sender’s name. From address – Sender’s e-mail address. Reply-to address – not required field, used to send replies to another address than defined in the From address field. User Name –login to authorize on the e-mail server. Password – password to authorize on the e-mail server. Use SSL/TLS – SSL/TLS authorization mode is required by some e-mail servers. To check if the SMTP settings are correct use a Send test e-mail feature. Click on the Send test e-mail button and enter recipient’s e-mail: If the test e-mail was received, SMTP settings are correct and working. Otherwise, check the weServerMessengerLog.txt file in WE Server’s folder for SMTP error messages. By default, SMTP settings are configured for the yahoo.com account of Work Examiner. This makes all email alerts and report work without any special user actions. Active Directory Integration (Pro edition only) The Active Directory Integration allows to export company’s organization structure information from the Active Directory service to the Work Examiner database. To enter the Active Directory Integration window, select the Server Options item in the Main Menu: and select the Integration tab: First of all, this feature is used for automatic creating of user groups and keeping them up-to-date in the Work Examiner database. It’s a good solution if there are a many employees in the company and AD user groups often change. You will not need to reflect the same changes in Work Examiner. User groups can be used in Dashboard and Quick Reports, Scheduled Reports, Website Filters and Application Filters. Active Directory Integration can use the following parameters: Synchronize WE user groups and users with AD security groups and user accounts – enables or disabled periodic AD -> WE data export (also called synchronization). Run synchronization every – determines the frequency of AD->WE data synchronization. It is not recommended to make it less than 24 hours because of a high domain controller server load possibility. Directly define DC address – uses an evident domain controller’s network name (IP address or NetBIOS name). Is used when default DC is not accessible as “\\*dcname+” or you want to export AD data from another domain. In the case of exporting AD data from another domain (rather than WE Server’s domain) it may be required to run the Work Examiner DB Updater Service (weServerDBUpdater.exe) under another domain account (Run As option for windows services). Create non-existent users and groups – allows exporting of AD users and user groups that do not exist in WE. Usually it makes no sense to create WE users and groups with no WE Client program installed on them. This feature can be useful if you’re sure that will deploy WE Clients on all users and want to create some App\Web filters and\or Scheduler Reports for them before WE Client deployment. Update WE users display names from AD user settings – allows to reflect AD display names in users’ friendly names. WE Client is using local user names, not AD names. Sometimes they can be different and this feature helps to make it common with AD. Also, this option is useful on frequent AD user’s display name change. AD synchronization (also called export) will run in three cases: on Work Examiner DB Updater Service (weServerDBUpdater.exe) start on Active Directory Integration settings change periodically every XX hours depending on the “Run synchronization every” value Filtering Website Filters The Website Filters feature allow to control user access to the Internet, restrict and\or notify user and administrators on any access attempt. This feature is a part of Web & App Filters section. Website Filters are determined by setting up Website Filter Rules. Website Filter Rules provide a lot of useful features: Prohibit employees from accessing certain Web sites; Allow employees access only to certain Web sites; Prohibit access to the Internet during business hours; Prohibit access to the Internet of certain employees; Provide access to Web sites for XX hours per day; Receive e-mail notification of access to the Website; Show a timer like “XX minutes left on facebook.com” for the end-user. Click “New Filter..” – “New Websites Filter” to create a new rule: Website Filter Rule allows to set a lot of options: schedule, actions, apply delay, users, computers. Website Filtering Rule parameters are as follows: General Website Filter Rule name and description Enable or disable Website Filter Rule Apply the rule with a delay – e.g. you may give an hour per day for employees to access the facebook.com. This “apply timer” function counts actions usage, not just a time spent from you clicked OK. Also, if the icon is enabled for WE Client (see Client Options - Common) a web timer popup can be showed: If the “Show warning message to user about the time left before applying the rule” is on, WE Client will periodically show a popup message. But if the web timer is on, message will not be showed. Message text can be customized, %URL% and %TIMELEFT% constants can be used to show the restricted website’s address and the time (in HR.MIN.SEC format) left for it. You may use all constants or some of them as you want in the text. Action Determine if website access blocking is enabled and blocking behavior: Access Denied message in the web browser, redirect to another URL, customized html reply; Determine if a popup message is showed to user when he is accessing a restricted site. User message text can be customized. %URL% constant will be converted to the accessed website address. You may use the constant or not as you want in the text; Determine if an alert e-mail message must be sent when user is accessing restricted site. Message text can be customized using some constants: o %TIME% - site access time o %USER% - name of a user who is accessing the site o %COMPUTER% - computer name from which the site is accessed o %WEBSITE% - website URL (e.g. fabecook.com) o %URL% - web page URL (e.g. facebook.com/profile?id=12345) o %ACTION% - action description, whether the site was blocked or not, depends on the Block option You may use all constants or some of them as you want in the text. Alert e-mail message will be sent with existing SMTP Settings. Websites Select websites to apply the rule for. Websites can be defined through Categories, Url Sets, Keyword Sets and Domain Sets only. You cannot add a Website directly, to quickly create an URL Set – use the Quick Add button. Select websites (through Categories, Url Sets, Keyword Sets and Domain Sets only) to exclude from the filtering rule. See more information on sets usage in the Manage Sets section. Schedule Hours selection (and also Day&Night hours) to apply the website filtering rule for Weekdays selection to apply the website filtering rule for Note: Client Options – Schedule feature has a higher priority than rules’ Schedule. If in the defined by the rule time WE Client is not working due to the client options – the rule will not work too. Users Selection of users for which the Website Filter Rule is applied. Selection of users for which the Website Filter Rule is not applied. Users can be selected directly or from User Groups and Organization Units. Click on the Add button and a special search window will appear. Computers Selection of computers for which the Website Filter Rule is applied. Selection of computers for which the Website Filter Rule is not applied. Computers can be selected directly or from Organization Units (special system All Computers group can be also used). Click on the Add button and a special search window will appear. Finally, all website filtering rules are applied for every user as a big single rule. Important: When using the Website Filters pay attention to the corresponding section (“Web Filter”) in Client Options – Web Filter. If the App Filter option is disabled there, all rules will not work. Also, you may change the list of filtered processes, enable HTTPS sites filtering and block TCP ports from Client Options. Application Filters The Application Filters feature allows you to block execution of applications by users and\or notify about these events. This feature is a part of Web & App Filters section. Application Filters are determined by setting up Application Filter Rules. Application Filter Rules provide a lot of useful features: Prohibit the launch of certain applications (such as games and instant messaging); Allow to run only certain applications (e.g. only MS Office package applications); Prohibit the launch of applications in certain time (e.g. during business hours); Receive e-mail notification of the application execution; Show a message for user who is running a restricted program. Click “New Filter..” – “New Applications Filter” to create a new rule: Application Filter Rule allows to set a lot of options: schedule, actions, apply delay, users, computers. Application Filtering Rule parameters are as follows: General Action Application Filter Rule name and description Enable or disable Application Filter Rule Apply the rule with a delay – e.g. you may give an hour per day for employees to access games and IMs. Determine if programs launch blocking is enabled or not; Determine if a popup message is showed to user when he is running a restricted program. User message text can be customized; Determine if an alert e-mail message must be sent when user is running a restricted program. Alert e-mail message will be sent with existing SMTP Settings. Applications Select programs to apply the rule for. Applications can be defined through Categories and Program Sets only. Select programs (through Categories and Program Sets only) to exclude from the filtering rule. Schedule Hours selection (and also Day&Night hours) to apply the application filtering rule for Weekdays selection to apply the application filtering rule for Note: Client Options – Schedule feature has a higher priority than rules’ Schedule. If in the defined by the rule time WE Client is not working due to the client options – the rule will not work too. Users Selection of users for which the Application Filter Rule is applied. Selection of users for which the Application Filter Rule is not applied. Users can be selected directly or from User Groups and Organization Units. Click on the Add button and a special search window will appear. Computers Selection of computers for which the Application Filter Rule is applied. Selection of computers for which the Application Filter Rule is not applied. Computers can be selected directly or from Organization Units (special system All Computers group can be also used). Click on the Add button and a special search window will appear. Finally, all application filtering rules are applied for every user as a big single rule. Important: When using the Application Filters pay attention to the corresponding section (“App Filter Enabled”) in Client Options – App Filter. If the App Filter option is disabled there, all rules will not work. Manage Sets Sets are used in Web & App Filters to determine the objects list to apply (or do not apply) the rule to. Url Set A Url Set allows to define many web pages based on their URL masks. This feature is very useful in the Website Filters. A URL set can consist of an unlimited number of elements. When defining these elements, you can use actual URL's or URL masks. Based on the keywords you specify, the program will analyze web page addresses and define if it matches to the set. For instance, if you use http://*sitename.com* as a mask, the set will include all the pages of sitename.com. If you use http://sitename.com as a mask, the set will only include http://sitename.com. Pages http://www.sitename.com/page1.html or http://www.sitename.com will not be added. When creating or editing a URL set, you can use the Search button to search websites among activities. When an activity is selected in the search dialog, the program adds all the pages of the selected site to a URL set (except for subdomains). Keyword Set A Keyword Set allows to define many web pages based on their HTML content. This feature is very useful in the Website Filters. A Keyword set can consist of an unlimited number of elements. When defining these elements, you must use just words and phrases. Masks are not supported here because, anyway, a word or phrase will be searched as a part of the whole page HTML code. As a result of this search system defines whether a website filtering rule is applicable or not. Domain Set A Domain Set consists of a great number of sites grouped by one common topic. This feature is very useful in the Website Filters. Domain Set can include thousands of sites. How it works in web filtering: on the client PC web filtering algorithm is searching for the requested web page entries in rule’s domain sets to define if it matches to the domain set or not. All Domain Sets together form the Website Content Database. Website content database includes 2+ millions of domains categorized by 80+ groups. It is updated on the workexaminer.com every ~10 days and automatically downloaded if a new version is released. See Database Settings for details. Also, the Website content database can be loaded to WE manually from the webcat.zip file, see more details on it in the WE Server Manager – Categories section. If you have no Support & Updates subscription, or it is expired –website content database will stop to auto-update. You may check how many days of the Support & Updates subscription are available in the WE Serer Manager – License section. Program Set A Program Set allows to define many executable applications based on their name or file name masks. This feature is very useful in the Application Filters. A Program set can consist of an unlimited number of elements. When defining these elements, you can use actual program name, file name or masks. Based on the keywords you specify, the program will analyze application’s product name (from version info) and the file name (short part of the path, e.g. calc.exe) and define if it matches to the set. When creating or editing a Program set, you can use the Search button to search applications among activities. When an activity is selected in the search dialog, the program adds it with * mask to a Program set (*appname*). Work Examiner Server Manager Attention: For proper work of WE Server Manager in Windows Vista and Windows7 with UAC enabled the application must run with Administrator rights. Status In Status tab Work Examiner services are displayed. User can run, stop and restart the selected service or all services of Work Examiner. Work Examiner Server is using 3 services: weServerMessenger.exe – Messenger service provides network communication between WE Console, WE Server and WE Clients weServerDBUpdater.exe – Database Updater service provides client logs processing and adding to the database, website content database control and some other items. FileZilla Server.exe – 3rd party FTP Server, is used by WE Server to receive client logs, send filtering policies and client options. If you had your instance of FileZilla Server installed before deploying WE Server – contact [email protected] for assistance. License License tab is responsible for displaying: the type of license (trial, extended trial, registered version), number of client licenses available, support and updates subscription status, HardwareID computer code (required to request the activation key) and the capability of system activation. To activate the system you must click "Activation ..." – "From File", select the file key.bin (usually sent via email after purchasing the product), and click "OK". After this Work Examiner services will automatically restart and the product will be activated. Note: If you’ve purchased the product, Work Examiner Team will send you an activation key only after receiving your HardwareID code (HID). HID is a unique id of your computer. If you change the server – send a new HID code to support and get new key. Database (Pro edition only) Database section configures the line to connect WE Professional server to MS SQL Server. The “Deploy…” button runs WE DB Wizard used to change install or update MS SQL Server database. See more info in the Install - WE Professional Edition section. Options When the option Run WE Server Manager on user logon is enabled the applications window will not be displayed, but WE Server Manager icon will appear in the notification area on the taskbar. Content DB Website Content Database is used by Websites Filters to block millions of pre-grouped popular domains. On this tab you can load the database of content-based categories from webcat.zip file to the Work Examiner system and see a summary of it. By default, website content database is downloaded automatically if you have active support and updates subscription. See Database Settings for website content database download details. If you’ve got the webcat.zip file from Work Examiner Team you can load it to WE by clicking the “Load…” – “From file…” items and selecting a file. Then the Website Content Database info will be updated and Domain Sets will be created. Contacts If you have any technical, sales and other questions about Work Examiner – feel free to send an email to [email protected] or to use a live chat on http://www.workexaminer.com .