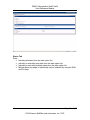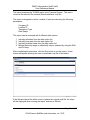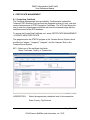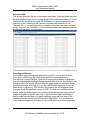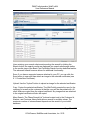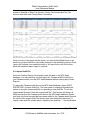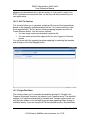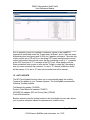
1
WEBTOOLKIT USER REFERENCE MANUAL DMA TaxAutomation WebToolKit User Reference Manual TABLE OF CONTENTS 1. 2. 3. 4. OVERVIEW...................................................................................................... 5 HOW TO USE THE USER MANUAL ............................................................... 5 LOG IN PAGE .................................................................................................. 6 WEBTOOLKIT HOME PAGE ........................................................................... 8 4.1. Change Password ...................................................................................... 9 5. REPORTS........................................................................................................ 9 5.1. Jurisdiction Code Report .......................................................................... 10 5.2. Product Taxability File Report .................................................................. 11 5.3. Reason Codes Report .............................................................................. 12 5.4. Audit Reports............................................................................................ 13 5.4.1. Transaction Report ............................................................................ 13 5.4.2. Detailed Report .................................................................................. 16 5.4.3. Filter Report ....................................................................................... 17 5.5. Tax Master File Report ............................................................................. 19 5.6. VERAZIP .................................................................................................. 20 5.6.1. Zip Code Directory Report ................................................................. 20 5.6.2. Zip Code Range Directory Report ...................................................... 21 5.6.3. County Directory Report .................................................................... 21 5.7. STEP (Sales Tax Exemption Processing) ................................................ 22 5.7.1. Certificate Report ............................................................................... 22 5.7.2. Expiration Report ............................................................................... 23 5.7.3. Reason Code Report ......................................................................... 24 5.7.4. Reason Code Rate Report................................................................. 25 6. CERTIFICATE MANAGEMENT ..................................................................... 26 6.1. Create New Certificate ............................................................................. 26 6.2. Find a Certificate ...................................................................................... 35 6.3. Advanced Find Certificate ........................................................................ 38 6.4. Display or Edit an existing certificate ........................................................ 40 6.5. Certificate Revision History ...................................................................... 41 7. TAX CALCULATOR ....................................................................................... 42 8. NEXPRO ........................................................................................................ 45 8.1. Entering Company Information ................................................................. 45 8.2. Activate NEXPRO Changes ..................................................................... 49 9. AUDIT REPORTING ...................................................................................... 50 9.1. Report Writer ............................................................................................ 50 9.2. Import Audit File ....................................................................................... 57 9.3. Clean Audit Table ..................................................................................... 58 9.4. Update Audit Table ................................................................................... 59 10. TOOLS ......................................................................................................... 60 10.1. Custom Product Code ............................................................................ 60 10.1.1. User Defined product Codes............................................................ 60 Page 2 of 122 © DuCharme, McMillen and Associates, Inc. 2013 DMA TaxAutomation WebToolKit User Reference Manual 10.1.2. Export Product Codes ...................................................................... 66 10.1.3. Import Product Codes ...................................................................... 67 10.2. Product Code Conversion ...................................................................... 68 10.2.1. Create Product Code Conversion .................................................... 68 10.2.2. Search, Update, And Delete Product Code Conversions................. 71 10.2.3. View Product Code Conversions ..................................................... 73 10.2.4. Activate Product Code Conversions ................................................ 74 10.3. Administration Codes ............................................................................. 74 10.3.1. Maintain Administration Codes ........................................................ 74 10.3.2. Export Administration Codes ........................................................... 79 10.4. Load Files ............................................................................................... 79 10.4.1. Product Taxability File...................................................................... 80 10.4.2. Tax Master File ................................................................................ 82 10.4.3. VERAZIP ......................................................................................... 83 10.4.4 STEP .................................................................................................... 85 10.4.4.1 EXCEPTION RULE FILE ............................................................... 85 10.5. Update Files ........................................................................................... 85 10.5.1. Product Taxability File...................................................................... 85 10.5.2. Tax Master File ................................................................................ 86 10.5.3. Zip Master File ................................................................................. 86 10.6. STEP Tools ............................................................................................ 87 10.6.1. Import STEP Database .................................................................... 87 10.6.2. Clear STEP Database...................................................................... 87 10.6.3. Load Transaction File ...................................................................... 87 10.6.4. Load Reason File ............................................................................. 88 10.6.5. Load STEP File ................................................................................ 89 10.6.6. Unload STEP File ............................................................................ 90 10.6.7. XLS To Steptran .............................................................................. 91 10.7. Freight File Editor ................................................................................... 91 10.8. Verify Audit File ................................................................................... 93 11. ADMINISTRATION ...................................................................................... 93 11.1. User Account Maintenance .................................................................... 93 11.1.1. Adding a New User .......................................................................... 93 11.1.2. Editing an Existing User ................................................................... 95 11.2. Taxware System Maintenance ............................................................... 96 11.2.1. Adding a New Taxware Instance to the WTK .................................. 96 11.2.3. Editing an Existing Taxware Instance on the Web Toolkit ............... 96 11.3. User Roles.............................................................................................. 99 11.4. Edit Toolkit............................................................................................ 100 11.5. External Customer Link ........................................................................ 103 11.6. Audit Reporting Configuration .............................................................. 106 11.6.1. Company Information..................................................................... 106 11.6.2. Upload Custom Query ................................................................... 107 11.6.3. Column Mapping ............................................................................ 108 Page 3 of 122 © DuCharme, McMillen and Associates, Inc. 2013 DMA TaxAutomation WebToolKit User Reference Manual 11.7. Certificate Validation ............................................................................ 109 11.8. Tax Calculator Defaults ........................................................................ 110 11.9. Background Process Status ................................................................. 111 11.10. XLS To Steptran Template Config...................................................... 111 12. AUTO UPDATE ......................................................................................... 113 12.1. Auto Update Status .............................................................................. 115 12.2. Auto Update Configuration ................................................................... 115 Page 4 of 122 © DuCharme, McMillen and Associates, Inc. 2013 DMA TaxAutomation WebToolKit User Reference Manual 1. OVERVIEW The TaxAutomation WebToolkit (hereinafter, “WTK”) was created to web enable the following Taxware products: Sales/Use Tax System, VERAZIP, STEP, NEXPRO and optionally, the Taxware Worldtax module. Additionally, TaxAutomation added several tools/functions which are unique to the WebToolkit, which enhance the overall functionality of the Taxware applications. This document is designed to give the end user an operational guide for using the tools and reports provided by the TaxAutomation WTK. 2. HOW TO USE THE USER MANUAL All the standard tools and reports that are associated with the standard Taxware product will reference the Help PDF Files supplied with the installation of Taxware. For all of the enhancements provided by the WTK, a detailed description of both the function and the operation of each item is provided herein. Below is the list of tools and reports. Each section has an explanation of the function, a screenshot, and any directions necessary to operate the individual tool or report. The individual items and their definitions are listed below as they appear in the menu of the WTK. Page 5 of 122 © DuCharme, McMillen and Associates, Inc. 2013 DMA TaxAutomation WebToolKit User Reference Manual 3. LOG IN PAGE To log in to the WTK, open Internet Explorer (version 6.0 or higher) (Note: make sure that the MS JVM for the Browser is at least Microsoft (R) VM for Java, 5.0 Release 5.0.0.3802) The Administrator for the WTK within the organization must supply a login username and password. Therefore, in order to log in to the TaxAutomation WTK, please enter: The USERNAME; The PASSWORD; and Select the Taxware Instance that the user is authorized to log into Then click on LOG IN. If the user logs in incorrectly, a message will tell the user that there was problem logging into the system. Once logged in, the system will automatically disconnect a user after a certain time of inactivity. The time limit for automatic disconnect upon inactivity can be set by the system administrator. If you try to logon to a Taxware instance that is currently not reachable by the WTK due to technical problems, the system will display a popup message indicating this fact. If the user chooses to continue after this message, all WTK functionality requiring an active connection to the Taxware instance will not be operational. We recommend that you immediately contact your system administrator if the connection to a Taxware instance is not available. To log out of the system, click the LOG OUT link on the menu on the left hand side of the screen. This can be done any time after the user has logged in. Page 6 of 122 © DuCharme, McMillen and Associates, Inc. 2013 DMA TaxAutomation WebToolKit User Reference Manual Page 7 of 122 © DuCharme, McMillen and Associates, Inc. 2013 DMA TaxAutomation WebToolKit User Reference Manual 4. WEBTOOLKIT HOME PAGE On the left hand side of the home page the WTK main menu is accessible: - xxxx System + REPORTS + CERTIFICATE MANAGEMENT ■ TAX CALCULATOR + NEXPRO + AUDIT REPORTING + TOOLS + ADMINISTRATION + AUTO UPDATE XXXX indicates the Taxware instance that you are logged on to. You will also see the current Taxware instance in the top right corner of each one of the subsequent WTK screens. Clicking on the + will expand the choices available. Clicking on the – will collapse the choices that you see for this item. (See image below) You will know you are at the lowest level of choices when you see the ■ instead of the + or -. You can return to the main menu page at any time, by selecting the menu button on any of the subsequent WTK pages. To expand all menu options click the Expand All button. To collapse the menu, click the Collapse All button. To logoff from the WTK, click the Logout button or close your browser window. Page 8 of 122 © DuCharme, McMillen and Associates, Inc. 2013 DMA TaxAutomation WebToolKit User Reference Manual 4.1. Change Password To Change your password, click the Change Password button. Specify a new password and confirm your new password. Click the Save button to save your new password. Note: If you forgot your password, please ask your WTK administrator to reset your password in the Administration->Users section as described later in this document. 5. REPORTS To access REPORTS, click on + to expand your list of choices. The following types of reports will appear. The Tax Audit, VERAZIP and STEP reporting options will initially appear as a +. Click this + to expand the choices to include those listed below. 5.1 5.2 5.3 5.4 Jurisdiction Code Product Taxability File Reason Codes Tax Audit 5.4.1. Transaction Report 5.4.2. Detailed Report 5.4.3. Filter Report Page 9 of 122 © DuCharme, McMillen and Associates, Inc. 2013 DMA TaxAutomation WebToolKit User Reference Manual 5.5 Tax Master File 5.6 VERAZIP 5.6.1. Zip Code Directory 5.6.2. Zip Code Range 5.6.3. County Directory 5.7 STEP 5.7.1. Certificate Report 5.7.2. Expiration Report 5.7.3. Reason Code Report 5.7.4. Reason Code Rate Report Some of the reports will provide a selection screen that allows you to limit the data that is processed for each report. For other reports, no selection screen exists and selecting the menu option will immediately run the corresponding report. The output of each report will be displayed in a separate browser window. It is possible to keep the report results window open and run additional reports, which allows you to have multiple report results windows open at the same time. You can save a report to your local computer by using the SAVE AS function in FILE menu of your browser. Each report can be printed using the PRINT function in the FILE menu of your browser. The report output can be searched for keywords by using the FIND function in the EDIT menu of your browser. 5.1. Jurisdiction Code Report To access the Jurisdiction Code Report, click on “REPORTS JURISDICTION CODE REPORT. This report executes the TAX911 report in the Taxware System and does not require any user interaction. This report returns all jurisdiction codes and an explanation of the logic behind each one. For example, the report will explain when a tax determined by the Taxware system will be treated as a sales tax versus a use tax, based on the various jurisdiction codes that are passed to the system (i.e., ship-to, ship-from, point-of-order origin, and point-of-order acceptance). The list is in alphabetical order by state and is for informational use only. For more information regarding the contents of this standard Taxware Report, please refer to the PDF document: Taxware Sales/Use Tax System User Guide, Chapter 5. Page 10 of 122 © DuCharme, McMillen and Associates, Inc. 2013 DMA TaxAutomation WebToolKit User Reference Manual 5.2. Product Taxability File Report This report executes the TAX008 report in the Taxware System. To access the Product Taxability File Report, select REPORTS PRODUCT TAXABILITY FILE. The report can be executed in 4 different ways: 1. 2. 3. 4. All Product Codes: Select the “All Product/State Codes” option. As the name suggests, this will return a listing of all product codes and their corresponding taxability by state (WARNING: This report is extremely large, and care should be taken before printing this report, which will likely run several thousand pages). Range of Product Codes: Select the “Product Code Range Option.” Select the lower limit of the desired product code range by placing the cursor on a product code in the product code listing, and press the shift key. While continuing to hold the shift key, select the upper limit of the desired product code range by placing the cursor on a subsequent product code in the product code listing. Multiple ranges can be selected. Individual Product Codes: Select individual product codes by placing the cursor on the desired product code. Ranges and Individual Product codes may be selected. Page 11 of 122 © DuCharme, McMillen and Associates, Inc. 2013 DMA TaxAutomation WebToolKit User Reference Manual It is further possible to restrict the output by choosing to include or exclude one or more state codes. This report can be executed using 3 different STATE options: 1. Including all states from the “Available States” list; 2. Including or excluding one state from the “Available States” list; and 3. Including or excluding multiple states from the “Available States” list. To do this, place the cursor on a desired state in the “Available States” listing on the States tab. To select multiple states the Shift key can be used to select ranges and the Ctrl key can be used to select multiple individual states similar to the method used to select product codes that is detailed above. To see the entire description of a product code, select the Entire/Clipped Descriptions button. This will toggle between long and shortened product code descriptions. Use the horizontal scroll bar in the product code description window. Instead of selecting product codes in the product code description window, it is also possible to enter a product code number directly in the Quick Selection input field. Select the Help button next to the Quick Selection input field to view additional option on how to use the Quick Selection input field. After completing the selections, click on “Run” to run the report. For more information regarding the contents of this standard Taxware Report, please refer to the PDF document: Taxware Sales/Use Tax System User Guide, Chapter 5. 5.3. Reason Codes Report To access the Reason Codes Report, select REPORTS REASON CODES. This report executes the TAX931 report in the Taxware System. This report does not offer any user interaction and provides a listing of the standard reason codes available in the Taxware system. For more information on the results of this standard Taxware Report, please refer to the PDF document: Sales/Use Tax System User Guide, Chapter 5. Page 12 of 122 © DuCharme, McMillen and Associates, Inc. 2013 DMA TaxAutomation WebToolKit User Reference Manual 5.4. Audit Reports 5.4.1. Transaction Report To access the Transaction Report, select REPORTS TAX AUDIT TRANSACTION. This page executes the TAX030 report in the Taxware System. Run the Tax Audit Report by selecting the following parameters: General Tab Date Type: • Invoice • Transaction • All • Transaction with invoice prior to “to date” • Fiscal • Fiscal and transaction dates (The date type selected here applies to the Date Range entered below) Date Range Tax Type: • Sales • Consumer Use • Service • Use • Rental Page 13 of 122 © DuCharme, McMillen and Associates, Inc. 2013 DMA TaxAutomation WebToolKit User Reference Manual States Tab State: • Including all states from the state option list; • Including or excluding one state from the state option list; • Including or excluding multiple states from the state option list; • Multiple states by range or individually may be selected by using the Shift and Ctrl keys. Page 14 of 122 © DuCharme, McMillen and Associates, Inc. 2013 DMA TaxAutomation WebToolKit User Reference Manual Options Tab Detail Level: • Detail • Invoice Summary • Extra Detail • City Summary Summary: • No summary type • Customer • Customer/Location • Location Other Options: • Division summary • Include Company ID • Compressed Print • Round Amounts Page 15 of 122 © DuCharme, McMillen and Associates, Inc. 2013 DMA TaxAutomation WebToolKit User Reference Manual After completing the selections, click the Run button to run the report. For more information on the results of this standard Taxware Report, please refer to PDF document: 5.4.2. Detailed Report To access the Detailed Report, select REPORTS TAX AUDIT DETAILED. This report executes the TAX032 report in the Taxware System. This report provides more detailed information on audit file transactions, such as customer details, product code and exemption details. This report is designed to return Transaction Details based on a variety of parameters, including: Transaction Type Date Range of Transactions Tax Type Customer ID Invoice ID User Defined Product Code Location Reason Code Rate Error Page 16 of 122 © DuCharme, McMillen and Associates, Inc. 2013 DMA TaxAutomation WebToolKit User Reference Manual Tax Product Code This report can be executed using 4 different STATE options: 1. 2. 3. 4. Including all states from the state option list; Including or excluding one state from the state option list; Including or excluding multiple states from the state option list. Multiple states by range or individually may be selected by using the Shift and Ctrl keys. After completing the selections, click the Run button to run the report. Since the General and States tabs are identical to the Transaction report, only the Options tab is shown here. For more information on the results of this standard Taxware Report, please refer to PDF document: Taxware Sales/Use Tax System User Guide, Chapter 5. 5.4.3. Filter Report To access the Filter Report, select REPORTS TAX AUDIT FILTER Page 17 of 122 © DuCharme, McMillen and Associates, Inc. 2013 DMA TaxAutomation WebToolKit User Reference Manual This report executes the TAX999 report in the Taxware System. This report returns a filtered audit file (staraud) downloadable as a zip file. This report is designed to return a subset of audit records using the following parameters: Company ID Location ID Transaction Type Date Range This report can be executed with 4 different state options: 1. 2. 3. 4. Including all states from the state option list; Including one state from the state option list; Including multiple states from the state option list. Multiple states by range or individually may be selected by using the Shift and Ctrl keys. After completing the selections, click the Run button to run the report. A new screen will appear allowing the user to download a zip file of the results. If the filtered staraud file will be used to replace the original audit file, the steps will be displayed when running the report, and are as follows: Page 18 of 122 © DuCharme, McMillen and Associates, Inc. 2013 DMA TaxAutomation WebToolKit User Reference Manual 1. Import the current audit file 2. Backup and replace the current audit file with the generated staraud file 3. Reset the audit counter (button will be on the popup screen) For more information on the results of this standard Taxware Report, please refer to PDF document: Taxware Sales/Use Tax System User Guide, Chapter 5. 5.5. Tax Master File Report To access the Tax Master File Report, select REPORTS TAX MASTER FILE. This report executes the TAX022 report in the Taxware System. This report returns sales and use tax rates for selected jurisdictions from the Tax Master File. The Options tab for this report is shown below. This report can be executed using 4 STATE options: 1. Including all states from the state option list; 2. Including or excluding one state from the state option list; 3. Including or excluding multiple states from the state option list. Page 19 of 122 © DuCharme, McMillen and Associates, Inc. 2013 DMA TaxAutomation WebToolKit User Reference Manual 4. Multiple states can be selected as a range using the Shift key and/or individual States can be select with the Ctrl key. Other selection parameters include: Print Sequence ZIP Codes within county sequence ZIP Code sequence - counties first and then cities/towns Alphabetical sequence Duplicate ZIP Codes All Records Duplicate ZIP codes for different jurisdictions within the same zip code For more information on the results of this standard Taxware Report, please refer to PDF document: Taxware Sales/Use Tax System User Guide, Chapter 5. 5.6. VERAZIP Reports on the Taxware VERAZIP module 5.6.1. Zip Code Directory Report To access the ZIP Code Directory Report, select REPORTS VERAZIP ZIP CODE DIRECTORY. Page 20 of 122 © DuCharme, McMillen and Associates, Inc. 2013 DMA TaxAutomation WebToolKit User Reference Manual This report executes the ZIP050 report in the Taxware System, which returns a listing of all zip codes. Other parameter selections include: States Report sequence: City/Town name or ZIP code sequence Print options: print part of city information or suppress part of city information After completing the selections, click “Run” to generate the report. For more information on the results that this standard Taxware Report provides, please refer to PDF document: Taxware VERAZIP System User Guide, Chapter 6. 5.6.2. Zip Code Range Directory Report To access the ZIP Code Range Directory Report, select REPORTS VERAZIP ZIP RANGE DIRECTORY. This report executes the ZIP055 report in the Taxware System, which returns all ZIP codes ranges. This report can be executed using 4 STATE options: 1. 2. 3. 4. Including excluding all states from the state option list; Including or excluding one state from the state option list; Including or excluding multiple states from the state option list. Multiple states can be selected as a range using the Shift key and/or individual States can be select with the Cntl key. All other select options are identical with the ZIP050 (Zip Code Directory Report) After completing the selections, click the Run button to run the report. For more information on the results of this standard Taxware Report, please refer to PDF document: Taxware VERAZIP System User Guide, Chapter 6. 5.6.3. County Directory Report To access the County Directory Report, select REPORTS VERAZIP COUNTY DIRECTORY. This report executes the ZIP070 report in the Taxware System. There is no user interaction for this report, simply click “COUNTY DIRECTORY” from the VERAZIP section to run this report, which lists county names and county codes Page 21 of 122 © DuCharme, McMillen and Associates, Inc. 2013 DMA TaxAutomation WebToolKit User Reference Manual (internally used codes) for all States. The list is organized alphabetically by state and county name. For more information on the results of this standard Taxware Report, please refer to PDF document: Taxware VERAZIP System User Guide, Chapter 6. 5.7. STEP (Sales Tax Exemption Processing) STEP module reports 5.7.1. Certificate Report To access the Certificate Report, select REPORTS STEP CERTIFICATE REPORT. This report executes the STEP40 report in the Taxware System. This report lists sales tax exemption certificate information and can be limited by the following selection criteria: • Report type: detail or summary; • Report Sequence: by clicking on the corresponding report type; • Certificate Selection: by clicking on the corresponding certificate type; • Selected Reason: by clicking on the corresponding reason code; • Company ID. Page 22 of 122 © DuCharme, McMillen and Associates, Inc. 2013 DMA TaxAutomation WebToolKit User Reference Manual This report can be executed using 4 STATE options: 1. 2. 3. 4. Including all states from the state option list; Including or excluding one state from the state option list; Including or excluding multiple states from the state option list. Multiple states can be selected as a range using the Shift key and/or individual States can be select with the Ctrl key. After completing the selections, click the Run button to run the report. For more information on the results of this standard Taxware Report, please refer to PDF document: Taxware Sales Tax Exemption Processing System User Guide, Chapter 5. 5.7.2. Expiration Report To access the Expiration Report, select REPORTS STEP EXPIRATION REPORT. This report executes the STEP44 report in the Taxware System. This report lists STEP Certificates that will expire within a given date range or expire during a specific time period over the next number of months. This report accepts the following selection parameters: Key Type: purchases, Sales, Facility, Construction, All Key Codes; Report Sequence: Exp. Date/State, Exp. Date/Customer ID Page 23 of 122 © DuCharme, McMillen and Associates, Inc. 2013 DMA TaxAutomation WebToolKit User Reference Manual This report can be executed using 4 STATE options: 1. Including all states from the state option list; 2. Including or excluding one state from the state option list; 3. Including or excluding multiple states from the state option list. 4. Multiple states can be selected as a range using the Shift key and/or individual States can be select with the Ctrl key. After completing the selections, click the Run button to run the report. For more information on the results of this standard Taxware Report, please refer to PDF document: Taxware Sales Tax Exemption Processing System User Guide, Chapter 5 5.7.3. Reason Code Report To access the Reason Code Report, select REPORTS STEP REASON CODE REPORT. This report executes the STEP51 report in the Taxware System. This report does not require any interaction by the user. For more information on the results of this standard Taxware Report, please refer to PDF document: Taxware Sales Tax Exemption Processing System User Guide, Chapter 5. Page 24 of 122 © DuCharme, McMillen and Associates, Inc. 2013 DMA TaxAutomation WebToolKit User Reference Manual 5.7.4. Reason Code Rate Report To access the Reason Code Rate Report, select REPORTS STEP REASON CODE RATE REPORT. This report executes the STEP53 report in the Taxware System. This report returns a list of all reason code rates, and does not require any interaction by the user. For more information on the results of this standard Taxware Report, please refer to PDF document: Taxware Sales Tax Exemption Processing System User Guide, Chapter 5. 5.7.5 EXCEPTION RULE REPORT To access the Exception Rule Report, select Main Menu Reports STEP EXCEPTION RULE REPORT. This report can be executed using 4 STATE options: 1. Including all states from the state option list; 2. Including or excluding one state from the state option list; 3. Including or excluding multiple states from the state option list. 4. Multiple states can be selected as a range using the Shift key and/or individual States can be select with the Ctrl key. This report will execute SUTREPORT in the Taxware System. Please note that this report will not be available for instances whose Taxware version is prior to 3.6. For more information on the results of this standard Taxware Report, please refer to PDF document: Taxware Sales Tax Exemption Processing System User Guide, Chapter 6. Page 25 of 122 © DuCharme, McMillen and Associates, Inc. 2013 DMA TaxAutomation WebToolKit User Reference Manual 6. CERTIFICATE MANAGEMENT 6.1. Create New Certificate The Certificate Management tools provided by TaxAutomation replace the Taxware STEP Windows Front-end and are designed to allow for easy, real-time creation/maintenance of STEP Exemption Certificates. The WTK also allows the user to scan the original paper certificate and store the scanned image with the certificate record in the WTK database To access the Create New Certificate tool, select CERTIFICATE MANAGEMENT CREATE NEW CERTIFICATE. This page executes the STEP20 program in the Taxware Server System, which modifies the “steptec,” “stepprod,” “steprate,” and the “steptran” files on the Taxware Server System. KEY - Select one of the certificate key fields: Sales, Purchases, Facility, or Construction JURISDICTION - Select the appropriate jurisdiction level for the exemption: State, County, City/Province Page 26 of 122 © DuCharme, McMillen and Associates, Inc. 2013 DMA TaxAutomation WebToolKit User Reference Manual Selecting State jurisdiction when dealing with a Canadian certificate will exempt at the GST level and selecting City/Province jurisdiction will exempt at the PST level. In the Key Information section, the following are required: COMPANY ID - Enter the Company ID for which the STEP Certificate is being created; CUSTOMER ID - Enter the Customer ID with which the STEP Certificate will be associated; For WTK systems that are connected to a SAP system, the user can retrieve Customer address information from SAP by clicking the “Get Customer Info” button at the right of the customer ID. This functionality requires that a corresponding SAP destination is setup. Please see the ‘SAP Config’ section later in this document. Clicking the “Get customer Info” button will only copy the address information into the corresponding STEP fields of the certificate. After the information has been retrieved, the user can manually overwrite this information before saving the certificate in the WTK. Alternatively, the user can enter the Customer ID and leave the address related fields in the Tax Certificate Details section blank. The WebToolkit will attempt to retrieve the address information from SAP when saving the certificate if all address related fields are left blank. When creating a certificate, it is important that the Customer ID field is populated with the exact Customer ID as it will be sent by your accounting system during a tax calculation call to Taxware. For example if your Customer ID is 1234, but your accounting package stores the Customer ID as 0000001234, you will need to create the certificate with Customer ID 0000001234, since otherwise Taxware will not find the certificate during a tax calculation call. As an added feature for SAP users, the WTK will automatically pad the Customer ID number with the correct number of leading zeros. In this case, you could enter 1234 in the Customer ID field and the WTK would automatically convert this to 0000001234, upon saving the certificate. STATE CODE - Select the State with which the STEP Certificate will be associated. The user can select multiple states by holding the CTRL key in the state list. The user can also select ALL in the state list. When selecting more than one state, the WTK will automatically create the exemption certificate for all states that were selected. TAX CERTIFICATE NUMBER - Enter the number printed on the Tax Exemption Certificate. If nothing is entered, the WTK will automatically default the value ‘N/A’ into the certificate number field upon saving the certificate. It is also Page 27 of 122 © DuCharme, McMillen and Associates, Inc. 2013 DMA TaxAutomation WebToolKit User Reference Manual possible to automatically validate the certificate number entered by the user. For more information on certificate validation, refer to 11.7. Certificate Validation. If the State Jurisdiction is selected, then a JOB NUMBER can be entered to define various job projects, or lease items. If the Job Number is entered, the user can then add Job Indicators for the Certificate by adding whether or not the Job Number is Non-taxable, Taxable, or a Special Rate at the State, County, City, Secondary County, and Secondary City levels. The second tab on the screen is available to set up this information. The Job Number Indicators tab is only accessible if a Job Number has been entered on the General tab. If the “Use Date Validation” checkbox is checked then a valid EFFECTIVE DATE and EXPIRATION DATE are required. The default setting for the “Use Date Validation” checkbox can be set by the system administrator. Read the Edit Toolkit section under the Administration menu later in this document on how to set the default value. The Effective Date is filled in with the current date by default. The rest of the information is optional. Please consult the Taxware STEP manual for the specific meaning of each field. It is also possible to automatically populate the expiration date based on the effective date, the selected state and reason code. For more information on certificate validation, refer to 11.7. Certificate Validation. The remaining fields that are not required are as follows: LOCATION - Specific jurisdiction within the above selected STATE CODE; OCCURRENCE NUMBER – This number is automatically assigned by the system and can not be changed. The first certificate for a specific Company/State/Customer-ID is always assigned an occurrence number of 00000. For subsequent certificates with the same key information the occurrence number will be incremented by one. During tax calculations only the certificate with the highest occurrence number will be taken into consideration. Depending on the state selected above, the WTK will return certain REASON CODE CATEGORIES and depending on which Reason Code Category is selected there will be a certain set of REASON CODE DESCRIPTIONS returned. Once selected, the REASON CODE will be entered on the form. If the reason code description is longer than the reason code description field, click on the ‘Whole Description’ button next to the reason code description field, to see the long description of the reason code. Specific reason codes in specific states have a reason code rate assigned. If you select a reason code in a state that has a reason code rate assigned, the system will allow the user to select the Reason Code Record View check box (e.g. reason code “BW” in reason code category Page 28 of 122 © DuCharme, McMillen and Associates, Inc. 2013 DMA TaxAutomation WebToolKit User Reference Manual “IN” for the state of North Carolina). If the user checks the Reason Code Record View check box, the following popup window will appear: If the user selects “Yes”, the system will apply the reason code rate of 1% and $80 maximum tax (North Carolina Manufacturing exemption) to the certificate. The system will indicate that a reason code rate is assigned to the certificate, by displaying the text ‘Reason Code Rate used’ on the General tab. RECEIVED DATE - Reflects the date that the Sales Tax Certificate was received; SIGNED BY - The name of the person who signed the exemption or resale certificate; TITLE - The title of the person who signed the certificate; PURCHASE DESCRIPTION - The description of the property being purchased, as written on the exemption certificate; PHYSICAL LOCATION - The place where the actual certificate is located; Page 29 of 122 © DuCharme, McMillen and Associates, Inc. 2013 DMA TaxAutomation WebToolKit User Reference Manual CERTIFICATE COMPLETE - Not used by Taxware, signifies whether or not the certificate is complete, but has no impact on the application of the certificate during tax calculations. CERTIFICATE ACTIVE - STEP only recognizes exemptions for certificates that are marked as active. Therefore, this signifies whether or not the certificate is active. DEFAULT TO STATE - Indicates whether the certificate defaults to state level processing. If this checkbox is selected, the certificate applies to all jurisdiction levels. If it is not checked, the certificate applies to the state level only. Note: This will exempt a Canadian customer from PST and GST level taxes. If the user is including or excluding specific product codes for the certificate then click the “Inc/Exc Products” tab at the top of the screen. On the resulting screen click either the “Include” or “Exclude” radio button, and then enter the specific product code and click the “Add to List” button. To remove a product code from the list, select the product code in the list and click “Remove from List”. The radio buttons “Include products/Exclude products” applies to all product codes in the list. To assign a special rate for the product codes entered in the list, click the “Add Special Rate” button and enter a custom tax rate at the appropriate taxation level. The example below shows a special rate of 2% state tax and 1.125% city tax, which will be applied to all product codes in the list. Alternatively, the user can enter a custom tax base percentage. I.e., the value 80% in the field base percentage would cause Taxware to tax only 80% of the tax base in a tax calculation for this certificate and the selected product codes. Page 30 of 122 © DuCharme, McMillen and Associates, Inc. 2013 DMA TaxAutomation WebToolKit User Reference Manual Alternatively, if you want to assign a special rate to a certificate, without including or excluding any product codes, you can select the Special Rates tab. Here, you can enter a special tax rate for each taxation level. To assign the special rate only to a specific product code, enter a product code and the special rate percentages. If you leave the Product code field empty, the special rate will be applicable to all product codes. The example below, shows a special tax rate of 3% state tax and 2% county tax, every time a tax calculation is performed using this certificate (regardless of the product code used). Page 31 of 122 © DuCharme, McMillen and Associates, Inc. 2013 DMA TaxAutomation WebToolKit User Reference Manual Once you have completed all data entry for the certificate, click the Save button. Upon clicking the save button, a confirmation popup will indicate that the certificate has been saved. After confirming the popup message, you will be returned to the certificate that you just entered. You can now for example select another state on the General tab and modify any other information on the certificate. His allows you to enter multiple certificates for the same customer, without having to re-type repeating information. If you want to enter a completely new certificate for a different customer, click the New button. This will reset all fields on the screen and allows you to enter a completely different certificate. Canadian Exemption Certificate To exempt a Canadian customer at the GST level, select state as the Jurisdiction Level in the CREATE NEW CERTIFICATE tool and Select Canada from the Sate Code list. Enabling the Default to State flag will exempt the customer at all levels while deselecting the flag will ensure that exmeption only occurs at the GST level. Page 32 of 122 © DuCharme, McMillen and Associates, Inc. 2013 DMA TaxAutomation WebToolKit User Reference Manual Exemption at the PST level can be achieved by selecting the City/Province Jurisdiction Level in the CREATE NEW CERTIFICATE tool. Be sure to select Canada for the State Code and also select the province from the drop down list near the Location text field. Page 33 of 122 © DuCharme, McMillen and Associates, Inc. 2013 DMA TaxAutomation WebToolKit User Reference Manual Advanced Tab This screen allows for the use of multi-state certificates. Each certificate can now be associated with one or more states. Simply fill in a certificate number for those states that you would like to create the certificate for. Please be aware that the selection on the “Advanced” tab overrides the state code selection on the “General” tab, i.e. no certificate will be created for the state code that is selected on the “General” tab. In addition to the certificate number, the expiration date can be defined individually for each state. Scanning certificates If you have a supported scanner attached to your PC, you can also click the Scan button after saving the certificate information as described above. This will open a popup window. Once the scanning popup window is displayed, lace the original paper certificate into the scanner and click the Scan button in the popup window. The system will then scan the paper certificate and then display the scanned image in the popup. If you are satisfied with the image, select the Save button in the popup. This will store the image in the WTK database and associate it with the certificate record in STEP. If you are not satisfied with the image, select the Scan Again button, which will discard the previously scanned image and replace it with the new scan. If you have multi-page certificates or want to scan front and back of a paper certificate, place the next page of the certificate into the scanner and click the Scan Next button. You can attach as many scanned images as necessary to one certificate record. After completing Page 34 of 122 © DuCharme, McMillen and Associates, Inc. 2013 DMA TaxAutomation WebToolKit User Reference Manual the last scan, select the Save button to save all scanned images into the WTK database. To view all scanned images that are associated with a certificate record, go to the Images tab on the certificate page. Here you will see thumb nail images of scanned certificates. Click on a thumb nail image to enlarge the image. To remove an image from the certificate record, select the checkbox underneath the thumb nail image and click the Delete Image button. To print a certificate image, select the checkbox underneath the thumb nail image and click the Print Image button. For a list of supported Scanner models please contact TaxAutomation. 6.2. Find a Certificate To locate a particular certificate, select CERTIFICATE MANAGEMENT FIND CERTIFICATE. Select the “Company ID” and/or enter the “Customer ID” and/or select a state before clicking on the “Search” button to find the certificate. This will return a list of the STEP certificates within the system that match the information that the user entered in the above fields. Note: the search that is executed via the Find Certificate function is performed using the indexed STEP files in the outdata directory on the Taxware server (compare to the Advanced Certificate Find function described later) Page 35 of 122 © DuCharme, McMillen and Associates, Inc. 2013 DMA TaxAutomation WebToolKit User Reference Manual The certificate find results page shows all certificates that match the selection criteria. If more than 1000 certificates match the search criteria, only the first 1000 are displayed on the results tab. Certificates that are deactivated are shown in italic font. The result list can be sorted by Customer ID (Key1), Customer Name, State or Province, by clicking on the corresponding column header. All certificates in the result list can be selected/deselected by clicking the Select/Unselect All button. To select/deselect individual certificates in the results list, check the checkbox to the left of a certificate. Once certificates are selected (checked) in the results list, the following functions are possible by clicking the corresponding button: Print Images: This will print all certificate images (scanned originals) that are associated with the selected certificates. Whether or not a scanned image is associated with a certificate is indicated by the image icon in the last column of the results list. From the results list, you can also click on the image icon, which will display the scanned image. Activate: This will activate all selected certificates (check the Certificate Active checkbox on the selected certificates). Deactivate: This will deactivate all selected certificates (uncheck the Certificate Active checkbox on the selected certificates). Page 36 of 122 © DuCharme, McMillen and Associates, Inc. 2013 DMA TaxAutomation WebToolKit User Reference Manual Delete: This will delete all selected certificates. Any images attached to the selected certificates will be deleted as well. Generate Flat File: This will produce a comma delimited flat file that can be downloaded to the users PC. The comma delimited file contains all fields of the selected certificates in the STEPTRAN file format. Upon download of this file to the users PC, the file can be opened in any MS office application for use in mailmerge (i.e. to send certificate expiration letters to customers). Upon clicking the Generate Flat File button a popup window will appear, that allows the user to save the automatically generated file on the local PC. If the search criteria matched more than 1000 certificates, the initially generated file contains the first 1000 certificates only. To generate a flat file containing all search results, click on the “All Results” button. Should the search return more results than Excel can handle in a single spreadsheet (~65000), the results can be separated into multiple files by checking the appropriate checkbox. Due to the potentially large file that is generated, the file is in a compressed format and can be opened using the WinZip application. Once the file has been uncompressed using WinZip, open the file in a text editor or MS office application of your choice. Page 37 of 122 © DuCharme, McMillen and Associates, Inc. 2013 DMA TaxAutomation WebToolKit User Reference Manual For the exact description of the record layout, please consult the Taxware STEP manual for the STEPTRAN file format. 6.3. Advanced Find Certificate The CERTIFICATE MANAGEMENT -> Advanced Find Certificate allows for additional search criteria and therefore allows a more dynamic search. As opposed to the Find Certificate function described earlier, the Advanced Find Certificate function is performed using the STEP records that are kept in the WTK database. The certificates in the WTK database are automatically kept in synch with the certificates in the indexed STEP files in the outdata directory on the Taxware server. If the WTK certificate database should become unsynchronized with the STEP files on the Taxware server (for example because you manually uploaded STEP certificate records outside of the WTK), you can re-synchronize the WTK certificate database by using the Import STEP Database function in the STEP Tools section described later in this document. In addition to the Company ID, Customer ID and State Code available thru the regular Find Certificate function, the Advanced Find Certificate function allows for searches by: • • • • • • • • • • • • User ID (WTK user ID that was used to create the certificate) Image (if set to “Yes”, the WebToolkit search displays only certificates that have an image attached) Active/Inactive Certificate Flag Certificate Number Reason Code Customer Name City Zip Received Date Effective Date Expiration Date Creation Date The search fields Customer Name and City allow for generic searches. I.e. a search for “Supply” will return certificates for “ABC Building Supply Inc.” as well as “Advanced Construction Supply Incorporated”. Depending on the database system (Oracle vs. SQL Server vs. Postgres SQL) that is connected to your WTK system, the searches may be case sensitive (i.e., “Supply” does not return the same hits as “supply” in an Oracle database system). Page 38 of 122 © DuCharme, McMillen and Associates, Inc. 2013 DMA TaxAutomation WebToolKit User Reference Manual Upon entering your search criteria and executing the search by clicking the Search button, the search results are displayed in a search results page similar to the results page of the Basic Find Certificate Search function described earlier. The advanced search however allows for additional functionality: Scan: If you have a supported scanner attached to your PC, you can click the Scan button to scan and then attach an image to the selected certificates (see 6.1. Create New Certificate). Upload: Use the “Upload” button to upload an image for the selected certificates. Copy: Copies the selected certificates. The WebToolkit prompts the user for the company id as well as the customer id that the copy will be associated with. All other fields are copied from the original certificate. Any images that are attached to the original certificate will also be copied. Mass Search: The "Mass Search List" buttons located next to the Customer Id, Number, and Customer Name fields allow a search for multiple values. The maximum number of values allowed depends on the vendor of your toolkit database. Page 39 of 122 © DuCharme, McMillen and Associates, Inc. 2013 DMA TaxAutomation WebToolKit User Reference Manual DMA recommendations are as follows: Microsoft SQL Server: 10,000 Oracle: 5,000 Postgres: 8,000 MySQL: 10,000 6.4. Display or Edit an existing certificate To edit or display an existing certificate, search for it using either the Basic Certificate Search or the Advanced Certificate Search. Click on the certificate in the results list to display its details. To edit the certificate information, simply make the desired changes and then commit them by clicking on “Save”. Some of the fields associated with a certificate cannot be modified (e.g. the certificate type, the customer number, the company id, the state code, etc.). These fields are considered the key fields of a certificate and are used to identify a particular record. The following functions are possible by clicking the corresponding button in the menu bar: Save: Saves the certificate record. Copy: Copies all the information of the currently selected certificate. The user can edit all fields before saving the new record. Please note that this does not copy any images that are associated with the original certificate. Delete: Deletes the currently selected certificate. Any images associated with the certificate will be deleted as well. Scan: If you have a supported scanner attached to your PC, you can click the Scan button to scan and then attach an image to the selected certificates (see 6.1. Create New Certificate). Delete Image: To delete an image, check the checkbox underneath the image and then click on the “Delete” button. Print Image: Prints the selected images (select an image by checking the checkbox underneath the image). Upload Image: Allows for upload on a certificate image. The Webtoolkit currently supports the following image formats: JPEG, BMP, GIF, TIFF and PNG. Additionally PDF files can be uploaded. Page 40 of 122 © DuCharme, McMillen and Associates, Inc. 2013 DMA TaxAutomation WebToolKit User Reference Manual 6.5. Certificate Revision History For audit purposes, the WTK keeps track of the user-id, customer-id, change date and type of change that was performed on any certificate. The CERTIFICATE Revision History function allows you to access this change history using any combination of the available fields. Example: If you would like to see all certificate creations, changes and deletes by a specific user id during a specific time frame, select the WTK user id from the User ID pulldown field, enter the date range in question and check the Add, Change and Delete checkboxes. Upon executing the search by clicking the Search button, the following report is displayed. The report shows for each certificate the user id, date and old/new field values for all certificate changes that meet the search criteria. The report can be printed by clicking the Print button. Page 41 of 122 © DuCharme, McMillen and Associates, Inc. 2013 DMA TaxAutomation WebToolKit User Reference Manual 7. TAX CALCULATOR To access the Tax Calculator Tool, select TAX CALCULATOR from the navigation menu. The Tax Calculator function allows the user to simulate tax calculations without the need to create a transaction in the user’s billing, accounting, or Taxware system for testing purposes. This tool can also allow the user to look up a tax rate or to test the user’s Taxware configuration after changes are made to the system. The Tax Calculator will take into account any jurisdiction and nexus and STEP certificate information. Note: Default values for most of the fields can be set in the ADMINITRATOR ---> TAX CALCULATOR DEFAULTS screen. Section 11.7 Page 42 of 122 © DuCharme, McMillen and Associates, Inc. 2013 DMA TaxAutomation WebToolKit User Reference Manual To use the tax calculator, enter as much information as you have available about the transaction. The following fields are required at a minimum to perform a calculation: Ship-From/Ship-To City, State, Zip code and Geo Code Tax Base Amount Calculation Date Company Code For a more accurate tax calculation, also enter the following values: Freight Amount (taxed by Taxware according to the settings in the Freight File. See Freight File Editor later in this document) Product Code Customer Number (to access STEP functionality). Please enter the Customer ID exactly as stored in the STEP system (i.e. with leading zeros). By default, the Tax Calculator sets the POO (Point-of-Order-Origin) and POA (Point-of-Order-Acceptance) locations to the Ship-From location information. This will return accurate tax calculation results for both Origin and Destination states. If the POO or POA location is not equal to the Ship-From location, go to the POO/POA tab and set the POO or POA location to your specific values. If you do not know the Geo Code for any of the Ship-To, Ship-From, POO or POA locations, you can enter only the City, State and Zip Code values and then Page 43 of 122 © DuCharme, McMillen and Associates, Inc. 2013 DMA TaxAutomation WebToolKit User Reference Manual click on the Find Geo Code button next to the Geo Code field. This will display a popup with the available Geo Codes for the specified location. In the popup, select the applicable Geo Code. This will copy the City, Zip Code and Geo Code information into the Tax Calculator screen. Alternatively, if you do not know the Zip Code or the City Name of the location, you can enter a combination of State and Zip Code or State and City Name and then click on the find Geo Code button. For the combination State/Zip, this will return a list of all Cities that fall into the specified State/Zip range. For the combination State/City name, this will return a list of all Zip Codes that fall into the specified State/City name range. In short, the more information you enter about the location, the fewer records are returned via the Find Geo Code function. Once you entered all required values, click the Calculate button, which displays the tax calculation results. (To reset all fields to their initial values, click the Clear All button). Page 44 of 122 © DuCharme, McMillen and Associates, Inc. 2013 DMA TaxAutomation WebToolKit User Reference Manual 8. NEXPRO 8.1. Entering Company Information Page 45 of 122 © DuCharme, McMillen and Associates, Inc. 2013 DMA TaxAutomation WebToolKit User Reference Manual The Taxware NEXPRO module is used to: Identify the jurisdictions in which your company has nexus; Select different levels of nexus that can be automatically applied to transactions when using Taxware’s Sales/Use Tax System; Set the Nexus jurisdiction at different business locations; Verify jurisdiction information for the business location and for the ShipFrom, Point-of-Order Origin and Point-of-Order-Acceptance locations using the VERAZIP System; To access NEXPRO, select NEXPRO NEXPRO. To view/maintain current company profiles click the appropriate Company ID from the table. To create a new company profile record click the New Company button. An existing company profile record can be deleted by clicking the delete button (after the record has been selected as described above) Page 46 of 122 © DuCharme, McMillen and Associates, Inc. 2013 DMA TaxAutomation WebToolKit User Reference Manual To create a new record, provide the following information: - Company ID; - Business Location; - Company city, state/province, county, zip/postal code, geo code; - Audit File location information; - Ship-From Information, if necessary; - POO Information, if necessary; and - POA Information, if necessary. This tab is used to fill out the Ship From/POO/POA information if applicable. Page 47 of 122 © DuCharme, McMillen and Associates, Inc. 2013 DMA TaxAutomation WebToolKit User Reference Manual If the Company Record is a Company Master Record AND the TAX ALL STATES Checkbox is unchecked the user can then set both STATE and LOCAL NEXUS Records. By Clicking on a State in the Table: For STATE NEXUS, the user can put Nexus details for each of the States in the list. The options, depending on the state, are as follows: • • • • Don’t Tax All in this State; Tax All in this State; Tax All in this State, Exclude All Locally Administered Cities and Counties; Tax All in this State, Include Only User Selected Administered Cities and Counties; Page 48 of 122 © DuCharme, McMillen and Associates, Inc. 2013 DMA TaxAutomation WebToolKit User Reference Manual • Tax All in this State, Exclude Only User Selected Administered Cities and Counties; If no state nexus has been maintained for a particular state, the system assumes normal taxability for that state (Tax All in this State) If the particular state the user is selecting contains any of the last three selections in the above list, then the user can apply a Local Nexus Record to the System. The user is given a list of local cities and counties that can be selected. Select the appropriate local jurisdictions for the company record and click “Save.” These records can be updated at any time if the nexus jurisdictions for the company record should change. For more information on this standard Taxware tool see the following: Taxware Sales/Use Tax System Toolkit (Toolkit PDF File, the Sales/Use User Guide PDF File, or the Sales/Use Technical Guide PDF File). 8.2. Activate NEXPRO Changes Page 49 of 122 © DuCharme, McMillen and Associates, Inc. 2013 DMA TaxAutomation WebToolKit User Reference Manual Changing NexPro records does not directly change the files used by your Taxware tax engine. This is performed as a 2 step process to keep you from having an incomplete NexPro setup active while transactions are being processed through the system. Once you have your NexPro information set up the way you desire and there are no current transaction being processed, you can select NEXPRO --> Activate NEXPRO Changes. You will be warned again about applying changes to an active system. If you click OK your changes will be applied. 9. AUDIT REPORTING 9.1. Report Writer With any Taxware system, users are limited to a certain set of reports that can be generated. As a result, TaxAutomation has created the Report Writer tool, which allows users to create custom reports, using audit file information that is stored in the WTK audit database. Report definitions can be saved so the user can reexecute the same report at a later time. The report can be produced in a printable format or it can be saved as a comma delimited file, so the data can be processed further in Excel or Access. The report write tool can also be used to re-create a Taxware Audit File (flat file) from the information stored in the WTK audit database. To access the Report Writer, select Audit Reporting ---> Custom Reports from the main menu. Page 50 of 122 © DuCharme, McMillen and Associates, Inc. 2013 DMA TaxAutomation WebToolKit User Reference Manual Once a query is built, it can be saved in the system for future use. To access an existing report definition, select the query from the “Saved Queries” select dropdown on this screen. Once the report definition (Query) has been selected, it can be re-executed by clicking Execute Query. You will then be given a choice to create a Report (screen), a Comma Delimited File or an Audit File format. You can delete a query from the system by clicking DELETE QUERY. To build a new query, enter an alias for the query (a short meaningful phrase to describe the query for the system, i.e. Q1 Sales Tax Total in Maine). Click the BUILD... button to continue. From there the screens are similar to the Edit Query selection as described below. Edit the fields and parameters of the query by clicking EDIT QUERY. You can execute the query at any time during you query definition, by clicking the Execute Query button. To reset a tab to it’s initial values, click the Clear Tab button. To save a Query definition for later execution, click the Save Query button. Page 51 of 122 © DuCharme, McMillen and Associates, Inc. 2013 DMA TaxAutomation WebToolKit User Reference Manual This screen show a listing of fields contained in the audit database, separated by category. Clicking the checkboxes will select that particular field for inclusion as a column in the report. The Summarization tab shows all the numeric fields that can have mathematical functions performed on them. These numerical functions include: SUM AVG MIN MAX COUNT Example 1: You select the field State Code and State Tax Amount on the Column Names tab. On the Summarization tab, you select the function SUM for the numeric field State Tax Amount. This will produce a report that contains one line per state with the total amount of state tax for each state. Example 2: You select the field State Code and State Tax Amount on the Column Names tab. On the Summarization tab, you select the function MAX for the numeric field State Tax Amount. This will produce a report that contains one Page 52 of 122 © DuCharme, McMillen and Associates, Inc. 2013 DMA TaxAutomation WebToolKit User Reference Manual line per state with highest state transaction amount for each state on any one transaction in the audit database. Example 3: You select the field State Code and State Tax Amount on the Column Names tab. On the Summarization tab, you select the function COUNT for the numeric field State Tax Amount. This will produce a report that contains one line per state with the number of transactions for each state in the audit database. The Criteria tab allows you to define selection criteria for your report including a WHERE clause into the query. You define a WHERE clause, by selecting a column name, an operand and a value. Available operands are: • >(Greater than) • < (Less than) • = (Equal to) • < > (Not equal to) • < = (Less than or equal to) • = >(Greater than or equal to) • LIKE • IN There are eight individual “Where” clauses that can be separated by an AND or an OR clause. Page 53 of 122 © DuCharme, McMillen and Associates, Inc. 2013 DMA TaxAutomation WebToolKit User Reference Manual Example 1: Column Name State Code Operand = Value FL Result: this will select all records where the State Code equals to FL Example 2: Column Name Invoice Date Invoice Date Operand >= <= Value 20040101 20040131 AND Result: this will select all records with an invoice date of January 2004. Note that all date values need to be specified in the format YYYYMMDD Example 3: Column Name City Name Operand LIKE Value New Result: this will select all records where the City Name contains the value New. E.g, New York, New Orleans, Newton Example 4: Column Name State Code Operand IN Value AK,AL,CA,FL,GA,IN,ID,TN,TX Result: this will select all records where the State Code is contained in the specified list of states Page 54 of 122 © DuCharme, McMillen and Associates, Inc. 2013 DMA TaxAutomation WebToolKit User Reference Manual Page 55 of 122 © DuCharme, McMillen and Associates, Inc. 2013 DMA TaxAutomation WebToolKit User Reference Manual The Additional Options tab allows you to define an Order By clause, which allows you to sort the report output in Ascending or Descending order for up to five columns of the report. Note that you can only sort by columns that you also have selected on the Column Names tab. The Subtotal by clause allows you to create one subtotal in addition to the grand total that is automatically added for all numeric columns. Note that you can only subtotal by a column that you also have selected on the Column Names tab. The Company ID selection allows you to define the report header (company logo and address) for the report output. Please see Audit Reporting Admin under the Administration section later in this document. Example: You selected the columns State Code, County Name, City name, State Tax Amount, County Tax Amount and City Tax Amount on the Column Names tab. For the Subtotal By clause, you selected County Name and for the Order By clause you selected State Code, County Name and City Name. In addition, you selected Function SUM for column State Tax Amount on the Summarization tab and a Where clause of State Code = AR. Result: this will produce a report for the state of Arkansas that will contain one line with the total State Tax, County Tax and City Tax Amount for all transactions in the audit database, which have the same State Code, County Name and City Name (tax totals by State, County and City). In addition, the report will be sorted by State Code and with State Code by County Name and within County Name by City Name. In addition to the grand total for all transactions, the report will Page 56 of 122 © DuCharme, McMillen and Associates, Inc. 2013 DMA TaxAutomation WebToolKit User Reference Manual contain a Subtotal of State Tax Amount, County Tax Amount and City Tax Amount after each new County Name. See below. Once you are on the report results screen, you can click the Back button to go back to your report definition (and make changes to the definitions and re-run the report until it meets your expected result) or you can click on the Print button, which will send the report output to a printer. 9.2. Import Audit File Since the Custom Reports functionality reads the data in the WTK audit database, it is important that you first import the Taxware audit file (flat file on your Taxware server) into the WTK audit database before running any Custom Reports. To import the Taxware audit file into the WTK audit database, select AUDIT REPORTING Import Audit File. The next screen to display will present the option of using the current audit file or uploading a new audit file. To use the current audit file select “Use the current audit file”. This function will import all NEW records from the Taxware audit file into the WTK audit database. Please note that only those records that have been added to the Taxware audit file since the last time the Import Audit File function was executed will be imported. To import a new audit file, please select “Upload a new audit file...”. Use the Browse Page 57 of 122 © DuCharme, McMillen and Associates, Inc. 2013 DMA TaxAutomation WebToolKit User Reference Manual button to select an audit file that is on your local PC. Please note that using that uploading an audit file will upload ALL records to the WTK database. This function potentially runs a long time, depending on the amount of data that is imported into the WTK database. Once you start the Audit File import, you will see an hourglass until the import has finished. For extremely large imports, you can simply close your browser (and shut down your PC) once you see the hourglass. Since the Audit File import process run as a server process on the WTK server, closing your browser or shutting down your PC with not affect the Audit File import process (it simply continues to run on the server, where you can let it run over night). 9.3. Clean Audit Table The Reset Counter tab allows the user to change the pointer in the audit file to import from that position the next time you add to the audit file. To execute this task, enter a number in the text box and click Reset Counter. The Purge Audit DB tab allows for the purging of records from the audit file. There are 4 options to purge records Page 58 of 122 © DuCharme, McMillen and Associates, Inc. 2013 DMA TaxAutomation WebToolKit User Reference Manual 1. 2. 3. 4. Purge by Date Purge by Company ID Purge by Invoice Number Purge all Records To execute this task, make a selection and click on the Purge Button. 9.4. Update Audit Table The Update Audit Table tab allows for the execution of custom queries on the WebToolkit database. Before the queries can be executed, they need to be uploaded to the WebToolkit using the Upload Custom Query option described below. To run a custom query, first select it from the dropdown box. The query string will then be displayed with a checkbox. To execute it, make sure that the checkbox is selected and click on the Run button in the top menu bar. Similarly, the user can delete a query by selecting it from the list, checking its checkbox and then clicking the Delete button. Please be aware that this is a very powerful feature that should only be used by users who are familiar with the Standard Query Language and the structure of the WebToolkit database. Page 59 of 122 © DuCharme, McMillen and Associates, Inc. 2013 DMA TaxAutomation WebToolKit User Reference Manual 10. TOOLS In the Tools section you will find tools and utilities that will allow you to manage and customize your Taxware system 10.1. Custom Product Code The Custom Product Code section allows you to fully manage the custom product codes in your product taxability files 10.1.1. User Defined product Codes The User-Defined Product Code function allows you to create custom product codes (with custom tax rules) in the Taxware system. To create a new product code, click the New Product Code button. Note that all custom product codes need to be defined in the number range between 90000 and 99999. Taxware reserves all other numbers. To change an existing product code definition, click on a product code in the list. Page 60 of 122 © DuCharme, McMillen and Associates, Inc. 2013 DMA TaxAutomation WebToolKit User Reference Manual On this screen, you have four options besides editing existing product codes. • Create a new Product Code • Synchronize Descriptions • Validate Tax Rule • Sync Tax Rule New Product Code The first step to create a custom product code is to assign a product code number (90000-99999), and a short and long description. Page 61 of 122 © DuCharme, McMillen and Associates, Inc. 2013 DMA TaxAutomation WebToolKit User Reference Manual If the new product code is based on an existing (Taxware product code) enter the Taxware code in the “Taxware Code” field to copy all existing rules, short and long description to the new custom product code. After creating the code itself along with its associated descriptions, click on the Tax Rules tab, which allows you define the tax rules for this custom product code. If the rules were copied from a standard Taxware code the “Link” checkbox will be set. To edit the rule, select the rule and hit the “Un-Link” button in the top bar. Note: setting the “Link” flag is an indication the corresponding rule should match the Taxware code rule. The custom product code rule will be updated should there be any changes to the Taxware code rule. See Validate and Sync Tax Rule below for more information on the syncing process. Page 62 of 122 © DuCharme, McMillen and Associates, Inc. 2013 DMA TaxAutomation WebToolKit User Reference Manual In the Tax Rules tab, you define a rule for each taxing jurisdiction where this product code should return non-standard tax rates. Tax rules can be created for State, County and City jurisdictions. Click the New Tax Rule button to create a new tax rule or click on an existing rule in the list. Page 63 of 122 © DuCharme, McMillen and Associates, Inc. 2013 DMA TaxAutomation WebToolKit User Reference Manual To define a tax rule, the following parameters are available (for a detailed description of those fields, please see the Taxware manual for custom product codes, i.e. the record layout of file produpdt_xxx in the Taxware indata directory. Record Type: State, County or City records are possible (For Canadian product codes, select CANADA as the state. Canadian provinces are treated as Cities by Taxware and product code definitions for Canadian Provinces must therefore be created as city records) State: State that the product code is applicable to Location: For State records, leave blank. For County records, select a county from the pull down list. For City records, type in the exact city name as maintained by Taxware (use the VERAZIP reports described earlier to identify the exact city name). For Canadian Province records, type in the Province name as maintained by Taxware. Effective Date: The date that this product code should be effective from. You can define product codes with a future effective date, to prepare the system for upcoming changes in the tax law. Current Tax Rate: If you want to assign a fixed tax rate for this product code, enter the rate here. Example 3.125% are entered in the format .03125. Max Amounts: this section allows you to define max tax rules for your product code. Please see the current Taxware manual for the possible values in this Page 64 of 122 © DuCharme, McMillen and Associates, Inc. 2013 DMA TaxAutomation WebToolKit User Reference Manual section. The values here will depend on the Taxware version that the WTK is connected to. The following fields are only applicable to State records: (Note that there needs to be a State record for every custom product code that you define – even if you only want to define a tax rule for one specific city or county, you still need to create an associated State record). Tax State: select Use Specified rate (T), if you have entered a fix tax percentage in the Current Rate field of a state record. Select Exempt (E) if you want to exempt the product code at the state level. Select Use Rate on File (space) if you want to tax the product code at the current tax rate on the Taxware tax master file (used if you want to create a city record with a custom rate, but want to tax the state at the default rate) Tax City: select Use Specified rate (T), if you have entered a fix tax percentage in the Current Rate field of a city record. Select Exempt (E) if you want to exempt the product code at the city level. Select Use Rate on File (space) if you want to tax the product code at the current tax rate on the Taxware tax master file. Select Special (space) if you want to use the specified rate for the specified city records, but want to use the default rate for all other cities not individually listed. Tax County: select Use Specified rate (T), if you have entered a fix tax percentage in the Current Rate field of a county record. Select Exempt (E) if you want to exempt the product code at the county level. Select Use Rate on File (space) if you want to tax the product code at the current tax rate on the Taxware tax master file. Select Special (space) if you want to use the specified rate for the specified county records, but want to use the default rate for all other counties not individually listed. Tax Transit: Select Exempt (E) if you want to exempt the product code at the transit tax level. Select Use Rate on File (space) if you want to tax the product code at the current tax rate on the Taxware tax master file. Bypass Max Tax: Select Use Standard Max Tax (space) if you want this product code to apply Taxware’s standard max tax processing logic (if applicable). Select Bypass Standard Max Tax (Y) if do not want this product code to apply Taxware’s standard max tax processing logic. Record City: Select No Separate City (space) if you do not plan to add individual city records for this product code (this flag is set for performance reasons, to prevent Taxware from searching for city records even though you already know that there won’t be any city records). Select City Record Exists (Y), if you plan on adding individual city records for this product code. Record County: Select No Separate County (space) if you do not plan to add individual county records for this product code (this flag is set for performance reasons, to prevent Taxware from searching for county records even though you already know that there won’t be any county records). Select County Record Exists (Y), if you plan on adding individual county records for this product code. Page 65 of 122 © DuCharme, McMillen and Associates, Inc. 2013 DMA TaxAutomation WebToolKit User Reference Manual Synchronize Descriptions During Monthly Taxware updates the proddesc (product codes description) file may get updated with a new file. If you have custom product codes and would like them to reappear in this description file, use this feature. Validate Tax Rule During the monthly Taxware updates the prodseq file containing the standard Taxware product code rules may be updated. The Validate Tax Rule will generate a report showing any changes for all custom product codes linked to a Taxware product code Sync Tax Rule If the “Validate Tax Rule” shows a rule was update the “Sync Tax Rule” option will update the custom product code rule to match the Taxware rule. 10.1.2. Export Product Codes Certain conditions may arise where you would like to export the custom product codes in one system, and import them into another. Other applications might arise, if your system is required to perform a master file replacement, and your custom product codes would be eradicated in the process. The first step in achieving these goals would be to export or reapply your current codes and tax rules using this utility. When you access this utility, you will see a listing of product codes and there associated tax rules by the jurisdiction for which they exist. Page 66 of 122 © DuCharme, McMillen and Associates, Inc. 2013 DMA TaxAutomation WebToolKit User Reference Manual Once you select the Tax Rules you would like to export or reapply, select the appropriate button, and you will be prompted to continue. 10.1.3. Import Product Codes The Import Product Codes utility provides an easy way to upload and run a custom product code file called produpdt_xxx. If you have the produpdt_xxx on your desktop, select the Upload button from the top of the screen. If the file is already in the Taxware->Indata directory, you may select the Run button to execute the file immediately. A report will come back with the results from the utility. Page 67 of 122 © DuCharme, McMillen and Associates, Inc. 2013 DMA TaxAutomation WebToolKit User Reference Manual 10.2. Product Code Conversion The product code conversion utility allows you to map your internal SKU numbers or product group codes to a Taxware product code. With the WTK, you can maintain the mapping between a Taxware Product Code and your internal material code. 10.2.1. Create Product Code Conversion To access the Product Code Conversion Tool, select TOOLS PRODUCT CODE CONVERSION CREATE. Page 68 of 122 © DuCharme, McMillen and Associates, Inc. 2013 DMA TaxAutomation WebToolKit User Reference Manual This Tool updates the prodconv.dt and the prodconv.nx files on the Taxware System. To properly map internal codes to Taxware product codes, use the following procedure: Click on COMPANY ID to select the company for which you want to create product code mappings; Select a PRODUCT CODE from the product code description list; Enter the SKUs or internal product codes that will be assigned to this Taxware product code by doing one of the following; • Enter a single SKU in the SKU field; • Enter a range of SKUs by entering the lower boundary in the LOWER RANGE field and the upper boundary in the UPPER RANGE field; or • Enter SKUs with a wildcard character. (For example, entering the value “10*” in the ENTER SKU field would map all of the following SKUs to the assigned product code: 10, 100, 101, 102, 103, 104, 105, 106, 107, 108, and 109. Entering the value “10?” in the Enter SKU field would map all the following SKUs to the assigned product code: 100, 101, 102, 103, 104 etc); Page 69 of 122 © DuCharme, McMillen and Associates, Inc. 2013 DMA TaxAutomation WebToolKit User Reference Manual Click on BUSINESS LOCATION to select the corresponding location, if desired; Click SAVE to save the user’s product coding. A screen appears with a detailed list of every SKU which will be assigned to the selected Taxware product code (NOTE: If using a wildcard, the user will be prompted to enter a maximum SKU code length – e.g., 4 characters. The maximum value permitted is 20. Once identified, press CONTINUE); Deselect any SKU from the list which should not be mapped to the selected Taxware product code. Click the Create Mapping button to create the product code mappings. Page 70 of 122 © DuCharme, McMillen and Associates, Inc. 2013 DMA TaxAutomation WebToolKit User Reference Manual 10.2.2. Search, Update, And Delete Product Code Conversions Search To search for a particular product code conversion, go to TOOLS PRODUCT CODE CONVERSION SEARCH UPDATE AND DELETE. Enter the following: (1) Company ID; (2) One of the following: (a) A SKU; (b) A SKU range; or (c) A specific product code. (3) Business location, if identified when created. Page 71 of 122 © DuCharme, McMillen and Associates, Inc. 2013 DMA TaxAutomation WebToolKit User Reference Manual Press the SEARCH button. The system will then display all existing mappings for the specified criteria. Page 72 of 122 © DuCharme, McMillen and Associates, Inc. 2013 DMA TaxAutomation WebToolKit User Reference Manual Update To update a product code conversion, follow the “Search” procedure immediately above to identify the mapping that needs to be updated. After getting search results, modify the product code assignments as desired and press the UPDATE MAPPING button. Delete To delete product code conversions, follow the “Search” procedure as noted above to identify the mapping that you wish to delete. After obtaining search results, mark the records you wish to delete with a check mark in the “Delete” column, and then press the DELETE SELECTED button. 10.2.3. View Product Code Conversions To view all product code conversions that have been made, go to TOOLS PRODUCT CODE CONVERSION VIEW ALL. Sort the resulting report by either “Lower SKU” or by “Product Code” by clicking on the corresponding column heading. The listing of product code mappings can also be downloaded as a comma delimited file to your PC. Click the Download File button to download. Page 73 of 122 © DuCharme, McMillen and Associates, Inc. 2013 DMA TaxAutomation WebToolKit User Reference Manual 10.2.4. Activate Product Code Conversions Once you have made all necessary product code conversions, whether new, updated, or deleted mappings, the changes must be activated. Perform this action by going to TOOLS PRODUCT CODE CONVERSION ACTIVATE PRODUCT CODE CONVERSIONS. Systematically, this action copies the product code conversion files from the “tkout” directory to the “outdata” directory on the Taxware server, which allows the Taxware system to recognize it. The end result of the product code conversion is the mapping of Taxware product codes such that the taxability of each product will be defined in the system. 10.3. Administration Codes 10.3.1. Maintain Administration Codes Administration codes allow you to define overwrites to the tax rate master files delivered by Taxware. Prior to the implementation of the NEXPRO functionality by Taxware, Administration Codes represented the only method of applying special taxation requirements to a specific taxing jurisdiction. However with the availability of the NEXPRO module in more recent versions of the Taxware system, the use of Administration Codes has become obsolete. The WTK supports Administration Codes primarily due to the fact that the Taxware COBOL or RPG versions even in newer releases do not provide the Page 74 of 122 © DuCharme, McMillen and Associates, Inc. 2013 DMA TaxAutomation WebToolKit User Reference Manual NEXPRO functionality. Consequently, we discourage the use of Administration Codes if you are using the C version of the Taxware product. TOOLS ---> ADMIN CODES ---> MAINTAIN To create a new Administration Code, click the New button. To maintain an existing Administration Code, click on the state name for which an Administration Code has already been defined. Page 75 of 122 © DuCharme, McMillen and Associates, Inc. 2013 DMA TaxAutomation WebToolKit User Reference Manual On the New Admin Code screen, select the state code (or by holding the CTRL key, multiple state codes) for which the Administration Code should be applicable. Next, choose the taxation option for the state, county and city level from the corresponding pulldown fields. For a complete description of the available options in the pulldown fields, please consult the Taxware Technical Reference Manual. The options selected at this level of the of the Administration code definition are applicable to all jurisdictions with the selected state and are automatically propagated to all jurisdictions (counties and cities) with the selected state. Next click the Save button, which returns you to the Administration Code overview screen. To define local Administration codes for individual cities or counties, select the state for which you want to create local administration codes. This will present the state Administration Code definition screen. From here, you have the ability to change your state Administration Code settings or delete the state Administration Code by clicking the Delete button. Page 76 of 122 © DuCharme, McMillen and Associates, Inc. 2013 DMA TaxAutomation WebToolKit User Reference Manual To create a local Administration Code for the selected state, click on the local Admin Codes tab and click the New Local Admin Code button. To edit an existing Local Admin Code, click on an existing Local Admin Code definition in the Local Admin Code tab. Page 77 of 122 © DuCharme, McMillen and Associates, Inc. 2013 DMA TaxAutomation WebToolKit User Reference Manual On the local Administration Code screen, specify the following values: Description: Description of the purpose of the Local Admin Code. I.e. “Exempt City XYZ” Record Type: County or City Admin Code Zip Code or City name: If you are creating a City Admin Code, enter either the ZIP code or select the city name from the city pull down list. Geo Code: If you are creating a City Admin Code for a particular taxing jurisdiction with a city, enter the Geo Code for the jurisdiction that the Local Admin Code should be applicable for. Date: Effective date for the Local Admin Code County Code or County Name: If you are creating a County Admin Code, enter either the three digit county code or select the county name from the county pull down list. Taxing Authority: Informational field that describes the taxing authority for which the Local Admin Code is applicable. I.e. “Palm Beach County”. New Admin Code: Taxation option for the Local Admin Code. For a complete description of the available options in the pulldown fields, please consult the Taxware Technical Reference Manual. Save the Local Admin Code by clicking the Save button. You are then presented with the Taxware TAX020 report output, which confirms the creation of the new Local Admin Code. Page 78 of 122 © DuCharme, McMillen and Associates, Inc. 2013 DMA TaxAutomation WebToolKit User Reference Manual For more information on this standard Taxware Tool, please refer to the PDF document: Taxware Sales/Use Tax System User Guide, Chapter 4.10.3. Administration Codes 10.3.2. Export Administration Codes After defining a State or Local Admin Code, it is necessary to apply the Admin Code definitions to the current Taxware tax master file. This step is also necessary after a tax master file replacement with a new tax master file that you might have received from Taxware. Check the State/Local Administration code and click the Reapply Selected button. This will reapply the selected Administration Codes to the Taxware tax master files. If the export button is clicked, a new window will appear allowing you to download the selected administration codes. 10.4. Load Files The Load Files functionality allows you to manually replace the tax, product and zip master files on the Taxware server. Page 79 of 122 © DuCharme, McMillen and Associates, Inc. 2013 DMA TaxAutomation WebToolKit User Reference Manual 10.4.1. Product Taxability File To load Taxware’s product taxability file, select TOOLS LOAD FILES PRODUCT TAXABILITY FILE. Select the product codes that you would like to load into the Product Taxability File: 1. All Product Codes: This will load all product codes contained in the Available Product Codes list into the Product Taxability File. 2. Selected Product Codes: This option will load only those product codes that are selected in the list of Available Procuct Codes. Holding down the Ctrl key will allow selection individual products. Holding down the Shift key will allow product ranges to be select. 3. Quick Selection: Individual product codes or ranges may be selected by directly keying them in the Quick Selection area. Separate individual product codes with a ','. Specify product ranges with a '-'. On the States tab, select the states for which you would like to load product code definitions: 1. Including all states from the state option list; 2. Including or excluding one state from the state option list; Page 80 of 122 © DuCharme, McMillen and Associates, Inc. 2013 DMA TaxAutomation WebToolKit User Reference Manual 3. Including or excluding multiple states from the state option list. Multiple individual states can be selected using the Ctrl key. State Ranges can be specified using the Shift key. Click the Upload button to upload the Product Taxability File, which is the “prodseq” file within Taxware, from you local PC. This will open a popup window. Specify the file name and location of the Product Taxability Master File on your local PC. Use the Browse function to browse for the file on your local PC. Once the file name is specified, click the Upload button in the upload popup window to upload the Product Taxability Master file from your local PC to the indata directory on your Taxware server. Once the upload finishes, click on the Close button to close the upload popup window. Regardless of the file name on your local PC, the uploaded file will be automatically renamed to prodseq. Note that you can obtain a product taxability master file from the Taxware Web Support Center website. Once the prodseq file is present on the Taxware server, click the Run button. This executes the TAX006 program on the Taxware server, which loads the selected product code definitions into the product taxability master file. For more information on this standard Taxware tool, please refer to the PDF document: Taxware Sales/Use Tax System User Technical Reference Manual, Chapter 6. Page 81 of 122 © DuCharme, McMillen and Associates, Inc. 2013 DMA TaxAutomation WebToolKit User Reference Manual 10.4.2. Tax Master File To load the Tax Rate Master file, select TOOLS LOAD FILES TAX MASTER FILE. On the States tab, select the states for which you would like to load the information in the Tax Master File: 1. Including all states from the state option list; 2. Including or excluding one state from the state option list; 3. Including or excluding multiple states from the state option list. Multiple individual states can be selected using the Ctrl key. State Ranges can be specified using the Shift key. Click the Upload button to upload the Tax Master File, which is the “newmast” file within Taxware, from you local PC. This will open a popup window. Specify the file name and location of the Tax Master File on your local PC. Use the Browse function to browse for the file on your local PC. Once the file name is specified, click the Upload button to upload the Tax Master file from your local PC to the indata directory on your Taxware server. Once the upload finishes, click on the Close button to close the upload popup window. Regardless of the file name on your local PC, the uploaded file will be automatically renamed to “newmast”. Note that you can obtain a tax master file from the Taxware Web Support Center website. Once the “newmast” file is present on the Taxware server, click the Run Page 82 of 122 © DuCharme, McMillen and Associates, Inc. 2013 DMA TaxAutomation WebToolKit User Reference Manual button. This executes the TAX021 program on the Taxware server, which loads the tax rates for the selected states into the tax master file. For more information on this standard Taxware tool, please refer to the PDF document: Taxware Sales/Use Tax System User Technical Reference Manual, Chapter 6. 10.4.3. VERAZIP 10.4.3.1. ZIP Master File To load the VERAZIP Master file, select TOOLS LOAD FILES VERAZIP ZIP MASTER FILE On the States tab, select the states for which you would like to load the information in the ZIP Master File: 1. Including all states from the state option list; 2. Including or excluding one state from the state option list; 3. Including or excluding multiple states from the state option list. Multiple individual states can be selected using the Ctrl key. State Ranges can be specified using the Shift key. Page 83 of 122 © DuCharme, McMillen and Associates, Inc. 2013 DMA TaxAutomation WebToolKit User Reference Manual Click the Upload button to upload the ZIP Master File, which is the “zipseq” file within Taxware, from you local PC. This will open a popup window. Specify the file name and location of the ZIP Master File on your local PC. Use the Browse function to browse for the file on your local PC. Once the file name is specified, click the Upload button in the upload popup window to upload the ZIP Master file from your local PC to the indata directory on your Taxware server. Once the upload finishes, click on the Close button to close the upload popup window. Regardless of the file name on your local PC, the uploaded file will be automatically renamed to “zipseq”. Note that you can obtain a ZIP master file from the Taxware Web Support Center website. Once the “zipseq” file is present on the Taxware server, click the Run button. This executes the ZIP010 program on the Taxware server, which loads the ZIP codes for the selected states into the ZIP master file. For more information on this standard Taxware tool, please refer to the PDF document: Taxware The VERAZIP System user Guide, Chapter 3. 10.4.3.2. County File To load the county files, select TOOLS LOAD FILES VERAZIP COUNTY FILE. To load county definitions, the Taxware file “cntyseq” will need to exist in the Taxware indata directory on the Taxware server. Page 84 of 122 © DuCharme, McMillen and Associates, Inc. 2013 DMA TaxAutomation WebToolKit User Reference Manual If the most recent “cntyseq” file is already present on the Taxware server, choose option one “Use the current County file” and click the Run button. This executes the ZIP080 program on the Taxware System. If you have downloaded a new “cntyseq” file from the Taxware Web Support Center Website, choose option “Upload a new County file”, which allows you to upload the “cntyseq” file from your PC to the Taxware server, prior to clicking the Run button. Use the Browse button to locate the “cntyseq” file on your local PC. For more information on this standard Taxware Tool, please refer to the PDF document: Taxware VERAZIP System User Guide, Chapter 3 10.4.4 STEP 10.4.4.1 EXCEPTION RULE FILE To load the exception rule files, from the Main Menu select TOOLS LOAD FILES STEP EXCEPTION RULE FILE. To load the exception rule files, the Taxware master file "excprule" must exist in the Taxware indata directory on the Taxware server. If you have downloaded a new "excprule" file from the Taxware Web Support Center Website, choose the option "Upload a new Exception Rule file", which allows you to upload the "excprule" file from your PC to the Taxware server, prior to clicking the Run button. Use the Browse button to locate the "excprule" file on your local PC. For more information on this standard Taxware Tool, please refer to the PDF document: Taxware VERAZIP System User Guide, Chapter 6 10.5. Update Files To manually apply the monthly Taxware file updates to your Taxware system, the following options are available: (Note that we recommend to use the AutoUpdate option instead, described later in this document.) 10.5.1. Product Taxability File To access the Update Product Taxability File tool, TOOLS UPDATE FILES PRODUCT TAXABILITY FILE. This function allows you to apply the Taxware provided product taxability file updates (produpdt_xxx) to your Taxware system. Page 85 of 122 © DuCharme, McMillen and Associates, Inc. 2013 DMA TaxAutomation WebToolKit User Reference Manual Upload file produpdt_xxx to the Taxware indata directory. Clicking the Run button executes Taxware program TAX007. Please see the “Load Product Taxability file” section in this document for additional details on how to use this feature. For more information on this standard Taxware tool, please refer to the PDF document: Taxware Sales/Use Tax System User Technical Reference Manual, Chapter 6. 10.5.2. Tax Master File To update the Tax Master File, select TOOLS UPDATE FILES TAX MASTER FILE.. This function allows you to apply the Taxware provided tax master file updates (taxupdt_xxx) to your Taxware system. Upload file taxupdt_xxx to the Taxware indata directory. Clicking the Run button executes Taxware program TAX020. Please see the “Load Tax Master File” section in this document for additional details on how to use this feature. For more information on this standard Taxware tool, please refer to the PDF document: Taxware Sales/Use Tax System User Technical Reference Manual, Chapter 5 10.5.3. Zip Master File To update the Zip Master File, select TOOLS UPDATE FILES ZIP MASTER FILE. This function allows you to apply the Taxware provided ZIP master file updates (zipupdt_xxx) to your Taxware system. Upload file zipupdt_xxx to the Taxware indata directory. Clicking the Run button executes Taxware program ZIP040. Please see the “Load ZIP Master file” section in this document for additional details on how to use this feature. For more information on this standard Taxware Tool, please refer to the PDF document: Taxware VERAZIP System User Guide, Chapter 5. Page 86 of 122 © DuCharme, McMillen and Associates, Inc. 2013 DMA TaxAutomation WebToolKit User Reference Manual 10.6. STEP Tools 10.6.1. Import STEP Database The WTK maintains tax exemption certificate information in the Taxware STEP files on the Taxware server and, in parallel, in the WTK database. This database is automatically kept in synch with the Taxware STEP files on the Taxware server when using the WTK to maintain certificate information. Should you maintain certificate information outside of the WTK (i.e. by using the Taxware PC STEP application), the WTK certificate database will become de-synchronized with the Taxware STEP files on the Taxware server. Should the WTK certificate database become de-synchronized with the Taxware STEP files on the Taxware server, execute the Import STEP Database function. This will: • Delete the contents of the WTK certificate database • Import the contents of the steptec, steprate and stepprod files in the outdata directory of your Taxware server into the WTK certificate database If the contents of your steptec, steprate and stepprod files in the outdata directory of your Taxware server are not current, first execute the Unload STEP Files function, described later in this document, before executing the Import STEP Database function. 10.6.2. Clear STEP Database This function will delete the contents of the WTK STEP database. The administrator of your WTK should ensure that this function is not accessible to regular WTK user, by setting the user permissions accordingly. If the contents of the WTK database are deleted, the Advanced Find function for STEP certificates, described earlier in this document, will no longer return any search results. 10.6.3. Load Transaction File To load the STEP transaction file, select TOOLS STEP TOOLS LOAD TRANSACTION FILE. Page 87 of 122 © DuCharme, McMillen and Associates, Inc. 2013 DMA TaxAutomation WebToolKit User Reference Manual To load the STEP Transaction file, the Taxware file steptran will need to exist in the Taxware indata directory on the Taxware server. If the most recent steptran file is already present on the Taxware server, choose option one “Use the current transaction file” and click the Run button. This executes the STEP020 program on the Taxware System. If you would like to upload a new steptran file to the Taxware indata directory on the Taxware server, choose option “Upload a new transaction file”, which allows you to upload the steptran file from your PC to the Taxware server, prior to clicking the Run button. Use the Browse button to locate the steptran file on your local PC. Note: If you are using the WTK functions Create Certificate and/or Maintain Certificate, described earlier in the document, you should not be required to use the Load Transaction File function. It is merely provide for compatibility reasons and for users who maintain STEP exemption certificates via the Taxware provided STEP PC application. Note: Using a Transaction file to add certificates to the Taxware system will not add them to the WebToolkit database. For more information on this standard Taxware Tool, please refer to the PDF document: Taxware STEP User Guide, Chapter 7. 10.6.4. Load Reason File Page 88 of 122 © DuCharme, McMillen and Associates, Inc. 2013 DMA TaxAutomation WebToolKit User Reference Manual To load the Reason Code file, select TOOLS STEP TOOLS LOAD REASON FILE. To load the STEP Reason Code Rate file, the Taxware file stepstre will need to exist in the Taxware indata directory on the Taxware server. If the most recent stepstre file is already present on the Taxware server, choose option one “Use the current Reason file” and click the Run button. This executes the STEP55 program on the Taxware System. If you would like to upload a new stepstre file to the Taxware indata directory on the Taxware server, choose option “Upload a new Reason file”, which allows you to upload the stepstre file from your PC to the Taxware server, prior to clicking the Run button. Use the Browse button to locate the stepstre file on your local PC. Note: The stepstre file is available for download from the Taxware WebSupport Center website. Should Taxware provide an updated version of the stepstre file, it will be automatically placed into the Taxware indata directory on your Taxware server when the WTK AutoUpdate function, described later in this document, is executed. For more information on this standard Taxware Tool, please refer to the PDF document: Taxware STEP User Guide, Chapter 6. 10.6.5. Load STEP File To load the STEP Files, select TOOLS STEP TOOLS LOAD STEP FILE. This function allows you to import the contents of the files steptec, stepprod and steprate, located in either the Taxware indata or outdata directories, into the Taxware STEP Btree files located in the outdata directory on your Taxware server. Note that this will first delete the Taxware STEP Btree files and will then recreate them with the contents of the steptec, stepprod and steprate files. This function should only be required if the Taxware STEP Btree files become corrupt or need to be replaced for any other reason. Page 89 of 122 © DuCharme, McMillen and Associates, Inc. 2013 DMA TaxAutomation WebToolKit User Reference Manual To load the STEP files, the Taxware files steptec, stepprod and steprate will need to exist in the Taxware indata directory on the Taxware server. If the most recent steptec, stepprod and steprate files are already present on the Taxware server, choose option one “Use the current STEP files in the indata directory” or option two “Use the current STEP files in the outdata directory” (depending on where those files are located on you Taxware server) and click the Run button. This executes the STEP900 program on the Taxware System. If you would like to upload new steptec, stepprod and steprate files to the Taxware indata directory on the Taxware server, choose option “Upload a new STEP files”, which allows you to upload the files steptec, stepprod and steprate from your PC to the Taxware server, prior to clicking the Run button. Use the Browse button to locate the steptec, stepprod and steprate files on your local PC. For more information on this standard Taxware Tool, please refer to the PDF document: Taxware STEP User Guide, Chapter 6. 10.6.6. Unload STEP File This function allows you to export the contents of the Taxware STEP Btree files, located in the Taxware outdata directory, into the Taxware sequential files steptec, stepprod and steprate, located in the outdata directory on your Taxware server. Note that this will first delete the contents of the Taxware files steptec, stepprod and steprate in the outdata directory of your Taxware server. This function should only be required if you are planning on rebuilding the WTK STEP Page 90 of 122 © DuCharme, McMillen and Associates, Inc. 2013 DMA TaxAutomation WebToolKit User Reference Manual database as described earlier in this document, or if you need to export your STEP certificates into sequential files, so that they can be processed by your own applications. 10.6.7. XLS To Steptran This function allows you to generate a steptran file from an Excel spreadsheet based on the mappings created between the two. You need to select an input Excel spreadsheet (*.xls file) and an existing mapping template and click on Create Steptran button. You will see two options: • You can simply create and download a steptran file • You can create and load the steptran file into your logged-on Taxware system You can even verify the mapping template mappings by selecting the template and clicking on the View Mapping button. 10.7. Freight File Editor This function allows you to maintain the taxability settings for Freight in the Taxware file taxfrtpd, located in the indata of your Taxware server. The taxability settings for Freight are maintained by Taxware and Taxware might provide you with periodic updates of the taxfrtpd file as tax laws regarding freight change in individual states. If you are using the WTK AutoUpdate function, described later Page 91 of 122 © DuCharme, McMillen and Associates, Inc. 2013 DMA TaxAutomation WebToolKit User Reference Manual in this document, the Taxware file taxfrtpd will be automatically applied to your Taxware server, should Taxware make a new taxfrtpd file available. Note that if you customize the taxability settings for freight using this function, you will be required to re-apply your changes to the freight taxability settings in this file, since a new taxfrtpd file from Taxware will overwrite any customizations that you might have performed. When entering into the WTK screen Freight File Editor, you will be presented with the current taxability settings for freight as defined in the Taxware taxfrtpd file. To define freight as taxable in a state, check the corresponding checkbox for that state. To define freight as non-taxable in a state, un-check the corresponding checkbox for that state. To save your changes and update the Taxware file taxfrtpd in the Taxware indata directory on your Taxware server, click the Save button. To undo any changes prior to saving them, click the Reset button. Page 92 of 122 © DuCharme, McMillen and Associates, Inc. 2013 DMA TaxAutomation WebToolKit User Reference Manual 10.8. Verify Audit File In the event that you are unable to run a Tax030 (Transaction Audit Report) with the error “Invalid Audit Data” you may have an invalid record in your audit file (Taxware\audit\taxaudit). This utility will allow you to verify your audit file, against records of invalid length. If the utility finds an invalid record, you will then have the opportunity to clean the file. Warning: The taxaudit file is a live file and should only be cleaned when no transactions are posting to Taxware. 11. ADMINISTRATION In the Administration section you will find the functions required to administrate your WTK server. 11.1. User Account Maintenance The WTK allows you to control access to each function (screen) within the WTK. Users are created centrally for the WTK instance, however, the permissions assigned to each user are specific to each Taxware instance that the WTK instance is connected to. This means that the user-id and password for a user is the same for every Taxware instance that the user can access via the WTK, however, via permission settings, you can define for each user what he can and can not do within the WTK, while connected to a specific Taxware instance. 11.1.1. Adding a New User To add new users within the WTK, click the New User button. Provide the following information: First Name Last Name User ID Password Status: Set the status to Active, which will allow the user to logon to the WTK. Set the status to Inactive if you want to temporarily disable the user from logging on to the WTK. Role: This allows you to assign a pre-defined set of permissions (role) to a userid. Select a role to assign a user profile that you have previously defined (as described later in this document). If no roles are defined in the system, leave this field empty and maintain the user permissions in the Permissions tab. Page 93 of 122 © DuCharme, McMillen and Associates, Inc. 2013 DMA TaxAutomation WebToolKit User Reference Manual Save as Role: If you plan to create a new role while maintaining the permissions for a new user, check the checkbox Save as Role and specify a name for the new role (i.e., Administrator, Tax Accountant, Customer Service). Click the Permissions tab to maintain the permissions for the user Page 94 of 122 © DuCharme, McMillen and Associates, Inc. 2013 DMA TaxAutomation WebToolKit User Reference Manual The Taxware instances defined for your WTK will be listed at the top of the page. To grant a user full access to all WTK function for a specific Taxware instance, click Taxware instance name at the top of the page. To grant a user access to all functions within a specific section of the WTK, click the checkbox next to an underlined section of the WTK. This will automatically grant access to all functions included in that section. To grant a user access only to specific function within a section of the WTK, click on the underlined section name (i.e. Administration). This will expand the functions within the section. Click the checkbox next to a specific function to grant the user access to that function. Uncheck the checkbox to remove access for the function. If only some functions within a section have been selected, the checkbox for the corresponding section will indicate this by having a gray shaded rectangle around the checkbox. 11.1.2. Editing an Existing User To edit an existing user, select “ADMINISTRATION USERS from the menu. On the resulting screen, select a user from the “Select a User” drop-down menu. Once selected, the user’s information (mentioned above) is filled in. Change the settings on the User Information or Permissions tab and click the Save button to save your changes. Click the Delete button to delete the selected user. Page 95 of 122 © DuCharme, McMillen and Associates, Inc. 2013 DMA TaxAutomation WebToolKit User Reference Manual Note that you can only change the user permissions for the Taxware instance that you are currently logged on to. 11.2. Taxware System Maintenance Use this function to define the technical settings about the Taxware instances that your WTK server can connect to. 11.2.1. Adding a New Taxware Instance to the WTK Since linking a new Taxware instance to your existing WTK requires a considerable amount of information, please follow the process outlined below: 1. Request the “New Instance” questionnaire from the TaxAutomation support group. 2. Complete this questionnaire (with the help of your TaxAutomation support representative) and return it to TaxAutomation. 3. Upon completion, TaxAutomation will generate a SQL script for your specific database platform and Taxware environment. 4. TaxAutomation will then send you this script along with detailed instructions on how to execute this script. This will automatically create the database definitions that are necessary to link a new Taxware instance to the WTK. 11.2.3. Editing an Existing Taxware Instance on the Web Toolkit To edit an existing Taxware instance, select ADMINISTRATION SYSTEMS. On the SYSTEM ADMINISTRATION screen, select the Taxware instance information from the “Current Systems” drop-down menu. Once selected, all the associated information for that system will be filled in each of the tabs on the screen. To save any changes to your Taxware instance configuration, click the Save button. The following is a description of the Taxware instance settings. General Tab: ALIAS – name that the Taxware instance will have within the WTK (e.g., TEST, QA, SANDBOX, or PRODUCTION); SYSTEM IP – the network IP address or server name associated with the Taxware instance; Page 96 of 122 © DuCharme, McMillen and Associates, Inc. 2013 DMA TaxAutomation WebToolKit User Reference Manual SYSTEM PORT – the network Port associated with the Taxware instance. This must match the port that the WTK listener is using on the Taxware server; STATUS – set to online for normal operation. Set to offline to temporarily remove the instance from the systems pulldown list on the WTK login screen. This will prevent all users from logging on to this Taxware instance, i.e. in the event the Taxware instance becomes temporarily unavailable for system maintenance. Database Tab: DATABASE DRIVER – the driver to be used with the WTK database associated with the Taxware instance; DATABASE TYPE – the type of database to be used with the WTK; DATABASE URL – the URL to be used with the WTK database; DATABASE USERNAME – the username to be used with the WTK database; DATABASE PASSWORD – the password to be used with the WTK database; CERTIFICATE DATABASE DRIVER – the driver to be used with the WTK STEP Certificate database associated with the Taxware instance; CERTIFICATE DATABASE TYPE – the type of database to be used with the WTK STEP Certificates; CERTIFICATE DATABASE URL – the URL to be used with the WTK STEP Certificate database; CERTIFICATE DATABASE USERNAME – the username to be used with the WTK STEP Certificate database; CERTIFICATE DATABASE PASSWORD – the password to be used with the WTK STEP Certificate database; Taxware Tab: AVP ZIP PATH – Full path to the VERAZIP (vzip) directory on the Taxware instance; AVP TAX PATH – Full path to the SALESTAX (salestax) directory on the Taxware instance; Page 97 of 122 © DuCharme, McMillen and Associates, Inc. 2013 DMA TaxAutomation WebToolKit User Reference Manual AVP OUT PATH – Full path to the OUTDATA (outdata) directory on the Taxware instance; AUDIT PATH – Full path to the AUDIT (audit) directory on the Taxware instance, containing the Audit File; ZIP IN PATH - Full path to the INDATA (indata) directory on the Taxware instance; ZIP OUT PATH - Full path to the OUTDATA (outdata) directory on the Taxware instance; VERAZIP PATH – Full path to the VERAZIP (vzip) directory on the Taxware instance; SALESTAX PATH – Full path to the SALESTAX (salestax) directory on the Taxware instance; STEP REAS PATH - Full path to the INDATA (indata) directory on the Taxware instance; REMOTE INDATA PATH - Full path to the INDATA (indata) directory on the Taxware instance (used for backwards compatibility with previous versions of the WTK); INDATA PATH - Full path to the INDATA (indata) directory on the Taxware instance; OUTDATA PATH - Full path to the OUTDATA (outdata) directory on the Taxware instance; STEP QUERY PATH – Full path to the directory on the Taxware instance where the Tax Automation STEP query programs are located. On Unix environments this is normally the directory where the UTL is installed. On Windows, this is the bin directory for the WTK service; CUST PATH – Same as STEP QUERY PATH; TK OUT PATH – Full path to the TKOUT (tkout) directory on the Taxware instance; REMOTE TK OUT PATH - Full path to the TKOUT (tkout) directory on the Taxware instance (used for backwards compatibility with previous versions of the WTK); Page 98 of 122 © DuCharme, McMillen and Associates, Inc. 2013 DMA TaxAutomation WebToolKit User Reference Manual MOUNTED OUTDATA PATH – Full path to the OUTDATA (outdata) directory on the Taxware instance (used for backwards compatibility with previous versions of the WTK); HOST TYPE – set to either UNIX or Windows; USE EXTENDED AUDIT – This flag indicates the structure of the taxaudit file (no = standard taxaudit file length). For taxware versions 4.0 and greater, if the flag is set no, the “USE_XL_AUDIT” field in the AVPTAX.INI file for windows or envars file for unix has to be set to “N”. TAXWARE VERSION: The Version of the Taxware system. USE SAP – either YES, NO, or DEFAULT (see SAP Configuration section later in this document for details on the available options) 11.3. User Roles ADMINISTRATION ---> User Roles To maintain predefined sets of permissions you can create user roles in the WTK. Typical roles would be “Administrator”, “Tax Manager” or “Customer Service Rep”. Once you have defined roles in the WTK, you can assign those roles to users as described earlier in this document. Page 99 of 122 © DuCharme, McMillen and Associates, Inc. 2013 DMA TaxAutomation WebToolKit User Reference Manual To create a new role, click the New User Role button and assign a Title and description for the role. The click go to the permissions tab and maintain the permissions for this role as described in the Maintain User section of this document. Save the new role by clicking the Save button. To edit an existing role, select a role from the Current Roles pulldown list. This will populate the role title and description as well as the role permissions on the Permissions tab. Save your changes to the role by clicking the Save button. To delete the selected role, click the Delete button. 11.4. Edit Toolkit The Edit Toolkit function allows you to maintain the technical setup information for the WTK server. Following a description of the available parameters: General Tab: WEB HOST IP – IP address or server name of the WTK server. Please make sure to include the port number if the Web Application Server hosting the WebToolkit is listening on a port other than the standard http port 80 (for example: webtoolkit.company.com:8080). TAX CALCULATOR PORT – The port through which the Tax Calculator executes its UTL transactions; TOOLKIT PATH – The context root of the WTK application as seen through a browser. This is normally /wtk; TOOLKIT HOME PATH – The context root and path of the WTK where the JSPs are located as seen through a browser. This is normally /wtk; CONFIGURATION PATH – The full path to the CONFIGURATION (conf) directory on the WTK server; WEB HOME PATH – The full path to the published WTK application on the WTK server; JSP HOME PATH – The full path to the published JSPs of the WTK application on the WTK server. This is normally the same WEB HOME PATH; Page 100 of 122 © DuCharme, McMillen and Associates, Inc. 2013 DMA TaxAutomation WebToolKit User Reference Manual OUPUT HOME PATH – The full path to the published OUTPUT directory of the WTK application on the WTK server; LOGO HOME PATH – The full path to the published IMAGES directory of the WTK application on the WTK server; WEB LOGO PATH – The path relative to the context root to the images directory as seen through the browser (including the context root); OUTPUT PATH – The path relative to the context root to the output directory used to display generated Taxware reports as seen through the browser (including the context root); LOG FILE PATH – The full path on the WTK server where the WTK application will write log files; LOCAL BIN – The full path to the local directory on the WTK for executing local programs (i.e. SAP RFC ); AUTO UPDATE PATH – The full path to the Auto Update utility install directory used to process Taxware updates; USE DATE VALIDATION – Default setting for the Use Date Validation flag on the STEP certificate screen USE PASSWORD ENCRYPTION – Default flag setting to encrypt all user password. PASSWORD MIN LENGTH – The minimum password length allowed when password encryption is enabled. (Note: 0 = no minimum length) PASSWORD SPECIAL CHARACTERS – The number of special characters required in a password when password encryption is enabled. (Note: 0 = no special characters required) PASSWORD EXPIRATION – The number of days a password will be considered valid before the user is prompted to change their password. The expiration field is activated when the password encryption flag is enabled. (Note: the default timeframe is 30 days. This value can be changed however it should not be 0) LOGIN ATTEMPT LIMIT – The number of incorrect login attempts allowed before the user account is locked. The attempt limit is activated when the password encryption flag is enabled. (Note: the default limit is 5 attempts. This value can be changed however it should not be 0) Page 101 of 122 © DuCharme, McMillen and Associates, Inc. 2013 DMA TaxAutomation WebToolKit User Reference Manual PASSWORD NUMERIC – The number of numeric values required in a password when password encryption is enabled. (Note: 0 = no numeric required) PASSWORD CAPS – The number of capital letters required in a password when password encryption is enabled. (Note: 0 = no caps required) Database Tab: DATABASE DRIVER – The current database driver associated with the WTK; DATABASE URL – The current database URL associated with the WTK; DATABASE USERNAME – The current database username for connection; DATABASE PASSWORD – The current database password for connection; Save your change to the WTK configuration setting by clicking the Save button. Page 102 of 122 © DuCharme, McMillen and Associates, Inc. 2013 DMA TaxAutomation WebToolKit User Reference Manual 11.5. External Customer Link The WTK has the ability to automatically populate customer address information when entering STEP certificates by calling into the ERP system’s customer repository or any other customer backend. The WTK provides a default external customer link implementation that allows for querying customer master records in SAP. To accomplish this, the WTK makes a remote function call to SAP (standard SAP RFC function: BAPI_GET_CUSTOMER_DETAIL) to obtain the customer address information. To maintain external customer link configurations, open the following link from the WTK’s main menu: ADMINISTRATION -> EXTERNAL CUSTOMER LINK. On the following screen, the WTK lists all external customer link configurations. To define a new configuration, click on “New Record”. To edit an existing SAP connection, select a record from the list. Click the “Save Record” button to save your changes or the “Delete Record” button to delete the selected external customer link configuration. It is possible to define multiple configurations, in case multiple companies with individual customer repositories are maintained in a single Taxware system. However, only a single customer backend can be defined per company. In addition to a set of individual configuration parameters, the following settings need to be made for all external customer link implementations: Configuration Property Implementation System Company Description The External Customer Implementation. Taxware instance ID as maintained under Administration->Systems. This field can be populated with the Taxware Company Code, thus allowing the user to set up multiple links for one WTK ID (allows for connection to a different customer repository based on the Taxware Company Code). Enter or select “ALL” if the configuration is not company specific and should be used for all companies. If a configuration for all companies exists as well as a company specific configuration, the system will pick the one that is company specific over the generic configuration. The default customer link implementation (com.dmainc.extcustomerlink. ExtCustomerLinkImplSapRfcCl) is a native C language implementation of SAP function BAPI_CUSTOMER_GETDETAIL. Page 103 of 122 © DuCharme, McMillen and Associates, Inc. 2013 DMA TaxAutomation WebToolKit User Reference Manual The implementation requires the following configuration parameters: Configuration Property Absolute location of executable SAP Destination SAP Client: SAP Username SAP Password SAP Language SAP Host SAP System Number SAP GW Host Description The absolute file path to the executable (e.g. d:\toolkit\bin\saprfccl.exe). SAP instance name (e.g., PRD, DEV, etc.). SAP client that contains the customer information. SAP user ID used by the WTK to log in to the SAP system. This user ID can be a type CPIC user, so that the “user” cannot log on interactively to the SAP system (for security purposes). However, it can also be a regular SAP dialog user ID. The user ID specified here must have authorization for the following: (1) To perform incoming RFC call; (2) To execute the function BAPI_CUSTOMER__GET_DETAIL; and (3) Read access to customer address information. See below for the exact SAP permissions required. SAP password of the User ID described above. SAP logon language, usually “EN” for English. IP address or server hostname of an SAP application server. Two-digit SAP system number (found in the SAPGUI logon parameters. IP address or server hostname of the SAP gateway process Page 104 of 122 © DuCharme, McMillen and Associates, Inc. 2013 DMA TaxAutomation WebToolKit User Reference Manual SAP GW Service Customer number padding character Customer number padding length Connection Timeout for the SAP instance to which the WTK is connected. Service name of the SAP gateway service to which the WTK is connected – usually sapgwxx, where “xx” is the SAP system number. The character that will be used to pad the customer number. For SAP systems with numerical customer numbers, this should be set to ‘0’. Leave this field empty if you do not want the customer number to be padded. The total length of the customer number. If the specified customer number is less than the value of this field, the system will use the padding character to pad it to the correct length. Timeout in seconds after which a request is cancelled. Please contact support at [email protected] or (561) 955-6820 Extension 202 for more information on custom external customer link implementations. Page 105 of 122 © DuCharme, McMillen and Associates, Inc. 2013 DMA TaxAutomation WebToolKit User Reference Manual 11.6. Audit Reporting Configuration The Audit Reporting function allows you to define header information for custom audit reports and lets you upload custom queries to be executed in the WebToolkit database. 11.6.1. Company Information When generating custom reports using the Audit Reporting functionality described earlier in this document, it is possible to specify a custom report header for each report. You can maintain custom report headers using the Audit Reporting Admin functionality. The custom report header contains address information about your reporting entity (company) as well as a company logo. To create a new report header, specify the following information and click the Save New Company button: Company Name: Name of the company (report header description). This name can be selected in the Company detail pulldown list on the Additional Options tab during the creation of a custom audit report (see Audit Reporting->Custom Reports) Address 1: Street Address Line 1 Address 2: Street Address Line 2 City State Country Zip Phone Fax Email Logo: Specify the file name of a logo that you would like to place on the report header. This file (jpg or gif format) needs to be located in the images directory of your WTK server. To upload a logo file from your PC to the WTK images directory, click the Upload Image button. This will allow you to browse for a logo file on your local PC and then upload this file to the WTK server. To change the report header information of an existing report header definition, select a Company Name in the Company pulldown list. This will populate the fields described above. Save any changes to your report header definition by clicking the Update Company button. To delete an existing report header definition, select the Company Name in the Company pulldown list and click the Delete Company button. Page 106 of 122 © DuCharme, McMillen and Associates, Inc. 2013 DMA TaxAutomation WebToolKit User Reference Manual The Next button allows you to go directly to the Custom Reports definition screen after defining a custom report header. 11.6.2. Upload Custom Query The Upload Custom Query tab allows for upload of custom SQL queries to the WebToolkit database. Note that this option does not execute the queries but only saves them in the database. To upload a custom query, enter an alias for the query that will help you recognize it and then click on the browse button. Select the file on your local hard drive that contains the query string and click on ok. Please make sure that each query in the file has to end with a semi-colon. Click on the “Submit” button to save the file contents to the database. To execute the query refer to the instructions given in 9.4. Update Audit Table. Please be aware that this is a very powerful feature that should only be used by users who are familiar with the Standard Query Language and the structure of the WebToolkit database. Page 107 of 122 © DuCharme, McMillen and Associates, Inc. 2013 DMA TaxAutomation WebToolKit User Reference Manual 11.6.3. Column Mapping The WebToolkit database contains extra fields that can be used to store information not available in the standard taxaudit file. The column mapping screen allows the user to customize the column name (for the corresponding data) that will appear in the custom reports. (note: the data columns are divided into three categories small, medium and large to store data of varying sizes. The data for the custom columns have to be populated by an external process.) See section 9 Audit Reporting on how to run custom report. Page 108 of 122 © DuCharme, McMillen and Associates, Inc. 2013 DMA TaxAutomation WebToolKit User Reference Manual 11.7. Certificate Validation The Certificate Validation feature assists the user with entering certain certificate related information. Firstly, you can configure the WebToolkit to automatically populate the expiration date when entering a new certificate; secondly, you can have the WebToolkit validate the certificate number that was entered by the user. It is possible to setup these validations for each state/reason code combination, e.g. “Sales to exempt charitable organization” might expire within 12 months in Connecticut whereas all other exemption certificates might be valid for 36 months by default. Page 109 of 122 © DuCharme, McMillen and Associates, Inc. 2013 DMA TaxAutomation WebToolKit User Reference Manual To setup a validation record, first select a state and reason code in the dropdown menus to the left. To setup a validation record for all reason codes within a state, select “All Reason Codes” under Reason Code Description. Next, specify for how long a certificate is valid for by default for this state/reason code combination. This determines the expiration date of the certificate when entering a new certificate. If you leave the field blank, the WebToolkit will not automatically populate the expiration date. Similarly you can setup one or multiple certificate number patterns. A certificate number pattern defines a valid certificate number format, i.e. if a user enters a new certificate and specifies a certificate number that does not match any of the certificate number patterns that are setup for the selected state/reason code combination, the WebToolkit will advice the user to review his entry. Do not enter any certificate number patterns to disable certificate number validation for a particular state/reason code combination. To delete a certificate validation record, select it from the list and click on remove. 11.8. Tax Calculator Defaults Page 110 of 122 © DuCharme, McMillen and Associates, Inc. 2013 DMA TaxAutomation WebToolKit User Reference Manual This function allows you to maintain default values for the Tax Calculator function described earlier in this document. The values maintained here will automatically populate into Tax Calculator screens every time you access the Tax Calculator function. In the Systems section, check the checkboxes for each Taxware system for which these default values should be applicable. After maintaining the desired default values, click the Save button to save your default values. 11.9. Background Process Status This screen monitors the import of an Audit or Step file into the system as well as the verification process of the audit file. Clicking the refresh button will update the screen for your Taxware instance that you are importing to. The buttons “copy audit file” and “clean audit file” will become available once the audit file verification terminates and bad records are found. 11.10. XLS To Steptran Template Config Page 111 of 122 © DuCharme, McMillen and Associates, Inc. 2013 DMA TaxAutomation WebToolKit User Reference Manual This screen allows you to create or edit a template that maps MS Excel spreadsheet columns to the actual steptran fields. You can use the template created here to generate steptran files if you have some step data in an Excel spreadsheet. You need to first choose whether you need to update an existing template or create a new template. Selecting either option takes you to the next screen with either values already populated (in case of Edit) or a blank template (in case of New). You can add new column mappings by simply selecting a STEP column name from a dropdown and a corresponding XLS column position and clicking the Add button. If you need to edit any existing mapping, simply click on the mapping that exists in the table on the right, make changes to it and click the update button. Once you have made all the additions/changes, simply click on the Save button at the top to save the mappings. You can use the created/modified template from under TOOLS STEP TOOLS XLS TO STEPTRAN along with an Excel spreadsheet to generate a steptran file from it. Note: If a certificate is valid for multiple states, keyword “ALL” can be used in the corresponding “state code” column of the Excel sheet to create a certificate for each state. If the certificate is valid for specific states only, provide a comma separated list of states in the “state code” column of the Excel sheet, e.g. “AL,CA,TN,UT”. Page 112 of 122 © DuCharme, McMillen and Associates, Inc. 2013 DMA TaxAutomation WebToolKit User Reference Manual XLS to Steptran Config for Canadian Customers: Similar to the creation of excemption certificates under the “Create new Certificate” option, there are some differences when configuring and XLS file for Canadian customers. The state flag column will be set to CN and if you are doing PST based exemptions the county column will contain the province name. Set the Jurisdiction code to “1” to exempt at the GST level and to “3” to exempt at the PST level. When dealing with the State jurisdiction level be sure to also set the “Default to state flag” according to how you want to exempt the customer. If it set to “D” then all jurisditction levels will be exempt. If it is set to “S” then only the state level will be exempt. 12. AUTO UPDATE The WTK AutoUpdate function allows you to automatically apply the monthly Taxware file updates to your Taxware systems. The AutoUpdate processes the following Taxware updates: Tax Master file updates (TAX020) Product Code Master file updates (TAX007) VERAZIP file updates (ZIP and County files) (ZIP040) Control/Runtime files Besides executing the file update functions, the AutoUpdate function also allows you to perform complete master file replacements (Load function). Page 113 of 122 © DuCharme, McMillen and Associates, Inc. 2013 DMA TaxAutomation WebToolKit User Reference Manual The AutoUpdate function can be scheduled to run automatically at a specified interval, or it can be run on demand. When running the AutoUpdate function, you can specify which Taxware instances should be updated by the AutoUpdate function. This allows you perform updates first in your test/QA environment and then, at a later point, in your production Taxware environment. When executing the AutoUpdate function, the following steps are performed automatically by the system: 1. The AutoUpdate process connects to the TaxAutomation website to determine the current file update versions available from Taxware. This information is downloaded to your WTK server via a secure connection in the form of an XML instruction file. 2. The AutoUpdate function determines which available Taxware file versions are applicable to your selected Taxware instances 3. The AutoUpdate function connects to the Taxware Web Support Center Website and downloads the applicable Taxware update zip files via a secure connection to the /toolkit/AutoUpdate/TaxwareUpdates directory on your WTK server 4. The AutoUpdate function decompresses the downloaded file updates in zip format 5. The AutoUpdate function renames the decompressed Taxware update files to their required file names 6. The AutoUpdate function uploads the Taxware update files to the indata directory on your Taxware server 7. The AutoUpdate function executes the Taxware import programs (TAX020, TAX007, ZIP080 and ZIP040 for file updates and TAX021, TAX006 and ZIP010 for master file replacements. 8. For Taxware versions 3.6 and higher, the AutoUpdate function executes the SUTUPDATE import program for exception rule updates. 9. The AutoUpdate function captures all output from the above Taxware programs (log files) and downloads those logs to the WTK server 10. The AutoUpdate function emails all log files and update version information to a predefined set of email recipients within your organization. In addition, the log information is also made available via the AutoUpdate Status function described later in this document. Should you not allow internet connectivity for your WTK server (prerequisite for the process described above), you can manually download the Taxware update zip files to the /toolkit/AutoUpdate/TaxwareUpdates directory on your WTK server. Once the files are present in this directory, you can then execute the AutoUpdate function. The AutoUpdate function will then skip steps 1-3 as described above and only perform steps 4-9 (for which no internet connectivity is required). Page 114 of 122 © DuCharme, McMillen and Associates, Inc. 2013 DMA TaxAutomation WebToolKit User Reference Manual 12.1. Auto Update Status The AutoUpdate status report provides access to all log information that was generated during each execution of the AutoUpdate function. The report details for each run-date the following information by Taxware instance (Taxware instances are listed as tabs. Click on each instance tab to view the status information for that instance): Status: General status information for this run. Possible status values are: • No Updates Available: Your Taxware system(s) are on the most current file versions. No updates were required at this time. • Success with Updates: Taxware update files were successfully applied to your Taxware system(s). • Partial Success: Taxware update file were applied to your Taxware system(s), but at least one file update had errors. See the attached log files to determine which update file(s) were not applied successfully. • Failure: The attempt to apply the Taxware update files failed completely, i.e. due to missing connectivity to the internet or connectivity problems between the WTK server and the Taxware instance(s). Product: For successful product taxability file updates, the applied product taxability update file version is displayed. Attempted but unapplied update file versions are displayed in red. VERAZIP: For successful ZIP file updates, the applied ZIP update file version is displayed in green. Attempted but unapplied update file versions are displayed in red. Sales Tax: For successful tax master file updates, the applied tax master update file version is displayed. Attempted but unapplied update file versions are displayed in red. Logs: Use your mouse to roll over the displayed log file icon, which will display the name of the log file. Click the log file icon to display the contents of the corresponding log files. All log files produced by the AutoUpdate function, the Taxware import programs and the Taxware change notification files (SumChng files) are accessible here. 12.2. Auto Update Configuration Page 115 of 122 © DuCharme, McMillen and Associates, Inc. 2013 DMA TaxAutomation WebToolKit User Reference Manual This function allows you to configure, schedule and execute the WTK AutoUpdate function. To manually trigger the execution of an AutoUpdate run, click the Run button. You can trigger the AutoUpdate run at any time, even in the event you already have an AutoUpdate job scheduled (see Scheduler Tab for more information on how to schedule an AutoUpdate job). To purge the log files that are produced during the AutoUpdate run, click the Purge Logs button. This will allow you to purge all log files for a specified period or to purge only those logs that were produced by AutoUpdate runs which did not result in an update to any of your Taxware instances. Taxware Instances Tab: Here you will see a list of all Taxware instances that are connected to the WTK. With the on/off checkbox next to each Taxware instance name, you control whether or not a specific instance should be updated by the AutoUpdate function. (Checkbox checked: Instance will be updated by AutoUpdate) With the Update/Load radio button, you control whether and update or a master file replacement is performed for a specific instance. Note that you will need to click the Save button to activate any changes to the Taxware instances tab. Page 116 of 122 © DuCharme, McMillen and Associates, Inc. 2013 DMA TaxAutomation WebToolKit User Reference Manual Configuration Tab: On the Configuration tab you specify the technical setting for the AutoUpdate function. The following settings are available: Note that you will need to click the Save button to activate any changes to the Configuration tab. Allow Remote Access: • TRUE: WTK has internet connectivity and you want the AutoUpdate function to automatically download all update files from the Taxware Web Support Center website • FALSE: WTK has no internet connectivity and you want to manually download the update files from the Taxware Web Support Center Website. In this case, manually place the compressed Taxware update files (.exe files) into the /toolkit/AutoUpdate/TaxwareUpdates directory on your WTK server. Allow Software Updates: • TRUE: Allow the AutoUpdate function to automatically apply software updates to the AutoUpdate software • FALSE: Do not allow automatic software updates to the AutoUpdate function Debug Enabled: • TRUE: The AutoUpdate function will write very detailed trace information. • FALSE: No trace file is written Note that in normal operation, this setting should be set to FALSE. Only set the Debug option to TRUE, if you are asked to do so by a TaxAutomation Support specialist. Force Partial Sales Tax: • TRUE: Automatically increment the current version number in Taxware file txupdtno in the indata directory on your Taxware server in the event that the Taxware import program TAX020 reports only a partial success • FALSE: Do not increment the current version number in the txupdtno file in the event of a partial success of program TAX020 Note: If you set this setting to FALSE, you will need to manually research and correct any circumstances that caused the TAX020 program to report a partial success, prior to being able to re-run the AutoUpdate function. Force Partial Product: Page 117 of 122 © DuCharme, McMillen and Associates, Inc. 2013 DMA TaxAutomation WebToolKit User Reference Manual • TRUE: Automatically increment the current version number in Taxware file txupdtno in the indata directory on your Taxware server in the event that the Taxware import program TAX007 reports only a partial success • FALSE: Do not increment the current version number in the txupdtno file in the event of a partial success of program TAX007 Note: If you set this setting to FALSE, you will need to manually research and correct any circumstances that caused the TAX007 program to report a partial success, prior to being able to re-run the AutoUpdate function. Force Partial VERAZIP: • TRUE: Automatically increment the current version number in Taxware file zpupdtno in the indata directory on your Taxware server in the event that the Taxware import program ZIP040 reports only a partial success • FALSE: Do not increment the current version number in the zpupdtno file in the event of a partial success of program ZIP040 Note: If you set this setting to FALSE, you will need to manually research and correct any circumstances that caused the ZIP040 program to report a partial success, prior to being able to re-run the AutoUpdate function. TaxAutomation User ID: Login user-id to the TaxAutomation AutoUpdate website (to retrieve XML update instruction set from TaxAutomation). This user-id will be provided by your TaxAutomation Support Specialist. TaxAutomation Password: Password for the above user id Taxware User ID: Login user-id to the Taxware Web Support Center website. This user id will be provided by Taxware Taxware Password: Password for the above user id When Email: • Always: Always send an email notification when the AutoUpdate function is executed (even in the event that no updates were applied) • Never: Never send an email notification when the AutoUpdate function I executed • Updates: Only send an email notification in the event the AutoUpdate function applied updates to the Taxware system SMTP Host: IP address or server name of your SMTP (email) server Email From Display: Name that will show as from Name on the AutoUpdate notification email Page 118 of 122 © DuCharme, McMillen and Associates, Inc. 2013 DMA TaxAutomation WebToolKit User Reference Manual Email From Address: email address that will show as from email on the AutoUpdate notification email Recipient list: Email addresses of all recipients for the AutoUpdate notification email. Separate multiple addresses by comma. Page 119 of 122 © DuCharme, McMillen and Associates, Inc. 2013 DMA TaxAutomation WebToolKit User Reference Manual Scheduler Tab: To define a scheduled job that will automatically execute the AutoUpdate function on a regular basis, use the Scheduler tab. Here you can also monitor the status of the AutoUpdate job. Note that you will need to click the Save button to activate any changes to the scheduler tab. Scheduler Status: Status of the AutoUpdate Scheduler. A status of Started indicates the an AutoUpdate job is scheduled to run a the specified frequency and date/time. A status of Stopped indicates that there is no AutoUpdate job scheduled at is time. Note that restarting the WTK server will terminate any scheduled jobs and will require you to restart the AutoUpdate job scheduler. Start/Stop Scheduler: • Start: To start the AutoUpdate job scheduler in the event the current scheduler status is Stopped • Stop: To stop the AutoUpdate job scheduler in the event the current scheduler status is Started Execution Interval: • Daily: Execute the AutoUpdate job on daily basis • Weekly: Execute the AutoUpdate job on a weekly basis Start Date: Date of first execution for AutoUpdate job Start Time: Start time of AutoUpdate job. Note that you should schedule the AutoUpdate job during periods of no or minimal activity in your Taxware system (i.e. during nights or weekends). Note that changes in the execution time/interval require a restart of the scheduler process. Page 120 of 122 © DuCharme, McMillen and Associates, Inc. 2013 DMA TaxAutomation WebToolKit User Reference Manual Current Versions Tab: The Current Versions Tab shows you the current Taxware file versions that are applied to your Taxware instances (as recorded in the txupdtno and zpupdtno files in the indata directory on your Taxware server) Page 121 of 122 © DuCharme, McMillen and Associates, Inc. 2013 DMA TaxAutomation WebToolKit User Reference Manual Page 122 of 122 © DuCharme, McMillen and Associates, Inc. 2013