1
(II
WI
WI
WI
Solar Observation
ISurvey I ISolar Observation I
WI
WI
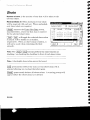
The Solar Observation screen is used to compute the azimuth to an
arbitrary backsight based on the position of a celestial body; typically
the sun.
WARNING! Direct viewing of the sun without a proper
filter will cause serious eye damage. Pointing a total station
directly toward the sun without a solar filter can also damage the
EDM components.
Find Azimuth Using Ephemeris Data: select this
method if you plan to enter data from an
ephemeris.
III
III
m
Select Method
I!mm
SSP3ct an Observation Meltloej::'
.. Fincf AZlmL1th Usinq ~herneris Data
Find Azimuth Using Date and Time: select this
method if you do not plan to use an ephemeris.
(' Find p,zlInu1;h t!slng Qate and Tll11e
Note: The fields within the Solar Observations
screen will vary depending on the method
selected above. All of the fields from each
method are described below.
I Settings [: located at the top of the screen, is a
shortcut to the Daterrime Settings screen (Page
R-36).
Lat. / Long.: is the latitude and longitude of the
total station. These values can be scaled from a
map, such as a U.S.G.S. 7.5-minute quadrangle
sheet or collected with a handheld GPS unit.
s~ttinW!1 Close
Aim
R-98
::1
!Left Edge ofCentBr'
~,pn-Llnear
tjor
djnation:Y
pnec I c;, .. , State Grid:Y
('tl -
GHAO
I:
Ip627:/~9
GHp,24 1176,2:35:31
Dec~1
be.
I-L',2'-14:,3
Pec1241-12iJC5J9
Splar Serrli-Di"rnewr
Iu
16129
II
l])
; II
---
19n9, 1C!:=:c:W3
Aim: selects the portion of the celestial body that where you intend to
aim. You can select Left Edge of Center, Center, or Right Edge of
Center.
..
......
......
..
..
..
..
......
..
..
..
..
..
..
.
•
(II
~ i
~D~ I
II
III
III
Note: Typically Left Edge of Center is selected when performing a sun
shot in the northern hemisphere and Center is selected for star shots.
[9']"4411.;';
I Corrections I:
displays which corrections are
currently selected with an N for no, or a Y for yes.
When tapped, the Corrections dialog box opens
where the following corrections are configured.
P N,:)t',-Lil1eP,lt !2eclinat.kln Correction
r
,
Correct to ~rid
CenlBr Meridian
r
I.c::.'
Use Zone ~onst3nt
I
•
0 Non-linear Declination Correction:
applies a correction for the linear
interpolation of the declination of the sun for the time that an
observation is taken. This error is usually negligible, but is
removed when this is checked. (This should only be checked
when performing sun shots.)
Zone CbnMant
•
0 Correct to State Grid: when selected, the computed
azimuth is referenced from the local State Plane grid rather
than true north.
•
R:I Center Meridian / Zone Constant: these values are used to
adjust the computed azimuth to the local State Plane grid.
Appendix A lists these values for the United States.
GHAO: is the Greenwich Hour Angle of the sun at zero hour Universal
Time, Greenwich, on the current date.
DeclO: is the declination of the sun at zero hour on the current date.
GHA24: is the Greenwich Hour Angle of the sun at zero hour
Universal Time, Greenwich, on the following day (24-hours later).
Dec124: is the declination of the sun at zero hour on the following day.
Solar Semi-Diameter: is the semi-diameter of the sun, expressed in
minutes and seconds.
R·99
~
f!M
f!J
..
Shots
@II
@II
@II
Number of sets: is the number of sets that will be taken to the
celestial object.
Reverse Shots 0: When checked, reverse shots
will be required with each set. When unchecked,
only direct shots are required.
Io."fi1J;T111
pir
Toss I / I Incll: will toggle the selected observation
so that it will be hidden or un-hidden,
respectively. When an observation is hidden, it
will not be used when calculating the final
azimuth.
•
Number of sets
I Shoot I: accesses the Enter Shot Data screen,
described below, where the shot data is entered
for the selected observation.
I
13
AZimutl,
~
BD
·~1
[11
"35"3'~1[112::::\\
~
[12
~:5'::')11]'27"
orI
[1.3
~:5::::oI]9l5211
I
Note: The IToss 1/ IIncll buttons perform the same function as
checking / un-checking the checkbox in front of each observation.
Note: A backsight observation cannot be tossed.
@ill: permanently deletes the most current observation if it is
selected allowing you to shoot that shot again.
I Reset I: permanently deletes all observations.
appear before the observations are deleted.
R-IOO
Settiflas I Clnse
I
A warning prompt will
::J
t2?verse shotsP"
un Time
rn
....
....
......
....
....
......
....
......
..
III
III
~
~
~
~
':;
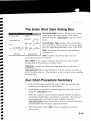
The Enter Shot Data Dialog Box
'IMiimtl.mN;fjijmn'.nm- OK I clQ!>~1
lo,ooclO
Horizont'3I Angle:
01/01/2000
currentIJatce/iimEl
DUT:
r",llvl
DD
(W
yyy\,
FFI
Date:
Time;
13:22:43
Hrs Te, (:;MTHH
r;:-'.".
U
I" .
1-
3.
Take§hot
J
MM
r7"'.............
I .".,
. !OS
r;---..
I', •\.
Get LQc.:l1
SSB
Horizontal Angle: displays the horizontal angle
measured bv the total station. This value is
updated with the
button, described
below.
[Ta}ZesFOD
Current Date / Time: displays the current date,
time, and DDT. These settings can be changed
from the Date/Time Settings screen (Page R-36l.
Date: if incorrect, the current date should be
lime
entered here.
Time: is where the precise time that the
observation occurred is entered.
Hrs to GMT: is the number of hours that the time at the current
location differs from Greenwich Mean Time.
[ake Shot I: records the horizontal angle from the total station.
I Get Local Time I: fills in the Time field
with the current time that is
set in the data collector. This function is not available when shooting
the backsight.
Sun Shot Procedure Summary
1. Point the telescope ahead of the path of the sun and lock the
horizontal movement of the total station.
2. Immediately record the horizontal angle from the total station
using the I Take Shot I button.
3. When the target becomes properly aligned with the crosshairs,
record the current time as accurately as possible. The time can
be automatically read from the data collector using the
I Get Local Time Ibutton, or measured from an external time piece
and manually entered in the appropriate fields.
I
4. When finished, tap the I OK button to complete the current
observation.
R·IOI
.,.
When all observations are complete, the Results page displays the
computed azimuth to the backsight.
Results
BS D/R: is the horizontal angle recorded to the backsight for the
particular direct/reverse observation.
Azi D/R: is the computed azimuth to the backsight for the particular
direct/reverse observation.
Avg: is the computed average azimuth of the backsight, relative to
true north.
Grid Avg: is the computed average azimuth of the backsight, relative
to the local State Plane grid. This field is only displayed when a state
grid correction is applied.
Note: See the User's Manual for more information on the usage of the
Solar Observation routine.
~
~
......
....
....
....
..
....
...
.
".
~
~
~
~
~
~
R-102
..
..
•
••
~
~
~
~
Solar Observations
~
~
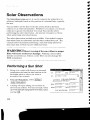
The Solar Observation screen is used to compute the azimuth to an
arbitrary backsight based on the position of a celestial body, typically
the sun.
~
~
~
You can either use the time set in the system clock on the data
collector or an external timepiece. Whichever you choose, you should
calibrate it against Coordinated Universal Time shortly before
performing the solar observation. An accurate timepiece is critical
when performing solar observations.
....
....
~
~
Two solar observation methods are available. One method requires
data taken from an ephemeris and the other method does not. The
example below illustrates performing a sun shot using ephemeris
data since that method requires additional steps.
fI!M
WARNING! Direct viewing of the sun without a proper
filter will cause serious eye damage. Pointing a total station
~
directly toward the sun without a solar filter can also damage the
EDM components.
ftJ
Performing a Sun Shot
1. Setup over a point with known or assumed
coordinates and aim the total station at the
backsight point to where you want to
determine the azimuth.
2.
From the Main Menu, select I Survey
I Solar Observation I.
I,
settinsr: I Close
137 ,2700
Lat.
Long.
t
~
("'"orr"-,t"'IO't,',,,~,', "I, NO,"",n,.j,-inear 'PB,".",·"dir,a~!qn:y
¥-
• -I:; '. h"
SlBlB Grid: Y
o
.,
D
~
~
If!
:::r
ur
DeclO !-12,;c445::
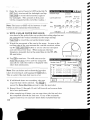
3. A dialog will open asking you to select an
observation method. For this example, select
the Find Azimuth Using Ephemeris Data option
and tap~.
....
..
~
~
GHA2411i6,2:=:S::H
OecI24l'l;c,U::S::9
Solar S8rrikDlametEr
10 16129
~
..
~
110
"
~
~
4. Enter the latitude and longitude for your occupy point in the Lat.
and Long. fields, respectively.
Note: Your latitude and longitude should have enough accuracy if it
is scaled from a topographic map or measured using a handheld GPS
unit.
5. In the Aim field, select the area of the celestial bocly where you
plan to take your measurements. For sun shots, the trailing edge
is usually used. (The left edge when in the northern hemisphere.)
I
I
6. Tap the Corrections... button if the correction settings displayed
to the right of the button need to be changed.
•
If performing a sun shot, check the Non-Linear Declination
Correction checkbox. <Leave it unchpcked for star shots.)
•
Check the Correct to State Grid checkbox if you want the
computed azimuth corrected to align with the local state
plane coordinate system.
Note: The Central Meridian and Zone Constant values for the United
States are provided in Appendix A of the Reference Manual.
7. Refer to a current ephemeris and fill in the remaining five values.
When the screen is correctly filled in, tap the Shots tab.
Note: The GRAD and DeclO values are read from the ephemeris for
the current date. The GHA24 and Decl24 values are listed in the
ephemeris for the following day. The semi-diameter is in minutes
and seconds so your value will look something like 0.16084.
8.
Tap the IShooij button to open the Enter Shot Data screen.
111
9. Enter the correct hours to GMT in the Hrs To
GMT field, aim toward the backsight and tap
[ake Sho~ to record the horizontal angle to
the backsight. (The azimuth to this point
will be computed at the end of the routine.)
I!DDMiil.m• •1rml.nM Q~ICI()sel
HQl'izontCiI~ngle
IOOOOOD
12/07/1999
Current Date!Tirne
Date
Note: The hours to GMT will be between -5 and
8 when in the continental United States.
Hrs To GMT
Time
1-:::
:;:]
MM
DD
112
lo~
Mf'11
S5
HH
fOB fC8
0.0
,{'(\.ol
I
199'~
roo I
sss
10. WITH A SOLAR FILTER INSTALLED,
aim ahead of the path of the sun so that the trailing edge has not
yet contacted the vertical crosshair in the scope and tap
[ake Sho~ to record the current horizontal angle.
11. Watch the movement of the sun in the scope. As soon as the
trailing edge of the sun contacts the vertical crosshair, either
tap the IGet Local Timel button or use an external timepiece
and note the precise time. (When using an external
timepiece, manually key in the noted time in the HH, MM,
88, sss fields.)
Get local time now!
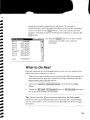
12. Tap IQEI to continue. You will return to the
Solar Observation screen and the computed
azimuth for each shot taken is displayed with
other shot information.
Solar Observation
Number of sets
13
AzJrnulti
SeWn
:::oJ
14. Repeat Steps] 0 through 12 until all forward and reverse shots
have been performed.
15. After completing all shots, you can scan down the list and view
the computed azimuth for each one. If any of the azimuths
appear incorrect, you can have those shots excluded from the
112
1]"00'[
:2:,CIIJ~:
241':'43
Ci7.13 :07001
241"'51
07:13:.39,002
241°57
:====:::;-_--.-__
13. If additional shots are remaining, the next
required shot will be selected. Tap IShoo~ to
access the Enter Shot Data screen to take the next shot.
Close
[]
un Time
07 12
Note: You can delete and re-shoot the last shot
taken by selecting it and tapping the ~ button.
This is useful if the last shot was in error.
tlever'38 '3hots r.-
'"
.,
......
....
....
-...-.
--..,,
.,
",
Get Local lime
Take :ahot
."
."
."
08:03 :29
DUT:
''""
~
IjJ
=r
3
~Il:~~
.,.,
.,.,
.,.,
..
~
-
computed average azimuth from all shots. To exclude a
particular shot, select the shot and then either tap the checkbox
next to the shot or the [ossl button. (You can include the shot
again by selecting it and re-checking the checkbox or tapping the
IIndl button.
Solar Observation
BS: D
Azi: D
Azi: D
Azi: D
BS: R
Tossed!
Azi: R
Azi: R
0°00'00"
353°10'23"
353° 10'27"
353°09'52"
0'='00'05"
352°47'32"
3S3 c'07'1O"
353°06'31"
Avg:
353c'08 '53"
r:;l
~
~
.r:;l
'#
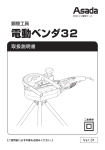
16. Tap the IResultsl tab to view the average
computed azimuth to the selected
backsight.
,"'T
~
~;J
What to Do Next
With the azimuth to the backsight known, you can now perform the
following steps to begin your survey.
1. Without moving from the occupy point used while performing the
solar observation, note the computed average azimuth from the
Solar Observation Results screen.
2. Access the ISurvey
Menu.
I, ISacksight Setup
1
screen from the Main
3. Toggle the Iss pOinij / Iss Directionl button to
the computed azimuth in that field.
Iss Directionl and enter
Tip: You can use the ~ power button and select the Past results...
option to select and automatically enter the azimuth computed from
the sun shot earlier. You can also access Past Results from the ~
[JJ hotkey.
113
•
~
4. Fill in the remaining fields with your current information and tap
ISolvel.
I
5. Access the Surve ,I Traverse / Sideshot screen from the Main
Menu (or use the Gtrl -[R] hotkey), aim toward the backsight used
during the solar observation, zero your horizontal angle on the
total station and tap either ISide Sho~ or tt"raversel. The data
collected should be aligned correctly with true north or your local
state plane coordinate system.
~
~
~
~
~
.,..,.
~
.,.
.,.
.,.
.,.
.,.
~
~
~
#'
#'
#'
.,..,.
.,.
~
~
~
~
~
~
114
.
.
~