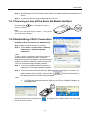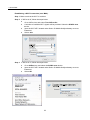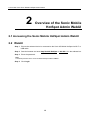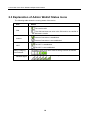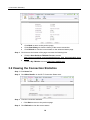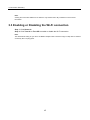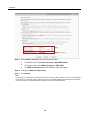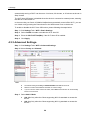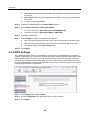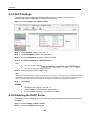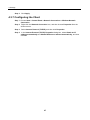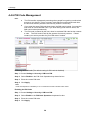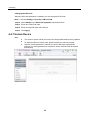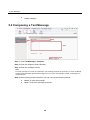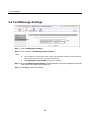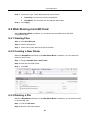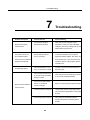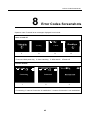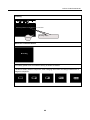
1
1 Quick Start Contents 1 Quick Start ....................................................................................................................... 3 1.1 Getting to Know Your Sonic 4G Mobile HotSpot .............................................................................. 3 1.2 Connection Scenarios ...................................................................................................................... 4 1.3 Appearance & Screen ...................................................................................................................... 5 1.3.1 Appearance ............................................................................................................................. 5 1.3.2 Screen Elements ..................................................................................................................... 6 1.4 Installing & Charging ........................................................................................................................ 7 1.4.1 Installing the SIM Card and the Battery ................................................................................... 7 1.4.2 Installing & Removing the microSD Card ................................................................................ 7 1.4.3 Charging the Battery................................................................................................................ 8 1.5 Accessing the Internet via Wi-Fi Connection ................................................................................... 8 1.5.1 Powering on and off the Sonic 4G Mobile HotSpot ................................................................. 9 1.5.2 Establishing a Wi-Fi Connection ............................................................................................. 9 1.5.3 Accessing the Internet ........................................................................................................... 12 1.6 Establishing a WPS Connection .................................................................................................... 12 1.7 Resetting Factory Defaults ............................................................................................................. 12 2 Overview of the Sonic Mobile HotSpot Admin WebUI ............................................... 13 2.1 Accessing the Sonic Mobile HotSpot Admin WebUI ...................................................................... 13 2.2 WebUI............................................................................................................................................. 13 2.3 Explanation of Admin WebUI Status Icons ..................................................................................... 14 3 Connection Summary ................................................................................................... 15 3.1 Viewing Connection Status............................................................................................................. 15 3.2 Viewing the Connection Statistics .................................................................................................. 16 3.3 Enabling or Disabling the Wi-Fi connection ................................................................................... 17 4 Settings.......................................................................................................................... 18 4.1 Device Settings .............................................................................................................................. 18 4.1.1 Configuring the SSID ............................................................................................................. 18 4.1.2 Changing the Admin UI Password ......................................................................................... 20 4.2 Network Settings ............................................................................................................................ 21 4.2.1 Selecting Network .................................................................................................................. 21 4.2.2 Selecting Profile ..................................................................................................................... 22 4.2.3 Setting Profile ........................................................................................................................ 22 4.3 Wi-Fi Settings ................................................................................................................................. 23 4.3.1 Enabling or Disabling the Wi-Fi ............................................................................................. 23 1 1 Quick Start 4.3.2 Wi-Fi Auto Off ........................................................................................................................ 23 4.3.3 Advanced Settings. ................................................................................................................ 24 4.3.4 WPS Settings ........................................................................................................................ 25 4.3.5 DHCP Settings....................................................................................................................... 26 4.3.6 Disabling the DHCP Server ................................................................................................... 26 4.3.7 Configuring the Client ............................................................................................................ 27 4.4 Security Settings ............................................................................................................................ 29 4.4.1 Wi-Fi Settings ........................................................................................................................ 29 4.4.2 Firewall Settings .................................................................................................................... 30 4.4.3 WLAN MAC Filter .................................................................................................................. 31 4.4.4 LAN IP Filter .......................................................................................................................... 31 4.4.5 UPnP Settings ....................................................................................................................... 33 4.4.6 PIN Code Management ......................................................................................................... 34 4.4.7 Unlock Device ........................................................................................................................ 35 4.5 System Management ..................................................................................................................... 36 4.5.1 Backup Settings ..................................................................................................................... 36 4.5.2 Restart ................................................................................................................................... 36 4.5.3 Restoring the Factory Defaults .............................................................................................. 36 5 Text Message................................................................................................................. 37 5.1 Creating and Sending a Text Messages ........................................................................................ 37 5.2 Composing a Text Message ........................................................................................................... 38 5.3 Text Message Settings ................................................................................................................... 39 6 microSD Card ................................................................................................................ 40 6.1 microSD Card Settings ................................................................................................................... 40 6.2 Web Sharing microSD Card ........................................................................................................... 41 6.2.1 Viewing Files.......................................................................................................................... 41 6.2.2 Creating a New Folder........................................................................................................... 41 6.2.3 Deleting a File ........................................................................................................................ 41 6.2.4 Uploading a File ..................................................................................................................... 42 6.2.5 Accessing microSD Card via USB ......................................................................................... 42 7 Troubleshooting ............................................................................................................ 43 8 Error Codes Screenshots ............................................................................................. 45 9 Acronyms and Abbreviations ...................................................................................... 48 2 1 Quick Start 1 Quick Start 1.1 Getting to Know Your Sonic 4G Mobile HotSpot The package contains the following items. If any of the items are missing or damaged, contact your local dealer immediately. Quick Start Guide Safety Information T-Mobile T’S &C’S Data cable Sonic 4G Mobile HotSpot Charger 3 Battery Storage Pouch 1 Quick Start 1.2 Connection Scenarios The actual connection procedure depends on the operating system of the Wi-Fi device. The connection scenarios illustrated here are for your reference. Scenario 1: Multi-device access via Wi-Fi Smart phone Scenario 2: One-device access via USB Game machine Digital camera Tablet Laptop Scenario 3: Multi-device access via Wi-Fi and USB at the same time Note: Five devices can be connected at the same time. 4 1 Quick Start 1.3 Appearance & Screen 1.3.1 Appearance No. Item 1 Screen 2 WPS button 3 Power button 4 USB/Charge connector 5 Reset button 6 SIM card slot 7 microSD Card slot 5 1 Quick Start 1.3.2 Screen Elements No. 1 Elements Description Main view Network signal indicator 2 Network indicator (2G, 3G or 4G) 3 Wi-Fi indicator 4 Wi-Fi users connected 5 Internet indicator 6 Message indicator Number of unread messages 7 8 9 10 Battery/Charging indicator Operator Name Roaming indicator 6 1 Quick Start 1.4 Installing & Charging 1.4.1 Installing the SIM Card and the Battery Install the SIM card in the card slot. Be sure that the SIM card is facing in the right direction, as shown in figure 2, and then slide the SIM card into the slot. 3 2 1 4 1 2 1.4.2 Installing & Removing the microSD Card Install the microSD card as shown. Note: The microSD card is an optional accessory. The Sonic 4G Mobile Hotspot supports up to 32GB. To install the microSD card, ensure that the battery is removed from the device. Insert the microSD card into the designated slot until resistance is felt and a click sounds. To safely remove the microSD card, ensure the device is powered off and the battery is taken out. Then press the card gently. The microSD card will pop out for removal. 7 1 Quick Start 1.4.3 Charging the Battery Note: The battery comes partially charged. It is recommend to fully charge the battery before first use. Charging with the provided wall charger will take approximately 4 hours with the device turned off; Charging using the data cable connected to a PC will take approximately 6 hours with the device turned off. Method 1: Using the wall charger Caution: Only use the wall charger provided with your Sonic 4G Mobile HotSpot. Use of a charger outside of what was provided may cause the Sonic 4G Mobile HotSpot to malfunction, fail, or could even cause a fire. Such use voids all warranties, whether expressed or implied, on the product. Method 2: Connecting to a PC for charging Connect the Sonic 4G Mobile HotSpot to a PC using the date cable provided with your Sonic 4G Mobile HotSpot. Note: The Sonic 4G Mobile HotSpot should be turned off. If the Sonic 4G Mobile HotSpot is turned on it will initiate an active data connection to your PC and may not charge. 1.5 Accessing the Internet via Wi-Fi Connection Note: Follow the steps below to access the Internet. Step 1 Powering on the Sonic 4G Mobile HotSpot. 8 1 Quick Start Step 2 Step 3 Establishing a Wi-Fi Connection with the Sonic 4G Mobile HotSpot and selected Wi-Fi device. Access the Internet using the selected Wi-Fi device. 1.5.1 Powering on and off the Sonic 4G Mobile HotSpot Press and hold device on and off. for 3 seconds to turn the Note: Turning on the device will display "T-Mobile". device will display "Goodbye". Turning off the 1.5.2 Establishing a Wi-Fi Connection Establish a Wi-Fi Connection (on Windows XP). Step 1 Make sure that the Wi-Fi is enabled. Step 2 Select Start > Control Panel > Network Connections > Wireless Network Connection. Note: To set up a Wi-Fi connection, the PC must have a wireless network adapter installed. If Wireless Network Connection is displayed, a wireless network adapter is available. Otherwise, check to make sure you have a wireless network adapter installed. Step 3 Step 4 Sonic-XXXX Click View available wireless networks to display a list of wireless networks available. Select the network that has the same SSID as listed on the back of your Sonic 4G Mobile HotSpot (Sonic-XXXX), and then click the dialog box as shown below when prompted. . Enter the network key in Note: The SSID and password label are affixed to your Sonic 4G Mobile HotSpot, as illustrated below. SSID: SONIC-XXXX Password: XXXXXXXX Wait until the wireless connection icon corner of the PC screen. is displayed in the status area in the lower right 9 1 Quick Start Establish a Wi-Fi Connection (on Windows 7). Step 1 Make sure that the Wi-Fi is enabled. Step 2 Select Start > Control Panel > Network and Internet > Connect to a network Note: To set up a Wi-Fi connection, the PC must have a wireless network adapter installed. If Wireless Network Connection is displayed, a wireless network adapter is available. Otherwise, check to make sure you have a wireless network adapter installed. Step 3 Step 4 Step 5 Click View available wireless networks to display a list of wireless networks available. Select the network that has the same SSID as listed on the back of your Sonic 4G Mobile HotSpot (Sonic-XXXX), and then click . Enter the network key in the dialog box as shown below when prompted. Note: The SSID and password label are affixed to your Sonic 4G Mobile HotSpot, as illustrated below. SSID: SONIC-XXXX Password: XXXXXXXX Wait until the wireless connection icon corner of the PC screen. is displayed in the status area in the lower right 10 1 Quick Start Establishing a Wi-Fi Connection (on a MAC). Step 1 Make sure that the Wi-Fi is enabled. Step 2 Step 3 If AirPort is off, follow the steps below. Go to AirPort icon and select Turn AirPort On. A window of available Wi-Fi signals will be provided. Select the SONIC-xxxx device. Input the Wi-Fi KEY located under Sonic 4G Mobile HotSpot battery cover as Password. Select Join. If AirPort is on, follow the steps below. Go to AirPort icon and select the SONIC-xxxx device. Input the Wi-Fi KEY located under Sonic 4G Mobile HotSpot battery cover as Password. Select OK. SONIC-xxxx 11 1 Quick Start 1.5.3 Accessing the Internet After successfully establishing a Wi-Fi connection, you can access your Sonic 4G Mobile HotSpot. After the Sonic 4G Mobile HotSpot is powered on, it will automatically connect to the network when data transmission is required, if a network is available. 1.6 Establishing a WPS Connection If the Wi-Fi client connecting to the Sonic 4G Mobile HotSpot supports the WPS function, the Sonic 4G Mobile HotSpot can generate a network key without manual input. To establish a WPS connection, perform the following steps: Step 1 Power on the Sonic 4G Mobile HotSpot. Step 2 Power on the receiving client. Step 3 Enable the WPS function of the Sonic 4G Mobile HotSpot. Note: Press and hold WPS button Step 4 to enable the WPS function of the Sonic 4G Mobile HotSpot. Enable the WPS function of the client. Note: For WPS operations on the client, see the user guide of the client. 1.7 Resetting Factory Defaults To restore your Sonic 4G Mobile HotSpot to the original factory settings and reconfigure the Sonic 4G Mobile HotSpot, press and hold the RESET button until the screen shows "Resetting". Note: This action deletes all personal configuration settings and restores all web-based management settings and parameters to their default values (including SSID, WiFi password and admin password). RESET Note: For information on backing up and restoring the settings of your Sonic 4G Mobile HotSpot please see section 4.5. 12 2 Overview of the Sonic Mobile HotSpot Admin WebUI 2 Overview of the Sonic Mobile HotSpot Admin WebUI 2.1 Accessing the Sonic Mobile HotSpot Admin WebUI 2.2 WebUI Step 1 Ensure the selected device is connected to the Sonic 4G Mobile HotSpot via Wi-Fi or USB cable Step 2 Start the browser and enter http://mobile.HotSpot or 192.168.1.1 in the address bar. Step 3 Enter the password. Note: The default password to the Sonic 4G Mobile HotSpot WebUI is admin. Step 4 Click Login. 13 2 Overview of the Sonic Mobile HotSpot Admin WebUI 2.3 Explanation of Admin WebUI Status Icons The following table shows the running status of the device. Item Status : The card is valid. SIM Internet : The SIM card does not exist or the PIN code is not verified or the SIM card is invalid. : Internet Connection is established. : Internet Connection is not established. Wi-Fi : The Wi-Fi is established. : The Wi-Fi is not established. Battery /Charging Level Indicator Network Signal The battery power level from weak to strong is shown as follows: The signal strength from weak to strong is shown as follows: 14 3 Connection Summary 3 Connection Summary 3.1 Viewing Connection Status Step 1 Click Home Tab to view the information of connection status, connection details, Wi-Fi connection status and Web link, and the device information. The connection details include the IP address, the SIM card status, the DNS sever number and the network type. Step 2 Click More Details... on the right area of the page to view a more detailed status page for either the Network or Wi-Fi connection. 15 3 Connection Summary Step 3 Click Back to return to the previous page. Click Clear History to clear the history of the current connection. Click Refresh to view the current status on the advanced status page. Click icons at the bottom of the page to access the following links. Click the User Guide or T-Mobile Forum to access http://support.t-mobile.com/community/phones_data_devices/mobile_broa dband Click the My T-Mobile to access http://my.t-mobile.com 3.2 Viewing the Connection Statistics Step 1 Click Home Tab. Step 2 Click More Details...in the Wi-Fi Connection Status area. Step 3 View the connection statistics. Step 4 Click Back to return to the previous page. Click Refresh to view the current status. 16 3 Connection Summary Note: Viewing the Connection Statistics is for reference only. Please refer to My T-Mobile for more accurate information. 3.3 Enabling or Disabling the Wi-Fi connection Step 1 Click Home tab. Step 2 Click Turn On or Turn Off to enable or disable the Wi-Fi connection. Note: The default Wi-Fi setting for your Sonic 4G Mobile HotSpot is On. The device will go to sleep after 10 minutes of inactivity when not plugged in. 17 4 Settings 4 Settings 4.1 Device Settings 4.1.1 Configuring the SSID The Service Set IDentifier (SSID) is used to identify your wireless network. The default SSID and password is assigned to you and can be located in the back of the device under the battery cover (please see 1.5.2). Your selected Wi-Fi devices, such as your laptop or tablet etc, can perform normal data communication with your Sonic 4G Mobile HotSpot only when they share the same SSID. It is recommended that you personalize the SSID and Password. You can enter any character string that is less than 13 characters as your personalized SSID, such as MyHome. Step 1 Click Settings Tab> Device Settings > Change SSID & Password Step 2 Change the default SSID in the textbox called Name (SSID): Step 3 Enabled/Disabled the SSID Broadcast. Step 4 Enabled: The device broadcasts the SSID. Users can see the Sonic 4G Mobile HotSpot. Disabled: The device does not broadcast the SSID. To access the Sonic 4G Mobile HotSpot, the user must obtain the SSID of the Sonic 4G Mobile HotSpot, allowing improved Wi-Fi security. Click Next. 18 4 Settings Step5 Step6 Step 5 Select 802.11 Security mode and Encryption Mode. The default value of the 802.11 Security is WPA/WPA2-PSK. The default value of the WAP Encryption is AES+TKIP. The WAP Pre-Shared key can be obtained under the battery. Step 6 Change the WAP Pre-Shared key. Step 7 Click Finish. Note: If you forget your device SSID or password and do not recall your admin password, you will need to perform a master reset of your device, which will return the device to the default SSID/Password listed under the back cover of the device.The admin password will also be reset to the default password. 19 4 Settings 4.1.2 Changing the Admin UI Password Step 1 Choose Settings Tab > Device Settings > Change Admin UI Password Step 2 Enter the current Admin password, and then enter the new password and confirm it. Step 3 Click Modify Note: If you forget your admin password you will need to perform a master reset of your device. 20 4 Settings 4.2 Network Settings 4.2.1 Selecting Network Step 1 Click Settings Tab > Network Settings > Network Selection. Step 2 Select a preferred network mode from the Preferred Mode list box. Note: This setting can only be altered when roaming. If the service provider provides only 2G or 3G service and the preferred mode is configured as 4G only, you cannot access the Internet. Step 3 Select the Mode for searching the network. Auto: The device automatically selects the best available network. Manual: The device will search for the available networks and the user selects one to register with. The default mode is Auto. Step 4 Click Apply. Note: In Manual mode, select the searched network and click Log on. 21 4 Settings 4.2.2 Selecting Profile Step 1 Click Settings Tab > Network Settings > Profile Selection. Step 2 Select a Profile name mode from the Profile List box. Step 3 Enter the Max Idle Time(s) Note: Max Idle Time: The T-Mobile Sonic 4G Mobile HotSpot will disconnect from internet when the idle time exceeds the "Max Idle Time".This setting can only be altered when roaming. 4.2.3 Setting Profile Step1 Step2-4 Step 1 Click Settings Tab > Network Settings > Profile Mangement 22 4 Settings Step 2 Enter the Profile Name, Dial-up Number, User Name and Password. Note: To obtain Dial-up number, User name and Password, contact your service provider. Step 3 Select a Authentication mode from the Authentication List box. Step 4 Set the APN and IP Address Note: The default setting of APN is Static,the default value is epc.tmobile.com The default setting of IP Address is Dynamic. 4.3 Wi-Fi Settings 4.3.1 Enabling or Disabling the Wi-Fi Note: In the Home Tab, under Wi-Fi Connection Status you can enable or disable Wi-Fi by clicking the Turn On/Turn Off button. Step 1 Click Settings Tab > Wi-Fi > Basic Settings. Step 2 Select Wi-Fi Radio. On: Enable the Wi-Fi. (Default setting) Off: Disable the Wi-Fi. (This action should only be selected to improve battery life or when the only connection is via USB cable) Step 3 Click Apply. 4.3.2 Wi-Fi Auto Off When the device is powered by the battery, the default setting for the Wi-Fi Auto Off feature is “Enabled” and WiFi Auto-Off time is set to 10 minutes, the Wi-Fi will be turned off automatically after the identified period of inactivity, i.e. no data transmission between the user and the Sonic 4G Mobile HotSpot .The amount of time your Sonic 4G Mobile HotSpot will wait until 23 4 Settings automatically turning off Wi-Fi can be set to 10 minutes, 20 minutes, or 30 minutes as shown in Step 3 below. The Wi-Fi Auto Off feature is disabled when the device is connected to external power, meaning that the Wi-Fi will remain on. In the event that your Sonic 4G Mobile HotSpot has automatically turned off the Wi-Fi, you can turn it back on by pressing the Power button or the WPS button once on the device. To enable or disable the Wi-Fi Auto Off function, please following the steps below: Step 1 Click Settings Tab > Wi-Fi > Basic Settings. Step 2 Select On/Off to enable or disable the Wi-Fi Auto Off. Step 3 Enter the Wi-Fi Off Time(Min), if the Wi-Fi Auto Off is enabled. Step 4 Click Apply. 4.3.3 Advanced Settings. Step 1 Click Settings Tab > Wi-Fi > Advanced Settings. Step 2 Select Country and Channel. Note: Step 3 The default setting of Country is UNITED STATES and Auto for Channel. Different countries have different standards on channel usage. If you do not know which channel to select, select Auto and the device can automatically search for the channel. Select 802.11 Mode. 802.11b: Only allow the Clients supporting 802.11b standard to access the device. 802.11g: Only allow the Clients supporting 802.11g standard to access the device. 24 4 Settings 802.11b/g: Allow the Clients compatible with with 802.11b/g standard to access the device. 802.11b/g/n: Allow the Clients compatible with 802.11 b/g/n standard to access the device. The default setting is 802.11b/g/n. Step 4 Change the default SSID in the Name (SSID): textbox. Step 5 Select 802.11 Security and Encryption Mode. The default setting tab of 802.11 Security is WPA/WPA2-PSK The default setting tab of Encryption Mode is AES+TKIP Step 6 Change the Password. Step 7 Select On/Off to enable or disable the AP Isolation. Step 8 On: The Clients connecting to the device cannot communicate with each other. Off: The Clients connecting to the device can communicate with each other. The default setting of the AP Isolation is on. Click Apply. 4.3.4 WPS Settings Wi-Fi Protected Setup (WPS) is a standard for easy and secure establishment of a wireless network. Traditionally, you would have to manually enter a wireless network name (SSID), and then manually enter a security key on both the access point and client to prevent unwanted access to your wireless network. With WPS, you do not need to know the SSID and security key. It will automatically configure the SSID and security key for the access point and the WPS enabled client devices on the network. Step 1 Click Settings Tab > Wi-Fi > WPS. Step 2 Enter the WPS PIN of the WPS client device on the network. Step 3 Click Apply. 25 4 Settings 4.3.5 DHCP Settings If the Dynamic Host Configuration Protocol (DHCP) server is enabled, the device can automatically assign IP addresses for Clients connected to it. Step 1 Choose Settings Tab > Wi-Fi > DHCP. Step 2 Set IP Address (default: 192.168.1.1). Step 3 Set Subnet Mask (default: 255.255.255.0). Step 4 Click the Enabled option button (default: Enabled). Step 5 Set Start IP Address and End IP Address. Note: Step 6 The value of Start IP Addres The minimum range is a single IP address. Enter the value of DHCP Lease Time. Note: The DHCP server automatically assigns an IP address to each client connected to the LAN. When the leased time expires, the DHCP server checks whether the client is connected to the LAN. If the client is disconnected from the LAN, the server assigns the IP address to another client. Thus, the IP address is not wasted. Step 7 Click Apply. Example IP Address of the device: 192.168.1.1 Start IP address: 192.168.1.XXX (2≤XXX≤254) End IP address: 192.168.1.YYY (XXX≤YYY≤254) 4.3.6 Disabling the DHCP Server If the DHCP server is disabled, you must manually assign IP addresses for clients connected to the device. Step 1 Choose Settings > Wi-Fi > DHCP. Step 2 Click the Disabled option button. 26 4 Settings Step 3 Click Apply. 4.3.7 Configuring the Client Step 1 Choose Start > Control Panel > Network Connections > Wireless Network Connection. Step 2 Step 3 Step 4 Right-click the Network Connection icon, and then choose Properties from the shortcut menu. Select Internet Protocol (TCP/IP), and then click Properties. In the Internet Protocol (TCP/IP) Properties dialog box, select Obtain an IP address automatically and Obtain DNS server address automatically, and then click OK. 27 4 Settings Example You can also enter the values of IP addresses and DNS server. The details are as follows: IP address: 192.168.1.XXX (2≤XXX≤254) Subnet mask: 255.255.255.0 Default gateway: 192.168.1.1 DNS server: Enter the default gateway (192.168.1.1) or contact your service provider. 28 4 Settings 4.4 Security Settings 4.4.1 Wi-Fi Settings You can configure the SSID as follows: Step 1 Choose Settings > Security > Wi-Fi Settings. Step 2 Configure the SSID. Step 3 Enabled/Disabled the SSID Broadcast. For details, see 4.1.1 Configuring the SSID 29 4 Settings 4.4.2 Firewall Settings Your device has a firewall that controls the incoming and outgoing data flow and protects your computer from illegal intrusion. Step 1 Choose Settings > Security > Firewall. Step 2 Select the Enable the firewall. Note: The other functions such as the IP address filter function and the WAN port ping function are available only when the Enable the firewall check box is selected, Step 3 Click Apply. IP address filter: LAN IP Filter function are available only when the IP address filter check box is selected This function can configure the device to block specific IP addresses of the Internet service so that they cannot be accessed from specific IP addresses of the clients in the local network. For detailed see 4.1.1 LAN IP Filter WAN port ping: The clients cannot use ping function to you when the WAN port ping check box is selected. Enable the firewall & Enable IP address filter are selected by default. 30 4 Settings 4.4.3 WLAN MAC Filter You can control and manage the clients accessing the WLAN, and improve the WLAN security performance. Step2 Step3 Step1 Step4 Step 1 Choose Settings Tab> Security > MAC Filter. Step 2 Select the MAC filter mode. The available options are as follows: Disabled: The MAC address filtering function is disabled (Disabled by default). Enabled: The clients with addresses in the MAC Address list are allowed to Deny: The clients with addresses in the MAC Address list are not allowed to connect to the device through the WLAN. Step 3 Enter MAC Address in the list. The device can perform the access control over the clients whose MAC addresses are in the list. Step 4 Click Apply. Example To locate the MAC address in the Windows OS, do as follows: 1. Choose Start > Run, and then enter cmd. 2. In the command window that is displayed, enter ipconfig/all. Then, press Enter. 3. The MAC address is displayed as the Physical Address 4.4.4 LAN IP Filter You can configure the device to block specific IP addresses of the Internet service so that they cannot be accessed from specific IP addresses of the clients in the local network. Step 1 Choose Settings > Security > LAN IP Filter. 31 4 Settings Step 2 Configure/Input the information as required by the page (see illustration below) Step 3 Click OK to save the settings. Step 4 Click Apply to validate the settings. Click Edit to modify the selected items in the list. Click Delete to remove the selected items in the list. Example You want to forbid the client (192.168.1.101) from accessing the Internet service www.huawei.com (10.82.48.26). Do as follows: 1. Set Protocol to TCP. Note: The protocol of Web service is TCP. If you do not know the protocol, you can select All. Then the device automatically searches for the protocol. 2. Set Status to On. Note: If you just want to perform the establishing operation and the filtering and enabling can be performed later, you can select Off. 3. Set LAN IP Address to 192.168.1.101. Note: To locate the LAN IP address in the Windows OS: Choose Start > Run, and then enter cmd. In the command window that is displayed, enter ipconfig. Then, press Enter. The IP address is displayed. 4. Set WAN IP Address to 10.82.48.26. Note: To locate the WAN IP address in the Windows OS, do as follows: Choose Start > Run, and then enter cmd. In the command window that is displayed, enter ping www.huawei.com. Then, press Enter. 32 4 Settings The WAN IP address is displayed as [10.82.48.26]. 5. Set LAN Port/ WAN Port to 80. Note: The default Port of Web service is 80. For the port and protocol, you can contact the service provider or access the official website of the Internet service. 4.4.5 UPnP Settings The Universal Plug and Play (UPnP) service realizes the intelligent interconnection between any two UPnP devices through port forwarding. The UPnP device can access the Internet dynamically and get the IP address automatically. Step 1 Choose Settings > Security > UPnP Settings. Step 2 Set UPnP Status to Enabled or Disabled to enable or disable the UPnP service. Step 3 Click Apply. Note: The default service of UPNP is Disabled. Step2 Step3 Step1 Example To enable or disable the UPnP service of the client (taking PC for example): 1. Choose Start > Control Panel > Add/Remove program > Add / Remove Windows Components. 2. Select Network Services and then click Details in the Windows Components Wizard to install dialog box. 3. Select UPNP User Interface to enable the UPnP service. 4. Click OK. 33 4 Settings 4.4.6 PIN Code Management Note: The PIN acts like a password preventing other people from gaining unauthorized access to your device. This is a numeric code which must be entered each time the device is started (unless the PIN security feature is turned off). If you enter the wrong PIN code three times, the SIM card is locked. You need the PUK code to unlock the SIM card. If you enter wrong PUK code ten times, the SIM card is locked permanently. The PIN code is created by the user, when he activates PIN code he then creates a code. The PUK code is held by the operator for security reasons. Please contact your service provider for your PUK code if needed. Step2 Step3 Step4 Step1 Disabling the PIN Code (The default setting for PIN code is disabled) Step 1 Choose Settings > Security > SIM Card PIN. Step 2 Select Disable in the PIN Code Operation drop-down list box. Step 3 Enter the correct PIN code. Step 4 Click Apply. Note: If PIN Code Operation is disabled you do not need enter the PIN code after each restart. Enabling the PIN Code Step 1 Choose Settings > Security > SIM Card PIN. Step 2 Select Enable in the PIN Code Operation drop-down list box. Step 3 Enter the correct PIN code. Step 4 Click Apply. 34 4 Settings Changing the PIN Code When the PIN code protection is enabled, you can change the PIN code. Step 1 Choose Settings > Security > SIM Card PIN. Step 2 Select Modify in the PIN Code Operation drop-down list box. Step 3 Enter the current PIN code. Step 4 Enter the new PIN code and confirm it. Step 5 Click Apply. 4.4.7 Unlock Device Note: This code is used to unlock the device and accept SIM cards from any operator. To obtain the Device Unlock code, please contact your service provider. After the correct password is entered, the device will reset automatically. However, if a wrong password is entered ten times, the device will be locked permanently. 35 4 Settings 4.5 System Management 4.5.1 Backup Settings Step 1 Choose Settings Tab > System > Backup Settings Step 2 Back up or restore settings The details are as follows: Backup settings: Click Backup to export the parameters to a file. Restore configuration parameters: 1. Click Browse to select the configuration file to be restored. 2. Click Reset to restore settings. Note: The backup file is named sqlite.db and will be stored in the default download folder based on the settings of the browser you are using. 4.5.2 Restart Click the button to Restart the T-Mobile Sonic 4G Mobile HotSpot. Note: This does not lose any of the user settings 4.5.3 Restoring the Factory Defaults If you need to restore the Sonic 4G Mobile HotSpot to the factory default settings Step 1 Choose Settings > System > Factory Reset. Step 2 Click Reset. Note: After this operation, all personal configuration settings are deleted and all web-based management settings will be restored to their previous values (SSID, Password and Admin password). 36 5 Text Message 5 Text Message 5.1 Creating and Sending a Text Messages Inbox stores the received messages, Sent stores the sent messages, including both the messages sent successfully and unsuccessfully. Draft stores the drafts of messages. Step 1 Step 2 Step 3 Click Text Message > Inbox/Sent/Draft. : The memory is full. : An unread message. : A read message. On the Text Message page, you can choose the following options. Turn a page and view messages. Refresh current storage status. Mark or unmark all messages. Delete the marked message(s). After you click one message in the message list, the detail of the message is displayed. You can choose the following options. Read contents. Reply to message. Forward message. 37 5 Text Message Delete message. 5.2 Composing a Text Message Step1 Step2 Step1 Step3 Step4 Step 1 Click Text Message > Compose. Step 2 Enter the recipient’s Phone Number. Step 3 Enter the message Content. Note: Each text message can contain 160 characters. If the message exceeds 160 character, you Sonic 4G Mobile HotSpot will automatically separate the message into two or more messages (the number of messages is in the parenthesis). Step 4 After inputting all the information, you can choose the following options: Send: To send the message Save: To save the message as a draft. 38 5 Text Message 5.3 Text Message Settings Step 1 Click Text Message> Settings. Step 2 View or edit the Text Message Center Number: Note: The information of Text Message center number is provided with the SIM card. When the SIM card is inserted, the information is changed automatically. Text Message Center Number is grayed out by default. Step 3 Select Text Message Save Mode to change between saving the messages in the SIM card, the device or SIM Card precedence. Step 4 Click Apply to save the settings. 39 6 microSD Card 6 microSD Card 6.1 microSD Card Settings Step1 Step 1 Choose microSD Card > microSD Card Settings Step2~5 Step6 Step 2 Set microSD Card Sharing Mode. Web Share Mode: You can only access the microSD card on the Web management page. USB Access Only: you can access the microSD card as a Removable Disk by connecting the device with the USB cable. Step 3 Select Enabled or Disabled to turn microSD Card Sharing on or off. Step 4 Set File to Share. The available options are as follows: All: Indicates that all files stored in the microSD card can be accessed. Custom Setting: Allows you to indicate the files that can be accessed. 40 6 microSD Card Step 5 Step 6 Set Access Type. The available options are as follows: Read Only: You can only view the shared files. Read/Write: You can both view and edit the shared files. Click Apply. 6.2 Web Sharing microSD Card When Web Share Mode is enabled, you can access the microSD card on the Web management page. 6.2.1 Viewing Files Step 1 Click microSD Card. Step 2 View the shared files. Step 3 Select UP to move back to the previous folder. 6.2.2 Creating a New Folder When the Read/Write permission of the Web Share Mode is enabled, you can create new folders in the SD card. Step 1 Choose microSD Card > New Folder. Step 2 Enter the new folder name. Step 3 Click OK. 6.2.3 Deleting a File When the Read/Write permission of the Web Share Mode is enabled, you can delete the files in the microSD card. Step 1 Click microSD Card. Step 2 Select the file to be deleted. 41 6 microSD Card Step 3 Click Delete Selected. 6.2.4 Uploading a File When the Read/Write permission of the Web Share Mode is enabled, you can upload files from the local to the microSD card. Step 1 Click microSD Card. Step 2 Click Browse to select a file to upload. Step 3 Click Upload. 6.2.5 Accessing microSD Card via USB When the USB Access Only mode is used, you can access the microSD card as a Removable Disk by connecting the device with the USB cable. Step 1 Connect the device to PC with the compatible data cable. Step 2 The PC detects and recognizes new hardware. Step 3 Enter My Computer and double-click Removable Disk mapped by the microSD card. Step 4 View or manage the files stored in the microSD card. 42 7 Troubleshooting 7 Problem Description Network security key Troubleshooting Possible Causes Problem Solving The wrong Wi-Fi/SSID Verify that you are using the correct password was entered. password or reset your Sonic 4G Mobile mismatch error HotSpot to the factory settings and use the default SSID and password. The system configuration is Your Sonic 4G Mobile HotSpot will appear The system cannot run having difficulty with the as a virtual CD-ROM in My Computer. the T-Mobile HotSpot auto-run software. Right-click Mobile HotSpot, click Open, and Admin shortcut installation click AutoRun.exe. If you have previously program automatically installed a version of the program, please uninstall it first. Sent Message failure The network is busy or you Try later or move to a location with good are in an area with no signal. signal strength. The connection between the pc and the Sonic 4G Mobile HotSpot is failed Verify that you are successfully connected to your Sonic 4G Mobile HotSpot. You are in the place where there is no 2G/3G/4G Data connection failed/no Move to an area with good signal strength. network coverage. Internet access The device data is corrupted. Local network access or the target server may be experiencing problems. Retry data request. The security type is incorrect Verify the Sonic 4G Mobile HotSpot security matches the connecting device security. 43 7 Troubleshooting The network is not allowing your Contact your operator to request access to the SIM Card to use data. network or if you have a pre-paid account check to make sure you have available funds. IE browser is causing Upgrade to the latest version or reinstall the problems. Internet Explorer browser. Connected to the Internet, Your operating system but unable to open any maybe infected by a virus. Web site Worm Blaster for example can affect upload and downloaded data flow, Use professional antivirus software to scan your system. resulting in an inability to access a website. The device may have over heated. Be sure to operate the device with adequate ventilation. Connected to the Internet but speeds are slower than normal, the device has turned off, or the screen reads "Temperature Invalid" Use of the device inside the storage pouch may cause the device to over heat and voids the manufacturers warranty. Remove the device from the pouch or non-ventilated area and wait for the device to cool down before resuming use. 44 8 Error Codes Screenshots 8 Error Codes Screenshots Operator name. Potential error messages displayed here include: Power on and off 4G Searching 1 Wi Fi T-Mobile 2 Goodbye 3 4 1. Press and hold power key 2. Auto searching 3. After search 4.Power off Connect network 4G Wi Fi 1 Connecting 1 4G Wi Fi 1 Connected 2 3 1. Connecting 2. Internet Connection is established. 3. Internet Connection is not established 45 8 Error Codes Screenshots Roaming 4G W i Fi 1 1 Roaming! Please access Web UI to reconnect! R Scrolling display Roaming When user resets the device Resetting The battery power level from weak to strong is shown as follows: 5 levels for battery Iterative sequence, when charging the screen will change between the 5 images in sequence. 46 8 Error Codes Screenshots Special case Wi Fi Wi Fi Wi Fi Wi Fi No Network Insert SIM Invalid SIM Enter PIN PIN lock 1 2 3 4G Wi Fi SIM Blocked 5 4 Wi Fi Low Battery 6 7 Battery Error 8 Temperature Invalid 9 1. No Network: Not connected to any 2G/3G/4G network. 2. Insert SIM: No SIM card or incorrect SIM 3. Invalid SIM: A non T-Mobile SIM card or defective card. 4. Enter PIN: PIN locked. 5. SIM Blocked: PUK code required. 6. Disconnect: Failed to connect. 7. Low Battery: The battery is low. 8. Battery Error: Defective battery or no battery when USB connected. 9. Temperature Invalid: The temperature exceeds the limit of 80º Celsius (~180º Fahrenheit) 47 9 Acronyms and Abbreviations 9 Acronyms and Abbreviations 2G The Second Generation of Wireless Networks 3G The Third Generation of Wireless Networks 4G The Fourth Generation of Wireless Networks AP Access Point DHCP Dynamic Host Configuration Protocol DNS Domain Name Server IP Internet Protocol MAC Media Access Control PIN Personal Identification Number SSID Service Set Identifier TCP Transmission Control Protocol UDP User Datagram Protocol UPnP Universal Plug and Play WAN Wide Area Network WLAN Wireless Local Area Network Wi-Fi Wireless Fidelity 802.11 A set of standards for implementing wireless computer communications maintained by the IEEE. 48