1
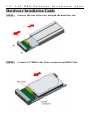
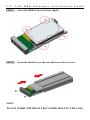
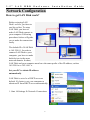
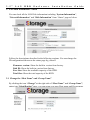
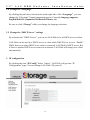
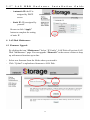
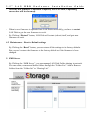
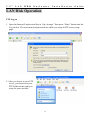
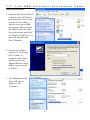
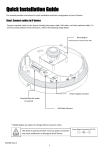
3 . 5 ”
L A N
H D D
E n c l o s u re
I n s t a l l a t i o n
G u i d e
3.5” LAN HDD
Enclosure User’s Manual
(LAN Disk)
1
3 . 5 ”
L A N
H D D
E n c l o s u re
I n s t a l l a t i o n
G u i d e
TABLE OF CONTENTS
Hardware Installation Guide..........................................................................................................................4
Network Configuration..................................................................................................................................6
How to get LAN Disk work?.................................................................................................................6
Set your PC to obtain IP address automatically.............................................................................6
Connect LAN Disk to your PC ...................................................................................................8
LAN Disk Management and Configuration ..................................................................................................9
1.
Connect to LAN Disk...................................................................................................................9
2.
LAN Disk Information - Status ................................................................................................10
2.1
Change the “Host Name” and “Group Name” ...........................................................10
2.2
Change the Administrator’s “Password” ....................................................................11
2.3
Change the “Date/Time”...............................................................................................11
2.4
Change the “Language” ................................................................................................12
2.5
Change the “DHCP Server” settings ...........................................................................12
3. IP configuration .........................................................................................................................12
4. LAN Disk Maintenance .............................................................................................................13
4.1
Firmware Upgrade ........................................................................................................13
4.2
Maintenance – Reset to Default settings......................................................................14
5. SMB Server ................................................................................................................................14
5.1
Create Folder .................................................................................................................15
5.2
Rename Folder ...............................................................................................................15
5.3
Delete Folder ..................................................................................................................15
5.4
Set Password of Sharing List ........................................................................................15
6. FTP Server .................................................................................................................................16
6.1
FTP service Enable/Disable ..........................................................................................16
6.2
Anonymous log in ..........................................................................................................16
6.3
Account List ...................................................................................................................16
6.4
Modify FTP Account .....................................................................................................17
7. Disk Utilities ...............................................................................................................................18
7.1
Format Disk....................................................................................................................18
7.2
Scan Disk ........................................................................................................................18
7.3
Sleep Time ......................................................................................................................18
LAN Disk Operation....................................................................................................................................19
FTP Log on .........................................................................................................................................19
Map Network Drive...........................................................................................................................20
FAQ.............................................................................................................................................................21
2
3 . 5 ”
L A N
H D D
E n c l o s u re
I n s t a l l a t i o n
About 3.5” HDD LAN Disk Enclosure
3
G u i d e
3 . 5 ”
L A N
H D D
E n c l o s u re
I n s t a l l a t i o n
G u i d e
Hardware Installation Guide
STEP1 : Unscrew the rear of the case, and pull the metal tray out.
STEP2 : Connect 3.5” HDD to the Power connector and IDE Cable.
4
3 . 5 ”
L A N
H D D
E n c l o s u re
I n s t a l l a t i o n
G u i d e
STEP3 :
Screw the HDD to the metal tray tightly.
STEP4 :
Insert the metal tray to the case and screw the rear case.
NOTE:
DO NOT INSERT THE METAL TRAY UPSIDE DOWN TO THE CASE!
5
3 . 5 ”
L A N
H D D
E n c l o s u re
I n s t a l l a t i o n
G u i d e
Network Configuration
How to get LAN Disk work?
Before enjoying LAN
Disk’s service, you have to
run Set up first. To setup
LAN Disk, you have to
make LAN Disk connect to
your computer. Following
procedures below will guide
you to make the connection
easily.
The default IP of LAN Disk
is 169.254.0.1. In order to
connect LAN Disk to your
computer, you have to make
both devices in the same
network domain. In short,
LAN Disk and your computer must have the same prefix of the IP address, such as
169.254.0.x or 192.168.1.x.
Set your PC to obtain IP address
automatically
LAN Disk is set to be a DHCP server as
default. It’s better to set your computer to
obtain an IP from DHCP server automatically.
1. Start Æ Settings Æ Network Connections
6
3 . 5 ” L A N H D D E n c l o s u re
2. Select “Local Area Connection” to push the
right key of your mouse, and click
“Properties” to enter the Local Area
Connection Properties windows.
I n s t a l l a t i o n
G u i d e
3. Select “Internet Protocol (TCP/IP)”.
Click ”Properties” to enter the Internet
Protocol (TCP/IP) Properties windows.
4. Check the options “Obtain an IP address automatically” in IP options.
7
3 . 5 ”
L A N
H D D
E n c l o s u re
I n s t a l l a t i o n
Connect LAN Disk to your PC
Connect LAN Disk to your PC through
LAN cable. You can check the LAN
connection as the figures shown right.
- Right click “Local Area Connection”
- Select “Status”
IP address shows the IP of your PC
assigned by LAN Disk.
Gateway is the IP of LAN Disk default.
After the LAN connection between LAN Disk and
your PC is build, you can start to make new settings
to your LAN Disk.
8
G u i d e
3 . 5 ”
L A N
H D D
E n c l o s u re
I n s t a l l a t i o n
G u i d e
LAN Disk Management and Configuration
All the management and Configurations of LAN
Disk are achieved through web browser.
1. Connect to LAN Disk
From the browser, types in http://storage, then, it will connect to LAN Disk
authentication page.
If it is the first time or you have never
changed the “User Name” and
“Password”, then types in:
User name: -----“admin”
Password:
-----“admin”
Otherwise, you have to type in the User
name and Password of your own.
Note1:
When two LAN Disks are simultaneously connected to your network, you need to
distinguish between the two by typing “http://storage-XXXX/” with their unique
MAC address. For example if your LAN Disk’s MAC address is 00-16-67-01-02-03,
you will need to enter “http://storage-0203/”.
Note2:
If your hard disk is bought newly or the file system is not FAT32 format, please
remember to click format in Disk Utility webpage, otherwise it is unable to make
LAN Disk working.
9
3 . 5 ” L A N H D D E n c l o s u re
2. LAN Disk Information - Status
I n s t a l l a t i o n
G u i d e
You can check all the LAN Disk information including “System Information”,
“Network Information” and “Disk Information” from “Status” page as below.
Follow the descriptions described in the following sections. You can change the
IP/configurations shown on the status page by yourself.
Firmware version: Show the built-in version from factory.
Disk ID: Show the built-in version from factory.
Free Size: Show the available capacity of the HDD.
Total Size: Show the total capacity of the HDD.
2.1 Change the “Host Name” and “Group Name”
By clicking the icon “Change” at the right side of “Host Name” and “Group Name”,
enters into “Identification” page, you can setup your own Host name and Group name.
10
3 . 5 ” L A N H D D E n c l o s u re I n s t a l l a t i o n G u i d e
Host Name: The default setting is “STORAGE OR STORAGE-XXXX”. The Last four
digits are MAC Address.
Group Name: The default setting is “WORKGROUP “. Enter a new name into “Group
Name” and click “OK” button to change to a new group.
2.2 Change the Administrator’s “Password”
By clicking the icon “Change” at the right side of “Administrator”, enters into
“Administration” page, you can change the “Password” of administrator to your own.
Administrator: admin (default). This can’t be changed.
Password: admin (default)
NOTE:
If you have made any change of “Password”, you have to enter this Password to get
into LAN Disk Management and Configuration pages next time.
2.3 Change the “Date/Time”
By clicking the icon “Change” at the right side of “Date/Time”, enters into
“Date/Time” setup page, you can adjust Date/Time to its right number.
11
3 . 5 ” L A N H D D E n c l o s u re
2.4 Change the “Language”
I n s t a l l a t i o n
G u i d e
By clicking the pull-down selection bar at the right side of the “Language”, you can
change the “File name” lingual supporting system. Currently, language supports
English/Shift JIS (Japanese)/Traditional Chinese, etc.
Be sure to click “Change” while you change the language selection.
2.5 Change the “DHCP Server” settings
By selection the “DHCP Server”, you can set LAN Disk to be a DHCP server or client.
LAN Disk can be used as a DHCP server or client while DHCP Sever is set to “Enable”.
While there is no other DHCP sever exist in a network, LAN Disk is DHCP server. But
if there is another DHCP server existed in a network, LAN Disk will change to a client
automatically.
3. IP configuration
By clicking the icon “IP Config” below “Status”, LAN Disk will get into “IP
Configuration” page. You can change LAN Disk’s IP yourself.
12
3 . 5 ”
L A N
H D D
E n c l o s u re
I n s t a l l a t i o n
G u i d e
- Automatic IP: the IP is
assigned by DHCP
server.
- Static IP: IP is assigned by
yourself.
Be sure to click “Apply”
button to complete the setting
of static IP.
4. LAN Disk Maintenance
4.1 Firmware Upgrade
By clicking the icon “Maintenance” below “IP Config”, LAN Disk will get into LAN
Disk “Maintenance” page. You can upgrade “Firmware” to the newest version to keep
up with newest functions up to date.
- Select new firmware form the folder where you stored it.
- Click “Upload” to upload new firmware to LAN Disk.
13
3 . 5 ” L A N H D D E n c l o s u re I n s t a l l a t i o n G u i d e
- After the new firmware is uploaded completely into LAN Disk, a uploading
success box will be shown up.
- When is new firmware is uploaded into LAN Disk successfully, you have to restart
LAN Disk to get the new firmware to work.
- By Clicking “Restart” button, LAN Disk will restart (reboot) itself, and gets new
firmware to work.
4.2 Maintenance – Reset to Default settings
By Clicking the ‘Reset” button, you can return all the settings to its factory defaults.
But you can’t restore the firmware to the factory default as if the firmware is been
changed.
5. SMB Server
By Clicking the ‘SMB Server”, you can manage LAN Disk Folder sharing in network.
You can create, rename and delete folders through the “Folder List”. Add or Remove
folders from the “Folder list” to “Sharing List”.
14
3 . 5 ” L A N H D D
5.1 Create Folder
E n c l o s u re
I n s t a l l a t i o n
G u i d e
Click on “Create” button to create your folder then enter the setting page below.
5.2 Rename Folder
Choose a folder and click on “Rename” to rename the folder.
5.3 Delete Folder
Choose a folder and click “Delete” to delete the folder. Please confirm before you click
"OK" button to confirm deleting folders.
5.4 Set Password of Sharing List
In order to increase the security and privacy level of the folder, click “Password”
button to set up password for share folders.
15
3 . 5 ” L A N
6. FTP Server
H D D
E n c l o s u re
I n s t a l l a t i o n
G u i d e
By Clicking the ‘FTP Server”, you can manage LAN Disk Folder sharing in internet.
See the figure shown below.
6.1 FTP service Enable/Disable
FTP service is activated by the option of selecting “Enable” or “Disable”. The port
number is set to default 21 or you can set to another.
Be sure to click “Apply” after made changes.
6.2 Anonymous log in
Anonymous log in is not allowed if you disable this function from “Allow
Anonymous” option.
You can also restrict the operation right while allow anonymous log in.
Be sure to click “Apply” after made changes.
6.3 Account List
You can add users to FTP account list. From the account list, users can be set to allow
or not allow accessing the FTP service. Even more, users can be removed from the
account list.
16
3 . 5 ”
L A N
H D D
E n c l o s u re
I n s t a l l a t i o n
G u i d e
6.4 Modify FTP Account
Choose a user form account list, click “Modify” button to modify user’s FTP
accessing right and share folders
Be sure to click “Modify” button after you made confirmation of changes.
17
3 . 5 ” L A N
7. Disk Utilities
H D D
E n c l o s u re
I n s t a l l a t i o n
G u i d e
By Clicking the ‘Disk Utility”, you can perform HDD management form the page as
below.
7.1 Format Disk
- Because of LAN Disk has to fulfill different OS systems, it can only support FAT32.
You can use this function to made FAT32 format of used HDD or new HDD.
- Beware that, all the partitions and data will be lost after processing this disk format.
- After HDD is formatted, LAN Disk has to restart to perform re-recognition procedure.
7.2 Scan Disk
Running the Scan Disk program will check the file system of HDD in LAN Disk, and
correct any error found. This program is suggested to execute regularly. Press the
“Start” button, and the results will be shown in the message box.
7.3 Sleep Time
While LAN Disk is not operation for a while, it’s better to make HDD enters into idle
or sleep mode for power saving. LAN Disk enters into Sleep mode by setting idle
duration interval. You can set LAN Disk idle duration form 5 to 60 minutes to Enable
this feature or 0 to Disable this feature.
18
3 . 5 ”
L A N
H D D
E n c l o s u re
I n s t a l l a t i o n
G u i d e
LAN Disk Operation
FTP Log on
1. Open the Internet Explorer and key in “ftp://storage/” then press “Enter” button into the
Log On box. The user name and password are which you setup in FTP server setup
page.
2. After you log on to your FTP
server, you can access your
FTP Folder as the right you
setup for your account.
19
3 . 5 ” L A N H D D
Map Network Drive
E n c l o s u re
1. Open the My Network Places
to Search your LAN Disk’s
host name then click it, and
you can see the folders
which you set up in SMB
Server page. You can select
the folder to push the right
key of the mouse, and click
on “Map Network Drive” to
enter the Map Network
Drive Windows.
2. You can select Drive
number (ex. D~Z) and
click “Finish” to
complete setup. Then,
you can access this
Mapped disk as a local
disk as easy as usual C
or D drive.
3. The Mapped network
drive will also be
shown in “My
Computer”.
20
I n s t a l l a t i o n
G u i d e
3 . 5 ”
L A N
H D D
E n c l o s u re
I n s t a l l a t i o n
G u i d e
FAQ
What is SMB?
SMB is a client / server, request-response protocol, which stands for Server Message
Block, is a protocol for sharing network resources, such as files, printers, serial ports,
etc. between computers.
What is FTP?
FTP, short for File Transfer Protocol, the protocol for exchanging files over the
Internet. FTP works in the same way as HTTP for transferring Web pages from a
server to a user's browser, FTP uses the Internet's TCP/IP protocols to enable data
transfer. FTP is most commonly used to download a file from a server using the
Internet or to upload a file to a server.
What is DHCP?
Short for Dynamic Host Configuration Protocol, a protocol for assigning dynamic IP
addresses to devices on a network. With dynamic addressing, a device can have a
different IP address every time it connects to the network. One task of DHCP is to
assist in getting a unique IP number of the computers that make use of the Internet.
What is MAC address?
A MAC address (Media Access Control) is a number (typically written as twelve
hexadecimal digits, represented as 8 bytes) which uniquely identifies a computer that
has an Ethernet interface.
What is an IP address?
An IP address (IP number) is a number which uniquely identifies a computer that is
making use of the Internet. It is analogous to your telephone number in the telephone
network to direct calls to you. The IP address is used by the Internet to direct data to
your computer, e.g. the data your web browser retrieves and displays when you surf
the net.
M0-90-316
21