1
Montage Elite Massage
By Omege Massage,Inc.
OMEGA
Omeg Massage,Inc thanks you for choosing the Montage Elite or the Montage Premier massage chair.
We encourage you to read through this manual before operating your new massage chair. We present you with the proper ways of using the
massage chair and point out some notes on safety.
Your massage chair has been designed to provide you with years of enjoyment. Please keep this manual in a safe place for future reference.
Contents
Important Safety Instructions
Part Names and Functions
Massage Chair Set Up & Preparation
Massage Programs
Care and Storage of your Massage
Massage Chair Specifications
Troubleshooting your Massage Chair
--
1~4
5~10
11~17
18~22
23
23
24
Important Safety Instructions -Please Read First
ELECTRIC SHOCK DANGER
-To reduce the risk of electric shock:
Always unplug the massage chair from the electrical outlet immediately after using and before cleaning.
Warning
-Follow these guidelines to reduce the risk of burns, fire, electric shock or other injuries:
1) Do not leave the massage chair unattended when it is plugged in. Unplug from the electrical outlet when not in use, and before putting on or
taking off parts.
2) Children, invalids or disabled persons should be closely supervised if they use or will be near the massage chair.
3) The massage chair is only for use consistent with this manual and should not be used for any other purpose. Do not use attachments not
recommended by the manufacturer.
4) Keep the electrical cord away from any heated surfaces.
5) Never operate the massage chair where the air openings could be blocked. Keep all air openings free of lint, hair or other particles which could
clog the air openings.
6) Never drop or insert any object(s) into any opening of the massage chair.
7) Do not use the massage chair outdoors or in any unprotected area. Keep the massage chair away from wet or humid areas.
8) Do not operate the massage chair where aerosol (spray) products are being used or where oxygen is being administered.
9) Only connect the massage chair to a properly grounded electrical outlet. For more information, see Grounding Instructions.
Grounding Instructions
This product must be grounded. In the case of breakdown or malfunction, grounding provides a path of least resistance for the electric current to
reduce the risk of electric shock. This product is equipped with a cord having an equipment-grounding conductor and a grounding plug. The plug
must be plugged into an appropriate outlet that is properly installed and grounded in accordance with all local codes and ordinances.
We recommend that you use a surge protector with this product.
Danger
Improper connection of the equipment-grounding conductor can result in the risk of electric shock. Check with a qualified electrician or serviceman
if you have any doubt as to whether the product is properly grounded. Do not modify the plug provided with the product. If the plug will not fit the
outlet, have a proper outlet installed by a qualified electrician. This product has a grounding plug. Make sure that the product is connected to an
outlet having the same configuration as the plug. No power converter should be used with this product.
Please Save These Safety Instructions
Important Safety Instructions -Please Read First
1.Usage Environment
•
•
•
•
Do not
Do not
Do not
Do not
use your massage chair in an excessively humid or dusty environment, as it may cause electrical shock or malfunction.
put your massage chair in a room with a temperature higher than 104F (40C).
place your massage chair next to any heat sources such as heaters, stoves or direct sunlight.
place your massage chair on a non-leveled surface.
o
CAUTION
You should use your massage chair in a cool room, where the temperature will not fluctuate abruptly. It is recommended that if you change the
temperature in the room with your massage chair, that you do so gradually. If your massage chair is stored in a cold room and moved to a warm
room, that you should wait one hour before operating. Malfunctions can occur when a cold massage chair is suddenly used in a warm room.
2.Unsuitable Users
If you have one of the following conditions, please consult your doctor before using the massage chair:
CAUTION
If
If
If
If
If
If
If
you are currently under the care of a doctor or not feeling well.
you have malignant tumors.
you have heart disease.
you are pregnant or menstruating.
you are under doctor'orders to rest.
you have any spinal disorders, curved or abnormal spine conditions caused by an accident or illness.
you have a high fever.
3. Operating Safety Precautions
• To ensure the safe and proper use of this massage chair, do not operate without first carefully reading this user's manual.
• Do not use the massage chair with other therapeutic equipment, electric blanket, etc, as it may result inefficacy or injury.
• Do not allow children or pets to play on or around the massage chair (i.e. behind the backrest, under the seat, or footrest)
as they can be injured by the moving parts during the operation of the massage chair.
• Do not place heavy objects on the armrest, footrest or back rest as they can fall and injure someone or hinder the massage
chair operation.
Important Safety Instructions -Please Rea
Do not use the massage chair if you are wet or are wearing wet clothes.
Do not operate the massage chair with wet hands.
Do not massage one part of your body excessively or for continuous long periods of time as it may cause pain, discomfort or injury.
Do not insert your hand, foot or other body parts along the paths of the massage rollers during the operation of the massage chair as it may cause
injury to the user.
O
CAUTION
Always sit in an upright position during the operation of the massage chair.
You may place a blanket, towel or back pad over the backrest if you prefer a softer massage.
Do not use the massage chair as a bed.
Do not apply the massage rollers directly on the head, joints of elbows, abdomen or other non appropriate areas.
The recommended usage time is 15 minutes per day. We do not recommend continuously massaging the same spot for more than 5 minutes.
Consult your health care provider about what the proper times are for you.
4. Discontinue Operation Immediately in the Following Situations:
If one of the following situations occurs, immediately switch OFF the power and disconnect the AC power cord from the Electrical Outlet. Please
contact our service department if you are unsure whether you should continue to use the massage chair in these situations.
•
•
•
•
•
If
If
If
If
If
the massage chair becomes or gets wet, stop the operation immediately to avoid potential electrical shock.
you feel abnormal or severe pain during the massage, stop the operation immediately and consult your doctor.
you find any malfunction or any other abnormal condition during operation.
there is a power failure or a power surge, stop operation and disconnect AC power cord from the Electrical Outlet until power is restored.
there is severe weather conditions such as lightning storms.
NOTE: Lift the backrest pad regularly to check for tears in the upholstery of the central cloth portion of the backrest
Do not disassemble the back cover from the massage chair, touching the inside mechanisms may result in electrical shock.
Never service the massage chair by yourself; this may void your warranty. Please contact our service department.
Important Safety Instructions -Please Read First
5.Important information about the Power Plug and Cord
Check that the voltage of the massage chair corresponds with the specifications indicated for the Chair (only for alternative current).
• Do not roughly disconnect the AC Plug from the Electrical Outlet.
• Do not connect or disconnect the AC Plug from the Electrical Outlet with wet hands as it may result in electrical shock.
• When disconnecting the AC Plug, pull it out by holding the plug and never by the cord.
• The Auto-Timer function stops the massage chair automatically; however, you should switch off the main power after operation.
• Do not place the AC cord under the massage chair as it may damage the cord and result in electrical shock or fire.
• Do not use the massage chair if the power cord or plug is damaged. Please call our service department.
• Do not use the massage chair if the Electrical Outlet is loose or the plug does not fit snugly into the Electrical Outlet.
6. Caution with the Remote Controller
•
•
•
•
•
Do not
Do not
Do not
Do not
Do not
sit, step or place heavy objects on the Remote Controller.
drop the Remote Controller. It is recommended that you place the Remote Controller back in its support when not in use.
exert excessive force on the Remote Controller.
operate the Remote Controller with wet hands.
operate the Remote Controller using sharp or hard objects as this may damage the Remote Controller.
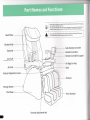
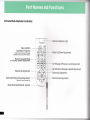
Part Names and Functions
• Check that the voltage corresponds with the specifications indicated for the massage
chair (only for alternative current)
• The plug of the massage chair must only be plugged into an appropriate outlet that is
properly installed and grounded in accordance with all local codes and ordinances.
• Do not place the massage chair within 3 feet (1 meter) of audio/video (AV) devices
such as televisions or radios to prevent signal interference.
Head Pillow-
Backrest PadSub-Remote Controller
Backrest-
Remote Controller
Remote Controller Support
Arm Cuff
(Montage Premier Only)
Air Bags for Hips
Armrest -
Seat
Footrest Adjustment Lever
Footrest
Moving Wheels
Chair Base
Front Footrest
Footrest Adjustment knob
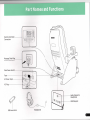
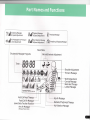
Part Names and Functions
Remote Controller
Connection
Massage Chair Plug
to Electrical Outlet
Main Power Switch
Fuse
AC Power Input
AC Plug
Audio Output for
Headphone
USB Dataport
USB music stick
Headphones
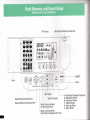
Part Names and Function
Remote Controller Overview
VFD Display
RELAXATION ACTIVATION VITALITY
Infrared Sub Remote Controller
MORNING
NIGHT
A=^^=^^^=^^^=^~^=
) ( B ) ( C ) (D ) ME
Music Player
Reset Footrest & Backrest
Backrest/Footrest Adjustment
Heat Therapies
Music Volume up/down
for Music Mode Only
-Music Synchronization
Synchronize massage with music
-5 Automatic Massage Programs
A: Relaxation Mode
B: Activation Mode
C: Vitality Mode
D: Morning Mode
E: Night Mode
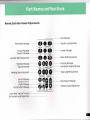
Part Names and Functions
Remote Controller Manual Adjustments
-Auto Shoulder
Whole Back Massage
- Shoulder Up Adjustment
Selection il_ Autoshoulder_Up
Cervical Massage
Thoracic Massage
-Lumbar Massage
Up
Down
Width
— Roller Width Adjustment
Up/Down Roller AdjustmentKneading Massage
Tapping Massage
Knead
Tap
Knead&Tap Press
Kneading Speed Adjustment
Tapping Speed Adjustment
Knead Speed
Tap Speed
Arm Air Massage
(Montage Premier Only)
Hip Air Massage
Foot & Calf Air Massage
Arm Air
Hip Air
Hip Vibration Massage
Vibration Speed Adjustment
v L Calf Air Tradtion Level yyr --y j
Lower Body Traction Function
Air Pressure Level Adjustment
Pressing Massage
Kneading &.Tapping Massage
Part Names and Function
Infrared Sub-Remote Controller
Remote Indicator Light
Main ON/OFF
Automatic Programs
(Select from 5 automatic massage
programs and music synchronization)
Roller Up/Down Adjustment
Manual massage Mode
& Massage Speed Adjustment
Air Massage & Pressure Level Adjustment
Backrest Up Adjustment
Backrest/Footrest Dual Adjustment
(Backrest Down/Footrest Up)
Reset Backrest/Footrest Upright
Hip Vibration Massage & Speed Adjustment
Footrest Up Adjustment
Footrest Down Adjustment
Part Names and Functions
• if Kneading Massage
ill/ & Speed Adjustment
\l Tapping Massage
llll & Speed Adjustment
if Air Massage & Air Pressure
^llff Level Adjustment
h if Hip Vibration Massage
'Hit & Speed Adjustment
Pressing Massage
Kneading & Tapping Massage
Music Mode
5 Automatic Massage Programs
Timer-
OO-OO
OO'OO
Backrest/Footrest Adjustment
Shoulder Adjustment
Thoracic Massage
Width Adjustment
Cervical Massage
Back Heat Therapy
Lumbar Massage
Foot/Calf Heat Therapy
Foot/Calf Air Massage
Lower Body Traction Function
Arm Air Massage
(Montage Premier Only)
Hip Air Massage
Buttocks/Thigh Heat Therapy
Hip Vibration Massage
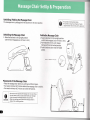
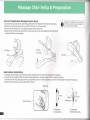
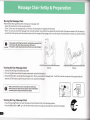
Massage Chair Set Up & Preparation
Unfolding/Folding the Massage Chair
0
The massage chair is packaged with the backrest in the down position.
• Be careful to fold backrest slowly.
• Be careful to not get your fingers or hands
caught between the armrest and the backrest
Unfolding the Massage Chair
Folding the Massage Chair
1. Raise the backrest to the upright position
until the latch engages(you will hear a click).
1. Raise the backrest to the upright position
until the latch engages (you will hear a click)
2. Pull the backrest lever up to release
the backrest from the locked position.
3. Push the backrest down into the folded
position.
Lever to fold backrest
Placement of the Massage Chair
• Place the massage chair where you will have sufficient space.
• You need a minimum of 24 inches behind the massage chair to recline.
• You need a minimum of 24 inches to incline the footrest.
o
CAUTION
• Use caution when placing the massage chair on wood floors.
• You may want to place a carpet underneath your massage
chair to prevent scratching/abrasions to your floors.
• Make sure nothing good is behind the massage chair to
obstruct the reclining position.
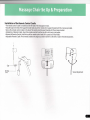
Massage Chair Set Up & Preparation
Installation of the Remote Control Cradle
• The remote control cradle is installed on the left side of the massage chair base.
• Snap the cap to the end of the support bracket and secure the remote control support bracket with the 3 screws provided.
• Secure the remote control cradle to the top of the remote control support bracket with the screws provided.
• Installation of Remote Cradle: Insert the remote control from the top until it sits firmly in the holder.
• Removal of Remote Control: Hold the top of the remote control and slide it up and out of the holder.
• Adjustable Remote Cradle: Pivot remote cradle to the angle you desire or swivel it to the left or right in the desired position.
Screws
(3 PCS)
Swivel Adjustment
Massage Chair Set Up & Preparation
Arm Cuff Installation(Montage Premier Only)
o
1.Insert the air tubes of the arm cuff through the hole of the middle of the armrest for both sides.
2.Open the armrest and secure the arm cuff with the four (4) screws provided.
3.Connect the air hoses to the air coupling located inside the armrest.
4.Close the top of the armrest and lift the armrest and secure the armrest together with the two(2)
screws behind the armrest guide.
Make sure to install the Arm Unit securely.
Otherwise, it would cause air leakage or injury if the unit falls accidently.
1 Screw
Seat Cushion Installation
1. The seat cushion needs to be connected to the massage chair for both the air and vibration massages.
2. Connect the air coupling to the air hose with the same color or number (Connect 3 to 3 or yellow to yellow).
3. Connect the electrical couplings with its corresponding color or number. To separate, press the hooks together and pull the plug out.
4. Attach the seat cushion by lining up the Velcro strips.
Velcro Strip
t
I
Pull out
Seat Cushion
To Separate
Air Connection
Hook
Press down
To Separate
Electrical Coupling
Massage Chair Set Up & Preparation
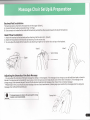
Backrest Pad Installation
The backrest pad is attached to the backrest with the zipper (View A).
A. Connect the back heating connectors Plug 1 to Plug 2.
B. One connector is located on the inside of the backrest pad and the other is located towards the top of the backrest.
Head Pillow Installation
1. Attach the headrest to the backrest pad by attaching it to the velcro strips. (View B)
2. Attach the head pillow to the headrest by attaching it to the velcro strips.
3. You can adjust the height of the head pillow by attaching it higher or lower to the velcro strips on the headrest.
View A
ViewB
ViewC
Velcro Strips
Zipper
Head Pillow
Adjusting the Intensity of the Back Massage
• You can adjust the intensity of the back massage by adding or removing pads. If the massage is too strong you can add additional pads, a towel or
blanket. One sponge pad is provided for you to place it into the backrest pad to help absorb some of the roller stimulation. If the massage is not
strong enough, then remove the pad. You can flip the backrest pad behind the massage chair (View C) for an intense massage.
• Please keep in mind, you should use your massage chair on a daily basis. However, please gauge your sensitivity to massages prior to using your
massage chair without the backrest pad.
O
CAUTION
Prolonged exposure to heat on the same spot for a long
duration is not recommended.
Sponge Pad
Massage Chair Set Up & Preparation
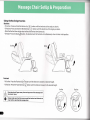
Using the Reclining Function
Backrest
• To Incline: Press and hold the Recline Up ^J> button until the backrest is at the angle you desire.
• To Recline: Press and hold the Recline Down^r~>button until the backrest is at the angle you desire.
(Note the Recline Down button also inclines the footrest simultaneously.)
• To Reset: Press the Reset (y*) button, the backrest and the footrest will simultaneously return to their initial position.
Incline
Recline
Footrest
• To Incline: Press the Footrest Up(-^) button until the footrest is raised to the desired height.
• To Recline: Press the Footrest Down (O) button until the footrest is lowered to the desired height.
Incline
' Keep hands and fingers away from moving areas of the massage chair
to prevent injury.
O
' Always make sure that the areas around the backrest and footrest are
clear before operating the massage chair.
Recline
Massage Chair Set Up & Preparation
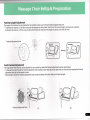
Footrest Length Adjustment
The length of the footrest can be adjusted for the comfort of each user by lifting the footrest adjustment lever.
• To Extend the Footrest: Lift the lever and push the footrest out with your feet. Once it is at the correct length, lock the lever in position.
• To Shorten the Footrest: Lift the lever and allow the footrest to slide back to the length you desire, then lock the lever.
Footrest Adjustment Lever
Front Footrest Adjustment
The angle of the front footrest can be adjusted for your comfort by rotating the footrest adjustment knob as shown below.
• To change the Angle: Rotate the footrest adjustment knob counterclockwise and adjust the angle with your feet and then release the footrest
adjustment knob to lock the angle in place.
• Reset Upright: Rotate the footrest adjustment knob counterclockwise and the front footrest will reset upright.
Footrest Adjustment Knob
Massage Chair Set Up & Preparation
Moving the Massage Chair
Please follow these guidelines when moving your massage chair:
• Adjust the backrest to its fully upright position.
• Carry: If you carry the massage chair, a minimum of two people are required to lift the chair.
• Move: You can also move the massage chair using the wheels. Use a minimum two people to move the chair. One person needs to lift the footrest
up while the other person pulls the backrest back until the weight of the massage chair is on the wheels. Push the chair to where you want to move it.
O
CAUTION
> Please pull out AC Plug from Electric outlet before moving Chair.
> Do not move the chair when someone is sitting on it.
' The chair is rather heavy and take sufficient care when lifting it.
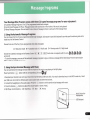
Turning On Your Massage Chair
(Carry)
(Move)
1. Connect the AC Plug to the Electrical Outlet.
2. Turn on the Main Power Switch located underneath and behind the backrest.
3. Press the (««) button, to activate the massage chair. When you activate the massage chair, it will first scan the curvature of the upper body and
detects your the exact acupoints to give you a truly customized massage.
o
• Make sure that the AC cord in not under the chair base.
• Always make sure that the main power switch is Off before
connecting the AC plug to the Electrical Outlet.
Turning On Your Massage Chair
• Press the Reset M<) button to reset the backrest and footrest to their initial starting position.
• Press the (M/K) button to OFF, turn off the Main Power Switch and unplug the AC plug from the Electrical Outlet.
Massage Programs
Your Montage Elite/Premier comes with three (3) types of massage programs for your enjoyment:
1) Automatic Massage Programs: Five (5) Pre-programmed whole body massages.
2) Synchronized Massage with Music: Massage function will synchronize with the rhythm of the music being played.
3) Manual Massage Programs: Mix and match from a choice of massage functions in each part of the massage chair.
1. Using the Automatic Massage Programs
You can choose from five (5) pre-programmed whole body massages. Each program is specially designed to provide specific wellness goals with a
single touch of the Remote Control.
Choose from one of the five (5) pre-programmed whole body massages:
A--Relaxation mode
B--Activation mode C--Vitality mode
D--Morning mode E--Night mode
Choose the automatic massage on the Remote Control ( A
) c ) ( 3 (^) Each letter corresponds with the icon
on the LCD
• To start the massage, press any of the automatic massage programs to enjoy a continuous massage of the whole body. Press the same button
again to stop the massage at any time.
2. Using the Synchronized Massage with Music
You can synchronize the massage function with the rhythm of the music you are playing in the Mp3 player.
Music Synchronize CjifT^ button with its corresponding LCD icon:
1.Download your favorite music onto your music Universal Serial Bus (USB) music stick. You need to download music in the MP3 format only. Insert
your USB music stick into the USB data port located underneath and behind the backrest.
2. Connect the headphones to the audio output. Press the «»)> button to start the synchronized massage with music.
3. Press the Volume(+lf^)buttons to adjust the volume higher or lower (4 levels).
4. Mp3 Player control buttons: C»/" )Start/Stop C »n )Next C m ^Previous
Audio Output for
Headphones
USB Dataport
Massage Programs
3. Manual Massage Programs
You can choose from different therapies ranging from back massages, air massages, vibration massages, lower body traction program and
heat therapy. You can also mix and match from a choice of therapies to find the perfect mix for you. You may also adjust the speed of the
massage, air pressure, intensity and position for your comfort and relaxation.
A) 4 Back Massage Programs:
• Kneading Massage
• Tapping Massage
• Kneading & Tapping Massage
• Pressing Massage
B) 3 Air Massage Programs:
• Hip Air Massage
• Calf/Foot Air Massage
• Arm Air Massage (Montage Premier Only)
Please use the chart below to help select the mix of Manual Programs Available
Massage Programs
Speed Adjustment Level
LCD
Width
Parts Up/down
Kneading
Tapping
Kneading fkTapping
Pressing
Hip Vibration Massage
C) 1 Lower Body Traction Program:
• Traction Footrest
D) 1 Vibration Massage:
• Hip Vibration Massage
E) 3 Heat Therapy Functions
• Back Heat Therapy
• Buttock/Thigh Heat Therapy
• Foot/Calf HeatTherapy
Arm Air Massage!
e
§
<3s
jb
f
O
Hip Air Massage
<o>
Calf/Foot Air Massage
#>
Calf/Foot Traction Massage
-n/
Back HeatTherapy
0
0
0
0
0
0
0
a
0
0
6T
a
E/T
0
^^
Buttock/Thigh HeatTherapy
^«
Foot/Calf Heat Therapy
^
A) Back Massage Programs
1. Kneading Massage
_
• Press the Kneading @ button to begin the kneading massage which then corresponds to the()?icon on the LCD.
• Press either Massage Selection CDffiAOd) button to select which area of the back or whole back you would like massaged.
• Press the massage Roller Up (^ button or the massage Roller Down button^pcontinuously to move the massage rollers to the desired
position and then release the Up/Down Massage Roller button to pinpoint the massage.
To adjust the speed of the massage, press the Plus/Minus Q Q button to increase/decrease the speed which then corresponds to the
icon on the LCD.
Press the Kneading^ button again to stop the massage at any time.
0
0
0
Massage Programs
A) Back Massage Programs (continued)
2. Tapping Massage
-^
• Press the Tapping ^button to begin the tapping massage which corresponds to the Tapping e/ icon on the LCD.
• Press either Massage Selection(D4g)4g)4g)button to select which area of the backer whole back you would like massaged. Adjust the roller
width with the Roller Width C£9 button.
• Press the Massage Roller Up 4§9 button or the Massage Roller Down (g) button continuously to move the massage rollers to the desired position
and then release the Up/Down Massage Roller button to pinpoint the massage.
• To adjust the speed of the massage, press the Plus/Minus Q Q button to increase/decrease the speed which corresponds to the Tapping Speed
icon §),!//the LCD.
• Press the Tapping (^ button again to stop the massage at any time.
3.
•
•
•
Kneading & Tapping Massage
^
Press the Kneading & Tapping ^ button to begin the dual action massage which corresponds to the Kneading & Tapping ^tjM icon on the LCD.
Press either Massage Selection 4DO€3)€§) button to select which area of the back or whole back you would like massaged.
Press the Massage Roller Up (g) button or the Massage Roller Down^^button continuously to move the massage rollers to the desired position
and then release the Up/Down massage roller button to pinpoint the massage.
• To adjust the speed of the massage, press the Plus/Minus Q Q button to increase/decrease the speed which corresponds to the Kneading
& Tapping Speed ^.i// J^f// icon on the LCD.
• Press the Kneading & Tapping ^ button again to stop the massage at any time.
4. Pressing Massage
/,
• Press the Pressing (^ button to begin the dual action massage which corresponds to the Pressing £=) icon on the LCD.
• Press either Massage Selection 4DCDd9(§) button to select which area of the backer whole back you would like massaged. Adjust the roller
width with the Roller WidthCS button.
• Press the Massage Roller Up (jg) button or the Massage Roller Down 4/g) button continuously to move the massage rollers to the desired position
and then release the Up/Down massage roller button to pinpoint the massage.
Press the Pressing fgl button again to stop the massage at any time.
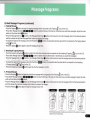
The following illustration provides a quick reference for the options to massage a
certain area on the entire back.
Massage Programs
B)Hip Vibration Massage
• Press the Hip Vibration ii button to begin the hip vibration massage for the buttocks and thighs which then corresponds to the Hip Vibration
Massage ^ icon on the LCD.
• To adjust the speed of the massage, press the Plus/MinusHbutton to increase/decrease the speed which corresponds to the Vibration Speed
icon §,ill on the LCD.
• Press the Hip Vibration Massage^button again to stop the massage at any time.
C) Air Massage Programs
Air Massage for Arms (Montage Premier Only)
• Press the Arm Massage €^ button to begin the Air Massage for your arms which then corresponds to the Air Pressure ^Q^ icon on the LCD.
• To adjust the air pressure of the massage, press the PlusQbutton or the Minus Q button to increase/decrease the air pressure which then
corresponds to the Air Pressure Level 60&,|// ' con on tne LCD. There are 4 levels of air pressure that can be selected.
• Press the Arm Massage © button again to stop the massage at any time.
Air Massage for Hips
• Press the Hip Massage^^button to begin the Air Massage for your buttocks and thighs which corresponds to the Air Pressure^Q^icon on the LCD.
• To adjust the air pressure of the massage, press the PlusQbutton or the Minus^button to increase/decrease the air pressure which then
corresponds to the Air Pressure Level {O&il/f icon on the LCD. There are 4 levels of air pressure that can be selected.
• Press the Hip Massage^button again to stop the massage at any time.
Air Massage for Calves/Feet
• Press the Calf/Foot Massage^^button to begin the Air Massage for your calves and feet which then corresponds to the Air Pressure-gQ& icon on
the LCD.
• To adjust the air pressure of the massage, press the Plus fi button or the Minus Q button to increase/decrease the air pressure which then
corresponds to the Air Pressure Level $)&il// icon on the LCD. There are 4 levels of air pressure that can be selected.
• Press the Calf/Foot Massage © button again to stop the massage at any time.
D) Lower Body Traction Program
Footrest Traction Function
• Press the Traction ^pbutton to begin the Lower Body Traction Function to stretch and extend your lower extremities which then corresponds to
the -j«/ icon on the LCD
• To adjust the strength of the stretch, press the Plus/MinusQ ^button to increase/decrease the strength which then corresponds to the Air
Pressure Level ^Q^icon on the LCD. There are 4 levels of strength of the stretch that can be selected.
• Press the Traction^button again to stop the massage at any time.
Massage Programs
E)Heat Therapy
Back Heat Therapy
• Press the Back Heat
• Press the Back Heat
button to begin the back heat therapy which then corresponds to the icon on the LCD.
button again to stop the heat therapy at any time.
Buttocks/Thigh Heat Therapy
• Press the Buttocks/Thigh Heat
• Press the Buttocks/Thigh Heat
Foot/Calf Heat Therapy
• Press the Foot/Calf Heat
• Press the Foot/Calf Heat
button to begin the buttocks and thigh heat therapy which then correspond to the icon on the LCD.
button again to stop the heat therapy at any time.
button to begin the foot and calf heat therapy which then corresponds to the icon on the LCD
button again to stop the heat therapy at any time.
Adjust the Shoulder Position
1. Press the Auto Shoulder ^) button to start the infrared scan of the curvature of your body which detects your
unique acu-points. The infrared scan will also detect your shoulder position and will automatically adjust the
massage rollers to your shoulder ^) height.
2. Press the Shoulder Up button to manually adjust the position of your shoulder. There are five (5) positions available for the shoulder area.
Timer
f+\o adjust the massage time, press the Timer Plus/Minus rH button which
icon on the LCD.
2.The default massage time is thirty (30) minutes and the massage program will stop automatically after thirty (30) minutes has elapsed.
3.Adjusting the time with the Timer plus/minus button: You can adjust the time in five (5) minute increments.
a. Press the Timer Plus [+J button to increase the time by five (5) minutes.
b. Press the Timer Minus \^j button to decrease the time by five (5) minutes
4.After setting the time, the timer will begin to count down and the massage program will stop automatically when the time has elapsed. If you
switch programs or change from automatic to manual, the Time remaining will not change.
Care and Storage of your Massage
Storage of your Massage
• If you are not going to use your massage chair for an extended period of time, then turn off the main power and disconnect the plug from the
electrical outlet.
• Keep your massage chair clean by periodically wiping off any dust or dirt to ensure long term performance of your massage chair.
• Keep your massage chair away from places with high humidity.
• To protect your massage chair, cover the massage chair with a dustproof cover to keep dust and dirt from building up.
• Keep the ventilation holes clear of dust and debris.
0
• Always keep your massage chair away from direct sunlight or heating appliances like
space heaters, etc.
Cleaning of Remote Controller
• Periodically clean your remote control with a dry cloth. Never use a wet cloth because it can cause a short in the electronics.
Cleaning of the PVC Leather Chair
• Periodically clean the PVC leather of the massage chair. You can use vinegar and water mixture or you can use a window cleaning solution.
Dip a clean white cotton towel into the cleaning solution. Wipe the areas of the PVC leather you want to clean.
• When using a cleaning solution, please exercise common sense. First start by cleaning on inconspicuous area on the massage chair before
liberally applying the solution on your upholstery.
O
• Never use any acidic cleaning solutions, diluents, volatile oil or bleaching powder.
These products may cause discolorations or cracks.
• Never use an iron on the PVC leather.
Specifications
Name: Montage Massage Chair
Model: [ ] Montage Elite [ ] Montage Premier
Rated Voltage: [ ]AC100-120V [ ] AC 220-240V
Rated Frequency: 50/60Hz
Power Consumption: 260W
Rated Working Time: 30 minutes
Net Weight: 188 Ibs (85kg)
Note: Specifications are subject to change without notice.
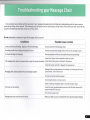
Troubleshooting your Massage Chair
If you encounter any problems with the operation of your massage chair, please check the following troubleshooting guide for some common
issues to see if they can be resolved. If the massage chair still does not work or malfunctions, please switch off the main power and remove the AC
plug from the electrical outlet and contact our service center.
Do not disassemble or attempt to repair the massage chair by yourself.
Conditions
Possible Cause or Action
Loud sound during Kneading, Tapping or Pressing Massage
Normal movement of the massage rollers
Knocking sound when changing massage functions
Mechanical sound when massage rollers switch to new massage function
Air sound starting and stopping
Normal operation of the air pump activating and deactivating
Check the AC plug is firmly connected to Electrical Outlet
The massage chair does not respond when using the remote controller
Check that the main power is switched to ON position
Check that remote controller is plugged into massage chair
Massage chair ceases operation during massage program
Massage chair may cease operation if it is being run continuously for a long
period of time. Turn off and let cool
The time on the timer has fully elapsed
Volume may be too low. Increase volume
Check to make sure headphone jack is connected to audio output
The music is not working
Check that music was downloaded correctly to the USB music stick and the
proper format (MP3) was used
Press the music play button
Massage does not synchronize with music
Make sure that you have activated the Music Synchronization Button
ALLRIGHTS RESERVED, ANY ALTERMENT PLEASE REFERTOTHE REALPRODUCT.
\a Massage
TEL:800-659-3650
OMEGA
www - om egamassage.com