1
Global Array Manager™
Server Software
Installation Guide and
User Manual
for Software Kit 5
Form Number SA67-0048-01
© Copyright March, 2002
All Rights Reserved.
All contents of this manual are copyrighted by IBM. The
information contained herein is the exclusive property of
IBM and shall not be copied, transferred, photocopied,
translated on paper, film, electronic media, or computerreadable form; or otherwise reproduced in any way,
without the express written permission of IBM.
Greetings
This manual describes the Mylex® Global Array Manager™ Server Software.
Requests for technical information about this and other Mylex/IBM products should be
made to your Mylex/IBM authorized reseller or Mylex/IBM marketing representative.
Please Notice
IBM, Mylex, Global Array Manager, GAM, SANArray Manager, SAM, RAID Assist,
RAID EzAssist, AcceleRAID, and eXtremeRAID are trademarks or registered trademarks
of International Business Machines Corporation and its subsidiaries. MS-DOS, Windows,
Windows XP, and Windows NT are registered trademarks of Microsoft Corporation.
Novell and NetWare are registered trademarks of Novell, Inc. UnixWare and Caldera are
trademarks or registered trademarks of Caldera Systems Incorporated. Solaris is a
registered trademark of Sun Microsystems, Inc. Linux is written and distributed under the
GNU General Public License which means that its source code is freely-distributed and
available to the general public. SuSE is a trademark of SuSE Incorporated. Red Hat is a
registered trademark of Redhat Incorporated. UNIX is a registered trademark of the Open
Group. Intel and LANDesk are registered trademarks of Intel Corporation. Other names
that are trademarks may be used herein for the purpose of identifying the products or
services of their respective owners.
Unless otherwise noted, companies, names and data used in examples herein are fictitious.
Our Policy
Although reasonable efforts have been made to assure the accuracy of the information
contained herein, this publication could include technical inaccuracies or typographical
errors. IBM expressly disclaims liability for any error in this information, and for
damages, whether direct, indirect, special, exemplary, consequential or otherwise, that
may result from such error, including but not limited to loss of profits resulting from the
use or misuse of the manual or information contained therein (even if IBM has been
advised of the possibility of such damages). Any questions or comments regarding this
document or its contents should be addressed to IBM at the address shown on the cover.
The following paragraph does not apply to the United Kingdom or any country where
such provisions are inconsistent with local law:
IBM PROVIDES THIS PUBLICATION “AS IS” WITHOUT WARRANTY OF ANY
KIND, EITHER EXPRESS OR IMPLIED, INCLUDING, BUT NOT LIMITED TO,
THE IMPLIED WARRANTIES OF MERCHANTABILITY OR FITNESS FOR A
PARTICULAR PURPOSE.
Some states do not allow disclaimer of express or implied warranties or the limitation or
exclusion of liability for indirect, special, exemplary, incidental or consequential damages
in certain transactions; therefore, this statement may not apply to you. Also, you may have
other rights which vary from jurisdiction to jurisdiction.
Information in this publication is subject to change without notice and does not represent a
commitment on the part of IBM. Changes may be made periodically to the information
herein; these changes will be incorporated in new editions of the publication. IBM
reserves the right to make improvements and/or changes at any time in the product(s) and/
or program(s) described in this publication.
It is possible that this publication may contain reference to, or information about, Mylex
products (machines and programs), programming or services that are not announced in
your country. Such references or information must not be construed to mean that IBM
intends to announce, provide, or make available such Mylex products, programming, or
services in your jurisdiction.
About This Manual
This installation guide covers the steps involved to install and use the
Mylex® Global Array Manager™ Server Software.
In addition, this document covers installation and use of SNMP, SANArray
Manager (SAM), GAM Event Logging, creation of GAM Server diskettes,
and GAM Server for Failover or Failback in MSCS.
For information on defining and setting RAID (Redundant Array of
Independent Disks) levels as well as configuration of the array, consult the
Global Array Manager Client manual and the RAID EzAssist Configuration
Utility User Reference Guide or RAID EzAssist Configuration Utility Quick
Configuration Guide.
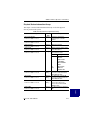
Conventions
Throughout the manual, the following conventions are used to describe user
interaction with the product:
bold
The user must enter the bold text exactly as shown.
↵
Press the Enter key.
Enter
Press the key labeled “Enter” (or “Delete”, etc.).
File->Run
Select the Run option from the pull-down menu
activated when the File menu pad is selected.
☛ Note
Supplementary information that can have an effect on
system performance.
Caution
Notification that a proscribed action has the potential
to adversely affect equipment operation, system
performance, or data integrity.
WARNING
Notification that a proscribed action will definitely
result in equipment damage, data loss, or personal
injury.
NetWare
Windows NT
Windows 2000 and XP
UnixWare
Solaris
Linux
Appendixes
vi
Global Array Manager Server Software Manual
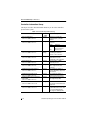
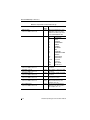
Contents
Chapter 1
Introduction
Overview ........................................................................................... 1-1
NetWare®, Windows® NT®, Windows 2000, and
Windows XP® .......................................................................... 1-1
UnixWare® and Solaris® ........................................................... 1-2
Linux ........................................................................................... 1-2
Global Array Manager Server Overview ............................................ 1-3
Monitoring Functions .................................................................. 1-3
Management Functions .............................................................. 1-3
Configuration Functions ............................................................. 1-3
Requirements .................................................................................... 1-4
Server Hardware and Software – NetWare ................................ 1-4
Server Hardware and Software – Windows NT .......................... 1-5
Server Hardware and Software – Windows 2000 or XP ............ 1-5
Server Hardware and Software – UnixWare .............................. 1-5
Server Hardware and Software – Solaris 7/8 on x86 ................. 1-5
Server Hardware and Software – Linux ..................................... 1-6
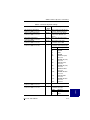
Chapter 2
NetWare
Overview ........................................................................................... 2-1
Global Array Manager Server Software for
NetWare 4.2, 5.1, and 6 .................................................................. 2-2
Installing Global Array Manager Server Software ...................... 2-2
Running Global Array Manager Server ...................................... 2-3
Troubleshooting Server Software Installation ............................. 2-5
DMI CI Manual Configuration ............................................................ 2-6
Optional DMI CI Parameters ...................................................... 2-6
Chapter 3
Windows NT
Overview ........................................................................................... 3-1
Global Array Manager Server Software for Windows NT 4.0 ............ 3-2
Installation Overview .................................................................. 3-2
File List ....................................................................................... 3-2
Installing Global Array Manager Server Software ...................... 3-3
Running Global Array Manager Server .................................... 3-14
Troubleshooting Server Software Installation ........................... 3-14
Manual No. SA67-0048-01
vii
DMI CI Manual Configuration .......................................................... 3-15
DMI CI Files .............................................................................. 3-16
Optional DMI CI Parameters .................................................... 3-16
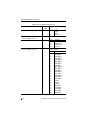
Chapter 4
Windows 2000 and Windows XP
Overview ............................................................................................ 4-1
Global Array Manager Server Software for Windows 2000 and
Windows XP .................................................................................... 4-2
Installation Overview .................................................................. 4-2
File List ....................................................................................... 4-2
Installing Global Array Manager Server Software ...................... 4-3
Running Global Array Manager Server .................................... 4-14
Troubleshooting Server Software Installation ........................... 4-14
DMI CI Manual Configuration .......................................................... 4-15
DMI Files .................................................................................. 4-16
Optional DMI CI Parameters .................................................... 4-16
Chapter 5
UnixWare
Overview ............................................................................................ 5-1
Global Array Manager Server Software for UnixWare 7.1 ................. 5-2
Creating the Global Array Manager Server Diskette .................. 5-2
Installing Global Array Manager Server Software ...................... 5-2
Running Global Array Manager Server ...................................... 5-3
Troubleshooting Server Software Installation ............................. 5-4
Uninstalling the Server Software ................................................ 5-5
Chapter 6
Solaris
Overview ............................................................................................ 6-1
Global Array Manager Server Software for Solaris 7 and Solaris 8 ... 6-2
Creating the Global Array Manager Server Diskette .................. 6-2
Installing Global Array Manager Server Software ...................... 6-3
Running Global Array Manager Server ...................................... 6-5
Troubleshooting Server Software Installation ............................. 6-6
Uninstalling the Server Software ................................................ 6-6
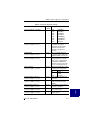
Chapter 7
Linux
Overview ............................................................................................ 7-1
Global Array Manager Server Software for Linux .............................. 7-2
Installation Overview .................................................................. 7-2
Installing Global Array Manager Server Software ...................... 7-2
viii
Global Array Manager Server Software Manual
Editing GAMEVENT and GAMEVLOG ....................................... 7-3
Running Global Array Manager Server ...................................... 7-4
Troubleshooting Server Software Installation ............................. 7-5
Uninstalling the Server Software ................................................ 7-6
Appendix A
SNMP Installation, Operation, and Definition
Introduction ........................................................................................A-1
SNMP Installation Overview ..............................................................A-1
SNMP Installation for NetWare ..........................................................A-1
Using the TRAPTARG.CFG File ................................................A-2
Starting the NetWare Agent .......................................................A-3
Optional SNMP Parameters for NetWare ...................................A-4
SNMP Installation for Windows NT, Windows 2000, or
Windows XP ....................................................................................A-5
Install the SNMP Agent ..............................................................A-5
Optional SNMP Parameters for Windows NT, Windows 2000,
or Windows XP .........................................................................A-5
SNMP Installation for UnixWare ........................................................A-7
Install the SNMP Agent ..............................................................A-7
Optional SNMP Parameters for UnixWare .................................A-7
SNMP Peer Agent Installation for Linux ............................................A-8
Software Development Kit ..........................................................A-8
Example of /etc/rc.d/init.d/snmpd File ........................................A-8
Installing gamagent Files .........................................................A-10
Starting gamdrvd, snmpd, and gamagent ................................A-11
Uninstalling gamagent Files .....................................................A-11
MIB Compilation and Definition File Creation ..................................A-13
MYLEXRAIDMIB Object Definitions ................................................A-14
Traps ........................................................................................A-14
Controller Information Group ....................................................A-18
Logical Drive Information Group ..............................................A-25
Physical Device Information Group ..........................................A-27
RAID Management Software Group ........................................A-30
Logical Drive Statistics Group ..................................................A-31
Physical Drive Statistics Group ................................................A-32
Fault Management Cabinet Information Group ........................A-33
RAID Event Information Group ................................................A-35
Battery Backup Unit Information Group ...................................A-37
Manual No. SA67-0048-01
ix
Appendix B
GAMEVENT
Introduction ........................................................................................B-1
NetWare ............................................................................................B-3
Enabling Event Notification ........................................................B-3
Enabling a GAM Event Log File .................................................B-4
Saving and Restarting ................................................................B-4
Windows NT, Windows 2000, and Windows XP ...............................B-5
Enabling Event Notification ........................................................B-5
Enabling a GAM Event Log File .................................................B-6
Saving and Restarting ................................................................B-6
GAMEVENT LOG Options .........................................................B-7
UnixWare ...........................................................................................B-8
Enabling Event Notification ........................................................B-8
Enabling a GAM Event Log File .................................................B-9
Saving and Restarting ................................................................B-9
Solaris ..............................................................................................B-10
Enabling Event Notification ......................................................B-10
Enabling a GAM Event Log File ...............................................B-11
Saving and Restarting ..............................................................B-11
Linux ................................................................................................B-12
Enabling Event Notification ......................................................B-12
Enable GAM Event Logging .....................................................B-13
Saving and Restarting ..............................................................B-14
Appendix C
Creating a GAM Server Installation Diskette
Introduction ....................................................................................... C-1
When to Create a GAM Server Installation Diskette ................. C-1
Creating a GAM Server Software Installation Diskette ..................... C-2
Appendix D
Installation of GAM Server for Failover or Failback in MSCS
Preparation ....................................................................................... D-1
Using Virtual Cluster IP Address ...................................................... D-1
Installing GAM Server for Failover or Failback in MSCS .................. D-1
x
Global Array Manager Server Software Manual
Chapter 1
Introduction
Overview
This manual describes information on how to install the Global Array
Manager™ (GAM) Server software for several supported operating systems.
This chapter describes:
• GAM Server functions
• GAM Server requirements under supported operating systems
Global Array Manager Server software is delivered on the CD-ROM, and is
used to install GAM Server software on a server running a particular
network operating system.
☛ Note
This manual assumes that the network administrator
will be performing any of the installation procedures
described herein.
NetWare®, Windows® NT®, Windows 2000, and
Windows XP®
Install GAM Server Software for Netware® 4.2/5.1/6, Windows® NT® 4.0,
Windows 2000, or Windows XP® directly from the CD-ROM. See the
appropriate chapter in this manual.
Manual No. SA67-0048-01
1-1
Overview
UnixWare® and Solaris®
Use one of the following methods to obtain GAM Server software for
UnixWare® 7.x, Solaris® 7 for x86, or Solaris® 8 for x86:
• Retrieve the appropriate GAM Server image file from the CD-ROM
and create a GAM Server installation diskette from the DOS image file.
• Insert the CD-ROM into a system running Windows NT, Windows
2000, or Windows XP, then click on “Create Software Diskettes” from
the RAID Management Software Installation menu. See Appendix C,
“Creating a GAM Server Installation Diskette” for details.
Linux
Before installing the GAM server for Linux on a Mylex PCI controller, you
will need to first download and install the Mylex PCI operating system
driver. You can get this from the appropriate web site (see Chapter 7,
“Linux”).
1-2
Global Array Manager Server Software Manual
Introduction
Global Array Manager Server Overview
Global Array Manager (GAM) Server Software is used to manage disk array
subsystems attached to a Mylex Disk Array Controller.
Monitoring Functions
The Global Array Manager Server software collects and disseminates
information on disk array status and resource utilization. The Global Array
Manager (GAM) and SANArray Manger (SAM) Client software organize
this information through a graphical display.
SNMP/DMI Support
The Global Array Manager Server software includes SNMP and DMI
support, allowing stand-alone monitoring of performance and fault
information. This is useful if a management package is already in use.
Support for these protocols includes “read only” functions.
Management Functions
The Global Array Manager Server software executes the management
instructions the GAM/SAM Client specifies. GAM Server software offers
fault management, reliable messaging, and superior operating system
support. GAM/SAM Client software manages or performs maintenance on
individual disk arrays and drives (with the appropriate authentication), again
through means of the graphical user interface.
Configuration Functions
GAM/SAM Client software provides disk array configuration and remote
TCP/IP support functions. If your goal is monitoring and simple
maintenance or messaging, Global Array Manager Server is sufficient for
these tasks.
Manual No. SA67-0048-01
1-3
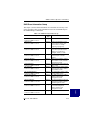
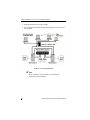
Requirements
Requirements
The following information provides the hardware and software requirements
for the Global Array Manager Server software under several network
operating systems.
The person who will be performing the installation must have Administrator
access for the system onto which GAM Server will be installed.
The instruction in this manual assume that the hardware installation for
external or PCI products, the system configuration, and the disk array
controller configuration are properly completed. If not, please see the PCI
Disk Array Controller Drivers Installation Guide and User Manual and the
RAID EzAssist Configuration Utility User Reference Guide or RAID
EzAssist Configuration Utility Quick Configuration Guide. If you are
installing the controller into an external product, please see the appropriate
external installation guide. Complete the required procedures described in
those manuals before proceeding with installation of GAM Server discussed
herein.
Before starting, be sure to read through all applicable instructions to
determine the specific requirements for this installation.
The correct environment must be present on the server for the Global Array
Manager Server software to work properly. The environment is a
combination of hardware and software which meets the following
requirements:
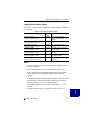
Server Hardware and Software – NetWare
• A server running Novell® NetWare 4.2/5.1/6
• 10 MB of free hard disk space on the SYS: volume
• Properly installed and configured Mylex Disk Array Controller with
the appropriate NetWare drivers
• (Optional) If SNMP participation is desired, SNMP support (available
from third parties) should be installed.
• TCP/IP must be installed
1-4
Global Array Manager Server Software Manual
Introduction
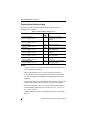
Server Hardware and Software – Windows NT
• A server running Microsoft® Windows NT 4.0 Workstation, Server, or
Enterprise edition on x86 with SP5 or SP6 installed
• 10 MB of free hard disk space
• Properly installed and configured Mylex Disk Array Controller with
the appropriate Windows NT drivers from Software Kit 5
• TCP/IP must be installed
Server Hardware and Software – Windows 2000 or XP
• A server running Microsoft Windows 2000 on x86 Professional,
Server, or Advanced Server with SP1 (optional), OR Windows XP
Professional or Home Edition
• 10 MB of free hard disk space
• Properly installed and configured Mylex Disk Array Controller with
the appropriate Windows 2000 or Windows XP drivers from Software
Kit 5
• (Optional) If SNMP participation is desired, SNMP support (available
from third parties) should be installed.
• TCP/IP must be installed
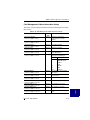
Server Hardware and Software – UnixWare
• A server running UnixWare (version 7.x on x86)
• 10 MB of free hard disk space
• Properly installed and configured Mylex Disk Array Controller with
the appropriate UnixWare drivers from Software Kit 5
• TCP/IP must be installed
Server Hardware and Software – Solaris 7/8 on x86
• A server running Solaris 7/8 on x86
• 10 MB of free hard disk space
• Properly installed and configured Mylex Disk Array Controller with
the appropriate Solaris drivers or Sun MLX driver from Software Kit 5
• TCP/IP must be installed
Manual No. SA67-0048-01
1-5
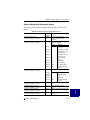
Requirements
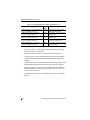
Server Hardware and Software – Linux
• A server running Linux version:
• Red Hat®, 6.2, 7.0, and 7.1 (external products support only 7.1)
• SuSe® 6.4, 7.1
• Caldera® 2.4
• Turbo Linux 6.0, 6.1
• 10 MB of free hard disk space
• Properly installed and configured Mylex Disk Array Controller with
the appropriate Linux drivers found on the web site to be used with
Software Kit 5 (see “Linux” on page 7-1)
• TCP/IP must be installed
• Inetd or Xinetd must be running
• SNMP (Optional)
1-6
Global Array Manager Server Software Manual
Chapter 2
NetWare
N
E
T
W
A
R
E
Overview
This chapter describes installation, verification, and startup of the Global
Array Manager Server software for Novell® NetWare. The software is
provided on the CD-ROM.
☛ Note
This chapter assumes that the network administrator
for this site will be performing these installation
procedures.
Manual No. SA67-0048-01
2-1
Global Array Manager Server Software for NetWare 4.2, 5.1, and 6
Global Array Manager Server Software for
NetWare 4.2, 5.1, and 6
Installing Global Array Manager Server Software
The Global Array Manager (GAM) Server software for NetWare has an
automated installation utility which is run from the NetWare server console.
This utility places the Global Array Manager Server application in the
correct server directory and modifies the NetWare startup file,
AUTOEXEC.NCF, to launch the application when the server is started.
☛ Note
These instructions assume that your CD-ROM drive
is properly identified and that CDROM.NLM is
loaded.
Follow the steps below to install the GAM server software. Note the
difference between NetWare 5.1 and NetWare 4.2 for the first step.
1. If you are using NetWare 5.1, simply insert the Software Kit
distribution CD-ROM into the file server’s CD-ROM drive; the mount
function is automatic. Go to Step 2.
If you are using NetWare 4.2, mount the Software Kit distribution
CD-ROM by typing the following command at the server console
prompt:
CD MOUNT ALL
Make a written note of the volume label that will appear at the end of
the messages during the load process. You will need to use the volume
label later in the installation.
2. At the console, type the following command and press Enter to run the
installation.
: <Volume Label>:gam\netware\install
☛ Note
Do not type any extension. Type only ....\install.
For NetWare 4.2, replace <Volume Label> with the
actual volume label you wrote down in Step 1.
2-2
Global Array Manager Server Software Manual
NetWare
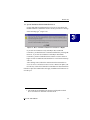
3. The Global Array Manager Server software installation screen
displays.
N
E
T
W
A
R
E
• To install the GAM Server software, select Install.
• To cancel the installation, select Exit.
As the software is installed, the server’s AUTOEXEC.NCF file is
updated to start the Global Array Manager Server application
whenever the server runs this file.
4. Press the Enter key at the Update AUTOEXEC.NCF message.
5. Installation is complete. Edit AUTOEXEC.NCF as follows:
Modify the GAMEVENT and GAMEVLOG lines manually.
After each -h parameter, change the GAMEVENT line to include the
IP addresses of the client systems you will use to record events. Modify
the pathname and filename in the GAMEVLOG command line if you
wish to. Refer to Appendix B, GAMEVENT, for more information.
6. Be sure to remove comment markers (such as the character #) from any
command line which you intend to enable.
7. Save the modified AUTOEXEC.NCF and exit.
8. Create a user account called gamroot.
9. To load the GAM server components, see “Loading Global Array
Manager Server Manually” on page 2-4 after verifying correct server
software installation.
Running Global Array Manager Server
The Global Array Manager Server runs on the server and delivers the
following information to the Global Array Manager Client:
• Monitors the controller(s) and disks in the server.
• Manages the controller(s) and associated disk subsystems in the server.
Manual No. SA67-0048-01
2-3
Global Array Manager Server Software for NetWare 4.2, 5.1, and 6
Loading Global Array Manager Server Manually
The Global Array Manager Server can be loaded manually from the
NetWare server console prompt by typing the following two commands:
load gamserv ↵
load gamevent -h <IP Address or Name of Client>
(repeat...)
Loading Global Array Manager Server Automatically
The Global Array Manager Server can be custom-made to start up
automatically on a NetWare server when it is restarted after installation of
Global Array Manager. This capability will be available because the
following two files will be automatically copied into AUTOEXEC.NCF, at
the end of the file, during the GAM installation.
load gamserv
load gamevent -h <IP Address or Name of Client>
(repeat...)
Remember that you will need to edit the IP address line. See Enabling the
Event Comment Line in the next section to add an IP address line, as needed.
Enabling the Event Comment Line
To enable event notification to GAM Clients, both local and remote, add
“-h DNS_NAME” or “-h IP_NUMBER” to the end of the “load gamevent”
line for each GAM Client and uncomment the line. DNS_NAME and
IP_NUMBER are the workstation’s Computer Name or IP Address. You can
add up to 50 clients. To use “DNS _NAME,” the “DNS_NAME” must be
listed in the “etc/hosts” file or “DNS_NAME” must be resolved by DNS
lookup.
Usage:
load gamevent -h <IP Address or Name of Client>
(repeat...)
For example:
load gamevent -h 192.128.2.3 -h 192.128.2.4
-h host1
2-4
Global Array Manager Server Software Manual
NetWare
Troubleshooting Server Software Installation
N
E
T
W
A
R
E
Problem: The message “Error in connecting selected server” is
displayed or an error is encountered when trying to
connect to a server.
Check:
Is the IP address correct?
Check:
Is the server software, GAMSERV.NLM, installed and
loaded on the server(s)? Use the following NetWare console
command to verify that the GAMSERV module is loaded:
modules GAMSERV ↵
Check:
Is the Ethernet connection good?
Check:
Is TCP/IP set up correctly? Try Ping to find the server.
Problem: Global Array Manager Server will not load.
Check:
Is the installation complete? The files GAMSERV.NLM,
GAMDRV.NLM, and GAMEVENT.NLM should be
contained in the SYS:SYSTEM directory of the server.
Manual No. SA67-0048-01
2-5
DMI CI Manual Configuration
DMI CI Manual Configuration
Optional DMI CI Parameters
After the installation of the DMI CI subcomponent, you have the option to
specify an additional parameter, known as the GAM IPC Port. The default
IPC port number for the GAM Server driver and Mylex CI port is 43162;
however, this number may be modified.
The IPC Port number for the GAM Server driver and the Mylex CI port
number must match for proper communication. Therefore, if either the GAM
Server driver port number or the Mylex CI port number is changed, be sure
to change the other port number to match.
You can specify this parameter through the command line.
The full command line format of Mylex CI is:
mdacci [-p <Ipc port>]
-p is to specify the IPC port number by which the DMI CI component
communicates with the GAM Driver.
☛ Note
If “GamIpcPort” is not specified, the default port
number will be used.
2-6
Global Array Manager Server Software Manual
Chapter 3
Windows NT
Overview
W
I
N
N
T
This chapter describes installation, verification, and startup of the Global
Array Manager (GAM) Server software for Microsoft Windows NT 4.0
(SP5 or SP6). The software is provided on the Software Kit CD-ROM.
☛ Note
This chapter assumes that the network administrator
for this site will be performing these installation
procedures.
Manual No. SA67-0048-01
3-1
Global Array Manager Server Software for Windows NT 4.0
Global Array Manager Server Software for
Windows NT 4.0
Installation Overview
Installation of the Global Array Manager Server component requires the
Windows NT, Windows 2000, or Windows XP operating systems. (Please
refer to “Windows 2000 and Windows XP” on page 4-1 if you are using the
Windows 2000 or XP operating system.)
You may also choose to install GAM Client or SANArray Manager (SAM)
Client at the same time, on the same system. Refer to the Global Array
Manager Client Software Installation Guide and User Manual for GAM
Client installation instructions. Refer to the SANArray Manager Client
Software Installation Guide and User Manual for SAM Client installation
instructions.
File List
Global Array Manager software is shipped on an accompanying distribution
CD-ROM. The file list (and path) is as follows (where X: represents the
drive letter of your CD-ROM drive):
X:\GAM\WINDOWS\
_INST32I.EX_
_ISDEL.EXE
_SETUP.DLL
_SYS1.CAB
_SYS1.HDR
_USER1.CAB
_USER1.HDR
3-2
DATA.TAG
DATA1.CAB
DATA1.HDR
LANG.DAT
LAYOUT.BIN
OS.DAT
SETUP.EXE
SETUP.INI
SETUP.INS
SETUP.LID
Global Array Manager Server Software Manual
Windows NT
Installing Global Array Manager Server Software
Follow the steps below to install GAM Server software for Windows NT 4.0.
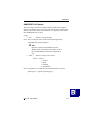
1. Make sure TCP/IP is installed and functioning properly.
2. Insert the Software Kit CD-ROM into your CD-ROM drive.
W
I
N
N
T
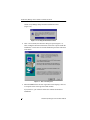
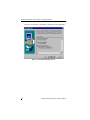
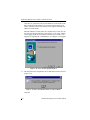
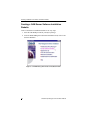
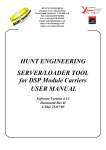
AutoRun will cause the CD-ROM to display the Mylex RAID
Management Software Installation menu (Figure 3-1).
☛ Note
If Autorun does not automatically start, locate the
Autorun.exe file on your CD-ROM drive and doubleclick the file.
Figure 3-1. Mylex RAID Management Software Installation Menu
3. Click “Install Global Array Manager.” This option is used to install
GAM Server.
Manual No. SA67-0048-01
3-3
Global Array Manager Server Software for Windows NT 4.0
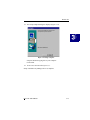
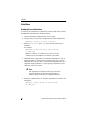
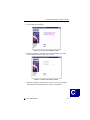
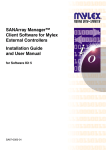
Global Array Manager Setup loads the installation wizard
(Figure 3-2).
Figure 3-2. Loading the Installation Wizard
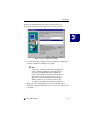
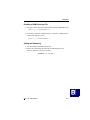
4. After a few moments, the Welcome dialog box opens (Figure 3-3).
After reading the Welcome information, click Next to proceed with the
installation, or click Cancel to end the installation procedure and return
to the menu.
Figure 3-3. Welcome Dialog Box
5. When the IBM Software License Agreement screen displays, click Yes
to accept the terms of the agreement and continue.
If you click No, you will not be allowed to continue GAM Server
installation.
3-4
Global Array Manager Server Software Manual
Windows NT
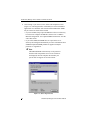
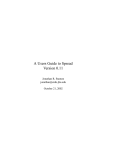
The Select Components dialog box opens as shown in Figure 3-4.
At this point you will select the component(s) you wish to install.
W
I
N
N
T
Figure 3-4. Select Components to Install
6. To select Global Array Manager Server for installation, click the box to
check the Global Array Manager Server option.
☛ Note
You may also choose to install Global Array Manager
Client or SANArray Manager Client at this time. If
you wish to install both GAM Server and GAM
Client or SAM Client, please refer to either the Global
Array Manager Client Installation Guide and User
Manual for GAM Client installation instructions or
SANArray Manager Client Installation Guide and
User Manual for SAM Client installation instructions.
7. When you select and highlight the Global Array Manager Server
option, the Change button becomes active to allow you to choose a subcomponent.
Manual No. SA67-0048-01
3-5
Global Array Manager Server Software for Windows NT 4.0
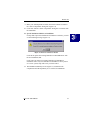
8. Click Change if you want to see the Select Sub-components screen
(Figure 3-5). The Program Files will normally be selected if DMI CI
applications were installed, such as Intel LDCM. DMI and/or SNMP
may be selected or deselected as needed:
• If you select DMI, Setup copies the DMI files to the server directory,
but it does not configure the DMI files. Please refer to “DMI CI
Manual Configuration” and “Optional DMI CI Parameters” near the
end of this section.
• If you select SNMP, the SNMP files are copied to the server
directory and configured automatically. For more information about
SNMP and Optional SNMP parameters supported in Mylex
products, see Appendix A.
☛ Note
The DMI and SNMP selections may not be present in
the Select Sub-components screen. If one or both are
not displayed, then the setup has detected that your
system does not support one or both of them.
Figure 3-5. Sub-Components List
3-6
Global Array Manager Server Software Manual
Windows NT
9. Make your subcomponent selections, then click Continue to return to
the “Select Components” dialog box (Figure 3-4).
10. Click Next from the “Select Components” dialog box to continue with
the installation.
11. Special Condition: GAM Server Installation
If setup finds a previous installation of GAM Server software, you will
see the following message (Figure 3-6).
Figure 3-6. Previous GAM Server Found
Click OK to replace the existing GAM Server and GAM Driver with
the new installation, OR
Click Cancel to retain your existing GAM Server/GAM Driver
installation. Since only one GAM Server/GAM Driver can be present
on a server system, setup will exit if you click Cancel.
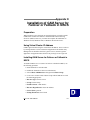
12. The Installation Summary screen (Figure 3-7) summarizes the
components and subcomponents you’ve selected for installation.
Manual No. SA67-0048-01
3-7
W
I
N
N
T
Global Array Manager Server Software for Windows NT 4.0
Click Next to continue, or click Back to change selected components.
Figure 3-7. Installation Summary Screen
3-8
Global Array Manager Server Software Manual
Windows NT
13. Special Condition: Old PCI Controller Drivers
If setup finds that an installed PCI driver for any of your Mylex PCI
RAID Controllers is older than version 6.90-00, you will see a message
of the following type1 (Figure 3-8):
W
I
N
N
T
Figure 3-8. Error – PCI Driver Must Be Version 6.90-00 or Higher
If you will use GAM Server only with Mylex External RAID
Controllers, you should choose to continue installation by clicking OK.
However, if you will use GAM Server with Mylex PCI RAID
Controllers, your PCI Controller Drivers must be version 6.90-00 or
higher in order to install and run GAM Server. Click Cancel and setup
will exit.
After clicking Cancel, follow the instructions in the PCI Disk Array
Controller Drivers Installation Guide and User Manual to update your
PCI driver(s). Then rerun GAM Server installation as described herein.
If the above Special Condition does not apply, installation will continue. Go
on to Step 14.
1. The actual driver identified in the message will depend on which
driver is found to be older than version 6.90-00.
Manual No. SA67-0048-01
3-9
Global Array Manager Server Software for Windows NT 4.0
14. During installation, files are decompressed and copied from the
installation CD-ROM to the destination folder (Figure 3-9).
Wait for this process to complete.
Figure 3-9. Installation Progress Display
15. If the Setup function detects an existing Global Array Manager Server
configuration file, the following Configuration File Selection/
Modification dialog box opens so that you can select whether to
modify the existing file or not (Figure 3-10).
Figure 3-10. Modify Server Configuration File Dialog Box
If no existing configuration file is found, Setup will create one. Proceed
to Step 16.
3-10
Global Array Manager Server Software Manual
Windows NT
• If you select “Use the existing file without modification” and click
Next, your existing configuration file will continue to be used. Skip
ahead to Step 17.
• If you select “Modify the existing file” and click Next, your
configuration file will be changed to include features new to this
version of GAM Server. Proceed to Step 16.
• If you select “Modify the default file (Existing file will be saved)” and
click Next, a new default configuration file will be used which includes
features new to this version of GAM Server. Your original file will also
be saved unchanged. Proceed to Step 16.
16. The Enter Event Recipients dialog box opens (Figure 3-11). Add IP
addresses or node names of client workstations that will receive event
notifications from this server. Enter up to 25-50 IP addresses or node
names (limit is 1028 bytes) with a space separating each entry.
Figure 3-11. Enter Event Recipients Dialog Box
☛ Note
Event notifications cannot be received by a client
unless its IP address or node name is identified. You
may include additional IP addresses or node names by
editing the GAMSCM.INI (configuration file) later.
See Appendix B “GAMEVENT.”
Manual No. SA67-0048-01
3-11
W
I
N
N
T
Global Array Manager Server Software for Windows NT 4.0
Click Next. If you did not enter any IP addresses or node names in the
Enter Event Recipients dialog box, a message appears asking if you
want to continue. Click Yes to continue or No to go back and enter IP
addresses or node names.
When IP addresses or node names are complete and you click Yes, the
Server Event Logging dialog box opens (Figure 3-12). Select “Enable
event logging on the server machine” and click Next to enable event
logging. See Appendix B, “GAMEVENT,” to configure event logging.
Figure 3-12. Server Event Logging Dialog Box
17. The full path for the configuration file is identified for future reference
(Figure 3-13).
Figure 3-13. Directory Path Information for gamscm.ini File
Click OK.
3-12
Global Array Manager Server Software Manual
Windows NT
18. The Setup Complete dialog box displays (Figure 3-14).
W
I
N
N
T
Figure 3-14. Setup Complete.
Setup has finished copying files to your computer.
Click Finish.
19. Create a user account called gamroot.
Setup of Global Array Manager Server is complete.
Manual No. SA67-0048-01
3-13
Global Array Manager Server Software for Windows NT 4.0
Running Global Array Manager Server
The Global Array Manager Server runs on the server and delivers the
following information to the Global Array Manager Client:
• Monitors the controller(s) and disks in the server.
• Manages the controller(s) and associated disk subsystems in the server.
The automatic installation procedure for Windows NT’s Global Array
Manager Server loads the GAM Server component as a “service.” This
service will load automatically at system startup. No special procedure is
required to run the GAM Windows NT Server.
To verify that this service has started, go to
Start->Settings->Control Panel->Services. Find the Mylex GAM Server
name. The word “Started” should appear beside it.
Troubleshooting Server Software Installation
Problem: The message “Error in connecting selected server” is
displayed or an error is encountered when trying to
connect to a server.
Check:
Is the Ethernet cable connection good?
Check:
Are the various port numbers set correctly?
Check:
Is the IP address of the Server correct?
Check:
Is TCP/IP set up correctly? Try Ping to find the server.
Problem: Global Array Manager Server does not load.
Check:
3-14
Did all of the server files load to the destination directories?
Do you have sufficient disk space for the installation?
A list of files needed for operation is given in Chapter 1.
If necessary, reinstall the software.
Global Array Manager Server Software Manual
Windows NT
DMI CI Manual Configuration
DMI CI files (also known as DMI files) are available for the Mylex Disk
Array Controller running under Windows NT. The DMI CI will act as a
general monitor to locate events such as hard disk status, driver
identification, etc.
DMI CI files must be manually configured after they are copied into the
server directory by the GAM server installation.
DMI is selected in the sub-component dialog box during the Global Array
Manager Server installation if the DMI application such as Intel LDCM was
installed. The DMI subcomponent can also be installed by itself via the
server installation utility.
☛ Note
When installation is complete, see “Optional DMI CI
Parameters” at the end of this section.
Use the SRVCCFG.EXE utility to configure the DMI files.
You will need to run the following command line from the GAMSERV
directory to install the mdacci service manually:
srvccfg MLXDMISRV MYLEXDMI %SystemRoot%\system32\gamserv\mdacci.exe
At this point, you have registered the CI as a service. Now, you need to
modify the dependencies of the DMI CI service to make sure the GAM
driver and Windows DMI Service Provider can be launched before the DMI
CI service at system boot time. This is done by entering the following
command line:
srvccfg depend MLXDMISRV gamscm;Win32sl
☛ Note
“gamscm” is the service name of the GAM Server/
Driver. “Win32sl” is the service name of the Windows
DMI Service Provider.
Manual No. SA67-0048-01
3-15
W
I
N
N
T
DMI CI Manual Configuration
DMI CI Files
There are three DMI CI files:
• MDAC.MIF
• MDACCI.EXE
• SRVCCFG.EXE
These files will be copied into the appropriate directory path during the
GAM Server installation process:
• %SystemRoot%\system32\gamserv\mdac.mif
• %SystemRoot%\system32\gamserv\mdacci.exe
• %SystemRoot%\system32\gamserv\srvccfg.exe
If the GAM Server installation detects the system environment variable
(%win32dmipath%) created by Intel®’s LANDesk® Server Manager,
these files will also be copied into the following locations:
• %win32dmipath%\mifs\mdac.mif
• %win32dmipath%\bin\mdacci.exe
☛ Note
If you are using the Intel LANDesk Service Manager,
you do not need to manually configure mdacci.exe.
Intel’s application will take care of this.
Optional DMI CI Parameters
After the installation of the DMI CI subcomponent, you have the option to
install an additional parameter, known as the GAM IPC Port. The default
IPC port number for the GAM Server driver and Mylex CI port is 43162;
however, this number may be modified.
☛ Note
The IPC Port number for the GAM Server driver and
the Mylex CI port number must match for proper
communication. Therefore, if either the GAM Server
driver port number or the Mylex CI port number
changes, be sure to change the other port number to
match.
3-16
Global Array Manager Server Software Manual
Windows NT
How to Specify the Parameter
You can specify the parameters in the system registry. After the installation
of Mylex CI onto a WIN32 system, see the registry key as follows:
HKEY_LOCAL_MACHINE\SYSTEM\CurrentControlSet\Services\MLXDMISRV
Follow these easy steps to specify the Mylex CI parameter:
1. Access the System Registry, locate the key “MLXDMISRV” according
to the above path.
2. Add a key, “Parameters,” under “MLXDMISRV”.
3. Add a key, “ExtraParameters,” under “Parameters.”
4. Add a DWORD value, “GamDriverPort,” under “ExtraParameters”, so
you can specify the IPC port number by which the DMI CI component
communicates with GAM driver, as done for -p in the NetWare
command line in “Optional DMI CI Parameters” in Chapter 2.
☛ Note
If “GamIpcPort” is not specified, the default port
number will be used.
Manual No. SA67-0048-01
3-17
W
I
N
N
T
DMI CI Manual Configuration
3-18
Global Array Manager Server Software Manual
Chapter 4
Windows 2000 and
Windows XP
Overview
This chapter describes installation, verification, and startup of the Global
Array Manager (GAM) Server software for Microsoft Windows 2000 and
Windows XP. The software is provided on the Software Kit CD-ROM.
☛ Note
W
I
N
2
0
0
0
This chapter assumes that the network administrator
for this site will be performing these installation
procedures.
Manual No. SA67-0048-01
4-1
Global Array Manager Server Software for Windows 2000 and Windows XP
Global Array Manager Server Software for
Windows 2000 and Windows XP
Installation Overview
Installation of the Global Array Manager Server component requires the
Windows 2000, Windows XP, or Windows NT operating systems. (Please
refer to “Windows NT” on page 3-1 if you are using the Windows NT
operating system.)
You may also choose to install GAM Client or SANArray Manager (SAM)
Client at the same time, on the same system. Refer to the Global Array
Manager Client Software Installation Guide and User Manual for GAM
Client installation instructions. Refer to the SANArray Manager Client
Software Installation Guide and User Manual for SAM Client installation
instructions.
File List
Global Array Manager software is shipped on an accompanying distribution
CD-ROM. The file list (and path) is as follows (where X: represents the
drive letter of your CD-ROM drive):
X:\GAM\WINDOWS\
_INST32I.EX_
_ISDEL.EXE
_SETUP.DLL
_SYS1.CAB
_SYS1.HDR
_USER1.CAB
_USER1.HDR
4-2
DATA.TAG
DATA1.CAB
DATA1.HDR
LANG.DAT
LAYOUT.BIN
OS.DAT
SETUP.EXE
SETUP.INI
SETUP.INS
SETUP.LID
Global Array Manager Server Software Manual
Windows 2000 and Windows XP
Installing Global Array Manager Server Software
Follow the steps below to install GAM Server software for Windows 2000 or
Windows XP.
1. Make sure TCP/IP is installed and functioning properly.
2. Insert the Software Kit CD-ROM into your CD-ROM drive.
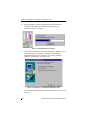
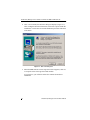
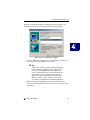
AutoRun will cause the CD-ROM to display the Mylex RAID
Management Software Installation menu (Figure 4-1).
W
I
N
2
0
0
0
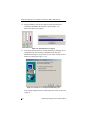
Figure 4-1. Mylex RAID Management Software Installation Menu
3. Click “Install Global Array Manager.” This option is used to install
GAM Server.
Global Array Manager Setup loads the installation wizard
(Figure 4-2).
Figure 4-2. Loading the Installation Wizard
Manual No. SA67-0048-01
4-3
Global Array Manager Server Software for Windows 2000 and Windows XP
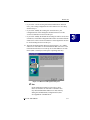
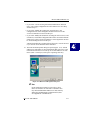
4. After a few moments, the Welcome dialog box displays (Figure 4-3).
After reading the Welcome information, click Next to proceed with the
installation, or click Cancel to end the installation procedure and return
to the menu.
Figure 4-3. Welcome Dialog Box
5. When the IBM Software License Agreement screen appears, click Yes
to accept the terms of the agreement and continue.
If you click No, you will not be allowed to continue GAM Server
installation.
4-4
Global Array Manager Server Software Manual
Windows 2000 and Windows XP
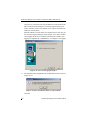
The Select Components dialog box is displayed as shown in Figure 4-4.
At this point you will select the component(s) you wish to install.
W
I
N
2
0
0
0
Figure 4-4. Select Components to Install
6. To select Global Array Manager Server for installation, click the box to
check the Global Array Manager Server option.
☛ Note
You may also choose to install Global Array Manager
Client or SANArray Manager Client at this time. If
you wish to install both GAM Server and GAM
Client or SAM Client, please refer to either the Global
Array Manager Client Installation Guide and User
Manual for GAM Client installation instructions or
SANArray Manager Client Installation Guide and
User Manual for SAM Client installation instructions.
7. When you select and highlight the Global Array Manager Server
option, the Change button becomes active to allow you to choose a subcomponent.
Manual No. SA67-0048-01
4-5
Global Array Manager Server Software for Windows 2000 and Windows XP
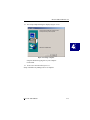
8. Click Change if you want to see the Select Sub-components screen
(Figure 4-5). The Program Files will normally be selected. DMI and/or
SNMP may be selected or deselected as needed:
• If you select DMI, Setup copies the DMI files to the server directory,
but it does not configure the DMI files. Please refer to “DMI CI
Manual Configuration” and “Optional DMI CI Parameters” near the
end of this section.
• If you select SNMP, the SNMP files are copied to the server
directory and configured automatically. For more information about
SNMP and Optional SNMP Parameters support in Mylex products,
see Appendix A.
☛ Note
The DMI and SNMP selections may not be present in
the Select Sub-components screen. If one or both are
not displayed, then the setup has detected that your
system does not support one or both of them.
Figure 4-5. Sub-Components List
4-6
Global Array Manager Server Software Manual
Windows 2000 and Windows XP
9. Make your subcomponent selections, then click Continue to return to
the “Select Components” dialog box (Figure 4-4).
10. Click Next from the “Select Components” dialog box to continue with
the installation.
11. Special Condition: GAM Server Installation
If setup finds a previous installation of GAM Server software, you will
see the following message (Figure 4-6):
W
I
N
2
0
0
0
Figure 4-6. Previous GAM Server Found
Click OK to replace the existing GAM Server and GAM Driver with
the new installation, OR
Click Cancel to retain your existing GAM Server/GAM Driver
installation. Since only one GAM Server/GAM Driver can be present
on a server system, setup will exit if you click Cancel.
12. The Installation Summary screen (Figure 4-7) summarizes the
components and subcomponents you’ve selected for installation.
Manual No. SA67-0048-01
4-7
Global Array Manager Server Software for Windows 2000 and Windows XP
Click Next to continue, or click Back to change selected components.
Figure 4-7. Installation Summary Screen
4-8
Global Array Manager Server Software Manual
Windows 2000 and Windows XP
13. Special Condition: Old PCI Controller Drivers
If setup finds that an installed PCI driver for any of your Mylex PCI
RAID Controllers is older than version 6.90-00, you will see a message
of the following type1 (Figure 4-8):
W
I
N
2
0
0
0
Figure 4-8. Error – PCI Driver Must Be Version 6.90-00 or Higher
If you will use GAM Server only with Mylex External RAID
Controllers, you should choose to continue installation by clicking OK.
However, if you will use GAM Server with Mylex PCI RAID
Controllers, your PCI Controller Drivers must be version 6.90-00 or
higher in order to install and run GAM Server. Click Cancel and setup
will exit.
After clicking Cancel, follow the instructions in the PCI Disk Array
Controller Drivers Installation Guide and User Manual to update your
PCI driver(s). Then rerun GAM Server installation as described herein.
If the above Special Condition does not apply, installation will continue. Go
on to Step 14.
1. The actual driver identified in the message will depend on which
driver is found to be older than version 6.90-00.
Manual No. SA67-0048-01
4-9
Global Array Manager Server Software for Windows 2000 and Windows XP
14. During installation, files are decompressed and copied from the
installation CD-ROM to the destination folder (Figure 4-9).
Wait for this process to complete.
Figure 4-9. Installation Progress Display
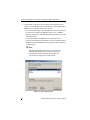
15. If the Setup function detects an existing Global Array Manager Server
configuration file, the following Configuration File Selection/
Modification dialog box opens so that you can select whether or not to
modify the existing file (Figure 4-10).
Figure 4-10. Modify Server Configuration File Dialog Box
If no existing configuration file is found, Setup will create one. Proceed
to Step 16.
4-10
Global Array Manager Server Software Manual
Windows 2000 and Windows XP
• If you select “Use the existing file without modification” and click
Next, your existing configuration file will continue to be used. Skip
ahead to Step 17.
• If you select “Modify the existing file” and click Next, your
configuration file will be changed to include features new to this
version of GAM Server. Proceed to Step 16.
• If you select “Modify the default file. (Existing file will be saved.)” and
click Next, a new default configuration file will be used which includes
features new to this version of GAM Server. Your original file will also
be saved unchanged. Proceed to Step 16.
“Modify the default file. (Existing file will be saved).” must be selected
if you want to use the External Client controllers.
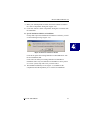
16. The Enter Event Recipients dialog box opens (Figure 4-11). Add IP
addresses or node names of client workstations that will receive event
notifications from this server. Enter up to 25-50 IP addresses or node
names (limit is 1028 bytes) with a space separating each entry.
Figure 4-11. Enter Event Recipients Dialog Box
☛ Note
Event notifications cannot be received by a client
unless its IP address or node name is identified. You
may include additional IP addresses or node names by
editing the GAMSCM.INI (configuration file) later.
See Appendix B “GAMEVENT.”
Manual No. SA67-0048-01
4-11
W
I
N
2
0
0
0
Global Array Manager Server Software for Windows 2000 and Windows XP
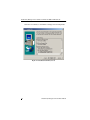
Click Next. If you did not enter any IP addresses or node names in the
Enter Event Recipients dialog box, a message appears asking if you
want to continue. Click Yes to continue or No to go back and enter IP
Addresses or node names.
When IP addresses or node names are complete and you click Yes, the
Server Event Logging dialog box opens (Figure 4-12). Select “Enable
event logging on the server machine” and click Next to enable event
logging. See Appendix B, “GAMEVENT,” to configure event logging.
Figure 4-12. Server Event Logging Dialog Box
17. The full path for the configuration file is identified for future reference
(Figure 4-13).
Figure 4-13. Directory Path Information for gamscm.ini File
Click OK.
4-12
Global Array Manager Server Software Manual
Windows 2000 and Windows XP
18. The Setup Complete dialog box displays (Figure 4-14).
W
I
N
2
0
0
0
Figure 4-14. Setup Complete.
Setup has finished copying files to your computer.
Click Finish.
19. Create a user account called gamroot.
Setup of Global Array Manager Server is complete.
Manual No. SA67-0048-01
4-13
Global Array Manager Server Software for Windows 2000 and Windows XP
Running Global Array Manager Server
The Global Array Manager Server runs on the server and delivers the
following information to the Global Array Manager Client:
• Monitors the controller(s) and disks in the server.
• Manages the controller(s) and associated disk subsystems in the server.
The automatic installation procedure for Windows 2000’s or Windows XP’s
Global Array Manager Server loads the GAM Server component as a
“service.” This service will load automatically at system startup. No special
procedure is required to run the GAM for Windows 2000 or XP on the
Server.
To verify that this service has started, go to
Start->Settings->Control Panel->Administrative Tools->Services, then
check under Name File, Mylex GAM Server, and Status to see if it has
started.
Troubleshooting Server Software Installation
Problem: The message “Error in connecting selected server” is
displayed or an error is encountered when trying to
connect to a server.
Check:
Is the Ethernet connection good?
Check:
Are the various port numbers set correctly?
Check:
Is the IP address of the Server correct?
Check:
Is TCP/IP set up correctly? Try Ping to find the server.
Problem: Global Array Manager Server does not load.
Check:
4-14
Did all of the server files load to the destination directories?
Do you have sufficient disk space for the installation?
A list of files needed for operation is given in Chapter 1.
If necessary, reinstall the software.
Global Array Manager Server Software Manual
Windows 2000 and Windows XP
DMI CI Manual Configuration
DMI CI files (also referred to as DMI files) are available for the Mylex Disk
Array Controller running under Windows 2000. The DMI CI will act as a
general monitor to locate events such as hard disk status, driver
identification, etc.
DMI files must be manually configured after they are copied into the server
directory by the GAM server installation.
DMI is selected in the sub-component dialog box during the Global Array
Manager Server installation. The DMI subcomponent can also be installed
by itself via the server installation utility.
☛ Note
When installation is complete, see “Optional DMI CI
Parameters” at the end of this section.
Use the SRVCCFG.EXE utility to configure the DMI files.
You will need to run the following command line from the GAMSERV
directory to install the mdacci service manually:
srvccfg MLXDMISRV MYLEXDMI %SystemRoot%\system32\gamserv\mdacci.exe
At this point, you have registered the CI as a service. Now, you need to
modify the dependencies of the DMI CI service to make sure the GAM
driver and Windows DMI Service Provider can be launched before the DMI
CI service at system boot time. This is done by entering the following
command line:
srvccfg depend MLXDMISRV gamscm;Win32sl
☛ Note
“gamscm” is the service name of the GAM Server/
Driver. “Win32sl” is the service name of the Windows
DMI Service Provider.
Manual No. SA67-0048-01
4-15
W
I
N
2
0
0
0
DMI CI Manual Configuration
DMI Files
There are three DMI files:
• MDAC.MIF
• MDACCI.EXE
• SRVCCFG.EXE
These files will be copied into the appropriate directory path during the
GAM Server installation process:
• %SystemRoot%\system32\gamserv\mdac.mif
• %SystemRoot%\system32\gamserv\mdacci.exe
• %SystemRoot%\system32\gamserv\srvccfg.exe
If the GAM Server installation detects the system environment variable
(%win32dmipath%) created by Intel®’s LANDesk® Server Manager,
these files will also be copied into the following locations:
• %win32dmipath%\mifs\mdac.mif
• %win32dmipath%\bin\mdacci.exe
☛ Note
If you are using Intel LANDesk Service Manager, you
do not need to manually configure mdacci.exe. Intel’s
application will take care of this.
Optional DMI CI Parameters
After the installation of the DMI CI subcomponent, you have the option to
install an additional parameter, known as the GAM IPC Port. The default
IPC port number for the GAM Server driver and Mylex CI port is 43162;
however, this number may be modified.
☛ Note
The IPC Port number for the GAM Server driver and
the Mylex CI port number must match for proper
communication. Therefore, if either the GAM Server
driver port number or the Mylex CI port number
changes, be sure to change the other port number to
match.
4-16
Global Array Manager Server Software Manual
Windows 2000 and Windows XP
How to Specify the Parameter
You can specify the parameters in the system registry. After the installation
of Mylex CI onto a WIN32 system, you can see the registry key as follows:
HKEY_LOCAL_MACHINE\SYSTEM\CurrentControlSet\Services\MLXDMISRV
Follow these easy steps to specify the Mylex CI parameter:
1. Access the System Registry, locate the key “MLXDMISRV” according
to the above path.
2. Add a key, “Parameters,” under “MLXDMISRV”.
3. Add a key, “ExtraParameters” under “Parameters.”
4. Add a DWORD value, “GamDriverPort,” under “ExtraParameters,” so
you can specify the IPC port number by which the DMI component
communicates with GAM driver, as done for -p in the NetWare
command line, see “Optional DMI CI Parameters” in Chapter 2.
☛ Note
If “GamIpcPort” is not specified, the default port
number will be used.
Manual No. SA67-0048-01
4-17
W
I
N
2
0
0
0
DMI CI Manual Configuration
4-18
Global Array Manager Server Software Manual
Chapter 5
UnixWare
Overview
This chapter describes information about the following installation,
verification, and startup of the Global Array Manager Server software for
UnixWare 7.1. The software is provided on the appropriate Software Kit
distribution CD-ROM with a file to create a diskette.
☛ Note
This chapter assumes that the network administrator
for this site will be performing these installation
procedures.
U
N
I
X
W
A
R
E
Manual No. SA67-0048-01
5-1
Global Array Manager Server Software for UnixWare 7.1
Global Array Manager Server Software
for UnixWare 7.1
Creating the Global Array Manager Server Diskette
Before installing the GAM Server for UnixWare, a diskette must be created
according to the instructions in Appendix C “Creating a GAM Server
Installation Diskette.”
This diskette will be used in the next section wherever instructed to insert the
“GAM Server diskette for UnixWare.”
☛ Note
After creating this diskette, DOS is not able to read it.
Installing Global Array Manager Server Software
Use pkgadd to install the Global Array Manager Server software for
UnixWare. Complete the following procedure.
☛ Note
These instructions assume the installation diskette is
in disk drive 1. If a different source is used, substitute
that location for “diskette1” in step 3.
1. Log in as root.
2. Insert the GAM Server diskette for UnixWare in the file server’s
diskette drive.
3. Type the following (match case exactly as shown):
pkgadd -d diskette1 GAM ↵
4. You are prompted to insert the diskette and confirm installation as
shown:
Insert diskette into Floppy Drive 1.
Type [go] when ready.
or [q] to quit: (default: go)
To begin installation, type:
go ↵
The files are copied and the Kernel is rebuilt.
5-2
Global Array Manager Server Software Manual
UnixWare
5. Installation is complete.
Modify the GAMEVENT and GAMEVLOG lines manually. To do this
edit the S99GAM file found in the directory /etc/rc2.d, changing the
GAMEVENT line to include (after each -h parameter) the IP
addresses of the client systems you will use with this server. Modify the
pathname and filename in the $EVENTLOGFILE command line if you
wish to. For more information, refer to Appendix B “GAMEVENT.”
☛ Note
If you are using SNMP features, you will need to
enable /usr/bin/gamagent. For more information,
please see “SNMP Installation for UnixWare” in
Appendix A.
6. Be sure to remove comment markers (such as the character #) from any
command line which you intend to enable.
7. Save the modified S99GAM and exit.
8. Create a user account called gamroot and assign Root access
privileges to that user account.
9. Reboot the system using the following command from the root
directory (match case exactly as shown):
U
N
I
X
W
A
shutdown -y -i6 -g0 ↵
R
E
Running Global Array Manager Server
The Global Array Manager Server runs on the server and delivers the
following information to the Global Array Manager Client:
• Monitors the controller(s) and disks in the server.
• Manages the controller(s) and associated disk subsystems in the server.
The installation of Global Array Manager Server for UnixWare causes the
appropriate drivers to load automatically at system startup. No additional
actions are required to start GAM Server beyond a system boot.
Manual No. SA67-0048-01
5-3
Global Array Manager Server Software for UnixWare 7.1
Troubleshooting Server Software Installation
Problem: An error is encountered when trying to connect to a
server.
Check:
Is the IP address of the Server correct?
Check:
Is the installation complete? Was the software successfully
loaded on the server?
Check:
Is the Ethernet connection good?
Check:
Is TCP/IP installed?
Check:
Is TCP/IP set up correctly? Try Ping to find the server.
Problem: Global Array Manager Server does not load.
5-4
Check:
Do you have login rights to the root?
Check:
Did all of the server files load to the destination directory?
Do you have sufficient disk space for the installation? If
necessary, reinstall the software.
Global Array Manager Server Software Manual
UnixWare
Uninstalling the Server Software
To remove the Global Array Manager Server software, complete the
following procedures:
1. Type the following command (match case exactly as shown):
pkgrm GAM ↵
2. You are prompted for confirmation as shown:
Do you want to remove this package [yes,no,?,quit]
At the prompt, type:
y ↵
The files are removed. The Kernel is rebuilt.
3. When you see the following message, removal is complete.
Removal of <GAM> was successful.
4. Reboot the system using the following command from the root
directory (match case exactly as shown):
shutdown -y -i6 -g0 ↵
U
N
I
X
W
A
R
E
Manual No. SA67-0048-01
5-5
Global Array Manager Server Software for UnixWare 7.1
5-6
Global Array Manager Server Software Manual
Chapter 6
Solaris
Overview
This chapter describes information about the following installation,
verification, and startup of the Global Array Manager Server software for
Solaris 7/8 on x86. The software is provided on the appropriate Software Kit
distribution CD-ROM with a file to create a diskette.
The Solaris drivers for the Mylex Disk Array Controller supports disk
drives, tape drives, and CD-ROM drives under Solaris 7/8 on x86. The
drivers support up to 16 controllers. Also, the drivers support secondary
system drives larger than 8GB.
☛ Note
This chapter assumes that the network administrator
for this site will be performing these installation
procedures.
S
O
L
A
R
I
S
Manual No. SA67-0048-01
6-1
Global Array Manager Server Software for Solaris 7 and Solaris 8
Global Array Manager Server Software for
Solaris 7 and Solaris 8
Creating the Global Array Manager Server Diskette
Before installing the GAM Server for Solaris, a diskette must be created
according to the instructions below using a DOS or Windows operating
system.
This diskette will be used in the next section wherever instructed to insert the
“GAM Server diskette for Solaris.”
1. Insert a DOS formatted diskette into drive A.
2. Insert the Software Kit CD-ROM into the CD-ROM drive.
3. From the DOS prompt, type:
F:\gam\solaris\x86\diskimg\gamssol7 a: ↵
F:\gam\solaris\x86\diskimg\gamssol8 a: ↵
F: identifies the CD-ROM drive.
\gamssol7: identifies Solaris 7 and \gamssol8: identifies Solaris 8
4. You will get a message asking if you want the disk to be overwritten.
To continue, type Y for Yes and press Enter.
5. Label this disk “GAM Server diskette for Solaris.” Save until needed.
☛ Note
After creating this diskette, DOS is not able to read it.
An alternative method to create this diskette is described in Appendix C,
“Creating a GAM Server Installation Diskette” .
6-2
Global Array Manager Server Software Manual
Solaris
Installing Global Array Manager Server Software
☛ Note
At this time, there is not an upgrade function. If you
want to use a current version of GAM Server
software, first, you will need to uninstall the old file
on your system and then install the new GAM Server
Software. The instructions are described in
“Uninstalling the Server Software” on page 6-6.
Then, please follow the instructions below to install
your GAM Server.
The installation of Global Array Manager Server for Solaris causes the
appropriate drivers to load automatically at system startup. No additional
actions are required to start GAM Server beyond a system boot.
1. Access the root directory (prompt is #) (commands are case sensitive).
2. Insert the GAM Server diskette for Solaris in the server’s disk drive A.
☛ Note
For more information about managing diskettes and
drives, see the Solaris System Administration Guide.
3. If GAM is currently installed, you should uninstall it first by typing the
following commands:
# /etc/rc2.d/S99GAM stop
S
O
L
A
R
I
S
# pkgrm GAM
4. If Volume Manager is running, temporarily stop it using the steps
below:
Get the process id number off of the volume manager, by typing the
following command lines:
# ps -ef | grep vold
# kill xxx (process id) (xxx replaced by a number
like 247)
# pkgadd -d /dev/rdiskette GAM
Manual No. SA67-0048-01
6-3
Installing Solaris Using the Solaris Device Configuration Assistant Diskette
5. Insert the GAM Server diskette, if not already inserted, into the disk
drive. You will see the following selections, type go after the colon
mark:
Type [go] when ready,
or
[e] to eject the diskette
or
[q] to quit: go and press Enter
The following processing message will display:
Processing package instance <GAM> from
</dev/rdiskette>
6. Type y for yes to continue with the GAM installation:
Do you want to continue with the installation of
<GAM> [y, n, ?] y
The following installation message will automatically display:
Installing Mylex GAM Server/Driver <GAM>
## Installing part 1 of 1.
## Execution postinstall script
GAM NOTE: please modify /etc/rc2.d/S99GAM to start
the gamevent
Installation of GAM completed
Installation of <GAM> was successful
#
7. Installation of GAM Server is complete. Modify the S99GAM file.
• You will need to access the S99GAM file in order to manually
modify the GAMEVENT and GAMEVLOG lines.
• At the prompt, type the following command to access and modify
the directory:
# vi /etc/rc2.d/S99GAM and press Enter
• Search for /gamevent or /gamevlog command lines and uncomment
the line(s) you want enabled.
• Modify the S99GAM file found in the directory /etc/rc2.d, then
change the GAMEVENT line to include (after each -h parameter)
6-4
Global Array Manager Server Software Manual
Solaris
the IP addresses of the client systems you will use with this server.
Modify the path and filename in the $EVENTLOGFILE command
line if you wish to. For more information, refer to Appendix B,
“GAMEVENT.”
8. Be sure to remove comment markers (the character #) from any
command line which you intend to enable.
9. Save the modified S99GAM and exit.
10. Type the following commands to return to /etc/rc2.d, to view a list of
your file, and to start or (restart) GAM.
# cd /etc/rc2.d
# ls
# ./S99GAM start
#
11. Create a user account called gamroot and assign Root access
privileges to that user account.
☛ Note
It is not required to reboot in order to enable GAM
when using Software Kit 5.0.
Running Global Array Manager Server
The Global Array Manager Server runs on the server and delivers the
following information to the Global Array Manager Client:
• Monitors the controller(s) and disks in the server.
• Manages the controller(s) and associated disk subsystems in the server.
Manual No. SA67-0048-01
6-5
S
O
L
A
R
I
S
Installing Solaris Using the Mylex MDAC Supplemental Driver Diskette
Troubleshooting Server Software Installation
Problem: An error is encountered when trying to connect to a
server.
Check:
Is the IP address of the Server correct?
Check:
Is the installation complete? Was the software successfully
loaded on the server?
Check:
Is the Ethernet connection good?
Check:
Is TCP/IP installed?
Check:
Is TCP/IP set up correctly? Try Ping to find the server.
Problem: Global Array Manager Server does not load.
Check:
Do you have login rights to the root?
Check:
Did all of the server files load to the destination directory?
Do you have sufficient disk space for the installation?
If necessary, reinstall the software.
Uninstalling the Server Software
To remove the Global Array Manager Server software, complete the
following procedures:
1. Type the following command (match case exactly as shown):
pkgrm GAM ↵
2. You are prompted for confirmation as shown:
Do you want to remove this package [yes,no,?,quit]
At the prompt, type:
y ↵
The files are removed. The Kernel is rebuilt.
3. When you see the following message, removal is complete.
Removal of <GAM> was successful
4. Reboot the system using the following command from the root
directory (match case exactly as shown):
shutdown -y -i6 -g0 ↵
6-6
Global Array Manager Server Software Manual
Chapter 7
Linux
Overview
This chapter describes installation, startup, and troubleshooting of the
Global Array Manager Server software for the Linux operating system with
the following distributions:
• Red Hat 6.2, 7.0, 7.1 (external products support only 7.1)
• SuSe 6.4, 7.1
• Caldera 2.4
• Turbo Linux 6.0, 6.1
The software is provided on the appropriate Software Kit distribution
CD-ROM.
☛ Note
This chapter assumes that the network administrator
for this site will be performing these installation
procedures.
Go to the following web sites to download the appropriate Disk Array
Controller Drivers:
• For PCI Controllers:
http://www.dandelion.com/Linux/DAC960.html
• For External Controllers:
http://www.qlc.com/bbs-html/csg_web/adapter_pages/driver_pages/21xx/21linux.html
For instructions on how to install the disk array controller drivers, see the
appropriate instructions on each web site and refer to the appropriate Linux
OS distribution reference manual.
Manual No. SA67-0048-01
7-1
L
I
N
U
X
Global Array Manager Server Software for Linux
Global Array Manager Server Software for Linux
Installation Overview
This section covers the following for the Global Array Manager (GAM)
Server software:
• ”Installing Global Array Manager Server Software”
• ”Running Global Array Manager Server”
• ”Troubleshooting Server Software Installation”
• ”Uninstalling the Server Software”
This process assumes that the network administrator for this site will be
performing this installation procedure.
Installing Global Array Manager Server Software
1. Log in as root.
2. Mount the CD (commands are case sensitive):
mount /dev/cdrom /mnt/cdrom
☛ Note
The mount point for SuSE is /cdrom.
Before Installing the GAM Server Software, you need to determine if there
is already a version installed (Step 3) and then remove it (Step 4). If you are
certain that no other version is installed, skip to Step 5.
3. To query the RPM database for GAM, type:
rpm -qa | grep gam
4. If GAM is listed, remove it, type:
rpm -ev <gam release name> (such as .rpm file name)
5. To install the GAM Server Software, type:
rpm -iv /mnt/cdrom/gam/linux/gam.server.x.00 xx.i386.rpm
7-2
Global Array Manager Server Software Manual
Linux
☛ Note
To query RPM about the contents of the GAM file,
type:
rpm -qpi <gam release name>
6. Stop the GAM server in order to unmount the CD-ROM, type:
/etc/rc.d/init.d/gam stop
7. Unmount the CD-ROM, type:
unmount /mnt/cdrom
The GAM server installation is complete.
Editing GAMEVENT and GAMEVLOG
The GAMEVENT and $EVENTLOGFILE will need to be edited so that it
will hold the correct host or IP address to direct the events to the desired
client(s).
1. Access the GAM file for GAMEVENT, type:
/etc/rc.d/init.d
2. Edit gam (replace [-h host1] with an actual—your user—address)
#user/bin/gamevent -h host1 &
For example (remove the # symbol to enable the command line):
user/bin/gamevent -h 192.168.0.148 &
By default, the Linux client and server are configured to communicate
correctly when using the root login. Please see the note in Appendix B,
“GAMEVENT” for details about root and non-root users and proper port
numbers for event logging.
3. Access the $EVENTLOGFILE file and remove the # symbol to enable
the command line.
user/bin/gamevlog -f /var/log/gamevlog.log &
Manual No. SA67-0048-01
7-3
L
I
N
U
X
Global Array Manager Server Software for Linux
Running Global Array Manager Server
The Global Array Manager Server runs on the server and delivers the
following information to the Global Array Manager Client:
• Monitors the controller(s) and disks in the server.
• Manages the controller(s) and associated disk subsystems in the server.
☛ Note
The device driver (e.g., DAC960 or qla2x00) must be
loaded prior to starting Global Array Manager Server
software.
To run the GAM Server software, follow these steps:
1. Log in as root.
2. Stop the GAM Serve, type:
/etc/rc.d/init.d/gam stop
3. Verify that all GAM Server components are gone:
ps -A | grep gam
4. If you see several process IDs left behind, you will need to remove
them by typing:
kill -g gamdrvd
If necessary, you can also remove process IDs individually by typing:
kill -9 <process ID #>
☛ Note
It is NOT required to reboot in order to enable GAM
when using Software Kit 5.0. However, if you need to
reboot for any other reason, go to step 5.
5. To restart the GAM Server type:
/etc/rc.d/init.d/gam start
7-4
Global Array Manager Server Software Manual
Linux
Troubleshooting Server Software Installation
Problem: An error is encountered when trying to connect to a
server.
Check:
Is the HBA device driver loaded?
If the device driver is not loaded manually (via insmod
qla2100) or at boot time, the server connection will not be
established since “gamdrvd” was started before the HBA
device driver was loaded.
Check:
Is the IP address of the Server correct?
Check:
Is the installation complete? Was the software successfully
loaded on the server?
Check:
Is the Ethernet connection good?
Check:
Is TCP/IP installed?
Check:
Is TCP/IP set up correctly? Try Ping to find the server.
Problem: Client won’t detect controller, but events will appear on
client event log viewer.
Check:
Is inetd running?
☛ Note
When Red Hat 6.2 is installed on a workstation, inetd
is not installed. The inetd may be installed as an rpm,
an upgrade, or as part of a custom installation.
Problem: Global Array Manager Server does not load.
Check:
Do you have login rights to the root?
Check:
Did all of the server files load to the destination directory?
Do you have sufficient disk space for the installation? If
necessary, reinstall the software.
Manual No. SA67-0048-01
7-5
L
I
N
U
X
Global Array Manager Server Software for Linux
Uninstalling the Server Software
1. To query the rpm database for GAM, type:
rpm -qa | grep gam
2. Locate the GAM file name within the list. Type the following to
remove GAM:
rpm -ev <gam file name>
7-6
Global Array Manager Server Software Manual
Appendix A
SNMP Installation,
Operation, and Definition
Introduction
The Global Array Manager includes a Simple Network Management
Protocol (SNMP) agent for the RAID controller and connected arrays. An
SNMP-based management application (also known as an SNMP manager)
can monitor and manage the disk arrays. An example of an SNMP
management application is Hewlett-Packard’s Open View. The SNMP agent
can be used to augment the Global Array Manager Client if you are already
running an SNMP management application at your site.
SNMP Installation Overview
The installation of the SNMP agent is accomplished in several phases:
• Installing the agent software on the server
• Placing a copy of the management information base (MIB) in a
directory which is accessible to the management application
• Compiling the MIB description file with the management application
SNMP Installation for NetWare
During installation of the Global Array Manager Server, the SNMP file was
copied to its appropriate directory as shown in the table below. The file can
also be copied to the server directory from a workstation’s floppy disk drive
(with the appropriate NetWare access rights to the server directory).
Table A-1. NetWare SNMP File
Operating system
NetWare
Agent filename
GAMAGENT.NLM
Server directory
SYS:SYSTEM
Depending upon the SNMP management application used, the MIB (an
ASCII text file named MLXRAID.MIB) must be placed in a specific
directory on the network management station running the management
application. The MLXRAID.MIB file must be manually copied to this
directory. For example:
Manual No. SA67-0048-01
A
A-1
S
N
M
P
SNMP Installation for NetWare
Table A-2. Location for MIB
SNMP Application
MIB location
OpenView
\OV\MIBS
NetWare NMS
\NMS\SNMPMIBS\CURRENT
☛ Note
Your management application may have a different
target directory. Consult the management
application’s user guide for the correct location.
Using the TRAPTARG.CFG File
The file, TRAPTARG.CFG, is an SNMP file that specifies all managers that
are to receive SNMP trap messages generated by the SNMP agent
(SNMP.NLM).
You will need to copy and edit TRAPTARG.CFG to direct the events to be
logged into the etc/ directory. (See the traptarg.cfg file for more
information.) Follow the steps below:
1. Copy TRAPTARG.CFG to this path: etc/traptarg.cfg
2. Edit the TRAPTARG.CFG file by adding either the logical (host)
name, IP, or IPX address, which will be directly below Protocol UDP
or Protocol IPX.
☛ Note
Leave white space preceding the address name.
Each address destination must be on a separate line.
For example:
Protocol UDP (logical (host) name or IP address)
ServerN (N is the name or IP address of the server to receive trap data)
In this section, you can put SNMP managers that want to receive traps from
the local node over UDP. Use either IP address or logical name. (If you use a
logical name, be sure the name and its corresponding IP address appear in
the sys:etc/hosts file.)
Protocol IPX (IPX address)
In this section you can put SNMP managers that want to receive traps from
A-2
Global Array Manager Server Software Manual
SNMP Installation, Operation, and Definition
the local node over IPX. Managers can be identified by NetWare service
name (a NetWare file server name, for example) or by an IPX address. To
specify by IPX address, use the following format:
IPX Network Number : MAC Address
c9990111 : 00001B555555
Starting the NetWare Agent
To start the agent, enter the appropriate command from the system console:
LOAD GAMAGENT ↵
About the NetWare Agent
The GAMAGENT NLM assumes that SNMP support for NetWare servers
(SNMP.NLM) is already installed on the server.
The GAMAGENT NLM will attempt to autoload the SNMP.NLM. If the
SNMP.NLM file is not present, the agent will not load.
The command to load the agent can be incorporated into the
AUTOEXEC.NCF or other operating system startup files as well.
A
Manual No. SA67-0048-01
A-3
S
N
M
P
SNMP Installation for NetWare
Optional SNMP Parameters for NetWare
After the installation of the SNMP subcomponent, you have the option to
specify an additional parameter, known as the GAM IPC Port. The default
IPC port number for the GAM Server driver and Mylex SNMP Agent port is
43162; however, this number may be modified.
☛ Note
The IPC Port number for the GAM Server driver and
the Mylex SNMP agent port number must match for
proper communication. Therefore, if either the GAM
Server driver port number or the Mylex SNMP agent
port number is changed, be sure to change the other
port number to match.
How to Specify the Parameter
The parameter can be specified directly in the command line, for example:
load gamagent[-p <gam ipc port>]
☛ Note
If “GamIpcPort” is not specified, the default port
number (43162) will be used.
A-4
Global Array Manager Server Software Manual
SNMP Installation, Operation, and Definition
SNMP Installation for Windows NT,
Windows 2000, or Windows XP
To enable the SNMP agent for Windows NT, Windows 2000, or Windows
XP, configure Windows NT, Windows 2000, or Windows XP for TCP/IP and
SNMP services. The Mylex SNMP Extension Agent file is
GAMAGENT.DLL.
Install the SNMP Agent
If the SNMP agent is required, you should make sure that TCP/IP and
Windows NT SNMP services are configured correctly.
☛ Note
The SNMP option will not be available unless the
correct directory paths are configured during
installation. See “Installing Global Array Manager
Server Software,” “DMI CI Files,” and “Optional
DMI CI Parameters,” in Chapter 3 for Windows NT
and Chapter 4 for Windows 2000 or Windows XP.
Optional SNMP Parameters for Windows NT,
Windows 2000, or Windows XP
After the installation of the SNMP subcomponent, you have the option to
specify an additional parameter, known as the GAM IPC Port. The default
IPC port number for the GAM Server driver and Mylex SNMP Agent port is
43162; however, this number may be modified.
☛ Note
The IPC Port number for the GAM Server driver and
the Mylex SNMP agent port number must match for
proper communication. Therefore, if either the GAM
Server driver port number or the Mylex SNMP agent
port number is changed, be sure to change the other
port number to match.
A
Manual No. SA67-0048-01
A-5
S
N
M
P
SNMP Installation for Windows NT, Windows 2000, or Windows XP
How to Specify the Parameter
You can specify the parameters in the system registry. A registry value,
MLX_GAM, is created and can be found under the path shown below. After
the successful installation of Mylex SNMP agent onto a Windows NT,
Windows 2000, or Windows XP system, you will see the registry key as
follows:
“HKEY_LOCAL_MACHINE\SYSTEM\CurrentControlSet\
Services\SNMP\Parameters\ExtensionAgents”
Follow these easy steps to specify the Mylex SNMP agent parameter:
1. Access the system registry and locate MLX_GAM; for example, the
value may be:
“SOFTWARE\Mylex\Global Array Manager\<CurrentVersion>”
2. Find the actual file path to the gamagent under the value of “Pathname”
in the following path:
“HKEY_LOCAL_MACHINE\SOFTWARE\Mylex\Global Array Manager
\<CurrentVersion>\Pathname”
3. Add a DWORD value, “GamIpcPort” under the <CurrentVersion> key.
Then, you can specify the gam driver ipc port number by which SNMP
agent communicates with GAM driver. (See -p in the NetWare
command line, as in “Optional SNMP Parameters for NetWare,” in the
previous section.)
☛ Note
If “GamIpcPort” is not specified, the default port
number (43162) will be used.
A-6
Global Array Manager Server Software Manual
SNMP Installation, Operation, and Definition
SNMP Installation for UnixWare
To enable the SNMP agent for UnixWare, you need to configure UnixWare
TCP/IP and SNMP services. Do this by enabling the usr/bin/gamagent file in
the S99GAM file.
Install the SNMP Agent
If the SNMP agent is required, you need to enable (remove the # symbol) the
usr/bin/gamagent file in the S99GAM file. This will send the traps to the
SNMP viewer.
Optional SNMP Parameters for UnixWare
After the installation of the SNMP subcomponent, you have the option to
specify an additional parameter, known as the GAM IPC Port. The default
IPC port number for the GAM Server driver and Mylex SNMP Agent port is
43162; however, this number may be modified.
The IPC Port number for the GAM Server driver and the Mylex SNMP
agent port number must match for proper communication. Therefore, if
either the GAM Server driver port number or the Mylex SNMP agent port
number is changed, be sure to change the other port number to match.
How to Specify the Parameter
The parameter can be specified in the S99GAM script file, which is used to
start and stop the GAM server components. For example, in S99GAM file,
the user can type:
/gamagent[-p <port icp number>] &
☛ Note
If “GamIpcPort” is not specified, the default port
number (43162) will be used.
A
Manual No. SA67-0048-01
A-7
S
N
M
P
SNMP Peer Agent Installation for Linux
SNMP Peer Agent Installation for Linux
The Mylex SNMP peer agent works with the UC-Davis SNMP agent when
compiled in the SMUX mode.
Information for UC-Davis SNMP is available at
http://net-snmp.sourceforge.net.
Software Development Kit
The Software Development Kit (SDK) is available by clicking the
Download button then clicking the ucd-snmp-4.2.2.tar.gz. The tar file must
be installed on the Linux system with the tar command:
tar –xvzf ucd-snmp-4.2.2.tar.gz
Then compile snmpd with the command:
./configure –with-mib-modules=smux; make; make install
to build snmpd and install it in /usr/local/sbin/snmp and associate files.
Note that the install does not include a boot startup file /etc/rc.d/init.d /
snmpd. This file should be added if not already present and have symbolic
links to it from /etc/rc.d/rc[35].d/S90snmpd.
Example of /etc/rc.d/init.d/snmpd File
The following is an example of the /etc/rc.d/init.d/snmpd file from Red Hat
Linux which has been modified to use the above configuration:
#!/bin/bash
# ucd-snmp init file for snmpd
#
# chkconfig: - 50 50
# description: Simple Network Management Protocol (SNMP) Daemon
#
# processname: snmpd
# config: /etc/snmp/snmpd.local.conf
# config: /etc/snmp/snmpd.conf
# config: /usr/share/snmp/snmpd.local.conf
# config: /usr/share/snmp/snmpd.conf
A-8
Global Array Manager Server Software Manual
SNMP Installation, Operation, and Definition
# source function library
. /etc/init.d/functions
RETVAL=0
start() {
echo -n "Starting snmpd: "
daemon /usr/local/sbin/snmpd
daemon /usr/local/sbin/snmptrapd -o /var/log/snmptrap.log
RETVAL=$?
[ $RETVAL -eq 0 ] && touch /var/lock/subsys/snmpd
echo
}
stop() {
echo -n "Shutting down snmpd: "
killproc /usr/local/sbin/snmpd
killproc /usr/local/sbin/snmptrapd
RETVAL=$?
[ $RETVAL -eq 0 ] && rm -f /var/lock/subsys/snmpd
echo
}
case "$1" in
start)
start
;;
stop)
stop
;;
restart)
stop
start
;;
condrestart)
if [ -f /var/lock/subsys/snmpd ]; then
stop
start
A
fi
;;
Manual No. SA67-0048-01
A-9
S
N
M
P
SNMP Peer Agent Installation for Linux
status)
status snmpd
RETVAL=$?
;;
*)
echo "Usage: snmpd {start|stop|restart|condrestart|status}"
RETVAL=1
esac
exit $RETVAL
S90snmpd must precede S99gamagent lexically in /etc/rc.d/rc3.d and rc5.d
so S90snmpd will be run before S99gamagent.
☛ Note
This install procedure may change due to installing
gam driver/server in the same rpm package
Installing gamagent Files
To install gamagent files, change to whatever directory (or media) contains
gamagent.rpm and enter the command:
rpm –i gam-agent-5.0.rpm
The gamagent.rpm will install the following files:
• /usr/local/sbin/gamagent (SNMP peer agent),
• /etc/rc.d/init.d/gamagent (system start/stop init file),
• /usr/share/snmp/gamagent.efs (definition file),
• /usr/share/snmp/snmpd.conf (snmpd configuration file),
• /usr/share/snmp/mlxraid.mib (Mylex MIB file).
And will create the following symbolic links:
• /usr/local/share/snmp/mlxraid.mib ==> /usr/share/snmp/mlxraid.mib
• /usr/local/share/snmp/gamagent.efs ==> /usr/share/snmp/gamagent.efs
• /usr/local/share/snmpd.conf ==> /usr/share/snmp/gamagent.efs
A-10
Global Array Manager Server Software Manual
SNMP Installation, Operation, and Definition
The /etc/rc.d/init.d/gamagent file will cause gamagent to be run after snmpd
and gamdrvd have started at boot.
The /usr/share/snmp/snmpd.conf configuration file must be edited for the
local system environment.
The file contains SNMP security options (man snmpd.conf) which are set to
‘public’ but may be changed. Change the sysLocation and sysContact
parameters. Change the trapsink, trap2sink, and informsink IP addresses to
the IP address of where SNMP traps are to be sent. Do NOT change the
smuxpeer line.
The Mylex gamagent SNMP peer agent calls the Mylex gamdrvd driver. The
gam-server-5.0.rpm must be installed before gamagent is run.
Starting gamdrvd, snmpd, and gamagent
To start gamdrvd, snmpd, and gamagent you may either reboot the system or
execute:
#/etc/rc.d/init.d/gam start
#/etc/rc.d/init.d/gamagent start
The trap client program (IP addresses in snmpd.conf) should be running on
the client system before rebooting the snmpd system as snmpd and gamagent
will send traps to the client after starting. To determine if gamdrvd, snmpd,
and gamagent are running, enter the command
ps –e
and check for gamdrvd, snmpd, and two gamagents.
To start, stop, or status gamagent, as root enter the command:
/etc/rc.d/init.d/gamagent start (stop or status).
Uninstalling gamagent Files
To remove the files installed from gamagent.rpm do the following:
Enter the command
rpm –qa | grep gamagent
to list gamagent’s full name for the next command.
Manual No. SA67-0048-01
A
A-11
S
N
M
P
SNMP Peer Agent Installation for Linux
Enter the command
rpm –e <the whole gamagent name entered from above command>
The main gamagent files will be removed. If snmpd is still to be used, the /
usr/share/snmp/snmpd.conf file must be recreated. The snmpd.conf is
backed up in /usr/share/snmp before gamagent was removed for such an
occasion.
A-12
Global Array Manager Server Software Manual
SNMP Installation, Operation, and Definition
MIB Compilation
pilation and Definition File Creation
The next step in the installation involves the integration of the MIB into the
management application’s database of events and status indicator codes.
This process is known as compiling the MIB into the application. This
process is highly vendor-specific and should be well-covered in the User’s
Guide of your SNMP application. Ensure that the compilation process
successfully integrates the contents of the MLXRAID.MIB file (known as
the MYLEXRAID_MIB object when viewed from within the SNMP
application) into the traps database.
A
Manual No. SA67-0048-01
A-13
S
N
M
P
MYLEXRAIDMIB Object Definitions
MYLEXRAIDMIB Object Definitions
Traps
All traps are defined under this object according to the following table:
Table A-3. Traps and Trap Numbers
Trap
Traps 1-127 are physical device traps
physicalDeviceOnline
physicalDeviceHotspare
physicalDeviceHardError
physicalDevicePFA
physicalDeviceAutoRebuildStarted
physicalDeviceManualRebuildStarted
physicalDeviceRebuildDone
physicalDeviceRebuildCanceled
physicalDeviceRebuildError
physicalDeviceRebuildNewDeviceFailed
physicalDeviceRebuildSystemDeviceFailed
physicalDeviceDead
physicalDeviceFound
physicalDeviceGone
physicalDeviceUnconfigured
physicalDeviceExpandCapacityStarted
physicalDeviceExpandCapacityDone
physicalDeviceExpandCapacityError
physicalDeviceCommandTimeout
physicalDeviceCommandAborted
physicalDeviceCommandRetried
physicalDeviceParityError
physicalDeviceSoftError
physicalDeviceMiscellaneousError
physicalDeviceReset
physicalDeviceActivespare
physicalDeviceWarmspare
physicalDeviceRequestSense
[RESERVED]
physicalDevicevRebuildStartFailed
[RESERVED]
Traps 128-255 are logical drive
(system device) traps
systemDeviceCheckStarted
systemDeviceCheckDone
systemDeviceCheckCanceled
systemDeviceCheckError
systemDeviceCheckSystemDeviceFailed
A-14
Trap number
1
2
3
4
5
6
7
8
9
10
11
12
13
14
15
16
17
18
19
20
21
22
23
24
25
26
27
28
29-57
58
59-127
128
129
130
131
132
Global Array Manager Server Software Manual
SNMP Installation, Operation, and Definition
Table A-3. Traps and Trap Numbers
Trap
systemDeviceCheckPhysicalDeviceFailed
systemDeviceOffline
systemDeviceCritical
systemDeviceOnline
systemDeviceAutoRebuildStarted
systemDeviceManualRebuildStarted
systemDeviceRebuildDone
systemDeviceRebuildCanceled
systemDeviceRebuildError
systemDeviceRebuildNewDeviceFailed
systemDeviceRebuildSystemDeviceFailed
systemDeviceInitializationStarted
systemDeviceInitializationDone
systemDeviceInitializationCanceled
systemDeviceInitializationFailed
systemDeviceFound
systemDeviceGone
systemDeviceExpandCapacityStarted
systemDeviceExpandCapacityDone
systemDeviceExpandCapacityError
systemDeviceBadblock
systemDeviceSizeChanged
systemDeviceTypeChanged
systemDeviceBadDataBlocksFound
systemDeviceWriteLUNMap
systemDeviceDataReadfromBlockinBDT
[RESERVED]
Traps 256-271 are FMT fan traps
fmtFanFailed
fmtFanOK
aemiFanFailed
fmtFanNotPresent
[RESERVED]
Traps 272-287 are FMT power traps
fmtPowerFailed
fmtPowerOK
aemiPowerSupplyFailed
fmtPowerNotPresent
[RESERVED]
Traps 288-303 are FMT temperature traps
fmtHeatBad
fmtHeatCritical
fmtHeatOK
aemiOverTemperature
fmtHeatNotPresent
Manual No. SA67-0048-01
Trap number
133
134
135
136
137
138
139
140
141
142
143
144
145
146
147
148
149
150
151
152
153
154
155
156
157
158
159-255
256
257
258
259
260-271
272
273
274
275
276-287
288
289
290
291
292
A
A-15
S
N
M
P
MYLEXRAIDMIB Object Definitions
Table A-3. Traps and Trap Numbers
Trap
[RESERVED]
Traps 304-306 are StorageWorks traps
fmtStorageWorksFailed
fmtStorageWorksCritical
fmtStorageWorksOK
Traps 307-383 are FMT enclosure traps
[RESERVED]
fmtEnclosureFanFailed
fmtEnclosureFanOK
fmtEnclosureFanNotPresent
fmtEnclosurePowerFailed
fmtEnclosurePowerOK
fmtEnclosurePowerNotPresent
fmtEnclosureHeatSensorFailed
fmtEnclosureHeatSensorCritical
fmtEnclosureHeatSensorOK
fmtEnclosureHeatSensorNotPresent
fmtEnclosureAccessCritical
fmtEnclosureAccessOK
fmtEnclosureAccessOffline
[RESERVED]
Traps 384-511 are miscellaneous traps
systemStarted
writebackError
stateChangeTableFull
[NOT USED]
adapterDead
adapterReset
adapterFound
adapterGone
batteryBackupUnitFound
batteryBackupUnitPowerLow
batteryBackupUnitPowerOK
[RESERVED]
controllerFirmwareMismatch
controllerBBUNotRespond
[RESERVED]
controllerECCEror
controllerHardECCError
[RESERVED]
controllerBBUDead
[RESERVED]
Traps 512-640 are system traps
gamSystemStarted
systemSizeTableFull
A-16
Trap number
293-303
304
305
306
307-319
320
321
322
323
324
325
326
327
328
329
330
331
332
333-383
384
385
386
387
388
389
390
391
392
393
394
395-403
404
405
406-413
414
415
416-417
418
419-511
512
513
Global Array Manager Server Software Manual
SNMP Installation, Operation, and Definition
Table A-3. Traps and Trap Numbers
Trap
systemUserLoggedIn
systemUserLoggedOut
[RESERVED]
Reserved Traps
Trap number
514
515
516-640
641-(167)
A
Manual No. SA67-0048-01
A-17
S
N
M
P
MYLEXRAIDMIB Object Definitions
Controller Information Group
This object is used to find information about any or all of the controllers
present in the system.
Table A-4. Controller Information Group
Table object
a2ControllerNumber
1.3.6.1.4.1.1608.1.1.1.2.1.1
Data
Type
Integer
a2OperationalState
1.3.6.1.4.1.1608.1.1.1.2.1.2
Integer
a2FirmwareRevision
1.3.6.1.4.1.1608.1.1.1.2.1.3
Display
String
a2ConfiguredChannels
1.3.6.1.4.1.1608.1.1.1.2.1.4
Integer
a2ActualChannels
1.3.6.1.4.1.1608.1.1.1.2.1.5
a2MaximumLogicalDrives
1.3.6.1.4.1.1608.1.1.1.2.1.6
Integer
a2MaximumTargetsPerChannel
1.3.6.1.4.1.1608.1.1.1.2.1.7
Integer
a2MaximumTaggedRequests
1.3.6.1.4.1.1608.1.1.1.2.1.8
a2MaximumDataTransferSizePerIo
RequestInK
1.3.6.1.4.1.1608.1.1.1.2.1.9
a2MaximumConcurrentCommands
1.3.6.1.4.1.1608.1.1.1.2.1.10
Integer
a2RebuildRate
1.3.6.1.4.1.1608.1.1.1.2.1.11
Integer
A-18
Integer
Integer
Integer
Description
References a particular
controller by its controller
number
Operational state of the
controller:
Value
Meaning
1
Functional
2
Non-Functional
128
Not Present
A displayable ASCII string
containing the firmware
version of the controller
The maximum number of SCSI
channels that can be
configured on the controller
Actual number of SCSI
channels present
Maximum number of logical
drives supported by the
controller
The maximum number of
targets (SCSI IDs) supported
per channel
The maximum number of
tagged requests per target
The maximum data transfer
size supported (in KB)
The maximum number of
concurrent commands that are
supported
The priority of rebuild versus
system I/Os; Value is 0 to 50;
0 = lowest rebuild priority,
50 = highest rebuild priority
Global Array Manager Server Software Manual
SNMP Installation, Operation, and Definition
Table A-4. Controller Information Group
Table object
a2LogicalSectorSizeInBytes
1.3.6.1.4.1.1608.1,1,1,2,1,12
a2PhysicalSectorSizeInBytes
1.3.6.1.4.1.1608.1.1.1.2.1.13
Data
Type
Integer
Integer
a2CacheLineSizeInBytes
1.3.6.1.4.1.1608.1.1.1.2.1.14
a2CacheSizeInMb
1.3.6.1.4.1.1608.1.1.1.2.1.15
a2CacheMemoryType
1.3.6.1.4.1.1608.1.1.1.2.1.16
Integer
a2EpromSizeInKb
1.3.6.1.4.1.1608.1.1.1.2.1.17
a2BusType
1.3.6.1.4.1.1608.1.1.1.2.1.18
Integer
Manual No. SA67-0048-01
Integer
Integer
Integer
Description
The logical sector (block) size
in bytes (Default: 512 bytes)
The physical sector (block)
size in bytes (Default: 512
bytes)
The cache line size in bytes
The memory size of the
controller cache in MB
Numerical identification of the
controller cache memory type:
Value
Meaning
1
DRAM
2
EDRAM
3
EDO
4
SDRAM
65
DRAM with parity
protection
66
EDRAM with parity
protection
67
EDO with parity
protection
68
SDRAM with parity
protection
129
DRAM with ECC
protection
130
EDRAM with ECC
protection
131
EDO with ECC
protection
132
SDRAM with ECC
protection
255
Unknown
The flash EPROM size in KB
Numerical identification of the
controller’s bus type:
Value
Meaning
1
EISA
2
MCA
A-19
A
S
N
M
P
MYLEXRAIDMIB Object Definitions
Table A-4. Controller Information Group
Table object
a2ControllerClass
1.3.6.1.4.1.1608.1.1.1.2.1.19
a2ControllerModel
1.3.6.1.4.1.1608.1.1.1.2.1.20
A-20
Data
Type
Integer
Integer
Description
3
PCI
4
VESA
5
ISA
255
Unknown
The class of the controller:
Value
Meaning
1
RAID controller
96
SCSI-SCSI
128
HBA controller
255
Unknown
Numerical identification of the
controller model:
Value
Meaning
1
DAC960E
8
DAC960M
16
DAC960PD
17
DAC960PL
18
DAC960PDU
19
DAC960PE
20
DAC960PG
21
DAC960PJ
22
DAC960PTL0
23
DAC960PR
24
DAC960PRL
25
DAC960PT
26
DAC1164P
27
DAC960PTL1
28
EXR2000P
29
EXR3000P
30
AR352
31
AR170
32
AR160
96
DAC960S
97
DAC960SU
98
DAC960SX
99
DAC960SF
100
DAC960SS
Global Array Manager Server Software Manual
SNMP Installation, Operation, and Definition
Table A-4. Controller Information Group
Table object
Data
Type
a2ControllerModel (continued)
a2SystemBusNumber
1.3.6.1.4.1.1608.1.1.1.2.1.21
Integer
a2SlotNumber
1.3.6.1.4.1.1608.1.1.1.2.1.22
Integer
a2InterruptVectorNumber
1.3.6.1.4.1.1608.1.1.1.2.1.23
Integer
a2InterruptMode
Integer
1.3.6.1.4.1.1608.1.1.1.2.1.24
a2NumberOfPhysicalDevices
1.3.6.1.4.1.1608.1.1.1.2.1.25
a2NumberOfPhysicalDevicesOffline
1.3.6.1.4.1.1608.1.1.1.2.1.26
Integer
a2NumberOfLogicalDevices
1.3.6.1.4.1.1608.1.1.1.2.1.27
a2NumberOfLogicalDevicesCritical
1.3.6.1.4.1.1608.1.1.1.2.1.28
a2NumberOfLogicalDevicesOffline
1.3.6.1.4.1.1608.1.1.1.2.1.29
Integer
Manual No. SA67-0048-01
Integer
Integer
Integer
Description
101
DAC960FL
102
DAC960LL
103
DAC960FF
104
FC ARRAY
105
DAC960MFL
106
DAC960MFF
107
DAC960FFX
255
Unknown
The system bus number for the
controller. This value is
supplied by the Operating
System and may not be
defined for all operating
systems.
The slot number where the
controller resides, defined for
EISA and MCA controller only
The interrupt vector number
being used by the controller.
This value is a mapped IRQ
supplied by the Operating
System and may not be same
as the actual Interrupt Vector
Numerical identification of the
interrupt mode (edge/level):
Value
Meaning
0
EDGE
1
LEVEL
255
Unknown
The number of SCSI devices
detected
The number of SCSI devices
with an operational state of
DEAD
The number of logical devices
currently configured
The number of logical devices
in a “critical” state
The number of OFFLINE
logical devices
A-21
A
S
N
M
P
MYLEXRAIDMIB Object Definitions
Table A-4. Controller Information Group
Table object
a2FaultManagementType
1.3.6.1.4.1.1608.1.1.1.2.1.30
Data
Type
Integer
a2ArrayInformation
1.3.6.1.4.1.1608.1.1.1.2.1.31
Display
String
a2LogicalDriveReadRequestsCount
1.3.6.1.4.1.1608.1.1.1.2.1.32
a2DataReadFromLogicalDrivesInMb
1.3.6.1.4.1.1608.1.1.1.2.1.33
Integer
a2LogicalDriveWriteRequestsCount
1.3.6.1.4.1.1608.1.1.1.2.1.34
a2DataWrittenToLogicalDrivesInMb
1.3.6.1.4.1.1608.1.1.1.2.1.35
Integer
a2LogicalDrivesReadCacheHit
Percentage
1.3.6.1.4.1.1608.1.1.1.2.1.36
a2PhysicalDriveReadRequestsCount
1.3.6.1.4.1.1608.1.1.1.2.1.37
a2DataReadFromPhysicalDrivesInMb
1.3.6.1.4.1.1608.1.1.1.2.1.38
Integer
a2PhysicalWriteRequestsCount
1.3.6.1.4.1.1608.1.1.1.2.1.39
Integer
A-22
Integer
Integer
Integer
Integer
Description
The controller’s fault
management type:
Value
Meaning
1
AEMI
2
OEM1
4
OEM2
8
OEM3
16
CONNER
32
SAFTE
64
SES
0
Not Present
A displayable ASCII string
containing the array
information. The information is
of the form: A(ch-targ ch-targ)
B(ch-targ), where A,B = Array
List, ch = channel number,
targ = SCSI target number.
The total number of read
requests to all logical drives
The amount of data that was
read from all logical drives in
MB
The total number of write
requests to all logical drives
The amount of data that was
written to all logical drives in
MB
The percentage rate of read
cache hits for all logical drives
The total number of read
requests to all physical drives
The amount of data that was
read from all physical drives in
MB
The total number of write
requests to all physical drives
Global Array Manager Server Software Manual
SNMP Installation, Operation, and Definition
Table A-4. Controller Information Group
Table object
a2DataWrittenToPhysicalDrivesInMb
1.3.6.1.4.1.1608.1.1.1.2.1.40
a2StorageWorksCabinetStatusOn
Channel0
1.3.6.1.4.1.1608.1.1.1.2.1.41
a2StorageWorksCabinetStatusOn
Channel1
1.3.6.1.4.1.1608.1.1.1.2.1.42
a2StorageWorksCabinetStatusOn
Channel2
1.3.6.1.4.1.1608.1.1.1.2.1.43
a2BatteryBackupUnitStatus
1.3.6.1.4.1.1608.1.1.1.2.1.44
a2PartnerControllerNumber
1.3.6.1.4.1.1608.1.1.1.2.1.45
a2WWName
1.3.6.1.4.1.1608.1.1.1.2.1.46
Data
Type
Integer
Integer
Integer
Integer
Integer
Integer
Display
String
Description
The amount of data that was
written to all physical drives in
MB
StorageWorks cabinet status
on channel 0
Value
Meaning
1
Ok
2
Not Ok
3
Not Present
StorageWorks cabinet status
on channel 1
Value
Meaning
1
Ok
2
Not Ok
3
Not Present
StorageWorks cabinet status
on channel 2
Value
Meaning
1
Ok
2
Not Ok
3
Not Present
BBU status
0
Not Present
1
Present
Dual Active Partner Controller
Number
Controller World-Wide Name
Notes:
• a2ControllerNumber is the index for any search operations against this
object.
• This is a READ-ONLY object. No SET operations are allowed.
• A GET operation returns information about the object whose MIB ID
is in the query.
Manual No. SA67-0048-01
A-23
A
S
N
M
P
MYLEXRAIDMIB Object Definitions
• A GETNEXT operation returns the object’s information which is next
to the MIB ID given in the query.
• Controller numbers start at 0.
A-24
Global Array Manager Server Software Manual
SNMP Installation, Operation, and Definition
Logical Drive Information Group
This object is used to determine information about any or all the logical
drives present in the system.
Table A-5. Logical Drive Information Group
Table object
a3ControllerNumber
1.3.6.1.4.1.1608.1.1.1.3.1.1
Data
Type
Integer
a3LogicalDriveNumber
1.3.6.1.4.1.1608.1.1.1.3.1.2
a3OperationalState
1.3.6.1.4.1.1608.1.1.1.3.1.3
Integer
a3RaidLevel
1.3.6.1.4.1.1608.1.1.1.3.1.4
Integer
a3WritePolicy
1.3.6.1.4.1.1608.1.1.1.3.1.5
Integer
a3SizeInMb
1.3.6.1.4.1.1608.1.1.1.3.1.6
a3PhysicalSizeInMb
1.3.6.1.4.1.1608.1.1.1.3.1.7
a3StripeSizeInBytes
1.3.6.1.4.1.1608.1.1.1.3.1.8
Integer
Manual No. SA67-0048-01
Integer
Integer
Integer
Description
References a particular
controller by its controller
number
The logical drive number
Numerical identification of the
logical drive state:
Value
Meaning
3
ONLINE
4
CRITICAL
255
OFFLINE
128
NotPresent
The RAID level selected for the
logical drive
0
RAID0
1
RAID1
3
RAID3
5
RAID5
6
RAID0+1
7
JBOD
Numerical identification of the
write policy setting for the logical
drive:
Value
Meaning
0
WRITE THRU
128
WRITE BACK
The logical drive capacity in MB
The total physical capacity used
by this logical drive in MB
The value of the stripe size in
bytes, valid only for RAID levles
0, 5, and 6
A-25
A
S
N
M
P
MYLEXRAIDMIB Object Definitions
Table A-5. Logical Drive Information Group
Table object
a3PhysicalDriveMap
1.3.6.1.4.1.1608.1.1.1.3.1.9
Data
Type
Display
String
a3ArrayList
1.3.6.1.4.1.1608.1.1.1.3.1.10
Display
String
a3RaidLevelString
1.3.6.1.4.1.1608.1.1.1.3.1.11
Display
String
Description
A displayable ASCII string
containing the list of all physical
drives that make up the logical
drive. This information is
provided in Channel Target
combination form. For example,
(0-1, 0-2, 1-3, 1-11).
The list of arrays across which
this logical drive spans. For
example, A, B, etc.
RAID Level associated with
Logical Drive
Notes:
• a3ControllerNumber and a3LogicalDriveNumber compose the Index
for a search operation.
• This is a READ-ONLY object. No SET operations are allowed.
• A GET operation returns information about the object at the address
(a3ControllerNumber/a3LogicalDriveNumber) specified in the
argument.
• A GETNEXT operation returns information about the next object at the
smallest address greater than the address specified in the argument.
• The lowest address of a drive (a3ControllerNumber/
a3LogicalDriveNumber) is defined as 0/0, followed by 0/1... 1/0, 1/1,
and so on.
• Controller numbers start at 0. Logical drive numbers start at 0.
A-26
Global Array Manager Server Software Manual
SNMP Installation, Operation, and Definition
Physical Device Information Group
This object is used to find information about any or all of the physical
devices present in the system.
Table A-6. Physical Device Information Group
Table object
a4ControllerNumber
1.3.6.1.4.1.1608.1.1.1.4.1.1
a4ScsiBusId
1.3.6.1.4.1.1608.1.1.1.4.1.2
a4ScsiTargetId
1.3.6.1.4.1.1608.1.1.1.4.1.3
a4ScsiLunId
1.3.6.1.4.1.1608.1.1.1.4.1.4
a4OperationalState
1.3.6.1.4.1.1608.1.1.1.4.1.5
Data
Type
Integer
Description
Integer
References a particular
controller by its controller
number
SCSI channel number
Integer
SCSI target number
Integer
SCSI logical unit number (LUN)
of the SCSI device
Numerical identification of the
physical device state:
Value
Meaning
0
UnConfigured
1
ONLINE
3
REBUILDING
4
INSTABORT
6
NOT PRESENT
8
DEAD
33
HOT SPARE
130
REBUILD
CANCELLED
The SCSI device vendor ID.
This is the vendor ID from the
SCSI INQUIRY data.
The SCSI device product ID.
This is the product ID from the
SCSI INQUIRY data.
The SCSI device product
revision level. This is the
revision level from the SCSI
INQUIRY data.
The physical device capacity in
MB
Integer
a4VendorId
1.3.6.1.4.1.1608.1.1.1.4.1.6
Display
String
a4ProductId
1.3.6.1.4.1.1608.1.1.1.4.1.7
Display
String
a4ProductRevisionLevel
1.3.6.1.4.1.1608.1.1.1.4.1.8
Display
String
a4SizeInMb
1.3.6.1.4.1.1608.1.1.1.4.1.9
Integer
A
Manual No. SA67-0048-01
A-27
S
N
M
P
MYLEXRAIDMIB Object Definitions
Table A-6. Physical Device Information Group
Table object
a4DeviceType
1.3.6.1.4.1.1608.1.1.1.4.1.10
a4SoftErrorsCount
1.3.6.1.4.1.1608.1.1.1.4.1.11
a4HardErrorsCount
1.3.6.1.4.1.1608.1.1.1.4.1.12
a4ParityErrorsCount
1.3.6.1.4.1.1608.1.1.1.4.1.13
a4MiscErrorsCount
1.3.6.1.4.1.1608.1.1.1.4.1.14
a4ArrayList
1.3.6.1.4.1.1608.1.1.1.4.1.15
a4LogicalDriveList
1.3.6.1.4.1.1608.1.1.1.4.1.16
A-28
Data
Type
Integer
Integer
Integer
Integer
Integer
Display
String
Integer
Description
Numerical identification of the
SCSI device type. The value
matches the device type value
of the SCSI INQUIRY data:
Value
Meaning
0
FIXED DISK
1
TAPE
2
PRINTER
3
PROCESSOR
4
WORM
5
CDROM
6
SCANNER
7
MO
8
CHANGER
9
COMMUNICATION
DEVICE
10
GRAPHICS-0
11
GRAPHICS-1
12-30
Reserved
31
Unknown
199
SCSI HOST
204
Ctrl Channel
The number of soft errors that
occurred
The number of hard errors that
occurred
The number of parity errors that
occurred
The number of miscellaneous
errors that occurred
The list of arrays to which this
physical drive belongs. For
example, A, B, etc.
The list of logical drives that
depend on this physical drive.
For example, 0, 1, etc.
Global Array Manager Server Software Manual
SNMP Installation, Operation, and Definition
Notes:
• a4ControllerNumber, a4ScsiBusId, and a4ScsiTargetId comprise the
Index for the search operation.
• This is a READ-ONLY object. No SET operations are allowed.
• A GET operation returns information about the object at the address
(a4ControllerNumber/a4ScsiBusId/a4ScsiTargetId) specified in the
argument.
• A GETNEXT operation returns information about the next object at the
smallest address greater than the address specified in the argument.
• The lowest address of a device (a4ControllerNumber/a4ScsiBusId/
a4ScsiTargetId) is defined as 0/0/0, followed by 0/0/1... 0/1/0, 0/1/1...
1/0/0, 1/0/1, and so on.
• Controller numbers start at 0. Channel numbers start at 0. Target IDs
start at 0.
A
Manual No. SA67-0048-01
A-29
S
N
M
P
MYLEXRAIDMIB Object Definitions
RAID Management Software Group
This object contains the build date and version number for the Global Array
Manager driver, Disk Array Controller device driver, and SNMP agent.
Table A-7. RAID Management Software Group
Table object
a5ManagementSoftwareRevision
1.3.6.1.4.1.1608.1.1.1.5.1.1
Data
Type
Display
String
a5ManagementSoftwareBuildDate
1.3.6.1.4.1.1608.1.1.1.5.1.2
Display
String
a5MylexDacDeviceDriverRevision
1.3.6.1.4.1.1608.1.1.1.5.1.3
Display
String
a5MylexDacDeviceDriverBuildDate
1.3.6.1.4.1.1608.1.1.1.5.1.4
Display
String
a5GamDriverRevision
1.3.6.1.4.1.1608.1.1.1.5.1.5
Display
String
a5GamDriverBuildDate
1.3.6.1.4.1.1608.1.1.1.5.1.6
Display
String
Description
A displayable string that shows
the revision level of the SNMP
agent
A displayable string that shows
the build date for the SNMP
agent
A displayable string that shows
the revision level of the
controller device driver
A displayable string that shows
the build date for the controller
device driver
A displayable string that shows
the revision level of the Global
Array Manager (GAM) driver
A displayable string that shows
the build date for the Global
Array Manager (GAM) driver
Notes:
• This is a READ-ONLY object. No SET operations are allowed.
• A GET operation returns information about the object at the address
specified in the argument.
• A GETNEXT operation returns information about the next object at the
smallest address greater than the address specified in the argument.
A-30
Global Array Manager Server Software Manual
SNMP Installation, Operation, and Definition
Logical Drive Statistics Group
This object is used to determine statistics about all logical drives configured
on a controller.
Table A-8. Logical Drive Statistics Group
Table object
a6ControllerNumber
1.3.6.1.4.1.1608.1.1.1.6.1.1
a6LogicalDriveNumber
1.3.6.1.4.1.1608.1.1.1.6.1.2
a6ReadRequestsCount
1.3.6.1.4.1.1608.1.1.1.6.1.3
a6DataReadInMb
1.3.6.1.4.1.1608.1.1.1.6.1.4
a6WriteRequestsCount
1.3.6.1.4.1.1608.1.1.1.6.1.5
a6DataWrittenInMb
1.3.6.1.4.1.1608.1.1.1.6.1.6
a6ReadCacheHitPercentage
1.3.6.1.4.1.1608.1.1.1.6.1.7
Data
Type
Integer
Integer
Integer
Integer
Integer
Integer
Integer
Description
References a particular
controller by its controller
number
The logical drive number
The total number of read
requests
The total amount of data that
was read in MB
The total number of write
requests
The total amount of data that
was written in MB
The percentage rate of read
cache hits
Notes:
• a6ControllerNumber and a6LogicalDriveNumber compose the Index
for a search operation.
• This is a READ-ONLY object. No SET operations are allowed.
• A GET operation returns information about the object at the address
(a6ControllerNumber/a6LogicalDriveNumber) specified in the
argument.
• A GETNEXT operation returns information about the next object at the
smallest address greater than the address specified in the argument.
• The lowest address of a drive (a6ControllerNumber/
a6LogicalDriveNumber) is defined as 0/0, followed by 0/1... 1/0, 1/1,
and so on.
• Controller numbers start at 0. Logical drive numbers start at 0.
A
Manual No. SA67-0048-01
A-31
S
N
M
P
MYLEXRAIDMIB Object Definitions
Physical Drive Statistics Group
This object is used to determine statistics about all physical drives
configured on a controller.
Table A-9. Physical Drive Statistics Group
Table object
a7ControllerNumber
1.3.6.1.4.1.1608.1.1.1.7.1.1
a7ScsiBusID
1.3.6.1.4.1.1608.1.1.1.7.1.2
a7ScsiTargetId
1.3.6.1.4.1.1608.1.1.1.7.1.3
a7ScsiLun
1.3.6.1.4.1.1608.1.1.1.7.1.4
a7ReadRequestsCount
1.3.6.1.4.1.1608.1.1.1.7.1.5
a7DataReadInMb
1.3.6.1.4.1.1608.1.1.1.7.1.6
a7WriteRequestsCount
1.3.6.1.4.1.1608.1.1.1.7.1.7
a7DataWrittenInMb
1.3.6.1.4.1.1608.1.1.1.7.1.8
Data
Type
Integer
Description
Integer
References a particular
controller by its controller
number
SCSI channel number
Integer
SCSI target number
Integer
SCSI logical unit number (LUN)
of the SCSI device
The total number of read
requests
The total amount of data that
was read in MB
The total number of write
requests
The total amount of data that
was written in MB
Integer
Integer
Integer
Integer
Notes:
• a7ControllerNumber, a7ScsiBusId, and a7ScsiTargetId comprise the
Index for the search operation.
• This is a READ-ONLY object. No SET operations are allowed.
• A GET operation returns information about the object at the address
(a7ControllerNumber/a7ScsiBusId/a7ScsiTargetId) specified in the
argument.
• A GETNEXT operation returns information about the next object at the
smallest address greater than the address specified in the argument.
• The lowest address of a device (a7ControllerNumber/a7ScsiBusId/
a7ScsiTargetId) is defined as 0/0/0, followed by 0/0/1... 0/1/0, 0/1/1...
1/0/0, 1/0/1, and so on.
• Controller numbers start at 0. Channel numbers start at 0. Target IDs
start at 0.
A-32
Global Array Manager Server Software Manual
SNMP Installation, Operation, and Definition
Fault Management Cabinet Information Group
This object is used to obtain information about the fault management cabinet
that is in use.
Table A-10. Fault Management Cabinet Information Group
Table object
a8ControllerNumber
1.3.6.1.4.1.1608.1.1.1.8.1.1
a8ScsiBusId
1.3.6.1.4.1.1608.1.1.1.8.1.2
a8CabinetNumber
1.3.6.1.4.1.1608.1.1.1.8.1.3
a8ScsiTargetId
1.3.6.1.4.1.1608.1.1.1.8.1.4
a8ScsiLun
1.3.6.1.4.1.1608.1.1.1.8.1.5
a8CabinetType
1.3.6.1.4.1.1608.1.1.1.8.1.6
a8NumberOfFans
1.3.6.1.4.1.1608.1.1.1.8.1.7
a8NumberOfPowerSupplyUnits
1.3.6.1.4.1.1608.1.1.1.8.1.8
a8NumberOfHeatSensors
1.3.6.1.4.1.1608.1.1.1.8.1.9
a8NumberOfDriveSlots
1.3.6.1.4.1.1608.1.1.1.8.1.10
a8NumberOfDoorLocks
1.3.6.1.4.1.1608.1.1.1.8.1.11
a8NumberOfSpeakers
1.3.6.1.4.1.1608.1.1.1.8.1.12
a8NumberOfFansCritical
1.3.6.1.4.1.1608.1.1.1.8.1.13
Manual No. SA67-0048-01
Data
Type
Integer
Description
Integer
References a particular
controller by its controller
number
SCSI channel number
Integer
The cabinet number
Integer
SCSI target number
Integer
Integer
SCSI logical unit number (LUN)
of the SCSI device
Numerical identification of fault
management cabinet type:
Value
Meaning
1
CONNER CR6
2
CONNER Smart
Cabinet
3
Safte
32
SAFTE
64
SES
255
Unknown
The number of fans housed in
the cabinet
The number of power supply
units installed
The number of heat sensors
Integer
The number of drive slots
Integer
The number of door locks
Integer
The number of speakers
Integer
The number of fans in a “critical”
state
Integer
Integer
Integer
A-33
A
S
N
M
P
MYLEXRAIDMIB Object Definitions
Table A-10. Fault Management Cabinet Information Group
Table object
a8NumberOfPowerSupplyUnitsCritical
1.3.6.1.4.1.1608.1.1.1.8.1.14
a8NumberOfHeatSensorsCritical
1.3.6.1.4.1.1608.1.1.1.8.1.15
a8NumberOfFansFailed
1.3.6.1.4.1.1608.1.1.1.8.1.16
a8NumberOfPowerSupplyUnitsFailed
1.3.6.1.4.1.1608.1.1.1.8.1.17
a8NumberOfHeatSensorsFailed
1.3.6.1.4.1.1608.1.1.1.8.1.18
Data
Type
Integer
Integer
Integer
Integer
Integer
Description
The number of power supply
units in a “critical” state
The number of heat sensors in a
“critical” state
The number of fans in the
“failed” state
The number of power supply
units in the “failed” state
The number of heat sensors in
the “failed” state
Notes:
• a8ControllerNumber, a8ScsiBusId, and a8CabinetNumber comprise
the Index for the search operation.
• This is a READ-ONLY object. No SET operations are allowed.
• A GET operation returns information about the object at the address
(a8ControllerNumber/a8ScsiBusId/a8ScsiTargetId) specified in the
argument.
• A GETNEXT operation returns information about the next object at the
smallest address greater than the address specified in the argument.
• The lowest address of a device (a8ControllerNumber/a8ScsiBusId/
a8CabinetNumber) is defined as 0/0/0, followed by 0/0/1... 0/1/0, 0/1/
1... 1/0/0,1/0/1, and so on.
• Controller numbers start at 0. Channel numbers start at 0. Target IDs
start at 0.
A-34
Global Array Manager Server Software Manual
SNMP Installation, Operation, and Definition
RAID Event Information Group
This object is used to obtain information on events that occur for any or all
of the controllers. This group’s information is used to send SNMP traps to
the SNMP Manager workstation.
Table A-11. RAID Event Information Group
Table object
a9EventTableIndex
1.3.6.1.4.1.1608.1.1.1.9.1.1
a9EventCode
1.3.6.1.4.1.1608.1.1.1.9.1.2
Data
Type
Integer
Integer
a9EventTimeStamp
1.3.6.1.4.1.1608.1.1.1.9.1.3
Integer
a9ControllerNumber
1.3.6.1.4.1.1608.1.1.1.9.1.4
Integer
a9ChannelNumber
1.3.6.1.4.1.1608.1.1.1.9.1.5
Integer
a9TargetNumber
1.3.6.1.4.1.1608.1.1.1.9.1.6
a9LunNumber
1.3.6.1.4.1.1608.1.1.1.9.1.7
Integer
a9LogicalDriveNumber
1.3.6.1.4.1.1608.1.1.1.9.1.8
a9FmtCabinetNumber
1.3.6.1.4.1.1608.1.1.1.9.1.9
Integer
Integer
Integer
a9FanUnitNumber
1.3.6.1.4.1.1608.1.1.1.9.1.10
Integer
a9PowerSupplyUnitNumber
1.3.6.1.4.1.1608.1.1.1.9.1.11
Integer
a9HeatSensorUnitNumber
1.3.6.1.4.1.1608.1.1.1.9.1.12
Integer
Manual No. SA67-0048-01
Description
The index to the Event Table
Numerical identification of the
event codes for events. (For
event codes, see “Traps”
beginning on page A-6.)
The time associated with the
event. This is provided as the
number of seconds since
midnight, January 1, 1970.
References a particular
controller by its controller
number
SCSI channel number; valid for
physical drive events and fault
management events
SCSI target ID; valid for physical
drive events
SCSI logical unit number (LUN)
of the physical device; valid for
physical drive events
The logical drive number; valid
for logical drive events
The fault management cabinet
number; valid for fault
management events
The fan unit number in the fault
management cabinet; valid for
fault management events
The power supply unit number
in the fault management
cabinet; valid for fault
management events
The heat sensor unit number
A-35
A
S
N
M
P
MYLEXRAIDMIB Object Definitions
Notes:
• The value -1 in any of the object fields signifies that the field is not
valid for the event being considered.
• This is a READ-ONLY object. No SET operations are allowed.
• A GET operation returns information about the object whose MIB ID
is in the query.
• A GETNEXT operation returns the object’s information which is next
to the MIB ID given in the query.
A-36
Global Array Manager Server Software Manual
SNMP Installation, Operation, and Definition
Battery Backup Unit Information Group
This object is used to obtain information about the Battery Backup Unit
(BBU).
Table A-12. Battery Backup Unit Information Group
Table object
a10ControllerNumber
1.3.6.1.4.1.1608.1.1.1.10.1.1
a10OperationalState
1.3.6.1.4.1.1608.1.1.1.10.1.2
Data
Type
Integer
Integer
References a particular
controller by its controller
number
Operational state of the Battery
Backup Unit (BBU)
Value
Meaning
1
No recondition since
power on
2
Recondition needed
4
First warning on low
battery charge
8
Last warning on low
battery charge
16
Reconditioning
active
32
Discharging
64
Fast charging
128
Low power alarm
255
No battery backup
present
The battery type
Integer
Integer
Integer
Integer
Integer
0
1
2
3
254
Integer
Integer
Integer
Integer
Integer
Integer
Integer
Integer
Integer
Integer
a10BatteryType
1.3.6.1.4.1.1608.1.1.1.10.1.3
a10CurrentPowerInHours
1.3.6.1.4.1.1608.1.1.1.10.1.4
a10MaximumPowerInHours
1.3.6.1.4.1.1608.1.1.1.10.1.5
a10ThresholdValueInHours
1.3.6.1.4.1.1608.1.1.1.10.1.6
a10ChargeLevelInPercentage
1.3.6.1.4.1.1608.1.1.1.10.1.7
Manual No. SA67-0048-01
Description
Integer
Integer
Integer
Unknown
Nickel Cadmium
NiMh
Lithium Ion
No battery backup
present
Current battery power in hours
Maximum battery power in
hours
Battery threshold value in hours
A
Integer
Current charge level of the
battery (%)
A-37
S
N
M
P
MYLEXRAIDMIB Object Definitions
Table A-12. Battery Backup Unit Information Group
a10Version
1.3.6.1.4.1.1608.1.1.1.10.1.8
a10OperationalStateString
1.3.6.1.4.1.1608.1.1.1.10.1.9
Integer
The battery hardware version
Display
String
Operational State of Battery
Backup Unit
Notes:
• a10ControllerNumber is the index for any search operations against
this object.
• This is a READ-ONLY object. No SET operations are allowed.
• A GET operation returns information about the object whose MIB ID
is in the query.
• A GETNEXT operation returns the object’s information which is next
to the MIB ID given in the query.
• Controller numbers start at 0.
A-38
Global Array Manager Server Software Manual
Appendix B
GAMEVENT
Introduction
GAMEVENT refers to the concept of “Event Notification” in Global Array
Manager. Event Notification involves the following:
1. The Global Array Manager Server (GAM Server) runs on the server
computer to which the Mylex controllers and third-party disk drives or
enclosures are installed. When an informational event or error occurs,
GAM Server generates an “event.” When an informational event,
status change, or error occurs, that is deemed significant enough to
inform the user, the controller generates a GAM event. That GAM
event is then retrieved by the GAM Server.
2. These events can be sent to client workstations running GAM/SAM
Client for display in GAM/SAM Client’s Log Information Viewer
when the particular server is accessed.
In order to do this, a command line in the GAM Server configuration
file must be modified to enable event logging to clients, AND to
identify the client workstations by IP address or name.
3. Events generated by GAM Server can also be saved to a log file
(GAMEVLOG.LOG, by default), which is stored on the system
running GAM Server and can be viewed or printed later.
In order to do this, another command line in the GAM Server
configuration file must be enabled to generate the event log file. The
name of the log file or its path can also be changed if desired.
4. In order to access valid parameters and default settings, run gamevent
on the DOS command line.
This appendix discusses how GAMEVENT works for various operating
systems.
☛ Note
G
A
M
E
V
T
The server and the client must have matching port
numbers to generate inpro event logging activity. By
default, the Linux client and server are configured to
Manual No. SA67-0048-01
B-1
Introduction
communicate correctly when using the root login. If
you would like to use any login other than root for the
GAM WINE Client, then you will need to modify the
server and client event port numbers. This is due to a
requirement by non-root users to use a port number
above 1000.
☛ Note
For example, -i 158 is the default for a root user and
-i 1158 needs to be entered for a non-root user.
If necessary, edit the gam file to change these port
number values.
B-2
Global Array Manager Server Software Manual
GAMEVENT
NetWare
Enabling Event Notification
To enable event notification to GAM clients, both local and remote, edit the
LOAD GAMEVENT command line in the AUTOEXEC.NCF file.
1. Open the AUTOEXEC.NCF configuration file in a text editor.
2. Navigate to the command line of the configuration file called #LOAD
GAMEVENT.
#LOAD GAMEVENT -h <enter client ip address>
3. Replace <enter client ip address> with a desired system name or
IP address.
For example:
#LOAD GAMEVENT -h 10.97.49.189 -h fabd_test
where: -h <address> sets address as a receiver of events.
Address may be an IP address or a network system name.
Some systems may already be identified in the LOAD GAMEVENT
command line, either because they were previously identified in your
existing AUTOEXEC.NCF file, or because they were automatically
registered when you entered IP addresses or system names during
GAM Server installation.
4. Additional entries require that you extend the command line. Type -h,
then an IP address or system name, separated by one space, for each
additional entry you need. Additional entries will be read by the system
as a continuous string of addresses. Correct spacing is important to
avoid confusion of the server names.
☛ Note
The argument list is limited to 1028 bytes, allowing a
practical maximum of about 50 event notification
addresses and provides space for additional addresses.
5. Delete the comment marker "#" from the command line to enable event
notification:
LOAD GAMEVENT -h 10.97.49.189 -h fabd_test
Manual No. SA67-0048-01
B-3
G
A
M
E
V
T
NetWare
Enabling a GAM Event Log File
1. Navigate to the section of the AUTOEXEC.NCF file called #LOAD
GAMEVLOG.
#LOAD GAMEVLOG -f sys:\public\gamevlog.log
2. If necessary, delete the comment marker “#” from the command line to
enable event logging to a file:
LOAD GAMEVLOG -f sys:\public\gamevlog.log
3. The file shown (gamevlog.log) is the default file name for the GAM
event log. If you want to change this file name, replace “gamevlog”
with your desired log file name.
4. The file path shown (sys:\public\) is the default file path for the GAM
event log. If you want to change this path, replace “sys:\public\” with
your desired file path name.
The log file will be saved to the appropriate directory.
Saving and Restarting
1. Save the .NCF file in your text editor.
2. Restart your system to start the GAM Server service and activate event
notification to the specified IP addresses or system names.
☛ Note
To start the event notification and/or logging without
restarting the system, type the command with the
parameters at the command prompt.
B-4
Global Array Manager Server Software Manual
GAMEVENT
Windows NT, Windows 2000, and Windows XP
Enabling Event Notification
To modify or add event notification to GAM clients, both local and remote,
edit the GAMEVENT command line in the GAMSCM.INI file.
1. Open the GAMSCM.INI configuration file in a text editor.
2. Navigate to the section of the configuration file called GAMEVENT.
gamevent.exe -h host1 -h host2
3. Replace host1 and host2 with a desired IP address or system name.
For example:
gamevent.exe -h 192.9.11.246 -h host1
where: -h <address> sets address as a receiver of events.
Address may be an IP address or a network system name.
Some systems may already be identified in the GAMEVENT
command line, either because they were previously identified in your
existing GAMSCM.INI file, or because they were automatically
registered when you entered IP addresses or system names during
GAM Server installation.
4. Additional entries require that you extend the command line. Type -h
then an IP address or system name, separated by one space, for each
additional entry you need. Additional entries will be read by the system
as a continuous string of addresses. Correct spacing is important to
avoid confusion of the server names.
☛ Note
The argument list is limited to 1028 bytes, allowing a
practical maximum of about 50 event notification
addresses and provides space for additional addresses.
5. Delete the comment marker "#" from the command line to enable event
notification:
gamevent.exe -h 192.9.11.246 -h host1
Manual No. SA67-0048-01
G
A
M
E
V
T
B-5
Windows NT, Windows 2000, and Windows XP
Enabling a GAM Event Log File
1. Navigate to the section of the GAMSCM.INI file called GAMEVENT
LOG.
#gamevlog.exe -f .\gamserv\gamevlog.log -s 0
2. If necessary, delete the comment marker "#" from the command line to
enable event logging to a file:
gamevlog.exe -f .\gamserv\gamevlog.log -s 0
3. The file shown (gamevlog.log) is the default file name for the GAM
event log. If you want to change this file name, replace “gamevlog”
with your desired log file name.
4. The file path shown (.\gamserv\) is the default file path for the GAM
event log. If you want to change this path, replace “.\gamserv\” with
your desired file path name.
The log file will be saved to the appropriate directory.
Saving and Restarting
1. Save the .INI file in your text editor.
2. Restart your system to start the GAM Server service and activate event
notification to the specified IP addresses or system names.
B-6
Global Array Manager Server Software Manual
GAMEVENT
GAMEVENT LOG Options
The server sends event activity (EVENT LOG) to other hosts computers,
which can be another server or a client system. Events can be written to a file
and/or to your local terminal screen. There are two options associated with
the GAMEVENT LOG, -f and -s.
Usage:
-f File : : Sets the event log file name
Note: The event log file will be created in the following directory:
%SystemRoot%\system32\gamserv
☛ Note
Option -s is valid for only Windows NT and
Windows 2000. This setting will send the events to
the NT/2000 Windows Event Viewer Application
Log.
-s
Value : : Sets the Severity Level to report.
Value 0 = Critical
1 = Serious
2 = Error
3 = Warning
4 = Information
Note: If a parameter is not specified, no information will be reported.
gamevlog.exe -f .\gamserv\gamevlog.log -s
G
A
M
E
V
T
Manual No. SA67-0048-01
B-7
UnixWare
UnixWare
Enabling Event Notification
To enable event notification to GAM clients, both local and remote, edit the
GAMEVENT command line in the S99GAM file.
1. Open the S99GAM configuration file in a text editor.
2. Navigate to the section of the configuration file called GAMEVENT.
#gamevent -h host1 -h host2 -h host3 &
3. Replace host1, host2, and host3 with a desired system name or
IP address.
For example:
#gamevent -h 10.97.49.189 -h 10.97.49.190
-h fabd_test
where: -h <address> sets address as a receiver of events.
Address may be an IP address or a network system name.
4. Additional entries require that you extend the command line. Type -h
then an IP address or system name, separated by one space, for each
additional entry you need. The system will read additional entries as a
continuous string of addresses. Correct spacing is important to avoid
confusion of the server names.
☛ Note
The argument list is limited to 1028 bytes, allowing a
practical maximum of about 50 event notification
addresses and provides space for additional addresses.
5. Delete the comment marker "#" from the command line to enable event
notification:
gamevent -h 10.97.49.189 -h 10.97.49.190
-h fabd_test
B-8
Global Array Manager Server Software Manual
GAMEVENT
Enabling a GAM Event Log File
1. Navigate to the section of the S99GAM file called GAMEVENT LOG.
#gamevlog -f $EVENTLOGFILE &
2. If necessary, delete the comment marker "#" from the command line to
enable event logging to a file:
gamevlog -f $EVENTLOGFILE &
Saving and Restarting
1. Save the modified S99GAM file and exit.
2. Reboot the system using the following command from the root
directory (match case exactly as shown):
shutdown -y -i6 -g0 ↵
G
A
M
E
V
T
Manual No. SA67-0048-01
B-9
Solaris
Solaris
Enabling Event Notification
To enable event notification to GAM clients, both local and remote, edit the
GAMEVENT command line in the S99GAM file.
1. Open the S99GAM configuration file in a text editor using vi.
2. Navigate to the section of the configuration file called GAMEVENT.
#gamevent -h host1 -h host2 -h host3 &
3. Replace host1, host2, and host3 with a desired IP address or system
name.
For example:
#gamevent -h 10.97.49.189 -h 10.97.49.190
-h fabd_test
where: -h <address> sets address as a receiver of events.
Address may be an IP address or a network system name.
4. Additional entries require that you extend the command line. Type -h
then an IP address or system name, separated by one space, for each
additional entry you need. The system will read additional entries as a
continuous string of addresses. Correct spacing is important to avoid
confusion of the server names.
☛ Note
The argument list is limited to 1028 bytes, allowing a
practical maximum of about 50 event notification
addresses and provides space for additional addresses.
5. Delete the comment marker "#" from the command line to enable event
notification:
gamevent -h 10.97.49.189 -h 10.97.49.190
-h fabd_test
B-10
Global Array Manager Server Software Manual
GAMEVENT
Enabling a GAM Event Log File
1. Navigate to the section of the S99GAM file called GAMEVENT LOG.
#gamevlog -f $EVENTLOGFILE &
2. If necessary, delete the comment marker "#" from the command line to
enable event logging to a file:
gamevlog -f $EVENTLOGFILE &
Saving and Restarting
1. Save the modified S99GAM file and exit.
2. Reboot the system using the following command from the root
directory (match case exactly as shown):
shutdown -y -i6 -g0 ↵
G
A
M
E
V
T
Manual No. SA67-0048-01
B-11
Linux
Linux
Enabling Event Notification
To enable event notification to GAM clients, both local and remote, edit the
GAMEVENT command line in the Gam file to remove the initial comment
marker.
To enable the Event Comment Line, follow these steps:
1. Log in as root.
2. Stop the GAM Server, type:
/etc/rc.d/init.d/Gam stop
3. Using a text editor such as gnotebook+, open the Gam file located in
the following path:
/etc/rc.d/init.d/Gam
4. Navigate to the section of the file called GAMEVENT.
5. Near the bottom of this section you will see a command line such as the
following (the command line parameters may differ, especially if IP
addresses or node names were previously added):
#gamevent -h host1 -h host2 -h host3 &
6. Replace host1 and host2 with a desired IP address or DNS_NAME.
For example:
#gamevent -h 10.97.49.189 -h 10.97.49.190
-h fabd_test &
where: -h <address> sets address as a receiver of events.
Address may be an IP address or a network node name.
7. Additional entries require that you extend the command line. Type -h
then an IP address or node name, separated by one space, for each
additional entry you need. The system will read additional entries as a
continuous string of addresses. Correct spacing is important to avoid
confusion of the server names.
B-12
Global Array Manager Server Software Manual
GAMEVENT
☛ Note
The argument list is limited to 1028 bytes, allowing a
practical maximum of about 50 event notification
addresses and provides space for additional addresses.
8. Save the Gam file in your text editor.
9. Delete the comment marker "#" from the command line to enable event
notification:
gamevent -h 10.97.49.189 -h 10.97.49.190
-h fabd_test &
Enable GAM Event Logging
To enable event logging, follow these steps:
1. Navigate to the section of the file called GAMEVENT LOG.
#gamevlog -f $EVENTLOGFILE &
where: -f sets the event log file name
2. If necessary, delete the comment marker "#" from the command line to
enable event logging:
gamevlog -f $EVENTLOGFILE &
G
A
M
E
V
T
Manual No. SA67-0048-01
B-13
Linux
Saving and Restarting
1. Save the modified Gam file and exit.
2. Start the Global Array Manager Server Service and activate event
logging and notification to the specified IP addresses or node names:
/etc/rc.d/init.d/Gam start
B-14
Global Array Manager Server Software Manual
Appendix C
Creating a GAM Server
Installation Diskette
kette
Introduction
The Global Array Manager (GAM) Server Software package provides RAID
Management functions for your Mylex Disk Array Controller. You can
create your own GAM Server installation diskette from the RAID
Management Software Installation menu under Windows. See Table C-1 for
information about GAM Server Installation Diskettes.
When to Create a GAM Server Installation Diskette
Table C-1. GAM Server Installation Diskettes
Operating System
GAM Server Diskette Required?
Netware 4.2/5.1/6
NO. GAM Server installs from the CD-ROM.
See Chapter 2.
Windows NT 4.0
Windows 2000
Windows XP
NO. GAM Server installs from the CD-ROM
RAID Management Software Installation
menu (autorun). See Chapter 3 or Chapter 4.
UnixWare 7.x,
Solaris 7 x86, Solaris 8 x86
YES. Follow the instructions in this appendix
to create a GAM Server diskette.
Linux (all installations)
NO. GAM Server installs from the CD-ROM.
See Chapter 8.
D
I
S
K
Manual No. SA67-0048-01
C-1
Creating a GAM Server Software Installation Diskette
Creating a GAM Server Software Installation
Diskette
Create a GAM Server installation diskette in six easy steps:
1. Insert the CD-ROM provided in your Mylex package.
2. From the RAID Management Software Installation menu, click Create
Software Diskettes.
Figure C-1. RAID Management Software Installation Menu
C-2
Global Array Manager Server Software Manual
Creating a GAM Server Installation Diskette
3. Click Global Array Manager.
Figure C-2. Create Software Diskettes Menu
4. Click the appropriate operating system corresponding to the GAM
Server installation diskette you wish to create.
Figure C-3. Global Array Manager Menu
5. When the operating system has been selected, you will be prompted
with a DOS shell requesting that you insert a blank diskette.
D
I
S
K
Manual No. SA67-0048-01
C-3
Creating a GAM Server Software Installation Diskette
Figure C-4. DOS Shell
6. Insert the blank diskette and press Enter to extract the image onto the
diskette.
Use your newly created diskette to install your GAM Server. Refer to the
appropriate chapter in this manual.
C-4
Global Array Manager Server Software Manual
Appendix D
Installation of GAM Server for
Failover or Failback in MSCS
Preparation
When preparing to use Clustering on external products, you need to install
GAM Server to utilize the failover or failback in Microsoft Clustering
Service™ (MSCS). However, you must first complete the installation of
Windows NT 4.0, Windows 2000, or Windows XP on both servers.
Using Virtual Cluster IP Address
GAM Login fails when using the virtual cluster IP address. This is resolved
by starting GAM as a service instead of an application. The Global Array
Manager Server should be started as a generic service, and not a generic
application. An application does not have NT privileges to use Login call.
Installing GAM Server for Failover or Failback in
MSCS
To install GAM Server as a resource for failover or failback in MSCS, use
the following procedure.
1. Install GAM Server on both nodes.
2. Disable the GAM Server Services on both nodes.
3. Select Cluster Administrator and right-click Cluster Group.
4. Create a new resource under Cluster Group called GAM Service with
the following properties:
• Resource type: Generic Service
• Group: Cluster Group
• Possible Owners: “Both Nodes”
• Resource Dependencies: Cluster IP Address
• Service Name: gamscm
S
R
V
R
• Startup Parameters: leave blank
Manual No. SA67-0048-01
D-1
Installing GAM Server for Failover or Failback in MSCS
5. Bring the GAM Service resource online.
6. Go into GAM Client and the following configuration will be seen on
the virtual IP.
Figure D-1. GAM Configuration
☛ Note
Disk 1 and Disk 2 are connected to an external unit
not shown in this illustration.
D-2
Global Array Manager Server Software Manual