1
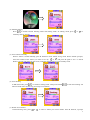
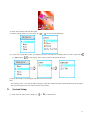
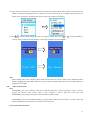
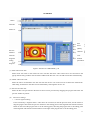
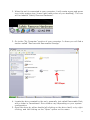
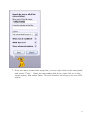
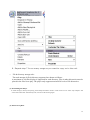
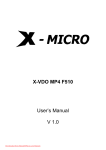
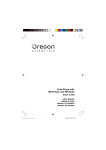
For the most up to date manual, please go to
www.machspeed.com/052manual.zip
User’s Manual
Contents
Preface
―――――――――――――――――――――――――――――――――――
Precautions―― ―――――――――――――――――――――――――――――――――
Function Profile――――――――――――――――――――――――――――――――
Appearance and Keys Description――――――――――――――――――――――――
Operations of Basic Functions ―――――――――――――――――――――――――
Charge and Precautions ――――――――――――――――――――――――――
Power On/Off ―――――――――――――――――――――――――――――――
Play Music―――――――――――――――――――――――――――――――――
Play Video――――――――――――――――――――――――――――――――
Photo Browse―――――――――――――――――――――――――――――
FM Radio―――――――――――――――――――――――――――――――――
Record―――――――――――――――――――――――――――――――――
E-Book――――――――――――――――――――――――――――――――――
Navigator――――――――――――――――――――――――――
System Setup―――――――――――――――――――――――――――――――――――――
Play Mode―――――――――――――――――――――――――――――――――――――
Settings of Sound Effect―――――――――――――――――――――――――――――――
Contrast
――――――――――――――――――――――――――――――――――――――
Display Time
――――――――――――――――――――――――――――――――――――
Auto Power-off
―――――――――――――――――――――――――――――――――――
Record Settings――――――――――――――――――――――――――――――――――
Lyric Switch ―――――――――――――――――――――――――――――――――――――
Language Selection――――――――――――――――――――――――――――――――――
Player Information―――――――――――――――――――――――――――――――――――
Exit ―――――――――――――――――――――――――――――――――――――――
Delete files――――――――――――――――――――――――――――――――――
Video Transfer Tools――――――――――――――――――――――――――――――
Computer
Communication―――――――――――――――――――――――――――――
Driver Setup and Description――――――――――――――――――――――――――
Connection to PC ―――――――――――――――――――――――――――――――――――
Upload/Save Data――――――――――――――――――――――――――――――――――
Format Player---------------------------------------------------------------------------------------------------------------Firmware Update-------------------------------------------------------------------------------------------1
Troubleshooting ―――――――――――――――――――――――――――――――
Specifications―――――――――――――――――――――――――――――――――
Preface
Congratulations on purchasing your Onyx digital media player! To get the most out of your purchase, please
take the time to carefully read through this manual.
If you have any remaining questions, comments, or concerns please feel free to contact Mach Speed technical
support at 580- 272-0035. Thank you for your support and cooperation!
We bear no responsibility for any damage or loss of personal data due to misuse of software and/or hardware,
damage to the player caused by human factors, replacement of battery or other unforeseen circumstances. To
prevent data loss, please backup your data regularly.
Information in the manual is subject to change without notice.
Information in the User’s Manual is subject to copyright protection. Without prior written permission,
photocopying or copying is prohibited.
Some of the pictures or functions described in this manual may not be the same as those included with your
player.
Precautions
• If you do not use your Onyx for an extended period of time, please switch it off.
• Avoid using your Onyx in extremely hot, cold, dusty or wet conditions.
• Avoid striking or dropping your Onyx, as it may cause physical damage, battery loosening, or other hardware
damage.
• Please charge the player under the following conditions:
o The battery icon shows
in normal operation with low battery prompt.
o The player turns off automatically.
o There is no response when pressing keys and the battery icon shows .
• Static electricity may cause damage to interior hardware of the player.
• Do not disconnect the player while formatting, uploading, or downloading files to the player, as it may cause
program errors, or cause the unit to not power on.
• When the player is used as a removable hard disk, user should store files following correct file management
methods. We are not liable for any data loss or damage.
2
Functions
·1.8-inch TFT full color LCD screen
·Supports music formats of *.MP3, and *.WMA
·Supports *.SMV movie format
·Supports photo browsing: .JPG and .BMP (24-bit limited)
·Stereo FM radio that can save up to 30 radio stations and can record & save radio programs
·Built-in high definition microphone
·Supports E-Book function to read text (*.TXT) files
·Support for ID3 tags and synchronic display of .LRC files
·Power off timer
·Multiple repeat and sound effect modes
·Supports A-B repeat of song/video/voice files.
·Easy file navigation
·USB2.0 (FS) port with top speed of 1000K Byte/S
·Support for on-line firmware updates
·Removable hard-disk which can be directly used as U-disk without installation of driver in
WIN2000 and above
·System requirements:
Pentium 400MHz CPU and above (or comparable); 64M memory and above; USB 2.0 port;
Compatible with WIN98SE, WINME, WIN2000 and WINXP operation systems.
3
Appearance and Keys Description
1. ON/OFF: Power switch.
2. PLAY: Turn on/off key, play, pause and file confirmation key.
3. MODE: Selection and confirmation of mode menu functions.
4. VOL: Volume adjustment, A-B repeat and single-key record.
5.
key: Selection of the previous file or menu.
key: Selection of the next file or menu.
6.
7. Screen: Picture display area of LCD.
8. MIC: Audio source port for built-in voice recording.
9. USB Port: USB connection
10. Earphone port: Jack for earphone line input and antenna for FM radio.
Basic Operation
I.
Charging and Precautions
(1) For optimal battery life, charge and discharge the battery at least once a month.
(2) The player can be charged either by computer USB or by the charger supplied with the player. Before
charging the player, please switch the power to ON. To extend the life of the battery, it is recommended
that you charge the player only after the battery is completely drained for the first three charges.
(3) When charging, the player will be powered on automatically and will display the charge status (the battery
icon changes continuously). When the battery is fully charged, the screen will display “Fully charged”.
(4) If using the supplied charger, the red and green lights on the charger will light up (red light is a power
indicator and green light is a charge indicator). and the green indicator light will go out.
(5) Please charge for 8-24 hours for the first 3 charges (this will activate the lithium ions and extend the life of
the player). Consequent charges should be conducted for 3-5 hours.
II. Power On/OFF
(1) If the power switch is in the OFF position, please switch it to ON.
(2) Press
while powered off to turn on the unit as shown below:
4
(3) Press
and hold while powered on and the following image will be displayed; press
and hold
until the progress bar is full and image appears to turn off.
Note:
1. There are 5 modes: Music, Photo Browse, Movie, Radio and E-Book. While on the Main Menu, if no buttons
are pressed, the unit will enter standby, and the screen will power down. Pressing any button will reactivate the
player.
2. Power-on memory function: If Powered off while in Music, Photo Browse, Movie, Radio, or E-Book mode,
the unit will re-enter that mode when it is powered back on (unless the ON/OFF switch is moved to OFF while
the unit is powered down)
3. If the unit freezes during operation, please move the ON/OFF switch to the OFF position for 10 seconds then
back to ON, and power the unit up.
4. When you power the player off using the ON/OFF switch, the player will not retain any settings adjustments
you have made. To retain settings adjustments, please power the player off using the PLAY button, and leave
the ON/OFF switch in the ON position.
III. Play Music
(1) In the main menu, select “MUSIC” by using
and
, the interface shown below will appear:
Press M to confirm to enter “MUSIC” mode. Press VOL while the music is stopped or paused to switch repeat
to play the current music. The
modes (Normal, Repeat one, Repeat All, Shuffle Repeat and Preview). Press
screen will display the following information: name and location of the current music, played time, total time of the
5
current music, play mode, sound effect, volume, music ID information and format of music as shown bellow. In
to pause and press it again to continue playing. Press
and hold for 3 seconds to stop
play mode, press
playing the current music.
NOTE: Lyric display requires corresponding lyric files (*.lrc) to be saved in the player.
(2) Music Selection
In music mode, press M to enter the navigation menu. Select the music you want to play by pressing
and press
or
to start playing the music you selected. Press VOL in the navigation menu to return to the parent
directory.
(3) Volume Adjustment
While music is playing, press and hold VOL to enter volume adjustment mode.
or
can be used to
decrease or increase volume between 0 and 31. Press VOL again to exit volume adjustment mode.
(4) Fast Forward / Rewind
or
In any audio playback mode, press
to fast forward or rewind the current music.
to skip to the next or previous music file. Press & hold
or
(5) A-B repeat
While the music is playing, press VOL to begin A-B repeat. The player will display “A-” and will set the start
point of the repeat. Press VOL again to select the end point, “B”, the player will display “A-B.” The player will
then repeat the music between A and B. Press VOL a third time to cancel the repeat.
6
(6) Single key Recording
While paused or stopped, press and hold VOL to enter voice recording mode. Press M to exit record mode.
(7) Press M and hold to exit Music mode and return to the main menu.
IV. Play Video
(1) From the main menu, press
or
to select “VIDEO” mode and press M to enter video playing mode.
(2) In video mode, press M to enter the video selection screen. Press
to play, and press
or
to select the video file you want
to start playing. Press VOL to return to the parent directory.
to rewind or fast forward and press
or
to switch
(3) In video playing mode, press & hold
or
between video files. Press VOL and a volume adjustment icon will appear and video playback will pause.
to decrease or increase volume, then press VOL to resume playback.
Press
or
(4) While playing, press
to pause and press again to continue. Press
and hold for 3 seconds to stop
playing.
(5) Press & hold MENU to return to the “VIDEO” main menu.
V. Photo Browsing
7
(1) In the main menu, select “PHOTO” by
or
as shown below:
(2) Press MENU to enter photo browsing mode. Press
or
to browse the previous or next photo.
(3) In photo browsing mode, press M to enter the photo selection list. Press
you want to view. Press
or
to select a photo file that
to view the selected photo. Press VOL to return to the parent directory.
(4) Press & hold MENU to return to the main menu.
(5) In photo browsing mode, press
to enter slideshow mode.
Note:
The player only supports photos in JPEG and BMP (24-bit) formats. If some photos are not properly displayed, it
may be caused by an unsupported format error. You can use photo editing software on a computer to save them
as *.jpg and continue to browse.
VI. FM Radio
(1) Before using the FM Radio, please insert the earphones first (the earphones act as the units antenna).
(2) From the main menu, select “RADIO” with
or
as shown below:
(3) Press M to enter Radio mode. If there are no radio stations saved in advance, the system will seek radio
stations first and save them. Once seeking is completed, press
or
to select one of the saved radio
stations to listen to.
8
(4) Manual Seeking
Press
to switch between listening mode and seeking mode. In seeking mode, press
or
to
manually seek for stations.
(5) Save stations manually
When a station is found manually, press & hold M to enter station saving mode. When “SAVE” prompts,
select the number of the station you want to save by
or
and press M again to save. A “Saved
Station” prompt will appear on the screen, indicating that the station is successfully saved.
(6) Auto Seeking
In FM radio mode, press
to switch to seeking mode. Then press & hold
to enter auto seeking. All
stations found will overwrite any previously saved stations.
(7) Delete saved stations
In FM listening state, press
or
to select a station you want to delete. Press & hold M, a prompt
9
“Deleted Station” will display on the screen, indicating that the station has been deleted successfully.
(8) Volume Adjustment
In FM listening mode, press VOL to enter volume adjustment. Adjust volume by
or
and press VOL
again to exit volume adjustment.
(9) Record an FM program
In FM listening mode, press & hold VOL to enter FM recording state. Press
to pause and press VOL/M
again to exit recording mode and the content recorded will be saved under the folder “FM” in “Video & music
navigator” automatically.
Enter “navigator” to play FM recordings. Its operation is the same as Music mode. See the detailed
description of Music mode operations.
(10) Press MENU to exit record mode and return to the main menu.
Note:
1. You can save up to 30 stations.
2. Auto saving of frequencies will overwrite previously saved stations.
3. Recorded FM program files should be saved in a sequence increasing by degrees as F001, F002… If the
storage is full, it will stop recording.
VII. Voice Recording
(1) In the main menu, select “RECORD” with
(2) Press M to enter voice record mode. Press
or
as shown below:
to begin recording and press
again to stop recording.
10
(3) Voice record files are saved under the “VOICE” folder automatically. Its operation is the same as Music mode.
See the detailed description of Music mode operations.
Note:
1. Voice record will generate record files in the sequence of V001, V002… in .WAV format.
2. If storage is full, it will stop recording.
3. You may press & hold VOL from any mode (except FM and Video Play modes) to begin voice recording.
4. Audio recording quality can be set to normal, medium and high.
VIII. E-Book
(1) From the main menu, select “E-BOOK” by
or
as shown below:
(2) Press M to enter E-Book browsing interface
(3) Page down/up by
or
to browse E-Book files.
(4) Press MENU to enter E-books selection list. Press VOL to return to the parent directory. Press & hold MENU
to return to the main menu.
Note: The player only supports the reading of .TXT files.
IX.
Navigator
(1) From the main menu, select “NAVIGATOR” by
or
as shown below:
11
(2) Press M to confirm and enter Navigator.
(3) Select a file or folder you want to play by
or
as shown in the following:
(4) If you want to play Movie files, you should press M to enter files list, select the file you want to play with
or
and press
to start playing. Press VOL to return to the parent directory.
(5) Press & hold M to exit Navigator and return to the main menu.
Note:
You can play music, voice record, FM record, play video files and browse photos and E-books through Navigator.
You can also find your favorite music and files conveniently.
X.
System Setup
(1) From the main menu, select “Setup” by
or
as shown below.
12
(2) Press M to enter setup. Press
or
to select item that you want to set, as follows:
to select “Play Mode”. Press M to enter its settings interface, in
o Play Mode: In Setup, press
or
which the following options are available: Normal, Repeat One, Repeat All, Shuffle Repeat, and Preview.
to select the play mode you like and press M to confirm and return to the parent menu.
Press
or
o
EQ: In Setup, press
or
to select “Eq”. Press M to enter settings list in which the following
options are available: Normal, Rock, Jazz, Classical, Pop and Bass. Select the desired equalizer setting
, then press M to confirm and return to the parent menu.
with
or
o
Display Time: In Setup, select “Display” with
or
. Press M to enter its settings list in which the
following options are available: 1 min, 2 mins, 5 mins and always. Select the desired time with
or
,
then press M to confirm and return to the parent menu.
13
Note:
Display time is set for power saving mode. If no keys are pressed during the display time you set, the system
will power off the display to save power. If you press any key, the screen will light reactivate.
. Press M to enter its settings list in which the
o Auto Power Off: In Setup, select “Power” with
or
following options are available: Disable, 1 min, 2 mins, 5 mins and 10 mins. Select the desired power-off
, then press M to confirm and return to the parent menu.
time with
or
Note:
If no keys are pressed during the power off time you set, the system will power off automatically.
o
Record Setting: In Setup, select “Record Setting” by
or
. Press M to enter its settings list in which
the following options are available: Source-Microphone; Sampling-Normal, Medium and High. Select the
. After making the desired changed, select “Exit” to return to the
parameter you need with
or
parent menu.
o
. Press M to enter its settings list in which the
Lyric Switch: In system setup, select “Lrc” with
or
, then press M to confirm
following options are available: Lrc OFF and Lrc ON. Select with
or
and return to the parent menu.
Note:
Lyrics will only be displayed for files which you have .LRC files for, regardless of whether the lyric switch is
set to ON or not.
o
Language Selection: In system setup, select “Languages” with
or
. Press M to enter its settings
14
list in which the following options are available: English, Spanish, Dutch, French, German, Italian, and
Portuguese. Select the desired language with
or
, then press M to confirm and return to the parent
menu.
o
. Press M to enter its display
Player Information: In system setup, select “About” with
or
interface in which the following information is available: Firmware Version, Free memory and Total
memory. Press M to confirm and return to the parent menu.
o
. Press M to confirm exit and return to the parent
Exit: In system setup, select “Exit” with
or
menu. You can also press & hold M to return to the main menu.
XI.
File Deletion
You cannot delete files from the MUSIC, VOICE, VIDEO or E-BOOK modes. You can only delete files in the
“DELETE” menu.
as shown below:
(1) From the main menu, select “DELETE” with
or
15
(2) Press M to enter the files list, and select the file or folder to be deleted. Press M to confirm your selection. If a
folder is selected, pressing M will enter its sub-files. If a file is selected, an “X” will appear before the name of
the file. Press M again to unmark the file. You can mark several files to be deleted.
(3) Press
and the prompt “Delete the files?” will appear. Select “Yes” with
or
and press MENU to
confirm. Once the files have been deleted, you will be prompted with “File Deleted!”
Note:
When deleting files in the computer, please make sure that that you use the safely remove hardware feature
before unplugging the USB cable, otherwise you may experience issues where the files are not fully deleted, or
programs are corrupted.
XII.
Video Transfer Tools
Note:
VIDEO2SMV_V41 only reformats video files. Relevant third party codecs and players must be used to
support the previous video format. Only if your computer is able to play the source files will
VIDEO2SMV_V41 be able to properly convert the files to .SMV format.
VIDEO2SMV_V41 is used without installing: Copy the folder “SMV Conversion Tool” to your PC. Enter the
folder and double-click video2smv.exe to run the conversion tool.
Conversion Tool Instructions:
16
OVERVIEW
Menu
Tool Bar
Files List
Size
Pixel
Quality
Preview
Window
Channel
Transfer
fragment
setting
User
defined
parameters
Progress
Figure 1 Interface of VIDEO2SMV_V41
(1) Add video source files
Select menu File>Add or click Add icon in the tool bar and select video source file to be converted in the
pop-up file browsing window. The file will be added to the files list. User can add several files simultaneously.
(2) Delete video source file
Select the files to be deleted in the files list and click Delete icon in the tool bar to delete the selected file.
Alternately, all the files in the files list can be deleted by selecting Edit>Delete All.
(3) Preview the video file
Select the file to be previewed in the files list and it can be previewed by dragging the progress bar below the
preview window by mouse.
(4)
Conversion settings
o Convert segment setting
If user needs only a fragment from a video file to be converted, In the file preview mode, use the mouse to
drag the progress bar below the preview window to the starting point of the fragment and click the selection
button on the left of the progress bar to set the starting point; then drag the progress bar to the ending point
of the fragment and click the selection button on the right of the progress bar to set the ending point
17
Selection of size
VIDEO2SMV_V41 provides two options: Full photo or Full screen. Full photo means that the size of
video file generated is consistent to the proportion of the size of video source file; Full screen means that the
size of video file generated is based on conversion of the source file by the pixel size. If size of the source
file is mot consistent to the proportion of pixel, transfer tools will intercept the source file.
o Selection of pixel size
User selects pixel matrix of the file to be transferred according to pixel of player screen, such as 128x128 or
160x128.
o Display quality setting
VIDEO2SMV_V41 provides four options for display quality: 200MB/Hour, 128MB/Hour, 83MB/Hour
and Customize. The larger the quantity is, the higher is the quality with even clearer video display.
o Selection of user defined parameters
When the user selects self-defined display quality, he can make some further settings to the relevant
parameters of video files, such as single/dual channel selection, audio quality selection, video quality
selection and frame rate frequency. In addition, you can rotate the source file with corresponding angle.
o
(5) Transfer
Select menu File>Convert or click Convert icon in the tool bar to start converting. While converting, the icon
Convert will change to Stop. Progress of the conversion is available in the conversion progress bar below the
window. Once the Conversion is completed, the “√”mark for the converting object in the files list will
disappear and the file is saved to the directory set for saving.
(6) Stop transfer
During the conversion process, the user can force the current conversion to stop by selecting menu File-
>Stop or click icon Stop in the tool bar without saving the file.
(7) Exit transfer tools
Select File>Exit or click “Close” button in the window to exit transfer tools.
Computer Setup
(1) Driver Setup and Description
Note: Systems with OS earlier than Windows 2000 must install the player driver to use the player. Systems
above WIN200 do not need the driver. Before setting the driver up, do not connect the player to the PC.
Please place the drive CD supplied into CD-ROM. Run file “SETUP.EXE” in “Driver&update Tools” and a
dialog box will appear:
Click “Next” and a license agreement will appear. Select “I agree” to continue setup.
Click “Next” a dialog box will appear for you to select an installation path. Select and click “Next”. Finally, a
prompt picture for setup completion will appear. Select “Finish” to restart the computer.
(2) Connecting to the PC
1. Connect the MP3 player to a working USB port.
18
2. When the unit is connected to your computer, it will create a gray and green
icon in the system tray (lower right hand corner of your desktop). The icon
will be labeled “Safely Remove Hardware”.
3. Go to the “My Computer” section of your computer. In there you will find a
section called “Devices with Removable Storage”
4. Locate the drive created by the unit, generally just called Removable Disk,
with a letter in Parenthesis. Drive letters vary depending on your system
configuration
5. Open the drive by either double left clicking on the drive itself, or by right
clicking, and left clicking on the “Open” option on the menu
19
6. Locate the music stored on your computer. Generally this is stored in the
“My Music” folder of your computer.
Tip:
If you are unable to locate the music on your computer, click on start, search,
files and folders, then search for *.MP3, *.WMA
20
7. Once you have located the song files, you can right click on the song itself,
and select “Copy”. Open the removable disk drive, right click on in the
empty space, and select Paste. This will transfer the song on to your MP3
player
21
8. Repeat step 7 for as many songs as you want to copy on to the unit.
o
File & directory storage rules
The total amount of file & directory supported are shown as follows:
A maximum of 200 files display is supported for each directory. Files in other directories must be
placed in the files list to play. The player only supports maximal 20 levels of file directories.
(3) Formatting the Player
To format the player directly and quickly, please backup information stored in it and connect it to PC. Enter “My Computer” and
select “Removable Disk” and format by FAT, as shown in the following figure:
(4) Firmware Update
22
1. Run Driver& update Tools \SETUP.EXE in CD and complete the installation following the installation
wizard (the same process as the driver setup).
Once installation has completed, click and run this program as follows:
2. Press and hold “PLAY” and connect the player to a USB port on the PC. The system will prompt to install
“Recovery Device” driver. We recommend selecting auto installation. Finally, click “Finish” as shown
below:
3. Wait until the version Number appears in “Current Firmware Version”, let go of the “PLAY” key you are
pressing, select “Format Data Area” and click “Start”. Once the update is completed, click “OK” to confirm
and finally click “Close” to close the window, as shown below:
23
Troubleshooting
Q:
A:
Q:
A:
Q:
A:
Why is the storage capacity displayed on my PC different from the listed value?
Software in the MP4 player takes up a small part of space in the memory. In addition, the systems adopted to
calculate memory capacity are different.
Why is my MP4 player slowing down?
Long term use of the MP4 player or frequent addition and deletion of files may cause fragments in the
interior flash memory (similar to fragments in hard disk) which will slow down the speed. Solution: Format
the player as shown above.
How to do when abnormities (such as freezing) occur in the MP4 player?
When MP4 player doesn’t work normally due to improper operation, you can switch the power to OFF, wait
for 10 seconds and restart by switching back to ON. Normal operation should resume.
Q: The player is not recording.
A: o You might be low on storage space. If this is the case, delete some files and try again.
o Backup important files on the player and format it, then try to record.
o Increase the volume and then try again.
o If battery power is low, please record after charging.
Q: Why can’t some files be played?
A: Files should be saved under the appropriate directories: Video files are saved in the “MVIDEO” folder, and
photo files are saved in the “PHOTO” folder. If files are placed in the wrong folder, then they will not be able
to be played. In addition, the file types you have added may not be in a compatible format, or they may be
DRM encrypted.
24
Specifications
Size
86mm×42mm×12mm (L×W×H|)
Weight
?
Screen
1.8-inch 26 ten thousand color LCD
Power Supply
Built-in 3.7V lithium battery
Memory
Flash memory:128 MB-2GB
Music Format
Support .MP3 and .WMA
MP3 Bit Rate
8Kbps -320Kbps,8KHz-48KHz
WMA Bit Rate
22Kbps-192Kbps,8KHz-48KHz
Lyric
Video Format
Support .LRC lyric display
Support .SMV
Photo Format
Support .JPG and .BMP(24-bit)
E-book Format
Support .TXT
Record Format
Support .WAV
FM Radio
Earphone Output
Power
Range of Output
Power
Signal/Noise Ratio
Language
(L)5mW+(R)5mW
20Hz~20KHz
85DB
English, Spain, Dutch, French, German, Italian and Portuguese
Temperature
System
Support 87.50-108.00MHz; can save 30 stations; FM record.
0-40℃
Support Windows98/SE/ME/2K/XP and Mac OS 10.
The User’s manual is subject to change without notice.
For the most up to date manual, please go to
www.machspeed.com/052manual.zip
25