1
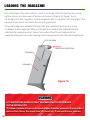
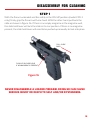
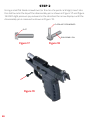
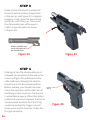
CPX-1 & CPX-2 SERIES
Instruction Manual
Important Note
Throughout this document, references to a manual safety apply only to the
model CPX-1. The CPX-2 is designed without a manual safety.
1
Important Safety Message
DO NOT OPERATE THIS FIREARM UNTIL YOU READ THE ENTIRE
INSTRUCTION MANUAL.
Introduction
This manual is designed to warn you about the dangers and responsibilities
associated with handling firearms. Do not attempt to load, unload or handle
this firearm until you have read and understand the contents of this manual.
The warnings in this manual must be followed for your safety as well as for
the safety of bystanders.
If after reading these instructions, you still do not understand the firearm
entirely, please consult with a firearms instructor for further instructions.
Danger
Never keep the firearm in the loaded condition when not in use.
warning
2
•
Always install the child-resistant lock on the firearm when not in use.
•
Never store your firearm in the loaded condition.
•
Always store ammunition in a separate place from where the firearm is
being stored.
•
Always store the firearm and key(s) out of reach of children.
•
Always keep your finger(s) out of the trigger area until you are ready to shoot.
•
Never point the firearm at anything you do not intend to shoot at.
•
Always be certain of the target you are shooting at and what is behind it.
A bullet can travel several miles before stopping.
•
Remember, firearm safety is the responsibility of the person handling the firearm.
contents
Introduction............................................... 2
Contents....................................................... 3
Misfire – Failure to
Feed or Eject....................................... 18
Adjusting the Rear Sight............... 18
Warning Messages.............................2-5
Legal Warning....................................... 5
Federal Law............................................ 5
Disassembly For Cleaning............... 19
Cleaning................................................ 22
Reassembly......................................... 23
Operating Instructions........................ 6
Component Names............................ 7
Basic Functions.................................... 8
Proper Grip Control....................... 12
Manual Safety.................................... 13
Removing the Magazine............... 13
Checking the Chamber................. 14
Slide Hold Open................................ 15
Ammunition........................................ 15
Loading the Magazine.................... 16
Preparing to Shoot.......................... 17
Firing...................................................... 17
Unloading the Firearm.................. 17
Child-Resistant Lock.......................... 25
Installing the Lock............................ 25
Storing and Transporting the Model CPX................................. 26
Limited Warranty................................ 27
Replacement Parts.............................. 28
Full Assembly..................................... 29
Frame Parts List................................ 30
Receiver Parts List........................... 31
Slide Parts List................................... 32
Glossary..................................................... 33
Limited warranty statement
The model CPX firearm has a lifetime warranty and is warranted to be free from
defects in material and workmanship.
SCCY Industries will not be responsible for any defects caused by careless handling,
unauthorized adjustment, modifications, improper ammunition, corrosion, neglect,
abuse, normal wear and tear or any unreasonable use. In the event your firearm
requires service beyond the warranty due to neglect or improper use, SCCY Industries
will contact you and give you an estimate of charges before any work is performed. Any
charges must be paid-in-full before the firearm is shipped back to you.
Any such defects will be remedied by SCCY Industries, pending SCCY Industries
inspection of the entire firearm. Service due to defects in material and/or workmanship
will be free of charge. Contact the factory at 866-729-7599 and speak with the service
department before shipping your firearm.
3
DANGER
Children are attracted to and can operate firearms that can cause severe
injuries or death. Prevent child access by always keeping firearms locked away
and unloaded when not in use. If you keep a loaded firearm where a child
obtains and improperly uses it, you may be fined or sent to prison.
ADVERTENCIA
A los niños los atraen las armas de fuego y las pueden hacer funcionar. Ellos
pueden causarse lesions graves y la muerte. Evité que los niños tengan acseso
a las armas de fuego guardandolas siempre con llave y descargadas cuando
no las este útilizando. Si usted tiene una arma de fuego cargada en un hogar
en que un niño tiene acseso a ella y la use indebidamente, le pueden dar una
multa o enviarló a la carcel.
WARNING
• Failure to read, understand and follow the instructions and warnings accompanying this product may lead to serious bodily injury or death.
•
INSTALLING AN EMPTY MAGAZINE INTO THE FIREARM AND PULLING THE TRIGGER WILL DISCHARGE A CARTRIDGE LEFT IN THE CHAMBER. ALWAYS CHECK AND MAKE SURE THE CHAMBER IS EMPTY WHEN HANDLING A FIREARM.
• Never carry a firearm in a loaded condition with the safety in the off position unless you are ready to fire it.
• Always make sure the firearm is unloaded before disassembly can be performed.
• Never point a firearm at anything you do not intend to shoot. If you do so, and the firearm discharges, injury, death or property damage may occur.
• Always install the child-resistant lock when the firearm is not in use.
• Never handle any firearm that is loaded or unloaded when alcohol or drugs have been consumed. • This firearm will discharge without a magazine installed.
4
WARNING
When using this firearm always WEAR EYE and EAR PROTECTION. This
applies to both the shooter and bystanders.
Keep the manual safety in the safe position (UP, CPX-1 only) until you are
ready to shoot. See page 11 for further instruction.
NEVER put your finger(s) on the trigger or in the trigger guard area until you
are ready to shoot.
NEVER continue to discharge your firearm if it fails to operate properly.
NEVER leave a loaded firearm unattended. Someone may discharge the
firearm and cause injury, death and/or property damage.
NEVER take anyone’s word that a firearm is unloaded and/or safety is in the
safe position (UP, CPX-1 only). Check the firearm’s condition yourself.
Be sure of your target. Be sure the area behind the target is clear before
discharging your firearm. A bullet can travel several miles. IF YOU ARE NOT
SURE, DO NOT SHOOT.
Always check the barrel for obstructions or blockages before you shoot your
firearm (make sure firearm is unloaded before doing so). Any obstruction, no
matter how small, could cause serious damage to the firearm and/or injury or
death to shooter or bystanders.
No safety feature can replace proper firearms training, safe gun handling
practices and common sense! When handling this or any firearm, always point
the firearm in a safe direction. And always handle this or any other firearm as
if it were loaded.
LEGAL WARNING
In most jurisdictions, it is illegal for a person under the age of 18 to possess
and/or operate a firearm unless under the direct supervision of an adult. The
adult owner of this firearm must ensure that no minors handle this firearm
without his/hers direct supervision. In some states you may be fined and/or
sent to prison.
FEDERAL LAW
It is unlawful to sell a handgun to any person less than 21 years of age. Doing so can result in fines and/or imprisonment.
5
OPERATING INSTRUCTIONS
SCCY Industries strongly urges you to review the following procedures. Follow
them carefully to learn the basic functions and handling characteristics of your
new firearm. It is strongly recommended that you retain these instructions
for future reference. If you transfer ownership of this firearm, this instruction
manual must be included.
Do not load the firearm until you have read all operating instructions at least one
time. If the firearm is loaded, do not attempt to unload the firearm until you have
read these instructions (see page 17, Unloading the Firearm). Throughout
the following procedures, always point your firearm in a safe direction. Keep your
finger(s) off the trigger and out of the trigger guard area. Grasp and hold the
firearm firmly (see page 12, Proper Grip Control). Remove the magazine
and check the chamber to make certain the firearm is unloaded.
You or anyone you permit to handle this firearm must review and understand
the entire instruction manual before handling the firearm. After reading the
entire instruction manual, read through it again, this time examining the firearm
in an unloaded condition to acquaint yourself with the features described in this
manual. If, after reviewing these instructions and examining the firearm, you are
unsure of how to safely operate the firearm, contact a certified firearm safety
instructor for further instruction.
When discharging your firearm, you and bystanders should wear eye and ear
protection at all times.
NOTE:
Manual Safety feature and associated information
are only applicable to model CPX-1.
6
COMPONENT NAMES
Slide
Front Sight
Disassembly pin
Slide hold lever
serrations
Left safety
lever (CPX-1)
Grip area
Magazine
Release
Frame
Magazine Base
Rear sight
Extractor
Barrel
serrations
Right safety
lever (CPX-1)
Grip area
Trigger guard
area
Trigger
Magazine base
7
Basic Functions
This section will describe the basic functions of the model CPX firearm. As shown
in Figure 1, the firearm is in the ready to shoot configuration.
The Model CPX utilizes a Double Action Only (DAO) firing mechanism and will
be explained in further detail throughout this section.
CARTRIDGE IN CHAMBER
HAMMER
TRIGGER FORWARD
Figure 1
STEP 1
The first half of the (DAO) double action firing mechanism is when the trigger is
pulled and the trigger bar engages the hammer and pulls it back to the cocked
position as shown in Figure 2.
The hammer can not remain in the cocked position, due to its design.
It automatically releases, once reaching its fully cocked position.
HAMMER COCKED
TRIGGER PULLED
Figure 2
8
STEP 2
The second half of the (DAO) double action firing mechanism is when the
hammer snaps forward contacting the firing pin, causing it to strike the primer
area of the cartridge as shown in Figure 3.
The primer ignites the gun powder in the cartridge. The ignited powder is turned
into expanding gases, forcing the bullet out of the barrel. As the bullet moves
through the barrel’s bore, it engages the rifling, thus causing it to spin. The
spinning motion of a bullet allows it to travel to the point of impact with a higher
degree of accuracy.
FIRING PIN STRIKES PRIMER
Figure 3
9
STEP 3
The expanding gases also push the empty case back, causing the slide to move
back as shown in Figure 4. The shooter will now experience perceived recoil.
As the slide is moved back, the empty cartridge is held and carried back by the
extractor (see part number: 01-012, extractor on page 32). When the slide
reaches its fully recoiled position, the empty cartridge makes contact with the
ejector (see part number: 01-032, ejector on page 31). The combining forces
between the empty cartridge being held by the extractor and being pushed by
the ejector force the empty cartridge out of the slide’s ejection port.
EJECTED CARTRIDGE
Figure 4
10
STEP 4
The slide is moved forward by spring forces generated through the recoil
spring sub assembly (see part number: 01-056, Recoil Spring Sub Assembly
on page 32).
As the slide moves forward, it picks up another cartridge from the magazine
and feeds it into the chamber as shown in Figure 5.
Once the slide reaches its fully forward position, the barrel locks up to the slide
as shown in Figure 1 on page 6 and the firearm is ready to be discharged again.
This cycle can be repeated until the magazine is emptied.
CARTRIDGE BEING FED INTO CHAMBER
RECOIL SPRING SUB ASSEMBLY
Figure 5
11
PROPER GRIP CONTROL
When preparing to shoot the firearm, firmly grasp the “grip area” of the firearm
as shown in Figure 6.
To pull the slide back, firmly grasp the firearm’s “grip area” with one hand. With
the other hand, firmly grip the “slide serrations area” and smoothly pull the slide
back as shown in Figure 7.
Figure 6
Danger
The finger(s) must remain clear of the trigger guard area until ready to
discharge the firearm.
Figure 7
12
MANUAL SAFETY ( Model CPX-1 Only )
The manual safety (found on CPX-1 only) is located on both the right and left
side (ambidextrous) of the grip area and should ALWAYS be placed in the “SAFE”
position until ready to fire. The safety rotates up and down between the “SAFE”
and “FIRE” position. See Figure 8, safety shown in “SAFE” position. See Figure 9,
safety shown in “FIRE” position.
Figure 9
Figure 8
REMOVING THE MAGAZINE
With the safety in the safe position, press
the magazine release button, as shown in
Figure 10, while maintaining a firm grip on
the firearm. The magazine will drop freely
from the magazine well. Do not allow the
magazine to fall on the ground.
To insert a magazine into the firearm, align it
with the magazine well and firmly slide it until
it locks into place. Do not force the magazine
into the magazine well or strike the magazine
base to seat the magazine. Doing so may
cause damage to the magazine.
MAGAZINE RELEASE
Figure 10
The magazine release procedure can be
done either in the slide hold position as shown,
or with the slide forward and locked.
REMOVING THE MAGAZINE DOES NOT REMOVE A CARTRIDGE FROM THE
CHAMBER.THIS FIREARM WILL DISCHARGE WITHOUT A MAGAZINE INSTALLED.
Manual Safety feature and Associated information
are only applicable to model CPX-1.
13
CHECKING CHAMBER FOR AMMUNITION
To view inside the chamber, place safety in safe position (model CPX-1 only),
remove the magazine, and then pull back the slide (approximately 1 inch) see
Figure 11. While doing so, always have your finger(s) clear of the trigger area.
Visually inspect inside the chamber and magazine area to see if a cartridge
is present. If a cartridge is present, your firearm is ready to be discharged/fired. If
you do not intend to shoot at this time, you should unload your firearm including
the cartridge in the chamber. Refer to page 15, Unloading Your Firearm.
CHAMBER AREA
TRIGGER AREA
Figure 11
Danger
ALWAYS CHECK THE CHAMBER
Never assume a firearm is unloaded when placing an empty magazine into the
firearm. Installing an empty magazine into the firearm and pulling the trigger
will discharge a cartridge in the chamber. This firearm will discharge without a magazine installed.
14
SLIDE HOLD OPEN
After firing the last cartridge, the slide will remain open see Figure 12. This
allows the operator to visually check the chamber and magazine area to make
certain the firearm is empty.
If you intend to reload the firearm, replace the empty magazine with a full one.
Firmly hold the firearm by the grip area, press down on the slide hold open lever.
This will allow the slide to return to its forward, locked position while feeding a
cartridge into the chamber. The firearm is now ready to be discharged.
SLIDE HOLD ENGAGED
Figure 12
AMMUNITION
figure 13
Figure 13
The model CPX is designed for 9mm LUGER ammunition only, seen
in Figure 13. The caliber is marked on the barrel and the cartridge.
Make certain 9mm LUGER is used only. The use of improper size
ammunition will cause damage to the firearm and/or injury or death
to shooter and/or bystanders. It is highly recommended that top
quality factory manufactured ammunition be used only. The use
of reloaded or military surplus ammunition can cause jamming
problems and possible serious injury to shooter and bystanders.
Never use ammunition that is wet, corroded, dirty, bent, crushed,
or is otherwise damaged.
15
LOADING THE MAGAZINE
Use the proper size ammunition. Insert a cartridge into the feed lip area using
light pressure in a downward fashion as shown in Figure14. Never force
cartridges into the magazine. As the magazine fills to capacity (10 cartridges), the
amount of pressure increases due to spring preload.
When cartridges are visible at the top hole, this indicates there are 5 or more
cartridges in the magazine. When cartridges are visible at the bottom hole this
indicates the magazine is full. Never force more than 10 cartridges into the
magazine. Doing so can cause damage to the magazine and its internal components.
FEED LIP AREA
LOAD IN THIS DIRECTION
5 ROUNDS
9 ROUNDS
Figure 14
warning
+P Cartridges should only be used on a limited basis
in the model CPX.
This type of ammunition creates much higher chamber pressures than standard
ammunition. Never fire more than 50 rounds of +P ammunition per session.
16
PREPARING TO SHOOT
Always point the firearm in a safe direction. Any and all firearms are dangerous if
not handled properly. Always wear proper eye and ear protection.
Lock slide BEFORE inserting loaded magazine. With the firearm pointed in a safe
direction, insert a loaded magazine into the magazine well until it locks into place.
Pull the slide back and lock it with the slide hold lever. Release the slide hold
lever when ready to feed a cartridge from the magazine into the chamber. When
ready to discharge the firearm, rotate the safety lever to the “FIRE” position.
IMPORTANT NOTE: Since the CPX-2 lacks a manual safety, it is ready to fire as soon as a cartridge is fed into the chamber!
If the firearm is in the slide hold position, insert a full magazine. Press the slide
hold lever to release the side. Once you press the lever, let the slide close
unassisted; do not grip or touch the slide as it travels forward. This will feed a
cartridge from the magazine into the chamber. The firearm is now loaded and
ready to be discharged.
FIRING
Firmly grasp the firearm, point the firearm at the target and carefully pull the trigger.
The firearm will discharge, and automatically feed the next cartridge from the
magazine into the chamber. The firearm is now ready to be fired again. Each time the
trigger is pulled, the firearm will discharge until all cartridges in the magazine and
chamber have been fired. When the last cartridge has been discharged, the slide hold
lever will cause the slide to remain in its rearward position.
UNLOADING THE FIREARM
Place the safety in the safe position (model CPX-1 only). Point the firearm in a safe
direction while keeping finger(s) off the trigger and out of the trigger-guard area. First
remove the magazine. Pull and hold the slide rearward, the cartridge in the chamber
will eject through the ejection port. Inspect to make certain no cartridge is present in
the chamber.
REMOVING THE MAGAZINE DOES NOT REMOVE A CARTRIDGE FROM THE
CHAMBER.THIS FIREARM WILL DISCHARGE WITHOUT A MAGAZINE INSTALLED.
manual Safety feature and associated information
are only applicable to model CPX-1.
17
MISFIRE – FAILURE TO FEED OR EJECT
Keep the firearm pointed at the target for no less than 30 seconds. This will allow
adequate time for a delayed cartridge to fire. Unload the firearm following the
UNLOADING THE FIREARM procedure on page 17. Remember to remove the
magazine from the firearm before ejecting the chambered cartridge.
Occasionally a semi-automatic firearm may fail to feed or eject a cartridge. If this
should happen, perform the following procedures:
• Keep fingers off of the trigger!
• Keep the firearm pointed in a safe direction during this entire procedure!
• Remove the magazine.
• Pull the slide rearward and remove any cartridge that is present in the chamber area.
• Inspect the cartridge that failed to feed or eject for dent or any other defects. A defective cartridge should be discarded and not used.
• Inspect the remaining cartridges in the magazine before continuing to discharge the firearm.
If failure to feed or eject continues, the firearm may require cleaning and oiling (see
page 20). If the problem continues, please contact a local gunsmith or SCCY Industries.
ADJUSTING THE REAR SIGHT
SIGHT
ADJUST
SCREW
Using a 1/16” allen wrench, loosen (counterclockwise)
the set screw located in the rear sight as shown in
Figure 15. Then, slide the rear sight to its desired
location and tighten the set screw (clockwise). MAKE
SURE FIREARM IS UNLOADED.
To move the point of impact to the left, move the rear
sight to the left. To move the point of impact to the
right, move the rear sight to the right. Make small
gradual adjustments until the firearm is sighted in.
WINDAGE
Figure 15
18
The model CPX’s sighting system is for windage
adjustments only (left or right). The Front Sight is
permanently mounted and cannot be adjusted.
DISASSEMBLY FOR CLEANING
STEP 1
With the firearm unloaded and the safety in the ON/UP position (model CPX-1
only), firmly grip the firearm with one hand. With the other hand, pull back the
slide as shown in Figure 16. If there is an empty magazine in the magazine well,
the slide hold lever will lock the slide in its rear position. If there is no magazine
present, the slide hold lever will need to be pushed up manually to lock into place.
PULL SLIDE
BACK
PUSH UP ON SLIDE HOLD
IF NO MAGAZINE IS PRESENT
Figure 16
NEVER DISASSEMBLE A LOADED FIREARM. DOING SO CAN CAUSE
SERIOUS INJURY OR DEATH TO SELF AND/OR BYSTANDERS.
19
STEP 2
Using a small flat blade screwdriver (or the rim of a spent cartridge), insert into
the slot found in the top of the disassembly pin as shown in Figure 17 and Figure
18. With light pressure pry outward in the direction the arrow displays until the
disassembly pin is removed as shown in Figure 19.
FLATBLADE SCREWDRIVER
SLOT
DISASSEMBLY PIN
Figure 17
Figure 19
20
Figure 18
STEP 3
Move the slide forward. It should now move freely off the receiver as shown
in Figure 20.
For further disassembly, refer to the subassembly exploded views on pages
29 through 32.
Figure 20
21
CLEANING AND OILING
To ensure proper operation of the firearm, it is necessary to keep the firearm’s
internal components clean and lubricated. After completing the disassembly
procedure (steps 1 through 3), the firearm is now ready for cleaning.
Normal cleaning is easily accomplished by using common gun cleaning fluids,
either liquid or aerosol, to remove any gun powder residue. Do not use any
water-based household cleaning products such as detergents; they can
cause corrosion.
Apply a light coat of gun oil to all internal surfaces, excluding the firing pin hole.
This allows a smoother operation while protecting the firearm from corrosion.
The slide, barrel and recoil spring subassembly can be separated for cleaning
(see page 32, slide parts list).
Clean the gun powder residue from the top of the receiver area and apply a light
coat of oil to the top of the receiver and hammer area. Also, apply a light coat of oil
to the inside of the feed lip area of the magazine, allowing oil to coat the inside of
the magazine body. Any further disassembly is not necessary under normal usage.
22
REASSEMBLY
STEP 1
Assemble the barrel, slide and recoil subassembly, making certain that the recoil
subassembly is seated properly. Note: the smallest end of the recoil spring
subassembly is placed In the hole on the front of the slide. The large end is
seated on the barrel lug.
Point firearm downward and align the slide with rails on the receiver, slide into place
as shown in Figure 21. There should be no magazine present during this process.
RAIL AREA ON RECEIVER
Figure 21
MAKE CERTAIN THERE IS NO CARTRIDGE IN THE CHAMBER DURING REASSEMBLY.
STEP 2
Push the slide all the way back while manually applying upward pressure on the slide
hold lever until it engages and holds the slide into place as shown in Figure 22. It is
normal to feel pressure; this is due to compressing the recoil spring subassembly.
SLIDE HOLD ENGAGED
LINE UP BARREL TO
RECEIVER
Figure 22
23
STEP 3
Make certain the barrel is pulled full
forward and the kidney-shaped hole
in the barrel, see Figure 23, is aligned
properly. If not, move the barrel back
and forth until it lines up. Then, push
the disassembly pin all the way in
until it snaps into place as shown
in Figure 24.
KIDNEY–SHAPED HOLE
ALIGN THIS AREA WITH
HOLE IN RECEIVER
Figure 23
Figure 24
STEP 4
Making certain the disassembly pin is
snapped into location (all the way in) as
shown in Figure 25; pull down on the
slide hold lever, allowing the slide to
move forward to the locked position.
Before loading, you should manually
check the operation of the slide, barrel
and firing system to ensure the firearm
is assembled properly. When the slide is
pulled rearward and released, the barrel
should unlock and lock. Test the firing
system by pulling the trigger several
times, ensuring the hammer strikes the
firing pin properly.
24
PUSH ALL THE
WAY IN
Figure 25
CHILD-RESISTANT LOCK
The model CPX is supplied with a
custom–fitted, child-resistant trigger
guard lock, as shown in Figure 26,
designed specifically for the model CPX.
In addition, the lock is supplied with 2
keys. NEVER INSTALL THE LOCK ON A
LOADED FIREARM.
LOCK
SHOWN
OPEN
The trigger guard lock should always
Figure 26
be installed on the firearm when the
firearm is not in use. (Also, see storing and transporting the model
CPX on page 26.)
Should the trigger guard lock become damaged or lost, SCCY Industries will
replace it for just shipping and handling charges. Some states require that all
firearms be locked when the firearm is not in use.
When the lock is in the open position, the key stays with the lock and cannot be
removed. The trigger guard lock can be installed on the firearm with or without
the magazine present.
INSTALLING THE TRIGGER GUARD LOCK
STEP 1
FIT TRIGGER BETWEEN
THESE 2 AREAS
With the safety in SAFE
position (model CPX-1 only)
and the trigger lock in the
open position, place the back
half of the lock on the trigger
guard as shown in Figure 27.
Make certain the trigger fits
between the two housings.
Figure 27
25
STEP 2
While firmly holding the firearm and back of the lock with one hand, use the free
hand to swing the front of the lock closed. The two halves of the lock should now
be mated securely around the firearm’s trigger guard as shown in Figure 28.
Figure 28
STEP 3
While firmly holding the two lock halves closed with one hand, use the free hand to
turn the key clockwise (right) to the lock position. Now the key can be removed.
STORE KEY(S) OUT OF REACH OF CHILDREN.
STORING AND TRANSPORTING THE MODEL CPX
Do not discard the box the CPX was purchased in. It is specifically designed to
store the firearm with the lock installed along with the spare magazine. Always
store your firearm with the child-resistant lock installed. Keep the firearm and
keys in separate places out of reach of children. Never store your firearm and
spare magazine loaded. Never store ammunition with a firearm. Always store
firearms and ammunition in separate places.
Prior to transporting your firearm, make certain it is unloaded (see page 17,
Unloading the Firearm). Contact your local law enforcement official for
approved methods of firearms transportation. It is unlawful to ship a firearm
to anyone other than the manufacturer or from dealer to dealer. If you require
shipping your firearm, make certain to log the firearm’s serial number.
26
LIMITED WARRANTY STATEMENT
The model CPX firearm is warranted to be free from defect(s) in material and
workmanship for a lifetime from the date of purchase.
Any such defects will be remedied by SCCY Industries, pending SCCY Industries
inspection of the entire firearm. Service due to defect(s) within the terms of the
warranty will be free of charge. Contact the factory at 866-729-7599 and speak
with the service department before shipping your firearm for service.
SCCY Industries will not be responsible for any defect(s) caused by careless
handling, unauthorized adjustment, modifications, improper ammunition,
corrosion, neglect, abuse, normal wear and tear, or any unreasonable use. In
the event that your firearm requires service beyond the warranty terms, SCCY
Industries will contact you and give you an estimate of charges before any work
is performed. Any charges must be paid-in-full before the firearm is shipped back
to you.
To ensure a quick turn-around, enclose a note stating the problem you
are experiencing with your firearm. Be sure to include the firearm’s return
address and contact telephone number. All firearm shipments must be
received by and signed by an adult. To expedite questions regarding the
status of your firearm while being serviced, please record the firearm’s serial
number and refer to it while speaking to the service technician.
All returned firearms shipped back to their owner must be received by and
signed by an adult (21 years of age or older) or the shipment will be returned.
27
REPLACEMENT PARTS
Should your model CPX require service or maintenance, contact:
SCCY Industries
1800 Concept Court
Daytona Beach, FL 32114
Call Toll Free: 866-729-7599
Business hours are 8:30am to 5:00pm, Monday through Friday, EST
Refer to pages 29 through 32 for individual part numbers.
• Please be advised that the receiver (part number: 01-007) must be
replaced by the factory only. Return of the entire firearm is mandatory.
• Individual parts for magazines are not available; magazines are only sold as full assemblies.
RECORD AND STORE THE MODEL CPX SERIAL NUMBER, KEEP
IN A SAFE PLACE BEFORE SHIPPING BACK TO THE FACTORY.
28
FULL ASSEMBLY
FRAME PIN (2)
01-030 $3.00
DISASSEMBLY PIN
01-037 $7.00
01-030
01-037
01-030
Please consult factory or check SCCY.com
to confirm current pricing before ordering.
29
FRAME PARTS LIST
FRAME
01-008$15.00
MAGAZINE RELEASE
01-013$5.00
END CAP PIN
01-023$1.00
END CAP
01-033$3.00
MAGAZINE RELEASE SPRING
01-034$2.00
01-034
01-008
01-013
01-033
01-023
30
RECEIVER PARTS LIST
RECEIVER
TRIGGER TRIGGER BAR
PLUNGER SPRING
TRIGGER SPRING
TRIGGER CAM
HAMMER
HAMMER SPING PIN
HAMMER AXIS PIN
HAMMER SPRING
SLIDE HOLD SPRING
EJECTOR PIN EJECTOR SLIDE HOLD
SAFETY LEVER RIGHT
SAFETY LEVER LEFT
PLUNGER SAFETY LEVER SCREW
01-007CALL
01-010
$5.00
01-014$5.00
01-015$3.00
01-016$3.00
01-018$7.00
01-022$7.00
01-031$2.00
01-024$3.00
01-025$3.00
01-028$3.00
01-029
$1.00
01-032$3.00
01-036$5.00
01-048$5.00
01-049$3.00
01-053
$2.00
01-054$2.00
01-018
01-016
01-007
01-014
01-048
01-010
01-032
01-028
01-022
01-036
01-029
01-024
01-054
01-015
01-049
01-053
01-031
01-025
31
SLIDE PARTS LIST
SLIDE
01-009 $125.00
EXTRACTOR
01-012 $5.00
FIRING PIN SPRING
01-020 $3.00
EXTRACTOR PIN
01-026 $1.00
EXTRACTOR SPRING
01-027 $3.00
FRONT SIGHT
01-038 $5.00
FIRING PIN
01-039 $7.00
REAR SIGHT
01-040 $7.00
BARREL
01-041 $30.00
FIRING PIN RETAINER 01-052 $3.00
RECOIL SPRING SUB ASSEMBLY
01-056 $9.00
REAR SIGHT ADJUSTMENT SCREW
01-058$1.00
01-038
01-026
01-012
01-009
01-027
01-052
01-058
01-040
01-020
01-039
01-056
01-041
32
GLOSSARY
This glossary is to define terms as used throughout this manual and to help the
beginner better understand firearm terminology.
Ammunition: (Ammo/Cartridge) A casing, bullet, primer, and gun powder
becomes a cartridge and is used in a firearm. Ammunition comes in many
different calibers.
Ambidextrous Safety: A safety system that can be applied from either side of
the firearm. (The model CPX-2 does not possess a safety.)
Barrel: The firearm component through which the bullet travels.
Bore: The hole in the barrel that is rifled.
Breech Face: A face on the slide that supports the cartridge in the barrel.
Cartridge: See Ammunition.
Chamber: A portion of a barrel that houses a cartridge.
Double Action: The style of a firing mechanism. The trigger is pulled only once to
cock and discharge the firearm.
Discharge: The firing of a cartridge.
Ejector: A component of a firearm used to eject an empty cartridge.
Extractor: A component of a firearm that pulls the cartridge out of the chamber.
Feeding: The process in which the slide pushes a cartridge from the magazine
into the chamber.
Feed Lips: The upper portion of the magazine that retains and positions the
cartridges to the chamber.
Firing Pin: The component of a firearm that strikes the primer area of a cartridge.
Grip: The portion of a frame where the firearm is held.
Hammer: The component of a firearm that strikes the firing pin.
Lock Breech: When the barrel and slide are locked together to contain the
chamber pressures created by shooting.
33
Magazine: An accessory of a firearm that stores live cartridges before
being discharged.
Magazine Release: A component of a firearm used to hold the magazine in place
and that, when pushed, releases the magazine.
Magazine Well: The hollow portion of a firearm’s frame that houses
the magazine.
+P Ammunition: Ammunition with a higher amount of gunpowder used to test
firearm chamber pressures.
Primer: The component of ammunition that, when struck by the firing pin, ignites
the gunpowder inside ammunition.
Receiver: The main component of a firearm that all the other firearm
components attach to.
Recoil: The reaction felt by the shooter after discharging a firearm.
Rifling: A series of spiraled grooves in the bore portion of a barrel, causing the
projectile to spin.
Slide: A major component of the firearm that moves back and forward to feed
and eject cartridges. This component also contains the barrel, firing pin and
recoil spring assembly.
Serrations: A portion on the back of the slide that the shooter grips when pulling
back the slide.
Serial Number: A unique number given to each firearm used to identify it.
Spring Preload: Forces generated by spring pressure.
Trigger Bar: A component of a firearm firing mechanism that links the trigger to
the hammer.
Windage: The left and right adjustment of a sight on a firearm.
34
Thank you for purchasing SCCY Industries Model CPX. We at
SCCY Industries are committed to supplying the firearms industry
with the finest possible products.
If you follow these instructions carefully, the Model CPX should
give you many years of fine service.
Remember: Safety First!
Before this firearm left the factory, it was test fired with a full magazine,
inspected, cleaned and packaged. SCCY Industries cannot control the
subsequent handling when your firearm left the factory. Therefore, examine
your firearm carefully before firing it.
Features
•
•
•
•
•
•
•
•
•
•
•
•
•
•
9mm 10-Round Magazine Capacity
Extra Magazine
Lock Breach
Stainless Steel Slide
Stainless Steel Barrel
Ambidextrous Safety
Slide Holds Open on Last Round
Adjustable Rear Sight
Internal Hammer
Double Action Only (DAO)
Polymer Frame
Child-Resistant Lock
Lightweight & Compact
Magazine Finger Rest
SCCY Industries, LLC
1800 Concept Court
Daytona Beach, Florida 32114
866-729-7599
[email protected]
[email protected]