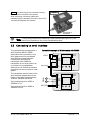
1
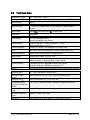
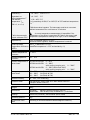
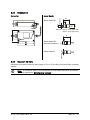
OPERATION MANUAL
Series IN 500
IMPAC Pyrometers
IN 510-N • IN 510 • IN 520-N • IN 520 • IN 530-N • IN 530
Confidential Information
The material contained herein consists of information that is the property of LumaSense
Technologies and intended solely for use by the purchaser of the equipment described in this
manual. All specifications are subject to change without notice. Changes are made periodically
to the information in this publication, and these changes will be incorporated in new editions.
LumaSense Technologies prohibits the duplication of any portion of this manual or the use
thereof for any purpose other than the operation or maintenance of the equipment described
in this manual, without the express written permission of LumaSense Technologies.
Copyright
© LumaSense Technologies 2011. All rights reserved.
Trademarks
IMPAC is a trademark of LumaSense Technologies.
All other trademarks are trademarks, registered trademarks, and/or service marks of their
respective holders.
LumaSense Technologies, Inc.
3301 Leonard Court
Santa Clara, CA 95054 USA
Telephone
+1 (408) 727-1600
FAX
+1 (408) 727-1677
E-mail
[email protected]
[email protected]
Website
http://www.lumasenseinc.com
Americas and Australia
Sales & Service
Santa Clara, CA
Ph: +1 800 631 0176
Fax: +1 408 727 1677
Europe, Middle East, Africa
Sales & Service
Frankfurt, Germany
Ph: +49 69 97373 0
Fax: +49 69 97373 167
India
Sales & Support Center
Mumbai, India
Ph: +91 22 67419203
Fax: +91 22 67419201
China
Sales & Support Center
Shanghai, China
Tel: +86 133 1182 7766
Fax: +86 21 5039 8096
Part No 550-0000-01
Revision A
October 2011
Contents
1
General ........................................................................................................................... 5
1.1
1.2
1.3
1.4
2
Introduction .................................................................................................................... 7
2.1
2.2
2.3
2.4
2.5
2.6
2.7
3
The connection cable ............................................................................................ 12
The connection ..................................................................................................... 12
Connecting to serial interface ............................................................................... 13
Optics ............................................................................................................................ 15
4.1
4.2
4.3
5
Appropriate use ...................................................................................................... 7
Components ............................................................................................................ 7
Accessories .............................................................................................................. 8
Unpacking the Instrument ...................................................................................... 8
Transport, packaging, storage ................................................................................ 8
Malfunction or Service Request............................................................................... 9
Shipments to LumaSense for Repair ........................................................................ 9
Installation .................................................................................................................... 11
3.1
3.2
3.3
4
Information about the user manual ........................................................................ 5
1.1.1 Legend ................................................................................................................. 5
1.1.2 Terminology ........................................................................................................ 5
Safety ...................................................................................................................... 5
1.2.1 General ................................................................................................................ 5
1.2.2 Electrical connection ........................................................................................... 5
Disposal / decommissioning ..................................................................................... 6
Limit of liability and warranty ................................................................................ 6
Sensor head........................................................................................................... 15
4.1.1 Exchangeability of Sensor heads ....................................................................... 15
Exchange of sensor head ....................................................................................... 16
Error messages at non-specified sensor temperatures ........................................... 17
Device Settings .............................................................................................................. 19
5.1
Parameters ............................................................................................................ 19
5.1.1 Emissivity (EMI) .................................................................................................. 19
5.1.2 Response time (T90) .......................................................................................... 20
5.1.3 Clear time (TCL) ................................................................................................. 20
5.1.4 Selection of the maximum or minimum value storage (MAX or MIN) ............. 20
5.1.5 Subrange (LO / HI) ............................................................................................. 20
5.1.6 Analog output (OUT) ........................................................................................ 21
5.1.7 Temperature display (°C / °F) ............................................................................. 21
5.1.8 Compensation of ambient temperature (CMP)................................................. 21
5.1.9 Sensor head temperature (AMB)....................................................................... 21
5.1.10 Baud rate (BD) ................................................................................................... 21
5.1.11 Address (AD) ...................................................................................................... 21
5.1.12 Limit switch (LIM) .............................................................................................. 21
5.1.13 Hysteresis (HYS) ................................................................................................. 22
Series IN 500 Operating Manual
Contents
iii
5.2
5.3
5.1.14 Wait time (only available via interface commands, see section 8.1,
Data format UPP®) ............................................................................................. 22
Settings at the instrument (only IN 510, IN 520, and IN 530) ................................ 22
Settings with HT 6000 (accessory) ......................................................................... 23
6
Settings via interface and software ............................................................................... 25
7
Maintenance ................................................................................................................. 27
7.1
7.2
8
Appendix....................................................................................................................... 29
8.1
8.2
8.3
9
Safety .................................................................................................................... 27
Service ................................................................................................................... 27
Data format UPP (Universal Pyrometer Protocol) ................................................ 29
Technical Data....................................................................................................... 32
8.2.1 Dimensions ........................................................................................................ 34
8.2.2 Scope of delivery ............................................................................................... 34
Reference numbers ............................................................................................... 35
8.3.1 Reference numbers instruments ....................................................................... 35
8.3.2 Reference numbers accessories ......................................................................... 36
Index ............................................................................................................................. 37
Series IN 500 Operating Manual
Contents
iv
1 General
1.1
Information about the user manual
Congratulations on choosing this high quality and highly efficient IMPAC pyrometer.
This manual provides important information about the instrument and can be used as a work of
reference for installing, operating, and maintaining your pyrometer. It is important that you
carefully read the information contained in this manual and follow all safety procedures before
you install or operate the instrument.
To avoid handling errors, keep this manual in a location where it will be readily accessible.
1.1.1
Legend
Note: The note symbol indicates tips and useful information in this manual. All notes
should be read to effectively operate the instrument.
Attention: This sign indicates special information which is necessary for a correct
temperature measurement
1.1.2
Terminology
The used terminology corresponds to the VDI- / VDE-directives 3511, part 4.
1.2
Safety
This section offers an overview about important safety aspects.
1.2.1
General
Each person working with the pyrometer must have read and understood the user manual
before operation. This also has to be done if the person has already used similar instruments or
was already trained by the manufacturer.
The pyrometer is only to be used for the purpose described in the manual. It is recommended to
use only accessories offered by the manufacturer.
1.2.2
Electrical connection
Follow common safety regulations for mains voltage (230 or 115 V AC) connecting additional
devices operating with this mains voltage (e.g. transformers). Touching mains voltage can be
fatal. An incorrect connection and mounting can cause serious health or material damages.
Only qualified specialists are allowed to connect such devices to the mains voltage.
Series IN 500 Operating Manual
General
5
1.3
Disposal / decommissioning
Inoperable IMPAC pyrometers must be disposed of in compliance with local regulations for
electro or electronic material.
1.4
Limit of liability and warranty
All general information and notes for handling, maintenance and cleaning of this instrument
are offered according to the best of our knowledge and experience.
LumaSense Technologies is not liable for any damages that arise from the use of any examples
or processes mentioned in this manual or in case the content of this document should be
incomplete or incorrect. LumaSense Technologies reserves the right to revise this document and
to make changes from time to time in the content hereof without obligation to notify any
person or persons of such revisions or changes.
All IMPAC Series 510, 520, and 530 instruments from LumaSense Technologies have a regionally
effective warranty period. This warranty covers manufacturing defects and faults which arise
during operation, only if they are the result of defects caused by LumaSense Technologies.
Disassembly of the instrument is not allowed. The warranty is VOID if the instrument is
disassembled, tampered with, altered, or otherwise damaged without prior written consent
from LumaSense Technologies; or if considered by LumaSense Technologies to be abused or
used in abnormal conditions.
Series IN 500 Operating Manual
General
6
2 Introduction
2.1
Appropriate use
The IN 510-N, IN 510, IN 520-N, IN 520, IN 530-N and IN 530 are stationary pyrometers for
non-contact temperature measurement of non-metallic surfaces or painted, coated or anodized
metals.
The versions IN 510, IN 520, and IN 530 are equipped with an illuminated LC display which shows
the actual temperature reading. All available parameters can be set via the integrated keyboard.
The types IN 510-N, IN 520-N, and IN 530-N do not have display and keyboard, they will be
parametrized via interface.
The types 510 are equipped with sensor head and sensor cable for an ambient temperature of
max. 85°C without cooling, types 520 and 530 are equipped with sensor head and sensor cable
up to 180°C without cooling.
2.2
Components
Converter
Series IN 500 Operating Manual
Sensor Head
Introduction
7
2.3
Accessories
Numerous accessories guarantee easy installation of the pyrometers. The following overview
shows a selection of suitable accessories. You can find the entire accessory program with all
reference numbers on section 8.3.2 Reference numbers accessories.
Mounting angle for sensor head
HT 6000:
Portable battery
driven instrument
for setting of
pyrometer
parameters
2.4
DA 6000:
Led digital display with
possibility for setting of
pyrometer parameters
Air purge for sensor head 10:1 and 2:1
Power supply NG DC
100…240 V AC
24 V DC
Connecting cable with
additional interface
cable/plug
Unpacking the Instrument
Thoroughly inspect the instrument upon delivery to the purchaser. Check all materials in the
container against the enclosed packing list. LumaSense Technologies cannot be responsible for
shortages against the packing list unless a claim is immediately filed with the carrier. Final claim
and negotiations with the carrier must be completed by the customer.
Save all packing materials, including the carrier’s identification codes, until you have inspected
the pyrometer and find that there is no obvious or hidden damage. Before shipment, the
pyrometer was examined and has been tested. If you note any damage or suspect damage,
immediately contact the carrier and LumaSense Technologies, Inc.
2.5
Transport, packaging, storage
In case the pyrometer is not put into service immediately, it should be tested in the application
or simulated application as promptly as practical to reveal any hidden damage. Unpleasant
surprises can be avoided by briefly trying any spare pyrometer before putting it in storage.
The instrument can be damaged or destroyed if shipped incorrectly. To transport or store the
instrument, please use the original box or a box padded with sufficient shock-absorbing
material. For storage in humid areas or shipment overseas, the device should be placed in
welded foil (ideally along with silica gel) to protect it from humidity.
The pyrometer is designed for a storage temperature of -20 … 70°C with non-condensing
conditions. Other kind of storage can damage or malfunction the pyrometer.
Series IN 500 Operating Manual
Introduction
8
2.6 Malfunction or Service Request
Contact LumaSense Technologies Technical Support in case of a malfunction or service request.
Provide clearly stated details of the problem as well as the instrument model number and serial
number. Upon receipt of this information, Technical Support will attempt to locate the fault
and, if possible, solve the problem over the telephone.
If Technical Support concludes that the instrument must be returned to LumaSense Technologies
for repair, they will issue a Return Material Authorization (RMA) number.
Return the instrument upon receipt of the RMA number, transportation prepaid. Clearly
indicate the assigned RMA number on the shipping package exterior. Refer to Section 2.7,
Shipments to LumaSense for Repair, for shipping instructions.
Technical Support can be contacted by telephone or email:
Santa Clara, California
Telephone: (408) 727-1600 or 1-800-631-0176
Email: [email protected]
Frankfurt, Germany
Telephone: +49 69 97373 0
Email: [email protected]
2.7
Shipments to LumaSense for Repair
All RMA shipments of LumaSense Technologies instruments are to be prepaid and insured by
way of United Parcel Service (UPS) or preferred choice. For overseas customers, ship units airfreight, priority one.
The instrument must be shipped in the original packing container or its equivalent. LumaSense
Technologies is not responsible for freight damage to instruments that are improperly packed.
Contact us to obtain an RMA number (if one has not already been assigned by Technical
Support). Clearly indicate the assigned RMA number on the shipping package exterior.
Send RMA Shipments to your nearest technical service center:
Santa Clara, California
Frankfurt, Germany
LumaSense Technologies, Inc.
3301 Leonard Court
Santa Clara, CA 95054 USA
Telephone: (408) 727-1600
1-800-631-0176
LumaSense Technologies GmbH
Kleyerstr. 90
60326 Frankfurt
Germany
Telephone: +49 69-97373 0
Email:
[email protected]
Email:
[email protected]
Series IN 500 Operating Manual
Introduction
9
To ensure consistent document formatting, this page was intentionally left blank.
Series IN 500 Operating Manual
Introduction
10
3 Installation
The pyrometers are powered by 24 V DC (possible range: 10 ... 30 V DC). When connecting the
instrument to the power supply ensure correct polarity. To switch off the instrument the power
supply has to be interrupted.
To meet the electromagnetic requirements (EMV), a shielded connecting cable must be used.
The shield of the connecting cable (diameter: 3 - 6.5 mm, max. 12 wires) has to be connected
only on the pyrometer’s side. If the connecting cable is extended, the shield of the extension
also needs to be extended. On side of the power supply (switch board) the shield must be open
to avoid ground loops.
1
2
3
4
5
6
7
8
Connection signal output and power supply
RS485 „A2“
RS485 „B2“
Relay contact (isolated)
(pink)
Relay contact (isolated)
(grey)
RS232 interface TxD (RS485 „A1“)
(violet)
RS232 interface DGND
RS232 interface RxD (RS485 „B1“)
Sensor head temp. (connection to GND)
Analog output mA or V or
type K or type J (connection to GND)
10 GND (- OUT)
11 0 V
12 +10 ... +30 V DC
9
Series IN 500 Operating Manual
(red)
(black)
(blue)
(green)
(yellow)
(brown)
(white)
4
3
2
1
Connection sensor head
NTC resistor
(yellow)
NTC resistor
(green)
Thermopile (+)
(white)
Thermopile (-) (brown)
Notes:
The sensor head is already
connected to the converter
(state of delivery).
For differentiation between
sensor heads of series 530 and
series 520:
530: resistor betw. 1 and 2: 80 k
520: resistor betw. 1 and 2: 20 k
Installation
11
3.1
The connection cable
The connecting cable has to be selected according to
the following criteria:
Shielded
Diameter 3 - 6.5 mm
Quantity of wires: if necessary
2 to 12:
- 2 for power supply.
additionally, if required:
- 1 for analog output
- 1 for sensor head temperature
- 1 GND for analogue output and /
or sensor head temperature
- 3 or 4 for digital interface
- 2 for relay contact
3.2
The connection
Grounding Wire Bridge
Fig. 2
1. Prepare the cable as shown in Fig. 1 .
2. The shielding of the connecting cable has to
be pushed over the plastic sleeve
2 mm further than the O-ring.
3. Fix the cable with the clamp screw.
4. At state of delivery an internal connection
between contact 11 and the housing exists.
Should the housing have its own earth
potential caused by an electric connection to
an object, the internal connection has to be
removed. Fig. 2 .
The screw bars inside the converter can be lifted up
for easy installation of the wires (input/output
cables and sensor head) Fig. 3 .
Fig. 3
_________________________________________________
Caution: Before connecting the pyrometer to
other instruments (e.g. controller, PLC, etc.) the
correct analog output (current, voltage or
thermocouple), corresponding to the input of the
instrument, has to be adjusted at the converter. A
wrong output might damage the connected
instrument.
Series IN 500 Operating Manual
Installation
12
Fig. 4 : For mounting of the converter housing,
there are two holes with 4 mm screws.
Fig. 4
After mounting, connecting cables and
parametrizing (if necessary), close the cover of the
converter and tighten the 4 screws.
mounting of
converter
Note: If using the pyrometer with measuring output thermocouple type K or J, this
output has to be connected with the correct compensating cable.
Connecting to serial interface
The pyrometers are equipped with a
serial interface RS232 or RS485
(switchable at the pyrometer). Only
short distances can be transmitted
with RS232 and electromagnetic
interferences can affect the
transmission. With RS485 the
transmission is to a large extent free
of problems. Long transmission
distances can be realized and several
pyrometers can be connected in a bus
system.
The transmission rate (in baud) of the
serial interface is dependent on the
length of the cable. Values between
1200 and 19200 Bd may be set.
Typical cable length for RS232 at
19200 Bd is 7 m.
Typical cable length for RS485 at
19200 Bd is 2 km.
Connection example of 2 instruments with RS485:
120
A2
B2
RS232
RS485
TxD/A1
GND
RxD/B1
24 V DC
0V
+24 V
Pyrometer 1, e.g. address 00
A2
B2
Master
3.3
A
B
24 V DC
RS232
RS485
TxD/A1
GND
RxD/B1
0V
+24 V
Pyrometer 2, e.g. address 01
Series IN 500 Operating Manual
Installation
13
To ensure consistent document formatting, this page was intentionally left blank.
Series IN 500 Operating Manual
Installation
14
4 Optics
4.1
Sensor head
Two different optical head types with a field of view 10:1 or 2:1 are available. The spot sizes at
different measuring distances are shown in the drawings below; intermediate values have to be
interpolated. An additional close focus lens is available for the 10:1 head of series 510 instruments
(temperature resistant up to 85°C) that can be used to generate a small spot size in a short distance.
4.1.1
Exchangeability of Sensor heads
Whether a sensor head can be used with a different electronic box is indicated by the identifier
"S1" on the sensor cable:
IN 500: optical heads 2:1 (S1 0xxx) and 10:1 (S1 1xxx) can be used with any electronic box.
IN 510: optical heads 2:1 and 10:1 (both S1 0xxx) can be used with any electronic box.
IN 520: optical heads 2:1 and 10:1 (both S1 2xxx) can only be used with IN 520 electronic
boxes
IN 530: optical heads 2:1 and 10:1 (both S1 4xxx) can only be used with IN 530 electronic
boxes
When connecting a new sensor head to the electronic box, the respective 8-digit pin-code has to
be set (see section 4.2 Exchange of sensor head).
Note: The pyrometer can measure objects at any distance but the farther the distance, the
larger is the measuring area (spot size). The object has to be bigger or at least as big as the spot
size of the pyrometer in the measuring distance.
Series IN 500 Operating Manual
Optics
15
4.2
Exchange of sensor head
Note: Whether a sensor head can be used with a different electronic box is indicated
by the identifier "S1" on the sensor cable. See section 4.1.1 for more information.
The sensor head is exchangeable if a
sensor head with other optical data or a
longer cable is required. Each sensor
head cable is marked with a label
containing a sensor code which has to be
set in the pyrometer.
The sensor head cable is available in
lengths of 3 or 15 m which can be cut to
any required length. The sensor code
label should be affixed to the remaining
part of the cable.
The cable has to be prepared in
accordance with the illustration. The
shield must be pushed above the washer
and O-rings, then the cable can be pushed into the converter and fixed with the clamp screw
(series 510) or soldered to the pins (series 520 and series 530). (For cable connection see
schematic in section 3, Installation).
The sensor code at the cable has to be set in the pyrometer as follows:
Setting via software: Set these codes S1 and S2
in “Pyrometer parameters“ under the button
and confirm them with
“OK”. Now the new sensor head is matching to
the converter and the pyrometer is ready for
measuring.
Additionally in the IN 510, IN 520, or IN 530 the setting of the sensor head codes can be
done via internal push buttons: Remove the cover of the converter and press the buttons
and simultaneously. While pressing these two buttons push the “PAR” button too.
The display shows code S1. With the arrow buttons and the new code S1 has to be
set and confirmed with the “PAR” button. Now code S2 appears on the display and has
to be set and confirmed in the same way.
A setting of these codes with the HT 6000 or digital display DA 6000 is not possible.
Series IN 500 Operating Manual
Optics
16
4.3
Error messages at non-specified sensor temperatures
The pyrometer gives the following error messages for the protection of the electronics and the
machines if the temperature of the sensor head is out of specified values:
Excess of specified sensor head temperature (corresponding to the model: 85°C or
180°C):
-
Output of the serial interface code 75550
-
Output of the analog output: 22 mA at 0/4 ... 20 mA, 5 V at 0 ... 5 V,
excess of end of measuring range at thermocouple output
-
The relay is de-energized (contact open)
-
Display of IN 510, IN 520, or IN 530: ERR 1 instead of the temperature reading
Sensor head temperature falls below specified value (0°C):
-
Output of the serial interface code 74440
-
Output of the analog output: 22 mA at 0/4 ... 20 mA, 5 V at 0 ... 5 V,
excess of end of measuring range at thermocouple output
-
The relay is de-energized (contact open)
-
Display of IN 510, IN 520 or IN 530: ERR 2 instead of the temperature reading
There is no error message if the converter temperature runs out of its specified operating
temperature.
Series IN 500 Operating Manual
Optics
17
To ensure consistent document formatting, this page was intentionally left blank.
Series IN 500 Operating Manual
Optics
18
5 Device Settings
5.1
Parameters
The setting of the parameters of the IN 510-N, IN 520-N, or IN 530-N can only be done via serial
interface (see also section 6, Settings via interface and software and section 5.3 Settings with
HT 6000 (accessory)), the parameters of the IN 510, IN 520, and IN 530 additionally can be
done by integrated push buttons inside the converter (see section 5.2 Settings at the
instrument).
5.1.1
Emissivity (EMI)
For a correct measurement, it is necessary to adjust the emissivity. This emissivity is the
relationship between the emission of a real object and the emission of a black body radiation
source (this is an object which absorbs all incoming rays and has an emissivity of 100%) at the
same temperature.
Different materials have different emissivities ranging between 0% and 100% (settings at the
pyrometer between 10 and 100%, an additional attenuation, setting from 100 to 120% can be
used for example to correct the measurement of objects behind gases with hot soot).
Additionally the emissivity is dependent upon the surface condition of the material, the spectral
range of the pyrometer and the measuring temperature. The emissivity setting of the pyrometer
has to be adjusted accordingly.
Typical emissivity values of various common materials for the two spectral ranges of the
instruments are listed below. The tolerance of the emissivity values for each material is mainly
dependent on the surface conditions. Rough surfaces have higher emissivities.
Object
" Black body furnace "
Human skin
Black dull varnish
Carbon soot
Wood
Paper
Asphalt
Glass / Quartz glass
Textile
Graphite
Cement
Water
Emissivity (%)
100
98
95
95
80 ... 92
92 ... 95
85
72 ... 87
75 ... 95
75 ... 92
90
95
Series IN 500 Operating Manual
Object
Brickwork
Fire clay
Rubber
Porcelain
Ceramics
Varnish
Plaster
Oil paint
Steel (oxidized)
Steel (smooth)
Aluminum (smooth)
Aluminum (anodized)
Emissivity (%)
85 ... 95
60 ... 80
10 ... 30
2 ... 15
96
Device Settings
19
5.1.2
Response time (T90)
Settings:
The response time is the time interval between the instant of an abrupt change in
OFF
the value of the measuring temperature and the instant from which the measured
0.5
.. s
value of the pyrometer remains within specified limits. The time is taken to reach
.
90% of the recorded temperature difference. In the OFF position, the device
30 s
operates using his time constant (shortest response time). Longer response times can
be used for the measurement of objects which have rapidly fluctuating temperatures to achieve
constant temperature reading.
5.1.3
Clear time (TCL)
The maximum value storage (or minimum value storage) stores the highest (or
lowest) measurement value. The clear time defines the time period until the stored
value is deleted and replaced by a new one.
The following settings are possible:
Clear time “OFF“: The storage is switched off and only momentary values are
measured.
Settings:
OFF
0.1
.. s
.
25 s
extern
auto
If any clear time TCL is set either the maximum value or minimum value storage will be
cleared.
The “auto” mode is used for discontinuous measuring tasks. For example objects are
transported on a conveyer belt and pass the measuring beam of the pyrometer only for
a few seconds. Here the maximum (minimum) value for each object has to be indicated.
In this mode, the maximum (minimum) value is stored until a new hot (or cold) object
appears in the measuring beam. The temperature which has to be recognized as “hot“
(or “cold“) is defined by the low (high) limit of the adjusted sub range. The stored
maximum value will be deleted when the temperature of the new hot object exceeds
the low limit LO of the sub range by 1% or at least 2°C. The stored minimum value will
be deleted when the object temperature falls below the high limit HI of the sub range
by 1% or at least 2°C.
The external clearing (“extern”) of the storage can only be activated and used with an
own software (see data format UPP , section 8.1).
5.1.4
Selection of the maximum or minimum value storage (MAX or MIN)
With this setting you choose between maximum or minimum value storage if the
storage function is activated by setting TCL. If TCL is switched “OFF”, the storage
function is not activated, the indication of “MAX“ or “MIN“ only shows the
preselection.
5.1.5
Settings:
MAX
MIN
Subrange (LO / HI)
Settings:
You have the opportunity to choose a subrange (minimum 51°C) within the basic
700°C
..
measuring range of the pyrometer. This subrange corresponds to the analog
.
output. LO describes the beginning of this measuring range, HI the end of the
-40°C
range. If the thermocouple output is used, the analog output does not change. In
addition, with the setting of a subrange it is possible to fulfill the requirements of the “auto”
clear mode of the maximum or minimum value storage (see above).
Series IN 500 Operating Manual
Device Settings
20
5.1.6
Analog output (OUT)
The analog output has to be selected according to the signal input of the
connected instrument (controller, PLC, etc.). You can choose between current
output (0 or 4 to 20 mA), voltage output (0 to 5 V) or thermocouple output
type J or K.
Settings:
0-20 mA
4-20 mA
0-5 V
type J
type K
Caution: Before connecting the pyrometer to other instruments (e.g. controller, PLC,
etc.) the correct analog output (current, voltage or thermocouple), corresponding to the
input of the instrument, has to be adjusted in the converter. A wrong output might
damage the connected instrument.
5.1.7
Settings:
°C
°F
Temperature display (°C / °F)
The temperature can be displayed in °C or °F.
5.1.8
Compensation of ambient temperature (CMP)
Settings:
This compensation is used for a very few special applications only. The standard
700°C
..
setting of this parameter is “auto”, because the temperature of the sensor head is
.
normally the ambient temperature of the measured object. Should the measured
-40°C
object be placed in an area with a higher ambient temperature (e.g. inside a
auto
furnace), the measurement might be falsified (probably too high temperature
indication). This influence can be compensated by presetting of the ambient temperature of the
object with help of the CMP-function (presetting within the measuring range of the
instrument). It has to be considered, that this method only improves the results if the ambient
temperature at the place of the measured object is always constant.
5.1.9
Sensor head temperature (AMB)
The temperature of the sensor head can be displayed.
5.1.10 Baud rate (BD)
The transmission rate of the serial interface in Baud (Bd) is dependent on the
length of the cable. The standard cable length with RS232 for 19200 Bd is 7 m,
with RS485 2 km. The baud rate is reduced by 50% if the transmission distance is
doubled.
Settings:
19200
.. Bd
.
1200 Bd
5.1.11 Address (AD)
Settings:
For connecting several pyrometers with RS485 (up to 32) with one serial interface,
31
..
it is necessary to give each instrument an individual address for communication.
.
First it is necessary to connect each single instrument to give it an address. After
00
that, all instruments can be connected and addressed individually. If parameters
may be changed simultaneously on all pyrometers, the global address 98 can be used. This
allows you to program all pyrometers at the same time, regardless of the addresses that have
already been assigned. If the address of a pyrometer is unknown, it is possible to communicate
with it using the global address 99 (connect only one pyrometer).
5.1.12 Limit switch (LIM)
The instruments are equipped with a relay contact, controlled by the measuring
signal. The switch point of this relay is adjustable with the function ”LIM” within
the measuring range. The relay contact is closed below the adjusted value, it is
open above it.
Series IN 500 Operating Manual
Settings:
700°C
..
.
-40°C
Device Settings
21
5.1.13 Hysteresis (HYS)
The relay contact opens immediately when the temperature exceeds the adjusted
“LIM“ value, it closes only if the temperature falls below a value which consists
of “LIM“ and the adjusted hysteresis.
Settings:
20°C
..
.
2°C
5.1.14 Wait time (only available via interface commands, see
section 8.1, Data format UPP®)
When using a pyrometer with RS485, it is possible that the connection is not fast enough to
receive the pyrometer’s answer to an instruction of the master. In this case, a wait time can be
set to slow down the data transfer (e.g.: tw = 02 at a baud rate 9600 means a wait time of
2/9600 sec).
Standard settings at delivery:
EMI=100; T90=OFF; TCL=OFF; MAX/MIN=MAX; OUT=0...20 mA; LO=0°C;
HI=500°C; °C/°F=°C; CMP=auto; BD=19200; AD=00; LIM=0°C; HYS=2°C
5.2
Settings at the instrument
(only IN 510, IN 520, and IN 530)
The buttons for parametrizing the IN 510, IN 520 or IN 530 are inside the converter and are
accessible after removing the cover (4 screws).
Interface switch:
RS232
RS485
Selection
of
parameters:
the
parameters are called with the button
PAR (the sequence is described on
section 5). If no button is pushed for
approx. 15 s, the instrument switches
back to measuring mode with the
latest parameter settings. A changed
value of a parameter is automatically
stored after changing to another
parameter.
Up / down buttons (
): After selection of one
parameter with the PAR button the up / down
buttons are used to set the available values.
Note: Do not operate the converter permanently with open cover.
Series IN 500 Operating Manual
Device Settings
22
5.3
Settings with HT 6000 (accessory)
The HT 6000 is a portable battery driven instrument for
the parameter setting of digital pyrometers and for
indication of temperature.
The pyrometer has to be connected to the
HT 6000 via its interface cable (RS232 or RS485) with
the female SUB-D connector. When the HT 6000 is
switched on it recognizes the pyrometer automatically
and the preset parameters can be displayed. With the
“PAR” button the different parameters can be called
in the sequence described on section 5.1 Parameters.
With the arrow buttons and the values of the
parameters can be selected and confirmed with the
“ENTER” button. If no button is pressed for 30 s the
HT 6000 changes to the temperature indication
without accepting the changed value.
Series IN 500 Operating Manual
Device Settings
23
To ensure consistent document formatting, this page was intentionally left blank.
Series IN 500 Operating Manual
Device Settings
24
6 Settings via interface and software
The entire parameters are adjustable via serial interface and PC software InfraWin (latest version
is available as download from the homepage www.lumasenseinc.com; min. system requirements
Windows 98 SE) or via self created user communication software (see UPP® table, section 8.1).
After installation of the software (select the setup program and follow the installation
instructions) and start of InfraWin, the start menu allows access to the several program function:
Opens a saved file
Storage of measured values for further processing
Online measurement with color bar display
Online measurement with graphic display
Setting of the parameters of the instrument
Setting of interface, baud rate and pyrometer addresses (RS485)
Time interval between two measurements
Number of connected instruments (max. 2)
Listing of measured or stored values in tabular form
Processing of measured (stored) readings in graph form
Processing of measured (stored) readings in a text file
Calculation of spot sizes in various measuring distances
Only if available: controls the programmable controller PI 6000
Before using the software, the serial interface(s) connected to the pyrometer(s) has (have) to be
selected under the Computer icon.
Afterwards all preset pyrometer parameters can be displayed and
modified.
The window pyrometer parameter contains all parameter
settings described in section 5.1. Choose the correct setting for
your application, the actual setting is displayed.
Notes:
“Basic range” displays the total range of the pyrometer
automatically and cannot be changed.
If you select a clear time longer than 0 s (OFF) you have to
choose “max“ or “min“ in the next line to define either
maximum value storage or minimum value storage.
If it is necessary to activate the ambient temperature
compensation, you have to switch to “man”. Then the
Series IN 500 Operating Manual
Settings via interface and software
25
small window T(Amb) appears and the temperature correction can be done. In position
“auto” it is assumed that the ambient temperature of object and sensor head is the
same (standard setting).
Under “Material“ you have the possibility to store the names of different measuring
objects with their emissivity values and to recall them from the list.
“1 meas.” shows the current measuring temperature in the pyrometer parameters
window for approx. 1 second.
“Test” opens a window that allows the direct communication with the pyrometer via the
interface commands (see section 8.1 Data format UPP®). Additionally a connection test
with the preset baud rate can be done.
Via the “open/save” symbols all settings can be stored and restored.
Further program functions are described in the online help of the software.
Series IN 500 Operating Manual
Settings via interface and software
26
7 Maintenance
7.1
Safety
Attention during pyrometer services:
Should the pyrometer be integrated in a running machine process, the machine has to be
switched off and secured against restart before servicing the pyrometer.
7.2
Service
The pyrometer does not have any parts which require regular service, only the lens has to be
kept clean. The lens can be cleaned with a soft cloth in combination with alcohol (do not use
acid solutions or dilution). Also standard cloths for cleaning glasses or photo objectives can be
used.
The lens of the 10 : 1 sensor head has an anti-reflective coating which appears slightly colored.
Be extremely careful - this layer can easily be rubbed off - this will greatly affect the measuring
results!
Series IN 500 Operating Manual
Maintenance
27
To ensure consistent document formatting, this page was intentionally left blank.
Series IN 500 Operating Manual
Maintenance
28
8 Appendix
8.1
Data format UPP (Universal Pyrometer Protocol)
Via interface and suitable communication software or via “Test” function of the InfraWin
software (section “pyrometer parameters”) commands can be exchanged directly with the
pyrometer.
The data exchange occurs in ASCII format with the following transmission parameters:
The data format is:
8 data bits, 1 stop bit, even parity (8,1,e)
The device responds with the entry of a command with: output (e.g. the measuring value) + CR
(Carriage Return, ASCII 13), with pure entry commands with "ok" + CR. With invalid commands
the instruments answers with „no“ + CR.
Every command starts with the 2-digit device address AA (e.g. "00"). This is followed by 2 small
command letters (e.g. "em" for level of emissivity ), finished with CR
This is followed, if necessary for that command, by the ASCII parameter "X". If this parameter
"X" is omitted, then the device resets with the current parameter.
Example:
Entry: “00em“ + CR
The emissivity setting of the device with the address 00 is returned
Answer: “0970“ + CR means emissivity = 0.970 or 97.0%
Series IN 500 Operating Manual
Appendix
29
Description
Reading measuring
value:
Command
AAms
repeatedly reading
measuring values:
Emissivity:
Response time t90:
AAmsXXX
Setting clear time tCL:
AAlzX
External clearing:
Setting maximum /
minimum value:
Read. max/min value:
Reading basic
measuring range:
AAlx
AAmiX
Reading sub range:
Setting sub range:
AAme
AAm1YYYYZZZZ
Analog output 1):
AAasX
AAemXXXX
AAezX
AAmi
AAmb
Temperature display 1): AAfhX
Reading ambient
temperature:
Entering ambient
temperature:
AAut
Sensor head temp.:
Max. sensor head
temp.:
Baud rate:
AAgt
AAtm
Instrument address 1):
AAgaXX
Reading switch point:
Setting switch point:
AAsl
AAslXXXX
AAutXXXX
AAbrX
Series IN 500 Operating Manual
Parameters
Output: YYYYY; 5-digit decimal, in 1/10 °C or °F
88880 = temperature-overflow
75550 = exceed max. sensor head temp.
74440 = fall below min. sensor head temp.
02563 = 256.3 °C or °F; -0170 = -17.0 °C or °F
XXX = 000 ... 999
XXX = Number of measuring values
XXXX = 0100 ... 1200 in ‰
X = 0 ... 6 (decimal)
0 = intrinsic time constant of the device
1 = 0.5 s
2=1s
3=2s
4=5s
5 = 10 s
6 = 30 s
X = 0 ... 8 (decimal)
0 = Max. value- / min. value storage off
1 = 0.10 s 5 = 5.00 s
2 = 0.25 s 6 = 25.00 s
3 = 0.50 s 7 = external clearing
4 = 1.00 s 8 = automatic clearing
Simulation of an external reset contact
X = desired setting
0 = maximum value, 1 = minimum value
Output: 0 or 1; 0 = max value, 1 = min value
Output: YYYYZZZZ (8-digit hex) 2)
YYYY = beginning of measuring range
ZZZZ = end of measuring range
as with mb
YYYY = beginning of measuring range
ZZZZ = end of measuring range
X = 0 ... 4
2 = 0 ... 5 V
0 = 0 ... 20 mA
3 = thermocouple
type K
1 = 4 ... 20 mA
4 = thermocouple
type J
X = 0;1 0 = Output Celsius
1 = Output Fahrenheit
Output: stored value, 4-digit hex 2)
e.g. 0258 corresponds to 600 degrees
XXXX = Value of ambient temp., 4-digit hex 2)
XXXX z.B. FFEC corresponds to -20 degrees
-99dez = FF9Dhex means: automatic, no
manual compensation
Output: XXX (dec. 000...180°C or 032...356°F)
Output: XXX (dec. 000...180°C or 032...356°F)
X = 0 ... 4
0: 1200 bd 1: 2400 bd
2: 4800 bd 3: 9600 bd 4: 19200 bd
XX: device address decimal; 00 ... 31 variable
device addresses; global: 98, 99
Output: XXXX (4-digit hex) 2)
XXXX (4-digit hex) 2); adjustable within sub
range
Appendix
30
Reading hysteresis:
AAhlXX
Setting hysteresis:
Wait time:
Reading sensor data:
AAhl
AAtwXX
AAse
Setting sensor data:
Reset 1):
Reading parameters:
AAseXXXXYYYY
AAre
AApa
Error status:
AAfs
Serial number:
Type / software
version:
AASsn
AAve
XX (2-digit hex) 2); XX setting 2 ... 20°C (4 ...
36°F)
Output: XX (2-digit hex) 2)
XX = 00 ... 99 relative delay value
Output: XXXXYYYY (8-digit decimal); Reading
of adjusted sensor data: XXXX: S1; YYYY: S2
XXXXYYYY (8- digit dec.); entering sensor data
Reset device
Output 11-digit decimal:
Digit 1 and 2 (10...99 or 00): EMI up to 100
Digit 3 (0 ... 6): t90 (response time)
Digit 4 (0 ... 8): tCL (storage clear mode)
Digit 5 (0 / 4): analog output
Digit 6 and 7 (00 ... 99): sensor head temp.
Digit 8 and 9 (00 ... 31): device address
Digit 10 (0 ... 4): device baud rate
Digit 11 (always 0)
Output:
XX;
XX=00…FF (00 = no error)
(01…FF: error code for LumaSense service)
Output: XXXXX (5-digit decimal)
Output: XXYYZZ (6-digit decimal)
XX = 76 (IN 510, IN 520, IN 530);
YY = Month of software version
ZZ = Year of software version
Notes: - the letter “l” means the lower case letter of “L” - bold values = default settings
After entering these commands the device carries out an automatic reset. The device
needs approx. 150 ms before it is ready to use and work with the changed settings.
The input and output corresponds to the preset degree C or degree F.
Additional instruction for the RS485 interface
Requirements to the master system during half-duplex operation:
1. After an inquiry, the bus should be switched into a transmission time of 3 bits (some
older interfaces are not fast enough for this).
2. The pyrometer's response will follow after 5 ms at the latest.
3. If there is no response, there is a parity or syntax error and the inquiry has to be
repeated.
After receiving the response, the master has to wait at least 1.5 ms before a new command can
be entered.
Series IN 500 Operating Manual
Appendix
31
8.2
Technical Data
Temperature range:
-40 ... 700°C (-40 ... 1292°F)
Sub range:
Factory setting: 0 ... 500°C; user adjustable (minimum span: 51°C)
Data handling:
Digital
Spectral range:
8 ... 14 µm (for measurement of non-metallic or coated metallic
objects)
Sensor head:
Optics 10:1: with lens; optics 2:1: without lens
IR detector:
Thermopile
Power supply:
10 ... 30 V DC ripple < 0.5 V
power consumption: max. 60 mA
Analog output:
Linear current (0/4 ... 20 mA), voltage (0 ... 5 V) or
thermocouple (type „J“ or „K“)
Additional output:
10 mV/°C or 10 mV/°F for temperature of sensor head
Load:
Max. 700
Output impedance:
100 Ohm (for thermocouple or voltage output)
Relay contact:
Isolated relay contact; 50 V DC; 0.2 A
Hysteresis:
Negative hysteresis, 2 - 20°C adjustable
(without current or value exceeded = open contact)
Digital interface:
Switchable: RS232 or addressable RS485 (half duplex)
baud rate 1200 up to 19200 Bd, resolution 0.1°C
Isolation:
Non isolated analog outputs and power supply (relay contact isolated)
Emissivity (EMI):
10 ... 120% adjustable in steps of 0.1%
Max. / Min. value
storage:
Clear time OFF; 0.1 s; 0.25 s; 0.5 s; 1 s; 5 s; 25 s; extern; auto
Response time t90:
180 ms; switchable: 0.5; 1; 2; 5; 10 or 30 s
Temperature display
(only IN 510, IN 520 and
IN 530):
LCD, 4 digit, 3 values per second, permanent display illumination
Exceeding of measuring
range:
Display 8888
Fall below measuring
range:
Display: 1°C below sub range
Resolution:
1/10°C (1/10°F from -40 to 999.9°F; 1°F from 1000 to 1292°F)
Series IN 500 Operating Manual
/ 24 V power supply (for current output) (500
/20 V)
Appendix
32
Uncertainty **)
T = 0...700°C:
0.8% or 1°C *)
Dependent on
object temperature T
and ambient
temperature Tamb.
T = 0...-20°C:
2°C
(EMI = 1, t90 = 1 s):
T = -20...-40°C: 3°C
TK of uncertainty: 0.03%/°C or 0.05°C/°C at 25°C ambient temperature
Tamb. *)
*)
Whichever value is greater. The instrument must be at a constant
ambient temperature for a minimum of 15 minutes
**)
With thermocouple
output minimum 2.5°C
Repeatability:
A correct temperature measurement is impossible if the
temperature of the object is more than 85°C below the sensor head
temperature (temperature reading is too high, no error message)
0.5% of measured value °C or 0.5°C
whichever value is greater, ambient temperature is constant
Noise Equivalent
with t90 = 180 ms: 0.1°C ( = 1)
Temperature Difference (measured temperature = 23°C and emissivity = 1)
(NETD):
Ambient temperature
converter:
0 ... 65°C
Storage temperature
converter:
-20 ... 70°C
Ambient temperature of IN 510-N and IN 510:
sensor head:
IN 520-N and IN 520:
IN 530-N and IN 530:
0 ... 85°C
0 ... 180°C
with cooling / purging unit:
0 ... 180°C (short-time 210°C)
with cooling / purging unit:
0 ... 200°C
0 ... 200°C
Storage temperature of
sensor head:
-20 ... 85°C
-20 ... 180°C
-20 ... 180°C
Relative humidity:
10 ... 95%, non condensing
Protection class:
IP65 (converter, sensor head 10:1, 180°C-sensor head 2:1)
IP20 (85°C-sensor head 2:1)
Weight:
320 g
Dimensions:
Converter:
Sensor head:
Housing:
Aluminum (converter), stainless steel (sensor head)
Operating position:
Any
CE Approval / EMV
tests:
According to EU directives about electromagnetic immunity
Series IN 500 Operating Manual
(IN 510-N, IN 510)
(IN 520-N, IN 520)
(IN 530-N, IN 530)
98 mm x 64 mm x 34 mm (L x B x H)
28 x 14 mm (L x Ø), thread M12 x 1, L=10.8 mm
Appendix
33
Dimensions
Sensor heads:
M12x1
Sensor head 10:1
28
10.8
Ø 14
Converter:
Ø4 Aperture
8.2.1
Cable -Ø:
approx. 3 mm (typ es 530)
approx. 4 mm (typ es 510)
31
7
Sensor head 2:1
8.2.2
Aperture Ø 4 .2
Sensor head 10:1
with close focus lens
Ø15
mounting holes
Scope of delivery
Instrument, one sensor head with cable length of 3 m or 15 m cable, works certificate, operation
manual.
Note: A connection cable is not included with the instrument and has to be ordered
separately (see section 8.3 Reference numbers).
Series IN 500 Operating Manual
Appendix
34
8.3
Reference numbers
8.3.1
Reference numbers instruments
3 874 360
IN 510
with sensor head 2:1
(85°C ambient temperature),
3 m cable
3 874 370
IN 510
with sensor head 2:1
(85°C ambient temperature),
15 m cable
3 874 460
IN 510
with sensor head 10:1
(85°C ambient temperature),
3 m cable
3 874 470
IN 510
with sensor head 10:1
(85°C ambient temperature),
15 m cable
3 874 160
IN 510-N
with sensor head 2:1
(85°C ambient temperature),
3 m cable
3 874 170
IN 510-N
with sensor head 2:1
(85°C ambient temperature),
15 m cable
3 874 260
IN 510-N
with sensor head 10:1
(85°C ambient temperature),
3 m cable
3 874 270
IN 510-N
with sensor head 10:1
(85°C ambient temperature),
15 m cable
3 874 380
IN 520
with sensor head 2:1
(180°C ambient temperature),
3 m cable
3 874 390
IN 520
with sensor head 2:1
(180°C ambient temperature),
15 m cable
3 874 480
IN 520
with sensor head 10:1
(180°C ambient temperature),
3 m cable
3 874 490
IN 520
with sensor head 10:1
(180°C ambient temperature),
15 m cable
3 874 180
IN 520-N
with sensor head 2:1
(180°C ambient temperature),
3 m cable
3 874 190
IN 520-N
with sensor head 2:1
(180°C ambient temperature),
15 m cable
3 874 280
IN 520-N
with sensor head 10:1
(180°C ambient temperature),
3 m cable
3 874 290
IN 520-N
with sensor head 10:1
(180°C ambient temperature),
15 m cable
3 874 550
IN 530
with sensor head 2:1
(180°C ambient temperature),
3 m cable
3 874 560
IN 530
with sensor head 2:1
(180°C ambient temperature),
15 m cable
3 874 570
IN 530
with sensor head 10:1
(180°C ambient temperature),
3 m cable
3 874 580
IN 530
with sensor head 10:1
(180°C ambient temperature),
15 m cable
3 874 500
IN 530-N
with sensor head 2:1
(180°C ambient temperature),
3 m cable
3 874 510
IN 530-N
with sensor head 2:1
(180°C ambient temperature),
15 m cable
3 874 520
IN 530-N
with sensor head 10:1
(180°C ambient temperature),
3 m cable
3 874 530
IN 530-N
with sensor head 10:1
(180°C ambient temperature),
15 m cable
Series IN 500 Operating Manual
Appendix
35
8.3.2
Reference numbers accessories
3 821 010
Connection cable 2 m, 10 wire, with additional digital cable (1 m) and
InfraWin analyzing and reporting software
3 821 020
Connection cable 2 m, for power supply and thermocouple output
(compensating cable)
3 874 830
Sensor head 2:1 for IN 510, sensor cable 3m
3 874 840
Sensor head 2:1 for IN 510, sensor cable 15m
3 874 860
Sensor head 10:1 for IN 510, sensor cable 3m
3 874 870
Sensor head 10:1 for IN 510, sensor cable 15m
3 874 780
Sensor head 2:1 for IN 520, sensor cable 3m
3 874 790
Sensor head 2:1 for IN 520, sensor cable 15m
3 874 880
Sensor head 10:1 for IN 520, sensor cable 3m
3 874 890
Sensor head 10:1 for IN 520, sensor cable 15m
3 874 740
Sensor head 2:1 for IN 530, sensor cable 3m
3 874 750
Sensor head 2:1 for IN 530, sensor cable 15m
3 874 760
Sensor head 10:1 for IN 530, sensor cable 3m
3 874 770
Sensor head 10:1 for IN 530, sensor cable 15m
3 848 790
Close focus lens (only for 10:1 optics, max. 85°C ambient temperature, not in
combination with air purge, cooling / purging unit or 90° mirror)
3 834 370
Fixed mounting angle (for sensor head or air purge with sensor head 10:1)
3 834 380
Adjustable mounting angle (for sensor head or air purge with sensor head 10:1)
3 835 330
Air purge (for sensor head 10:1)
3 835 410
Air purge (for sensor head 2:1)
3 834 250
Fixed mounting angle (for air purge with sensor head 2:1)
3 834 260
Adjustable mounting angle (for air purge with sensor head 2:1)
3 835 340
90° mirror (sensor head 10:1)
3 852 290
DIN-rail-power supply NG DC; 100 ... 240 V AC, 50 ... 60 Hz
3 890 560
DA 6000-N: LED-digital display with possibility for pyrometer parameter setting;
RS232 interface
3 890 570
DA 6000-N with RS485 interface
3 826 500
HT 6000: portable indicator and instrument for pyrometer parameter setting
3 852 440
IMPAC Protocol converter RS485
Profibus-DP (max. 1 instrument)
3 852 460
IMPAC Protocol converter RS485
Profibus-DP (max. 32 instruments)
Series IN 500 Operating Manual
24 V DC, 1 A
Appendix
36
9 Index
A
Accessories 8, 35
Address 21
Ambient temperature 21
Analog output 21
Appendix 29
B
Baud rate 21
C
Clear time 20
Components 7
Connection 11
Connections 12
Converter housing 13
M
Maintenance 27
Max. / min. value storage 20
Measuring output 13
O
Optics 15
P
Parameters 19
Power supply 11
R
Reference Numbers 35
Response time 20
D
S
Data format UPP 29
Device Settings 19
Dimensions 34
H
Safety 27
Sensor head 15
Sensor head temperature 21
Serial interface 13
Service 27
Service Request 9
Settings at the instrument 22
Shield 11
Shipments 8, 9
Software 25
Subrange 20
HT 6000 23
Hysteresis 22
T
I
Technical data 32
Temperature display 21
Installation 11
Interface 25
U
E
Emissivity 19
Error messages 17
Exchange of sensor head 16
L
Limit switch 21
Unpacking the Instrument 8
W
Wait Time 22
Series IN 500 Operating Manual
Index
37